Various ways to make a chicken feeder with your own hands from scrap materials. Hopper feeders for chickens DIY feeders for laying hens
Are you planning to raise chickens and have already built a chicken coop for them? Then it's time to take care of the rest - in particular, the feeder. It is easy to make, especially since you can use various materials. Let's look at the simplest and most common options for making a chicken feeder with your own hands.


Where should I start?
The feeder can be made from anything - for example, from boards, boxes, pipes or plastic bottles. But regardless of the material chosen, one problem always arises - we are talking about mixing the feed. And if you use several feeders at the same time, they will take up too much space. There is a way out of this situation, but we’ll talk about it a little later.

So, in order for the feeder to cope with its functions, you need to prepare for its construction in advance. First, decide on the size of the structure and choose a place for it. It does not matter whether it is located in the chicken coop or in the yard - all birds should have free access to it. Moreover, chickens should not crowd or interfere with each other while feeding.

It should also be remembered that chickens need not only dry, but also wet food (we are talking about mash). In the first case, hopper containers in the form of a cylinder are ideal, in which the volume of feed is replenished automatically. For wet food, a trough-shaped feeder is more suitable, on top of which there is a “spinner” made of timber.


Making a chicken feeder - an overview of popular methods
Of course, the procedure for constructing a trough differs from a bunker-type feeder both in terms of labor costs and the complexity of the work. But modern equipment and the materials significantly simplify the process, so there will not be any particular difficulties.
Note! When constructing a feeder, you need to adhere to one important rule: the structure should be stable and food should not spill out of it. Otherwise, not only will there be an overconsumption of feed, but also a violation of sanitary standards.
Option one. Creative feeder made from a cutting board

To make such an unusual bird feeder, you must prepare:
- cutting board;
- funnel;
- a small plastic cup;
- rubber hose (transparent);
- electric drill.
The further algorithm of actions should look something like this.
Table. Making a feeder from a cutting board
| Steps, no. | Photo | Description |
|---|---|---|
| Step 1 |  |
Take a funnel (preferably plastic) and trace its outer contours on the board. Try to do everything as accurately as possible. |
| Step 2 |  |
Drill many holes within the drawn circle. It is important not to overdo it here, since the supply of dry food should be limited. |
| Step 3 |  |
Take a pre-prepared transparent hose of the required diameter. Connect the hose to the end of the funnel; if necessary, you can use additional fasteners (for example, a clamp). |
| Step 4 |  |
Take a plastic cup and make a hole at the bottom as shown in the image. The diameter of the hole should be such that the end of the hose fits tightly and holds well. |
| Step 5 |  |
Take the other end of the hose and place it in the hole you made. If the density is insufficient, treat the edges of the hole and the outer surface of the hose with sealant. |
| Step 6 |  |
Next, you need to glue the funnel bell to cutting board. To do this, treat the contour of the circle with the holes with sealant. |
| Step 7 |  |
Place a funnel on the circle and hold it in this position until the sealant dries. |
| Step 8 |  |
Connect one end of the hose to the cup and the other to the glued funnel. The funnel should end up at the bottom of the board. |
When assembled, the feeder described above will look like this. You can add grain.
Note! The grain will be poured through the hose from the watering can into the cup itself. Also make sure the board is stable as chickens are likely to perch on it.
Option two. Hopper feeder made from a plastic bucket
This design can be considered automatic, since your participation in feeding the chickens will be minimal. Such a feeder can be purchased ready-made in a store, but it will not be cheap, so you can try to make it yourself. The manufacturing procedure is quite simple.

Supplies you will need:
- special sectional bowl for animals;
- plastic bucket.
After preparation, follow the instructions below.
Step 1. Take a plastic bucket and make holes in the bottom through which the food will pour out (as shown in the image below).

Step 2: Attach the sectional bowl to the bottom of the bucket using screws.

Step 3. Fill a plastic bucket with grain or any other food and close the lid.

The advantage of this design is that it can be installed in almost any convenient place (stand or hang). As food is consumed, it will be automatically poured into the bowl under the influence of its weight.


Option three. Construction made from plastic bottles
Nowadays, water is often stored in cheap plastic containers. There are probably such bottles in every home and they can be used to build a convenient feeder.

Step 1. Cut the bottle in half and make holes in the bottom half as shown in the image. The size of each hole should be sufficient for the chicken head to fit freely into it (it is advisable to leave a small margin).
Step 2. Take the second bottle, cut out the bottom, then place it with the neck down inside the prepared cut. As a result, there should be a few centimeters between the neck and the bottom.

Step 3. Pour the grain inside and cover the hole in the top with something. The disadvantage of this design is that in case of bad weather it must be moved indoors, but for placement inside the poultry house this is the best option.
For chickens, you can make a similar design in smaller sizes using regular plastic bottles. The manufacturing technology will be the same.

Option four. Simple wooden feeder (No. 1)
If you don’t have a lot of chickens, and only pieces of wood from scrap materials, then you can make the feeder described below. The latter is great for cases where owners do not have the opportunity to periodically add grain (in other words, this is also a bunker feeder). It is not difficult to make such a design, the main thing is to strictly follow the instructions below.
First prepare these Consumables and equipment:
- pieces of durable thick plywood or wood;
- electric drill, set of drills;
- a pair of loops;
- sandpaper;
- saw;
- screwdriver;
- pencil;
- roulette.
After this, proceed directly to production.

Step 1. Start by creating a drawing, then transfer it to the tree, drawing the elements of the required dimensions:
- bottom 29x17 centimeters;
- two “sides” 40 centimeters high with an upper edge of 24 and a lower edge of 29 centimeters;
- two rectangles for the front wall - 28x29 and 70x29 centimeters;
- top cover (26x29 centimeters);
- back wall (40x29 centimeters).
Step 2. Carefully cut out all the elements.
Step 3. Make holes for the screws in the required places using an electric drill.
Step 4: Sand all surfaces to ensure they are smooth and safe for birds.
Step 5. Using screws, assemble all the elements into a single structure. To achieve maximum density, you can use a clamp. It is also important that the back and front walls are attached at an angle of 15°.

Step 6. Using hinges, attach the cover to the back of the side panels.
Step 7. It is also advisable to treat the feeder with an antiseptic. No paints or varnish should be used.

Note! The finished design will be spacious and convenient; food, protected from moisture, will be gradually supplied automatically. Apart from labor costs, no other shortcomings were noticed.
Option five. Simple wooden feeder (No. 2)

Another simple option is a feeder made in the form of a small trough. It is suitable for those who have a large number of chickens and have a shelter in case of precipitation.
To work you will need:
- thick boards or plywood;
- hammer;
- screws (you can use nails instead);
- saw;
- pencil;
- paper;
- ruler.

Step 1. First, make a drawing of the future structure. Determine as accurately as possible all elements, their dimensions and installation locations of fasteners. This is the most critical stage that will help you avoid possible errors and inconsistencies.
- bottom (15x100 centimeters);
- a pair of side walls (8x100 centimeters);
- one beam (HxWxD - 2x3x100 centimeters);
- small end walls 15 centimeters wide and a height corresponding to the long side walls + the thickness of the bottom.
Sawing out the end walls is the most difficult step. For a better idea, we advise you to familiarize yourself with the image below.
Step 3. In accordance with the drawing, cut out each of the elements.
Note! The bottom should be thick and heavy enough to prevent birds from overturning the structure. The height of the walls should be comfortable for the chickens.
Step 4. Connect all the elements together. Try not to leave any gaps, as food can spill out through them. Additional wood processing is not required; moreover, if desired, this design can be modified to suit your own needs.
The advantages of such a feeder include durability and strength, as well as versatility regarding the type of food used (the latter can be either dry or wet). As for the disadvantages, there is only one - the feeder needs minimal care.


Option six. Two-story wooden feeder

The next option is intended primarily for dry food (although various mash can be used). Ideal for small rooms, as the second tier compensates for the lack of free space. For work you will need screws and bars.
Step 1. First, prepare all the elements of the feeder. The main one will be the lower tier, the height of which should be 25 and the width 26 centimeters. As for the length, it depends on the number of birds.
Step 2. Make special grooves into which the damper will be inserted.
Step 3. The second floor will be a small trough with a board height of 10 centimeters. Place the second floor on the ends of the first, then attach with hinges.
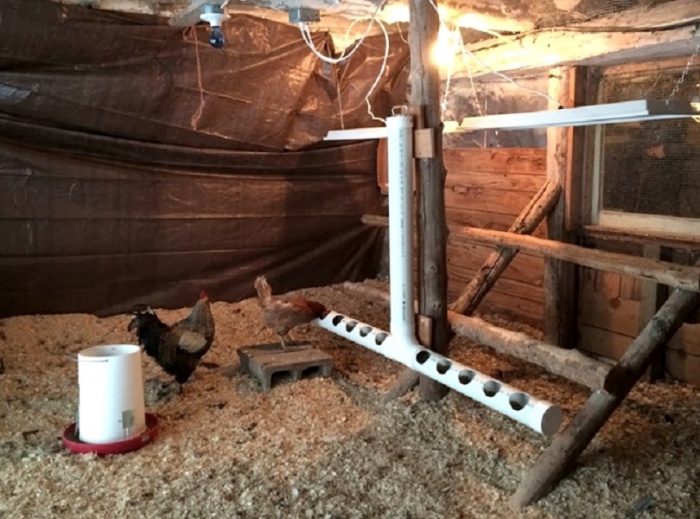
Option seven. PVC pipe construction
An easy-to-implement option that requires minimal expense and effort. PVC pipes They are sold everywhere and are inexpensive. To make, use one of the methods below.
Method one. With cutouts

To build this structure, take care of the following consumables:
- a pair of PVC pipes (40 and 60 centimeters in length);
- two plugs;
- connecting elbow.
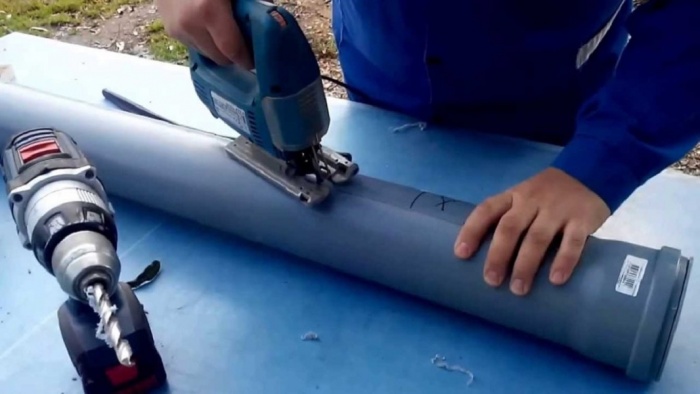
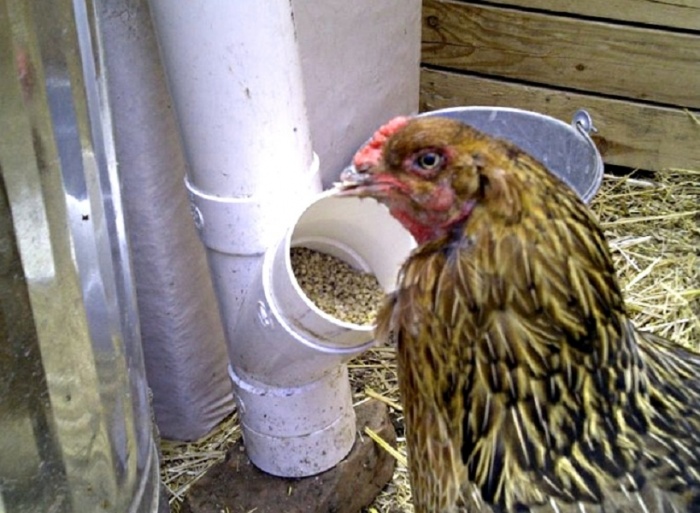
The 60 cm pipe will be installed horizontally and will serve to feed the pizzas. Another pipe is installed vertically and is necessary for feeding grain. Start by making a hole in a longer pipe, although instead they often make one large one, through which the birds will peck the grain.
Step 1. On a 60-centimeter pipe, draw holes with a diameter of 7 centimeters and with the same spacing.
Step 2. Cut out the traced holes.

Cutouts can be oval
Step 3. Place a plug on one end of the pipe.
Step 4. Install an elbow on the second end, and, in turn, insert another pipe into it.
Step 5. Secure the resulting structure in the poultry house, preferably in two or three places at once, so that it holds well.

After each addition of grain, put a second cap on top to prevent debris from getting inside. The described design is also a bunker design, so feed can be added only once or twice a day.

Method two. With tee

In this case, for production you will need:
- PVC pipes selected by size (70, 20 and 10 centimeters);
- two plugs;
- tee with an angle of 45°.
Step 1. Take a 20cm pipe and place a cap on one end. This will be the bottom of the feeder.
Step 2. Place a tee on the other end of this pipe so that the side elbow is directed upward.

Step 3: Insert a small pipe into the side hole.
Step 4. Insert the longest length of pipe into the third hole of the tee. Here, as in the previous method, after each filling of feed the pipe must be closed with a plug.

There are other ways to make a bird feeder from PVC pipes, as experienced poultry farmers talk about in the video below.
Video - Feeder made of pipe
Option eight. Canister construction
A cheap and easy way to make a feeder.

For work, prepare:
- any plastic canister;
- a piece of pipe 10-15 centimeters in length;
- fasteners;
Step 1: Clean and dry the canister thoroughly.
Step 2. Using a knife or any other tool, cut about 5 holes on the sides. The diameter of the holes should be about 6-7 centimeters so that the head of the chickens can fit freely into them.
Step 3. Make a hole in the top for filling grain and attach a pipe on top (the diameters must match). This will prevent birds from getting inside.
To protect against rain and debris, you can additionally take care of the pipe cover.
Option nine. CD container design
Don't throw away your old CD container - you can still use it to feed your chickens!

In order to build such a structure, prepare:
- long container;
- large bowl;
Step 1. Clean and dry the container, then cut three or four 2x2 centimeter holes on its walls near the rim.
Step 2. Fill the container with food and cover the top with a bowl.
Step 3. Turn the container with the bowl over and place it in the desired location.
Note! Make sure that there are no sharp corners in the cut areas that could injure the chickens.
We also note that this design is not durable and is designed for a small number of birds.
Option ten. Automatic design
The video below shows another interesting option - a structure that opens under the weight of the chicken.
Video - Automatic feeder
This is not a complete list possible options– the article describes only the most popular of them. By showing ingenuity and imagination, you can come up with your own design, the main thing is that the product is durable and safe for feathered pets.

It’s not enough to build a good barn for chickens; you also need to equip it: secure perches, make nests, install/hang drinking bowls and feeders. But you need to do this in such a way that it is convenient for you to maintain the poultry house. Chickens don't really care how beautiful their nests are. They will fit perfectly on the floor. It will be inconvenient for you to collect eggs from the floor, and they might even get pecked. Therefore, we arrange the chicken coop in such a way as to make it more convenient for you.
Perches
First of all, you need to equip the inside of the chicken coop with perches. This is a round or oval stick - a tree branch, a shovel handle, a planed block, etc., fixed at some height above the floor.
On average, they take about 20-25 cm of perch length per chicken. They are attached to the wall at a distance of 25-30 cm, one perch from the other - at a distance of 35-40 cm. You can make multi-tiered ones, but there will be fights for the highest place. Please note that all dimensions are approximate only and are necessary for reference purposes. Everything is selected more according to location: different breeds and chicken coops, and their owners too.
To make cleaning easier, a shield made of some smooth material is installed at a distance of 20 cm below the perch. Litter accumulates on it, so choose a smooth surface: it will be easier to sweep away.

The question remains: at what height should the perch, and therefore the shield, be made? It is most convenient to clean it in a cart. It should fit under the shield so that you can dump the droppings directly into the wheelbarrow with a hoe. For the flood, the height of the shield is determined by the height of your car, and above the shield there will already be perch slats. And again, choose the height of the chicken perch so that cleaning is convenient.
Nests
The second required element in arranging a chicken coop is nests. They will lay on the floor, but the eggs will be dirty, and they may even peck. According to the norms, one nest is made for three hens. But in fact, it turns out that no matter how many of them you do, they choose one or two, maximum three, and stand in line. The rest are exactly the same, standing empty next to each other. From time to time their tastes change, they begin to rush to others... From all this it follows that you can safely count 5-6 heads per nest, half will still be empty.
It is better to place the nests so that it is convenient for you to pick up the eggs, i.e. hang on the wall. So that the bird can safely get there, they make ladders - an inclined board with perches/sticks nailed across it. The same ladders are made for perches. If the nests are placed close to the perches and at approximately the same level, they will move back and forth. Quite convenient.

You can make such civil nests
If possible, make sure that the back side of the nests faces the corridor, if there is one. A door is made on the back side. Then to pick up the eggs you don’t need to go into the pen - open the doors and collect them.

Chickens also love to rush in the dark, or at least in dim light. That’s why the entrance is made small, and so that they don’t sit inside for a long time, sleep and shit, the roof is made with a strong slope (in the photo).
You can simply arrange or hang the boxes along the wall, but organize the darkening by placing a partition in front of the nests. In general, it is difficult to predict their behavior. Sometimes the nests are simply ignored and are carried anywhere. Then a stencil or mock-up can help: cut out an egg from white paper and place it in the nest. It might help: they will start rushing there.
Several nests in different designs are shown in the photo below. These are all real chicken coops, you can use them.
Plastic is very practical: it’s easy to wash, it’s inexpensive, you can do a lot of things, and chickens really love these plastic nests. Place more hay in them and they will fly. The space below can be used for perches or an IR lamp can be hung on the bottom to make a solarium.
In the nest you always use your hands with caution: you never know what the chickens laid there... It is much more convenient and safer when the eggs are rolled into a special compartment - the egg receptacle. The main catch in this device is to choose the angle of the floor and the flexible material so that the egg moves it away and stops before it reaches the wall. To soften the “landing”, sawdust is poured onto the bottom.

Since the eggs roll up and the bird does not see them, they may refuse to lay eggs in such nests. In this case, you can make a dummy egg - from thick foam plastic in full size or cut out a stencil from paper - and glue it to the bottom. This almost always works.
Chicken cages
Sometimes the birds are kept in cages. But this is for industrial or semi-industrial maintenance. With this method of cultivation, a large number of birds live in a small area. A drawing of a cage for chickens with dimensions is posted below.

Broiler cage drawing with dimensions
All sizes are according to the standards, and there is no need to invent anything. This is the minimum that laying hens need. And what can come out of such cells is in the photo below.

Watch the video to see how to make broiler cages from wood. Everything is described in great detail: what, for what, what sizes, how to assemble and what is needed for this. Really useful.
Drinkers and feeders
Setting up a chicken coop is unthinkable without drinking bowls and feeders. Moreover, they should be there too. There are periodic and bunker feeders. Periodic - this is when you came, poured out the amount of food and that’s it. Until the next feeding they stand empty.

Climbing in and digging around is a favorite thing
Bunker feeding is when there is a decent supply of feed, which is constantly poured into some container. Both have disadvantages: periodic ones - every time you need to go to the chicken coop and pour grain, and the birds crowd around, fight for the best place, which sometimes leads to the feeder being turned over.
If you have a bunker feeder, you need to go much less often, but it is possible to overfeed the bird, which is a disaster for laying hens. Therefore, either the laying hens are given a large walk or only broilers are fed in this way.
There are many designs of periodic feeders, but not all of them allow you to use feed economically. The easiest way is to pour the food into a bowl or container. But, if there is at least some opportunity, the chickens begin to rake up the food, spilling it out and then trampling it down. I have to throw it away. And such feeders allow you not only to dig into the food, but also to climb into the feeder with your feet. Therefore they need to be improved. To do this, install wire dividers on the container. Feed consumption decreases sharply: it is more difficult to rake it out.

You can make, for example, another similar feeder (or drinking bowl), which is conveniently attached or placed against the wall. It is probably easier to weld it from metal, although there are craftsmen who can make something similar from wood.

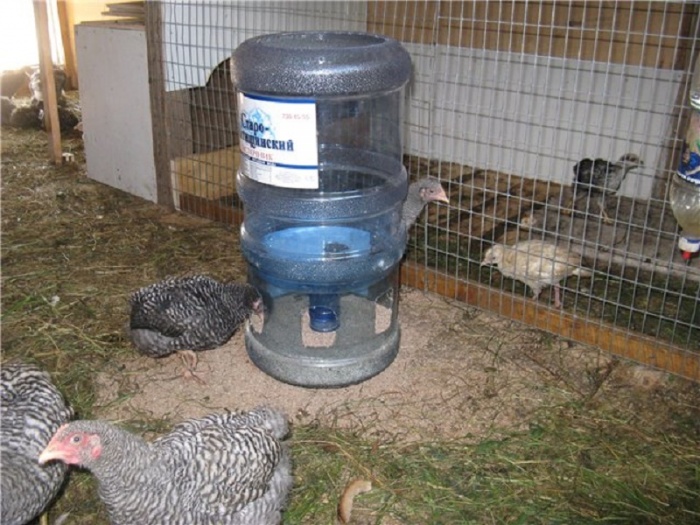
There are some interesting ideas. For example, an economical auto-feeder is assembled from an old car disk, a basin of suitable diameter and a plastic water bottle with a capacity of 5-10 liters.

Look for a disk of the type shown in the photo: with a large number of small holes along the outer edge. In the middle, cut a hole the size of the neck of the bottle. Cut out the bottom of the bottle cap, leaving only the threaded ring. The feed mixture is poured into the bottle, a disk is put on it, and the cut-off lid is pressed against it. Feed is poured into a basin and a structure is installed on top.

In order not to disassemble the feeder every time when you need to add food to the bottle, you can cut the bottom, making it like a lid. Then the bottle itself can be secured more seriously: fixation with the thread from the cap is not very reliable. But such an improvement does not allow anyone to rummage through the food, and no one can get into the basin.
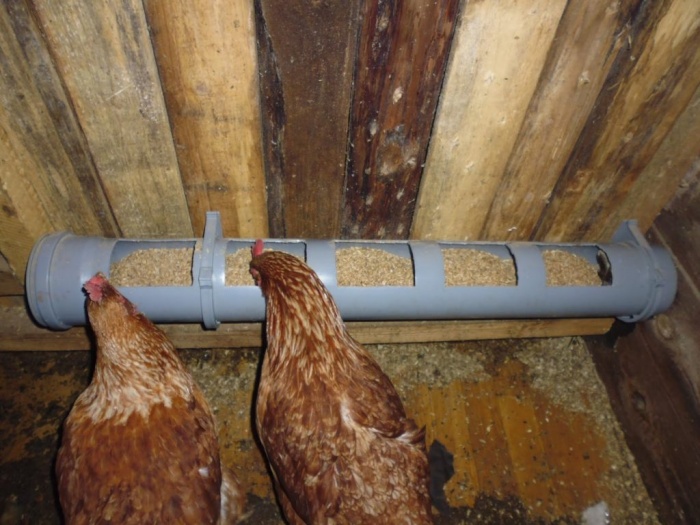
You can make a feeder from a piece of plastic sewer pipe. Holes with a diameter of about 7 cm are cut out on both sides. They do not have to be round at all - square or rectangular will also work. A corner is installed at the ends at 90° with the socket up and along a small piece of pipe: feed can be poured here.


A simple but spacious bunker feeder is a decent chest with a folding bar attached at the bottom. In the open position, food is poured onto it.
Another option for an economical feeder is made from plastic sewer pipes. But this is already a bunker structure: there is a decent supply. The design is simple, and consumption is reduced.
An even more interesting design of the chicken feeder in the video: with a lid. To open it, you need to jump on it.
Another option is a bunker feeder made of PVC pipes and a plastic water bottle.
Homemade drinking bowls for chickens
It's almost the same story with drinking bowls. Only here is water splashed, which, when mixed with droppings, gives an exceptionally persistent odor, as well as dirt. All this does not contribute to easier and faster cleaning. Therefore, the choice of drinkers is no less important than the feeders.
The simplest option for not large quantity birds - up to 15 pieces - siphon drinkers. They have legs and allow you to save water. If the legs are designed well, even a chicken flying onto the top will not knock them over.

Siphon drinkers - factory-made and homemade from a plastic bottle
Factory drinkers, of course, look more attractive, but homemade version- it's almost free, but they work no worse. In the photo you see a simple homemade siphon waterer for chickens: a support was nailed in the corner - a piece of board with a hole cut out for the neck. On top there is a fastening system and a load so that it does not get knocked down. A hole is cut into the former bottom of the bottle into which water is poured. The trick here is to choose the distance at which to install the water container: so that there is not too little or too much of it.
Cup drinkers are convenient when grown in cages, as they are conveniently attached to the mesh. But no one bothers you to hang a piece of mesh, say, on a wall or come up with another mount.

They allow you to water the birds without splashing. Water is supplied to the cup, it tilts under the influence of gravity, cutting off the supply. They drank the water, the cup rose, the water flows again. A hose is connected to the side fitting, the second end of which is located in a container of water, which should be above the level of the drinkers. Convenient and economical.

Nipple drinkers for chickens. These are small devices, a few centimeters in size. A cone-shaped stainless steel rod is inserted into the plastic case.

These nipples are screwed into plastic pipes into which water is supplied. A hole of the required diameter is drilled, a thread is cut and the nipple is screwed in. When you press the rod, a few drops of water appear. The chickens peck at the rod, drinking the drops that appear. The main disadvantage of this method is the drops that fall on the floor. To prevent this from happening, a special drip catcher is placed under each drinker. It simply snaps onto the pipe.
Despite their miniature size, these small drinking bowls cost a lot, especially if they are high-quality - read - imported. Ours are, of course, cheaper, but they break faster.

And the rest are different cups and basins into which water is simply poured. Their disadvantage is that birds often turn them over, and the water in them quickly gets dirty.
Is there some more interesting ideas from homemade ones. For example, such a pipe drinking bowl is shown in the photo. In a piece plastic pipe The water level is controlled by a float mechanism from the toilet cistern. Three drinking bowls are attached to the pipes.

The video demonstrates a drinking bowl with auto-filling.
If you want to arrange the chicken coop, you can arrange it in such a way as to minimize the need for its maintenance. In this case, the bird will bring not only income, but also pleasure: it is always pleasant to look at objects made with your own hands, but keeping a bird in a chicken coop without “direct” hands is difficult and expensive.
A bunker feeder for chickens is a container that contains a supply of feed. During the day, it is served in portions in containers to which the bird has access. As a result, feeding is rarely done. It is well preserved because the container is covered with a lid on top. The chickens eat it as it comes.
These feeders are made by hand. For this, improvised materials are used. Depending on the number of birds, there are many designs that differ in size and nuances of work.
Requirements for bunker products
During manufacture, a bunker feeder for chickens must meet the following requirements:
- 1. Protect the space from debris. This is ensured by special sides.
- 2.Easy to operate. Depending on the number of chickens, different numbers of feeders are installed. They must be accessible for feeding and cleaning.
- 3. Dimensions. The length of automatic feeders is selected based on 10 centimeters per 1 chicken. Especially if they are broilers. For chickens, this value is halved. If the chicken coop area is large, then several small devices are installed so that the birds do not crowd in one place.
Comfortable designs made from simple materials
When making bunker feeders with your own hands, you need to focus on the availability of available materials. A good option is the wood from which the products are made different types. In addition, plastic bottles, buckets or PVC pipes are used.
At the first stage, a drawing is prepared. Then the necessary materials and tools.
An important manufacturing condition is the stability of the structure. If the grain begins to spill out of the bunker, it will be overused.
Simple wood product
This homemade device easy to make. Externally it looks like a tray. There is a handle on top for easy carrying.
First a drawing is made.

Materials and tools are being prepared:
- plywood or boards;
- saw;
- screws;
- pencil;
- ruler.
- 1. Markings are made on the prepared material according to the dimensions of the drawing.
- 2. Using a saw, all parts are cut out.
- 3. The elements are fastened with screws.
It is important to prevent gaps from appearing between structural parts.
Another option for a wooden feeder
This option is used when it is not possible to frequently add feed. The materials and tools used are the same.
After preparing the drawing, cutting out the parts begins. All sharp edges are smoothed with sandpaper. Fastening is carried out using screws, for which holes are prepared in advance. During assembly, the front and rear walls are installed at an angle of 15 degrees.

A cover is attached to the back of the side walls. It is installed on hinges.

Two-story product
Such original idea used in limited space. The second floor acts as a compensator for the lack of space. Mostly dry food is used, but mash is allowed.

The step-by-step production is as follows:
- 1. First the 1st floor is made. Its height is 25 cm and its width is 26. The length is a free measurement. It depends on the dimensions of the room.
- 2. Grooves for the damper are made.
- 3. The second floor is a box 10 cm high. A hinged lid is fixed on hinges. The box is installed at the ends of the 1st floor and secured to it.
From a plastic bucket
With this feeder, automatic feeding occurs. Human participation occurs only when filling the feed. To make a homemade structure you will need a plastic bucket.

Holes are made in the lower part, near the bottom.

Using screws, a sectional bowl is screwed from below.

The bucket is turned over, filled with grain and covered with a lid.

The advantage of such a product is the ability to install it anywhere in the chicken coop.
From plastic bottles
Plastic bottles make cheap and convenient gadgets. The disadvantage is the inability to use in open spaces due to the open top.

The step-by-step production is as follows:
- 1. Two plastic containers are prepared, and one of them is cut in half along the diameter.
- 2. Grooves are cut in the lower part. They are made in such a way that the bird's head can fit through.
- 3. The second bottle is also cut into 2 parts and the cut neck is inserted into the bottom of the first container. The distance between the neck and the bottom is several millimeters.
- 4. Grain is poured on top. It will fall out in the required quantity as the chickens eat it.
PVC product
Such material is easy to process, and there are no problems with its acquisition. For manufacturing you need to prepare 2 pipes, the same number of plugs and a connecting elbow.
The first pipe is positioned horizontally, and holes with a diameter of 7 mm are made in it. The step between them is the same.

In some cases, oval grooves are made. Chickens will peck grain through them.

A cap is placed on one end to prevent the food from spilling out, and a knee is put on the other end. A second pipe is inserted into it, which is located vertically. For stability, in some places it is attached to the wall of the poultry house. Feed is poured on top and falls into a horizontal pipe. To prevent debris from entering the system, a second plug is inserted from above after each addition of feed. This is usually done 2 times a day.

From a pipe with a tee
This will require one long pipe and two small sections - 20 and 10 cm. In addition, a tee and 2 plugs.
A plug is put on one end of a 20 cm piece of pipe, and a tee on the other. Its branch is directed upward, and a 10 cm long piece is put on it. A long pipe is inserted from above.

The structure is positioned vertically and attached to the wall of the chicken coop. The food is poured on top and the top hole is closed with a plug. Grain appears from the branch of the tee, from where the birds peck at it.

From a canister
A plastic canister is used for these purposes. You will also need 20–25 cm of pipe, which can be rolled out of tin, as well as several brackets.

The operating procedure is as follows:
- 1. A hole is cut in the upper part of the canister according to the diameter of the pipe.
- 2. The two parts are aligned and secured using brackets.
- 3. Holes are cut in the sides of the canister.
- 4. Food is poured on top and goes into the canister.
To prevent debris from entering the system, a cover is provided on the pipe.
From a CD container.
Craftsmen use a wide variety of things to make bunker feeders. The CD container is not durable, but it lasts for a while.
To do this, several narrow grooves are cut in the upper part. Grain is poured into the container, turned over and placed in a bowl. The main thing is that there are no sharp edges left on the surface.

Timer design
For grain mixtures and bulk feeds, feeders with a timer are made. With help program control birds receive food in a timely manner, and feed is consumed rationally.
The timer regulates the activation time of the auger mechanism, which ensures the supply of the feed mixture. For such feeders, batteries are provided. During the day, feed is supplied 8 times. The disadvantage of this design is its high cost.
If you have a poultry house at your dacha, you need to take care of feeding the individuals. Hopper feeders are the best option for this. The chickens will always be fed, and there will be no dirt in the chicken coop. Of all the types of devices, the most convenient ones are selected. The main indicator is the number of birds.
The presence of poultry on the farm has always been considered a good help for the budget. Regardless of the breed of chicken - egg or meat, up to 70% of the cost of rearing is spent on feeding. Therefore, a properly designed chicken feeder is one of the important conditions for keeping poultry.
Variety of feeders
Adequate nutrition of chickens is the key to high productivity of farming. First, it’s worth understanding the variety of types of feeders. Classification is carried out according to several criteria.
According to the material of manufacture:
- Wooden. Used for feeding dry food. Usually the feeder is filled with mixed feed or grain, less often with mineral supplements in the form of shells and chalk.
- Plastic and metal. Ideal for placing wet mash. Such feeders are much easier to clean than wooden structures for chickens.
- Mesh containers are used for feeding green grass.
Do-it-yourself chicken feeders differ in the type of feed supply:
- Trays are represented by flat containers with low sides that prevent feed from scattering. Ideal for feeding chickens.
- The groove structures are complemented by a restrictive removable grille or turntable. Partitions inside the container form compartments for distribution various types stern. Installing them outside the cages will help facilitate the maintenance of trough feeders.
- Hopper devices are designed for filling with dry mixtures for chickens. Filling the container in the morning daily dose, you don’t have to worry about the feeding process for 24 hours. The closed design of the feeder ensures dryness and cleanliness of the feed, which enters the feeding trays in decreasing portions.
Regarding the position in the poultry house, homemade chicken feeders can be floor-mounted or mounted. Floor-standing ones are characterized by mobility and the ability to easily change their location. Installation of hanging structures usually takes place around the perimeter of the chicken coop using special brackets.
The photo below shows various designs for feeding chickens:

Design requirements
Before you make a chicken feeder, you should familiarize yourself with the criteria that it must meet. The list of conditions contains only three items:
- Rational feed consumption. A design drawing is selected that will not allow chickens to scatter food, climb inside the container and spoil the contents with their excrement.
Note! Turntables, protective sides and various devices for hiding the main volume of food inside the feeder will ensure that this condition is met.
- Easy to maintain. Daily filling of the chicken container with food, periodic washing and cleaning should proceed without hindrance. Therefore, it is important to find a material and design suitable for the given purposes. Lightness and mobility, a simple washing process and the ability to disinfect the feeder will reduce labor costs for caring for chickens.
- Optimal sizes. The tank parameters should provide space for the daily feed requirement, taking into account the livestock. For an adult chicken, 10-15 cm is allotted in trays; for chickens, 5-8 cm is enough. If the tray is made in the shape of a circle, 2.5 cm is enough for the chicken. The ability for all birds to use the feeder at the same time will eliminate the possibility of pushing away weaker individuals.
More examples of containers for feeding poultry are shown in the photo below:


Manufacturing of plastic structures
When making do-it-yourself chicken feeders, plastic buckets or large bottles with handles are often used. The containers are selected from hard plastic so that the walls do not deform under the pressure of the food located inside. Cylindrical containers are optimal for designing a bunker device for feeding chickens. Main process steps:
- 6-8 cm are removed from the bottom edge of the bucket and holes are cut out.
- A plastic tray, the diameter of which exceeds the parameters of the main container by 10-15 cm, is suitable as the bottom of the feeder.
- If a convenient element is missing, it will be replaced by the bottom of a plastic bucket large sizes, rather than what was chosen to fill the chickens with feed.
- The parts of the feeder are fixed together with self-tapping screws, as shown in the photo:

After filling the container with chicken feed, close it with a lid. The structure can be placed on the floor or hung by a handle so that the bottom is located at a height of 0.2 m from the surface.
By analogy with a bucket, other containers are used to make the structure. Examples are shown in the photo:


There are other designs made from two plastic bottles.
The procedure for decorating the feeder shown in the photo above includes the following steps:

Comment! It is better to place a similar structure inside the chicken coop. When placed in an open area, if it rains, the food may get wet.
Identical designs are suitable for chickens, the manufacture of which involves smaller containers.


Hopper-type feeders can be classified as automatic designs, since the grain is supplied as the chickens absorb the feed.
Let's use pipes
It’s quite easy to make good chicken feeders with your own hands from PVC pipes. There are several design options.
Method 1
To work you need to prepare:
- two pipes 0.4 and 0.6 m long;
- connecting elbow;
- a couple of plugs.
A longer pipe is intended directly for feeding chickens, the second is attached perpendicular to the first and is used to supply dry food. To make it convenient for chickens to peck, holes with a minimum size of 7 cm are marked on the pipe. These can be circles or ovals, the choice is arbitrary and does not contain strict canons. After marking the holes in the feeder, cut them out as shown in the photo:

Further actions:
- one end of the pipe is closed with a plug;
- the second edge is connected to a short pipe using an elbow;
- A convenient feeder for chickens is suspended in the poultry house.
Reliable fastening is ensured by fixing the structure at two or three points. After filling with food, the end of the pipe is also closed with a plug. This type of feeder is also a bunker type and allows you to fill it with grain once a day.
Method 2
For the second design option you will need:
- PVC pipes of sizes 10, 20 and 70 cm;
- tee with a bend angle of 45°;
- a couple of plugs.

Algorithm of actions:
- A pipe 0.2 m long is closed on one side with a plug.
- The tee is placed on the second edge with the knee up.
- The side hole is equipped with a pipe of the smallest size.
- The top of the tee is connected to the longest pipe.
After each filling of the structure with food, the upper part of the feeder is closed with a second plug.
The third method of arranging a feeder for chickens is described in the video material:
Wooden crafts
There are also several design options for wooden chicken feeders.
Method 1
A drawing of an interesting design made of wood or thick plywood is presented below:
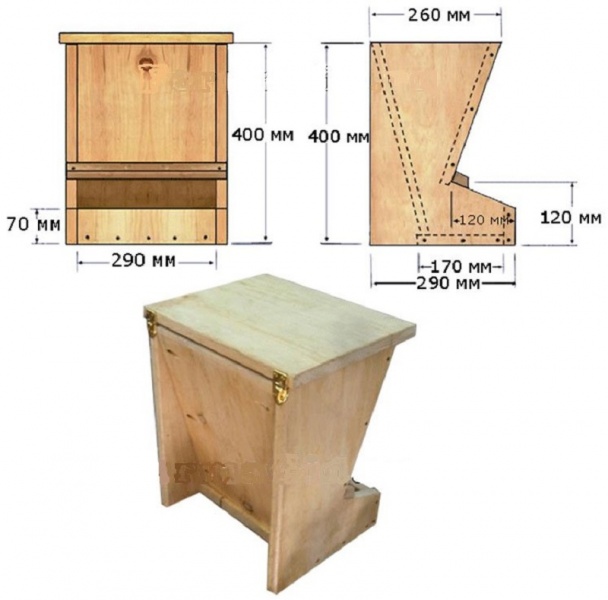
According to the drawing, the main elements are marked on the selected material:
- two side parts;
- two rectangles for the front wall;
- back wall;
- bottom of the feeder;
- the top cover where the chickens' feed will be poured.
Further procedure:
- The parts of the feeder are carefully cut out.
- Using a drill, holes for the screws are prepared.
Advice! To prevent chickens from getting hurt on the feeder, all rough surfaces are treated with sandpaper.
- The structure is assembled together using screws. As a result, the front wall is located at an angle of 15 degrees in relation to the back wall.
- The cover is installed on the back of the side walls using hinges.
- To extend its service life, it is better to treat the feeder with an antiseptic composition. The use of varnish and paints is prohibited.
The finished convenient design for chickens is shown in the photo:
Method 2
You can make a feeder tray for chickens, as in the photo below:

A clear drawing will help in making a simple structure from wood or thick plywood:
According to your own or the drawing given above, parts are marked on a wooden surface. The entire structure consists of side and end walls, bottom and beams. For beginning craftsmen, difficulties may arise when cutting out end elements.
Comment! When drawing up your own drawing, select the correct height of the boots so that it is convenient for the chickens to get food. The material for the bottom is chosen to be heavy and thick so that the chickens do not overturn the feeder.
When connecting elements, make sure there are no gaps in which food could spill. The choice of feeder type depends on the number of chickens and the conditions under which they are kept.
Conclusion
Each of the methods is quite simple and accessible to any novice master. Another variation of making a wooden bunker feeder is presented in the following video:
Food and water are important for any living organism. Therefore, when breeding chickens, special attention should be paid to the quality of feeders. A properly selected element of maintenance allows you to increase productivity and take care of the health of birds, since pathogens can enter the chickens’ bodies through contaminated food and water.
A good feed device also saves the owner’s time and effort, which is mainly important when keeping a large number of animals. In addition, the thoughtful design of the feeder helps keep food out of unwanted mouths such as mice, rats and sparrows.
Requirements for chicken feeders
Feeder from glass jar- not a very practical solution, the food may spill out, the chickens may knock over the can and you need to monitor the availability of food.
Like any element of maintenance, bird feeders must meet certain requirements.
- Ensure rational use of feed. The structure must be made in such a way that chickens cannot climb into it, scatter food or spoil it with excrement. This can be achieved using various elements of the feeder (sides, turntables, nets, jumpers), which protect the bulk of the feed inside the device.
- Optimal size and volume. The feeder must provide the entire population of birds with food. Moreover, its design should provide simultaneous access to food to all chickens, so that strong individuals do not drive away weak ones. Find out about cannibalism in chickens.
- Ease of use. The device is easy to clean, food can be poured into it without any problems, and it is also convenient for birds.
- Strength, stability, safety. The material of the feeder should deform as little as possible during use and be non-toxic to birds. The structure must be stable when in contact with chickens, and not tip over or fall on its side.
- Fit for purpose. A feeder made of a specific material must be used for a specific type of feed.
To calculate the length of the tray, 10-15 cm is allotted for each adult, and 5 cm is enough for chickens. In a circular tray device, each bird receives 2.5 cm.
View
All feeders are classified according to the following criteria:
- method of fastening;
- type of food (wet, dry, grass) and feeding method;
- size;
- manufacturing material.
By type of fastening there are:
- Floor-standing. The main requirement for the design is stability. Due to the placement of the feeder on the floor, birds can easily climb into it, which will lead to unproductive wastage of feed and sometimes even spread infectious diseases. Read about diseases of laying hens.
- Wall-mounted. They are highly stable due to wall mounting.
- Hanging. They are hung at the level of the bird's back so that it can peck the food without scattering it. This type of feeder is difficult for rodents to get into. He will tell you how to get rid of rats in a chicken coop.
The size of the feeders must correspond to the number of birds, otherwise their feeding will be insufficient. Each type is designed for a certain amount of food, so it can be one large container or several small ones. The calculation for birds is carried out as follows:
- 10-15 cm of tray is required for one adult;
- for chicken feeders the figure is halved;
- with a circular design, 2.5 cm of tray is required per bird.
For stable and high productivity, all birds must have access to the feeder at the same time.
Depending on the material used to make the feeders, there are:
- Wooden. The best option for dry food and .
- Plastic and metal. Designed for wet food, as they are easier to clean than wooden ones.
- Made of mesh or metal rods. Used when feeding green grass.
- Combined. Allows different types of feed to be given to chickens at the same time.

Homemade iron bucket feeder
According to the feed supply method, there are three types of design:
- Tray. Any flat container with sides that can be used to feed chickens is considered. The most budget option, which is suitable for chickens, but due to instability is poor for feeding adult birds.
- Grooved. The design is complemented by a restrictive removable grille or turntable. Thanks to this, each of the birds has its own compartment with food, and they can also be used for different types stern. You can find out about feed for laying hens.
- Bunkers. An ideal choice when feeding dry food, as it allows you to fill the daily amount of grain or feed. Feed flows into the tray as needed, and the closed design keeps food clean and dry.
When selecting feeders, it is necessary to take into account all factors affecting the productivity of chickens. Right choice will significantly save costs on the care and maintenance of birds in the future.
We make it ourselves from scrap materials with our own hands
Feeders for broilers and laying hens can be bought ready-made, but to save money they can be easily made independently from available materials. As a material, you can use almost anything that is at hand (boards, boxes, pipes, plastic bottles, etc.). The main thing is that the material from which the feeder will be made is safe for the health of the birds. The main problem in production is mixing the feed. The best option is a universal feeder that is suitable for any type of food. If it is impossible to make such a container, you can make several separate ones for each type of food. However, when using several feeders at the same time, they take up a lot of space.
When making feeders yourself, at the final stage you should make sure that the design does not have sharp or protruding parts that could harm the birds during operation.
From a cutting board
To make this feeder you will need:
- cutting board;
- funnel (preferably plastic);
- small plastic cup;
- transparent rubber hose;
- electric drill.
To begin with, you need to trace the outline of the wide part of the funnel as accurately as possible on the board. Next, many holes are drilled in the circled area at some distance from each other. Their number should be sufficient to allow food to pass through, but at the same time limit the amount of food it appears. The pre-prepared hose is then connected to the end of the funnel, and additional fasteners can be used if necessary. After this, a hole is made on the side of the plastic cup, the diameter of which is slightly larger than the diameter of the hose. The second end of the hose is placed in the hole of the cup. If the fastening density is insufficient, a sealant can be used. Next, the bell of the funnel is glued to the cutting board using sealant so that the outline of the funnel coincides with the drawn outline. After this, the funnel will be located on the bottom of the board and connected with a hose to the mug.
He will tell you how to make drinking bowls for chickens with your own hands.
Thanks to this system, the food will flow through the hose into the cup. However, care must be taken to ensure the stability of the board, as birds may land on it.
From a plastic bucket

An old plastic bucket makes a stable floor feeder
To make a bunker feeder from a bucket you will need:
- plastic bucket;
- fastening materials;
- tool for creating holes (drill, knife);
- special sectional bowl for animals.
To begin with, holes are made in the very bottom of the bucket through which the food will flow. After this, using screws, a sectional bowl is attached to the bottom, on the outside of the container. The bucket is turned over, food is poured into it and the lid is closed. When manufactured correctly, each hole opens into a separate section, where feed is supplied as needed. The advantages of such a feeder are automatic feed supply and ease of installation in or.
This type of feeder can be purchased ready-made, but it will be expensive. It can be considered automatic, since when it is used, participation in feeding chickens is minimal.
From plastic bottles
Such material can be found in most households. To make a feeder you need:
- Take 2 bottles and cut the first one in half. In the lower part, at a distance from each other, cut holes, the diameter of which allows the bird to freely stick its head inside.
- In the second bottle, cut off the bottom, turn it over and install the parts with holes inside so that the neck does not reach the bottom by a few centimeters. The grain is poured inside the bottle, after which the top part is closed.
This feeder is easy to carry, but in bad weather it must be covered indoors. A chicken feeder can be made using the same principle, only using a smaller bottle as a basis.
Two options for wooden feeders
Wood can be found in any yard, which is why many feeders are made from this material.
First option
These feeders are made of a hopper type, so they are suitable for owners who do not have the opportunity to frequently feed their birds. To make it you will need:
- pieces of durable plywood or wood;
- saw;
- electric drill, set of drills;
- screwdriver;
- several loops;
- sandpaper;
- roulette;
- pencil.
First you need to create a drawing, which will then be transferred to the tree. The standard parameters are:
- bottom - 29x17 cm;
- two side parts 40 cm high with a top edge of 24 cm and a bottom edge of 29 cm;
- two rectangular panels for the front wall, 28x29 and 70x29 cm, respectively;
- top cover - 26x29 cm;
- back wall - 40x29 cm.

Metal feeder - strong and durable
After accurate measurements, all elements are carefully cut out. In the designated places, holes for screws are made using an electric drill. All elements should be sanded until smooth to protect the birds. After this, all parts are assembled into a single structure and fastened with screws. If necessary, you can use a clamp to increase the tightness of the seal. The front and rear walls must be attached at an angle of 15°. The lid is then secured to the back of the side walls using hinges. It is advisable to treat the finished product with an antiseptic. This feeder is comfortable and roomy. Apart from difficulties at the creation stage, it has no disadvantages.
When processing the feeder, it is strictly forbidden to use paints or varnishes.
Second option
This product is suitable if you have a large number of birds and a canopy in case of bad weather. The feeder is universal, durable and strong. Required materials for production:
- thick boards or plywood;
- saw;
- hammer;
- screws or nails;
- paper;
- Ruler and pencil.
First, a clear drawing is made, the dimensions of all elements are calculated, and after that the measurements are transferred to the tree. Standard product parameters:
- bottom - 15x100 cm;
- 2 side walls, 8x100 cm each;
- 1 beam – 2x3x100 cm (HxWxD);
- small end walls 15 cm wide and with a height corresponding to the long side walls + the thickness of the bottom.
All elements are carefully cut in according to the drawing, processed with sandpaper and fastened together. It is advisable that there are no gaps left, as food can spill out through them.
One piece should be thick and heavy enough to prevent birds from knocking it over.
Two-story
This type is primarily used for dry feeding, although if necessary it can be used when feeding mash. Ideal for saving space, especially in small spaces. The structure is made of bars, screws and hinges. The first step is to measure and cut out all the elements of the future structure. In this feeder, the lower floor is the main one, its height is 25 cm, and its width is 26 cm. The length depends on the number of birds that will use the product. The end sides of the lower tier should be 8-10 cm higher than the wall. Next, special grooves are made into which the damper will later be placed. The second floor is made in the form of a small trough with a board height of 10 cm. It is installed on the ends of the lower floor and secured with hinges.
In addition to saving enormous space, such feeders are stable and birds cannot climb into them, which significantly saves feed.
From PVC pipes
The best option for farms with a large number of chickens. No manufacturing required high costs and effort, since PVC pipes are sold everywhere and have a low price. There are many ways to make pipe feeders, but two are the most common.
With cutouts

You can make an excellent feeder from a plastic pipe by pre-cutting holes
For this option you will need:
- 2 PVC pipes, 40 and 60 cm in length;
- 2 plugs;
- connecting elbow.
A long pipe is installed horizontally and is used for feeding. A short pipe is mounted vertically and is used to store and supply feed. First, holes with a diameter of 7 cm and with the same distance from each other are drawn on a large pipe. After this, holes are cut in the designated places. The hole can be made on one side or both. Then a plug is attached to one end of the horizontal pipe. On the other side, an elbow is installed, and a vertical pipe is placed in it. When installing, the finished feeder must be firmly secured in 2-3 places. After the feed is poured into the smaller tube, the end is closed with a second plug to keep out debris.
The design of the feeder is a bunker, so food can be added 1-2 times a day.
With tee
For the second version of the feeder you will need:
- PVC pipes 70, 20, 10 cm long;
- 2 plugs;
- tee with an angle of 45°.
A plug is placed on one side of the middle pipe. It will serve as the bottom of the product. On the other side, a tee is attached to the pipe so that the side elbow faces upward. A small pipe is installed in the side of the elbow, and the largest is placed in the remaining hole of the tee. As in the previous feeder, after filling the feed, the pipe must be closed with a plug.
From a canister
A low-cost and simple way to make a feeder. To create it you will need:
- any plastic canister;
- pipe 10-15 cm long
- fastening materials
First, the canister must be thoroughly cleaned and then dried. After this, using a knife or other tool, cut about 5 holes on the side parts. Their diameter should be approximately 6-7 cm so that the bird’s head can easily fit into it. A hole is cut in the upper part of the canister, matching the diameter of the pipe. After this, a pipe is installed to fill the grain. Thanks to this design, birds will not climb inside. To protect the food in bad weather, you can make a lid to close the pipe.
From a CD container

If you don’t have a plastic bucket, then a CD container can be used as a handy tool for making a feeder.
Even such unusual material can be used to create a feeder. To make this you will need a long container, a large bowl and a knife. Before starting production, the container must be thoroughly cleaned and dried. After this, 3-4 2x2 cm holes are cut out on its walls near the rim. Next, the container is filled with food, a bowl is placed on top, after which the entire structure is turned over and installed in the required place. This feeder is not durable and stable, so it is designed for a small number of chickens.
Since cutting holes in the plastic may leave sharp corners that can injure birds, the finished product should be carefully checked and any irregularities should be corrected if found.
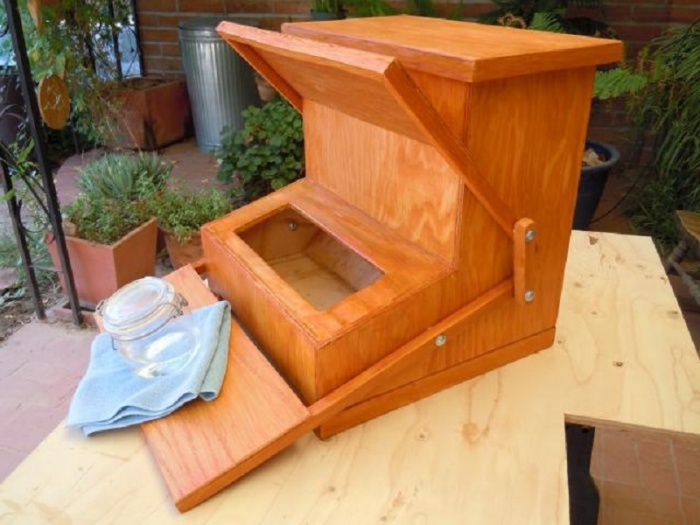
Automatic with timer
This system involves independently pouring food into the tray from the storage container. There are many types of automatic feeders. The most popular type is a wooden automatic feeder with a pedal. To make this type you will need:
- wooden boards or thick plywood;
- thin wooden beams;
- screwdriver, drill, drill bits, saw;
- fastening materials;
- sandpaper;
- paper, pencil and ruler.
To begin with, a drawing of the product is drawn with calculations of the parameters of all elements. The standard feeder has:
- 2 side walls 40 cm high with an upper edge of 26 cm and a lower edge of 29 cm. Additionally, triangles are cut out on them so that the lower part is wide and protruding.
- 2 rectangles for the front part - 28x29 cm and 7x29 cm.
- Rectangle for the roof 26x29 cm.
- Rectangle for the back wall 41x29 cm.
Cover for the tray and pedal according to the dimensions of the structure.
To begin with, the wooden beams are cut into 6 parts. The 2 longest pieces (the length is calculated based on the width of the pedal and the box) will serve as a mount for the pedal. 2 medium ones are needed for the lid above the tray. A pair of short ones will serve to connect the lifting mechanism. Next, all parts are cut out and processed with sandpaper. After this, the automatic feeder is assembled, all elements are fastened with screws. The back panel should be at an angle of about 15˚. The top cover is secured with two hinges. Next, you need to secure the pedal to the bottom of the structure. Thanks to this element, when pressed, the tray with food will open. Thus, the food will be completely protected, and the birds can open the box on their own by standing on the pedal.
It is advisable to treat the finished structure with an antiseptic, but varnishes or paints should not be used.
Specifics of homemade chicken feeders for chickens

Chicks require less feed than adults, so the feeder should be small
The main difference between chick feeders is their size. Since chicks need less feed, the dimensions of their food container are much smaller compared to the feeders of adult chickens. In addition, chicks are very active, so containers with food and water must be strong, stable and safe. Chickens eat a lot, which is difficult to regulate with a large number of chicks. Therefore, the best solution would be to make an automatic feeder that can independently add food throughout the day. Chickens, like adult birds, love to climb into containers with food, contaminate the food and throw it out. Because of this feature, it is advisable to use the most protected feeders.
Video
In the video we will see an example of a self-made pipe feeder.
conclusions
- High-quality, practical feeders are the key to good poultry productivity, their health and rational use of feed.
- If you are not able to feed the birds on time from built homemade feeders, it is best to equip them with automatic feeders (automated chicken feeders with a timer, which can be purchased from the manufacturer in bulk for a large number of birds).
- These designs will allow you to regulate the amount of chicken food during the day.
- Feeders can be purchased ready-made, however self-production in most cases saves a lot of money. They can be made from literally any available material.
- Don't forget about the safety of birds. The material of the feeder, like the nest, should not be toxic for them, since chickens like to peck at everything. In addition, the product should not have nicks, roughness or other defects that could harm the birds.