How to make a chicken feeder: drawings, dimensions, examples from wood, plastic bottles and pipes. Chicken feeder: do it yourself Types of chicken feeders
You can find fresh fruits and vegetables on supermarket shelves at any time of the year. It’s not a problem to buy poultry meat today. Why, then, do not summer residents stop growing their own crops and do not give up farming? We are sure that each of the gardeners and poultry farmers will tell you how products grown with their own hands are tastier, juicier and more environmentally friendly. But if even urban summer residents can maintain a vegetable garden, then raising chickens is not such an easy task. However, for our folk craftsmen, a do-it-yourself feeder is not a problem. If you wish, we will select information on homemade devices for you.
Balanced and, very importantly, timely nutrition is necessary for chickens to be healthy. But modern people have a lot to do and it’s not always possible to keep track of feeding times. It is much easier if the feeding process takes place using a device that supplies food automatically. We bring to your attention several options for homemade feeders and drinkers. We will be glad if any of the proposed models will make your life easier.

Constantly remembering poultry feeding hours is very difficult. Considering that the farmer may be away for a day or two, hopper-type feeders become an indispensable item.
Option #1 – pipe to you, hen!
The most ingenious inventions are usually very simple. This is exactly what the idea of using polypropylene pipes can be considered.
To assemble the necessary device you will need:
- pipes of various diameters;
- couplings;
- connecting devices.
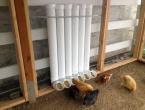
We attach a part called a “connecting elbow” to the polypropylene pipe. We place the resulting structure in the chicken coop. We pour food into the pipe from above, and then close the upper end of the structure with a lid. The feed is fed into the knee under the influence of gravity. As the chickens consume feed, it will be added to the knee from the pipe. In the pipe, the level of the product will gradually decrease. After a few days, it will be possible to pour a new portion of food into the pipe.
This design is good if there are few birds on the farm. Otherwise, the connecting elbow can be replaced with another pipe, securing it parallel to the floor. Birds will be able to get food from a horizontal pipe through holes in it. Such a feeder not only saves the owners time, but also space in the chicken coop: it is conveniently located and does not bother anyone.

This is how a simple feeder made from polypropylene pipe looks like. Agree that it’s difficult to come up with something simpler than this basic device

Of course, if there are a lot of chickens on the farm, you can simply make a lot of pipes for feeding them. But we will do it simpler and attach another pipe to the main one - a horizontal one, in which we will make holes
This device has one drawback: the lack of limiters. Chickens can climb onto the pipes, trample and ruin the food.
Option #2 – bunker type devices
If you buy an automatic bird feeder in specialized stores, you will have to pay a decent amount. Moreover, a large farm will require several similar products. Meanwhile, there is nothing complicated in the proposed design.

When choosing a menage or portioned dog bowl to make such a feeder, do not lose sight of the fact that its diameter should be greater than the diameter of the base of the bucket
You need to prepare:
- a plastic bucket that was left after the renovation;
- a sectional bowl for dogs or an inexpensive vegetable bowl, also made of plastic;
- sharp knife.
We cut holes in the bottom of the plastic bucket in accordance with the number of compartments in the container. The size of the holes themselves should allow feed to flow freely into the feed pan. The bucket and the menagerie must be connected to each other using screws.

It is better not to place the feeder on the ground, but to hang it. In this case, the likelihood that chickens will climb on it is minimal.
The food is poured into the container and the bucket is closed with a lid. The feeder can be placed on a horizontal surface or suspended so that the birds can freely get food. By hanging the bucket by the handle in the right place, you can be sure that the chickens are fully provided with food for several days.
Option #3 – basic dining room
Construction requires very little time and the simplest materials. Prepare:
- container with a plastic handle;
- chain-link mesh;
- sharp knife.
The plastic container must be emptied of its contents, rinsed thoroughly and dried. Carefully cut out the front part. We make a cut in the handle of the bottle so that it can be hung on the mesh that surrounds the chicken coop. We pour the food directly into the bottle. It is important that the container is at a height that is as comfortable as possible for the feeding bird.

The feeder is constructed in a matter of minutes. It’s good if the chicken coop is fenced with a mesh, otherwise a piece of chain-link can be simply pulled in the right place
Option #4 – plywood feeder
Another option for a bunker can be made from a sheet of plywood. We cut out vertical high walls and build a box without a front part. The height of the feeder is approximately 90 cm. Thanks to this size, you can fill in a large amount of feed at once.
The feed should not get stuck at the exit. To do this, place a piece of plywood at the bottom of the box so that it has a slight slope towards the front. Now the bulk feed will roll down to where it will be accessible to the chickens. The optimal slope when using granulated feed is 20-25 degrees, and when feeding grain - 12-15 degrees.

A plywood feeder is also a simple device. It’s just more difficult to care for than plastic products. An antiseptic coating can help, but plastic is still more hygienic
The horizontal area in front of the inclined plane is the place where the feed will fall. A common problem with many home-made structures is the lack of restrictions, thanks to which chickens cannot climb into the feeder, spill the feed and spoil the feed with the products of their vital activity. In this case, the problem is solved with the help of restrictive sides. The front side should be at least 6 cm, and the side sides should be twice as large.

The advantages of this design are its spaciousness and security. Using this device, you can be sure that the food will last for a long time, it will be spent rationally, it will not spill and will not be spoiled
All you have to do is attach the front wall and you're done. The feeder will last a long time if it is thoroughly treated with antiseptic preparations. Use a spray gun for this purpose. A finished and even elegant look will be given to the product by coating with acrylic paint. You can assemble all the parts together using a screwdriver and self-tapping screws.
Option #5 - plastic devices
Food-grade plastic is an excellent material from which you can make comfortable drinking bowls and similar “plates” for chickens. The undoubted advantage of these devices is their mobility. They can be carried and placed where it is convenient for the farmer.
To work you need to prepare:
- two plastic buckets;
- two water bottles that are used in a household cooler;
- a piece of polypropylene pipe approximately 25 cm long and of large diameter;
- electric drill and drills 20 and 8 mm in diameter;
- electric jigsaw.
It is necessary to make holes in the buckets in such a way that the birds can freely reach water and food, but cannot get inside. To make the openings uniform and neat, you can use a template. By applying it to the walls of the buckets and tracing it with a felt-tip pen, we get the contours of future holes.

From an aesthetic point of view, these drinking bowls and feeders are very good. But they are also incredibly functional.
We mark a hole by drilling a hole in each with an 8 mm diameter drill. To cut out the openings we use a jigsaw. For plastic, a file is suitable for both wood and metal, but you need to choose a product with a small tooth.
We make two limiters from a piece of polypropylene pipe: for food and for water. Thanks to this device, the neck of the container will not touch the bottom of the bucket, and it will be possible to control the supply of feed and water. Using a jigsaw, we divide the pipe into sections of 10 and 15 cm. Take a short piece and drill three holes at a distance of 3 cm from the edge with a drill of 20 mm in diameter. We also drill holes in a long section of pipe with the same drill, but at a distance of 5 cm from the edge. Next, we use a jigsaw to cut out segments in a long section to make something like a crown with three teeth.

It is very convenient that the buckets have handles by which these structures can be transported to the place of use. There you can either install devices or hang them all by the same handles
Fill the containers with water and food. We put a long limiter on the bottle with food, and a short one on the one with water. Cover the containers with buckets and turn them over. The devices are ready. So easily and quickly both a feeder and a drinking bowl can be made from materials that are easy to obtain. Thanks to the presence of handles, both devices are convenient to carry. This is the most hygienic and successful option.
Video master class: bottle feeder
There were more ways to make a fattening device. To eliminate this obvious injustice, we invite you to watch a video on how to make a very simple waterer for chickens from plastic bottles that can be bought at any store.
Are you planning to raise chickens and have already built a chicken coop for them? Then it's time to take care of the rest - in particular, the feeder. It is easy to make, especially since you can use various materials. Let's look at the simplest and most common options for making a chicken feeder with your own hands.

The feeder can be made from anything - for example, from boards, boxes, pipes or plastic bottles. But regardless of the material chosen, one problem always arises - we are talking about mixing the feed. And if you use several feeders at the same time, they will take up too much space. There is a way out of this situation, but we’ll talk about it a little later.

So, in order for the feeder to cope with its functions, you need to prepare for its construction in advance. First, decide on the size of the structure and choose a place for it. It does not matter whether it is located in the chicken coop or in the yard - all birds should have free access to it. Moreover, chickens should not crowd or interfere with each other while feeding.

It should also be remembered that chickens need not only dry, but also wet food (we are talking about mash). In the first case, hopper containers in the form of a cylinder are ideal, in which the volume of feed is replenished automatically. For wet food, a trough-shaped feeder is more suitable, on top of which there is a “spinner” made of timber.


Making a chicken feeder - an overview of popular methods
Of course, the procedure for constructing a trough differs from a bunker-type feeder both in terms of labor costs and the complexity of the work. But modern equipment and materials significantly simplify the process, so there will not be any particular difficulties.
Note! When constructing a feeder, you need to adhere to one important rule: the structure should be stable and food should not spill out of it. Otherwise, not only will there be an overconsumption of feed, but also a violation of sanitary standards.
Option one. Creative feeder made from a cutting board

To make such an unusual bird feeder, you must prepare:
- cutting board;
- funnel;
- a small plastic cup;
- rubber hose (transparent);
- electric drill.
The further algorithm of actions should look something like this.
Table. Making a feeder from a cutting board
| Steps, no. | Photo | Description |
|---|---|---|
| Step 1 |  | Take a funnel (preferably plastic) and trace its outer contours on the board. Try to do everything as accurately as possible. |
| Step 2 |  | Drill many holes within the drawn circle. It is important not to overdo it here, since the supply of dry food should be limited. |
| Step 3 |  | Take a pre-prepared transparent hose of the required diameter. Connect the hose to the end of the funnel; if necessary, you can use additional fasteners (for example, a clamp). |
| Step 4 |  | Take a plastic cup and make a hole at the bottom as shown in the image. The diameter of the hole should be such that the end of the hose fits tightly and holds well. |
| Step 5 |  | Take the other end of the hose and place it in the hole you made. If the density is insufficient, treat the edges of the hole and the outer surface of the hose with sealant. |
| Step 6 |  | Next, you need to glue the bell of the funnel to the cutting board. To do this, treat the contour of the circle with the holes with sealant. |
| Step 7 |  | Place a funnel on the circle and hold it in this position until the sealant dries. |
| Step 8 |  | Connect one end of the hose to the cup and the other to the glued funnel. The funnel should end up at the bottom of the board. |
When assembled, the feeder described above will look like this. You can add grain.
Note! The grain will be poured through the hose from the watering can into the cup itself. Also make sure the board is stable as chickens are likely to perch on it.
Option two. Hopper feeder made from a plastic bucket
This design can be considered automatic, since your participation in feeding the chickens will be minimal. Such a feeder can be purchased ready-made in a store, but it will not be cheap, so you can try to make it yourself. The manufacturing procedure is quite simple.

Supplies you will need:
- special sectional bowl for animals;
- plastic bucket.
After preparation, follow the instructions below.
Step 1. Take a plastic bucket and make holes in the bottom through which the food will pour out (as shown in the image below).

Step 2. Attach the sectional bowl to the bottom of the bucket using screws.

Step 3. Fill a plastic bucket with grain or any other food and close the lid.

The advantage of this design is that it can be installed in almost any convenient place (stand or hang). As food is consumed, it will be automatically poured into the bowl under the influence of its weight.


Option three. Construction made from plastic bottles
Nowadays, water is often stored in cheap plastic containers. There are probably such bottles in every home and they can be used to build a convenient feeder.

Step 1. Cut the bottle in half and make holes in the bottom half as shown in the image. The size of each hole should be sufficient for the chicken head to fit freely into it (it is advisable to leave a small margin).
Step 2. Take the second bottle, cut out the bottom, then place the neck down inside the prepared cut. As a result, there should be a few centimeters between the neck and the bottom.

Step 3. Pour the grain inside and cover the hole in the top with something. The disadvantage of this design is that in case of bad weather it must be moved indoors, but for placement inside the poultry house this is the best option.
For chickens, you can make a similar design in smaller sizes using regular plastic bottles. The manufacturing technology will be the same.

Option four. Simple wooden feeder (No. 1)
If you don’t have a lot of chickens, and only pieces of wood from scrap materials, then you can make the feeder described below. The latter is great for cases where owners do not have the opportunity to periodically add grain (in other words, this is also a bunker feeder). It is not difficult to make such a design, the main thing is to strictly follow the instructions below.
First, prepare the following supplies and equipment:
- pieces of durable thick plywood or wood;
- electric drill, set of drills;
- a pair of loops;
- sandpaper;
- saw;
- screwdriver;
- pencil;
- roulette.
After this, proceed directly to production.

Step 1. Start by creating a drawing, then transfer it to the tree, drawing out the elements of the required sizes:
- bottom 29x17 centimeters;
- two “sides” 40 centimeters high with an upper edge of 24 and a lower edge of 29 centimeters;
- two rectangles for the front wall - 28x29 and 70x29 centimeters;
- top cover (26x29 centimeters);
- back wall (40x29 centimeters).
Step 2. Carefully cut out all the elements.
Step 3. Make holes for the screws in the required places using an electric drill.
Step 4. Sand all surfaces to ensure they are smooth and safe for birds.
Step 5. Using screws, assemble all the elements into a single structure. To achieve maximum density, you can use a clamp. It is also important that the back and front walls are attached at an angle of 15°.

Step 6. Use the hinges to attach the cover to the back of the side walls.
Step 7. It is also advisable to treat the feeder with an antiseptic. No paints or varnish should be used.

Note! The finished design will be spacious and convenient; food, protected from moisture, will be gradually supplied automatically. Apart from labor costs, no other shortcomings were noticed.
Option five. Simple wooden feeder (No. 2)

Another simple option is a feeder made in the form of a small trough. It is suitable for those who have a large number of chickens and have a shelter in case of precipitation.
To work you will need:
- thick boards or plywood;
- hammer;
- screws (you can use nails instead);
- saw;
- pencil;
- paper;
- ruler.

Step 1. First, make a drawing of the future structure. Determine as accurately as possible all elements, their dimensions and installation locations of fasteners. This is the most critical stage, which will help to avoid possible mistakes and inconsistencies.
- bottom (15x100 centimeters);
- a pair of side walls (8x100 centimeters);
- one beam (HxWxD - 2x3x100 centimeters);
- small end walls 15 centimeters wide and a height corresponding to the long side walls + the thickness of the bottom.
Sawing out the end walls is the most difficult step. For a better idea, we advise you to familiarize yourself with the image below.
Step 3. In accordance with the drawing, cut out each of the elements.
Note! The bottom should be thick and heavy enough to prevent birds from overturning the structure. The height of the walls should be comfortable for the chickens.
Step 4. Connect all the elements together. Try not to leave any gaps, as food can spill out through them. Additional wood processing is not required; moreover, if desired, this design can be modified to suit your own needs.
The advantages of such a feeder include durability and strength, as well as versatility regarding the type of food used (the latter can be either dry or wet). As for the disadvantages, there is only one - the feeder needs minimal care.


Option six. Two-story wooden feeder

The next option is intended primarily for dry food (although various mash can be used). Ideal for small rooms, as the second tier compensates for the lack of free space. For work you will need screws and bars.
Step 1. First, prepare all the elements of the feeder. The main one will be the lower tier, the height of which should be 25 and the width 26 centimeters. As for the length, it depends on the number of birds.
Step 2. Make special grooves into which the damper will be inserted.
Step 3. The second floor will be a small trough with a board height of 10 centimeters. Place the second floor on the ends of the first, then attach with hinges.
Option seven. PVC pipe construction
An easy-to-implement option that requires minimal expense and effort. PVC pipes are sold everywhere and are inexpensive. To make, use one of the methods below.
Method one. With cutouts

To build this structure, take care of the following consumables:
- a pair of PVC pipes (40 and 60 centimeters in length);
- two plugs;
- connecting elbow.
The 60 cm pipe will be installed horizontally and will serve to feed the pizzas. Another pipe is installed vertically and is necessary for feeding grain. Start by making a hole in a longer pipe, although instead they often make one large one, through which the birds will peck the grain.
Step 1. On a 60-centimeter pipe, draw holes with a diameter of 7 centimeters and with the same spacing.
Step 2. Cut out the drawn holes.


Step 3. Place a plug on one end of the pipe.
Step 4. Install an elbow on the other end, and, in turn, insert another pipe into it.
Step 5. Secure the resulting structure in the poultry house, preferably in two or three places at once, so that it holds well.

After each addition of grain, put a second cap on top to prevent debris from getting inside. The described design is also a bunker design, so feed can be added only once or twice a day.

Method two. With tee

In this case, for production you will need:
- PVC pipes selected by size (70, 20 and 10 centimeters);
- two plugs;
- tee with an angle of 45°.
Step 1. Take a 20cm pipe and put a plug on one end. This will be the bottom of the feeder.
Step 2. Place a tee on the other end of this pipe so that the side elbow is directed upward.

Step 3. Insert a small pipe into the side hole.
Step 4. Insert the longest length of pipe into the third hole of the tee. Here, as in the previous method, after each filling of feed the pipe must be closed with a plug.

There are other ways to make a bird feeder from PVC pipes, as experienced poultry farmers talk about in the video below.
Video - Feeder made of pipe
Option eight. Canister construction
A cheap and easy way to make a feeder.

For work, prepare:
- any plastic canister;
- a piece of pipe 10-15 centimeters in length;
- fasteners;
Step 1. Clean and dry the canister thoroughly.
Step 2. Using a knife or any other tool, cut about 5 holes on the sides. The diameter of the holes should be about 6-7 centimeters so that the head of the chickens can fit freely into them.
Step 3. Make a hole in the top for filling grain and attach a pipe on top (the diameters must match). This will prevent birds from getting inside.
To protect against rain and debris, you can additionally take care of the pipe cover.
Option nine. CD container design
Don't throw away your old CD container - you can still use it to feed your chickens!

In order to build such a structure, prepare:
- long container;
- large bowl;
Step 1. Clean and dry the container, then cut three or four 2x2 centimeter holes on its walls near the rim.
Step 2. Fill the container with food and cover the top with a bowl.
Step 3. Turn the container with the bowl over and place it in the desired location.
Note! Make sure that there are no sharp corners in the cut areas that could injure the chickens.
We also note that this design is not durable and is designed for a small number of birds.
Option ten. Automatic design
The video below shows another interesting option - a structure that opens under the weight of the chicken.
Video - Automatic feeder
This is not a complete list of possible options - the article describes only the most popular of them. By showing ingenuity and imagination, you can come up with your own design, the main thing is that the product is durable and safe for feathered pets.

Feed is one of the key factors in raising chickens. This is where most of the funds go. To properly distribute food and not lose it just like that, farmers build feeders. Of course, factory products differ in their performance, but with some skills, you can make feeders with your own hands that will be no worse than purchased ones. We’ll look at what you need for this in this article.
Materials
As you understand, feeding devices come in several types and differ in different parameters. The first thing that distinguishes products is the materials from which they are made.

The most popular tree among farmers. This natural material is great for dry food such as grain, feed and various minerals. But it is best to avoid raw food - it will remain on the material, which in the future will lead to rapid spoilage of food.

The chicken diet must include mash. For this type of food, plastic products are ideal - they are easy to clean, which significantly increases savings.

Hopper feeders are made of metal. Most often, these are arched products, where the back wall is “blank” and the front side is covered with a mesh.


Feeding method
How convenient it is for farmers to feed poultry depends on this factor - it is much easier to do it once a day than to constantly replenish the supply:
- Tray models perfectly serve as chicken feeders. Generally speaking, this is an ordinary container with sides that prevent food from spilling out. The elongated shape allows you to increase the number of birds feeding at a time.
- The groove model has a special spinner and a demarcation grid. There may also be partitions inside - convenient if several types of food are used at once.
- Automatic feeders, or bunkers, are very practical. You can pour dry food and grain into them. Standard size is the daily food requirement for chickens. At the bottom, the structure is equipped with a tray - when the bird eats, it is replenished without human intervention.

Nuances of feeders
The main task of the products is to use feed economically. To do this, first of all, various protective devices are installed, in the form of turntables, nets, sides and others. Otherwise, the bird will rake and throw food out of the feeder, which is in no way compatible with rational use.

Service is an equally important factor. Since containers get dirty quickly, they need to be washed and cleaned quite often. To avoid difficulties with this, it is necessary to use suitable materials and design.

The volume of the feeder should be equal to the required amount of food per day. At the same time, you also need to take into account the dimensions - so that all chickens have free access.

Options
We present to your attention some ideas for feeders that will turn out no worse than store-bought ones. They will be easy to use, which will significantly increase their value. At the same time, the food will not need to be replenished every time - it is enough to do it once a day.

The simplest product is considered to be a bottle hopper. To do this, you need to remove the bottom from a five-liter bottle so that 15-centimeter sides remain on it. We make a hole in it and fix it on plywood. The entire design can be slightly improved by adding one and a half liter and two-liter containers.

PVC pipes are also considered an excellent material for making feeders. For the horizontal option, you need to take a 150 mm pipe and put on the elbows on both sides - to fill the feed.

You need to make several windows in the sidewall through which the bird will feed. All that remains is to fix it on the wall. For the vertical version, we put on a tee with two elbows - but such a product is designed for a small number of chickens - take this nuance into account.

A homemade grass bunker is relatively easy to make, especially if you have the right tools. You need to select steel rods and weld and connect them using a welding machine. Then all that remains is to fix it on the wall. The proposed photos of chicken feeders will help you decide on the right one.

Photos of chicken feeders


Feeding chickens takes a lot of time, but this responsibility cannot be neglected. To simplify work in the chicken coop, different types of feeders were invented. Hopper feeders for chickens have a lot of positive qualities, they are really convenient and easy to use. The article will describe the characteristics of these feeders, their advantages, possible disadvantages, and also provide recommendations on how to make them with your own hands.
What is a bunker feeder?
The bunker feeder for feeding birds is a structure consisting of two parts.

- The bunker is the first element - a container into which grain is poured and where it is stored.
- The tray is the second element - a container into which the grain is poured and from which the chickens eat.
There is a hole in the top of the bunker into which food is poured; it is always closed with a lid of any type so that the birds do not try to climb inside.
Such feeders are made from different materials, they can be of different shapes, types, types. They are sold everywhere, but you can build such a feeder yourself, which will be discussed below.
Advantages of bunker feeders
Also check out these articles

Hopper feeders for chickens have many positive qualities.

- Purity. Due to the fact that the grain is in a separate, closed container, it is always clean and does not get dirty.
- The breeder can add bird food much less frequently once every 1-3 days. Some people even provide food for the birds a week in advance; this is very convenient if, for example, you need to be away for a long time and there is no one to look after the birds.
- The variety of shapes and sizes of structures allows you to choose the appropriate option in each individual case.
- It is not difficult to remove such feeders if you make them removable and not stationary.
Are there any disadvantages?

The main problem with a bunker feeder is the unlimited supply of feed. On the one hand, this makes life easier for the breeder, but on the other hand, it can lead to obesity in the bird. This is exactly what breeders fear and it is for this reason that they rarely purchase a bunker design for adult individuals. Indeed, a bird can overeat, especially if it is prone to obesity, so it is necessary to purchase such a feeder either for chickens or for breeds that are not prone to overeating.
It is also important to note that if the coop is damp, all the feed can be blocked and begin to rot right in the bunker. Such food is very harmful, so you need to wash such a dish regularly, check for odor inside and place it only in dry rooms.
Another problem associated with the regular presence of food in the chicken coop is mice and rats. They will enjoy unlimited access to food no less than chickens, so it is necessary to poison rodents from time to time.
How to choose a feeder in a store?

A lot of bunker types of chicken feeders are sold in stores. But how to choose a good design in each individual case?

How to make a bunker feeder with your own hands?
The popularity of bunker-type feeders for chickens has led to a rush on them from inventors. There are so many designs you can assemble with your own hands that you can’t see on the Internet! So, if you don’t have the money to buy such a thing, you can make it yourself from anything!

- The first option is a wide pipe (sewer), bent on one side at an angle of 90 degrees. You just need to attach it to the wall (5-6 pipes are placed nearby) with the curved side down. The food is poured from above and pours down, and due to the fact that the pipe is curved, it does not fall down, but remains in the pipe and the birds simply eat it.
- In an old plastic bucket, holes are made in the bottom area. Then take a not very deep container (for a tray) and place a bucket in it so that the holes made are at the bottom. Now you can use the design for its intended purpose. Grain is poured inside, the bucket is closed on top with a lid, and feed is poured into the tray as the chickens peck at it.
- Hopper feeders for chickens can also be made from wood or chipboard. It’s true that making such a feeder is much more difficult, but the design will be more reliable. Essentially, you need to build a box where the grain will be poured, make a hole at the bottom and attach a feeder (tray) made by yourself from the same wood to it. After that you can try it out.
- The simplest and most accessible design is made from plastic bottles: the bottom is cut off, placed in a bowl, several holes are made in the bottle so that the grain can spill out - that's all. But such a feeder is unreliable and can easily fall apart, so it is used only for feeding chickens.
If desired, you can use other materials and manufacturing methods, the main thing is that the main function of the feeder is respected - supplying food as you eat what is in the tray.
To effectively provide food for poultry, farmers use special feeders. Let's consider what feeders for chickens should be, their varieties, and also how to make various devices for feeding young animals and adults.
Basic requirements for chicken feeders
The following is required from chicken feeders:
- Provide chickens with food. They must contain a daily portion of food and provide each bird with quick access to food.
- Convenience and ease of maintenance. The feeder should be easy to fill with food, move, clean and wash.
- Ensure cleanliness and dryness. It is necessary to take closed devices so that precipitation and debris cannot get inside. It is optimal if the design does not allow birds to climb into it with their feet, scatter and dirty food.
- Safety. The feeder is made from bird-safe materials. There should be no sharp protrusions or protruding nails that could cause injury or places where the bird could get stuck.
- Sustainability. The structure must stand firmly or be securely fastened so that laying hens cannot knock it over.
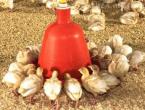
Did you know? Most chicken feeders sold are red or yellow. These colors attract babies well and help increase food intake. It should be noted that there should be a sharp contrast in color between the gender and color of the feeder and drinker.
Types of chicken feeders
Feeders are produced in different designs and using different raw materials.
Depending on the type of feed supplied
In different devices, feed may be supplied in a different way from others.
Bunker
Closed type, keeping the feed clean. Only dry food is poured into it. Its design features allow you to immediately place the daily dose of food into it - food will flow into the trays as the bird consumes it. 
Grooved
The tray of this design has a spinner or a removable grid-limiter. This feeder is equipped with several sections for food. 
Tray
It is a shallow container with sides that prevent food from scattering. Typically used to feed chickens.
Important! Such trays are installed at the rate of 10–15 cm for each laying hen and 5 cm for each chicken. The circular tray provides only 2.5 cm per head.
Depending on the material used
Feeders are divided according to the raw materials used for their production:
- Wooden. They are optimal for dry food and supplements.
- Metal. Good for moisture-rich foods.
- Plastic. They are used in the same way as iron devices.
- Made of mesh or thin rods. They are usually filled with herbal mass.
Depending on location
The feeder can be located in different places of the chicken coop and can be:
- Floor-standing. It is located directly on the floor of the chicken coop and must have good stability so that it does not fall over. At the same time, the bird has the opportunity to climb with its feet into the food and bring in garbage.
- Wall-mounted. Reliably attached to a wall or other stable structure (partitions, fences). The bird will not be able to climb into the hanging devices with its feet. Such feeders should be mounted at a level that is comfortable for food consumption.
- Hanging. They are attached at the height of the chickens' backs, and they are inaccessible for climbing.

How to make a chicken feeder with your own hands
You can buy an industrial product, or you can make it yourself. There are ways to make these devices even from waste material such as plastic bottles.
Bunker
This type of homemade feeder is made from PVC pipe.
For this you need to have:
- sewer PVC pipe of the required diameter and length to the height of the chicken coop - 1 pc.;
- tee for PVC pipes - 1 pc.;
- thick wire;
- measuring meter;
- marker;
- jigsaw
For this homemade device, take a PVC pipe of 7–6 cm for ordinary chickens, and 11 cm for broilers.
Did you know? Laying hens constantly need calcium in their bodies, since a lot of this element is spent on the formation of eggshells. They lay eggs only in the light.
When making it, you need to do the following:
- Cut off the PVC pipe with a jigsaw or grinder - you need a piece the size of the floor to the ceiling of the chicken coop minus 30 cm. Cut off the piece of pipe where there is no thread.
- At the top of the pipe, at a distance of about 20 cm from the cut, burn holes on the sides for the wire that will secure the pipe.
- Connect the bottom of the pipe with a thread to a tee.
- Secure the structure with wire to the hook. There should be 20 cm between the bottom of the device and the floor.
- The pipe is filled with food from above. It lingers in the bends of the tee, and when the birds eat away part of it, under its own weight the food again enters the tee.
Video: how to make a bunker feeder for chickens with your own hands
A simple option from a plastic bottle
Very little time and budget will be spent on a feeder for young animals from a 5 liter plastic bottle.
To do this you need to stock up on the following:
- 5 l plastic bottle - 1 pc.;
- a piece of wire;
- liter glass jar with a lid - 1 pc.;
- scissors or knife;
- marker.
Did you know? In Ancient Rus', chickens appeared aroundIV century BC. They were brought by traders from Greece.
During the manufacturing process you need to perform the following steps:
- Cut off the top of the bottle where the narrowing begins, but not all the way - leave 5 cm of plastic.
- Mark with a marker and cut holes with a diameter of 3 cm at a distance of 2 cm from each other in the bottom of the bottle. A chicken's head will easily fit into such holes, but its body will not be able to squeeze through. It is necessary that the holes are smooth, without sharp edges.
- To prevent the chickens from knocking over the feeder, you need to place a liter jar of water or sand inside it. If the bottom is uneven, then first you need to pour 1 cm of food into a plastic bottle for a more stable position of the weight jar.
- Make holes in the lid at the edge, and under it, on the wall of the container. They should be opposite the uncut part. Thread a wire through them to close the lid.
- Pour food up to the holes, close the bottle with a lid and secure with wire.
Video: DIY chicken feeder made from a plastic bottle
Tray type made of wood
You can make a wooden device in the shape of a tray.
To do this you need to have the following:
- a wooden board with a smooth surface 12–15 cm wide and 1 m long for the bottom of the tray;
- 2 narrow long boards of wood with a smooth surface, no more than 5 cm wide and 1 m long - for the sides along the feeder;
- 2 small wooden planks for the cross sides, 15–20 cm in height (the width must exactly match the width of the product);
- a narrow smooth board 3–4 cm wide and length corresponding to the size of the tray. It will be used as a handle for moving and will serve as a barrier for chickens when they try to climb into the feeder with their paws;
- metal nails and screws - 20–30 pcs.;
- sandpaper - at least 20 cm;
- marker;
- 1 m ruler for measurements;
- hammer;
- plane;
- saw.
Important! Any feed equipment must be carefully looked after. Routine cleaning should be carried out regularly. Remains of wet food (mash) should be removed in a timely manner so that the food does not become acidic. Feeders are washed as needed, as it depends on the type of food.
Manufacturing instructions:
- Process the boards with a planer until a smooth surface is obtained.
- Take the necessary measurements with a ruler and mark the corresponding dimensions on the boards. Using a saw, cut out the necessary parts.
- Use a pencil to outline paired parts - numbers 1, 2 are applied.
- Attach the end sides to the bottom with nails and screws, positioning them so that they are 2 cm below the bottom level. Such small protrusions will be the legs of the product.
- Then grout using sandpaper. Then use it to remove burrs on the board intended for transfer.
- Place the handle along the product along the transverse sides, and then secure it with nails (screws).
- If you plan to use the feeder also for wet mash, it is filled with water and allowed to swell for 6–7 days. The swollen wooden surface will smooth out all the gaps in the joints, and the product will not leak.
Video: DIY wooden tray feeder for chickens
Automatic
It involves the spontaneous pouring of food into the food container from the storage container. You can find many different models of such devices, but the most popular is the automatic feeder made of wood, equipped with a pedal.
It requires the following:
- wooden boards;
- sheets of compacted plywood;
- small blocks of wood;
- nails, bolts, screws;
- loops - 2 pcs.;
- pattern paper;
- electric drill;
- drill;
- sandpaper;
- saw (hand);
- marker;
- roulette.
The dimensions of the product depend on the number of birds, the size and design of the chicken coop itself.
Important!Each workpiece should be sanded down with sandpaper to avoid any unevenness that could cause injury to birds. You cannot apply varnishes and paints so as not to harm the health of the chickens.
Manufacturing of standard model:
- Draw and cut out 10 blanks for the feeder. Cover for the tray (26x29 cm), 2 panels on the sides (height 40 cm, top edge 26 cm, bottom edge 29 cm), on which triangles are cut out so that the bottom is wider and protrudes slightly, rectangular bottom 29x17 cm, detail walls at the back (41x29 cm), 2 rectangular parts for the wall at the front (28x29 cm and 7x29 cm), a lid for closing on top and a pedal according to the parameters.
- Cut the wooden beams into six pieces. The 2 beams to which the pedal will be fixed will be longer in width of the box and pedal. Cut the other 2 medium bars to the size of the lid on top of the tray. The third pair is needed to connect the lifting mechanical device.
- Use a saw to cut the plywood blanks according to the patterns.
- Connect all sides with screws. It should be noted that the rear part should be placed at an angle of 15° so that the feed does not stagnate in the corner, but passes freely further. To ensure a better fit, a clamp is used.
- Secure the lid on top. This requires 2 loops.
- The pedal and bars should be assembled. Medium-sized ones are attached on the sides to the lid. Two holes are drilled at the other end of the bars. The size of one of them must be slightly larger than the diameter of the bolt, and also be located closer to the end of the bar. It should correspond to a hole in the side wall of the structure. It is necessary to embed the bolt so that the block can move in the plane of the wall.
- In the same way, fix the longest block to the pedal of the structure. The hole that will connect the block to the wall should be placed at 1/5 of the total length of the block. The second hole must be drilled closer to the end of the block.
- Attach short bars to the two free holes located on each side. This fastening must be rigid for the pedal to function, that is, you need to press the pedal and check that the lid on top opens. If this does not happen, the bolt tension should be adjusted.
- Treat the resulting structure with antiseptics.
Video: how to make an automatic chicken feeder with your own hands
Installing feeders in the chicken coop
These devices should be installed at the rate of 1 piece per 20 heads. It is advisable that access is only for the head. The structure is installed securely so that chickens cannot turn it over and do not paddle in it with their paws, as this will contribute to food contamination and the occurrence of infections. They should be located so that the impact of the external environment is minimal, that is, indoors or under a canopy.
Usually in a chicken coop, feed containers are placed closer to the door so that the chickens have an important reason to return home from free range. When installed, the edges of the feeders should be at the level of the bird's back. The feeding front for chickens is about 15 cm.
During the period of disinfection of the chicken coop, which is carried out 2 times a year, the feeders and drinking bowls must be treated with disinfectants. Experts recommend performing a general cleaning of poultry feeding and watering equipment with detergents at least once a month.
Basic feeding rules
- Chicken feed should contain enough calcium. To do this, food includes mineral supplements (shells, chalk, meat and bone meal) and fermented milk products (whey, cottage cheese, kefir).
- Chickens should consume three types of food - dry, wet, combined.
- During the cold period and during molting, nutrition should be enhanced with vitamin and mineral supplements and sprouted grains should be given.
- Laying hens are fed 3-4 times a day.
- The main diet of poultry consists of grain crops (at least 60%). These are wheat, corn, millet, buckwheat and others. The rest of the diet consists of vegetables, green herbs, vitamin and mineral supplements.
- Follow feeding hygiene rules.
- The most convenient in terms of caring for chickens is commercial feed, but it is also the most expensive.
 So, you can make a feeder for hens or chicks yourself. Many DIY projects do not require any special skills. By choosing the required type of feeder, you can achieve economical food consumption according to all standards and provide food to the inhabitants of the chicken coop in a timely manner.