What can be made from a glossy magazine. Crafts from newspaper tubes: interesting ideas, weaving options and step-by-step instructions for creating crafts (85 photos). Wallpaper from newspapers
Today I would like to talk about how wonderful crafts can be made from old newspapers, or rather, I will share the works of the author Denise Fiedler from America. Her paper crafts are so simple and interesting, and even doable for children. Now, let's look at the technique of performing them.

Crafts from paper and newspapers
The wonderful craftsman Denise Fiedler has made a successful career as an interior designer, without stopping there, she creates for the soul and successfully sells them. With a special love for old printed books and newspapers, their intricate fonts and yellowed pages, in the age of electronic publishing, she found a way to give old books new life. From their colorful pages, she created a series of unusual and very sincere works dedicated to pets.

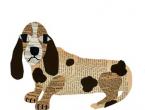
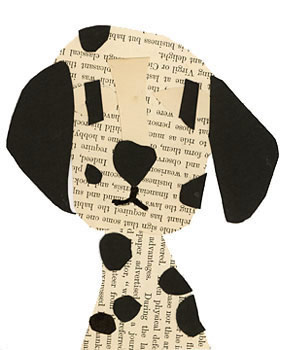
Just look at how wonderful a paper dog can be made using the applique technique. And it’s not at all difficult to create!

The author uses scraps of old newspapers and pieces of colored paper to make his works. Carefully cutting out every detail and putting the composition together, she gets beautiful portraits of dogs and cats. each of which has its own character and mood.

In addition, such original crafts can be an excellent reason to get the whole family together and spend an interesting evening in a warm, homely atmosphere, creating a portrait of your pet.
The technique is considered quite simple and can be performed even by small children. How exciting and exciting can this process be?!

Just look at this playful and smiling Jack Russell Terrier, such a mischievous paper dog can be an excellent decoration for a child’s room.

And what a charming and charismatic pug he turns out to be, it seems that he is about to jump out and start licking everyone!

What if there is another furry friend at home? A cat can also become a heroine for creating crafts or paper applications. A little effort and patience, and the Siamese cat portrait is ready!

Just look at how important and serious the character from newspaper pages and old certificates is looking at you!

And it doesn’t matter if at home you have an ordinary tricolor kitten picked up on the street. The limitless possibilities of such a multifaceted material as paper will allow you to accurately reflect the color of your pet and its mischievous character.

You can make a huge number of crafts.
And if the house is filled with newspapers and/or magazines, then even better, because... you will also save on paper.
You can make very beautiful products from this material.
Here is just a small part of what can be made from newspapers and magazines.
Works from newspapers: wall clocks
You can make this decoration without using a clock mechanism - you will get a beautiful decoration for your home, reminiscent of the sun.
You will need:
Approximately 24 sheets of newspaper or magazine
Pencil or pen (to make it easier to twist the tubes)
Scissors
Long needle
Two plastic discs (like those that protect a large package of CDs)
* discs can be replaced with colored cardboard of any color.
Cardboard in the shape of a circle with a hole in the middle (optional)
Battery operated clock mechanism (optional)


DIY newspaper crafts: project "Butterfly"

You will need:
Newspaper or junk magazine
Butterfly stencil
Double-sided foam tape
Matte cardboard
* You can make butterflies in several sizes and shapes.
* If you want to make a butterfly of the same shape and size, you can use one stencil or buy a shaped hole punch.


1. Prepare a stencil.
2. Using a stencil, draw butterflies on different sheets of magazine or newspaper. You can draw a butterfly on one sheet, fold several sheets together and cut out several butterflies at once.

3. Cut out the butterflies.
* Each sheet can be cut into wide strips that can be folded together, draw 2-3 butterflies of different sizes on one strip and cut out several at once.
4. As you cut out the paper butterflies, fold them carefully on a flat surface. You can arrange them depending on the color scheme and/or size (shape).

5. Attach double-sided foam tape to each butterfly. You can bend the wings of the butterflies a little. Also try making several layers of double tape so that the butterflies "fly" at different levels.
6. Prepare matte cardboard. For convenience, you can use a pencil to mark the places where you will glue your paper butterflies.

* Choose a suitable background for your composition.
7. Insert the cardboard into the frame. You can remove the glass from the frame if it is in the way.


Bracelet made from newspapers (master class)

You will need:
Newspapers or magazines
Scissors
1. Cut out rectangles measuring 10cm x 4cm.

2. Bend each rectangle in half its length and straighten it.

3. Bend the ends to the fold line on the left and right.
4. Fold in half again to create a long, thin strip.

5. Fold the strip in half its width and unbend it.

6. Fold the left and right halves in half so that they meet at the fold line.

7. Fold the shape in half again to form a V shape.

* In a similar way, you need to fold several rectangles.
8. To start folding the bracelet, you need to connect all the parts. Start placing the ears of one figure into the ears of another until you have 27 links in the chain. A total of 3 chains are needed.

9. Connect the chains using several blanks (V shape).

How to make a paper chain:
Crafts from newspapers for beginners: vase and stand from newspapers

You will need:
Glue or glue stick
Scissors
Newspapers or magazines
1. Cut each sheet of newsprint or magazine paper into 4 vertical strips as shown in the image. Choose the length of the strips yourself.

2. Fold each strip in half, securing it inside with glue.

3. Now fold the strips in half again and secure with glue again.

4. Start twisting the strips. This needs to be done tightly. After several movements, apply a drop of glue.

5. In order to make the base of the vase, you need to twist both several small spirals and one large one. In this example, the second option (large spiral) is used.

Glue several strips together to get one long strip, which you then need to twist into a large spiral. If your base isn't big enough, just glue as many strips to it as you need and add them to the spiral.

6. Start gluing all the small spirals together, thereby assembling the vase.
* You can make a stand for a cup or teapot in the same way.


We decorate a suitcase with newspapers and magazines

You will need:
Old suitcase
Brush
Magazines
PVA glue, or even better decoupage glue
Scissors or utility knife

1. Cut out the images you like from your favorite magazines, which will then decorate your suitcase.
2. Apply glue to the suitcase and begin carefully placing magazine excerpts on it.
3. Apply glue again on top of the glued pages.
4. Decorate the entire suitcase in this way.
5. Using scissors or a utility knife, carefully cut off the excess pieces so that everything is even.
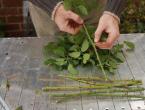
Product made from newspapers: bouquet of roses

You will need:
Scissors
Glue gun with hot glue (you can try superglue/Moment glue)
Flower wire

1. Cut a circle with a diameter of approximately 10 cm from a sheet of newspaper.
2. Cut a spiral from the circle, approximately 2.5-3 cm wide.

3. From the outer end of the spiral, start twisting the paper until you reach the center part.

4. Let the twisted flower “bloom” a little - lower the spiral.

5. Secure the flower with hot glue.

6. Prepare the floral wire, bend one of the ends and glue it to the flower. The end of the wire can be covered with a piece of newspaper.


7. Make several flowers to make a lush bouquet.
8. Combine all the flowers into a bouquet and secure the stems with wire. If the stems are too long, you can shorten them with scissors.

9. Wrap a beautiful ribbon around the stems and secure the ribbon with glue.

You can make many items from newspaper tubes: vases, flower pots, baskets, boxes, handbags, and even pieces of furniture.
Working with this material is not difficult; the newspaper tubes themselves are convenient for work. They are flexible, so they don't break. They are easily connected to each other, and to give a beautiful appearance, you need to paint them.

You can paint the tubes in advance. To do this, dilute the paint with water, place the tubes halfway, then turn them over to the other side. Stain paint is suitable for wood, there are many types of shades. When the tubes are dry, you can start working. You can paint after assembling the work, using different brush sizes.

DIY crafts from tubes
This type of creativity has become very popular. It does not require any material costs, old newspapers and magazines are in every home, they are always thrown away, and instead you can create real masterpieces.

Before work, you should stock up on enough of them. In addition to newspapers and magazines, you can take old notebooks or thin A4 sheets of poor quality.


Making straws
To create the tubes, each page of newspaper is cut lengthwise into four equal parts. You should prepare a long knitting needle in advance and place it at an angle to the tip of the newspaper. Holding the free tip, wrap the newspaper around the knitting needle, after twisting, remove it from the tube, and glue the tip with glue. When working, hold it well and wind it tightly so that the tubes do not unwind.

It will be more convenient to work if you make tubes in which the ends of different diameters will make it easy to insert one tube into another.

On the Internet there are many photos of fakes made from straws, such as baskets, cups, pieces of furniture, fruits, and animals, which you can use to learn from.

To make your work aesthetically pleasing, you need to train.

For beginners, you can start working with tube crafts by weaving round boxes or baskets.


Cart, step by step instructions
You need to start from the foundation. Glue together four pairs of pre-prepared long tubes in the shape of a web.

We begin weaving, to fix it, we glue the ends of the first tube together. When making the bottom, every two stakes, we glue the ends of the tubes together for strength. For the first time, you can simplify the work by cutting out the bottom from cardboard and gluing the tubes onto it.

When starting to weave the side walls, place a vessel inside that matches the diameter of the basket, this will make the work easier. When the basket has reached the desired height, bend the ends to form a beautiful rim.

The manufacturing process takes place using the method of horizontal weaving into vertical tubes that extend from the base.

Vase
An easy to make flower vase that requires a cardboard base from a roll of paper towels to shape the vase.

Manufacturing:
Prepare a sufficient number of newspaper tubes. Apply PVA glue to the cardboard base and glue the tubes vertically, taking into account that the tubes should be longer and completely cover the cardboard.


Cut the top straight, or give it another original shape. When the glue is completely dry, apply varnish using a brush.

When your work skills are more refined, you can begin making crafts of irregular shapes. You can even make pieces of furniture. To make them durable, they are varnished.

Master class on crafts made from tubes “Chair”
Prepare:
- Plastic chair for support.
- Cardboard.
- Tubes from newspaper.
- Glue.


Weaving pattern:
Place the cardboard under the chair, cut it to the desired size, this will serve as the bottom of the future chair. Glue the tubes onto the cardboard base quite tightly, and at the bend at a slight angle.

Raise the tubes to the top. Secure the support with several tubes, and hide their ends in the middle. For work, clothespins and threads are used as additional means.


When you finish the fourth row, you can use two tubes at a time. Accordingly, the bottom and stand of the high chair are ready. Next we weave the seat, using only one tube.

The back of the chair weaves on the left side, gradually narrowing towards the top. Excess ends are cut off and hidden in the middle. You can attach armrests to the chair. Be sure to varnish to ensure the strength of the chair.

Having honed your skills and learned to handle this type of material well, you can create unusual and original things.


Photos of crafts made from newspaper tubes


Surely, many of us have old magazines that have already been read and re-read more than once, but we don’t dare throw them away. Almost everyone subscribes to newspapers, which then turn into huge piles of waste paper.
And, of course, we all dig free flyers out of our mailboxes. Don’t rush to get rid of this “wealth”: you will still need it. Look at what unusual and, most importantly, beautiful decor you can make from unwanted newspapers and magazines with your own hands. These cheerful and fun DIY magazine crafts are sure to brighten up your home. Let's figure out what you can make from magazines with your own hands.


What is needed for this?
What is attractive about this method of decoration? Firstly, it’s easy to implement: you don’t need any special skills, just give in to your imagination. Secondly, it does not take up much space or time. Thirdly, you can involve the whole family in such a fun handicraft and have a fun and exciting time. So, here's what you'll definitely need:
Scissors;
PVA glue and glue stick;
Ruler, pencil;
A thin bamboo stick or knitting needle (we will wind paper tubes on it);
The surface you are going to decorate.
You've probably noticed that the decor from old newspapers and magazines is based on the use of identical blanks - newspaper and magazine tubes and strips rolled up like a snail. By varying them in size and color, you can create interesting compositions and transform ordinary or already boring things - photo frames, mirrors, wall clocks, vases, floor lamps, candlesticks and all kinds of boxes for storing a thousand and one little things. In this original way you can decorate gift wrapping or make a wall panel. So, let's learn how to make these blanks.
Newspaper and magazine tubes
1. Take a sheet of paper and fold it in half, smooth the folded area well with scissors.
2. Place a bamboo stick or knitting needle diagonally (the size of your future workpiece depends on its diameter) and begin to carefully and tightly wind the tube. After several layers, coat the remaining sheet with glue. It should not be too liquid (it is better to use a glue stick). After you get a tube of the diameter you need, carefully remove the stick.
3. Done! Now all that remains is to dry it and create masterpieces .


You can use these newspaper tubes in their original rounded form. Cut them into pieces of the length you need and glue them end to end. Don't skimp on the glue, they should stick well. If you don't want to get your hands dirty, you can use double-sided tape.
On a note: In order to secure the magazine tubes in a “herringbone” pattern, it is not at all necessary to cut them, you can simply bend them carefully, as shown in the photo.

“Flattened” tubes look no less beautiful. If you “flatten” them a little, you get a very interesting shape that it’s simply a shame not to play with (see photo). In this case, you cut short pieces and glue them where the cut is. .


It will be effective if you squeeze these tubes tightly and cut the resulting strips into small pieces. There is no need to glue them end to end (see photo).


Newspaper and magazine snails
1. Take a sheet 8 times wider than the intended strip. Fold it in half the same way, then bend the edges towards the middle and fold it in half again. Smooth each fold well so that your stripe is as thin and neat as possible.
2. Now we twist the “snail”. To do this, start winding the strip on a bamboo stick or knitting needle (you can also take a pencil or felt-tip pen, then you will get magazine “rings”). Don’t forget to coat the inside of the strip with glue so that the “snail” does not spread.
3. After you have received the workpiece of the required size, cut off the rest of the strip and let the “snail” dry .


Both blanks of the same size or color, as well as different ones, look beautiful in the decor. Turn on your imagination! By the way, the strips do not have to be twisted; they can be used just like that, wound in a spiral onto a cylindrical surface, for example, a vase, round box or candlestick. If desired, the finished composition can be painted or coated with a layer of varnish. And a few more words about the background. It can be just a white surface or a surface covered with magazine or newspaper pages.


Unusual panel made from magazine strips
And finally, another very interesting and simple DIY panel idea. In this case, there is no need to twist the tubes or snails, just cut thin strips (you can use both color pages and black and white). You will need a frame with a mat, preferably under glass, and two sheets of cardboard. On white cardboard the size of your frame, glue magazine strips at a short distance from each other. From the second sheet (it’s better to take cardboard with an interesting texture) create a stencil. Now place the stencil on the striped background, secure it and under the frame. If it allows, it is better to place a sealant between the sheets of cardboard, then the picture will turn out three-dimensional .


It is unlikely that anyone will be left indifferent to homemade interior items decorated in such a simple but very effective way. In addition, this is a great opportunity for creative self-expression and relaxation. Create beauty with your own hands with pleasure!
Sourcesphoto: www.craftstylish.com, papercreative.ru, biovi.ru, stranamasterov.ru.
Newspaper tube weaving is based on traditional wicker weaving. Currently, it has gained great popularity, because this material is always at hand, and using your imagination, you can create beautiful crafts from newspaper tubes. Master classes on creating crafts for beginners will help with this. Once your hand is “stuffed,” you can begin to create more complex products.
Clean printing paper is better suited for weaving. It is soft and colors evenly. If it is not possible to find such paper, then you can use sheets of ordinary newspapers to create original crafts from newspaper tubes. You can work with office paper, but it is quite thick, and this is inconvenient.
Basket
- newspaper or magazine sheets;
- cardboard;
- knitting needle or wooden skewer;
- PVA glue;
- scissors;
- ruler;
- brush;
- pencil.
Cut the newspaper into squares measuring 10 by 10 centimeters (longer tubes will require larger squares).

Place the knitting needle on the corner of the sheet and wrap the paper tightly around it. Remove the knitting needle. To prevent the tube from unwinding, coat the edge of the newspaper with glue before twisting. Carry out this operation with all sheets of newspaper.

Cut 2 identical circles from cardboard for the base of the basket. The volume of the future craft depends on the diameter of the circles.

Glue 8 newspaper sticks onto one cardboard circle as shown in the photo.

Glue the second circle on top. This workpiece should be placed under a press for 10-20 minutes.


After this comes the most important stage - weaving. You need to lift one tube from the workpiece vertically and glue the tube to it horizontally, as shown in the photo.

This tube must be led behind the nearby frame vine so that it goes around it from the outside, and the next tube from the inside. If the vine with which we are braiding ends, then we take another tube and, as it were, screw it into the edge of the last vine, and continue to weave.

Covering the frame tubes from the outside and then from the inside, weave all the rows until you get the desired height of the basket.

When the last row is made, cut the vine tube at an angle, coat its edge with glue and bring it inside the basket as far as it will go. Also cut the frame tubes, coat them with glue and tuck them inside the craft.

To make a handle you need to weave 2 tubes together. To prevent them from unraveling, it is better to glue them together. Place the edges of the handle inside the basket and secure with glue.

If desired, the finished basket made from newspaper tubes can be painted and decorated with decorative flowers, beads, and decoupage.
Hat
Required materials and tools:
- newspapers;
- scissors;
- glue;
- Bowl.
Make 10 long tubes from newspaper (you can see how to make them in the previous master class).

Fold 8 tubes crosswise, as in the photo.

Connect the remaining 2 tubes and place them behind a horizontal stack.

Weaving is carried out using 2 tubes at once using the “rope” technique. Place one tube under the base of the hat, the other on top, and cross each other. Do this with all ends of the base cross.

Weave the second circle using the same technique.

On the third circle, braid each base vine with a “rope”, separating them from each other.

To make the hat even and neat, we apply the weave to the convex bottom of the bowl and use it as a mold.

For convenience, we secure the vines with clothespins to the edges of the bowl. This way they won't get confused and interfere.

Continue weaving until the hat has sufficient depth.

Remove the bowl and begin weaving the brim of the hat.

Cut the vine used for weaving and bring its edges inside the craft.

Take a new tube and thread it through the loops near the base vines, as shown in the photo.

Do this with each base vine, inserting new tubes into the loops next to it.

To weave the fields, you will need one vine, which will braid each tube using the “rope” technique.


Weave until the brim is wide enough.

After this, bring all the remaining base vines inside the craft and tuck it into the cells.

Trim unnecessary ends with scissors or wire cutters.

You can decorate the hat with acrylic paints, artificial flowers, and ribbons.


Fungus
Required materials and tools:
- newspapers;
- wire;
- scissors;
- glue;
- Bowl.

For the base you need 8 newspaper tubes. In order for the fungus to keep its shape well, thin wire is inserted into the tubes. Make a square-shaped base from them, as shown in the photo.
To make the base for the fungus neat and convex, you need to place it on a small bowl. Continue to braid the vines, but now keeping to the bowl shape.
Once the mushroom cap is ready, remove the bowl. Bend the tubes so that you get a leg.
Braid the inside of the mushroom and go out onto the stem, as shown in the photo. At this stage, the leg should be slightly widened so that it does not turn out straight.
The wire at the base of the tubes will not allow the craft to unravel, so the edges of the tubes can simply be wrapped inside the fungus.
To decorate the fungus, you need to paint its stem with white paint and its cap with brown. Afterwards, the entire craft needs to be coated with colorless varnish.
Panel
DIY crafts from newspaper tubes are a great way to decorate your interior. An exclusive option is a panel.
Required materials and tools:
- newspaper sheets;
- PVA glue;
- glue brush;
- a knitting needle or skewer made of wood;
- acrylic or food paints;
- stationery erasers;
- scissors;
- strong threads;
- needle.
Progress:

Lapti
You can make souvenir bast shoes from newspaper tubes, which are considered a family amulet, a symbol of longevity and health.
Required materials and tools:
- sheets of newspapers or magazines;
- PVA glue;
- glue brush;
- a knitting needle or skewer made of wood;
- acrylic or food paints;
- stationery knife;
- scissors;
- linen thread.
Progress:
- Lay the sheets of newspaper crosswise with the long side, bend them in half and cut them with a utility knife.
- Wind the resulting sheet onto a pencil diagonally from the right corner so that one edge is slightly wider than the other. Apply a small amount of glue to the edge of the sheet to prevent the tube from unwinding.

- Insert three tubes into each other, fixing them with glue. You need 5 of these long tubes.

- Place the tubes according to the photo and start weaving, taking into account that you are planning a right or left product.

- At the end of weaving, thread the end of the tube using a knitting needle along the entire length of the sole.
- After the bast shoes are ready, you can paint them with water-based Oak stain, and then apply white acrylic paint. The paint is applied with a semi-dry brush in random strokes, creating the effect of antiquity.

- When the paint is completely dry, coat the product with a primer. To do this, you need to mix PVA glue with water in a ratio of 3 to 2. This will make the bast shoes strong.
- To decorate bast shoes, just use linen thread and wrap it around the edges of the bast shoes, creating an antique effect.


Frame
Another way to use newspaper tubes is to make crafts and decorations from the twisted spirals, such as creating an original photo frame.
Required materials and tools:

- sheets of newspapers or magazines;
- PVA glue;
- brush;
- a knitting needle or skewer made of wood;
- acrylic paints;
- scissors;
- white sheet of paper;
- cardboard.
Progress:

Tree
An original way to use newspaper tubes is to create an unusual interior tree.
Required materials and tools:
- sheets of newspapers or magazines;
- PVA glue;
- brush;
- a knitting needle or skewer made of wood;
- acrylic or gouache paints;
- scissors;
Progress:
- Prepare the tubes.

- Fasten 13-15 tubes together, wrapping them with thread and a strip of paper coated with glue. Thus, a tree trunk is formed.

- Using the next tube coated with glue, wrap the formed trunk in a spiral to the required height. If the tube runs out, insert the next one into it and continue weaving.

- Divide the trunk into 2 unequal parts, forming branches. Wrap each branch with a tube coated with glue.


- Separate the branches again and wrap them. Continue dividing until there is 1 tube left in each branch.

- Trim the last branches to the desired length and form curls.

- Wrap the lower part of the trunk with another layer of tubes, slightly thickening it.

- Cover the finished wood with a mixture of PVA glue and gouache.

- After the glue has dried, coat the product with varnish and decorate.

Box
Required materials and tools:

- sheets of newspapers or magazines;
- PVA glue;
- felt-tip pen;
- a knitting needle or skewer made of wood;
- scissors;
- dye.
Progress:
- Prepare tubes and a box of a suitable shape, which will be braided during the work.


- To begin, form the frame of the future product. To do this, mark the places where the main tubes pass at the bottom of the box, taking into account that the more often they are located, the denser and stronger the weaving will be. There should also be base tubes at the corners of the box.
- Glue the tubes according to the markings.

- Start weaving the walls of the box. To do this, glue an additional tube to the base tube, which will be used for weaving. Braid the base tubes in the classic way: the first outside, the second inside, the third outside, and so on.

- In this way, braid the box completely. If the working tube runs out, it is “extended” by inserting an additional one into it, smearing the edge with a small amount of glue.


- When finished, cut the edge of the working tube at an angle of 45 degrees and hide it inside the product. Also cut the main tubes and bring them inside, fix them with a small amount of glue.

- Paint the finished box with acrylic or water-based spray paints.

- After the paint has completely dried, decorate the product using satin ribbons, artificial flowers and beads.
Egg
Required materials and tools:
- sheets of newspapers or magazines;
- PVA glue;
- a knitting needle or skewer made of wood;
- scissors;
- dye.
Progress:
- Prepare tubes from newspapers.
- Place three tubes crosswise, fixing the intersection with a drop of glue.

- At the intersection, glue the fourth tube and begin weaving. Bend one tube over 2 others, take the next one and bend it over the other two, then the next one, and so on.


Cup
Required materials and tools:
- sheets of newspapers or magazines;
- PVA glue;
- a knitting needle or skewer made of wood;
- scissors;
- dye.
Progress:

Flowers
Required materials and tools:
- sheets of newspapers or magazines;
- PVA glue;
- a knitting needle or skewer made of wood;
- wire;
- wrapping;
- scissors;
- dye.
Progress:
- Prepare tubes from newspapers, paint them yellow, green and brown, wait until completely dry.

- Insert a wire into 3 short yellow tubes and twist a wooden skewer one by one, forming spirals. These will be the pistils of the flower.

- Take 2 more yellow tubes. Bend one of them in half, and wrap the second in a loop around the first and begin to braid without tightening. This will be the first petal. Also weave 2 more yellow and 3 brown petals.


- Make leaves from green tubes in the same way, only with a sharper bend.


- When all the preparations are ready, collect the flower. Fasten the pestles together with wire. Around the pistil, attach a second layer of brown petals, and then yellow ones. Using a wire, attach a stem of 3 green tubes to the flower head.


- Wrap the stem with wire for strength. Attach a leaf while wrapping.


- To hide the attachment points and wire, wrap the stem with wrapping paper.

- The flower is ready; if desired, it can be varnished.

Heart
Required materials and tools
- sheets of newspapers or magazines;
- glue Moment;
- a knitting needle or skewer made of wood;
- wire;
- scissors;
- dye.
Progress: