Is it possible to get a seedling from a rose flower? How to grow a rose from a cutting from a bouquet at home? Steps for rooting in a pot
Don't rush to throw it away. Few people know, but flowers can be given a second life. You don't need any supernatural knowledge to do this. We will study a few tips and answer the main question: how to grow a rose from a cut flower.
First difficulties
Don't think you can do it easily the first time. As soon as you want to grow a rose using this method, you may encounter the following problems:
- If you have flowers of foreign origin, there will be problems with rooting. This happens due to the fact that they are treated with various chemicals.
- Even if you have Russian roses, be prepared that the buds will be small. And also such plants are not resistant to severe frosts.
But don't despair. If you follow our recommendations, you will quickly learn how to grow a rose from a cut flower.
Basic Rules
To achieve your goal, we suggest using the following tips:
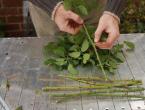
Tip 1. When the bouquet has matured, prepare cuttings that are cut from the stems. The height of each of them should not exceed 20 cm. This will help them not to dry out.
Important! Each cutting should have 2-3 live buds.
Tip 2. If there are any leaves left on the cuttings, cut them off immediately. Make one cut each on the top and bottom of the kidney. To do this, prepare a sharp knife.
Tip 3. For a day, place the cuttings in a solution that promotes rapid rooting. This drug can be purchased in a special store.
Tip 4. Buy the right soil. Special soil for roses is suitable for this. It contains all the necessary components and trace elements. Place all the soil in boxes or pots.
Tip 5. You can plant cuttings no earlier than after 2 months.
Tip 6. Cover all seedlings with plastic bottles. They will help maintain a constant temperature, which should be between 20-25 degrees.
Tip 7. The soil in pots should always be moist. Spray the cuttings with water 5-6 times a day.
Tip 8. During the cold season, do not keep plants on the balcony.
By following our rules, you can easily get the answer to the question of how to grow a rose from a cut flower. The photo will show in more detail the cuttings that will make a real miracle.

Original ways
If you are seriously interested in the question of how to grow a bush rose from a cut flower, then you will be interested in the following method. We invite you to read in detail:
- Prepare the cuttings and insert each into one potato.
- Make a garden bed on your property. To do this, dig a small trench.
- Choose a place that is sunny and inaccessible to winds.
- Add sand to the trench. Now sort the young shoots. Choose only those copies that are the size of a pencil. The shoots must be even.
- Now we plant them in the prepared bed and cover them with soil.
- During this time, sprouts may have formed on the potatoes; we urge you to cut them off.
If you still doubt whether it is possible to grow a rose from a cut flower, then our answer will be obvious. Of course, you can, the main thing is desire and compliance with all the rules.

Cautions
Now that you have decided to take a closer look at the question of how to grow a rose from a cut flower, then be prepared for the following:
- if you have been growing cuttings at home all this time, then in the first spring the plant must be transferred to open ground; even a large container will be cramped, since the plant has large roots;
- always remember that this flower is the most capricious of all representatives of the flora, so provide it with proper care.
You can plant cuttings in open ground in the summer. June is best for this. They are planted in the ground, which must be fertilized with peat and humus. Cover the cuttings with a glass jar. If fresh green leaves appear on them, this indicates that the plant has taken root successfully. Continue to constantly loosen the soil, remove weeds and water as necessary.

We answered your main question: “How to grow a rose from a cut flower?” The rest is up to you. Follow the instructions exactly and you will definitely succeed.
There are several ways to grow roses on your property, and one of them is to root cuttings from a bouquet. No matter how beautiful the flowers given are, they will soon wither in a vase, so why not recreate this beauty in your garden? The process of growing from cuttings cannot be called simple, and not everyone succeeds the first time, but it’s still worth a try. To avoid mistakes, you need to learn in detail about which roses are suitable for this, how to cut cuttings correctly and other important nuances.
Roses grown in local conditions and cut at the beginning of summer have the greatest survival rate.

Most varieties imported from abroad are treated with special chemicals that slow down the withering of flowers, but reduce their ability to take root. Although even such roses sprout from experienced gardeners.

As for the timing: in June the shoots actively grow even under unfavorable conditions, and therefore take root better, but in August-September the vitality of the plant declines, which also affects root formation in the cuttings. Roses from winter bouquets take root the worst.

Another important condition: the flowers must be fresh. If the water in the vase is not changed for several days, the cuttings rot, harmful microorganisms enter the stem tissue and the rose becomes unsuitable for rooting. Therefore, it is advisable to cut flowers on the same day that the bouquet is presented. If for some reason you cannot do this right away, be sure to place the selected specimens in clean cold water overnight, having previously trimmed the ends by 1-1.5 cm.

For cuttings, choose roses with strong, healthy stems in the lignifying stage. This can be determined by the color of the shoots and the thickening of the skin on them. In addition, the thorns of mature stems break off easily. Completely lignified shoots with a thick core do not tolerate prolonged moisture and rot. And immature and too thin cuttings do not have time to take root well, as a result of which they freeze out in winter.
To take cuttings, you will need a very sharp knife or pruning shears so that the stem tissue is not unnecessarily injured during the cutting process. The tool must be disinfected, this way you minimize the risk of contamination of the planting material.
Step 1. The roses you like are taken out of the bouquet and the condition of their stems is checked. Unopened buds and already opened flowers are trimmed (they can be placed in wide glasses or a shallow vase with cold water so that such beauty does not go to waste).

Step 2. Flower stems are cut into cuttings of 15-30 cm. They move down 1 cm from the lowest bud and make an oblique sharp cut. Above the second bud from the bottom, at a distance of 1-2 cm, a cut is made again, but this time straight. The result was a cutting with two buds. The rest of the shoot and all other stems are cut in the same way.

Advice! If there is little planting material, you can cut cuttings with one bud. In this case, they are made from 6 to 8 cm long, with the bud located in the middle of the cutting.
Step 3. On each cutting, the lower leaves are completely removed, and the upper ones are shortened by about a third. This will help reduce moisture evaporation and the shoots will not dry out. It is not recommended to completely remove all leaves in order to maintain the circulation of juice with nutrients in the cuttings. Finally, all thorns are removed.
Step 4. Take a container with clean, settled water, dilute any root formation stimulator in it and immerse the prepared cuttings into the solution to a third of their length. Soaking time is about 6 hours.

Advice! An aloe solution can be used as a stimulator for root growth: fresh aloe juice is diluted with water in a ratio of 1:9. Honey water also gives a good effect: add a teaspoon of natural honey to 0.5 liters of water. The duration of soaking the cuttings in such solutions is at least 24 hours.
The concentration of the stimulant should not be exceeded, nor should the planting material be kept in solution. After a day, the cuttings are removed and rooting begins in any convenient way.
The most effective root formation stimulants
| Drug name | Short description | Consumption rate for soaking cuttings |
|---|---|---|
| Biostimulant containing phosphorus, potassium and basic macroelements needed by plants. Available in the form of a cream-colored powder. When using the product, you must wear gloves and observe other safety precautions. | 1 gram per liter of water |
| Organic stimulant with high biological activity, non-toxic. Available in the form of powder, tablets and instant capsules | 1 tablet per 2.5 liters of water |
| Biostimulant based on plant extracts, enriched with microelements and vitamins. Contains glucoside steroids and amino acids that affect the development of lateral roots. Available in liquid form | 2 drops per liter of water (soaking time 30 minutes) |
| Organic immunomodulator based on an extract from Echinacea purpurea. Effectively stimulates root formation, can be used simultaneously with Heteroauxin | 1 ml per 10 liters of water |
| An effective growth stimulator and immunomodulator based on plants. Non-toxic, can be used in combination with other drugs. Release form – 1 ml ampoules | 1 ampoule per 2 liters of water |


Methods for rooting cuttings
There are several popular ways to root rose cuttings:
- in water;
- in the ground under cover;
- in potato tubers;
- in the package.
Germination in water
The easiest option is to germinate in water. It is better to take spring or rain water, but if you only have tap water, be sure to filter it or at least let it settle. Roots will not develop in a chlorinated environment. The filled container is placed in any convenient place, protected from direct sunlight, and the cuttings are lowered into it. It is very convenient to use glass jars for these purposes - this way the planting material is always in sight. Only the lower tips of the cuttings should be in water; there is no need to immerse them too much, as excessive moisture contributes to tissue rotting.

Cuttings in water - photo
Every two days the water in the jar is changed to fresh, and so on for 2-3 weeks. After 15-20 days, whitish growths form on the cuts, from which roots develop. Already at this stage, the cuttings can be transplanted into the ground, although experienced gardeners advise waiting a few more days for the roots to develop stronger. The main disadvantage of this method is the low concentration of oxygen in the water, which is why the roots either do not germinate at all or develop very weakly and rot.
Rooting in pots
Most often, roses from a bouquet are rooted in pots and mini-greenhouses, where they are provided with the most optimal conditions. In this case, the roots develop stronger, they are much stronger and more resistant to adverse factors. For one cutting, a small pot or 0.5 liter plastic glass is enough. Many people use cut plastic bottles for these purposes. If you plan to root all the cuttings in one box, please note that there should be at least 6-8 cm between the seedlings.
Step 1. The container for germination is treated with a strong solution of potassium permanganate and dried. Prepare the soil substrate: mix 2 parts each of garden soil and rotted compost and add 1 part washed sand. If the soil is loose and fertile, it is not necessary to use compost. It is advisable to heat the finished soil mixture in the oven to destroy weed seeds and pathogens in the soil. You can take a purchased universal primer and save time.
Step 2. Place small pebbles on the bottom of the pots for drainage, then the prepared soil to the very top, compact it slightly with your hands.

Step 3. Using a spatula or stick, make a depression in the soil and carefully lower the cutting so as not to injure the roots. Double-bud cuttings are buried so that only the upper bud remains above the surface; single-bud cuttings are covered with soil only up to the bud. Compact the soil around the plantings and water.

Step 4. They make a shelter to create a greenhouse effect.

The cuttings in separate pots are covered with half-liter glass jars, the boxes are wrapped in film. After planting, it is necessary to ensure the room temperature is not less than + 25 degrees during the daytime, and + 18 at night. Containers should not be placed in an open sunny place or in drafts.

Water as the soil dries in small portions.

Successful rooting is indicated by small sprouts appearing in the axils of the leaves. This usually happens in a month or a little earlier, depending on the variety of roses and growing conditions.

As soon as the first shoots appear, the plant begins to be ventilated little by little, removing the cover for a few minutes a day. Gradually, the ventilation time is increased, and when real leaves appear, they completely stop covering. It is recommended to transplant rooted cuttings to a permanent place after strong young shoots have formed.

Rooting with potatoes

Potato tubers provide the cuttings with optimal moisture conditions and feed the developing roots with healthy carbohydrates. Thanks to potatoes, you can get excellent seedlings with a developed and strong root system, without much hassle. It is very important to choose the right tuber: it should not be sick, with damaged skin, or lethargic. Such potatoes will begin to rot in the soil and infect the cutting itself. Before planting, potatoes must be washed, eyes removed, disinfected in potassium permanganate and dried.
To begin with, prepare an area in the garden: choose a bright place protected from the wind, dig a trench about 15 cm deep. A layer of sand 4-5 cm thick is poured onto the bottom and moistened well. Using a sharp knife, make deep, but not through, holes in the tubers, dip the lower sections of the cuttings in Kornevin, and insert them into the potatoes. Each cutting requires a separate potato.

Tubers prepared in this way are lowered into a trench and covered with earth.

Tubers with cuttings are laid in a trench - photo
The top bud should be above the ground surface. Water again with water, and then cover the plantings with jars, plastic bottles or film.

Further care consists only of regular moderate watering so that the soil does not dry out or become too wet. With the appearance of sprouts in the internodes, the plantings begin to be ventilated, gradually increasing the time, and after 14-17 days the shelter is completely removed.
Growing roses in a bag
This method is not one of the most popular, but it is also used quite often. American flower growers call it the “burrito method.” You will need regular newspaper, a plastic bag and cuttings prepared for rooting.
Step 1. The treated and soaked cuttings for a day are removed from the water and carefully placed on newspaper.

Step 2. The edges of the newspaper are folded in and a tight bundle is made, which is generously moistened with water. Excess water is allowed to drain so that the newspaper does not fall apart.
Step 3. The bundle with cuttings is placed in a bag, tied and placed where the temperature is kept between 18-20 degrees.


Receiving fragrant noble flowers as a gift, we involuntarily catch ourselves thinking “I wish I could preserve this beauty for a long time,” but this is possible - you just need to know how to grow a rose. Since ancient times, rose bouquets have amazed us with their aroma and delicate beauty, but sooner or later the cut plants “die”, and we regretfully throw the withered, short-lived beauty into the trash. And it’s completely in vain, because any rose can be grown even at home.
In order to start breeding flowers, you do not have to be a breeder. You can turn to the experience of other people on the Internet and, with the help of video lessons, master one of the simple techniques at home in the spring or autumn, or at the dacha in a greenhouse.
How to grow
There are several options for growing roses:
- cuttings in water and soil;
- cuttings in potatoes;
- removal from seeds in the ground;
- in the greenhouse.
To understand which method is the most interesting, or simple and effective, we will consider each method in detail and learn how to properly grow these noble flowers at home or in a greenhouse.
How to grow a rose from cuttings
This method is considered the most effective and efficient for any variety of roses; varieties whose ancestors were rose hips take root especially well at home. This was originally a wild plant, a fallen branch of which instantly sprouted even on not the most fertile soil. That is why its descendants take root at home by cuttings from a bouquet much faster, in contrast to artificially selected species.
Which roses should not be rooted at home:
- European teas;
- hybrids from South America;
- Dutch long-stemmed.
These are capricious and complex flowers that require the use of special skills - budding. Here you need to be able to implant buds into growing rosehip branches, taking into account seasonal characteristics. In addition, they are characterized by particularly long transportation times; to preserve life and freshness, the plants are treated with special preparations, which minimizes the likelihood of successful removal from a bouquet by cuttings. And the probability of growing such a rose from a cutting, not just at home, but even according to all the rules in a greenhouse, comes down to 10%; not even the most competent and detailed video will help here; you will need a plantation and an appropriate climate.
Season:
Preparation must begin correctly from the moment the rose falls into your hands and into the vase. If you have ever grown them yourself or want to take them from a friend’s garden, it is best to do this in the fall. If we want to give life to a flower from a bouquet at home, the season does not matter, you can root at any time of the year. However, experienced plant breeders say that nature tells us through its entire existence that all plants germinate best in the spring.
Procedure:
- Select several roses from the bouquet, cut off the buds, remove the thorns and completely immerse the stems in water for a day.
- Using a sharp knife or scissors, cut the stem diagonally at an angle, which will prevent air from entering the cut. But everything is not so simple - you need to cut in the right places. The cutting must be at least 10 cm long and have at least one bud; ideally, the lower cut should be made in the middle between the nodes, and the upper one immediately above the bud should not be longer than 1 cm and sprinkle it with pounded activated carbon. The bottom of the cutting is cut crosswise with a knife no deeper than 8 mm. The lower cut is treated with a root growth stimulator; they can be bought at any gardening store.
- We put it in a vase with water and cover it with a plastic bag; many gardeners add a couple of drops of honey there, since it is a good biostimulant or their chemical variants. We don’t change the water, we just let it sit and add it to the vase as it evaporates. There is another option - you can place the cutting directly into the soil, the main thing is not to forget to water it regularly so that the soil always remains moist.
- When roots appear in the water, we plant them in a pot; with the option of rooting immediately in the ground, we simply wait for the result.
- Preparing the seeds for planting. We construct a backing made of gauze, fabric or cotton pads so that this layer can retain moisture.
- Add a little hydrogen peroxide.
- Place the seeds.
- Cover with another layer identical to the substrate.
- We put it all in a container, wrap it loosely in plastic and place it in a cool, dark place.
- We wait until everything germinates, constantly maintaining humidity.
- We plant the sprouted seeds in soil or peat tablets, which can be bought at any specialty store.
- It remains to maintain a normal level of lighting and temperature plus 18-20 degrees.
- The first buds should not be grown in the hope of a bouquet, they should be cut off, this will ensure good development of the roots.
- The plant can then be grown at home or in a greenhouse.
Advice! Before placing the cuttings in the soil, you should first make drainage in the pot - pour special pebbles. In order for the stem to grow quickly and correctly, you should even build a mini-greenhouse in a pot at home - a kind of greenhouse on a wire frame, covered with polyethylene. How to arrange it can be found in the video on the Internet.
How to grow a rose from seeds
Most often we receive seeds from China. It would seem that this is such a distant country, can a miracle really happen and shriveled grains turn into beautiful plants? And this magic happens, the main thing is to follow the sequence correctly, the procedure is described very well and simply in video tutorials for beginners.
What to do:
It takes much longer to grow a rose from seeds than from a cut cutting in a bouquet, however, some rare varieties can only be grown in this way.
How to grow a rose from a cut flower in a potato
This simple method is almost a hundred years old; it is suitable specifically for the home; for an industrial greenhouse it would take too much time and energy consumption. It can be grown either from bushes from the dacha in the fall, or from a cut bouquet at any time of the year. There are many videos with detailed visual instructions to help beginning gardeners.
What you will need:
- medium sized pots;
- potato tubers;
- bouquet of roses;
- large jar;
- drainage pebbles;
- a little sand;
- soil for flowers (any);
- flora restorer.
Process:
- We form a pot - put pebbles on the bottom for drainage, a 3-5 cm layer of sand, and fill in some of the soil.
Advice: if you used non-purchased soil, you need to add phytosporin to it to restore the microflora.
- We prepare the cuttings as described in the section on cuttings and stick the lower sharp cut into the potato tubers.
- We place the potatoes along with the cuttings in prepared pots and sprinkle them with earth (drop them in).
- We place it in places with good lighting.
- Many gardeners advise using an ordinary jar as a greenhouse, others argue that potatoes themselves are capable of maintaining the life of a rose stem in the desired condition without the greenhouse effect. Roses grow either way, you can try both options.
- When the stems strengthen and grow, they are planted in pots in the usual manner.
- When growing roses in winter, when there is a lack of natural light, it is worth organizing artificial lighting, and fluorescent lamps are best suited for this. If there is not enough light in greenhouses, it is better to use sodium varieties with a power no higher than 650W.
- It is better to replant roses closer to autumn, so that they have time to take root by winter, or in spring, so that they can take root by summer.
- You need to carefully monitor the appearance of the plants and at the slightest appearance of spots and darkening, figure out what the reason is and take action. In the early stages, any diseases of the shoots can be cured.
- If you use a jar as a greenhouse, you need to periodically lift it and allow the seedlings to “breathe”.
- When transplanting rooted stems from greenhouse conditions into pots, this should be done gradually, increasing the time they remain without a greenhouse. It is not recommended to immediately remove the jar or plastic, this is stressful for the rose.
- Not only polyethylene or cans can be used as a greenhouse; cut plastic bottles are great.
- For home roses, you should not skimp and take soil from parks, vegetable gardens, etc. It is better to buy special soil in the store, it is lighter in structure, has the necessary nutrients and does not contain pathogens.
It is no secret that many gardeners grow roses for business and therefore are reluctant to share their secrets, considering everyone to be potential competitors. However, some summer residents who have greenhouses learn the same points from their own experience and willingly share with each other.
A few shared secrets
Understanding how to grow a rose from a cut flower or seeds is not a difficult task, the main thing is to strictly follow the instructions. It is much more important to properly care for it for months during the growth process, avoiding temperature changes and drying out of the soil. Gardeners also recommend regularly spraying the cuttings from above. If all necessary conditions and recommendations are strictly observed, after a long period of continuous care for the fragile plant, the beautiful rose will reveal itself to the world and its owners. With careful care, a home rose can satisfy aesthetic needs for many years outside of the seasons, bring freshness and give a feeling of comfort.
Regardless of whether you are the owner of a magnificent rose garden or have never tried to grow flowers, when you are presented with an armful of buds of amazing beauty, an irresistible desire arises to prolong life and grow a rose from a bouquet. Sometimes you don’t even dare throw royal plants into the trash bin - some dry out the buds, while others leave the cuttings in water in the hope that they will take root and in the future will again delight you with the delicate beauty of their flowers.
Select suitable stems and cut cuttings
The whole secret is that not all purchased flowers are suitable for further rooting. The best chances are for buds grown in domestic greenhouses. In most cases, you cannot expect a good result from imported roses, because when sent from other countries, flowers are treated with various preparations, preserving them for a long time. As a result, the plants can no longer be called alive, and they are not capable of producing roots.
Video about growing roses from a bouquet
So, we found out that imported roses are not suitable for rooting. You don’t even have to waste time on Dutch specimens with long stems - it’s almost impossible to get roots from them. To increase your chances of a successful result, follow these rules:
- It is better to root flowers from a fresh bouquet, since after standing for four days in a vase, the flowers may lose the ability to take root;
- green flexible stems are just as undesirable as hard woody ones; the best option is a soft stalk that begins to become woody;
- the stem of the cutting should have a bud at the top and bottom;
- do not choose stems that are too thick or too thin for cuttings.
Ideally, it is better to decide as soon as you receive a bouquet as a gift whether you will admire it for several days or immediately take advantage of the chance to propagate beautiful flowers by rooting cuttings on the very first day.

Not all purchased flowers are suitable for further rooting
If you decide in favor of the second option, carefully remove unopened buds and blooming flowers. You can place them in a glass vase or glasses of water so that the beauty of the bouquet is not wasted. Now it’s time to start cutting directly: cut the rose stems into cuttings 15-30 cm in length, so that there are at least two buds on each cutting. Cut the top leaves in half to reduce moisture evaporation from the plant; simply remove all other leaves and thorns.

There are no particular differences in how to propagate garden roses by cuttings at home and how to plant a rose from a bouquet.
The cutting is cut one centimeter above the top bud and the same amount below the bud located below. Cut the lower end of the cutting at a sharp angle with a well-sharpened knife, and cut the upper end strictly in a straight line and seal it with candle paraffin. The cuttings are ready - you can put them in water with potassium permanganate for a day, or in a solution that enhances the growth of the root system.
Preparing the soil for cuttings
The soil for planting cuttings should be light enough and have good breathability. Ordinary universal primer is quite suitable for these purposes; you can purchase it at any specialized store. Another option is to prepare the soil for planting yourself. To do this, take garden turf soil (two parts), well-rotted leaf soil (one or two parts) and sand (one part). All this must be sifted to remove inclusions of lumps, pebbles and debris, and mixed thoroughly. Then the soil should be calcined in the oven to destroy pests, weed seeds and pathogens of various diseases. The container for planting cuttings should be about 20 centimeters high. A drainage layer is poured into it, then prepared soil, into which the cuttings are planted. It is advisable to pour a layer of clean calcined sand (about three centimeters) on top. This will allow good access of moisture and air to the base of the cutting.We transplant the cuttings into the ground and grow roses from a bouquet
There are no particular differences in how to plant a rose from a bouquet at home and how to plant it. Cuttings are installed in the same way in pots or boxes with a drainage layer, river sand and soil, require the same careful care and can be transplanted into open ground when the first fresh leaves appear from the buds.

Rose cuttings from a bouquet are placed in pots or boxes with a drainage layer in the same way.
The main thing is to ensure that when planting cuttings:
- the second bud remained on the surface of the earth;
- the soil in the pots with cuttings was constantly slightly damp;
- plants at home were provided with a “greenhouse effect” using transparent film or plastic bottles.
Video about growing roses
In the first two years, all the buds of young bushes will have to be cut off so that the roots of the plant continue to develop successfully. When growing roses in an apartment, you will need to regularly spray the plants with water at room temperature. Watering should be done moderately in the mornings and evenings, avoiding overwatering. For indoor flowers, you will need to form a bush by cutting off underdeveloped, mature and intertwining branches.
How to grow a rose from a bouquet in potatoes
Growing roses in potatoes is one of the simplest and at the same time effective methods for rooting cuttings from a bouquet.Interesting fact. The secret is that the potato creates a constant moist environment for the cutting and at the same time provides it with nutrients. The same root crop protects the young plant from hypothermia and other external factors.
Preparing potatoes
For planting roses, large or medium-sized potatoes are selected, preferably even, smooth, without diseases or rotten areas. Ideally, it is best to take young potatoes (if the season allows). The most important thing to do is to carefully cut out all the eyes from the potato to prevent it from sprouting. Otherwise, there is a chance to grow a spreading potato bush instead of a beautiful rose. After this, using an awl, a narrow knife or a long nail, a hole (not through) is made in the potato with a diameter slightly larger than the thickness of the cutting.Preparing the cuttings
The cutting is prepared in the same way as with other germination methods. It’s a good idea to pre-soak it for a day in a solution of “Kornevin” or any other root formation stimulator. Another option is to dip the wet cutting into Kornevin powder.Rooting cuttings in potatoes
A rose in a potato can be planted like in a pot. Same goes for open ground, depending on the season. A hole about 2 centimeters deep is prepared in open soil. A layer of sand about five centimeters thick is poured into it for drainage. The cutting is stuck into the hole in the potato so that the lower bud of the rose is inside the root crop. After this, the shoot, together with the tuber, is lowered into the prepared hole in the ground and covered with fertile soil to two-thirds of the height.
 Caring for planted cuttings
The cuttings are planted in a permanent place under cover, regardless of the planting season. If you plant cuttings later than mid-summer, it is better to plant them in pots. However, they will need shelter at first and indoors. The easiest way to use glass jars or cut plastic bottles as shelter. The plastic will have to be slightly dug or pressed into the ground so that the bottles are not blown away by the wind. If you planted many cuttings at once, you can cover them with film. From time to time, the jars need to be removed to ventilate the cuttings. The ventilation time gradually increases. Do not rush to remove the jar when the first young leaves appear. This does not mean that the plant is securely rooted. The shelter is completely removed only when the rose is actively growing. Most likely, this will happen next year. The earthen ball should not be allowed to dry out completely, however, excessive humidity will only damage the young plant and may contribute to its rotting. “Epin” can be added to water for irrigation and spraying. It is better to replant plants in open ground in the spring. Further care for planted cuttings will not differ from care for any young roses.
If you decide to do rooting, keep in mind that flowers given in winter take root the worst; in March the chances increase, and most of the summer bouquets take root. But no matter what time of year you receive a bouquet, try to use the chance to extend the life of beautiful roses - what if they take root and can decorate your garden or windowsill?
Article updated 01/29/2018When we are given a beautiful bouquet of roses, we feel sorry that they begin to die and want to preserve this beauty. At this point, you can try to grow a new bush from the cut rose on its own roots.
After all, a cut rose is nothing more than a cutting capable of taking root and continuing its life.
Preparation of cuttings
It’s good if, upon seeing the bouquet, the hostess has the idea of growing roses from these shoots. Then she will immediately begin preparing the cuttings, and they will not just stand in the water and rot at the cut points. After all, the longer the decay process, the less likely it is that the shoots will develop their own roots.
Therefore, to prevent the ends of the roses from rotting, before lowering them into water, they are cut by 2 cm and lowered into clean spring (or purchased) water. At night, the bouquet is placed in a deeper container so that only the heads of the buds are on the surface of the water. After caring for the bouquet in this way, you need to start preparing the cuttings, without waiting for the bud head to completely wither.
IMPORTANT! The most durable cuttings with 2-3 buds are obtained from the middle of the stem of a cut rose.

So, turning to this important point, they cut the shoots from the bouquet. In this case, the lower cut is always made obliquely at an angle of 45 degrees. The top cut should be blunt to reduce the evaporation of moisture from the cutting. The upper cut is made only 1 cm above the kidney. In this case, the lower leaf plates on the shoot are removed altogether, and the upper ones are shortened by half, reducing the evaporation of moisture from the cutting. Thorns also need to be removed with sharp pruning shears. After all this, we can say with confidence that the cutting is completely ready to be rooted.
IMPORTANT! All cuts must be made with pruning shears in order to injure the rose shoots as little as possible.

Optimal rooting conditions
In order for rose cuttings to take root quickly and without problems, certain conditions must be met:
- take cuttings of domestic roses;
- the temperature in the room should not fall below 18 degrees Celsius;
- there should be no drafts or sudden changes in temperature;
- there should be constant humidity under the shelter.
By fulfilling these requirements, you can be sure that the cuttings will have their own root system.
How to grow roses from a given bouquet

You can root roses at home all year round or in the summer directly in open ground. For this purpose, you must have with you, in addition to prepared cuttings:
- a small container with drainage holes;
- nutrient soil;
- any stimulator of root formation;
- pruner
Having all this at hand, you can choose any method that will be convenient for propagating shoots.
Methods for rooting cuttings

Rooting of cuttings depends on the grade of roses. If local varieties of roses are used in the bouquet, the shoots will take root quickly and without problems. If a grower is going to grow roots on Dutch roses, then you can get a positive result with only 40% of the cuttings. This turns out to be due to the fact that roses are treated with certain hormones that slow down the wilting process, but they also inhibit the process of formation of root mass on the shoot.
IMPORTANT! We must also remember that in spring the process of root mass formation is more active than at other times of the year. The root growth stimulator “Kornevin” will help to grow roots.
Germination in water

Growing rose cuttings in water is the easiest option. To do this, they are immersed 1/3 in water. Water should be used filtered and settled for 24 hours. The vessel is placed in the following place:
- where there are no drafts;
- no rays of direct summer sun;
- no sudden temperature changes.
It is worth remembering that the water is changed every other day. After about a month, white tubercles will appear at the ends of the cuttings - these are future roots. When the roots become 5 cm long, the shoots are planted in nutritious and loose soil.
Using potatoes

If you choose this method, the potatoes will serve as a nutrient medium for the formation of roots. The potato tuber should be:
- healthy;
- without mechanical damage;
- strong and resilient.
To prepare the selected potatoes, you need to remove all the eyes from it, rinse it under running water and use an awl to make holes where the cutting will actually be inserted.
IMPORTANT! When making holes, do not make it through into the cutting; before inserting it into the potato, coat it with growth stimulator powder.
This method can be used to grow shoots in an apartment, or directly in open ground. To do this, dig a shallow trench, no deeper than 15 cm, pour a 5 cm layer of sand and place potato tubers with rose cuttings stuck into it. When burying shoots, you must leave the apical bud on the surface.

After planting, everything is well watered with warm, settled water and covered with a cut-off plastic bottle to create a greenhouse microclimate. For the winter, such a shelter is not removed, but is buried lightly with earth and then covered with snow. In the spring, in place of the cutting there will be a small bush. But such propagation is suitable for the middle and southern regions of Russia; at the latitude of the Moscow region, young shoots must be additionally covered with spruce branches and lutrasil.
Using the package

Today, this is an unusual way of germinating the root system on a rose cutting. All shoots are carefully wrapped in wet newspaper in such a way that the cuttings do not peek out from under it. This wet package is placed in a black bag and put into a room where the air temperature will not rise above +20 degrees Celsius.

IMPORTANT! When propagating roses in this way, you need to check the condition of the cuttings once a week and get rid of spoiled ones.
Rooting in a pot
This method is the most traditional. For this purpose you will need:
- Small capacity.
- Nutritious and loose soil.
- A glass jar is large enough to cover the planted rose cutting.
- Rose shoots.
The pot and expanded clay are doused with boiling water to get rid of various fungal infections that may be there. The soil must be steamed in the oven for 20 minutes at 200 degrees - this is done to disinfect it from pests.

Place a 2 cm layer of expanded clay in the prepared pot, add calcined soil and moisten it well. Now proceed directly to planting the prepared cuttings. It is lowered with an oblique cut into the ground, deepening it so that the lower growth bud is immersed in the ground. The shoot is covered with a jar in order to create a humid greenhouse climate, this will provide more guarantees for the viability of the cutting.
If several cuttings of the same variety are planted in one container, they are lowered into the ground in increments of 7 cm.
In the future, it is necessary to ensure that the soil under the jar or bag does not dry out, but is moderately moist at all times. The temperature in the room where the cuttings will be germinated should be between 18-25 degrees Celsius. When small branches begin to grow from the internodes, there is no need to rush and immediately remove the jar. It is necessary to gradually accustom the young shoots to the environment and raise the jar by 2 cm so that air can enter under it. This will protect the cuttings from blackleg disease.
Cuttings of bouquet roses in autumn
Autumn is a suitable time to germinate rose cuttings. The method has a number of advantages:
- Such an adult bush will not have rose hips.
- Roses on their own roots tolerate harsh winters well.
- You can easily get a cutting from a given bouquet or ask your neighbors in the country.
The timing of cuttings coincides with the pruning of shoots for the winter. Therefore, cuttings take place at the end of October. The cuttings are prepared in the usual way and planting begins. They are immediately planted in a permanent place and this is a huge plus in the propagation of roses. The shoots treated with a growth stimulator are lowered into the ground at an angle of 45 degrees and shed generously with water. After planting, 1-2 growing buds remain above the ground. All cuttings are covered with glass or plastic containers and removed in the spring with the onset of stable warmth.

Is it possible to root flowers from a bouquet in winter?
There is no clear answer. It all depends on which rose the cutting was taken from. With a Dutch rose in winter, it is impossible to get the root system on the shoot. You can try to take cuttings from a local rose, but the process will be quite lengthy and even when the sprouts begin to grow from the axils, you should not remove the shelter, since the roots form very slowly and the sprouts can grow at the expense of the main stem. The best choice would be to plant the cuttings in a transparent plastic glass in winter so that you can monitor the formation of roots. But the rooting process will be long, if in the summer you can get small roots on the shoot in a month, then in the winter the cutting can stand all winter and only with the onset of spring will it begin to grow the root system.

Landing at a permanent place
Planting of young cuttings in a permanent place occurs when it is already warm outside. The night temperature should not fall below 12 degrees Celsius. A correctly selected place should be sunny and protected from northern winds.
Method of planting a seedling:
- A hole is dug slightly larger than the root system of the seedling.
- Filled with nutritious and loose soil.
- A seedling is placed in the center of the hole, and its roots are evenly spread in different directions.
- After planting, all shoots are shortened by 2/3 and the bushes are shed with warm water.

It takes 2 weeks for seedlings to adapt to a new place. All this time, it is advisable to cover them from direct sunlight and carefully ensure that the soil where the seedlings are planted does not dry out.
IMPORTANT! In the first year, all emerging buds must be cut off so that the flower can grow a good root system by winter.