Independent production of a household vibrating table. Do-it-yourself vibrating table - various manufacturing options How to make a vibrating table
When paving slabs are needed, they buy them or make them with their own hands. For independent work requires special equipment vibrating table. It can be purchased in an open trading network or ordered in an online store. But if the construction budget is limited or a lot of tiles are needed for the improvement of the territory, then it is easier and more profitable to make a vibrating table with your own hands. Manufacturing instructions and assembly drawings will help you quickly master the technology.
Homemade vibrating table has a variety of purposes:
- tamping of cement or asphalt mixtures;
- production of paving slabs, window sills, monuments, eurofences;
- production of cellular building blocks;
- carrying out test work.
The scheme of the device looks simple: a smooth steel table, fixed by a movable joint on the frame, and an electric motor with an eccentric on the shaft, which creates oscillatory movements. The vibration frequency reaches 3000 per minute.
According to the technology, tile molds (steel or polymer) are filled with mortar and placed on the work surface. Then turn on the unit for a certain time. Under the influence of vibrations, concrete gradually sags, compacts and gets rid of air bubbles. At the end of the cycle, the engine is turned off, the molds are removed and sent to dry. The result is durable and load-resistant tiles of large and small sizes.
An electric vibrating table is the best choice for home use. Its productivity reaches 50 m2 per day. The disadvantage of such equipment can be considered dependence on power sources. In addition, it has considerable dimensions, which complicates transportation. In the manufacture of large concrete castings, hydraulic vibrating tables are used, in which there is no spring device.
How to make a vibrating table for paving slabs yourself?
Before proceeding with manufacturing, it is advisable to find assembly drawings of a typical unit in the technical literature or on the Internet. On the diagram, you need to make marks of the motor attachment points, determine the dimensions of the table and components. The optimal height of the device is 0.8 m. The width and length are set based on the size of the injection molds.

To work, you will need the following tools and materials:
- table drawing;
- corner or channel profile;
- metal pipes;
- steel springs and "glasses" under them;
- metal sheet for countertops;
- vibration motor for 220 V (brands IV-98 or IV-99E);
- grinder with discs for metal;
- welding machine;
- electric drill;
- hardware for fixing the engine and fixing the vibrating table to the floor.

Step-by-step instruction
1. Installation of the base.
- Weld a frame from equal sections of a pipe, profile or corner. Dimensions can be made arbitrary, but standard drawings usually indicate 700 × 700 mm.
- Weld legs with plates to the frame, which are later fixed with anchors or concrete mortar. If the vibrating table is not fixed on the floor, then during operation it will randomly move. For stability, the structure can be additionally weighted with an axis of reinforcing bars, welded around the perimeter or crosswise.
- On the reverse side of the frame in each corner and in the center, attach "glasses". They can be made from scraps of steel pipe with a height of 60-70 mm. The diameter should be 2-3 mm larger than the cross section of the spring. Install "glasses" exactly according to the scheme, without displacements and distortions. The efficiency of the vibrating table depends on this. If there were no “glasses”, then the springs are welded directly to the frame. In order not to look for new ones, you can use a used one. Springs from a car or moped work well, you just need to cut them in half.
2. Making a countertop.
- Weld plates on top of the springs. Lay a monolithic sheet 8-10 mm thick on them. If the metal is too thin, then the working surface is quickly deformed. It can be strengthened by welding the transverse corners.
- To the bottom of the table, weld sections of the channel with holes in the form of a frame. This is the base for the engine.
- Along the perimeter of the tabletop, attach the sides of the steel corner 50 × 50 mm.

3. Assembling the vibrating table.
- Mount the vibration motor on the channel frame motionlessly.
- Connect the table to the support post by welding it to the plates on the springs.
- Fix the finished vibrating table on the floor with anchors or concrete pouring.
- Start the engine and check the operation of the unit by placing a mold with a tile mortar. If necessary, make adjustments to the stiffness of the springs and the overall stability of the vibrating table.
The most difficult thing in the assembly scheme of the vibrating table is the correct choice of the electric motor. When it is planned to make small volumes of paving slabs, it is enough to buy a single-phase engine with a voltage of 220 V with a power of up to 700 watts. For frequent use of the table, you will need a medium power motor (1.2-1.5 kW), equipped with an automatic shutdown system in case of overloads or power failures.
According to the instructions, the engine must be unbalanced. This creates a vertical vibration that is transmitted to the table and molds. If the desired brand is not available or it is not affordable, then you can use the motor from the old washing machine. This is a good replacement option for a vibrating table, although short-lived. At high rates of tile production, old motors quickly fail. After 30-35 cycles, the bearings wear out in them or the axle is disconnected.

The motor can be mounted in different ways:
- in a horizontal plane - a vertical vibration is obtained;
- along the vertical axis - this is how horizontal vibrations are provided;
- at an angle of 45° to the tabletop - vibration forms forms in all planes.
The uneven oscillation of the table with a large amplitude leads to the “boiling” of concrete and its supersaturation with air. As a result, the tiles are of poor quality with voids inside. They have poor resistance to mechanical stress and crack quickly. Selection of the optimal amplitude of table vibration (a combination of speed and uniformity of movement) is carried out using an eccentric. A metal washer is put on the motor shaft and a threaded hole is made on the side. The amplitude is adjusted by screwing in / unscrewing the bolt, which is then fixed with a control nut.
If the vibrating table for the manufacture of paving slabs is supposed to be operated in different modes, then you need to take care of installing an AC potentiometer. With it, you can change the voltage level and adjust the strength of the oscillations depending on the composition of the solution.
Before starting the table, check the horizontal orientation of the work surface. If there are even slight deviations from the axis, then during vibrations the tile mold will move on the table, and the solution will splash out of it.
When making the legs of the vibrating table, you should pay attention to some nuances:
- the engine must not touch the floor;
- the height of the legs must be chosen so that the master is comfortable servicing the installation and does not have to bend over;
- All legs must be exactly the same size.
Steel springs can be replaced with loops, which are easy to make yourself from a strong tourniquet or rope. Such connections, located in the corners of the base, allow the tabletop to be well centered. The dimensions of the vibrating surface are determined based on production volumes. The wider the table and the more powerful the motor, the more tiles can be made.
Today, many city dwellers would probably like to have a dacha or a private house, on the territory of which there is a well-groomed lawn and attractive paths. If it is not possible to allocate an impressive amount from the budget, but there is a desire to equip the exterior of the site, then you can make a vibrating table for the production of tiles, which will create material for arranging paths.
Description of the vibrating table
The described design is simple, it is simply indispensable for independent. This device will allow you to make products of different shapes, while concrete mixture should be used as the material.
Do not assume that the vibrating table can only be purchased in specialized stores. You can make such a design yourself. The top plate acts as the base, which is attached to the steel base with a movable joint. Among other things, you will need an engine that will set the surface in motion.
In the process of vibration of the plate, bubbles come out of the molds that are filled with concrete. This is the only way to ensure the proper quality of the product. When making vibrating tables for paving slabs with their own hands, it is necessary to ensure the perfect evenness of the tabletop. It must be smooth, and the motor used must provide uniform vibration.
Preparation of tools and materials

To carry out the work, you will need a steel pipe in the amount of 4 pieces, a metal sheet that will form the basis of the countertop, as well as a metal spring - it will become the movable connection. The master needs a corner with dimensions of 50 x 50 mm, which can be replaced with a channel profile. Make sure you have an engine with the right amount of power. When vibrating tables are made for specialists, they prepare a welding machine, a drill, as well as a grinder. To install the engine, you will need bolts in the amount of 4 pieces.
Manufacturing technology
Despite the fact that the vibrating table is a simple design, the technology described below should be followed in the process of work.
The base on which the tabletop will be fixed should be made from a corner or channel. The dimensions of the vibrating table can be completely different depending on the desire of the master. We will take standard dimensions, which are limited to 700 x 700 mm. If you decide to use other dimensions, then you must remember that they must correspond to the power of the engine used.
When do-it-yourself vibrating tables for paving slabs are made, craftsmen use pipes that act as legs. They should be welded to the base. In order to ensure maximum stability, steel plates must be welded to the legs and reinforced with concrete. If this stage is excluded, then the table during use will move from place to place, while it will be in doubt.
Should be selected individually, but it is important to ensure the convenience of working with the design. Among other things, the engine must be at a certain distance from the ground. If you are making vibrating tables for then springs should be welded from the central part in each corner. Ideally for carrying out these works, those parts that are borrowed from a moped are suitable. They need to be cut in half first.

A sheet of metal should be laid on top of the spring. A material that has a thickness of eight millimeters or more should be used. Bolts will be needed to fix to the engine sheet. If you follow these recommendations, you will be able to make a table that will help produce up to 60 square meters of products during the day.
Engine selection

Before you make a vibrating table with your own hands, you need to think about which engine will be used. The one borrowed from the washing machine is quite suitable for this. Despite the fact that it works properly, it has a rather significant drawback, which is fragility. Such a motor can withstand only about thirty operating cycles. After that, the axle becomes loose or the bearing jams. That is why there is an opinion expressed by home craftsmen that such engines are not able to hold out for a long time under conditions of increased loads, which turn out to be a vibrating table.
As an alternative solution, you can use a vibrator brand IV-99 E for 220 volts. It is sold in stores of relevant goods for 6,000 rubles. Such a design copes with the tasks assigned to it quite well.
Among other things, it is important to prepare a drawing of the vibrating table, it will help to complete the work correctly.

If you draw up a similar circuit, then it should indicate the location of the AC potentiometer, which will regulate the strength of the vibration. In the process of changing the voltage level, it will be possible to adjust the oscillation frequency for a certain type of solution used. However, many craftsmen, thinking about how to make a vibrating table with their own hands, decide to save money using only the engine.
Secrets of the work

It is important to make a table that is not only strong, but also sufficiently resistant to vibration. Only in this way will the structure be able to withstand the loads exerted. The engine must be installed in a specific location. Sometimes it can only be determined empirically. The tabletop will consist of a rectangular frame and a steel sheet. It is sometimes provided with an additional frame on which the source of vibration is fixed. The springs for the vibrating table will allow limited mobility of the countertop, so their choice should be taken seriously.
Conclusion
In addition to the springs mentioned, it is permissible to use loops made of a durable bundle. A rope will work too. Four of these connections, located at the corners of the base, will center the platform located on top. When choosing a vibration motor for a vibrating table, you should take into account that it should not provide an unnecessarily strong displacement of the tabletop relative to its original position. Otherwise, it will not be possible to exclude the spilling of the solution, which was distributed over the forms. That is why it is recommended to first consider factory models.
The production of paving slabs is carried out using the vibrocasting method. For this, a special device is used - a vibrating table. There is nothing to replace it at home, so you have to make it yourself.
How to make a vibrating table for the manufacture of paving slabs? Let's consider this question in more detail.
The process of solidification of concrete, accompanied by small frequent fluctuations, proceeds with the release of air bubbles, compaction of the concrete structure and an increase in the density and strength of the material. To ensure this mode, a vibrating table is used.. It is a surface that makes frequent oscillatory movements (about 3000 / min).
Forms filled with concrete are installed on this surface and vibration treatment is performed. The mode significantly compacts the concrete structure, which significantly affects the quality of paving slabs, the operating conditions of which require great strength.
There are different types of devices, from large industrial ones with a hydraulic source of vibration for processing large concrete blocks, to smaller electric ones that create vibration using an eccentric mounted on an electric motor shaft. Since only the second option is available at home, we will not consider the hydraulic drive device.

Frequency and amplitude of vibrations- characteristics that determine the texture of the processed material. They are set up empirically, it is too difficult to calculate all the nuances in advance, because too many variables are involved in the process.
Therefore, the design of the table should provide for the possibility of some adjustment of the oscillation amplitude.

Find out on our website how to lay. Let's talk about the successive stages of the work performed.
And you will find a lot of useful information about preparing the site for laying paving slabs.
Materials and tools that will be required
The specifics of the device allows the use of only metal elements. All connections are welded or bolted. Accordingly, for the manufacture you need sheet metal with a thickness of 3 mm(the larger the area, the thicker the sheet will be required).
For the bed you need a corner or channel. Table movement is provided by springs, the size of which must correspond to the mass of the table plus the load from the installed molds.
To assemble a vibrating table for paving slabs with your own hands you will need a welding machine, an electric drill with a set of drills for metal. Cutting of metal parts is done by a grinder. You will need a measuring tool, a set of wrenches for threaded connections.

Table legs require secure anchoring to the floor, otherwise, during operation, he will run around the room. It is best to cement the legs into the recesses, for which sheet metal pads must be welded to the ends and deepened by 10-15 cm.
If possible, you should pour anchors into the floor and attach the table to them, this option will allow you to disconnect the device if necessary and move it to another location.
How to make a drawing
Manufacturing work you need to start by creating a drawing of the device. Random fabrication is not recommended, as it is difficult to remake a welded assembly.
All dimensions must be calculated, distances, engine mounting locations so that its location is as close as possible to the center of mass of the table. If the eccentric is located not on the motor shaft, but on a separate drive, then it is placed in the center. The creation of a drawing must begin with a bed.

Height, type of fastening to the floor is taken into account, the perimeter of the strapping of the bed in terms of repeats the outlines of the working surface. This is necessary because the springs are located at the corners and at the center points of the sides of the table.
How to choose the right engine
The table area is selected based on the engine power, which should not be too large. Usually, power up to 1 kW is sufficient.. A table with dimensions of 1500 by 800 mm is suitable for such an engine.

The dimensions are approximate, since the weight of the table and the speed of the motor shaft are not taken into account. In general, care should be taken not so much about power as about the condition of bearings or bushings.
They bear the entire load, and to ensure long-term operation, it is necessary to choose a motor with reliable bearings. If necessary, if the design allows it, engine can be upgraded by removing the bushings and replacing them with reinforced bearings.
If you plan to install an eccentric directly on the motor shaft, such a procedure will greatly extend the performance of the motor.
Manufacturing instructions

On this, the process of assembling a home-made vibrating table for paving slabs can be considered complete, it remains to start the device and adjust the amplitude of vibrations by changing the position of the eccentric.
Important nuances, error prevention
- Along the perimeter of the working surface of the table, a side is needed to prevent the form from slipping with concrete.
- If you use long bolts as guide rods for the springs, you can tighten the springs slightly by screwing on the nuts and washers to fix the table more securely and limit the amplitude of vibration.
- Instead of a conventional electric motor, you can use a vibrator of the IV99 type or similar, with which you can more accurately control vibrations and get a high-quality result.
Security measures
All work should be carried out in a room designed for such actions. Welding work, as fire hazardous, must be carried out with the presence of fire extinguishing equipment.
Cutting, drilling and other work with metal is carried out in compliance with safety regulations. Attention should be paid to working with a grinder.
The first start is best done with the drive belt removed. to eliminate the consequences of incorrect connection or fastening of nodes.
Do not forget about protective grounding, which must be connected before the test run.
In this video, see how you can make a vibrating table for the production of paving slabs with your own hands:
The assembly process of the vibrating table does not take much time, usually its installation is completed in one day.
Setting the mode can be done almost instantly, or drag on for some time, since the best option is found empirically.
The unit made in this way can serve for a long time, and can be used both for the production of paving slabs, and for other work with concrete, ceramics or other compositions that require vibration treatment.
In principle, all work related to the casting of elements from various building mixtures can be performed without the use of this apparatus. But its use is still highly desirable. Thanks to him, not only the decorativeness of the surfaces of these products improves, but also their quality and strength increase. Consider how this happens and how to assemble such a device yourself.
The principle of operation of the device and the list of necessary materials
The mixtures used for casting various objects are too thick in consistency. That is why, unlike more liquid solutions, they are not capable of filling various containers with high quality. When filling the molds, the mixture lays unevenly, which leads to the formation of air pockets.
The air from these bubbles gradually exits during solidification, but the void in the body of the element remains. Thus, there are weak points in a seemingly solid product. Under excessive load, or an accidental impact or fall, such voids cause the entire element to break.

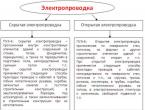
 vibrating table drawing
If the voids are formed at the very bottom of the mold (where the front side of the product is usually formed), then after solidification on the surface of the element, recesses, depressions and pits of various sizes can be found, which significantly spoil the appearance of the cast mold.
The use of the apparatus in question helps to avoid these troubles due to its vibrational function. A slight vibration causes the mass to slowly sink down under the pressure of its own weight. In the process, the air pockets are filled with the mixture, and the air itself is etched out.
 Drawing vibrating table and sand sifter
  vibrating table frame diagram
To assemble a vibrating table according to the drawing with your own hands, you must first purchase the following materials(all dimensions are approximate, you can either increase or decrease them according to your own needs):
1. Vibration motor.
2. Welding machine.
3. Springs - Timing "Kamaz" - 4 pieces.
4. Metal sheet - 0.3x75x120 cm.
5. Profile pipes - 0.2x2x4 cm - 6 meters (for legs) 2.4 meters (for the frame under the cover).
6. Metal corners - 0.2x4 cm - 4 meters.
7. Bolts (for engine mounting).
8. Spec. paint (to protect the product from corrosion).
9. Water metal rings - 4 pcs. (the diameter should match the diameter of the springs, or be slightly larger).
 vibrator mount
  vibrator mount on table top
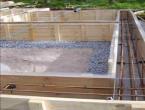
  vibrating table base
  result of work
In order to mechanize this process and facilitate the work, it is possible to manufacture a mechanical device with an electric drive. Such a mechanism will be especially relevant if it is necessary to prepare a large amount of building mixtures from bulk materials.
Such a device is called a vibrating sieve or a vibrating screen. It has a fairly simple design, and therefore it is not difficult to make a vibrating sieve with your own hands.
General design device
Making a vibrating screen for sand or gravel does not require a lot of time. The design description of the vibrating sieve provides for the following elements:
- supporting frame, on which all other parts and assemblies are located and fixed;
- electric drive, which can be used as a power saw, jigsaw or drill;
- an outer box (frame) without a bottom, mounted on fixed furniture rollers;
- guide rails from a metal corner for moving rollers along them;
- nestable box with a metal mesh bottom;
- a chute for transporting the sieved material to the collection hopper;
- device for adjusting the speed of rotation of the electric motor.
The transport chute is easiest to make from plywood, but a metal construction will be much more reliable, especially when screening gravel or other coarse materials.
A device for adjusting the speed of rotation may already be provided in the design of an electric drill or jigsaw. In this case, a separate external controller is not needed.
The principle of operation of a vibrating sieve for bulk materials is to transfer translational movements from a power tool to a frame with a fixed sieve. After sieving the materials, the inner wooden frame with the sieve is raised and the unnecessary screenings are discarded.
Necessary materials
For the manufacture of a frame, two boxes and other elements of the mechanism, you will need:
- wooden bars 60x70 mm;
- plywood 20 mm thick;
- 6 rubber or spring shock absorbers;
- 4 or 6 furniture rollers with mounting frame;
- piano loop with a length of at least 500 mm;
- metal corners for guide rails;
- metal plates or strip to strengthen the wooden parts of the structure;
- screws, bolts and nuts.
Particular attention should be paid to the strength of the piano loop, since when screenings are discarded, significant mechanical loads will fall on it.
Dimensions of the main structural elements
Before assembling the sand shaker, it is recommended to draw an assembly diagram or a simple assembly drawing. This will simplify assembly work and help determine the order in which they are performed.
- length 1400 mm;
- width 600 mm;
- height 850 mm.
The length of the outer drawer without bottom should be equal to half the length of the supporting frame. The width is 100 mm less than the width of the base, the depth is at least 120 mm.
The dimensions of the inner box with a bottom made of mesh should ensure that it can be easily removed from the inner frame for free tipping and release from accumulated screenings. The outer and inner drawer are connected on the short side with a piano loop, as a result of which there is the possibility of lifting and overturning the inner structure.
Assembly order
The manufacture of the vibrating sieve begins with the assembly of the supporting frame from wooden blocks in accordance with the drawing. To increase the strength of the structure, the connection of wooden parts is recommended to be made with reinforcement with metal corners and plates.
After that, on the inside of the base frame, it is necessary to fix the guide rails as a support for the movement of the furniture castors. The guide corners are fastened together in a single structure with the help of transversely mounted wooden bars. To reduce the level of vibration during operation, 6 or 8 rubber shock absorbers must be installed between the corners and the guides.
To fix the drive for a vibrating screen from an electric drill, jigsaw or saw, on one side of the upper part of the support frame, it is necessary to provide for a platform corresponding to the size of the power tool.
After assembling the support frame, a plywood gutter is made and installed. The processed material will flow through it into a collection container. It is more difficult to make a metal gutter, but it will provide a longer service life.
At the next stage, a screening structure is assembled from two boxes, one of which with a sieve is nested in the second.
On one short side, the boxes are fastened together with a piano loop.
From the bottom of the outer box without a bottom (frame), furniture rollers are fixed, which ensure the ease of movement of the boxes along the rails on the bearing support.
The mesh size of the metal mesh is determined by the fraction of the bulk material to be screened. Fastening the mesh to the frame is best done with metal tape and self-tapping screws.
The working body of the power tool is connected to the external movable box using a spring connection, which will provide smoother vibrations during the operation of the mechanism. The translational movements from the electric drive are transmitted to the boxes, and as a result of their oscillations along the guides, the material poured into the inner box with the net is sieved.
The electrical power consumption of the mechanism depends on the power of the installed power tool. At the same time, it should be noted that the more powerful the saw, the larger the dimensions of the vibrating sieve can be made and, due to this, large volumes can be processed.
If you use an eccentric, then you can use an electric drill as a power unit. In this case, the tool is installed sideways to the boxes and the drive mechanism will oscillate.
Oscillation speed control unit
Power tool manufacturers produce models with or without adjustable motor speed. In the second case, the vibrations of the electric saw may be too frequent, and an additional external device for adjustment will be required.
A rheostat type regulator can be purchased from electrical supply stores. At the same time, it is recommended to buy a circuit breaker, which will provide additional protection for the tool and its long-term operation.
As a result, you will be able to provide any necessary vibration frequency of the working boxes of the vibrating screen, depending on their load and the weight of the material being processed, without overloading the electric drive.
Protecting the drive from dust
During operation, especially with materials such as cement and dry glue, dust is generated that enters the actuator. Therefore, it is recommended to cover the installed electric motor with a protective casing, the design of which should not block the ventilation openings of the tool. Such a casing can be made from a 2-liter plastic bottle.
The finished assembled vibrating screen and its operation can be seen in the video below.