Concrete floor for a bath with hands. How to make a concrete floor in a bath: device and diagrams. Waterproofing, insulation and reinforcement
The bath room is the place where the wet mode of operation prevails, and the floor gets the most. Even boards treated with antiseptics rot after a few years, become brittle and collapse. Concrete flooring is a good alternative to wood flooring: it retains its integrity in damp conditions, protects against heat loss when properly installed, and lasts throughout the life of the bath. In this article we will tell you how to make a concrete floor in the bath with your own hands.
Features of the concrete base
It is reasonable to equip the concrete floor in the washing department of the bath, where it is most damp. In fact, water is on the floor until natural evaporation, which is unfavorable for a wooden coating. For the steam room, you can make a boardwalk - the temperature in the room is always high and the humidity level is within the acceptable limits for the material.
A concrete floor for a bath is almost no different from similar structures in residential buildings. Its main difference is the need to arrange a slope towards the pit, into which water flows. Otherwise, the liquid will stagnate.
Benefits of a concrete floor:
- The design can be equipped with any type of cladding;
- Concreting provides high strength of the floor in any conditions;
- Durability of the coating - repairs will not be useful for 20-30 years with the correct arrangement of the pie;
- Concrete is resistant to decay and destruction.
Flaws:
- Floor installation is a lengthy process. Before operation, it is necessary to wait for the set of strength and complete curing of the concrete;
- It is necessary to strictly follow the recommendations for installation in order to get a warm floor, and not a cold base under your feet.
The floor in the bath is made of concrete or wood - it does not matter. Concrete cake is laid out mainly on the ground.
What should be the concrete floor cake
The composition of the floor construction pie includes several layers (from bottom to top):
- Sand and gravel cushion on the ground;
- Floor waterproofing;
- Insulation foam or polystyrene material;
- Reinforcing layer (mesh);
- Concrete screed;
- Finish coating.
There are variations of replacing layers:
- The sand and gravel pad can be replaced with a sand bed. Sand and crushed stone can be separated by geotextiles, then they perform their functions better: gravel drains water from the soil, and sand stabilizes loads. The sand itself also filters and drains water.
- Under waterproofing for backfilling, it is useful to make a concrete layer, as in the construction of a foundation. It is enough to prepare a solution of -M75 and pour it in a thin layer on the sand - this will give a strong base that increases the rigidity of the "pie".
The device of a concrete floor in a bath on the ground must be done at a slope to one of the walls, which has a drainage system (drain). This may be an outlet chute or a hole to which the pipe fits. Drainage can also be arranged in the middle of the room, then the slope is made from all sides in its direction.
It is also necessary to protect the walls adjacent to the floor - they are waterproofed and lined in parallel with the arrangement of the floor covering.
step by step
There are several variations of the floor device, so we will give installation instructions according to the basic scheme above.
Working with soil and backfill
The base for the bath is prepared in advance, at the stage of ground work before the installation of the foundation. The fertile soil layer is heeded to a depth of 10-15 cm, more durable rocks are compacted with vibrating plates.
Soil compaction is not required when installing a conventional wooden floor. In the case of installing a concrete screed, this is necessary in order to prevent heaving of the base, leading to the destruction of the "pie".
On a compacted base, backfill with gravel 10 cm thick and sand 10-15 cm thick, textiles are laid between them. At the same stage, the location of the drainage system is indicated - they dig a pit and lay pipes at an angle to the assembly well. Then the top layer creates a slight slope towards the drain.
Waterproofing and insulation
Work on insulation from water and heat loss determines how warm the coating will be and how long it will last.
As an insulating material, bitumen-based composites are suitable: glass elastomer, hydroisol and the like. They are laid out with an overlap on the walls of at least 20 cm (the extra ends will go under the finish). The canvases are rolled out with an overlap of up to 10 cm or along the markings, the joints are glued with polymer compounds, and the second layer is laid in the same way for reliability.
Waterproofing is laid on a rough screed. This is logical: a low-grade stone serves as a support, but is not a bearing layer for the cake. Some masters make sand waterproofing, then a rough screed is not needed. But for this, the embankment must be carefully compacted and leveled.
It is imperative to work out the entrance to the drainage pipe - from the inside, with entry to the floor, it is also pasted over with waterproofing.
EPS (extruded polystyrene foam) is used as a heater for the bath floor - it has high strength and is resistant to dampness, does not absorb water. Mineral wool and other soft floor tiles are not suitable. A layer of insulation 50-70 mm is laid over the entire floor area, it is necessary to make a cutout for a drain or a pit. Epps boards have tongue-and-groove joints, so they do not need to be further processed. The distance between the floor and walls of 1.5-2 cm is a compensation gap, it should not be closed.
Reinforcement
The screed works mainly in compression and bending, moreover, on both sides - both indoors under the weight of people and bathing equipment, and perceive the load from the ground. So that the concrete does not crack and the coating does not lose its integrity, you can buy a screed or tie it yourself from a wire with a diameter of 8 mm with a cell size of 10-15 cm.
The mesh must be laid at a height of 3 cm from the insulation so that it is inside the screed, and not under it. It is convenient to insert steel clamps into the epps and fix the frame canvas or put it on 3 cm thick bars.
Solution preparation
For floor screed, concrete mortar M200-M250 is used. The necessary components and their quantity are presented in the table:
To improve the plasticity of the solution in water, it is necessary to introduce a complex additive that increases the elasticity and water resistance of the mass without loss of strength.
For mixing, you will need an autonomous concrete mixer.
How to fill the screed
A concrete screed on a wooden floor is carried out on a waterproofing film, on a floor on the ground - on a heater.
The solution is laid, starting from the far corner towards the exit. When leveling the surface, it is necessary to create a slope of the surface towards the drain. It is necessary to concrete the drain point in the bath separately manually - you need to close up all the cracks and smooth the inner diameter of the resulting hole.
The floor is poured continuously so that structure transitions do not form - these are potential weaknesses in the structure.
After laying the mortar, you can sprinkle dry cement on its surface and smooth it (). Thus, a strong and water-resistant base for cladding is obtained.
You can start facing after 3 weeks, then the cement ironing should be rubbed smoothly again.
Floor covering
Walking in the bath on bare concrete is uncomfortable. How to cover / paint the floor in the bath:
- Staining with waterproof paints (acrylic, special paints with antiseptics);
- Tiling, preferably with a rough surface.
You can make a floor that is warm and pleasant for your feet from a board 2 or more cm thick - flooring is made of wood and laid on top of a concrete screed or tile.
When building a bath on the site, the question arises of what material is better to make the floor from. Many, of course, will say that the concrete base will be cold and uncomfortable. And partly this is true. However, today technology allows you to make a warm concrete floor in a bath with your own hands with a step-by-step guide at no great cost.
The main advantages of concrete pavement are its durability, resistance to mechanical stress, water resistance, resistance to decay and rapid destruction. And these qualities are essential for a bath room with high humidity.
Ways to install a concrete floor
 There are two methods for pouring the concrete base of the floor in the bath:
- on the ground;
- on the lags.
The choice of filling method depends solely on the preferences of the owners of the bath and the funds allocated for the construction or repair of the bath room.
Laying concrete on the ground
Laying concrete on the ground involves the preliminary removal of a layer of turf from the surface of the earth, with a depth of about 40 - 50 cm. A layer of gravel about 15 cm high is poured into the resulting pit. The surface is carefully rammed.
A layer of sand, about 30 - 50 cm thick, is poured onto the gravel layer and is also carefully compacted. After that, you can pour a concrete screed, providing for a slope. You can pour one or two layers of screed, not forgetting the heat-insulating and waterproofing layers.
Laying concrete pavement on logs
Laying concrete pavement on logs is a slightly different pouring process. This option is good enough that a well-ventilated space is formed under the bath floor, which does not require the installation of additional ventilation systems in a concrete screed.
In this case, it is very important to pre-treat all wooden elements with antiseptic compounds. Then the dried logs are laid in place, creating a kind of grid of beams with a section of 10x20 cm.
A rough plank floor is attached to the logs. The thickness of the boards should be 2 - 4 cm. Do not forget about the waterproofing of the surface, as well as the insulation layer. Then a concrete screed is poured, which is reinforced with a metal mesh.
Scheme of the device of the concrete floor
 The device of a concrete floor in a bath room requires compliance with a certain technology for the production of work. There are many nuances that should be observed when pouring a concrete base.
It is conditionally possible to divide the filling process into several stages.
Step 1: creating a wastewater drain
A bathhouse is a place with high humidity, which requires a well-established drainage system. The construction of the drain must be approached responsibly and planned in advance, at the design stage of the bath building.

It is necessary to determine in advance the location of the drain and all items in the bathhouse. Drainage should not interfere with bath procedures. The best option for its location will be a place located under the shelf.
Another important detail is the creation of a direct sump, from which the pipe will already depart to the main sump. After mounting the straight line, proceed to waterproofing and pouring the plane.
Step 2: Thermal insulation of the concrete pavement
 Concrete has the property of long heating, which is not very good in bath rooms. To avoid long warming up, special attention should be paid to the insulation used in the concrete screed.
Today, there are several ways by which it is possible to insulate the concrete floor in the bath. The choice is up to the end user.
Warming methods
Firstly, you can make two layers of concrete screed, between which a layer of modern insulation will be laid. In this case, more time and physical costs will be required. This method is the most popular in today's interior decoration market.
Secondly, you can put a layer of thermal insulation on a ready-made concrete screed. However, in this case, you will have to provide an additional layer of finishing flooring. This will lead to additional financial and energy costs.
Most often, wooden flooring is chosen, which, in conditions of constant humidity, will not be able to last for a long time, even if it is covered with special compounds.
Step 3: pouring the first layer of concrete
Before the direct pouring of the first layer of concrete, the surface must be carefully leveled. If pouring is carried out on the ground, then it is necessary to carefully level the surface using crushed stone and sand, well-packed.
If laying is done on logs, use the building level to monitor compliance with the evenness of the surface of the log. If this moment is not observed, the concrete base may turn out to be uneven, which will lead to cracks and destruction of a reliable foundation in the future.
The first layer of concrete can be 120 - 150 mm thick. It can be poured immediately over the entire plane or divided into squares and poured in stages. After pouring, the concrete surface is leveled and left to dry completely.
It should not be forgotten that the floor surface should have a slight slope towards the drainage, otherwise the water will stagnate on the floor surface and create trouble for the owners.
For complete solidification and shrinkage of the concrete coating, it will take several days. Only after waiting for the necessary time, you can proceed to the next stage of work.
Step 4: waterproofing and thermal insulation layers
For a bath room, the most appropriate arrangement will be the arrangement of a double layer of waterproofing. Before laying the first waterproofing layer, it must be ensured that the concrete base does not have cracks, chips, bumps and oil stains.
On the dried concrete, apply several layers of liquid mastic. Each subsequent layer is applied only after the previous layer has completely dried. After complete drying, a rolled waterproofing material is applied to the mastics. There should be no gaps or gaps between the laid fragments of the film, so that the surface is carefully protected from the effects of harmful moisture.
After arranging the waterproofing layer, you can proceed to the thermal insulation of the concrete pavement.
Today, there are many options for insulation. For a bath, materials such as foam concrete, expanded polystyrene, expanded clay, boiler slag or mats are well suited.
For laying the heat insulator, the concrete surface must be smooth and without defects. The optimal layer of insulation material is 50 - 100 mm. The choice of material depends solely on the preferences of the customer and his financial capabilities.
Step 5: pouring the second layer of concrete
After the waterproofing and insulation of the plane have been carried out, you can start pouring the final layer of the concrete coating. For the mixture, smaller aggregate fractions are used.
Provided that the bath room is small, the finishing pouring can do without additional reinforcement with a metal mesh. However, if the area of \u200b\u200bthe room is impressive, additional reinforcement is indispensable. Also remember that concrete must be poured onto a clean and even surface.
The optimal thickness of the final layer of concrete coating is 100 mm. Do not forget also about the slope of the floor to the drains.
The top layer of concrete, as well as the bottom one, hardens within a few days. During this time, no manipulations are carried out in the bath. After complete hardening, after a few days, the concrete floor and the bath can be used for its intended purpose.
It should be noted that often the owners of the bath room resort to additional materials that are laid on a concrete base. For example, a plank floor is often used. In this case, you need to carefully treat the wooden elements of the floor with special antiseptics, against rotting and fungus.
A good option for a bath will be special wooden flooring, which can be easily taken out to dry after bath procedures.
Drainage system in the bath
As mentioned earlier, the drainage system and the necessary slope of the floor in the bath must be provided in advance and without fail.
There are two options for mounting drainage systems.

Directly under the bath, if the screed is made on logs
This option is good because it does not require large energy costs on the part of the customer. In this case, a drainage hole meter by meter and about a meter deep breaks out under the concrete base of the floor. The pit is covered with construction sand and large gravel.
It is important to provide an air vent system in the drainage pit so that the accumulated sewage does not create an unpleasant odor around the bath building.
You can dig a drainage hole away from the construction of the bath. In this case, you will have to carry out a special drainage pipe.
This option is good only in cases where the concrete screed is raised above the ground surface. If concrete is poured directly on the ground, this option of the drainage system is excluded.
Sewer pipes built into the screed
This option is used when the concrete surface is built directly on the ground under the bath building. Then there is simply no place for a drainage pit, so you have to dig it at some distance from the bath and run sewer pipes from the bath to the drainage pit.
In addition, sewer pipes will have to be built into the concrete surface of the bath floor, which also requires a little skill and knowledge of technology.
Building a bath is not an easy task that requires compliance with certain rules and conditions. In particular, this applies to the arrangement of flooring.
In this article, we will take a closer look at how to make a concrete floor in a bathhouse with minimal financial and time costs.
Benefits of concrete pavement
To begin with, let's look at why concrete floors in the bath are really the right decision.
This coating has a lot of positive characteristics:
- perfectly tolerates dampness;
- withstands increased mechanical and physical stress;
- with proper arrangement, it only becomes stronger over time;
- not subject to decay.
In addition, such a coating is easier to care for, and if you give it the right angle of inclination, it will also be incredibly simple.
And most importantly, the coating can be revetted with the same ceramic tiles that are resistant to sudden changes in temperature and high levels of humidity, which will make the bath attractive in appearance.

Below is an instruction, following which you can quickly equip a high-quality and durable concrete floor for a bath with your own hands. For clarity, the material is illustrated with high-quality photos, which will help you understand how to work more correctly.
Rules for arranging flooring
The correct arrangement of the concrete floor in a wooden bath involves the insulation of the coating, which will allow:
- ensure an optimal microclimate in the room;
- guarantee the safety of the coating;
- avoid floor cooling.
For conventional building materials, and the process itself involves the following steps:
- the soil is initially compacted with high quality;
- a cushion of crushed stone with a thickness of 12 to 15 centimeters is poured on top of the soil;
- if possible, crushed stone is recommended to be impregnated with bitumen.

A crushed stone cushion must be used in order to evenly distribute the loads of the floor covering on the ground surface.
Features of insulation
Concreting the floor in the bath provides for two options for insulation, each of which has its own advantages:
- First, one layer of the base is laid, a layer of heat-insulating material is laid between it, and then the second layer is laid.
- First, a base layer is laid, then thermal insulation, a warm floor is arranged on it and all this is covered with wood.
If you are interested in the first option, then to implement it, you need to follow these steps:
- for the lower layer of the base, it is recommended to use a concrete mixture with large gravel, the size of which will be from twenty to thirty millimeters;
- the thickness of the first layer ranges from 12 to 15 centimeters.
Advice. When arranging the flooring in a small bath, it is recommended to lay the coatings immediately over the entire area of the room.
If the room is large, then the base should be poured gradually, dividing the room by means of guides, which can be made of metal or wood, into strips of about one meter.
This will create a stronger and more durable coating. Not to mention the convenience of working according to this principle - it will be much easier to level the surface with a rule. After the surface is leveled, the guides are removed, and the remaining space is filled with concrete mix.

Please note - in order for the concrete floor in the Russian bath to harden, to become really strong, you need to wait a few days. In this case, you should not just close the room and forget about the coverage.
It requires some attention and care:
- the surface is sprinkled with sawdust;
- in order to avoid excessive drying, which will lead to cracks in the surface of the coating, the concrete is periodically sprayed with water.
The need for waterproofing
High-quality construction of concrete floors in the bath provides for the construction of a reliable and durable heat-insulating layer.
To do this, you will need special building materials:
- foam concrete;
- slag;
- expanded clay crushed stone;
- gravel;
- mineral wool;
- expanded clay sand;
- expanded polystyrene.
Naturally, each of the above materials has its own positive and negative characteristics.
The same slag is quite affordable and does not require significant financial investments. Expanded clay crushed stone is more expensive, but it will require somewhat less than slag.

Expanded polystyrene has excellent thermal insulation properties, but there are also disadvantages associated with the fact that this material can be damaged by rodents. If there are any on your site, then after a while the floor may sag. Not to mention the flammability of polystyrene.
For reference: Its analogue is Polpan, which is able to resist rodents.
Quite often, for optimal thermal insulation, it is recommended to use foam concrete, but such material has certain negative characteristics, in particular, it is too hygroscopic, and therefore it is necessary to provide a good level of waterproofing that will protect:
- from the water in the bathhouse;
- from high levels of humidity;
- from rising groundwater.

After the completion of work to ensure the waterproofing of the floor, work should begin on the insulation of the floor covering.
Below are the norms for the use of a particular material:
- slag layer - from 25 to 30 centimeters;
- foam concrete layer - 25 centimeters;
- expanded polystyrene - from 7.5 to 10 centimeters;
- gravel - from 10 to 15 centimeters.
Regardless of the chosen type of thermal insulation, it is necessary to lay it only on the lower layer of waterproofing of the concrete pavement. For this purpose, you can use roofing material, a conventional polyethylene film (depending on the thickness, it can be folded in half) or liquid waterproofing.
Advice. Before applying liquid insulation, it is necessary to prime the concrete, which will ensure the durability of its peeling from concrete.
The heat-insulating layer must also be covered with waterproofing, using any of the above materials for this.

Arrangement of the upper concrete layer of the floor covering
The sequence of work includes:
- filling;
- alignment;
- rammer.
It makes no sense to use reinforcement when arranging concrete flooring in a bath.
However, if the room is too large, then it is still recommended to perform reinforcement, for which a mesh is best suited, with a cell diameter:
- 10 by 15 centimeters;
- 15 by 15 centimeters
Innovative methods for arranging flooring in the bath
Above, we examined the traditional method of arranging flooring. Now let's dwell a little on the modern methods used in the arrangement of the floor.
In particular, we are talking about laying ceramic tiles, thanks to which:
- arrangement of the second concrete layer is not necessary;
- the tile is mounted on the thermal insulation of the first concrete layer.
This method implies a more accurate compliance of all works with the recommendations for creating a floor:
- use only mineral wool insulation specially designed for this purpose;
- a waterproofing layer is created from a special composition of concrete;
- glue ceramic tiles only on a special, especially thin composition.
In conclusion

Pay special attention to the choice of quality materials. In this case, it is better not to save money, because how reliable you make the flooring, how comfortable the microclimate in the steam room will be, you can get the most out of your stay in the bath.
In addition, the right choice of building materials, as well as their proper installation, will simplify the operation of the coating, reduce possible costs for repairs and subsequent maintenance of the floor.
If you adhere to all the above technologies during work, use only special material, then you will be able to do the concrete floor in the bath with your own hands as quickly as possible. At the same time, the coating will be durable, effectively retain heat.
In the presented video in this article you will find additional information on this topic.
The manufacturing technology of the floor in the bath is very different from the design in residential premises. This is largely due to high temperature and humidity, which, even with periodic exposure, affect finishing and facing materials. Following the step-by-step guide, you can make the floor in any room of the bath with your own hands.
Floor arrangement in the washing department of the Russian bath
Washroom is a room for taking water procedures, located in front of the steam room. Usually, in order to save space and for convenience, the washing room is combined with a shower room. It can also be installed font, barrel or small bath. In the Russian bath, the washing room is combined with a steam room.
The temperature in the washroom may vary. When cold air enters from the dressing room, it drops, sometimes below 30°C, and when hot steam penetrates from the steam room, it rises to 50–60°C.
This directly affects the method and technology of flooring. It should be well ventilated and dry quickly. Moisture and water retention should not be allowed, but at the same time it is necessary that the underground space is well ventilated without creating strong drafts.
For arranging a steam room, it is best to use one of two types of floor:
- The flowing one is a wooden plank, located on a supporting lag structure, which, in turn, is fixed on support pillars, a lower crown or a concrete base. For free flow of water, the floorboards are laid in a collapsible way with a small gap of up to 5–6 cm.
- A non-leaking floor is a monolithic hermetic coating made of wood or concrete with a slight slope. At the lowest point on the plane, a hole is mounted connected to the sewer system, which drains dirty water into the drain pit.
Both types have their advantages and disadvantages. A leaking floor is installed quite quickly, but if not properly insulated, it can cause too low temperatures in the washing room. This is especially noticeable when the bath is small or poorly insulated.
A non-leaking floor has a more complex structure, but it allows you to lay a full-fledged heat-insulating layer, which significantly increases comfort and reduces heat loss. But when performing repairs, you will have to completely dismantle the front layer, while for the leaking one you will need to remove only part of the floorboards.
What material can be used
For the manufacture of the floor in the washing room, wooden boards, concrete, insulating materials, plastic or metal pipes, galvanized fasteners, etc. are used. The total amount of materials required directly depends on the chosen floor design and its installation.
In the bath, you can make a leaking poured monolithic concrete floor with a tile or boardwalk lining. This design is only suitable if the building was built on a strip foundation. If piles were used, then it is recommended to lay galvanized steel with a crate.
To make a monolithic floor in a washing room, you will need:
- fine-grained sand and expanded clay;
- bituminous mastic;
- roofing felt and polyethylene film;
- extruded polystyrene foam;
- waterproofing material with a reflective layer (when using a warm floor);
- steel mesh for reinforcement;
- metallic profile;
- cement-sand mixture;
- porcelain tiles or planed wooden board;
- siphon and plastic pipe.
The described design may include laying a system of underfloor heating, which allows you to maintain a constant temperature in the washing room. This will also affect the performance of the coating - moisture will evaporate faster without penetrating into the seams between tiles or boards.
Video: what material to lay on the floor in the bath
Calculation of the amount of materials for the washing room
The size of the washing room depends on the total area of \u200b\u200bthe bath, so in each case it will be necessary to calculate the materials according to individual parameters. In order to understand how to do this, as an example, the calculation of the material for a room of 3 × 4 m is given. The floor is usually located at a height of 50 cm from the ground.
To install the floor you will need:
- Fine-grained sand. It will be used as a backfill on the ground. The layer thickness is 10–15 cm. The total volume of sand is: V=(3×4)x0.15
\u003d 1.8 m 3. - Expanded clay is used for filling in front of heat-insulating material. Layer thickness 25–40 cm. Total volume of material: V=(3×4)x0.4=4.8 m 3 .
- Extruded polystyrene foam is a heat-insulating material laid on top of the expanded clay cushion. Layer thickness 50–100 mm. When buying polystyrene foam from the Penoplex company, 3 packs of insulation will be required to insulate a floor with an area of 12 m 2.
- Cement-sand mixture. It can be bought ready-made or made by hand. The first option is recommended. The thickness of the poured layer is 7–12 cm. The consumption of the mixture with a layer thickness of 1 cm is indicated on the bag with the dry mixture. For example, when buying polygran sand concrete, the consumption is 18 kg / m 2. To fill the floor with a thickness of 1 cm, you will need: V \u003d (3 × 4)x18 \u003d 216 kg. For 7 cm layer: V=216×7=1512 kg, or 84 bags.
- Reinforcing mesh is used to strengthen the cement-sand layer. The optimal cell size is 50×50 mm. The total coverage area is 12 m 2 .
- Roofing felt is used to isolate expanded clay filling from a sand cushion and soil. The total amount is 12 m 2. It is better to purchase roofing material made in accordance with GOST with a density of 350 ± 25g / m 2.
- Polyethylene film is used to insulate the gravel pad. The total amount is 12 m 2. Optimum density - 150 microns.
- A metal profile will be required for the manufacture of beacons for leveling the screed. If the total area of \u200b\u200bthe washing room is 12 m 2, then approximately 25 m of the profile will be required.
- Siphon and drain pipe. Usually, it is brought to the center or far wall in the washroom. With this in mind, 4–5 m of a polypropylene pipe with a diameter of 25–32 mm will be required. For installation of a turn, an elbow made of a similar material is required.
The flooring is selected individually, taking into account the requirements of the owner. If you plan to lay tiles, then it must have anti-slip properties. For example, porcelain stoneware 30 × 30 cm in size is suitable for washing. One package is designed to cover 1.30–1.5 m 2 of the floor. Therefore, for a room of 12 m 2, 8–10 packages are required.
If it is planned to lay a wooden floor, then it is better to use a grooved larch floorboard with a thickness of 20 mm or more as floorboards. It is desirable that the material has already been dried to natural moisture.
Necessary tool for mounting the structure
For the arrangement and manufacture of the floor you will need:
- shovel;
- concrete mixer;
- water tank;
- container for concrete mix;
- metal rule;
- bubble level;
- construction knife;
- paint brush.
In addition to the basic tools, for laying porcelain tiles you will need:
- manual rail tile cutter;
- putty knife;
- mallet;
- container for tile adhesive.
When laying a grooved board, use:
- jigsaw;
- hammer;
- galvanized screws or nails.
How to make a concrete warm floor with tiling in a sauna
Before installing the floor, it is necessary to clean the soil inside the foundation from construction debris, branches, leaves, etc. If the inside of the bearing blocks is very damp, then you should wait for them to partially dry.
The sequence of actions when installing a monolithic floor in a washing room is as follows:
- The surface of the soil must be carefully leveled, compacted, and large stones, if any, removed. The inner surface of the strip foundation is treated with bituminous mastic in 1-2 layers.
- At this stage, you need to consider entering the drain pipe through the strip foundation. For example, a hole is made in a concrete block with a puncher, into which a piece of steel pipe is mounted. Through this jumper, a polypropylene pipe will be inserted under the floor structure.
- The drain must be carefully mounted in the place where the corresponding hole will be located. A plastic plug must be put on the end of the pipe so that sand, expanded clay or concrete mixture does not get inside.
- It is necessary to pour fine-grained sand on the surface of the soil, carefully compact it. The layer thickness is 10–15 cm. If the sand is too dry, then after leveling the surface is slightly moistened. This will help to tamp the pillow more quickly and efficiently.
- Now you need to lay the roofing material on the inner surface of the foundation with an overlap of 18–20 cm. When laying rows, it is recommended to leave an overlap of 13–15 cm. For a more rigid fixation, the edge of the web is smeared with bituminous mastic. If necessary, the roofing material is attached to the surface of the foundation.
- Next, you need to lay out a layer of expanded clay up to 40 cm thick. After backfilling and leveling this material, 6–8 cm should remain to the upper edge of the foundation.
- It is recommended to cover the expanded clay pillow with a polyethylene film 150–200 microns thick. The joints are covered with paper adhesive tape. After that, a heat-insulating material up to 10 cm thick is laid on the polyethylene.
- Now you can install beacons to distribute the concrete mixture over the surface. The step between the guides is 60–100 cm. A cement-sand mixture is used to install the beacons. In the manufacture of guides on cement, a reinforcing mesh is laid so that it is located between the insulation and beacons.
- When installing beacons, it is necessary to ensure that a slight slope is formed towards the drain hole. To do this, each guide is checked by level.
- At the bottom of the wall along the perimeter of the washing room, you need to glue the damper tape. The processing height is 10–15 cm. After the concrete has dried, the protruding excess of the tape can be cut off.
- Now you need to fill the screed. It is recommended to prepare the mixture for this in a concrete mixer.
The concrete screed gains full strength in 25–28 days. After 3–5 days, you can carefully dismantle the guides and fill in the voids that have formed. In the process of drying, especially in the first week, the screed should be moistened with water 2-3 times a day. Flooring can be laid no earlier than after 25 days.
Video: do-it-yourself drain in the bath (step by step instructions)
How to treat a pouring wooden floor
The composition is applied with a paint brush on a cleaned and dry surface, which has previously been sanded. It is also recommended to disinfect.
The interior of the washing room can be dried (use a special substance based on vegetable oils that forms a film coating). This material perfectly protects wood from the negative effects of high temperature and moisture.
The room where the sink is located can simply be painted, but it is recommended to use only special water-repellent compounds.
With frequent use of the bath, it is necessary to carry out periodic impregnation of wooden surfaces (once every six months), since this coating tends to wash out. The average cost of semi-matte varnish for baths and saunas varies from 550 to 800 rubles per 1 liter.
Do-it-yourself steam room flooring: a step-by-step guide
The steam room is the central room in the bath. The air temperature in it can reach 70°C with a humidity of 80%. In a Finnish sauna, the air is 10–20°C hotter, but the humidity is noticeably lower.
The requirements for floor construction in the steam room and washing room are almost the same. Water and condensed moisture must be freely removed from the surface, while it is necessary that heat is retained, and the lining must have anti-slip properties.
According to the type of arrangement, the floor in the steam room is also divided into two types: leaking and non-leaking.
The best option for baths on a pile foundation would be the construction of an insulated leaking floor with a plank or grating flooring. The most common device scheme for such a floor will consist of:
- Floor beams.
- Skull bar.
- Boardwalk subfloor.
- Pit for the formation of a drain hole;
- Drainage polypropylene pipe.
- Water ladder.
- Expanded clay thermal insulation pad.
- Reinforced concrete screed.
- Plank grating.
- Waterproofing with an overlap on load-bearing walls.
When installing the floor, you can use expanded clay filling and concrete screed. This is a laborious process that requires certain skills in working with a cement mixture.
Expanded clay can be replaced with conventional mineral insulation, and instead of a screed, put a sheet of galvanized steel.
Material selection and calculation
The size of the steam room directly affects the amount of material required. Therefore, as an example, a calculation is given for arranging a floor in a 3 × 3 m room.
To make a leaky floor you will need:
A polypropylene pipe, a drainage elbow and a ladder are purchased taking into account the location of the drain hole. To organize a drain in the middle of the room, you will need to lay a pipe, put on a swivel elbow at an angle of 90 ° C, and make an extension to drain the drain flush with the floor surface.
Floor making tool
You will need the following tool:
- electric jigsaw or wood saw;
- construction knife;
- metal scissors;
- screwdriver;
- electric planer;
- hammer;
- square;
- chisel.
How to lay the floor in a frame bath on a pile foundation
Before you arrange the floor, you will need to carefully examine the lower crown and the supporting beams. If there is any damage or signs of decay, then this element requires partial or complete replacement.
The manufacturing technology of the pouring floor in the steam room consists of the following:
- At the bottom of the bearing beams cut into the crown, draft bars are attached. To fix the elements, galvanized nails 60–70 mm long are used. Mounting step - 50 cm.
- A rough flooring made of edged boards is laid on the supporting bars. To do this, it is sawn off with a size corresponding to the width of the opening between the beams. Fasteners are not used during installation. A hole is cut in the draft flooring for the entry of a drain pipe.
- After laying the flooring, the floor surface is covered with roofing material with an overlap on the wall of 15–20 cm and an overlap of 10 cm with each other. The joint seam is smeared with bituminous mastic.
- The space between the lags is filled with heat-insulating material. Most often, basalt wool is used in rolls, but expanded clay pillow can also be made.
- The flooring of the guides is carried out from a bar or a thick board. To do this, the material is laid in such a way that a slope is formed, for which you can use linings under the timber at the base.
- The guides are attached directly to the support joists using galvanized nails or self-tapping screws 50–80 mm long. After that, the space between them is filled with basalt wool.
- A galvanized sheet is laid on top of the guides with an overlap of 15–20 cm on the wall. Only special self-tapping screws with a flat head are used for fastening. The step of fastening along the wall is 15–20 cm, along the guides - 20–30 cm. After laying, a small hole is carefully made in the center of the sheet to drain the water.
- The support beams are fastened under the plank pouring floor. To do this, a beam with a section of 70 × 70 mm is attached to the wall using a “L”-shaped galvanized corner with a step of 70–100 cm. Floorboards from a polished board are laid on top of the beams (it is better to use larch). The distance between them should be 3-5 mm.
Galvanized sheet is used infrequently, but this is a pretty good solution that allows you to unload the load-bearing floor structure. If the bath is erected on a strip foundation or is settled in the basement of the house, then it is better to give preference to a grate with further pouring of a concrete screed.
Video: how to make a plank floor with a slope in a larch steam room
How to prevent rotting logs and floorboards
To treat the floor in the steam room, a heat-resistant (withstands up to 120 ° C) water-based varnish is used. This is an elastic coating that protects the wood from the penetration of moisture, vapors and dirt.
The composition is applied to the prepared floor covering with a paint brush in 2 layers. Application is carried out in a ventilated room at a temperature of 5–30°C. When arranging a flowing floor, processing should begin after laying the load-bearing log. Only after the composition has dried (2-3 hours should pass), you can proceed to laying the floor covering and impregnating it.
This composition is not suitable for processing furniture in the steam room. Benches, stools, chairs must not be covered with it.
The average consumption of the mixture is 18 m 2 /l.
Installation of the floor in the bath is a technologically complex and time-consuming process, largely depending on the individual characteristics of the structure, its dimensions and the type of bearing base. Before performing this work, it is recommended to draw up a diagram where you want to designate its main elements and components. This will allow you to more accurately think over the flooring technology specifically for the parameters of your bath.
When the walls of the bath are erected and the roof is completed, it's time to move on to the floors. With self-construction, making a concrete floor in a bathhouse with your own hands will be the most acceptable option in terms of the simplicity of the process and operational parameters.
The bath, especially the washing room, is characterized by high humidity. Upon contact with water, the tree will quickly rot and become unusable, which will require periodic repairs.
The construction of a concrete floor in the bath will dramatically increase the period of non-repair operation. If all stages of work are performed correctly, then the next repair may be needed only after 20-30 years.
Design cons
Among the shortcomings characteristic of a concrete screed, we should mention the presence of wet work on the preparation and pouring of the mortar and the need to maintain a technological break for the curing of the mortar.
In addition, there is a popular belief that the concrete floor is very cold. This is true if the screed is poured directly on the ground. The use of heat-insulating materials of the required thickness as underlying layers will make the temperature of the floor covering quite acceptable for operation.
In order for the concrete floor in the bath to turn out to be warm and durable, it is necessary to perform a multi-layer structure:

- sand bedding on compacted soil;
- a layer of gravel or small gravel;
- thick polyethylene film;
- rough screed;
- waterproofing layer;
- insulation;
- clean screed.
The above list is universal and can be applied to any soil.
In order to have a detailed idea of how to make an insulated concrete floor in the washing and steam room in the bath, it is necessary to consider in more detail the process of performing each layer of the structure. The key to successful do-it-yourself work is to follow the sequence of technological stages and use the appropriate materials.
Foundation preparation
Before starting work, it is necessary to prepare a solid foundation. If this is not done, then all the efforts spent on installing a concrete floor in the bath will be spent almost in vain. After a very short time, the floor will either crack, or due to capillary rise, moisture will rise from the soil.
The first step is to remove the top layer of soil with plant residues. The surface is then levelled. A small pit is dug in the corner of the room or in its center. The water generated during the operation of the bath will drain into it.

Drainage from the pit outside the foundation is carried out with the help of a drainage pipe dug at an angle with a diameter of 100-200 mm. This scheme allows you to create more favorable operating conditions for a wooden bath.
Seal
After leveling, the soil must be compacted. To do this, you can use both specialized tools (vibration platform) and manual rammers made from cutting logs or timber.
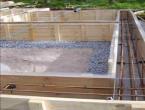
The compacted surface is covered with a layer of sand 5-10 cm thick and then a layer of gravel or small gravel about 10 cm thick. These two layers are also carefully compacted. Such measures are designed to prevent capillary rise of moisture from the soil.
On top of the gravel layer, a rough screed is made with a cement mortar with a thickness of about 5-10 cm.
Mixture recipe
To prepare the solution, you will need the following ingredients (by weight):
- cement brand M400 - 1 part;
- river sand - 1.2 parts;
- gravel, crushed stone of fractional size 5-10 mm - 2.7 parts.
When using M500 cement, the amount of sand and gravel can be increased to 1.6 and 3.2 parts, respectively.
Mixing
The measured components are thoroughly mixed. The amount of water that needs to be filled in is determined locally. Here it is necessary to maintain a balance.

With a large amount of water, it is convenient to fill and level the mixture. However, the curing time of the screed and the risk of cracking during the drying process increase dramatically.
When doing do-it-yourself work, most often water is added in small portions while stirring the mixture until a plastic, thick, evenly moistened mass is obtained.
Insulation
Before pouring the rough screed, a dense polyethylene film is laid on the surface of the layer of leveled and compacted gravel. Its main purpose is to prevent the penetration of cement mortar or water from it into the gravel bed. In the first case, a bridge for capillary moisture will appear. In the second, the strength of the screed will decrease.
After filling and leveling the surface with the required slope, a technological pause is made, during which the screed hardens and gains strength. It usually takes two, maximum three days. During this time, the surface should preferably be lightly moistened periodically or covered with a damp cloth to reduce the risk of cracking.
A layer of crushed stone is poured at the bottom of the pit and cement mortar (prepared in the same proportions as the mortar for the screed) is poured 5 cm thick.

The walls of the pit must be concreted with a thickness of at least 5-7 cm. To do this, after the bottom has completely hardened, formwork is made of boards along the perimeter of the pit. Then the concrete solution is prepared and poured.
Implementation of hydro and thermal insulation
A layer of waterproofing is a must. It prevents the penetration of moisture both from the side of the soil and from the side of the washing rooms, which in winter conditions keeps the base on the ground intact.
Most often, a roofing material laid in two layers is used as a waterproofing layer. The rolls are rolled overlapping over the entire surface of the floor with a slight (3-5 cm) bend onto the walls. Places of overlap and junction with the walls are carefully smeared with bituminous mastic.

The second is laid in a similar way with a slight offset relative to the first layer.
No exception is made for the pit. Its walls and bottom are also covered with double waterproofing.
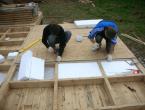
Comfortable operation is impossible without insulation of concrete floors in the bath. For these purposes, 5 cm thick extruded polystyrene foam (EPS) boards are best suited. This material is immune to moisture and has sufficient density and mechanical strength. XPS slabs along the perimeter have tongue-and-groove protrusions that ensure the creation of a continuous monolithic heat-insulating layer.

The implementation of thermal insulation begins with a pit. Then its walls are lined with the level of the floor. The final stage is the laying of XPS boards on the floor. All remaining gaps between the plates are filled with mounting foam. The result is a single monolithic heat-insulating layer.
A finishing screed is used as the final finishing layer when constructing a concrete floor in a bath. The components and the principle of its preparation are completely similar to the rough screed.
The only difference is the presence of a reinforcing layer, which is usually a metal mesh. As a rule, the operation of concrete floors in the bath does not provide for the impact on them of strong loads, therefore it is quite possible to replace the metal reinforcing mesh with fiberglass.

The thickness of the screed layer to be concreted is about 7-10 cm. The reinforcing layer should be at a distance of about 3 cm from the screed surface. This arrangement provides the greatest strength of the surface layer.
Solution preparation
The potting mix is best prepared in large batches in a concrete mixer. This will save you a lot of time and effort. In addition, better results are obtained if the entire area is concreted at once, or at least the maximum possible part of it. This allows you to make a more durable monolithic coating compared to pouring in small areas.
Work progress
Work begins with a pit. First you need to make a finishing screed bottom. This is followed by the execution of wooden formwork and concreting of the walls flush with the heat-insulating layer. Here it is also necessary to ensure that the solution does not get inside the drainage pipe.

The further course of work is to evenly distribute the concrete mixture on the floor surface. As soon as the layer thickness is about 5-7 cm, a reinforcing mesh is laid out and it is poured with a layer of mortar of the required thickness.
Drying and elimination of imperfections
Drying the final screed is carried out in the same way as for the rough layer:
- drying time is 2-3 days;
- during the drying process, the surface is periodically moistened.
If cracks formed in the bath during the maturation of concrete floors, it means that the moisture regime of drying was violated. Cover needs to be repaired. To do this, cracks are patched and filled with a repair compound of cement and sand, taken in equal proportions.
Finishing options for further use
There are a large number of options that allow you to finish the concrete floor in the bath:
- covering with ceramic tiles;
- arrangement of wooden ladders over the entire surface of the floor;
- installation of a wooden leaky raised floor.

The answer to the question of how to cover the surface of the finishing screed entirely depends on individual preferences and financial capabilities.