Installing a polycarbonate greenhouse: do-it-yourself assembly instructions. Installation of a polycarbonate greenhouse: do-it-yourself video, installation and instructions, correct soil on the site Instructions for installing a greenhouse
Bulky and inconvenient glass greenhouses are confidently being replaced by their counterparts made of polycarbonate. Due to their strength and lightness, they are in great demand among summer residents. But most of all, the user is attracted by quick installation, since the simplest installation of a polycarbonate greenhouse is carried out directly on the ground, without a foundation.
How to equip the foundation for installing a practical greenhouse
First, the master needs to choose the type of future base. There are seasonal and permanent options for installing a polycarbonate greenhouse using concrete, blocks, timber, or performing a point and strip foundation.
Urgent installation of a polycarbonate greenhouse without a foundation, directly on the ground, saves significant funds and makes it possible to transfer the structure to the right place on the site. At any time, you can disassemble a simple wooden foundation.
Is there a need for a foundation?
At the beginning of work, each master has a question about how to properly install a polycarbonate greenhouse, about choosing a base for it and optimal materials. Let's say the master plans to assemble an arched polycarbonate greenhouse. It weighs 60-70 kg and will move with strong gusts of wind. In this case, it is simply necessary to make a foundation in order to fix the structure on it.
Among the positive qualities of a greenhouse on a good basis, we can confidently name:
- extended service life,
- the presence of reliable protection against showers, spring floods, weeds and temperature changes,
- well-warmed earth
- creation of a rigid structure, relevant for areas on swampy soils.
In a polycarbonate greenhouse standing on the ground, high beds cannot be installed. The gardener will have to plant the plants later.
Under a polycarbonate greenhouse, you can make a strip foundation of concrete mix, bricks, sleepers or in the form of a trench covered with gravel. And you can install the structure on metal piles screwed into concrete, crushed stone or directly into the ground.
If you have to move a temporary greenhouse to a new location, a point-type foundation is suitable for it. Such a base is made from timber scraps and connected to the greenhouse with steel corners.

So, in order for the structure to serve the owner for many years, he must put a polycarbonate greenhouse with his own hands on a tape-type base. On swampy soils, a block foundation is a good choice. The timber foundation is short-lived, since the wood in the ground will surely rot and will soon require replacement.
Where is the greenhouse located?
When deciding on a place for a greenhouse, you need to take into account important circumstances:
- lighting mode: all day the sun's rays should fall on the site,
- equipping the structure with a special soil heating system, which will allow the greenhouse to be operated all year round,
- taking into account the directions of the "wind rose".
To install a polycarbonate greenhouse with your own hands for winter use, you need to find a place where cold winds do not fall. Under this condition, you can significantly reduce the cost of electric heating.
Installation on a concrete foundation

When the master already knows how to install a polycarbonate greenhouse, he must determine its dimensions and choose the right material for assembling the frame. For construction, a metal profile, PVC pipes or wooden beams are used. These materials have different service life.
If the summer resident is still thinking about what to put a polycarbonate greenhouse on, he can use the most reliable, time-tested building material, concrete, as a base. First you need to dig a pit, lay a gravel layer and fill it with sand. The formwork must be erected, retreating 0.2 m from the soil layer. Lay the fittings on a sandy layer, pour the solution into the finished box and the next day proceed with the installation of the frame.
On a brick foundation, the greenhouse is held by fastening to the hinges. The point base is also quite easy to install: dig a few holes, fill them with concrete and install the frame legs in them.
Installation of a polycarbonate greenhouse on the ground

If the owner of the cottage could not decide what to put a polycarbonate greenhouse on, experts give good advice. It turns out that there is a good opportunity to erect a structure on a leveled plot of land, as in the photo. There is no need for compaction, which reduces soil fertility. According to the instructions, the summer greenhouse is placed directly on the prepared soil, without constructing a solid foundation of concrete.
Do-it-yourself installation of a polycarbonate greenhouse without a foundation has several indisputable advantages:
- significant savings in the family budget,
- simple installation technology,
- the ability to perform work without the involvement of assistants,
- mobility,
- easy and quick disassembly.
Installation on bare ground also has negative sides: the greenhouse will lose up to 1/10 of the heat and create access to useful plants for insects, rodents and weeds. It will not be possible to place two greenhouses on a small site, but a structure without a base can be moved from time to time to another place with better quality soil.
Timber base for garden greenhouse
A beam support is used when a greenhouse is urgently needed to grow a new crop that needs a separate comfortable place. This option helps to significantly save on building materials and is usually used for the installation of seasonal greenhouses.
Among the significant advantages of a timber base, experienced users call:
- quick installation and dismantling to transfer the greenhouse to another location,
- smooth edges of the beam, allowing you to make a geometrically correct frame of the greenhouse,
- environmental friendliness and material safety,
- creating a favorable microclimate for planted plants, thanks to good air permeability and heat retention,
- easy repair in cases of decay and damage by pests.
To increase the operating time of the beam, you need to impregnate it with special antiseptics.
The owner of the dacha will have to finally decide what the polycarbonate greenhouse is installed on, whether to make a foundation at all and how to choose the material for it. Of course, the greenhouse will stand without it, but the foundation will be able to solve the problem of weed growth and pest penetration. A professional talks about the need for a foundation for a greenhouse in this video:
To grow vegetables indoors as efficiently as possible, it is important to take care of the future harvest even at the stage of greenhouse construction. After all, if the shelter is not made according to the rules, no feeding and stimulation will help to get the full return from the plants. Proper installation of a polycarbonate greenhouse is the key to its trouble-free operation for many years.
Polycarbonate is a fairly flexible material that allows you to assemble a greenhouse of almost any shape. However, only two types of structures are popular among gardeners, the most reliable and easy to perform:
- arched;
- tented.
Small greenhouse on site
Arched shelters for closed ground
Structures with arched ceilings are the most durable and economically justified. Their shape is such that snow and rain do not linger on the slopes. The arched greenhouse withstands gusts of wind better than other types of structures.
Making arches yourself requires engineering skills, experience, and the right tools. Therefore, arched frames are more often not made on their own, but are purchased ready-made, industrial production.
Installation of an arched polycarbonate greenhouse from the manufacturer is quite simple and can be done by almost any summer resident.
Standard three-meter spans are completely covered by one sheet of polycarbonate, which is attached only at the ends, which reduces the consumption of expensive material.

Arched polycarbonate greenhouse
Tent greenhouse structures
A tent greenhouse is a house with a gable roof, located on vertical racks. Most often, tents are erected by hand, although you can sometimes find ready-made frames on sale.
The dimensions and proportions of such a design can be any, depending on the wishes of the owner. The consumption of materials for a tent greenhouse is greater than for an arched one, because polycarbonate will have to be cut according to the size of the frame and carefully fixed on all sides.

House shaped structure
Instructions for installing a finished polycarbonate greenhouse
The installation of a polycarbonate greenhouse is conditionally divided into three stages:
- Preparing the site and laying the foundation.
- Assembly and installation of the frame.
- Polycarbonate attachment.
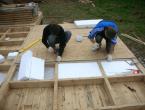
Site preparation and foundation laying
Before installing the greenhouse, the site is carefully leveled, cleared of debris, vegetation, if necessary, remove the top layer of turf. Small temporary greenhouses usually do not need a foundation. If the greenhouse is large and it is supposed to be used year-round or for ultra-early growing of vegetables, then you can’t do without a foundation.
The base can be point, that is, laid only under the bearing supports, or tape - around the entire perimeter. The material used is wooden beams, concrete blocks, bricks or concrete pouring.
The main stages of the construction of a concrete foundation:
- Mark the outlines of the future structure on the ground, clearly observing the angles of 90 degrees.
- Dig a trench along the perimeter with a depth of 30-50 cm and a width of 20-30 cm. In areas with deep freezing of the soil, you will have to dig deeper - up to 1.0-1.2 m.
- Fill the bottom with gravel of medium fraction with a layer of 10-20 cm, depending on the depth of the trench.
- If the soil is very loose, sandy, crumbles easily, then formwork must be installed. To do this, wooden shields are knocked together and lowered parallel to the walls. The formwork should rise 10 cm above the surface. In areas with dense soil, there is no need for formwork.
- For greater strength, steel reinforcement or mesh is lowered into the trench.
- Fill the hole with concrete. Filling is carried out in layers around the entire perimeter, and not each wall separately.
- Level the concrete surface with a level and leave for 3-4 days until completely solidified.
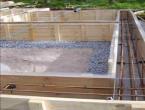
![]()
Under the foundation it is necessary to dig a trench
Assembly and installation of the frame
Industrial frames are supplied complete with all necessary fasteners, however, to facilitate the work, it is necessary to prepare the following tools:
- pliers;
- a screwdriver or a strong Phillips screwdriver;
- roulette;
- marker;
- a hacksaw with fine teeth or a construction knife.
Detailed instructions for assembling a polycarbonate greenhouse may differ depending on the manufacturer, but the general recommendations are the same for everyone.
First of all, you need to find an assistant, because one person cannot cope with such a voluminous design.
Frame assembly steps:
- The assembly starts from the ends. The central arched part is connected to the uprights using the screws and fasteners supplied with the set. It is more convenient to do this on the ground, and not in an upright position.
- Install the end on the foundation, check the level of verticality and fasten it with anchor bolts or clamps.
- At the top, strictly in the middle of the arch, a horizontal cross member is screwed. The same crossbars are placed on both vertical supports. In order for the guides to be on the same level, be sure to measure the exact distance with a tape measure and make appropriate marks with a marker.
- Assemble the next arch, install on the base and screw to the crossbars. The observance of 90 degree angles is checked, after which the vertical supports are finally attached to the foundation. The step between the arches is 2.1 meters, this is due to the width of a standard polycarbonate sheet.
- In the same way, they do with all the other arches and crossbars, not forgetting to constantly check the corners with a level.
- Proceed to the installation of doors and transoms at the ends. First, frames and additional stiffeners are screwed. They are attached to the doorway, after which they check their performance. If the door does not close, clings to the frame or spontaneously opens, then the opening is not set evenly.
- To correct the situation, the structure or part of it is disassembled and then reassembled, carefully aligning the corners and checking the verticality. A correctly assembled end, together with doors, vents and stiffeners, when checked by a level, should form a single plane. This completes the installation of the greenhouse frame and you can cover it with polycarbonate.

Connection points are carefully fixed
Fastening polycarbonate to the frame
The assembly of a polycarbonate greenhouse is approaching the final stage. Covering the frame with sheets is quite simple. When installing a purchased greenhouse, you will not need to cut almost anything, because one six-meter sheet covers the standard three-meter arch. You will have to work with a hacksaw only at the ends of the structure.
Stages of work:
- Before use, the protective film is removed from the polycarbonate. Under the film, the sheets have a layer that protects against ultraviolet radiation, therefore, during operation, polycarbonate is fixed with this side out.
- The ends of the sheets are sealed with a sealant in the shape of the letter P, put on glue or a special vapor-permeable film. If this point is neglected, condensate, cold air and insects will enter the sheet tunnels through non-hermetic ends, as a result of which the greenhouse will retain heat worse.
- Together with an assistant, one edge of the sheet is fixed at the foundation on the first arched span, after which the sheet is thrown over the structure and fixed on the other side. Work is best done in calm weather, as even small gusts of wind blow away light sheets.
- If the greenhouse is small, the sheets are connected to each other with a special connector supplied in the kit. On large structures, it is better to additionally fix the polycarbonate along the entire length by screwing it to the arches. For fasteners, use thermal washers with a seal or, in extreme cases, ordinary self-tapping screws with washers. Mounting holes are drilled slightly larger than the diameter of the self-tapping screws to give a margin in case of thermal deformation. Holes should be at a distance of 0.5-1.0 cm from the edge of the sheet.
- To decorate the ends of the greenhouse, the sheets are applied to the facade, screwed in several places, after which the excess polycarbonate protruding beyond the borders of the facade is cut off. It turns out a solid wall in which doors and vents are cut out. The cut pieces are decorated along the edges with a sealant and screwed into the appropriate places.

Installation of polycarbonate
Installation of a homemade polycarbonate greenhouse
Only experienced craftsmen can independently design and assemble a polycarbonate greenhouse.
As a frame for a home-made structure, wooden beams, metal corners, PVC plumbing pipes or a galvanized profile used in drywall construction are used.
The steps for creating a homemade greenhouse look like this:
- Drawing a detailed design plan on paper, indicating all dimensions. All subsequent assembly of the greenhouse takes place based on this plan.
- Foundation laying. This stage is no different from the actions during the construction of the finished greenhouse.
- Preparation of material for the frame. Cut the required number of parts of the appropriate length. If the frame is wooden, the bars are impregnated with an antifungal primer or machine working.
- Frame assembly.
- Sheathing of walls with polycarbonate.

Detailed drawing of a homemade greenhouse
When designing a greenhouse, the size of a standard polycarbonate sheet of 6.0 by 2.1 m must be taken into account. By fitting the structure to these measurements, you can avoid cutting waste.
Another important point is that there should be supports or roof elements at the joints so that the polycarbonate has something to attach to. Therefore, the distance between the posts should not exceed 2.1 m.
A few more points to consider when installing a polycarbonate greenhouse:
- the most reliable material for the frame is a galvanized profile. It does not rust like ordinary iron, does not rot like wood, is stronger than PVC pipes;
- the height of the structure, together with the roof, should be within 3-3.5 m. In lower greenhouses, air circulation is disturbed, and too high greenhouses are not economically justified for personal plots;
- when designing a door to a greenhouse, it must be taken into account that a garden wheelbarrow must pass through it;
- vents are located at the top of the structure.
To better imagine how a polycarbonate greenhouse is assembled, you should watch the video of the masters. The videos clearly show the entire installation process.
A properly assembled greenhouse is a stable and durable structure that can last more than one year. Polycarbonate shelters combine excellent light transmission, heat-insulating properties and ease of use.
The dream of any gardener is to have a greenhouse on the site in order to provide himself with fresh vegetables or earn money by selling off-season fruits and herbs. If you decide to buy a ready-made structure and want to equip a greenhouse yourself, follow the instructions given in the article and get a quality structure, saving on assembly and construction.
Choosing a place for a greenhouse on the site
To grow a good crop in a greenhouse, you first need to choose the right place for its equipment.
Rules for the successful location of the greenhouse:
- trees and shrubs on the site should be protected from drafts and winds;
- the development of plants should not be interfered with by the surrounding buildings - the distance to the nearest buildings should be about 3 m;
- long walls are located in the east-west direction for maximum sun exposure of plants in the greenhouse, and short walls - south-north;
- trees and shrubs on the site should not shade, and the root system should take moisture from plants in the greenhouse;
- the approach to the construction should be convenient.
Did you know?Today, the largest greenhouse structure, covering an area of 121 hectares, is located in the UK - the Royal Botanic Gardens, Kew.
The best time to install a greenhouse is autumn, when the plants have stopped fruiting and the crop is harvested. At this time, nothing will prevent you from choosing a site for installation and free space for installation. The structure will overwinter without damage, since polycarbonate is not affected by low temperatures.

Site preparation begins with marking and cleaning. The site for installation must be marked with pegs, remove the top layer of soil, cleaning it from roots and large stones. Tamp and level the vacated space using a building level.
Self-installation of polycarbonate greenhouses
For assembly, you will need an assistant, since it is impossible to fix and support the structure alone. Stock up on the necessary tools (screwdriver, wrenches, knife, level, square).
Did you know? Most greenhouses - in Holland. They occupy 10,500 hectares, which is one fourth of the area of the entire country.
Design choice
When choosing a structure, one should take into account temperature fluctuations in the region and wind loads, take into account the stability of the structure. You should not choose a large greenhouse if you are not going to use the entire area - a smaller area is easier and easier to heat.
The most common and convenient designs are:

Foundation preparation
Many believe that the foundation is necessary for capital structures, and the lightweight construction of the greenhouse can be placed directly on the ground. This decision is justified by the mobility of the greenhouse, free movement on the site.
But the stationary base, in turn, provides strength and stability, and is necessary in the following cases:
- the wind rose in this area creates windage - the structure can be torn off by the wind;
- large greenhouse sizes - lead to deformation and subsidence;
- the greenhouse is used all year round without interrupting the growing process;
- by placing the structure above ground level, it is possible to save up to 10% of heat;
- unfavorable climatic conditions and external influences - protection against freezing, ingress of moisture, cold air, rodents and pests.
Polycarbonate greenhouses require a rigid base. By choosing easy-to-build types of foundations, you can cope with their construction even with minimal construction skills.
The simple design of the point foundation allows you to install the greenhouse horizontally on supports made of wood, brick, concrete or foam concrete blocks or pillars. The larger the structure, the more durable the material for the supports must be chosen. This type of foundation is suitable for temporary and light greenhouses.

For a medium-sized structure, 6-8 reference points will be needed:
- Carry out the markup according to the size of the frame.
- Support posts are placed in the corners (they are dug into the level with the soil).
- Evenly position and dig in the remaining columns a meter apart.
- Stuff a corner for the subsequent fastening of the frame.
When installing a support-column structure, roofing material can be used as a formwork for pouring pillars. Such a foundation is reliable, durable and inexpensive, but additional work is needed to insulate the base and rigid strapping.
It is used for stationary heavy greenhouses of large sizes and is a masonry laid in the ground along the perimeter of the following materials:
- concrete- formwork is installed in a shallow trench along the perimeter of the base of the greenhouse and poured with concrete or rubble concrete;
- bricks or blocks- such materials can be installed on a sandy base, fixing with a cement solution;
- wooden beam or sleepers- the material is knocked down and fastened into a frame, and installed on roofing material or roofing felt to provide waterproofing. Railway sleepers are treated with anti-rot compounds, but the timber will have to be treated.

The order of work on the device of the strip foundation is as follows:
- Marking and digging trenches.
- Substrate preparation (sand, gravel, roofing material).
- Formwork installation, reinforcement and concrete pouring (for concrete foundation).
- Ultimate waterproofing.
The basis for the greenhouse is a frame made of a wooden bar of a suitable section. It is easy to attach any frame to a tree and change the position of the greenhouse with further use. For greater reliability, additional posts can be installed in the corners when attaching the base of the greenhouse.
Important!Any wood requires treatment with antiseptics and impregnations to protect it from moisture and decay.
Procedure:
- Marking the site for the foundation.
- Digging a trench, the depth and width of which depends on the section of the beam (for example, with a section of 10 × 10 cm, the depth is 15 cm, the width is 80 cm more than the thickness of the beam).
- Laying roofing felt or roofing felt overlap for waterproofing.
- Laying the beam on the base and fastening the frame with corners.
- Leveling by level (correct minor deviations by adding sand or gravel).
- Pros:
- high-quality thermal insulation;
- low cost;
- ease of installation and operation;

- Minuses:
- low strength;
- short service life;
- the need for impregnation.
Whatever type of blocks you choose, they all fit into the foundation in a tape way:
- Sand is poured at the bottom of the trench, moistened and rammed.
- The first row of blocks is laid on a cement mortar.
- In the corners lay out 2-3 blocks in height, strictly observing verticality.
- Pull the cord between the corner blocks for a horizontal level.
- The blocks are fastened with mortar and so fill all subsequent rows.
Important! When constructing any foundation, it is necessary to install anchors (bolts, reinforcement, corners or metal plates), with their help, the greenhouse is attached to the foundation.
- Pros:
- good waterproofing;
- durability;
- favorable cost.

- Minuses:
- low thermal insulation;
- weak strength.
Concrete
This type of foundation is used under such conditions:
- proximity to groundwater;
- installation of a greenhouse on a slope;
- deepening the greenhouse into the ground.
Did you know? Icelandic geysers are used for greenhouses. This provides enormous savings on heating.
Work sequence:
- The trench under the foundation is covered first with sand, then with gravel and compacted to the ground level.
- Install formwork over gravel.
- Distribute the reinforcement, fastening it with wire.
- It is poured with concrete mortar, compacting it and not forgetting to install anchors.
The lightness of the frame and plastic of the polycarbonate greenhouse makes it possible to do without a support base, but the question arises of reliable fastening of the structure to the soil in order to avoid turning over in the wind. Such an installation of a greenhouse is possible only with seasonal use.

To install the structure on the ground, lugs (T-shaped pillars) are dug into the soil to a depth of 30 cm, which should be included with the greenhouse. This reduces windage and creates relative stability.
- Cons of installing a greenhouse without a foundation:
- heat loss (up to 10%);
- poor protection against freezing through the ground;
- penetration of weeds, rodents and pests;
- destruction of polycarbonate sheets upon contact with the ground;
- land settling can cause skew.
- Benefits of ground installation:
- ease and speed of installation;
- profitability;
- ease of dismantling after seasonal work;
- free movement around the site.
Frame selection
The frame is the skeleton of the greenhouse, and it must be strong, reliable and durable.
When making a choice in favor of a specific material for the frame, you need to remember the requirements for the structure as a whole:
- ease of installation of a translucent coating;
- recreating the selected form;
- ensuring sustainability;
- ensuring the rigidity of the entire structure;
- resistance to temperature extremes inside and outside the room.
Wood is a traditional, affordable and inexpensive (compared to others) building material for protected ground structures. The construction and operation of wooden frames has pros and cons. 
- Pros:
- ease of installation;
- economy of consumables;
- environmental friendliness of the material;
- any materials are easily attached to a wooden frame;
- good thermal insulation.
- Minuses:
- fragility of the structure without appropriate impregnation;
- treatment with antifungal drugs is necessary;
- insufficiently elastic material to create, for example, arched structures.
Greenhouses with a metal frame are considered more reliable and durable. In this case, profile pipes, aluminum and galvanized steel should be used in the frame. The coating should be galvanized on both sides, this is the only way to protect the structure from rust, which will certainly happen with a polymer-powder or primed coating, which are not able to withstand the greenhouse climate that is aggressive for metal. For frames, a U-shaped profile (section 50 × 40 mm) is suitable, arcs can be made from a rack profile, and horizontal parts from a guide.

For the manufacture of frame arcs, you can use ordinary square profile pipes with a cross section of at least 20 × 20 × 1.5 mm (bend using a pipe bender), and racks - from a rack profile (50 × 50 × 3 mm). The pipe has good rigidity, condensate does not linger on it, care consists only in timely painting. To reduce thermal conductivity, light-colored paint should be chosen. Arcs from pipes are cost-effective, but in winter you will have to clear the roof of snow to avoid deflection.
The aluminum profile is durable, light, strong and does not require painting, but expensive and difficult to weld on your own. When fastening an aluminum frame with bolts, the strength and reliability of the structure is reduced.
The galvanized profile is easy to use, not subject to corrosion and allows you to create a structure of any shape (arched, one- and two-slope). When working with a galvanized profile, you need to be careful not to cut yourself with sharp joints.
The number of transverse fastenings - arcs affects the strength, rigidity, snow and wind resistance of the structure. For the strongest, the distance between the arcs is 0.5 m. The optimal location of the arcs is in increments of 0.67–1 m, depending on the characteristics of the profile. With a step over 1 m, it is necessary to use the thickest polycarbonate and profile.
More often, the frame is sheathed with cellular polycarbonate, which has successfully replaced glass and film. Polycarbonate is stronger than glass and is not inferior to it in light transmission (86%), superior in thermal insulation properties, strength, flexibility and lightness. Polycarbonate is resistant to natural factors and withstands temperature fluctuations (-40°С…+120°С). A special protective layer prevents the penetration of ultraviolet rays into the room.

Sheathing with polycarbonate is the most important moment in the installation of the greenhouse and requires careful observance of the rules:
- mounting holes should be slightly larger than the diameter of the screws (this will avoid damage during thermal expansion);
- a long sheet of polycarbonate should be fixed with self-tapping screws into the oval mounting holes, setting the self-tapping screw in the center;
- self-tapping screws must be at least 5 mm in diameter with rubber washers to reduce heat loss through the joints;
- before the start of the sheathing, the inner film is removed from the polycarbonate sheet, the outer one - after the work is completed;
- the sheet must be placed strictly vertically so that the condensate from the internal cells drains freely from the voids;
- fastening is carried out 3.5 cm from the edge of the sheet;
- the fastening step with self-tapping screws depends on the thickness of the sheet and is 30–40 cm (thickness 6–8 mm), 50 cm (thickness 10 mm);
- it is necessary to control the efforts when screwing in the screws in order to avoid damage to the sheet.
Important! When sheathing with polycarbonate, the sheet must be fixed with a protective layer to the outside, and not otherwise.
Polycarbonate sheathing starts from the end walls, the sheets are installed with an overlap and screwed. The excess is cut off with a knife along the frame, doors and vents are cut out along the openings. Then the side walls and roof are sheathed. With the arched shape of the greenhouse, the sheet is thrown from the base of one side to the other, leveled and attached to the frame. Subsequent sheets are overlapped (5-10 cm) in the absence of special joints. Remove the outer film - and the greenhouse is ready for use.
To get good yields, it is important not only to choose the design of the greenhouse, but its arrangement inside - the location of the beds, paths, shelves and racks. The relatively small space of the erected greenhouse must be used to the maximum benefit for caring for plants and for creating a microclimate - a combination of light, humidity, heat and ventilation.

The layout of the beds depends on the vegetable crops grown and the size of the greenhouse:
- three beds- two passes, the middle bed (90–120 cm) is wider than the side ones;
- two wide beds on the sides- one pass, plants in this arrangement receive maximum sunlight;
- three narrow beds- two wide aisles;
- wide bed in the middle- two narrow side ones, the scheme is appropriate for wide greenhouses.
The beds form a height of about 30-60 cm and are located in the west-east direction, undersized plants are planted on the south side. At the entrance, leave free space by making the central bed shorter. The paths between the beds should provide a free approach to the plants. With narrow paths, the plants are located close to each other, which reduces the illumination and ventilation of the plantings. Wide paths are an unreasonable use of usable space.
The optimal width of the tracks is 45–70 cm. The tracks can be laid out with stone, gravel, brick, paving slabs, roofing felt over the boards. Internal racks are used for potted plants, containers with seedlings, household inventory. The width of the shelves is approximately 90 cm, and the height is selected based on ease of use.
Greenhouses made of polycarbonate are heated by natural sunlight during the summer, and during the winter months, heating can be done with heaters or stove heating. To ensure ventilation in the summer, the windows of the greenhouse can be kept open all day. Use will automatically adjust the temperature and humidity.

In early spring or autumn, when there are no plants indoors and the temperature does not drop below zero, it is necessary to carry out work to eliminate malfunctions, damage and sanitize the structure:
- washing for disinfection and cleaning from dirt with a pressure of plain water from a hose;
- checking the stability and, if necessary, strengthening the frame and base;
- updating the protective layer of the frame;
- inspection and replacement, if necessary, of polycarbonate;
- elimination of cracks and punctures;
- preparation of the greenhouse for winter, for arched structures, supports are installed to protect against deflection under the weight of snow (10 cm of snow already poses a threat to strength).
Important! Washing is carried out in calm weather to avoid dust settling on a wet surface. Do not use abrasive materials and brushes, so as not to break the protective layer from ultraviolet radiation.
You need a polycarbonate greenhouse if: you are ready to spend all your free time in the garden in winter and summer, to please your loved ones with your own crop without chemicals, appreciate your work and want to protect your crop from environmental influences. The success of the plan will depend on the choice of the right place for the construction of the greenhouse.
Before deciding to assemble a 3x6 m polycarbonate greenhouse step by step, you will need to do a little preparatory work. Find the most understandable and detailed project of the greenhouse frame, which would not require high costs or the involvement of "narrow" specialists for the installation of a polycarbonate greenhouse. Usually, it takes at least four days to assemble the frame and lay polycarbonate, provided that materials and tools are fully provided.
What are polycarbonate greenhouses made of?
The main expense of future construction is the assembly of the frame, so the first thing to think about when choosing a polycarbonate greenhouse project is the material for the supporting structure. It is possible to assemble the skeleton of a greenhouse in several ways, but the reliability of the structure remains the determining factor, and only then can we talk about the price of the issue.
Most often, in order to assemble the frame of a small polycarbonate greenhouse, specialists and various kinds of cobblers offer four types of material:
- Metal square tube with galvanized or phosphate coating;
- Aluminum pipe and profile;
- Wooden slats and timber, slab and unedged board;
- Plumbing polypropylene pipes.
Of course, we are talking about assembling a full-fledged stationary frame with a small foundation and polycarbonate wall cladding. If you select a frame for greenhouses - makeshift for one season, then the selection criteria will be based on the ease of assembly and the low cost of the roof. The greenhouse needs to be quickly assembled, and at the end of the growing season, removed, the construction details and polycarbonate sheets should be collected in bags until the next season. Therefore, if you plan the design and assembly with your own hands, it is better not to use drawings of a polycarbonate greenhouse for a greenhouse.
Metal and wood
Of the entire list, the most reliable material can be considered a steel profiled pipe. If you adhere to the basic requirements of the polycarbonate greenhouse construction technology, then the steel frame lined with plastic will stand on the summer cottage for at least 30 years. Wood is next on the list of the most reliable solutions. Despite the fact that wood is inferior to aluminum and plastic in mechanical strength, this solution has one important advantage - home-made polycarbonate greenhouses assembled on a wooden frame are easy to repair and maintain.

Advice! When choosing the material from which it is planned to assemble a greenhouse or a polycarbonate greenhouse with your own hands, you should remember that you will also have to repair it on your own, so the frame should be easy to repair and replace damage.
In addition, steel pipe and wood are better for building a square polycarbonate greenhouse. Using a beam and a corner, a square, or even trimming a metal water pipe, assembling a building with a gable roof is much easier and cheaper than bending arched ceilings.
The advantages of plastic and aluminum for arched structures
One of the ways to build a polycarbonate greenhouse with your own hands involves the usual copying of finished structures designed and manufactured by firms in the factory. So, if you look at the finished kits, it turns out that most of the models sold have to be assembled from a plastic and aluminum pipe with a diameter of 15-25 mm.

The reason for this decision is obvious, installing such polycarbonate greenhouses with your own hands takes a couple of hours of intensive labor, so aluminum and polypropylene are good if you need to assemble small buildings. Another advantage of plastic and aluminum profiles is the insensitivity of the material to condensate, which always collects a lot under polycarbonate. If you have to fight for the normal state of the greenhouse made of wood and steel with the help of paints and varnishes, then the aluminum frame can be assembled, forgotten and not remembered.

Polycarbonate greenhouse options
The use of polycarbonate coating greatly expands the possibilities for DIYers in planning and assembling temporary buildings. Thanks to the use of polycarbonate, several new and classic models have been designed:
- Arched greenhouse covered with honeycomb plastic. The greenhouse frame is assembled from ready-made gable segments and load-bearing arches. It is believed that this type of greenhouse frames appeared as an expanded and reinforced version of the greenhouse;
- Box type greenhouse with a gable roof. Before the advent of cellular and cast polycarbonate, it was a whole problem to assemble a full-fledged gable roof, since the plastic film could not withstand gusts of wind;

- The greenhouse-hut is assembled from two gentle slopes, glazed with cellular polycarbonate. If there is a problem, how to make a polycarbonate greenhouse with your own hands, then this option is best suited;

- Box-type greenhouses attached to the house with a curved or pitched roof. A relatively new version of a winter greenhouse or greenhouse is attached to the foundation and side wall of a residential building.

If the first two types are classified as country greenhouse complexes, which have to be assembled on a separate foundation, then the version of the greenhouse attached to the house can be assembled using only a few tens of meters of a polypropylene pipe and 30-35 m 2 of cast polycarbonate. The only drawback of this design is the high cost of plastic. Due to the strong shading from the walls of the house, the greenhouse frame has to be assembled and glazed with the most transparent and more expensive monolithic polycarbonate.
For your information! Attached schemes of greenhouses and hotbeds are not only a way to protect the basement of a building, but also a good option to save on heating on cold and frosty days.
The listed structures differ from each other not only in the shape of the roof and the profile of the supporting beams. The main difference lies in the method of assembling the frame and the technology of laying polycarbonate. It is clear that different methods of assembling parts are used for greenhouses of different sizes, therefore, before trying to build a polycarbonate greenhouse with your own hands, you will need to master carpentry or welding or learn how to assemble pipes by soldering polypropylene.

What are the sizes of polycarbonate greenhouses
Each version of the greenhouse has its own optimal size and recommended material for the manufacture of the frame. For example, the most popular arched structures today are made in the "tunnel" form factor, 1.5-3 m wide and 4 m, 6 m, 8 m and 10 m long. It is recommended to assemble the supporting arches from aluminum and steel profiles.
For your information! Approximately these sizes are assembled arched-arc greenhouses made of polycarbonate with a frame of polypropylene pipes. They are easy to distinguish from steel and aluminum structures by couplings.

The dimensions of the arched polycarbonate greenhouses are chosen in such a way as to reduce the loss of the honeycomb sheet. The standard package contains sheets of honeycomb plastic, 2.1 m wide and 10 m long. That is, from one canvas it is possible to cut two segments sufficient to overlap arcs with a width of the base of the greenhouse equal to 3 m.
A classic greenhouse house is most often built according to the same standards, from 4 to 12 m long, 3.6-4 m wide. Structures on steel frames are always the widest, wooden and polypropylene frames are rarely more than 3.6- 4 m

At present, the dimensions of a polycarbonate greenhouse 3x6 m on a frame made of a metal square pipe 20x20 mm, with a wall thickness of 2 mm are recognized as the best option.
Drawings of polycarbonate greenhouses with dimensions
There are two ways to accurately and accurately assemble the greenhouse frame. The first case involves compiling it yourself or using ready-made instructions for assembling a polycarbonate greenhouse with your own hands. This is the simplest option, available even for people who are farthest from construction. A good option is to draw up a plan for assembling a polycarbonate greenhouse with your own hands from a video, for example, from a video:
Easy to assemble, but time consuming. It is much easier and more convenient to make a sketch, but rather a drawing of the future frame indicating the dimensions and nuances of polycarbonate fastening. Moreover, by halving the size, the existing sketches and calculations can be used with your own hands as drawings for a polycarbonate greenhouse.
Arch scheme
Structurally, the frame of the greenhouse is assembled from seven bent arcs, pulled together by horizontal crossbars. All details, including gables and arches, are made by welding from a bent square pipe 20x20 mm. Before assembling the greenhouse, metal parts are treated with a mixture of orthophosphoric and acetic acid.

Entrance doors are provided on the front and back gables. The frame under the door can be assembled from a wooden beam or welded from a square. In the upper part of the gables, air vents or vents are installed, they can be assembled as part of the door leaf, but it is best to make it in the form of a transom above the door.
Square greenhouse option
It is much more difficult and expensive to assemble a classic greenhouse box with a gable roof. One of the options for such a design is shown in the drawing below.

As in the previous version, the box is built from seven sections welded from a square pipe. In order to assemble the greenhouse cladding, you will need three strips of polycarbonate 2.1 m wide.
The design of a greenhouse with a gable roof differs from the arched version:
- The shape is more convenient for working inside the greenhouse;
- Roof slopes can be assembled from molded polycarbonate, which increases the amount of light entering the room;
- The case is more rigid, well withstands gusts of wind in any direction.
The arched building holds the wind well only from the lateral direction, therefore, before placing a polycarbonate greenhouse on the arcs, it is necessary to correctly orient the structure relative to the wind rose.
The advantages of a greenhouse with a round roof include a simple device and minimal costs for the manufacture of load-bearing arc sections. It will take three times as long and twice as much material to assemble a frame with a gable roof. There is practically no difference in terms of polycarbonate consumption. Therefore, most summer residents choose the option with an arched type of ceiling.

How to calculate polycarbonate for a greenhouse
It should be said right away that it makes sense to assemble arched greenhouses not so much because of the lower costs for polycarbonate or metal, but because of the simplicity of the design. If we take as a basis the drawing of a greenhouse-box and count the number of assembly units, then we can imagine how much the laboriousness of building an arched structure is less than the time and effort spent on assembling a square gable scheme.
In order to assemble an arched greenhouse 3x6 m, you will need the following materials:
- For the arrangement of the foundation - 200-210 pieces of red brick, 75-98 kg of M300 cement, gravel and sand - 1.5 cubic meters;
- In order to assemble the supporting arcs for polycarbonate, you need 7 pieces of a square pipe 20x20x2 mm, 6 m long;
- 18 m of pipe 40x20x2 mm are used for piping the base, in order to assemble the gables and horizontal crossbars, another 30 m of pipe 20x20 mm will be required;
- In order to assemble the cover of the greenhouse, you need 4 pieces of polycarbonate 2.1 m, 3.5 mm thick. For fasteners, a standard self-tapping screw with a washer is used, the assembly will require 120-140 pieces plus 18 m of edge end profile for embedding polycarbonate honeycombs;
- In addition, to assemble and fasten the greenhouse frame on the foundation, you need to buy 18-20 pieces of anchors, with a washer, nut and grower, sheds - 6 pieces.
Important! Since the greenhouse frame is assembled by welding, you will need to rent a good welding inverter for a couple of days or, even better, a semi-automatic device with a mask and a pack of electrodes.
Before assembly, the supporting arches and metal parts of the greenhouse gables must be treated separately and sequentially, with a daily interval, with an aqueous solution of phosphoric acid, primer and paint for atmospheric work.
Preparing for the installation of a polycarbonate greenhouse
The process of preparatory work is primarily associated with cutting blanks and welding individual parts. It is easier to assemble a greenhouse if the gables and arcs were made in advance, for example, arches from a pipe were cut and profiled in a garage or home workshop. Of course, you can do the same work at the place of future assembly, but this approach greatly complicates and slows down the work.

The most important stage of preparation is considered to be the manufacture of arcs. There are many recipes for how to bend a square pipe in an artisanal way or using a homemade machine.
Advice! If possible, it is best to order an arc bend in the nearest locksmith or repair shop. Firstly, the quality will be an order of magnitude higher, and secondly, it will not be necessary to spend precious effort and time to assemble the machine, which will be required once for the entire construction site.
The cost of arc profiling services is approximately 30-50% of the pipe price.
How to install a polycarbonate greenhouse correctly
The first thing to start planning and preparing for assembly is the choice of a site for assembling the frame. Despite the fact that most of the details of the greenhouse were made in the workshop, in order to assemble the frame, you will need a site about twice the size of the base of the greenhouse 3x6 m. patch under the foundation.
Site selection and foundation installation
Usually, the owners put the greenhouse box in the most illuminated place of the site, away from trees and outbuildings. But, in addition to illumination, it will also be necessary to take into account the direction of the wind, the flow of cold spring air can be very inopportune, so it is recommended to hide a polycarbonate greenhouse behind buildings, for example, behind a bathhouse or a barn.

The second condition for choosing a site is the presence of a drainage system for rain and groundwater. Before assembling the greenhouse, it may be necessary to lay drainage or concrete gutters to drain moisture.
As soon as the issue with the choice of location is resolved, you can proceed to the arrangement of the foundation. For marking, it is easiest to use wooden stakes with a stretched cord. Next, you will need to dig a trench to a depth of 20-25 cm and a width of a shovel bayonet.

A film is laid on the bottom, then sand with gravel, the top layer is covered with the largest fraction of crushed stone and poured with concrete. After about a day, you can lay out the basement of the foundation to a height of two bricks. Of course, the greenhouse can also be assembled on steel stakes hammered into the soil, but, as practice shows, on heaving soils, this method of assembling the greenhouse foundation leads to deformation and breakage of the strapping.

Frame for a polycarbonate greenhouse
The assembly of the bearing part of the greenhouse begins with the gables. If they could not be welded in a garage, then this will have to be done on the site. In order to assemble the pediments, it is enough to choose a pair of arcs with the same curvature. The blanks are laid on the platform, the supporting ends are pulled together with a thin steel wire and the lower section of the strapping is welded. Next, you need to alternately assemble and weld the door frame and the window window.

After the metal has cooled, you can start cutting polycarbonate. To do this, the frame of the pediment is laid on a sheet of polycarbonate spread out on a flat area and with a construction knife, as according to a template, cut out the details of the cladding.

It remains to install the gables on the plinth, lay and assemble by welding the horizontal crossbars and the lower pieces of the strapping from the pipe 40x20 mm. The lower part of the greenhouse frame before assembling the arcs for polycarbonate must be thoroughly welded and fixed on the foundation with anchors.

Covering with polycarbonate sheets
The final step is the installation of support arcs and polycarbonate sheets. Most of the frame of the greenhouse, except for the base, up to this point was assembled by welding tacks with an electrode. This made it possible to assemble the frame and at the same time make changes if inaccuracies were made during assembly.

Arches are laid on horizontal crossbars alternately, first in the center, then to the left and right of the first arc. As soon as the parts have been laid and leveled, you can proceed to full-fledged welding with an electrode of all welding seams.
The final touch is the assembly of the polycarbonate cladding. The sheets are laid on the finished frame alternately, with overlapping edges, and although many experts consider this assembly method obsolete, it is best suited for thin polycarbonate. Only after the roof of the greenhouse has been assembled can the gables be sewn up.
Oddly enough, but the most time-consuming step in assembling a polycarbonate coating is the installation of end strips. If you leave the installation of protection to the last stage, then it is quite possible to close the ends with overlays, but this is extremely inconvenient. It is much easier to lay the end plank just before attaching the sheet to the greenhouse plinth.
The most painful question that owners face when making homemade greenhouses is whether it is worth doing the entire building with their own hands. It is much easier to buy a ready-made kit-constructor. The total cost of materials, including labor and delivery, is only slightly less than the price of the kit.

In this case, there is a significant difference. Ready-made greenhouse designers are assembled using couplings and self-tapping screws, so the strength of a 3x6 m structure is enough for a maximum of 3-5 years of operation, despite the fact that polycarbonate can withstand 15-20 years. In a home-made version, the frame is assembled by welding, which guarantees operation for up to 30 years or more. It is possible to replace a polycarbonate sheet in a 3x6 m greenhouse in one day, moreover, with minimal costs.
When we look at the polycarbonate greenhouses standing on neighboring plots, installing a greenhouse seems to us a simple and quick thing. And after all, today you don’t even need to procure any materials yourself, everything is on the market or in the store! What does the process actually look like, and is it as simple and fast as we would like?
It's not all cute and carefree, it turns out. Always things, products, and especially designs designed for the mass consumer and produced specifically for mass sales, are worse than piece units.
It's not about the materials, it's about the design. Since the product is designed for the widest possible application, there are no complex elements that should, for example, facilitate operation. So, when purchasing a ready-made arched polycarbonate greenhouse, at the same time you buy all its disadvantages in the kit.
No, of course, the benefits are undeniable! Installing a polycarbonate greenhouse will greatly facilitate your gardening life.
Among the advantages can be listed (for all available options):
- The greenhouse will not break like glass (see);
- Much stronger than film models;
- Holds heat well inside
- The material can always easily take the necessary forms;
- Polycarbonate is perfectly cut with a simple knife.
As for the shortcomings, no one will tell you about them, because it is not customary to scare away the consumer. And along with the purchased "factory" polycarbonate greenhouse, you will buy all its negative qualities (see).
And then you will not get rid of them, even following the installation instructions exactly.
- Installation will not be as fast as advertised. Or in a tutorial video. Before you properly install the polycarbonate greenhouse, you will have to make a foundation on the spot (see), and then, if necessary, also a plinth (preferably if the foundation is self-leveling and without formwork). A plinth is needed if you raise the level of soil inside the greenhouse, its fertile layer. To put it more precisely and simply, to import more land;
- After the delivery of the kit (greenhouse), you will have to assemble its lower part, carefully measure all the indicators, and, according to the ready-made data, arrange the foundation. Which, by the way, will then stand for more than one day just like that. No, it can dry in the open sun in a day, but it will not gain its nominal strength, but rather crack. That is, upon delivery of our greenhouse, we pour the foundation and wait a couple of weeks. After all, you don’t know what size structure you will buy tomorrow at the market?

- Minus number two: the typical form of greenhouses popularized by the people is arched. But this is not due to the fact that such a design is optimal. And because the installation of polycarbonate on the greenhouse in this case is much easier, in this case it is simply more convenient for manufacturers to run the conveyor. And this is determined by the "standard" dimensions of polycarbonate sheets. With a normal width of 2.1 meters, a standard sheet has a length of 12 meters, but, of course, no one will work with such “sheets”. Therefore, standard sheets are cut in half, and the structure is “sharpened” under 6 meters. In such polycarbonate greenhouses, even a typical installation instruction is given, one for all occasions;
- The third drawback is that the standard design does not allow to increase the height of the ceiling. A standard sheet will have a radius of curvature of exactly 1.9 meters, and a width of 3.8 meters, respectively. You will draw a cap on the roof. In some designs, however, you can "play" with the dimensions, if you take the smaller one, that is, 2.1 meters, as the main side of the polycarbonate sheet. Accordingly, you can make the ceiling a little larger, but you will have to lay four sheets across so that the total length of the roof is 8.4 meters. And these are additional fasteners, joints, especially transverse ones, where water and condensate will flow;
- The fourth, somewhat paradoxical drawback, is precisely the arched structure. It is slightly superior in complexity to the straight-line one in the manufacture of the frame, when it comes to metal profiles or pipes, and not plastic. It is easier to make plastic, but the strength is lame;
- For the manufacture of frame structures, it is necessary to use slipways, equipment or pipe benders, and anyway, it is quite difficult to get arcs of the same size. And if you make each arc piece by piece, then absolutely ...
Conclusion! Ready-made designs of polycarbonate greenhouses are quite durable, beautiful, warm and overly expensive. Much more expensive than a self-assembled building. And they are not always as practical as we would like, in comparison with their own construction according to their own project. Mass projects do not even have adaptation to a specific area or microclimate of the zone, and cannot be.
But you, of course, have already purchased such products if you want to know how to install a polycarbonate greenhouse. Therefore, we go further for you personally.
Installation of a finished polycarbonate greenhouse
Preparation
This includes work on clearing the site, the device (pouring) of the foundation and the construction of the basement.
- The site where the building will be located must be cleared not only of vegetation and debris, but also a small top layer of soil must be removed. Anyway, then you will add the earth, and so - along with the fertile layer, you will also remove the seeds of future weeds. And work becomes much more convenient.
The site is cleared more than is required for the installation of the structure, about one and a half meters on each side around the entire perimeter must also be cleaned. This will be required when storing materials and tools.

- We dig a trench under the foundation. Since this is not a house or a barn, the trench is enough for a depth of 20-25 cm, even taking into account the sand cushion for the device. But as same, all according to the rules! We check the evenness and dimension of the sides of the open trench again by pulling two ropes diagonally. In the end, they should be equal in length, then you have the correct rectangle;
- We make a pillow out of sand, you can not sift the sand, not that case. And ramming such a pillow does not make much sense, you can only spill it with water to compact it. Layer - 5 cm, no more;
- Lay a layer of waterproofing along the walls of the trench;
- Bookmark a buta or broken brick, but don’t be too zealous, since the depth of occurrence is small. Only corners can be reinforced, along the entire length there is no need, but there is also no prohibition;
- Fill the trench with rubble and reinforcement with a liquid solution of cement and sand. The proportions are normal, 1:3, with a brand of Portland cement grade M 500 and higher;
- After setting the calculated tensile strength of the foundation (this is about two weeks, you can - one and a half), waterproof the foundation along the top bed. You can put a red brick base on it.

Frame installation
A polycarbonate greenhouse with the installation of a finished frame must be supplied with instructions, where all actions must be described in detail. Each version of finished structures from different manufacturers may differ in materials and the way they are attached to each other. Therefore, it makes no sense to give specific descriptions of your step-by-step work.

- Since a greenhouse is a kind of room in which there will definitely be high humidity, all elements must be protected from moisture. If these are metal parts, they are protected at the factory, but it does not happen that there are no sawn off or cut off places where the protection is removed. At the joints and at the joints, it is desirable to paint over the metal profile or cover it with some other corrosion protection means;
- Wooden parts are also treated with antiseptics and covered with paints or varnishes in places where they are sawn. It is understood that the blanks for the frame, made of wood, are also protected from moisture, mold, and so on even at the factory along the entire length;
- When installing the frame on the plinth, it is advisable to attach it to the base in several places. This can be done by drilling a through hole directly through the base elements with a long drill. You can also fix the structure on wooden inserts pre-arranged in the plinth, located approximately 1.5-2 meters apart.
Covering the frame with polycarbonate
There are several options for how to properly install polycarbonate on a greenhouse. Surely, in the finished design, the developers provided for one of them, and supplied the kit with consumables, that is, fasteners. These are either self-tapping screws (screws, bolts) with thermal washers, or a special profile, which can be metal (see) or polycarbonate.
Fasteners with thermal washers
Fasteners with thermal washers require pre-drilling holes in polycarbonate sheets. Their diameter should usually be slightly larger than the diameter of the self-tapping screw, the pressing density and tightness of the attachment point is ensured by a special seal in the form of a washer.
The self-tapping screw is screwed in as usual, its head is closed with a cap provided in the fastener design to protect the metal from moisture. In this case, butyl rubber or rubber gaskets must be laid on the frame to ensure both tightness from the inside and tightness.

With this fastening, the connecting seams from the outside remain open, tightness is ensured only from the inside. Water seeps into the seams. In addition, at the ends it is necessary to close the ducts inside the polycarbonate sheets so that water does not flow there either.
The upper ends are tightly closed with construction tape or any other similar method, and the lower ends must be perforated for condensate drainage. Otherwise, the sheets will fog up and lose their transparency.
In the case of using a profile, everything is much more pleasant. The H-shape provides a tight entry of the ends of the polycarbonate inside, thereby immediately providing both density and tightness. The upper and lower ends of the material are also closed with an end profile, and all problems with the protection of the ducts are solved.
Here we figured out how to properly install polycarbonate on the greenhouse. The rest remains!
doors
Everything is also provided by the manufacturer, so there is no need to independently select materials and measure them. It remains for you to assemble the frame of the canvas and hang polycarbonate on it, and then mount the door on the structure. It is advisable to sew the sheets to the frame "on the ground" while the door is not yet hung.

How you will ensure the density of closing the door is the choice of the owner, so to speak. If seals are provided in the finished design, then everything is fine initially. But it is not always so rosy, we recall that the greenhouse is mass-produced.
Therefore, it would be nice to provide for the installation of a rubber sheet seal with a thickness of no more than 2 mm. For these purposes, a bicycle chamber cut along is perfect.
There is no need to go to the store to buy a branded greenhouse model, especially if you know how to assemble a polycarbonate greenhouse yourself.
Within 15-20 years, it will serve you without repair, which means that additional costs will not be required.
Foundation
All large greenhouses are mounted on columnar foundations. Only the outer sides of the greenhouse are made of strip foundations. The depth of soil freezing for a given area should be taken into account.
This information can be obtained from:
- Internet
- Construction organizations
- City, district, regional departments of architecture
- Reference technical literature
In order to fill the columnar foundation, it is necessary to make a formwork from boards 25 mm thick. The height of the columnar foundation should be equal to the depth of soil freezing plus 250-300 mm. The minimum section of the foundation column is 150*150 mm. It is necessary to insert a reinforcing bar of at least 8 mm into each extreme foundation column, which should protrude from the concrete by 150-200 mm.
Concrete for foundation posts must be at least M 200 grade. Each post must be installed on a solid foundation. Before the developer, the question may arise: How to align all the foundation columns under one level? When installing posts in the ground, you should not worry if one post is higher and the other is lower. After installing the columns and checking the geometric dimensions, they are cut to the level using the “Bulgarian with a diamond wheel”.
- In order not to fill the foundation columns, you can buy ready-made concrete pillars for fences
- Columns can be round
Breakdown of foundation axes
Before building the foundation, it is necessary to make a breakdown of its axes on the ground. For small greenhouses, a tape measure is enough. If the greenhouse is large, it is impossible to install polycarbonate greenhouses without a theodolite. In order to make the breakdown correctly, it is necessary to make a breakdown of the axes of the greenhouse and install a cast-off on the ground:

Designations in the figure:
- Saw to pass the central axis.
- Auxiliary axes for marking foundation edges
- Corner shatter
- Stroke to designate the central axis
Pegs 7,8,9,10,11,12 to mark the corners and extreme points of the greenhouse.
Necessary materials:
- Roulette
- Wooden pegs
- Nails
- Large stakes
- Axe
- Synthetic rope (wire)
- plumb line
First you need to make a rectangle with the required dimensions. We drive nails into the pegs where the axes of the greenhouse will pass. After the axes of the greenhouse are broken on the ground, they must be taken out of the construction site.
To do this, a cast-off of wooden poles and boards are installed outside the site. The cast-off should be strong and not stagger from the wind. All axes of the greenhouse will be placed on it. This is done so that at any time you can check the correct installation of the foundation columns and the installation of the greenhouse frame.
Tips: There can be as many cast-offs as there are main and auxiliary axes in the greenhouse
Foundation check
The horizontality of the foundation can be checked:
- Leveling
- Theodolite
- water level
Where can you get these tools? The level and theodolite can be borrowed from specialized construction organizations. The water level is used by folk craftsmen. It consists of a rubber hose and two glass tubes.
The geometric dimensions are checked with a tape measure.
A right angle is a rectangle with dimensions:
- Legs 3 meters and 4 meters
- Hypotenuse 5 meters
In a rectangle with such dimensions, the angle is 90 degrees.
- The water level can be made by yourself from a watering hose and two glass tubes or syringes.
foundation concrete
The industry produces cement in bags of 50 kilograms of various grades.
For example, a column with a section of 150 * 150 mm and a height of 1200 mm will have a volume of: 0.15 * 0.15 * 1.2 = 0.027 m3. That is, for 10 columns with a height of 1.2 and a section of 150 * 150 mm, 0.27 m3 of concrete M 200 is needed.
There are special tables that discuss various options for preparing concrete, depending on the brand of cement, water-cement ratio and various aggregates of crushed stone and sand.
- The foundation of a small greenhouse must be mounted to the nearest millimeter and strictly horizontal.
- If the greenhouse is large, then each column must be set in accordance with the project. The height of the columns regulate the slopes for water runoff.
- Sometimes cement manufacturers print tables on bags for the preparation of various grades of concrete.
Greenhouse Options
When building polycarbonate greenhouses, there can be several options for their designs:
- Double-sided greenhouses.
- Single slope greenhouses.
Installation of arched structures
Arched polycarbonate greenhouses have found the widest application among amateur gardeners. Polycarbonate sheets, in addition to their good thermal performance, are also durable and flexible.
Thanks to this, the industry began mass production of arched greenhouses (, and many others). Arched greenhouses are the most technologically advanced of all, although the arched design has some drawbacks. But such a design still has more advantages.
- Regardless of the manufacturer's guarantees, it is necessary to install additional braces
- Before starting assembly, it is better to watch the installation video for clarity.
Assembling an arched greenhouse
- In order not to make mistakes, the instructions for assembling a polycarbonate greenhouse should be the guiding and guiding force of vegetable growers.
- On the foundation posts, a strapping of wooden beams 100 * 100 mm is mounted. The bars are treated with antiseptic materials against decay.
- In the arches of industrial production made of square metal pipes, holes are drilled for attaching polycarbonate. All holes must be drilled according to the template. The template is made from a metal strip. If the arches are made of aluminum or galvanized metal profile up to 1 mm thick, no drilling is required. Fastening can be done on screws - self-tapping screws.
- On a wooden or other (metal) strapping of the foundation columns, the points of attachment of the arcs are marked.
- After checking all dimensions, assembly can begin in accordance with the manufacturer's recommendations.
- The first arc must be strengthened on the braces so that it does not stagger from side to side.
- All arcs are sequentially mounted from the first to the last arc.
- The frame of the greenhouse is reinforced with metal braces and connected with metal profiles in accordance with the drawings.
- After checking all the dimensions, proceed to the installation of polycarbonate sheets.
Greenhouse details
The photo shows how to seal polycarbonate sheets. A sealing tape should be installed at the top of the sheet, and a perforated tape for draining condensate should be installed at the bottom.

After gluing the sealing and perforated tape, it must be fixed with a U-shaped end profile. It should be in the kit.

This profile is used to join two adjacent polycarbonate sheets. He is inseparable. In this case, polycarbonate sheets and profiles are mounted sequentially one after the other.

In this case, the installation of polycarbonate on the greenhouse can be started by installing the lower part of the connecting profile, and then, by installing the polycarbonate sheets, “snap the top”. This type of connection is more convenient to use.

Wall profile FP can be used in the construction of shed greenhouses.

The corner profile is used to connect the extreme corner sheets. The connection is sealed due to the elasticity of polycarbonate.
The design feature of the profile is such that it is designed for large greenhouses. Polycarbonate sheets are inserted on both sides.

Detachable connecting profile
In this version of the connecting profile, a ridge is provided, consisting of two parts. Having attached the lower profile, rubber seals, polycarbonate sheets are installed in it and the upper part of the profile is inserted into it. With some effort, the upper part of the skate “snaps into place”.
Good advice :
- For the winter, all the arcs in the greenhouse made of polycarbonate sheets should be supported with wooden supports with braces, resting them against recesses in the ground to avoid the collapse of the greenhouse from snow
- All polycarbonate sheets must enter joints with a gap of at least 5mm
- All holes in polycarbonate sheets must be larger than self-tapping screws or screws by 2mm
- All joints of polycarbonate sheets with connecting elements should be sealed with silicone
And if you do not listen to good advice, then you can face the fall of the greenhouse. It can be seen that this flimsy structure is not designed for harsh and snowy winters. Not even a hint of braces.
Therefore, when buying a greenhouse, you should always take an interest in its design. If there are no braces, you can make them yourself using a metal profile and an electric drill. The costs are small, and unpleasant surprises can be avoided.

Installation of double-slope greenhouses
The construction of foundations for gable greenhouses is no different from the construction of foundations for arched greenhouses.
When arranging gable greenhouses and designing them, the recommended roof slope angles should be taken into account. Tilt angle may vary 10° to 30°.
The higher the angle of inclination of the roof, the less snow load, but the consumption of materials is greater. The main thing during installation is the correct and accurate breakdown of the greenhouse frame on the foundation. The frame can be fixed in different ways. Self-tapping screws to a wooden strapping or dowels to a concrete foundation.
Details of double-slope greenhouses and their connections

The design features of the frame of a double-slope greenhouse are such that the corner connection is rather rigid and does not allow adjusting the width of the greenhouse by pushing the structure on the foundation without damaging it. Therefore, the accuracy of the breakdown of the foundation plays a major role here.
Greenhouse manufacturers have tried to unify its details. Installation of a polycarbonate greenhouse from a metal profile is not difficult.


The connection of two rafters together with a self-tapping ridge forms a strong knot.

To increase the strength of the greenhouse structure, braces are used. If there are no such braces in the proposed greenhouse design, they should be made independently.
The manufacturer used a metal profile in the form of a square pipe for the greenhouse frame. The profile can be not only in the form of a square, but also a rectangle.

If everything is done in accordance with the recommendations of greenhouse manufacturers, and even measures are taken to strengthen the structure, such a greenhouse will last a long time. In the photo, you can see the corners of the greenhouse reinforced with braces. Braces should strengthen not only the walls of the greenhouse, but also the roof.
Installation of shed greenhouses
The installation of single-slope greenhouses differs from the installation of gable ones in that one of the sides of the greenhouse is adjacent to a building or some kind of structure. In fact, a single-sided greenhouse is half of a double-sided greenhouse.
When installing, pay attention to the connection to the wall. The connection must be sealed. Can be sealed with polyurethane foam.
Helpful Hints:
- For unification, all repeating connections must be made according to the template
- The distances between the rafters must be a multiple of the width of the polycarbonate sheet. These dimensions are: 2100mm, 1050mm, 700mm
- For a large greenhouse, it is desirable to use an aluminum connecting profile
- For fixing polycarbonate, it is necessary to use special washers with gaskets
- The bending radius of the sheets is specified in the manufacturer's recommendations
- Polycarbonate is drilled with conventional metal drills