DIY paper fence for. DIY decorative fence. Angel on the Christmas tree
Any owner of a summer cottage dreams that his flower beds and flower beds will evoke admiration. It is very pleasant when harmoniously combined flowers of different sizes and bright colors evoke genuine delight among others. But to prevent harmony from developing into chaos, it is necessary to divide flower beds into functional zones. A simple solution is to delimit plants using decorative fences.
Selection of material and preparation for work
For the artistic decoration of a summer cottage, various types of decorative fencing are used.
Fences and fences decorate the area in an original way, fit harmoniously into the landscape composition, and also reliably protect flower beds and beds. Small fences made from scrap materials will become the original “highlight” of a summer cottage or garden, dividing the space into functional zones.
DIY fencing for flower beds is an important detail of landscape design.
It is not always advisable to purchase expensive decorative fences, which are offered in a wide range in specialized stores. Having desire and imagination, it is not difficult to create a small fence on your own. After all, there are many available materials that do not require special costs associated with the acquisition:
- used glass or plastic bottles;
- car tires to be recycled;
- colored caps from plastic bottles;
- wooden planks available on the farm;
- remains of white or red brick;
- plastic remaining after repair;
- pieces of slate gathering dust in the barn;
- stone located on the banks of reservoirs;
- a vine that allows you to create a unique wicker fence;
- small logs that can be cut from a tree trunk.
It is enough to show a little imagination, and materials to be recycled, as well as unnecessary materials, can easily turn into an original fencing of flower beds and beds of a summer cottage or the territory of a private house. A non-standard version of a small decorative fence has a number of advantages.
Positive sides
Fences made on your own, using materials available in everyday life, have a number of undeniable advantages:
- attractive appearance. Such a fence will concentrate the attention of others and will have a positive effect on improving the exterior of the site;
- minimum costs. The construction of a decorative fence will not affect your family budget, since there is no need to purchase material for construction;
- ease of installation. Installation of the fence is quite simple and does not require professional training or the use of special tools;
- environmental friendliness. The fencing design uses unnecessary and recyclable materials, the use of which will avoid environmental pollution;
- possibility of drainage - excess moisture does not linger in the garden bed;
- variety of design solutions. The use of scrap materials allows you to create many small and original fences;
- the possibility of limiting plant growth. The fence makes it difficult for green spaces to grow independently;
- no need for special care. Periodically, you can wash off the dust with water using a watering hose;
- light weight. Due to its low weight, the fence does not require foundation preparation.
Despite many advantages, fences made from scrap materials are not without drawbacks.
Negative points
The weaknesses of structures made from improvised raw materials include:
- Insufficient resistance to mechanical stress. A lightweight fence can be damaged if handled carelessly.
- Limited service life. Temperature changes and high humidity negatively affect the duration of use.
- The need to remove dirt. Splashes and traces of soil that appear after rain must be washed off with water.
Considering the lack of costs associated with the construction of the fence, the disadvantages cannot be considered significant. In addition, the design of the fence can always be easily washed and restored, and if you get tired, you can easily change the design and form a new original fence.
Solutions options
There are many types of fencing that you can assemble yourself from existing materials. Let's look at some of them:
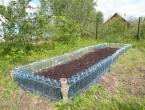
- small fence made of glass bottles. The use of glass bottles dug into the soil allows you to create decorative fences of various configurations;
- fencing made of plastic containers. Standard sizes of plastic bottles allow you to show your imagination and easily implement original solutions;
The original fencing made from plastic bottles can last a long time
- use of automobile ramps. A wide field of activity is provided to owners of used car tires. This material has increased resistance to mechanical stress;
Making a flower bed from a tire with your own hands is not particularly difficult.
- use of colored lids. The use of multi-colored caps from plastic bottles will create unique and bright fences that fit perfectly into the exterior of the site;
Dividing an area using multi-colored covers is a bright and original solution
- fence made of wooden slats. A lightweight fence made of wooden slats is not only reliable protection from small children and pets, but also a striking element of style;
A light fence emphasizes the attractiveness of the flower garden
- brick edging. The white or red brick remaining after construction will reliably protect the planting from damage and restrain the root development of plants;
In addition to excellent decorative purposes, brick fences zone space and prevent the spread of weeds
- decorative fence made from plastic waste. The original use of plastic waste as a decorative fence will provide the flower garden with uniqueness;
You can create an original flowerbed from plastic waste
- slate fencing. Waste roofing materials have proven themselves to be a durable fence for flower beds and flower beds;
Slate is convenient to use for forming beds
- stone fence. Natural stone fits well into the natural landscape, therefore it is used when creating flower beds and fences for plants of various heights;
A wonderful addition to the garden - a stone flowerbed
- wicker option. A wicker fence in a rustic style will add a unique flavor to the exterior and will bring a lot of pleasure in the creation process;
A wicker fence will add a rustic touch
- construction from chocks. The use of medium-diameter logs allows you to reliably protect plants and build fences of any shape.
Wooden edging looks aesthetically pleasing and colorful
Video: DIY fencing for flower beds
Preparation for construction
At the preparatory stage of work, carefully consider the general concept of the fences being created. They must have a unified artistic solution and fit harmoniously into the design of the site. Develop a small sketch, determine the height of the fence and the perimeter of the flower garden. By adding up the lengths of all sides of the fence, it is easy to calculate the length of the fence. This is a necessary operation that allows you to determine the amount of materials required for the construction of the fence. If you are creating a new flower garden, flower bed or bed, clear the soil surface of debris and vegetation. Mark along the contour of the fence and plan the base.
The design features and height of the fence depend on the type of plants in the flowerbed, the general style of the site, as well as the functional purpose of the fence. There are no strict requirements for the use of certain materials for fencing, but the following recommendations should be followed:
- A smooth transition from the lawn to the flower bed will be ensured by a low fence made of natural stone or a brick edging.
- Reliable protection from pets and young family members will be provided by a wooden fence or wicker fence more than 45 cm high.
- A fence made of glass bottles, slate or bricks buried in the soil will prevent plants that reproduce using root shoots from leaving the flowerbed area.
- The structure of a tall wooden fence made of slats must be strong in order to maintain stability under the mass of climbing plants.
A wicker fence will protect plantings from children and pets
Calculation of the quantity of materials
Knowing the length of the fence and the parameters of the material used, calculate its required amount. The determination method depends on the type of fence. For example, for plastic or glass bottles, the required amount of material is determined by dividing the perimeter of the area by the diameter of the bottles used. A similar calculation should be performed for automobile ramps or chocks.
When creating a wicker fence from rods, you should divide the length of the fence by the sum of the average diameter of the rods used and the size of the gap between them. The resulting value is the number of rods required to form a fence of a given length. Calculation of the required number of wooden planks is carried out using the same method.
When determining the volume of required materials, be guided by a general calculation, which is based on the dependence of the length of the fenced contour on the dimensions of the elements of the future fence.
Required Tools
If you want to make a small decorative fence yourself, prepare the following tools:
- shovel for leveling the soil surface;
- cord and pegs for marking the fenced contour;
- building level to control the horizontality of fence elements.
Depending on the design of the fence and the material used, an ax or a heavy hammer may be required to hammer and compact the chocks, as well as cement mortar to secure the stone fence.
Technology of work execution
A step-by-step guide will make it easier to complete the work of making fences for your favorite clubs. Let's look at the most common fencing options made from available materials.
How to form a decorative fence from plastic bottles
Using standard plastic bottles, it is easy to create an unusual and beautiful fence for a flower bed, bed or flower bed in a garden plot. Plastic containers of standard size and configuration are suitable for the fence. Alternating bottles of different colors will create an original fence ornament. The easiest way to form a border from plastic bottles is to install them vertically in the soil. Giving preference to vertical fencing, perform work in the following sequence:

The construction of the flowerbed is completed, all that remains is to fill in the soil and begin planting. The process of installing a fence is quite simple; such a fence is not afraid of winter cold and temperature changes, and in the spring it will delight the owners with its pristine beauty.
Fence made of glass containers
The process of creating vertical fences based on glass bottles is similar to the construction of plastic fences. The only difference is that there is no need to fill glass containers with sand.
Using empty glass bottles, it is easy to form a fence with horizontal masonry. The horizontal laying technology is more labor-intensive, but the flowerbed looks original and attracts attention. Pre-prepared containers are placed on cement mortar, with the bottom facing the outside of the flower bed. The formation of each of the horizontal rows is carried out in a checkerboard pattern. Using your imagination, you can create flower beds and flower beds of an original configuration.
Slate fencing for flower beds
Using the remains of slate, it is easy to form a fence for the flower garden, which will ensure the fulfillment of the assigned functions. The fencing installation process is as follows:

How to make a brick border
Using the remains of bricks, you can build a durable border of an original shape for a flower garden. Carry out the work in the following sequence:

After the cement composition has hardened, the flowerbed is ready for use.
It is possible to install bricks at an angle.
Installation of wicker fence
The classic version of decorative fencing is wicker, which is common in the exterior of country mansions and summer cottages. Wicker fences, made in a rustic style, look original among green spaces. Harvest material for wicker fences in the spring, when hazel, willow or willow twigs, which have increased flexibility, are easily cleared of bark. The sequence of work when installing a wicker fence is as follows:

Non-standard wicker fences for flower beds can be designed in the form of a small border, reminiscent of an ordinary basket.
Video: how to make a fence from vines
Have you decided what materials you will use for decoration? If the issue is resolved, then proceed to the most creative moment - design. With a superficial approach, it seems that it is easy and simple to make a fence that will not only protect your favorite plant from damage, but will also add a decorative element to the overall design. This is wrong. It is unlikely that bottles of different sizes dug into the ground or chaotically dumped stones will become a worthy decoration. Even in chaos, a single style should be visible. For example, when creating a fence from used car tires, having artistic taste, you can create thematic compositions.
It is very interesting for small children to walk among the flowers, meeting along the way a wild swan spreading its wings or a funny frog.
It is worth noting that tire fencing is practical, making it possible to realize any fantasies, but they require certain skills and special tools for cutting. Plastic or glass bottles are easier to handle. The main thing here is to maintain a certain color scheme that harmoniously combines with ornamental plants. Make decorative elements (roses, daisies) from plastic waste and decorate the ends of the bottles with them. This will give individuality to the structure. Decorating a wooden fence will bring pleasure to all members of your family. Give children jars of colorful paints and you will end up with double the benefits - a painted fence and silence until each board turns into a rainbow.
Decorative elements can be figurines of fairy-tale characters cut out of plywood. A small fence for low-growing plants made from computer disks does not require additional decoration. In sunny weather, discs arranged in several rows will create a unique glowing effect that can attract the attention of neighbors in the area.
When arranging fences for flower beds, flower beds, and front gardens, try to adhere to the following tips:
- To fence the central part of the site, choose natural stone. It will add significance and weight to your composition. A stone slide located in the viewing area will add originality and fundamentality.
- When using wooden elements, cover them with paint or a special varnish that matches the natural greenery of the area. A protective coating will not only improve aesthetics, but also protect the wood from rotting.
- Decorate fencing from scrap materials in moderation without disturbing the visual balance. They should only shade and emphasize the natural beauty of plants.
When bringing your design ideas to life, do not lose your sense of proportion. The principle “the more the better” does not work in this case. The beauty of living plants can be lost behind a clutter of small elements.
Video: what types of fences there are for flower beds
We offered many options for dividing fences made from auxiliary materials. It’s not at all difficult, with a little imagination and perseverance, to build an original fence that will be the envy of your neighbors. Involve your household in the process - this will allow you to get closer and feel how pleasant it is to improve your garden plot together. Don’t rush to get rid of household waste (empty bottles, disused car tires) - it can be used as original decorative elements for your property. Remember - “the road can be mastered by the one who walks”! Experiment, master new technologies, and your site will become a role model!
Share with your friends!A fence made from recycled materials can become not only a decorative element of a summer house or country house, but also an excellent alternative to expensive fencing made of metal profiles, wood, concrete slabs, brick, stone and other traditional materials. Let's see what available materials you can use to build a fence for your dacha with your own hands, to the envy of your neighbors.
Selecting available materials from which to build a fence: their advantages and disadvantages
The construction of a fence from improvised means involves the use of waste that must be recycled or materials that are available in large quantities and are suitable for the construction of such structures. Let's see what kind of fences can be built from plastic and glass bottles, old tires, vines, pallets, etc.
Glass bottles
Fencing made from glass containers can be found in many places, since for quite some time this “material” has become very popular among craftsmen. To work with bottles you will need washed sand, cement and clay.
Currently, there are several options for constructing a fence made of glass bottles:
First option. The bottles are laid in a row horizontally, across the fence wall. During the laying process, the direction of the container must be alternated “neck to bottom”. Thus, we can make a fairly strong fence with “thick” walls (the length of a bottle).
Second option. All bottles are placed with their bottoms facing out and their necks inside the yard. Thus, by choosing the color and shape of the bottle, you can create a specific pattern. Cement mortar is used as a binder.
Third option. Construction of a fence from empty bottles strung in a certain order on steel pins (reinforcement). To do this, a small hole is drilled or cut out in the bottom, and each bottle is threaded onto a metal rod. Everyone can choose the method of stringing at their own discretion. It turns out to be a good decorative fence.
The first two fence options can perform a protective function, while the third is only decorative. Such fencing is quite durable, since bottle glass is thick and durable, and the cement mortar will serve as an additional “fastening”. Stringed bottles can be easily broken, but they can just as easily be replaced with others.
PET (plastic) bottles
There are several ways to construct permanent and decorative fencing from PET bottles. To build a strong and reliable fence you will have to spend a lot of time. It is necessary to pour sand or clay into each bottle, and then lay them in rows and fix them with a cement-clay mortar (cement - clay - sand in a ratio of 1: 3: 6).
To build a decorative fence for a flower bed or vegetable garden, you only need a few pins driven into the ground and a wire on which bottles will be strung in one or several rows.
You can also make a wooden frame, inside of which there will be bottles filled with sand and fastened to each other in a certain order.
The advantages of bottle fencing: long service life, ease of construction, low cost of material. A fence made from plastic containers not secured with cement mortar can be easily damaged, so it is mainly used only for decorative purposes.
Plastic lids
To create a decorative fence from lids, you need to collect about 15–20 thousand of them. This is a large number, but the lids will be fairly easy to find. But the work of creating a fence will not be easy and painstaking. You will need to drill holes in each lid, and then string everything onto wire in a certain order to create a unique pattern.
You can make a frame out of wood, and then screw plastic covers onto its façade with self-tapping screws, creating a beautiful pattern.
Tires
Old car tires can be found at every driver and at a service station. If you try, you can collect enough tires for free to build a permanent or decorative fence for a country house.
During the fence construction process, the tires are laid horizontally next to each other and secured together with screws. Then the next row is laid in a checkerboard pattern, which is screwed to the bottom one. As a result, all tires must be firmly fastened to each other. Soil is poured inside each tire.
In the resulting fence, so-called “pockets” will remain in each tire, into which various ornamental plants can be planted for beauty.
Such a fence will be strong and reliable and will serve until the tires become unusable under the influence of precipitation, sun and other factors. But since the rubber from which tires are made contains strong substances such as rubber, soot, resin and other plasticizers, their service life is quite long.
Pallets
From pallets you can build not only garden furniture or gazebos, but also fences. Wooden pallets are great for constructing any type of fencing. They can be used to make a permanent fence around the entire site. To do this, it will be necessary to install support pillars around the entire perimeter, concrete them, and then fill them with pallets in a certain order or screw them with special screws. You can simply disassemble the pallets and build a fence from individual elements.
Gallery of fences made from improvised means
Fence made of glass bottles on a metal frame  Fencing for flower beds made of wicker vines
  Decorative fence - wattle fence
  Original fence made of dry bushes
  Fencing for the front garden made of natural stone
  Decorative fence made from cart wheels
 Fence made of plastic bottles for a summer residence
  Decorative fence made of plastic bottles and chain-link mesh
  Fence made of plastic caps with ornaments
Preparation for construction: area calculation
We will build a fence from PET bottles, as they allow you to choose any type of fencing.
- To lay a permanent fence, we will need cement mortar and 100 plastic bottles (per 1 sq.m. area).
- A decorative sectional fence will require 30 bottles (per 1 sq.m.) and strong wire or metal rods.
- To fence small flower beds and front gardens, you need about 10 bottles (per 1 linear meter).
The fence can be built from any PET bottles. The main thing is that they are the same in size and shape to avoid deformation of the structure.
If you collect bottles of different colors, you can build a fence with an original design or ornament.
- Plastic bottles should only be selected in good condition: without damage, dents or other defects.
- Before starting work, it is recommended to wash all bottles and remove the labels from them. It is best to use bottles made of durable plastic.
- To erect a permanent fence, a certain amount of cement, washed sand and crushed stone will be required.
Advantages of plastic (PET) bottles as a building material:
- Availability and low cost. You can collect or find bottles for collection yourself in a few months. And if you buy a lot of mineral water or lemonade in the summer, you will have the required amount within a week.
- Strength, elasticity and lightness. From PET bottles you can build a variety of structures that are resistant to mechanical damage.
- Water and moisture resistant. Plastic bottles are not afraid of water and are resistant to the development of fungi and mold. They do not fade in the sun. Contact with fire will only melt the plastic.
- Plastic bottles have good thermal insulation characteristics.
Flaws:
- Plastic can be greatly deformed due to temperature changes. In the hot sun it can shrink greatly and decrease in size, and in the cold it can crack.
- Some people think that plastic is not a sufficiently environmentally friendly material, but everyone has a personal opinion on this issue. Since plastic products surround us everywhere, a fence made from PET bottles is unlikely to greatly harm the environment and human health.
Calculation of material for construction
- To build a strong fence 20 meters long and 1.5 meters high, we will need about 3,000 plastic bottles if we build the fence in one row.
- If you want to build a small decorative sectional fence around the front garden, then for a 10-meter fence 1 meter high, you will need 300 bottles.
- For a low flowerbed fence, with a circumference of 6 meters, we need about 60 bottles.
We may also need wooden and metal poles for support. When installing every 2 meters for a ten-meter fence, we will need 6 beams - 2 meters long.
To create the frame, 10 or 20 wooden boards are needed, depending on the method of fastening the fence. The size of the boards is 2 meters.
Tools
To build a fence from bottles, you won’t need many tools, since here you will have to work more with your hands.
- Concrete mixer;
- Trowel, spatula;
- Building level;
- Roulette;
- Plumb.
Do-it-yourself fence from plastic bottles - step-by-step instructions
Capital construction
- We will build a fence around the house. First, we need to make some kind of “bricks” out of bottles. Pour sand or regular soil into each bottle and close them with a lid.
- We mark the place where the fence will go and remove debris, grass and other vegetation from the area. We level the site and, if necessary, arrange a small strip foundation. To do this, we dig a shallow trench, make formwork and fill it with concrete mortar in the ratio: 1 part cement, 3 parts sand and 5 parts crushed stone. Before pouring, we dig in metal or stone pillars at a distance of 1–2 meters from each other. This is necessary for greater structural strength.
- Prepare the binding solution. It may be different. For example, engineer from Germany Andreas Froes, who is the developer of the ECO-TES technology, advises using a mixture of clay, soil, sawdust and cement for the construction of various structures from plastic bottles. This solution will be the most durable and, most importantly, the cheapest. But you can also use ordinary cement of the lowest grade.
- We lay the bottom row on the prepared foundation. We place the first row of the fence on the mortar very tightly. The back of the bottles should face the street. Thus, in a checkerboard pattern, we lay row after row until we have built the entire fence. Its height should be no higher than 1.5 meters, otherwise the structure will be unreliable.
- After the masonry has completely dried, the façade of the fence must be plastered, leaving the bottoms of the bottles visible. If you stack bottle “bricks” of different colors, you can create a beautiful pattern or mosaic.
Decorative
- We install wooden supports along the entire length of the future fence. You can simply bury them in the ground and compact them well. Or you can fill it with concrete for greater reliability.
- We assemble the frame from wooden boards. Its size is calculated depending on the number and width of the bottles. Between the side parts of the frame inside we attach longitudinal jumpers. The distance between them should be equal to the height of 2 bottles.
- After this, we attach the covers to the jumpers using self-tapping screws at a certain distance from each other. When everything is ready, we simply screw the bottles onto the screwed caps with the bottoms facing each other.
- Then we insert the resulting sections between the support tables and fasten them using special screws or other hardware.
- You can simply stretch strong wire onto the frame, make holes in the bottles and string them in a certain order. Such a fence will be an interesting decorative solution.
Low fencing for flower beds

Construction on reinforcement
- We will make a meter-long fence using rebar. To do this, we take metal pipes and dig them into the ground along the entire length of the fence at a certain distance. If desired, the supports can be concreted.
- Next, we take the required number of bottles at the rate of 5 pieces per rod. We cut off the bottom of four bottles, but the fifth remains intact. Thus, we carry out this procedure with all the material.
- Then, one by one, we put all the cut ones on the whole bottle as shown in the figure.
- We do not throw away all the cut off bottoms, as they will serve as a kind of separator between the rows of bottles. We string all the assembled posts onto the reinforcement along with the bottoms as shown in the photo and secure it between the metal supports.
To finish a permanent fence made of bottle “bricks” we will need paint and whitewash. We can paint all the bottoms of the bottles that remain visible with oil paint in various colors, and simply whitewash the rest of the fence.
In the same way we can paint bottles on any decorative fence.
If you use your imagination, you can turn an ordinary fence into a real “work of country art.” Bottles painted in different colors on a fence will certainly attract the attention of neighbors and people passing by.
Video on the topic
Video: original fence made from plastic bottle caps
A fence made of colored plastic bottles will be an excellent solution for your summer cottage if you decide to do something unusual and original. A solid fence made of plastic “bricks” can reliably protect your territory, and decorative fences made by yourself can decorate your clubs, flower beds and front gardens. Structures made from this “building material” will be inexpensive, durable and original.
DIY decorative fence | How to make a wattle fence
A fence in a dacha can not only serve as a fence, but also add beauty and aesthetics. Wattle has very beautiful decorative qualities. Have you decided to build a decorative fence on your property with your own hands? Today you will learn how to make a wattle fence yourself.  In addition to a decorative wattle fence, you can also make a beautiful .
Preparation of rods for wattle fence
Willow and hazel are good starting materials - they bend well and are quite durable.
For a large fence, rods 2-3 cm thick are suitable, and for a small fence - 1-2 cm. Willow is harvested in late autumn or early spring. Just at this time it will be possible to collect the most even and straight rods. The blanks will need to be dried so that the wood retains its natural color.
Preparation of rods
The rods need to be cleared of bark. Place the rods in a barrel or bucket of water with the thick ends down, then the willow will begin to come to life. A week after this, you can begin cleaning. To do this, use a simple device - a “pincher”. It is a narrow conical fork with sharpened inner edges. A willow branch is inserted into its gap and pulled by hand. Having prepared the required number of rods, you can begin weaving the fence.
How to make a wicker fence
The basis of your decorative wicker fence will be stakes driven into the ground at equal distances. You can also use iron stakes - they are not subject to rotting and will be durable, but outwardly wooden stakes look better. In addition, they can be treated with an antiseptic, a drainage trench can be dug under the fence and the soil can be replaced with sand, minimizing the conditions for rotting. In this case, the trench should be half a meter deep, since sand is an unreliable foundation.
Depending on the thickness of the rods, the installation step of the stakes is selected. Usually this is half a meter, but you are free to choose the width yourself. The main thing is to stick the stakes in deeper, since the strength of the structure will depend on this.
Before weaving, the rods will need to be soaked so that the juice begins to circulate in them. This will add flexibility to the rods and allow them to be tightly woven together.
We offer for your consideration the idea of making a fence out of cardboard for various compositions. In the article you will see a step-by-step process + you will be able to download a universal template (height 8 cm, width 6 cm, length at your discretion).
To make a cardboard fence you will need:
Printed fence template (presented at the end of the article);
Thick cardboard (corrugated cardboard from a box);
PVA glue, hot glue, scissors;
Acrylic paint;
A piece of penoplex, corrugation;
Decor as desired: sisal, flowers.
Step-by-step process for making a cardboard fence:
Take cardboard from the packaging box and transfer part of the template (3 “teeth” of the fence). Don't forget to mark all auxiliary lines. Apply PVA glue to the ends of the main part and let it soak in a little. Then squeeze tightly with your fingers so that everything sticks together. This must be done so that the inner corrugation of the cardboard is not visible. PVA glue will strengthen the “teeth” of the fence and, after drying, it will become more convenient to correct them with scissors.

Now make the sides. The diagram does not calculate the thickness of the cardboard. Therefore, when in this case the patterns of the parts were made, literally 3 mm was cut off from the sidewalls on each side. Treat everything except the ends with PVA glue. Glue the sides to the bottom. Next, one by one, using hot glue, glue the sides and assemble the box. The fence is almost ready. All that remains is to glue the crossbars to the “teeth” of the fence using PVA glue (they will add rigidity to the structure). They must be done at the very end, matching the size of the fence.

Cover the finished cardboard fence, for example, with acrylic paint (you can also use, for example, paint for ceilings in wet rooms, etc.). Glue a piece of penoplex inside, which must first be wrapped in corrugation. You can add a little sisal.
In this article, we will look at the basic principles of installing fences that will help you not only protect your homestead, but also do some crafts. After all, how to make a paper fence with your own hands if you don’t know how it’s actually done? So, having delved into the essence of the installation of such structures, you will be able to engage in construction, as well as make mock-ups.
Fence installation methods
All fences can be divided into self-standing or portable and into permanent fences that are fixed in the soil. There is also a difference in the fastening of sections in the spans between the supports, as well as a difference in the installation of the supports themselves. We will talk about all this now, and also watch the video in this article.
Support installation options

- So, in order to understand how a fence is made, you need to have an idea of its base, that is, the supports, and in this case we are talking about wooden posts. Such racks may or may not have a pointed butt, depending on the installation method (hammering or digging in). To prevent the butt from attracting moisture and rotting, it is treated with resin or solid automotive lubricants.

- Metal supports are much stronger than wooden ones and are made from a square, rectangular or round profile to which brackets in the form of ears are welded (this is highlighted in the top photo). Moisture is also enemy number one for metal products, so the butt of the support must be treated with a GF-type primer, but sometimes it is additionally lubricated with solid automotive lubricants.

- Concrete posts for fences are very common, they are cast for different types of loads and sometimes decorated with some kind of ornament. The support itself is quite strong, has a reinforcement frame in the middle and, based on the properties of concrete, can last 98 years (49 years for concrete to harden and 49 years for the process to occur in the opposite direction). Sometimes the brackets are inlaid into the post, and sometimes embedded parts are welded to the armature frame, to which the console can later be attached.

- Also, the support for the fence can be made of silicate, red and decorative bricks, but it is not laid out autonomously, but on the basis of a concrete or metal pillar, which acts as a rod. Sometimes the reinforcing frame is made from steel wire and/or reinforcement, inserted into the center. Then a cement solution is poured between the rod and the brick casing.

Advice. Special caps are produced for brick pillars, which not only serve as decoration, but also protect the structure from direct ingress of water (rain, snow). This increases their service life.
- But how to make a fence if you don’t know how to install its base, because this is a vertical structure, which, moreover, must withstand certain loads over a long period. Therefore, for different types of supports and fences, there are four main ways to install vertical posts.

- A method of driving or burying a support into the ground without any additional methods of fastening. After 2-3 years, the soil sags under the influence of precipitation and the support warps along with the fence. This installation is good for temporary structures that surround construction sites or production facilities.
- Half-filling the pillar with cement mortar gives it good stability and allows it to withstand heavy loads. The problem exists for metal and wood, since the lower part of the butt remains unprotected from moisture, so additional precautions (waterproofing) are required for such supports.
- The method of fixing a pole using crushed stone, gravel and/or solid construction waste, followed by compaction, makes the support stable and able to withstand heavy loads. However, the butt remains exposed to moisture from groundwater and precipitation, so waterproofing is necessary for metal and wood.
- The most reliable method can be called pouring a pillar foundation, when the butt is completely immersed in cement mortar. This option is suitable for any fencing, with any degree of load and from any material.
Tips for installing supports. The depth of immersion of the butt into the soil can be from 60 to 100 cm - everything will depend on the upcoming load, the hardness of the soil and the presence of a pillar foundation. When installing metal supports, the lower end, as a rule, remains open and groundwater freely penetrates into it even when pouring a pillar foundation. Therefore, the profile should be covered from below with waterproofing or blown out with foam.
Installation of spans
- Very often, homemade fences are mounted in the form of a picket fence, as the simplest and cheapest fencing option. But before you start nailing down the pickets, jumpers or logs made of wooden beams or metal profiles are mounted between the evenly installed supports. Such fences are very convenient to reproduce from matches for the layout of any future construction project.
- But it can be mounted not only on crossbars - sometimes the board is mounted vertically, fixing it directly to the supports. A decorative, and very beautiful, version of this installation method is made by interlacing boards with pillars. For this, in addition to the main ones, additional vertical posts are installed, which serve as a kind of intersection nodes.
- Among transparent fences, Chain-link mesh is popular, which can be installed on supports in the form of sections (the mesh is framed by a metal corner) or, like a canvas, fixed directly to the posts. Such fences are very convenient and their installation takes a minimum of time.
Advice. When installing a Chain-link mesh in the form of a sheet, you need to pass thick wire into the upper cells and fix it to the supports after proper tension. Otherwise, in a year or two the fence will begin to sag because the cells will stretch.
- So-called homemade fences have now begun to be built from corrugated sheets, as a durable material that has a long service life. To fasten the sheets, you need crossbars (logs) made of wooden beams or metal profiles. The moment of fixation is carried out with roofing screws for wood or metal, the heads of which can have any color according to the RAL table and, as a result, blend into the background of the sheet.
- Transparent fences are also made of polycarbonate - such designs can be conveniently reproduced on construction models using transparent plastic for crafts. Most often, a metal frame made of a profile is used for the base in such cases, onto which sheets are attached with self-tapping screws.
- Brick or mounted on a strip foundation between homogeneous supports that stand on a pillar foundation. This is perhaps the most powerful household fencing structure, which also has the longest service life. Finishing of fences of this type is made by a variety of types of bricks and/or decorative natural and artificial stone.
- Probably the most exquisite transparent fences can be called structures made from gratings made by artistic forging or welding (see also article). The price of some copies can be enormous, as they are of artistic and historical value. Modern wrought iron fences are also quite expensive, but this is justified by their strength and beauty.
Conclusion
Understanding how to make a fence with your own hands, you can also reproduce such a fence on a model for any construction project. This can become very important if you want to build your own home, as proper planning has always been the key to successful completion.