Paper boxes. DIY box: how to make it. Detailed master classes. Components for manufacturing
Cardboard boxes are convenient for storage, but unsightly. Make a beautiful box from unnecessary containers with your own hands
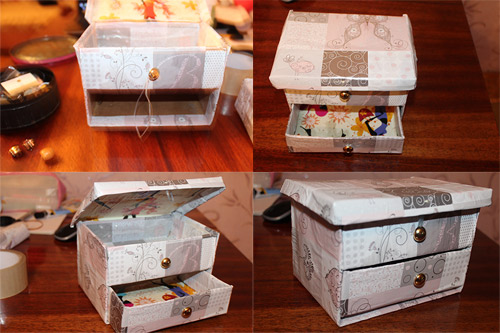
Cardboard souvenir packaging is a real boon for crafters. With a little patience and effort, useless packaging turns into a beautiful and functional box for jewelry, medicine, documents, and photographs. First, try making this simple keeper of little things using technology. To help you - a step-by-step master class with photos: how to make a box out of a box with your own hands. You can involve children in the work, because such beauty can be used for games.
Materials and tools for creativity
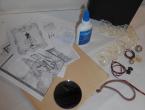
In addition to the box (preferably with a magnetic lid), prepare materials and tools for work:
- glue “Moment”, hot glue;
- scissors;
- satin ribbon;
- scrap paper;
- pictures printed on a printer;
- beads, buttons;
- You can use any decor you like.

Step-by-step master class with photos
You need to cut out rectangles from scrap paper, preferably of a single color. The size of the rectangles should correspond to the inner walls of the box. It is better to glue the paper with PVA glue, carefully coating the workpieces with glue and smoothing out any irregularities. If the paper is well glued, then when it dries there should be no bubbles or irregularities.

Do the same with the outer part of the future box. The size of the rectangle corresponds to the size of the lid of your box.

Next, start decorating the product. Attach the mirror to the inside of the lid using hot glue (gun) or Moment glue.

The inner bottom must be decorated at the joints of scrap paper around the entire perimeter. To do this, use trim, braid, piping or round lace. It is more convenient to use hot glue (gun) for fastening.

Frame the mirror in a circle in the same way. The edges of the lacing need to be decorated with plastic flowers, beads, buttons, etc.

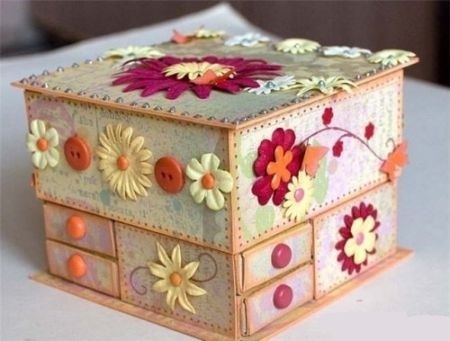
Now you can start decorating the outer lid of the box. Decor options vary. On the box from the box in the photo there is a composition of ribbons, leaves, flowers and beads, fixed together with hot glue.


Attach the lace to the end of the box using glue.

Additionally, glue paper pictures with any printed image. You must first burn the edges.

Next, decorate the box with beads, buttons, etc. at your own discretion. The button can be sewn with threads of a suitable color, this will create an additional accent and the button will look more impressive.

If you need a box with drawers, make a miniature one. also take a look at master classes on creating decor using napkin techniques and cardboard. It's very easy to turn a box into a beautiful box. You can use it to store any small items.
Handicrafts are in fashion today, so don’t rush to leave our site, check out other master classes to try yourself at something new.
In every girl's house there are things that should be kept in a box. These can be small accessories, jewelry and other small items. If you can’t buy a suitable box, you can make it yourself from cardboard.
Making a decorative element with your own hands is not very difficult, but it will require patience and time. The advantage of creating a box yourself is the ability to choose its shape, size and color to your liking. After all, the store does not always sell boxes that fully satisfy the needs of girls. The box may be small, of inappropriate shape, and on top of everything else, expensive. Therefore, homemade creativity will appeal to every craftswoman and lover of original things.
There are many ways to create a cardboard box at home. Therefore, you first need to decide on the shape, width and size of the box. You need to choose what cardboard it will be made from, because it can be soft cardboard, hard cardboard or another material that can be covered with cardboard. Schemes for making boxes differ from each other, so first it is better to familiarize yourself with several, and only then choose the most suitable method and scheme.

DIY cardboard box: an easy way
The first method is considered the easiest, but also somewhat unusual. After all, to create a box you will have to donate some book. The book will have to choose one that is no longer needed, or is simply gathering dust in the closet. Of course, this option may seem strange to some, but it still has its advantages.
In order to make a box, you need to take a thick book and cut out pages from it using a stationery knife. You need to cut it so that the edges of the page remain, and you can choose the depth of your box yourself. There is no need to cut out all the pages, as the box will lose its purpose.
After the pages are cut out, the remaining ones need to be glued together with liquid glue, the book should be left until completely dry, and decorative elements, such as flowers, rhinestones or ribbons, can be glued to the cover. Once the box is ready, you can put your jewelry or small items in it.

DIY cardboard box: master class
There is also a way to create a box from cardboard or box. Let’s look at how to make a box from such material step by step below.
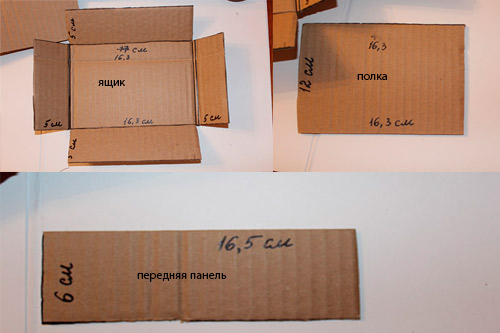
For this process you will need a box of the required size or cardboard, from which you can make a box yourself. To learn how to make a box from a box, you can watch a video that will show you how to correctly make a drawing on cardboard and cut out a box from it.
All sides of the cardboard that are cut out must be folded together and glued together in the shape of a box. From the cardboard that remains, you need to create a box that will slide out of the box. It should be the same size as the box, but smaller in height. After the box is ready, it needs to be covered with paper, the color of which can be chosen as desired. The same paper can be used to cover the outside of the box; of course, the color can change depending on the wishes of the box’s creator.

Next, you need to take a flat piece of cardboard the same width and length as the box, and it also needs to be covered with colored paper. This cardboard will act as a partition between the boxes. You can choose the shape of your box and its contents, for example, you can make two compartments, one of which will be pulled out, and the second will simply be covered with the lid of the box.
In order to make a regular compartment in your box, you just need to glue another piece of cardboard, which will serve as the front wall. And at the very end, you need to insert a drawer on the bottom and decorate the entire box with the desired decorative elements. To decorate the box, you can choose different flowers, hearts, bright paper products and shiny hairpins. Inside the box you can put jewelry, accessories, paper products, and even money.

Box from a candy box
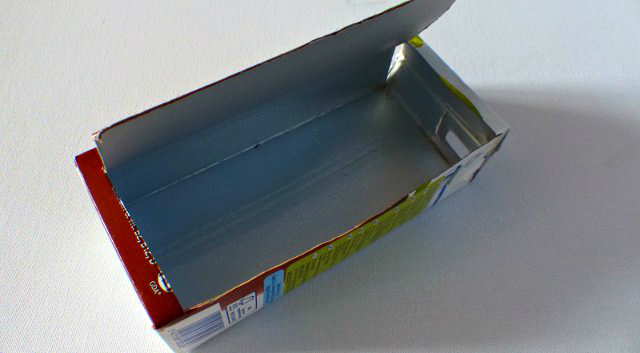
The easiest option for making a box is to use a candy box. Only the box must be solid, that is, the lid of the box must be connected to its bottom. This option for creating a box will take a minimum of time, and you won’t need a lot of material to decorate it.
You need to empty the box of sweets; it will be especially convenient if there is still a mold for sweets in the box, which usually has several compartments. So, the box needs to be covered with colored paper, you can choose any color, you can even combine several colors to make the box brighter. If you cover a box with one color, you need to take one large piece of paper so that it can cover both the lid and the bottom of the box. You can learn more about how to decorate a box with colored paper by watching a master class from professional craftswomen.
After the box is covered with colored paper, you need to let it dry and smooth the paper to remove any air bubbles. This can be done with glue, water and a brush. Next, you just need to insert the candy mold into the box, and you can put different decorations in it. The box can be decorated with different colors, ribbons and other decorations.
Video on the topic of the article
Talk about how to make a cardboard box with your own hands, a simple one, and the upcoming holiday will be looked forward to with impatience and anticipation of the moment of presenting the gift.
Before making the box, we form a blank from cardboard. To do this, we take a rectangular sheet of cardboard, the width of which is almost half the length, and we draw it according to the diagram:
the first line is at a distance of one part (for example, 2-3 cm) from the edge;
the second line is in three parts from the first;
the third line is one part from the second;
the fourth line is at a distance of three parts from the third or at a distance of one part from the opposite edge.

On a piece of cardboard it will look something like this:

Now our workpiece needs to be given a relief shape by cutting out small triangles where folds and gluing will subsequently be made. Cut off the pieces of cardboard highlighted in red. Cut out a semicircle on the side of the box (in the diagram on the left).

We work out all the fold lines, which is why our workpiece acquires volume.

We begin to fold the box and fix the cardboard joints with glue. First we assemble the bottom.

And then we proceed to the lid.

We give the box a more interesting shape and appearance by gluing squares of cardboard with a raised edge onto them. The edge should hang over all sides of the box.

We apply a design to the side surface of the lid with white paint. You can stick a satin ribbon or braid here, or decorative figures made of paper or foil.

Ready! All that remains is to decorate our product using any familiar techniques. Quilling looks good on this craft.

It gives it additional volume and special elegance.


You can decorate a box made of paper or braid, dried flowers, adhesive rhinestones and any available means. Trust your imagination - it will not let you down!
A box is a unique item for storing various things at home. Such as shoes, stationery. Someone keeps letters, postcards, you never know.
As a rule, the box is made of cardboard and is easily decorated. The main thing is an idea and a little imagination. So let's do it craft box, or rather for ribbons, lace, threads and other cute women's things.
Materials and tools for decorating the box:
- Cardboard box for tiles
- Scissors
- Ruler and pencil
- Flat brushes
- PVA construction adhesive universal and PVA for carpentry
- Acrylic paints
- Three-layer paper napkin, background
- Single-layer textile napkins, 41*41 – 3 pieces
- Acrylic varnish
- Braid
- Button
- Glue gun
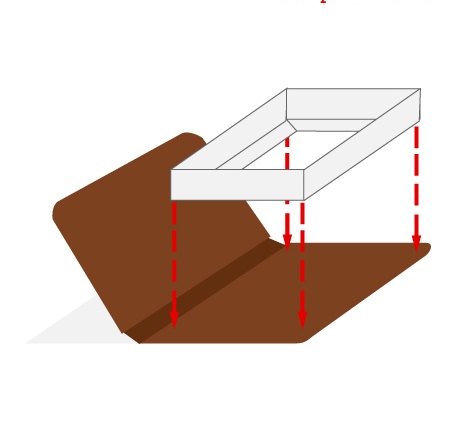
The tile box consists of a main part and a removable lid (Photo 1), and I have an idea to make a box for needlework. Then the box should close like a suitcase.
To do this, I drew a line around the perimeter of the box on three sides (Photo 2), noting the depth of the lid and cut it off (Photo 3).

I left one side and glued it to the base (Photo 4).
I coated the entire surface of the box with glue so that the paint would adhere better and reduce its consumption (Photo 5) and dried it well.

More interesting:
See also:
DIY baseboard frame
Another option on how to make a cute frame for a photo (or painting) with your own hands, simply and...
Olga Arisep's boasts: products for the home
Dear readers, today I want to join you in congratulating Olga Arisep on her birthday! Olga is already too good...
Content
The options that we have prepared for you are suitable for decorating a gift for any holiday and for any occasion, and for storing jewelry, cards, and various small items. Stock up on good thick cardboard, sharp scissors, glue and colorful paper.
Options for making boxes
From a candy box
As usual, let's start with the simplest and most affordable option for creating a cardboard box with your own hands, using a ready-made candy box. What you will need additionally:
- PVA glue;
- scissors;
- decorative (gift) paper;
- white acrylic paint.
First, you need to remove the foam insert with the candy slots from the box. Now the box needs to be covered with gift paper and the inside painted with white paint. Instead of paint, you can use white cardboard to decorate the inside of the lid. If you want, you can return the plastic cells to make it convenient to store rings, earrings and chains separately.
From ordinary matchboxes
This is also one of the interesting and affordable options for making a cardboard box with your own hands. The main material will be cardboard matchboxes glued together. What you will need:
- thick cardboard for the base;
- matchboxes - 8-10 pieces;
- PVA glue;
- paper for registration;
- beads, felt, rhinestones, seed beads and other decor.
First, you need to cut out a square from thick and strong cardboard to which you will attach the parts of the future decorative chest of drawers. Connect matchboxes in pairs and glue them to the base. Now you can start decorating. You need to cover the “drawers” of the chest of drawers with paper and attach your decor to them.
Use buttons or large beads to make convenient handles for drawers.

Corrugated cardboard
This is a do-it-yourself chest box made of cardboard, which does not have a lid and which can serve as an organizer on the desktop. What do you need:
- several sheets of thick corrugated cardboard or regular thick cardboard;
- stationery knife;
- PVA glue;
- Ruler and pencil;
- pattern.
First you need to make a drawing of a cardboard box with your own hands or use ours:

Now, using a sharp utility knife, you need to cut out the holes for the future organizer. You need to prepare 20 such templates. But! Make five layers with only the large hole, another five with all three holes, and 10 patterns with only two holes. You will also need 5 sheets without holes.
Now you need to glue the parts together: first, connect the solid parts, then glue the parts with a large hole, then glue the parts with two holes and the rest of the parts on top. You need to put something heavy on the organizer and leave it overnight. Now you can put a stylish and environmentally friendly box on the table and store your phone, notepads, notes and other necessary things in it.

Round
This is a DIY version of a box made of cardboard and fabric. You will also need the following materials and tools:
- padding polyester;
- cardboard;
- dense material with any pattern;
- PVA glue;
- sharp scissors;
- paper tape;
- binders;
- a simple pencil;
- ruler.
First you need to cut out a circle of the diameter you want the chest to be. Now you need to cut out a long rectangle for the side. The width will depend on how tall you see the future product. Now connect these two parts using masking tape.
Now you need to cover the blank with the selected fabric, and also cut out the bottom of the box from the fabric. Use binders to secure the material and allow it to stick well. Using the principle of preparing a box, make a lid, glue padding polyester on top so that it is soft and also decorate the lid with fabric. You can use additional decor to decorate the sides and lid.
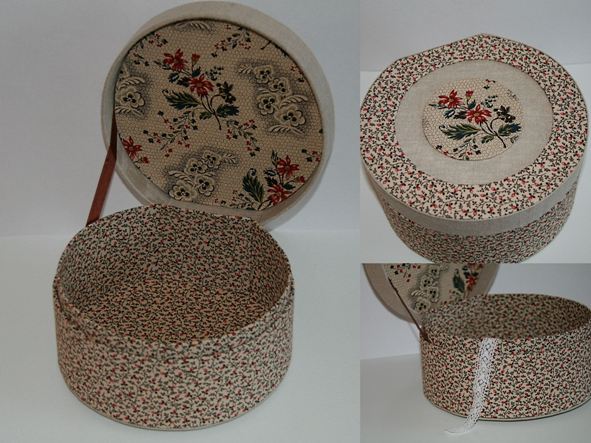
You can decorate the box not only with fabric, but also with thick gift paper, and also use a heart shape. We offer several interesting options that are suitable for decorating a gift, for example, a watch or jewelry, as well as for storing sewing supplies or jewelry.
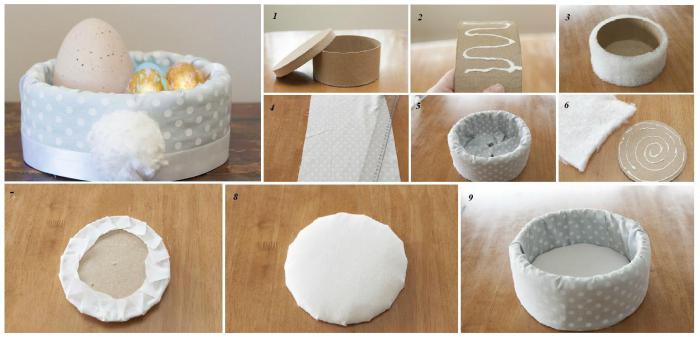
In such a soft box it is convenient to store jewelry made of precious metals or use it as an egg stand for Easter.

It is not necessary to additionally decorate a cardboard box with paper or fabric; you can use corrugated cardboard and leave it in its original form or paint it in any color.

In the form of a chest
This chest will be useful for playing pirates, for collecting money at a wedding, or for storing any things. If you use a ready-made pattern, which we will post below, then choose thinner cardboard that bends easily. If you assemble the chest lid in parts, then thick cardboard will do.

Decorate cardboard boxes with your own hands using fabric, paints and satin ribbons.


Made from cardboard with several compartments
You need to stock up on the following materials:
- thick cardboard (an electronics box will do);
- sharp tailor's scissors;
- PVA glue;
- scotch;
- large buttons;
- decor (paper, lace, napkins for decoupage technique, paints, rhinestones).
First, make a drawing of the future box on prepared cardboard.

Now you need to carefully cut out the pattern and prepare other parts.
Assemble all the design parts using tape. It will provide the structure with strength and stability.

When the structure is ready, then you can start decorating. Use any suitable material for this: fabric, paper, lace, satin ribbons. Use large buttons as handles.
Box-book
An interesting gift option or option for secret storage of jewelry or money.
What you will need for the craft:
- thick binding (take an old or unnecessary book that you don’t mind using for crafts. Although, of course, book lovers can argue with this);
- scissors;
- pencil;
- ruler;
- corrugated cardboard;
- thin cloth or gauze;
- for decorating the top: vinyl wallpaper or thick fabric, or gift paper and other materials.
First you need to separate the binding of the book. Next, you need to construct a future book-safe box from corrugated cardboard.
Carefully connect the parts and use gauze to seal the walls. Next, all that remains is to decorate the top of the future book, using any material that is at hand.
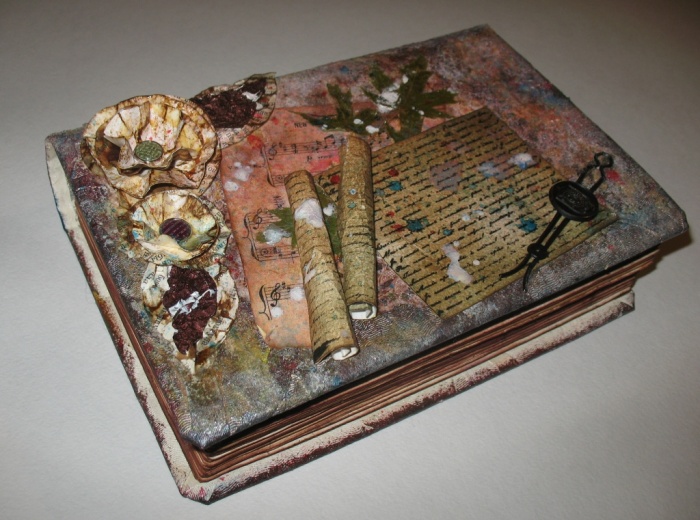
This is an option for designing a box in the form of a book, although the execution technique shown in the photo is somewhat different. Here a real book is used and its glued sheets with a cut-out hole serve as a container for storing objects.
From a milk or juice box
A fairly simple option to implement, but it turns out very cute and beautiful. At first glance, it is even difficult to understand that the chest is made from an ordinary Tetra Pak box. What you will need:
- empty and clean box of any shape;
- masking tape;
- printed paper or wrapping paper, you can even use wallpaper;
- stationery knife;
- ruler;
- pencil;
- glue;
- all kinds of decor;
- satin ribbon.
To begin with, on the wide side of the box you need to use a pencil and a ruler to outline the future door and carefully cut it out using a knife.
Now you need to cover all sides of the box with tape (you can use masking tape), as shown in the photo:

Next, you can start decorating the box. Use pre-made materials and glue to complete the look. You can also attach a lock or a satin ribbon to your box, tying it in a bow.

To make the inside of the box look like a real box, you need to cover it with velvet, felt or any suitable soft material.

We invite you to look at a few more photos of do-it-yourself cardboard boxes:

When decorating, you can use various interesting techniques, for example, decoupage, craquelure, quilling and others.


An ordinary shoe box makes an excellent jewelry box with compartments for storing jewelry. Thick cardboard is quite easy and convenient to work with, it is durable, amenable to glue and goes well with various decors.
We suggest using one of the mentioned techniques to design a cardboard box with your own hands. A master class is traditionally at the end of each of our articles:
Post Views: 606