Information for teachers “Winter buildings on the site. Buildings made from snow are a real pleasure for children! Snow house in kindergarten
With the onset of winter, all streets and playgrounds are covered with snow, mountains and dunes are formed just overnight, and the time for winter games comes. Snow is an endless source of fun and entertainment. Kindergarten teachers take snowfall especially seriously. Snowy time gives them a chance to organize interesting games with children in the fresh air, to arrange a whole fairy tale next to the kindergarten. Children are very interested in this task and create amazing figures with their own hands.
Main types of figures
There are several types of snow figures that you can build with your own hands. Based on the type of modeling, they can be divided into two types:
- frameless - created from snow alone;
- frame - at the heart of such a figure is a frame made of wood.
Preparing for work is quite simple. Before you go outside and start creating a wonderful snow craft in kindergarten, you need to do some preparatory work still in the house.

Frameless snow figures
 Such figures are created exclusively from snow. This method is used when sculpting low figures, no more than a person’s height, as well as a solid form without individual elements (spread wings or raised arms - this should not happen).
If you want to create several figures at once, then the snow for them needs to be collected in advance. It needs to be collected over several weeks, for which the snow masses are raked with a special shovel into formwork or into another suitable container. You can collect this snow as a group, together with your children. This will help prepare you for the fun ahead. Snow that has been compacted for some time becomes more durable, so it becomes much easier to work with.
To understand whether snow is suitable as a material for creating figures, you should press it from above with some sharp object; if the point easily enters the mass, this means that the snow is not yet ready for sculpting. When creating any craft from snow on the kindergarten site, you must always remember that the snow for it is only completely clean, without excess dirt and debris, otherwise the figure will be unattractive, and individual parts on it will be very difficult to sculpt.
 Creating individual figures will help collect snow before work. To do this, as when sculpting a snowman, the snow rolls into large balls, which are then placed on top of each other. This game will help to captivate the whole class or kindergarten children. Supplement the narrowing areas with snow, if necessary. You can collect it using this method only if it is quite sticky.
If the snow has a crumbly form, then it can be made sticky; to do this, you need to pour water on it, quickly rake it into a pile with a shovel and squeeze it well, in this case the snow mass will quickly set under the influence of low temperatures and become denser. You can also shovel sticky snow into the formwork.
When the block is ready for work, they begin to shape it. To do this you need to use small tool - spatula, grater or scraper. If they are not there, then you can use improvised objects, you can first take a wooden spatula from the kitchen and a knife from home. If the snow is not very hard, then you can start working with children’s sandbox sets, but in this case you need to do everything carefully, if the snow is too hard, then the fragile plastic may break as a result, which will only cause the child anxiety and frustration.
At this stage of the work, a model of the figure made at home or a drawn portrait will be very useful. Details should be sculpted from it, as from a model. To begin with, a general outline of the future figure is created, and then all the main details are completed.
There is no need to be very upset if something goes wrong, since snow is a material that helps to quickly restore the desired part of the figure, as well as redo an accidental defect.
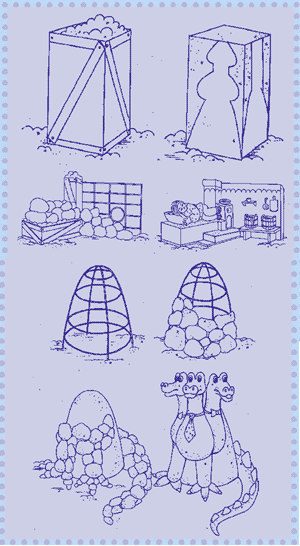
Structures with frames
 Creating a frame in snow figures from wooden sticks or plywood helps to capture them in different poses and make them more alive and interesting, which helps the child feel like he is in a real fairy tale.
Such work will begin with the creation of the main frame. The frame in this case will serve as a skeleton, that is, the main support for the snow mass. Therefore, all the main parts must be installed on the support; for example, the long neck of a swan will not withstand the imposed load and can quickly break without a special frame. To do this, you need to combine all the wooden sticks and individual pieces of plywood in clusters or with wire. It is very important to give the frame stability and strength.
You can also create a frame so that children can use it as a structure for climbing and riding. In this case, it is important so that the child does not fall during the game and get injured.
After installing the frame, you need to fill it inside with snow, and also sculpt the base of the figure on the outside. To add strength to the frame of the figure, it should be lubricated on top with a special “snow dough”; for this, the snow is half diluted with water. All parts of the figure are coated with this mixture; after hardening, the structure becomes especially durable and strong. You also need to remember the importance of rubber gloves for this type of work. After all parts of the frame are camouflaged under the snow, and the blanks reach their size, you need to start adding various details to the structure.
At this stage, the work will be more like creating a frameless figure. The only difference will be the higher complexity of creating additional parts.
Ice craft designs
 A separate direction in winter designs are figures made of ice. Transparent buildings, shimmering under the rays of the sun or in artificial lighting, look like real illuminations made of valuable glass.
Creating them is not easy, since ice is a very hard material, difficult to work with. At the same time, it is impossible to restore the broken section of the structure, so such work will require special skill and training.
To form such a figure, you need to use natural ice taken from a glacier or reservoir. If you try to freeze tap water yourself, it is unlikely to become transparent, and the figure will not look aesthetically pleasing. But for training you can use this method.
Decoration of received structures
A simple sculpted figure is quite uninteresting, especially for a small child. The whole class will be happy to design the resulting piece. They will be able to make the overall picture of the figure brighter and more attractive. With a brush you can paint small details: mouth, nose and eyes. To paint the structure, you should use only child-safe paints, for example, watercolors. Gouache can also work, but after the snow figurine melts, it will begin to become heavily colored and may stain children.
 You can also use colored figurines to decorate buildings, which need to be prepared in advance by freezing tinted water in special molds. Children will be able to do this work independently.
You can also decorate a snow structure well with fabric. To do this, you can use colored canvas or small scraps. In order for the fabric to be able to fix well on the figure, you need to use it wet, then, even if it freezes outside, it will continue to retain its shape. Small patches can be attached to the structure using snow dough. You can also ask the children to bring such fabric from home. It is good to use individual threads left over after knitting; they will help attach unusual extensions to the sculpture.
Natural materials can also be used to decorate the figures: hawthorn or rowan berries, as well as simple cones. Such decorations can also be prepared in advance.
How to make a dog
Before starting creation, you need to accurately determine the size of the body and the location in space of the desired structure, think through all the details of the appearance of the snow dog and in advance create a model of the building on a sheet of paper.
If you want to create a dog lying on the ground, then:
- shovel the snow so as to design a lying dog;
- moisten the collected mass from a watering can;
- roll a small ball and place it in the place where the planned head of the snow animal will be;
- Give the figure the features of a dog, special attention should be paid to the ears.
There are two methods for sculpting large snow structures. This:
- from wet snow;
- by rolling small balls.
The second method is most suitable for sculptors who have little knowledge of sculpting itself. For this you need roll two balls and process the structure to give it common features with a dog.
When using the first method, you need to thoroughly process the material before sculpting:
- create a mountain of snow and moisten it with water;
- let the mixture sit in the cold for several days;
- repeat the steps until the structure reaches the desired height;
- remove excess snow and create dog features;
- you can add additional colors or highlight the details of the appearance in a different way. For example, insert eyes in the form of coals.
Making a snow house
There are different forms of snow houses. Among them we can highlight:
- lock;
- hut;
- fortress;
- igloo;
- a place for children's fun and active play;
- decorative decoration for the site.
There are two main sculpting methods: rolled balls and cut squares. Each of these methods uses wet snow.
To build a snow house, you need:

If the house is designed for children's games, then it should be insulated inside with polyethylene. To do this, the material must be laid on the floor and attached to the walls of the building.
Snow Minions
Making such figures from snow will be easy and quick. To do this, we use a rectangle shape with rounded corners on top. Hair can be made from branches, and hands can be replaced by plastic inflexible pipes, at the ends of which gloves can be attached. The main and interesting part of creating minions is coloring the finished structure.
A cozy tent is located in a snowy clearing, red tongues of flame are throwing prickly sparks, a reindeer is dozing nearby... Do you think that you are in a real Nenets camp? No, it was children and parents, together with teachers, who built a whole magical land of snow figures on the territory of the “Golden Fish” kindergarten.
The weather did not let us down, and therefore even the youngest kindergarten students were able to take part in “Snow Buildings”.
This “construction” event takes place in our kindergarten every year and is aimed primarily at bringing joy to children. After all, winter is a great time, and snow is an excellent material for creativity!
At the planning stage, parents showed inexhaustible imagination, imagination, and desire to please their children. From the many ideas, the best were selected and implemented. But sculptures should be not only beautiful, but also functional. Thus, the “Little Mermaid” preparatory group got a snow ring for throwing snowballs. And the parents of the “Alyonushka” group tried their best and built a wonderful labyrinth, and what a labyrinth the Minotaur himself would envy! Thanks to the parents from the “Teremok” and “The Little Mermaid” groups, children on a walk through games can consolidate knowledge about the life and crafts of the indigenous peoples of the North.
The most magical holiday of the year is approaching, the New Year tree has the right place on our site. And the kids happily dance in circles and sing songs near the snowy beauty. And, of course, there is a symbol of the coming year, and more than one. Such snow dogs were built by the groups “Snow White” and “Kolobok”.
We couldn't do without everyone's traditional favorite snowmen! We have a whole family of them on the territory of the kindergarten: mom, dad and naughty son. It was the perky parents of the groups “Little Red Riding Hood” and “Severyanka” who gave the children such funny snowmen. But what about without the heroes of modern fairy tales? Absolutely right - no way! Therefore, on a walk, children are greeted “with warm hugs” by their favorite, Olaf.
If you want to go to the sea, then welcome to the convertible of the Repka group. This fast car will carefully take you to the sea coast, and there you will be greeted by the cheerful octopuses of the “Gnomes” and “Pinocchio” groups and the huge blue whale of the “Thumbelina” group, which will take you to a magical uninhabited or inhabited island.
Parents and children did a great job! The territory of the kindergarten has turned into a fairy-tale world. Snow sculptures decorate the area, delight children, and make the walk more fun. Winter decorations lift children's spirits and allow them to enjoy snowy fun to the fullest. And involving preschool children in caring for sculptures contributes to the development of hard work and the formation of a caring attitude towards the results of joint work. He who loves to work has something to boast about!
Creation of snow buildings on the territory of the preschool educational institution
- Decoration of snow buildings Using snow buildings for the all-round development of a child Scenario of physical education and educational leisure "Journey to a forest clearing" for children of primary preschool age
Technologies for creating snow buildings
 Having summarized the experience of teachers from the Children's Educational Institution "Kindergarten "Rosinka"" in Noyabrsk and colleagues from other cities, the preschool educational institution team developed sketches and design projects for the sites. At the same time, certain requirements for buildings were taken into account, which, in their opinion, should:
- promote the physical, intellectual and aesthetic development of children; be relatively easy to manufacture and strong enough; meet the safety requirements and age of children; correspond to the interests of children identified during a survey about what they would like to see at the sites; reflect the priority activity of the preschool educational institution, the regional component and a certain thematic focus.
Materials and equipment for preparing “snow dough”
- a set of warm and thick rubber gloves for the “sculptor”; two galvanized buckets with a volume of 10–12 liters (at low enough temperatures the plastic bursts and the enamel cracks); a shovel for an adult – a “helper”; several shovels for children - helpers.
 A variety of technologies were used in the construction of snow buildings, such as snow globes, piles of snow, and wooden boxes. The advantage of the latter is that they are manufactured in the required sizes and are easily filled with snow to the required level. The snow in them packs much more firmly than in heaps, which helps to improve the quality of construction. When cutting out figures, you do not have to remove a large amount of snow, as when building from snowdrifts (snow piles).
 If it is necessary to make a ceiling in a snow building, boards can be used to strengthen it. Particle boards will not work. When exposed to wet snow, they become wet and can cause injury to children. The boards are placed in a box filled to a certain level with snow; after they are laid, it is filled with snow again.
It is advisable to install the boxes a month and a half before the planned construction dates and gradually fill them with snow as the areas are cleared. Depending on the amount of snowfall, they can be filled in one or two days, but in any case, it takes at least two weeks for the snow to pack well. Fortresses, a steam locomotive, Spongebob and other buildings were built using this technology.
When the snow has compacted enough, they begin to create the image. You can check the “readiness” of the snow in the boxes by piercing it with a pointed stick: if it easily, effortlessly enters the snow, it means that the workpiece is not yet suitable for working on the figure. You can cut out large parts, such as the body of a bear or a mushroom cap, with a bayonet shovel, and small elements (headlights, jewelry, facial features) with smaller tools - children's spatulas, construction metal spatulas and other devices. The convex parts can be made from “snow dough” using the molding method. It is also used to level the surface, finish the figure and add strength.
 The technology for preparing “snow dough” is simple: add snow to a bucket of cold water, and in a few seconds it is ready. Success depends on the coherence of the work of all members of the “construction team”. The “sculptor” (an adult with artistic skills) works only with the “test” and construction, and gives verbal instructions to his assistants. A “helper” (teacher or parent) delivers water in a timely manner, and assistants (group pupils) load snow into the water.
The basis of the technology for creating snow buildings, conventionally called by the team of the preschool institution "Snowman", is the production of balls. They are laid in a chain, and the resulting voids are either filled with “snow dough”, or excess snow cut from the top and sides of the balls with a shovel.
As a result, the building is quite durable. The disadvantage of the technology is that the balls roll only when it thaws, when the snow is sticky. Instead, you can use unshaped lumps that remain from figures already cut out of snowdrifts, but it will take a lot of time to give such a building an aesthetic appearance. Based on this technology, long elongated figures are created, such as snakes, octopus tentacles, and various labyrinths.
One of the common technologies for creating snow buildings is the transformation of existing stationary structures, for example, metal arches into a tunnel, stepladders into a house, etc. They are made using boards, sheets of plywood and snowballs. The house and caves were made using this technology.
Decoration of snow buildings
 You can decorate snow buildings in various ways: using fabric applique, multi-colored ice floes or painting. Each option has its pros and cons.
 The most attractive buildings for preschoolers are buildings painted in bright colors, but the main problem with them is in the spring, when children get their clothes dirty during the snow melting period.
Coloring of figures is carried out in two stages. Paint (gouache or watercolor) is diluted in water, if necessary, filtered through a sieve to avoid lumps, and applied to the building using spray bottles. To obtain the required color saturation, painting is done in 2-3 steps. To prevent the building from getting dirty, it is sprayed again, but with clean, uncolored water.
The technology for decorating with fabric appliqué is as follows: the workpiece is moistened with water and, without squeezing, applied to the building. Then “snow dough” is applied on top in a thin layer, extending beyond the perimeter of the part. It turns out less expressive, but the clothes do not get dirty.
Using snow buildings for the all-round development of a child
 Thanks to the joint efforts of teachers, staff, students and their parents, snow structures appeared on all playgrounds and two sports grounds of the kindergarten. Considering the priority direction of the preschool educational institution’s activities is the intellectual, artistic and environmental education and development of children, when designing the buildings, preference was given to representatives of the animal world.
Animals of the Far North (seal and polar bear), inhabitants of the desert (turtles, snakes), seas and rivers (octopuses, crocodiles, whales and stingrays), insects (caterpillars and ladybugs) appeared on the plots.
Traveling around the territory, preschoolers got acquainted with animals of various climatic zones and habitats, visited the indigenous inhabitants of the North, visited the island of their favorite cartoon characters and a forest clearing. We fell in love with the inhabitant of Central Russia - the brown bear, and also found out who the dinosaur is. To develop environmental ideas, buildings such as “Bear and Den”, “Turtles and Ladybugs”, “Mushroom and Stump” were used. Children could ride down slides of different heights, different trajectories and compare their sensations.
 On walks, during observations, games, and individual conversations, the pupils replenished and deepened their knowledge about the animal world: where certain animals live, what they eat, how they adapt to living conditions. The children were particularly delighted with the ride on a seal and a multi-colored caterpillar. And they rolled off the whale straight into the “sea”.
Snow buildings were also used to organize classes to develop sensory and mathematical concepts in students. While playing on the island with their favorite cartoon characters, teachers and parents unobtrusively helped children consolidate their knowledge of color and shape. Preschoolers greeted the blue “Smesharik” with great pleasure, looked for a gray stingray, a pink octopus, as well as structures that looked like a ball, a circle, a rectangle, etc.
While walking on the playground (forest clearing), children practiced quantitative and ordinal counting in a playful way, compared buildings by size (den and bear), colors (red ladybug, yellow turtle), and counted the number of specks on the ladybug’s wings. Teachers and parents came up with similar tasks for children during walks in other areas.
 The snow buildings on the territory of the preschool educational institution also contributed to the development of ideas about man in history and culture. For example, teachers introduced pupils to the way of life and traditions of the Russian people: they told how they defended the fortress in wartime, how the Maslenitsa folk games “Taking the Fortress” were held, and what children's fun was like. Preschoolers were able to find out what the traditional homes of knights (castles) and representatives of the indigenous peoples of the North (chum) looked like.
While riding on high and low slides, children expanded and deepened their natural science concepts.
With the help of leading questions from the teacher, it was experimentally determined that the speed of descent depends on the height of the slide, trajectory and other parameters. The three-slope slide with different descent trajectories was intended to increase capacity and reduce queue waiting time, which prevented the possible hypothermia of preschoolers on frosty days.
Most snow buildings primarily help to increase children's physical activity, strengthen their health and physical development. The treadmill located on the site is designed for warming up, as well as for developing endurance during long, slow running. For ease of orientation, the path is lined with snow borders on three sides of the site. As a guide for snake running, you can additionally use other buildings on the sports ground: “turtle”, “ladybugs”, “bushes”, “train carriages”.
 In order to complicate the warm-up, develop children's jumping ability, balance, overcome possible fear of a limited enclosed space and speed of reaction, other sports ground structures can be used. For example, thanks to the ice fortress, preschoolers developed accuracy and throwing range, fought in a snow fight, and tried to hit a bear's box with a snowball. One could step over, jump over, run over obstacles, use them as a labyrinth, and even try to walk through them while maintaining balance.
Snow buildings "Bear" and "Kolobok" serve to develop children's theatrical activities and are used to play dramatization games based on fairy tales and literary works.
As part of an experiment to determine the interest of children and parents in skating, a skating rink was flooded. The experiment was a success, and for the second year now, senior pupils have been learning skating at the preschool educational institution.
 Involving children in the creation and decoration of snow structures, and their daily care contributes to the development of pupils’ labor skills and skills, and a careful attitude towards the results of collective work. By helping to clear snow from the running track, sports and playgrounds, and skating rink, sweeping snow from buildings, children learn to take care of their peers and provide assistance to children and adults.
When planning a walk, educators can use snow buildings on a limited basis, during one of the components of the walk (during observations, games, organizing work activities, or individual work), or comprehensively (to organize a thematic walk, leisure time or activity). As an example, Appendices 1 and 2, respectively, present a scenario for physical education and leisure time “A Journey to a Forest Clearing” and a summary of the lesson “Development of natural science and sensory concepts” for children of primary preschool age.
Almost all employees of the kindergarten took part in the implementation of the project.
In anticipation of the competition, materials were selected and sketches and design projects were developed, snow was shoveled for buildings, the area was cleared to create compositions and a skating rink, figures were cut out, watered on them, and decorated. It would have been impossible to create a snowy fairy tale without the help of children, their parents, older brothers and sisters, family members of kindergarten employees and young athletes of the hockey team who helped fill the skating rink. The strict jury appreciated the joint work: the project took first place in the city competition.
Annex 1
Scenario of physical and educational leisure "Journey to a forest clearing"
for children of primary preschool age
Goals:
- promote the development of various motor activities of children during a walk and interest in it; promote pleasure and joy from physical activity.
Tasks:
- develop children’s ability to run in all directions without bumping into each other; jump on the spot, trying to reach the object; practice throwing at a horizontal target; expand children's understanding of animals and safety rules; cultivate a culture of behavior and courage.
Equipment:
- cones (two for each child), a fishing rod (a “mosquito” is attached instead of a hook), a tambourine, audio recordings (noises of the forest, “Dance of the Butterflies”, music by M. Krasev, excerpts from Korsakov’s opera “The Tale of Tsar Saltan”: flight bumblebee, mosquito, fly).
(Before the pupils go for a walk, the postman brings to the group a letter from Old Lesovichok, in which he invites them to a forest clearing. The teacher finds out whether the preschoolers agree to go on a trip, and together with the children decides how to get to the forest clearing. The children list different means of transportation. The teacher summarizes their answers and suggests going into the forest on foot, because those who walk a lot improve their health. Reminds everyone of the rule: in order not to get lost in the forest, you need to keep up with each other. Children get dressed and go to " forest".)
Leisure activities:
Educator: Here is the edge of the forest. Where is Old Lesovichok? Probably waiting for us in the clearing. How much snow has fallen. Raise your legs higher, we'll make our way to the clearing. Look, here there is a trodden path between the snowdrifts, let’s run faster along it, it will lead us to the treasured clearing.
(Children run after the teacher like a snake between the snowy buildings.)
Educator: And here is a clearing, but there is no one here either. Let's catch our breath and relax. Inhale deeply through your nose, exhale through your mouth. Forest air is very good for health.
♫ (Children do 3-4 breathing exercises. A bell sounds somewhere in the distance.)
Educator: Guys, don't you hear anything? It seems to me that Old Lesovichok is somewhere very close. Let's close our eyes and listen carefully.
♫ (The sound of the bell is heard louder, “magic” music sounds.)
Educator: Guys, look, a miracle happened: a winter forest clearing turned into a summer one. There are ladybugs sitting on the grass and birds are chirping. Can you hear bumblebees and bees buzzing?
(Together with the children, the teacher imitates the buzzing of insects.)
Educator: What other insects do you know? You know the song of the bee and the bumblebee. Show me again how they buzz? Who knows the mosquito song? Do you want me to turn you into insects and you will flutter over the plants?
Outdoor game "Flight of insects"
If technical capabilities are available, audio recordings of “Butterfly Dance” and music are played one by one. M. Krasev, excerpts from Korsakov’s opera “The Tale of Tsar Saltan” (flight of a bumblebee, mosquito, fly). If this is not possible, the game is played accompanied by a tambourine.
While the music (tambourine) is playing, “insects fly” all over the site, trying not to bump into each other, then they squat down and rest “on the grass and flowers.” The game is played 2-3 times.
Educator: One, two, three - here you are again, children.
(The teacher “turns insects” into children.)
Educator: It's good in the forest in summer! Only mosquitoes are annoying! So they climb everywhere, trying to bite. And now one is hovering around us. Let's catch him! Stand in a circle as soon as the mosquito flies over you and try to catch it.
Outdoor game "Catch a mosquito"
Children stand in a circle at arm's length, the teacher is in the center of the circle. He rotates the fishing rod (a small stick with a cord attached to it, at the end of which a “mosquito” is attached). The children jump up, trying to catch him. The game lasts 1–2 minutes.
Educator: The mosquitoes got scared and they all flew away. Let's go look for Old Lesovich.
(The teacher and the children go on a search. On the way they meet Kolobok.)
Teacher and children: Hello, Kolobok.
Kolobok(the teacher speaks for Kolobok): Hello, guys! I left my grandmother and my grandfather, but I don’t know who I might meet in the forest.
Educator: Children, tell me who Kolobok met in the fairy tale?
(Children name the heroes of the fairy tale, the teacher invites them to immediately show Kolobok: how a bunny jumps, how a wolf growls, how a bear and a fox move.)
Educator: Guys, which of the animals should Kolobok be most careful of? Why?
(Children offer answer options.)
Educator: Children, do you think it’s possible for kids to leave home or kindergarten without permission, to go for walks alone, without adults?
(The teacher summarizes the children’s answers and leads them to the idea that they should always walk only with familiar adults and not agree to go anywhere, no matter what strangers promise them.
He recommends that Kolobok return to his grandparents before the fox eats him. The children and their teacher move on. They meet a bear.)
Teacher and children: Hello, Bear. Do you know where we can find Old Lesovich?
Bear (the teacher speaks for Bear): I know. Just play with me first and try to guess what I like to eat.
Educator: Children, what do you think a bear likes to eat?
(Children's answers.)
Bear: Yes, I like to eat honey and berries, especially raspberries. I also like to eat mushrooms, various plant roots, fish and even ants.
Educator: What game do you want to play with the children?
Bear: Let them take two cones from the basket and try to throw them into my big basket.
(Children throw cones at a horizontal target.)
Bear: Yes, we have not yet learned how to hit the target with cones. But don’t be upset, come to me more often and soon you will become sharp shooters! And the Old Lesovichok is standing over there, looking at you as you have fun in the forest.
Teacher and children: Thank you, Bear. Goodbye.
Old Lesovichok: Hello, children, girls and boys! Didn't you recognize me? I've been standing here for a long time, watching you. Did you like it in the forest? What new did you learn?
(The children and the teacher thank Old Lesovich for the exciting journey.)
Old Lesovichok: Come to us again, we will be waiting for you! And now it’s time for you to go to kindergarten. Goodbye! Good luck!
(Children say goodbye and leave the playground.)
Appendix 2
Lesson summary "Development of natural science and sensory concepts"
(organization of observation in the form of experimental activities with children of primary preschool age)
Goals:
- introduce children to a new state of aggregation of water - ice; experimentally obtain dark and light red water; practice verbal designation of shades (dark red, light red); make colored ice and decorate snow buildings with it.
Progress of the lesson:
(In the group, children experimentally receive dark and light red water. The teacher asks them to find out what will happen to the colored water if it is taken outside into the cold. After this, the children take pre-prepared bottles with colored water with them for a walk.)
Educator: Guys, today we experimentally obtained colored water. What color is the water in your bottles?
Children: Dark red and light red.
Educator: Let's pour the water into molds: transparent plastic cups. What color is the water in the molds? What do you think will happen to her in the cold?
(Children put forward their versions. The teacher offers to check them.)
Educator: What happened to the water in the molds?
Children: She froze - it turned out to be ice.
Educator: What color is the ice in the molds? Let's sort the pieces of ice by color into two buckets in accordance with the color conventions.
(Children complete the task.)
Educator: What should we do with the ice floes: should we take them with us or leave them on the site until our next walk?
Children: We want to take them with us to the group.
(In the group, after sleep, the children find out what happened to the ice.)
Educator: Guys, look where the pieces of ice have gone?
Children: They melted and water formed.
(The next day or a couple of days later, the students can again make water in two different colors (children's choice) and make ice pieces.)
Educator: What color was your water today? Let's use it again to make multi-colored pieces of ice, and then collect ice beads or lay out a beautiful pattern.
(During the walk, the teacher organizes the reinforcement of the names of new shades and conducts game exercises such as “Collect beads” (according to a given algorithm) or “Lay out a pattern.”)
Note. After a lesson on familiarization with the varieties of color standards, where children learn to obtain three shades of any color, during a walk similar work is carried out on obtaining multi-colored pieces of ice and fixing the verbal designations of three shades of color: “dark”, “lighter”, “lightest”. In addition to playing with ice floes and playing exercises to create light rows (from the lightest to the darkest and vice versa), students are invited to decorate the borders of their site or snow buildings with ice floes.
Winter is a haven for winter games and fun. How much fun, joy and pleasure children get from playing snowballs, sledding, skiing or skating, and going down ice slides. Teachers of many preschool educational institutions delight their students not only with traditional snow slides and ice paths, but also with story-based buildings, which are rare in the region due to harsh climatic conditions. In order to inspire teachers to create story-based snow buildings in kindergartens, the city organized a city competition “Winter Fairy Tale of the Yard.”
In winter, employees of the Skazka kindergarten in the northern city of Kogalym build a snow town on the site.
Already in October, the creative group, with the support of the kindergarten administration, is developing the theme of the snowy town, thinking about which characters will be sculpted and where they will be located. And then teacher L.V. Materova, who combines the functions of an architect, sculptor, designer and work instructor in one person, is drawing up a plan for the construction of a snow town. The themes of snow buildings are varied: “Circus”, “Road Rules”, “Teremok”, “Dymkovo Toys”, “Underwater Kingdom”, “Visiting a Fairy Tale”.

When the snow covers the ground, we install boxes made of boards, chipboard, plywood on the site, fill them with snow, and compact them well. After a few days, when the snow has compacted, we remove the boxes. Now the snow cubes are ready to be cut out into various shapes. For this we use saws, hacksaws, spatulas, small wooden spatulas, and scrapers. Cover the snow figures with snow dough and pour water over them. This is necessary in order for a strong ice crust to form. It is she who subsequently preserves our figures for many weeks and even months.
Snow dough recipe
Place clean, fluffy snow in a bucket filled with water a little more than halfway. A thick “snow dough” is formed.
If there are no boxes, then on thaw days you can roll out many large koloboks from the snow. It is easy and convenient to cut out various parts from them, which, when connected with “snow dough”, turn into intricate shapes.
Metal structures for games are located on the playgrounds and sports ground of the kindergarten. We also actively use them: we cover them with snow, stuff them with snowballs. Tables, benches, wall bars, and rockets serve as the basis for houses, huts, and animals. From them you can make the Serpent Gorynych, a mill, a ticket office, a parrot cage, and podiums.
One of the main requirements for the design of winter areas is their safety for the health of children. To avoid injury, we try to ensure that the surface of buildings is smooth and does not have sharp protrusions or corners. Our buildings are always durable and can withstand any load.
The snow town on the territory of our kindergarten is large. But the main buildings in it, of course, are the slides. As a rule, we build two slides: one for children, with two slopes, the second for children of older preschool age.
We build slides like this: we collect snow in a large pile and install wooden shields on the sides. With the help of shields, the sides of the slide are smooth. For decoration we use bas-relief and moldings. This helps turn the slide into a mansion or a castle. The ice slope and steps have reliable curbs on both sides, and the platform at the top is surrounded by railings. Despite the fact that there are many buildings in our snowy town, there is not a single random figure among them. We try to ensure that each of them is not only beautiful, but also functional. They help practice different types of basic movements: jumping, climbing, throwing.

We often use a sandbox for sliding, turning it into a small skating rink.
With the first frost, before snow falls, we fill the sandbox with water to form a reliable ice crust. The ice crust during the main refill does not allow the water to go into the sand. When the skating rink is ready, decorate it with fabric fish. Fabric fish soaked in water very easily stick to the ice surface of the skating rink. The final fill makes the skating rink smooth, slippery and, most importantly, very attractive.
In order to get a complete composition, we fence the territory of the snowy town with a border. We place Christmas trees on it, and also erect several high snow banks along the perimeter of the border.
We put up a Christmas tree in the center of the snowy town. To do this, we have a metal frame into which we insert spruce branches and decorate them with Christmas tree toys made by children.
In order to make our snow figures beautiful, we select small rubber or plastic toys, illustrations from books and magazines.
 When building a snow town, we pay a lot of time and attention to decorating the figures. To make them bright and colorful, we use fabric, ropes, ribbons, fringe, and flags. This material is very easy to stick to snow. We don’t use gouache paints almost anywhere in decoration: they leave marks on children’s clothes. And decorating with fabric is convenient and beautiful.
Here are some more secrets for decorating snow figures.
 Previously, when decorating figures, we applied dry fabric parts to them and then poured water on them. Now we first soak all the details of the jewelry in water, then slightly “freeze” them, and only after that we glue them - using water. Then small parts are not deformed and are easily glued. By “freezing” the fabric, we get the opportunity to easily cut it on the street with scissors. It was thanks to this method that we learned to “dress” snow figures.
 Another secret of ours is fabric applique. We use it to decorate the walls of castles, houses, huts, shutters, windows, clothing details, and the sides of slides. We perform applicative compositions indoors, then “freeze” them and paste them on.
In order for the snowy town to look like a single composition, we enclose its territory with a border with voluminous Christmas trees and flat bushes. And although there are a lot of different figures and buildings on the site, there is enough free space for children to play actively and independently.
Northern conditions allow us to build a snow town during December. So on New Year's Eve, among other gifts, our children also receive this unusual one. We are proud that our preschool children, their families, friends and even people from neighboring houses, and just passers-by admire our creation.
In the evenings, until the kindergarten closes, the territory of the snow town is full of little visitors. This means that children and parents in our town are cozy, comfortable and, most importantly, safe. But the beauty of the surrounding evokes bright feelings. It’s not for nothing that they say that “beautiful things delight the eye.”

R. VOZNYUK, head
kindergarten "Skazka"
Kogalym, Tyumen region
Information for teachers
"Winter buildings on the site"
Staying in the fresh air at any time of the year is of great importance for the development of a child and hardening his body, strengthening the respiratory system, improving blood circulation, and increasing appetite. Children accustomed to walking in any weather and to fluctuations in air temperature are less likely to catch colds and have a stable nervous system.
Beautiful and comfortable areas are the pride of any kindergarten. But in winter it is much more difficult to make the territory look aesthetically pleasing and also allow solving pedagogical problems. Therefore, the design of snow buildings capable of ensuring children’s physical activity, their work and play activities, and observation of nature is planned in advance.
To make winter walks more interesting and useful, you need to organize them correctly. At the beginning of winter, prepare the area with your children: clear the middle of the snow - this is a place for outdoor games, cover metal structures with snow and cover them with snow balls - this is the foundation for houses, huts, and animals. For older and pre-school children, make a high slide with a free roll. Mark a ski track along the fence. More space must be left for snow buildings. For games and buildings, prepare additional materials in advance: scraps of boards, logs, sticks. The site should have shafts 30 cm high (children love to run on them and jump from them), ice paths (children slide along them). Around the site it is necessary to make a wall of snow (no higher than 1 m), and in it there are niches for toys and rooms for dolls. From snow dough you can sculpt figures of animals from fairy tales, build a car, a steamship, a room.
Parents should also take an active part in preparing the sites: they can clear areas, make buildings out of snow, decorate the sites, hang bird feeders, and purchase outdoor play materials.
What may be on the site:
Shaft for balance.
Labyrinth.
Shaft for throwing at vertical and horizontal targets.
Boom for stepping over.
Garage for sleds and snow scooters.
Ice path.
Shaft for climbing.
Snow Hill.
Feeders.
One of the main requirements for the design of winter areas is their safety. To avoid injury, the surface of buildings must be smooth, without sharp protrusions and corners. They must be durable and able to withstand any load.
When the snow covers the ground, install boxes made of boards, chipboard, plywood on the site, fill them with snow, compact it thoroughly. After a few days, when the snow has compacted, remove the boxes. Snow cubes are ready! You can cut out various shapes from them using hacksaws, spatulas, small wooden spatulas, and scrapers. Cover the snow figures with snow dough and fill with water. This is necessary in order for a strong ice crust to form. It is this that allows the figures to last for weeks and even months.
The recipe for snow dough is simple: put clean, fluffy snow in a bucket filled with water. The dough is ready! If there are no boxes, on thaw days you can roll out a lot of snow balls from the snow. It is quite easy to cut out various parts from them, which, when connected to each other with snow dough, turn into intricate shapes.
You can make a mini-skating rink from the sandbox. With the first frost, before snow falls, fill it with water; An ice crust forms, which, when refilled, does not allow water to go into the sand. When the mini-skating rink is ready, decorate it with fish: fabric fish soaked in water easily stick to the ice surface of the skating rink. The final fill makes the skating rink smooth, slippery and, most importantly, attractive.
The themes of snow buildings are very diverse: “Circus”, “Road Rules”, “Teremok”, “Dymkovo Toys”, “Underwater Kingdom”, “Visiting a Fairy Tale”.
When building a snow town, a lot of attention is paid to decorating the figures. To make them bright and colorful, fabric, ropes, ribbons, fringes, and flags are used. They are easy to “stick” on the snow. The details of the jewelry are first moistened with water, then “frozen” and only then glued with water. As a result, small parts are not deformed and are easily glued.
The descent from the mountain should not end near a hiking trail, pond, or roadway.
When using mechanisms, protective equipment is required (helmet, gloves, knee pads, goggles, etc.), and I’m not even talking about a first aid kit (MANDATORY!!!).
There is a type of winter sport - skeleton, in which you slide down a mountain in a specially equipped ice chute, lying on a sled head first. In our case, this is completely unacceptable: you must sit on the sled with your feet forward, resting on the front bracket, firmly holding the side bars of the sled with your hands, preferably in a sitting position (especially since many sleds have a backrest). It is necessary to maintain an interval during skating to avoid collisions and collisions, since there are a large number of people skating. It is necessary to climb the mountain to slide down again in a safe place, so that again there are no dangerous oncoming collisions.
There are mountains where the descent has an icy base and there are a large number of people on it using plastic seats and cardboards for better gliding. The rules for safe riding are approximately the same:
- feet forward;
- observe the interval;
- climb the mountain in a safe place.
If people ride sleds and snow scooters on these slides, then maintaining intervals and caution becomes especially necessary. It is necessary to warn those who ride machinery so that they are more careful and do it at a safe distance..
I consider it my duty to say a few words about the so-called “extreme sports”; people who, in addition to fearlessness and recklessness, have an excellent vestibular apparatus and a certain physical fitness (the ability to fall, group), ride, sometimes from very high icy mountains “on their own two feet.” It is useless to recommend or advise such people, but still, a helmet, sports gloves, knee pads, elbow pads, glasses and, of course, a first aid kit are vital. If you happen to be around such “characters” - STAY AWAY FROM THEM - YOU WILL BE HEALTHIER!