Topiary made of tubes. Decorative tree made from newspaper tubes. Shell topiary
In the interior you can often find a homemade topiary or a tree of happiness, which attracts good luck, financial wealth and good mood.
Topiary in a mug

How to make a tree of happiness with your own hands? Everything is very simple. To do this you will need the following set of materials, namely:

Master class: DIY tree of happiness in a mug
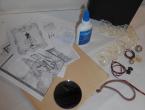
Let's prepare necessary materials:
- a ball-shaped piece of polystyrene foam;
- a beautiful mug;
- artificial flowers;
- a wooden stick or a regular pencil;
- decorative ribbons for winding the barrel;
- ball. It should be the same diameter as the mug;
- some artificial moss or grass.
Wrapping pencil with tape and insert it into the ball. Alternatively, you can fix it using polyurethane foam in a mug.

Next, you need to insert and artificial flowers so that there are no empty spaces. After this, the finished crown is strung onto the trunk. Decorative moss or grass is used as decoration. Also, in addition, you can plant an artificial butterfly on the edge of the mug.

Photo of a tree of happiness with your own hands from corrugated paper. This topiary is made according to the same principle as topiary in a cup. Only to decorate it, instead of artificial flowers, you can use flowers made of multi-colored corrugated paper.

How to make a coffee tree?
Topiaries made from aromatic plants are very popular. They serve not only to decorate the interior, but also to fill it with aroma. Happiness trees made from coffee beans are very popular.

To make such a tree you will need the following materials:
- roasted coffee beans - 100 gr.;
- sippy cup;
- whitewash brush;
- blank in the shape of a plastic ball. The optimal diameter of the ball is 8-9 cm;
- scissors;
- brown threads;
- two rubber bands for money;
- universal colorless glue;
- sand, gypsum or cement - 200 g;
- branch or stick 20 cm long and 1.5-2 cm thick;
- twine 50 cm.
Coffee Tree Making Guide
Using scissors, you need to make one hole in the plastic blank.

Let's sort it out whitewash brush on strands.
Attach the strands to one end of the branch. For these purposes we use an elastic band for money. Coat the future “trunk” with glue and glue it in a spiral threads. You can secure the thread at the other end of the stick with an elastic band.

We glue the ball-shaped blank with brown threads. You can also take fibers from poplar fiber for these purposes.
Using super glue, liquid nails or a glue gun, glue the ball with the first layer grains.

Tip: it is best to glue the grains in a chaotic order. Glue must be applied directly to each grain and quickly glued to the workpiece. All work must be carried out in a well-ventilated area.
The second layer is done in the same way.
Create an original one tree pot. To do this you will need strands from the brush. We coat the bottom of the container with universal glue and place it on the strands laid out on the table. Threads that protrude beyond the edges must be trimmed.

We cut the strands of the brush. They should be 3 cm longer than the height of the container. Next, you need to apply glue to the glass. Moreover, the glue is not applied to the entire surface. You should leave 2.5-3 cm on top. Next, the container is glued with strands prepared in advance. After this, it is tied at the bottom with twine, and the excess is cut off. It is also necessary to trim the strands from above. As a result of this, the threads should rise two centimeters above the glass.


Pour into a container filler. This could be sand or gypsum. You can also use polyurethane foam for these purposes. Next, you need to move the strands at the top and place a funnel with a barrel on the container.


The container should be tied at the top twine.

Finally, you can place a few coffee beans near the barrel. You can also lay moss at the base of the composition and place an insect on the crown.
Flat coffee topiary

To create such a flat coffee topiary with a magnet, you need to stock up on the following materials:

Step-by-step instruction
The first thing you need to do before starting work is to turn on heat gun so that it warms up.
While the heat gun is heating up, you can do blanks. To do this, you need to draw a circle and a pot on cardboard and cut out these details using scissors.

Assembling the tree parts. Crown and pot connect using a flat stick. To do this, you need to insert the stick into the cardboard blank so that it is between two layers of paper.


To fix the parts together we use glue.

The workpiece must be glued burlap on both sides.

Tip: the burlap on one side should be equal to the diameter of the workpiece, and on the other side - slightly larger. This way you can hide the ends of the cardboard and the tree will look beautiful from behind.
Improvised potty decorate as well as the crown.

We glue it on the back magnets.

Decorating the crown coffee beans. They are attached with glue along the edges of the workpiece. Moreover, the grains should be arranged with the cuts downwards.


We glue the next row so that the grains are arranged with the cuts facing up. We alternate subsequent rows in the same way as the first and second rows.

To give the crown volume, it is necessary to glue several layers in its central part.

Finally, you will need to glue decorative ribbons and lace.

Topiary - tree of happiness made of boxwood

To make this decoration you will need the following materials:
- boxwood branches. Both artificial and natural branches are suitable for topiary;
- decorative container;
- artificial flowers;
- a little moss;
- filler. In our case it will be gravel;
- wire.
Step-by-step instructions for making topiary - the tree of happiness
Inserted into the workpiece boxwood branches so that there are no voids.


The branches that will serve as the trunk must be tied wire.

A hole is made in the spherical blank and the ball is placed on the barrel.


A layer of moss must be placed on top of the gravel.

The crown can be decorated with artificial flowers.


DIY money topiary

Topiary can also be made from artificial paper money. Such decoration can attract financial well-being to its owner. Making such a money topiary with your own hands is not particularly difficult.

For manufacturing you will need the following materials:

Step-by-step instruction
Decorating the pot. Colors the upper part, about one or two centimeters. For these purposes, it is best to use acrylic paint. Cover the rest of the pot with twine. For these purposes, apply a thin layer of glue over the entire surface using a toothpick. The end of the twine is securely fixed with glue.


The basis for the crown we make it from old newspaper and thread. To do this, simply crumple newspaper sheets and wrap them with thread. In our case, the workpiece is about 10-11 cm in diameter. In order for the ball to be durable, it must be coated with PVA glue. After the glue has dried, you need to make a hole three to four centimeters deep in the workpiece.


12-15 skewers need to be tied together. Their number depends on the diameter of the paper blank. We tie the skewers on both sides with thread. Using a hot glue gun, pump hot glue into the hole and immediately insert the tied swords there. After the glue has dried, you can begin wrapping the trunk with twine. During the wrapping process, coat the barrel with glue. We fix the ends of the twine.


Napkins or newspapers must be torn into pieces. PVA glue is mixed one to one with water. Next, one or two layers of the adhesive mixture are applied to the newspaper blank so that the threads and newspaper are not visible.

Let's do gypsum mortar and pour it into the pot. There should be about one centimeter left to the top edge of the pot. The trunk must be installed in the center of the pot. If necessary, hold the barrel with the workpiece until the mixture hardens. This process takes about 15-20 minutes.


While the plaster hardens, you can make blanks from artificial banknotes. To do this, they need to be cut in the shape of a circle. To make disks you will need artificial money measuring 15.5x6.5 cm. On average, our ball will need 17-18 disks. The paper blanks must be folded in the form of an accordion with a width of about one centimeter. We tie the resulting accordion in the middle with a ribbon, and glue its ends on both sides.


We glue the bills to the ball from bottom to top. Hot glue is used for these purposes. We close the gaps with coins.


From paper money We make elements of different shapes and attach them in a chaotic manner.

You can decorate plaster using sisal.

We place small ones under the tree burlap bags. To do this, cut out a circle from the fabric, the diameter of which is about 9-10 cm. Take a needle with a strong thread and stitch it along the entire circumference at a distance of 1.5 cm from the edge. After this we tighten the thread. We place a large coin inside the bag and fill it with cotton wool or padding polyester on top. We tighten the bag and secure it with several stitches.


Decorative parts should be glued to the pot, and the crown can be decorated with coins.


DIY ribbon topiary

Do-it-yourself topiary made from ribbons looks very impressive. To make such a decoration you will need the following materials:
- ball-shaped blank made of polystyrene foam;
- stick or pencil;
- ribbons;
- glue;
- decorative pot;
- invisible.
The tape is cut into small strips and wound around your finger to form rings. Then, one by one, you need to attach the formed rings to the workpiece. At the same time, make sure that there are no empty spaces on the ball. On one side, the pencil is inserted into a ball with ribbons, and on the other, it is inserted into a pot filled with gravel. As a decoration, you can put decorative frost or decorate with trimmings from ribbons.


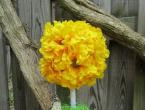
Topiary - a tree of happiness with your own hands from fresh flowers

Topiary can also be made from fresh flowers. To do this you will need the following materials:
- decorative container;
- plastic bag;
- chopsticks or branches;
- putty;
- floral sponge;
- decorative ribbons and wire;
- Natural flowers. In our case, 9 roses.
We wrap the inside of the pot with a bag and fill it with putty solution so that 5-7 cm remains on top. Insert a stick into the solution and leave it overnight. After the putty has hardened, the remainder of the bag must be cut off.


Cut out a circle from a floral sponge and fill the pot with it to the very top. Next, wet the sponge and place a layer of moss on top. You need to stick roses in the central part of the sponge. They can be secured using decorative tapes with wooden rods. Bows can be used for decoration.


DIY paper topiary
DIY paper topiaries are very popular. They can be made according to any of the above instructions. For the base you will need a polystyrene foam ball, a decorative small vase, a pencil and paper flowers. To make flowers, you can use both regular and corrugated paper. To revive the topiary, you can use regular moss, which is usually placed in a vase.
Candy topiary master class
To make such a topiary you will need a standard set: a ball-shaped blank, a pot, stems, ribbons and about 300 grams of colored candies. The process of making such a topiary is standard. The rod is inserted into the pot, the ball-shaped workpiece is covered with a red ribbon. The lollipops are glued on top using a glue gun. To avoid staining the candies, it is better to take them with tweezers. The space around the trunk can be decorated with glass pebbles or large beads.


Topiary from lollipops
This decoration is easy to make with your own hands. On each lollipop you need to stick a drawn eye. Next, all the candies are stuck into a sphere-shaped blank made of polystyrene foam.


Balloon topiary
A topiary made from balloons looks beautiful. In order to make such a decoration you will need the following materials:
- polystyrene foam blanks in the shape of a ball and cube;
- pencil or flat wooden stick;
- multi-colored small size balloons - 70 pcs.;
- multi-colored large size balloons - 70 pcs.;
- small sawdust;
- glue or putty;
- decorative pot;
- pins or paper clips.
The process of making such a tree is standard. Only on the ball-shaped blank, instead of flowers, balloons tied together are attached.


DIY shell topiary

Another original idea is to make your own topiary from shells. Such a tree will long remind you of a summer vacation on the seashore. To create such a masterpiece you need to stock up on the following materials:

First we do tree crown. To do this, stick sisal and shells onto a foam ball using a heat gun.


Next, let's move on to the device. trunk. Our barrel will be made of wire, which must be wrapped with white thread and twisted. Two trunks will be made for our tree. Only the second one will be wrapped with twine.

The next stage is manufacturing pot. To fix the tree, foam will be used in the shape of a cylinder, which must be attached to the bottom of the pot with glue. The trunk is attached to the crown on one side, and stuck into the foam on the other. For fixation we use hot glue.


For strength, fill the distance between the flowerpot and the foam with paper, glue it and cover it with cardboard. Next, first beige and then white sisal is placed in the container. Seashells of different sizes and shapes will also be used as decoration.


To add bright accents, use a satin ribbon. The crown can also be decorated with beads on a fishing line.


An original version of making topiary from sisal and fruits

First, let's make crown For these purposes, you can take a ready-made base ball, or you can make it yourself from newspapers and threads. In our case, the base was made of newspaper, which was crumpled into a ball with a diameter of 6-7 cm.


Let's start filling the pot plaster. After the solution is poured, you need to insert the barrel there and leave it to harden.

While the solution hardens, you can begin making decor for the crown. To do this, you need to cut a small piece of sisal and make a ball out of it. In total, you will need to make about 25-40 lumps.

To decorate the trunk we use lace or twine. We fix the sisal balls on the workpiece with glue. We decorate the space around the trunk with sisal, decorative ribbons, beads, etc.


DIY felt topiary

This homemade felt topiary looks original. To make such a decoration, you need to prepare the following materials:

Manufacturing procedure
The most labor-intensive part of the work is considered making flowers. All blanks are made from fabric circles of different sizes. A minimum of 30 such blanks will be needed for a topiary. In order to make a voluminous rose from a circle, they must be arbitrarily cut in a spiral. The rosette turns out more magnificent if it has many turns. Also, small circles-bottoms are cut out before each flower, which are attached below. To decorate, attach a bead to the center of the flower.


Trunk can be painted with acrylic paint.

Crumpled wood was used as a filler for the pot. paper filled with glue.
Place a piece of green around the trunk felt, which will imitate grass.

We connect the trunk with the pot and the crown.
We attach flower and leaf blanks to the crown.


We decorate the product using ribbons, ribbons and beads.


DIY New Year's topiary

With the onset of cold weather, many people are thinking about making their own New Year's topiary. To do this, you need to prepare the following materials:

Manufacturing procedure
Using white acrylic paint, you need to paint the inside of the pot and fill it with foam. While the foam has not hardened, insert a branch there, which will be the trunk of the New Year's tree.


We fix New Year's balls, candies and pine cones on the crown using wire, toothpicks and glue.


The cones can be painted white and gold.

We decorate the topiary with New Year's tinsel.


Natalia Kiryushina
Topiary, also called the “European tree” or “Tree of happiness”, is a common interior decoration in European floristry, which has recently become widespread in our country.
Topiary is a small composition in the form of an artificial decorative tree with a predominantly round crown, located in a flower pot. Serves as a bright detail in interior decoration and symbolizes wealth and well-being in the home.
When creating it, you can use a variety of materials (flowers, coffee beans, sisal fiber, shells, beads, ribbons, cones, coins, etc.) and color combinations. Their sizes can also be very different.
I would like to draw special attention to the fact that topiaries are often called trees of happiness. The fact is that even in ancient times, something strong in an emotional sense was represented in the shape of a ball. Since then, it has been believed that the shape of the ball brings happiness to its owner. And if you give topiary to a person dear to you, then you can consider that you have given him a piece of happiness.
Dear Colleagues! I present to your attention my works
Topiary made from satin ribbons
Topiary made from coffee beans and satin


Marine style

Made from sisal, berries and fruits

From paper napkins


An equally fascinating form of creativity for me is weaving from newspaper tubes.
History of origin
Wicker weaving is the making of wicker products from wicker. The history of wicker weaving goes back to ancient times. People wove from reeds, reeds, bamboo and willow vines. In Rus', weaving baskets, baskets, children's cradles, and bast shoes from wicker was especially widespread. Our ancestors used this type of art not for pleasure, but out of urgent necessity.
The experience of our ancestors was also useful when weaving newspaper tubes. Using this weaving, you can create a large number of beautiful and functional items for your home with your own hands. Wickerwork has a special aura. They are characterized by beauty, warmth and naturalness. Now everyone can master this interesting, simple craft.
These are the crafts I made
Floor vases


Baskets


Flower stand and composition "Mill""

Wall panel


Dare, create and you will definitely succeed, because a teacher is a creative person!
Publications on the topic:
When I first saw products made from newspapers, I was simply amazed: how it was possible to create such works of art from an ordinary newspaper.
One of my family’s favorite hobbies is “silent hunting.” And as soon as the mushroom season arrives, we are armed with buckets and baskets.
Good afternoon to everyone who visited my page! I present to your attention my small, but significant for me, exhibition of cross-stitched paintings.
Research work of a 4th grade student “The second life of an old newspaper. Weaving from newspaper tubes" Private educational institution “Boarding School No. 11 of Secondary General Education of the Open Joint Stock Company “Russian Railways”.
Dear colleagues, we continue the topic of “weaving from newspaper tubes” and today I present to your attention another weaving master class.
Dear colleagues, today I present to your attention a master class on weaving from newspaper tubes, I have already shown several master classes.
3 145 227
Today I want to tell you how you can quickly and happily build a topiary with your own hands for beginners - as always, I will give several master classes and explain in detail how even a beginner in needlework can create a topiary with their own hands. Topiaries are a great gift; they are also used for decorating and scenting rooms, and such an artificial tree can also be a wonderful gift - for example, a topiary made from money will attract wealth to the house.
Satin ribbons
Let's try to make topiary from satin ribbons. If you know how to do it, then it will be very easy for you, but even if this is your first time taking up ribbon topiary, you will succeed. So, I’ll tell you about the experience of making topiary from satin ribbons with your own hands.Required:
- about six meters of satin ribbon (no narrower than 5 cm, it’s better to take several colors);
- threads, beads, and ribbon for decoration;
- glue gun or regular superglue;
- a stick or a piece of plastic tube for the barrel;
- pot or bucket;
- material for the middle - a fabric bag, crumpled newspaper or a foil ball;
- earth, pebbles, crushed stone (I used colorful glass for an aquarium).
We make 12-15 roses from satin ribbon. You can use several shades of ribbon (for example, three or four), or you can get by with just one shade - when I made a topiary for my younger sister to decorate the wedding photo booth, I used a beautiful ivory-colored satin ribbon.
We make the middle - for example, we crumple up foil or old newspaper, wrap it with threads to make a dense shape. You can wrap it with ribbon, but there is no need - satin roses turn out quite lush.
The trunk can be made from a branch, a plastic pipe or any suitable stick. In extreme cases, dense wire, folded in several layers and wrapped with tape, is suitable. Wrap your trunk with tape, and then glue the trunk to the crown of the tree on one side and to the pot or bucket on the other.

We string a couple of beads onto a thread and “sew” the beads and a satin rose to the topiary. It should be sewn or glued firmly. When the entire ball is covered with roses, you need to prepare the trunk and pot.
You need to pour a weighting agent into the bucket, straighten all the flowers, and, if necessary, decorate with a decorative ribbon.

From coffee

We will also make a coffee tree with our own hands. To make topiary from coffee beans you will need:

- base (plastic ball, foam ball - sold in craft stores);
- trunk (branch, stick, tube);
- a pot or something instead (I had a beautiful clay jar last time, but now I have an ordinary glass);
- coffee beans (you shouldn’t skimp - good coffee has an indescribable bright aroma);
- solution for fixing (I use regular putty, plaster, alabaster, or even cement will also work);
- brown acrylic paint;
- glue gun and glue sticks;
- newspaper or scrap paper;
- burlap or other characteristic fabric;
- decor for decorating a coffee topiary with your own hands.

Money
By the way, using the same logic as using coffee, you can make a topiary out of coins with your own hands. Look at the photo to see how beautiful it is to make part of a topiary out of coins, and you will get a money tree topiary. You can use regular coins and paint them with gold paint, or you can buy special decorative coins (they will shine brightly).The manufacturing principle is the same as for a coffee tree - you need to take a base, cover it with paint, first cover it partially with coins (you can do it with a lock - as if coins are shining from an open wallet), and then cover it with coffee and fix it in a pot. Unbleached linen and burlap go well with this tree as decoration.
A topiary made from banknotes also looks very interesting, but I won’t lie - I haven’t yet created a beautiful topiary from banknotes, I’m still working on a tree made from banknotes with my own hands, so if you want to make a money tree from coins or a tree from banknotes that attracts wealth, then watch the master class on how to make a money tree with your own hands.
The kusudama-style tree is also interesting - see how to make topiary with your own hands following step-by-step instructions.
Video bonus: two master classes on how else you can make an original money tree from banknotes:
From napkins
A chic topiary made from napkins with your own hands is made literally from nothing, you will need:- several bright napkins;
- base ball (plastic or foam);
- branch or stick;
- gypsum (any mixture for fixation);
- titanium glue or any polymer glue;
- pot or glass;
- stapler and scissors;
- various ribbons and lace, decor and paper for the pot (can be replaced with fabric).

So, how to make a tree with your own hands from ordinary napkins:
- First, we make ordinary flowers from napkins and paper clips - we fix the napkin folded several times with a stapler, cut it out in a circle, and crumple it into petals.
- You will need 15-20 flowers, if there are not enough, you will make more, but usually this amount is enough for a lush and beautiful topiary tree of happiness.
- We cover the ball with a napkin, wrap the barrel with ribbon, and dry it;
- We cover the ball with flowers from napkins, skillfully weaving decor into your tree from napkins with our own hands - it can be lace, beads, bows and even plastic figures; small wooden letters or words on topiary look very attractive;
- We dilute the gypsum and “plant” our tree - we immerse the finished topiary with its trunk in a pot and fill it with gypsum, hold it until it sets.
Now you know how to make a tree of happiness with your own hands and you can decorate such products to your taste.
Cones
By the way, you can make a very beautiful topiary from cones, especially since it is quite easy to do. What is needed to make topiary from cones:- pot or glass;
- stick, branch, tube - trunk;
- a round base for topiary - you can take a foam ball, you can cut it out of polyurethane foam, in extreme cases, crumpled newspaper wrapped in threads will do;
- lumps (preferably bigger);
- brown acrylic (preferably glossy, dark);
- fabric for decorating a glass;
- decor to decorate your topiary made of cones - beads, threads, buttons and so on;
- gypsum or any building mixture for fixation;
- glue gun and rods for it;
- scissors, brushes.

We start making topiary from pine cones by decorating the glass - we cut the fabric diagonally (this way it drapes better), and we tighten it, gluing it with a gun. By the way, do you want to avoid unsightly glue marks? Glue it where it will not be visible (on the bottom and inside the glass, and the walls should simply be covered).
We prepare the base - fix the stick to the ball, paint everything with acrylic (it’s better to cover it with newspaper first).

We cover the ball with cones, let it dry and fix it in a pot - for this we dilute plaster, dip the trunk of our tree and hold it until the plaster sets.

You can decorate topiary from cones in different ways; I prefer beads in natural shades.

You can decorate your pine cone topiary with ribbons, hang artificial berries or even small figurines on the cones.

Beads and beads
You can also make a charming topiary from beads. It’s easier to understand how to make a tree from beads with your hands, so watch the video below on how to make a topiary from beads. By the way, a craftsman can make absolutely anything from beads - including decor, for example, berries that can be used to decorate a money tree made of beads.
Now you know how to make an artificial tree with your own hands step by step. I admit honestly, every topiary made by yourself is something special, and you will understand what it will be like only when you start decorating it. Try making festive trees and ordinary modest trees for the interior - those that are laid out with cones and coffee beans can not only decorate the room, but also flavor it (you can add a couple of drops of essential oil).
And my sister makes money topiaries with her own hands, which lure money into the house; I will publish a tutorial next time - for now I can only show from photographs what such products look like. Try making your own topiaries and surprise your loved ones with unusual gifts!
A few more original master classes + Video bonus
DIY shell tree:
From the tapes:
And one more lesson on creating a tree from petals with singed edges:
Ideas for inspiration:


Ceramic floristry Master Class on creating Sakura from polymer clay
The fire is burning, the wind is blowing, sakura is blooming...
Good day to YOU, our dear readers, craftswomen, needlewomen!
The topic of our meeting today is bonsai sakura. Today we will talk a lot. Make yourself comfortable.
And we will begin our conversation with the poems of the Japanese poet Hatori Haso.
Ume plum on the window -
First spring hanami!
A fragile tree in a bowl,
The branches are covered with flowers...
The trill of Uguisu glorifies
Plum blossom time!
Remember! Love is like a bonsai
You need to grow patiently.
Translation by D. Rumat.
Some introductory information:
Bonsa?y (Japanese: lit. “grown in a tray”) is the art of growing an exact replica of a real tree in miniature. The word "bonsai" comes from the Chinese "pen-tsai". Art arose in 231 BC. e. in China.
Sakura - in Japan means clouds. The fleeting nature, extreme beauty and quick death of flowers is often compared to human life. Due to this, sakura flowers are deeply symbolic in Japanese culture; their image is often used in Japanese art.
Once they have created a bonsai, some masters will say to themselves:
"All! I will never take this on again...”
Others will certainly return to it again, improving their skills. Creating new, even more complex forms of trunk and crown, delving into the philosophy of bonsai art.
And if you are ready, let's get started. To create Sakura we will need the following tools.


At the first stage, determine the shape of the trunk of the future plant.
Traditional Bonsai styles can be found on Wikipedia.
First the idea!
Are you already sure that the trunk of your tree will be straight with symmetrical branches, bent as if by a gust of wind, or have a cascade shape?! So start with this!
Draw a sketch. Look for pictures on the global network, think over the shape, choose the right size bonsai. This is important! Because if you end up with a small tree, it will get lost in a large container and the composition will lose its proportions.
For beginners, we recommend starting simply with a sakura branch, which also looks very elegant in a small container and requires much less effort.
So, the trunk.
We take wire No. 22 and begin to increase its thickness. We used paper napkins for this.

To remove excess looseness, we tighten everything with floral tape.
You may have to make several layers, but it is not at all necessary to make the trunk as powerful as ours.

We will prepare the branches separately. They should be the same length as the main trunk.
Attention!
The lower part of the wire must be left open, because these pieces will serve to fix the finished composition in the bonsai pot.


Collect all the branches in the tree. Give the structure the desired shape and cover everything with clay.
Attention!
After pasting the branches with bark, it will be extremely difficult to change their direction,
so we do everything thoughtfully!


In our work we used the bark of wild grapes.

Remove the very top layer.

For gluing, we used several types of glue. Second, for instant fixation, and latex.
We would like to warn you that this is a very painstaking work that requires patience and accuracy.
But this method of creating a barrel is interesting because you can make it of absolutely any shape, putting your energy, rhythm and mood into the product.

Help yourself with tools. Use a slightly damp cloth to remove excess glue from the barrel.

When the base is formed, think about how many flowers and buds we will need.
We must dress every branch.

Let's prepare the required number of stems by rolling No. 28 wire with polymer clay.

We glue the pestle to the stem.

Roll out a thin tendril from a tiny ball, sharp on both sides.
Pion-online polymer clay is ideal for this process. Pion-online clay can be easily rolled into a thread thinner than 1mm.

Fold the antennae in half.

Glue it to the pestle.

Using acrylic paint we will create anthers on the stamens.


And let's start with the petals.
A strawberry flower cutter will help us create even petals of the same shape.
P.S. For anyone who is unable to roll out petals of the same size from a drop of clay, we suggest using our tip. See photo.


For a long time!?...
-NO!...
-Try it yourself!...

We collect the petals with glue.
Attention! Be careful when working with instant glue. Try not to inhale its fumes. Although the manufacturers assure us that it is practically safe. We must work with it very carefully. If you accidentally glued your fingers together, do not tear them apart with force, try using a solvent. Take care of your golden hands, your health and do not allow children to work with this glue!


And since it so happened that we are assembling our flower as a designer. We will also make the sepals one petal at a time. There are 5 parts for the flower.


And one more detail - the thickening at the base of the flower. Here it is better to use latex glue.

We tint the center of the flower and buds with a delicate pink color.

Tint the base of the flowers and buds with oil paint.


We will collect it in a bun according to your desire, connecting flowers and buds.


Let's glue the bark where needed.

If it seems to you that there are few flowers on the branch and it is “bare”, add a branch in the traditional way. See photo.


We fix the tree in the bonsai pot. For the solution, we took river sand and repair putty.
It was an experiment!
As strange as it sounds, we are also learning. Who cares...?)) The weight of our product turned out to be about 5 kg.
Advice!
To lighten the weight, add small expanded clay to the mixture.

We glue plant material onto the glue, imitating grass.


Some artificial moss.


OK it's all over Now!
We wrote for a long time, but we didn’t say everything. :)
It took us even longer to sculpt... And for good reason!
We hope that we have inspired you to new feats! :)


Creative success to YOU!
Love and prosperity!
Your Pion-online and its craftswomen.
Master class topic:
« Topiary. Weaving a stand from newspaper tubes.”
Master class goals:
Introduce the art of “Topiary”
Learn to roll tubes correctly;
Introduce the technique of weaving tubes “in a spiral”
To cultivate hard work, accuracy, perseverance, aesthetic taste, and the desire to make a gift with your own hands.
Materials: newspaper and magazine sheets, multi-colored napkins, corrugated paper, spool threads, beads.
Tools: knitting needles with a diameter of 2.5 mm, scissors, hot glue with a gun, PVA glue, a can of paint with a spray gun, a wide glue brush, a jar for glue.
Progress of the lesson:
What is topiary? You ask.
Topiary or as it is also called the “Tree of Happiness” is a decorative artificial tree that can be used to decorate the interior. Depending on its size and design, it can be installed either on a bookshelf or on the floor; both in the kitchen and in the living room.
Topiary is a very original composition that always attracts attention. Its main part is round in shape and in the process of decorating the ball you can show your ideas using various materials and color palettes.
Today I want to invite you to make it with me for the upcoming holiday of March 8th. Check out several topiary designs.
Slide show
Organization of the workplace, distribution of materials and tools.
To make tubes you will need:
- magazine strips - width 6 cm
- knitting needle - diameter 2.5 mm
- glue stick
Making newspaper tubes:
- We cut the magazine along the wide side into 4 parts, we get stripes.
- We take a knitting needle and begin to twist the strip onto it. We twist it from an angle of 45 degrees and wind it away from us onto the knitting needle.
- Approaching the opposite corner, apply glue and twist.
- Carefully remove the knitting needle - the tube is ready.
Practical work:
Ball preparation:
- We form a lump from the newspaper, wrap it diagonally like in a diaper, and so on until the desired size.
- Wrap it with thread.
- We glue the ball using the “popye-moshe” technique
Demonstration of labor technique:
Stand weaving:
- We lay 4 tubes vertically, and 4 more horizontally on them in the middle.
- We take an additional tube, bend it in half and twist it each time, braiding 4 tubes in 2 circles, 2 tubes in 3 circles, 1 tube each up to a diameter of 12 cm.
- We tuck the ends of the working tubes into the weaving.
Practical work:
- Turn the bottom over if the edges curl up.
- We put the extra tubes in the center: 2 were bent, 1 was left. 6 tubes left.
- We thread an additional tube next to one of the 6 workers.
- We extend the working tubes by inserting a wide edge into a narrow one and vice versa.
- We begin to weave upward in a spiral, placing one tube on top of another in 2 rows, carefully placing the knots.
- We narrow the weave towards the center, laying the tubes 1cm from the knot.
- We place cardboard of the desired diameter rolled into a tube into the narrowed weaving to ensure the stability of the structure. We continue weaving along the cardboard tube.
- Having reached the top, we begin to expand, placing the tubes in parallel and wrapping the first and second from bottom to top. We will place a paper ball in it.
- We tuck the last working tube into the weave, and leave the rest sticking out.
Practical work:
- We cover the finished weaving with thick PVA glue, coating the knots well.
- Leave until completely dry.
- We cut off the ends of the tubes.
- We apply paint from bologna.
Making flowers from napkins and corrugated paper:
- Fold the napkin in three layers along its long side.
- We form the edge: bend the corner inward twice and turn the bottom edge back; wrap it once and fold the bottom edge back like a wrapper.
- We roll the workpiece inward in a spiral.
- We wrap the ends with thread.
We decorate the ball with flowers, beads, twigs.
Place the decorations on hot glue.
The topiary is ready!
I hope you liked my lesson, and you will definitely try to repeat it at home.