Crafts from shells, a country of craftsmen. Beautiful crafts made from shells with your own hands. Craft from shells - original candlestick
After a trip to the sea, positive emotions always remain, and stylish crafts made from shells will remind you of a pleasant vacation for a long time. Collecting shells on the beach is a fun activity that adults and children enjoy, but often this natural material is thrown away or stored in bags. Shells come in different shapes and sizes, so handicraftsmen use them to make animal figurines, flowers, jewelry and much more. Find out, what beginners can do with seashells with your own hands and spend your leisure time profitably.
DIY shell trees
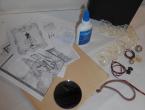
Materials:
- glue gun
- cardboard
- shells
- decorative elements.
A tree made of shells will remind you of a good holiday at sea for a long time. First prepare a cone-shaped case made of cardboard or plastic. Apply glue to the cone and start gluing the shells. First you need to use thick shells, and then glue on the medium and small ones. If you think through the drawing, you will get a very original composition.

Small gaps between shells can be hidden using sea or white sand.
Shell ball for beginners
Today, craft stores sell a large number of blanks, which can be used to create original crafts. If you find a foam ball, the shells will stick well with hot glue. Another way is to take any ball and prepare a special mixture of sand and tile adhesive. This composition is applied to the ball using a spatula, so that the layer is uniform, rub it in with a cloth.

You should glue the large shells first, and then the small ones. You can select shells that are approximately the same size and start gluing them in a circle. The original ball can be presented as a souvenir or gift from a sea holiday. Try it in the same way. To do this, place the ball in a special microphone and cover it with shells of different sizes.
How to make a candle holder from seashells

You can break or saw some shells, the main thing is that the edges are not sharp.

A candlestick can be easily made from an ordinary glass.

If you wish, you can cover it with small shells or simply pour sand into a container, fold the shells and light a candle.


Original crafts from shells for beginners
Shells are fairly easy to work with, so don't be discouraged if you're new to this type of craft. Sand in a jar along with shells is one of the simplest crafts that requires only your imagination. Print out photos from your last vacation, pour sand, shells into a beautiful jar, add photos and other decorative elements. Tie the jar with twine and your craft is ready.

Shell pendants will complement the marine-style interior and give the interior a creative look.

Summer is the time for long-awaited family trips, holidays on the seashores and small fun adventures. Surely, in addition to pleasant impressions and a bronze tan, you, or rather your child, brought with you various shells and other sea “treasures”, which you painstakingly collected on the beach every day. It will be very interesting for both your child and you to make original crafts from shells with your own hands. After all, even the process of creating it will help you remember fun days spent on vacation. Crafts made from seashells, a beautiful natural and durable material, can decorate the most sophisticated interior and give it a slight touch of mystery.
Preparing shells for work. Cleansing
Before you start making crafts from shells, you need to clean them thoroughly - just soak them in a solution of water and any chlorine-containing product, for example, bleach. If you want to remove the dark outer layer, soak them longer, then brush the shells and rinse them in clean water. If desired, you can add shine to them with clear nail polish or furniture polish, or with oil or heavy cream. But, in this case, before gluing the shells, the gluing areas will have to be additionally degreased with alcohol. 

A gift that is not properly decorated loses its festive atmosphere and surprise effect. And souvenir bags and boxes are not a cheap pleasure. But there is a way out - make it for the people you love
Drilling holes
Some types of shell crafts, such as wind chimes, garlands, beads, bracelets and other decorations, require drilling a hole. This is quite easy to do, the only difficulty is that the shells may crack or delaminate at the drilling site. Therefore, remember the main rule: the thinner the sink, the smaller the hole should be in it.
Method 1. Select a drill bit with a diameter of 0.8 - 2 mm. Place the shell on a wooden board and secure it with masking tape. Drill the hole directly along the tape - it will prevent the shell from splitting or delaminating.
Holidays on the sea coast are popular among residents of our country. Very often, as a souvenir of days spent on hot beaches, we bring home shells or beautiful stones collected on the shore. Often, these beautiful creations of nature, once they arrive at our home, begin to accumulate on shelves, in drawers or closets, taking up space and not really decorating the apartment. How to be? Read our article and you will learn many new ideas and options for what can be made from such souvenirs.
In this article we will tell you how to turn old deposits into beautiful DIY crafts that you can make maybe even a child. This real master class with step-by-step instructions and photos will help you decorate your home with original and unique products. Children can be involved in the process, so a fun and useful time is guaranteed for the whole family. And of course, nothing compares to such things that remind you not only of a vacation at sea, but also of the time spent with children in the process of making a product.
Where to begin?

After preparation, make sure that have all the necessary materials, and read the step-by-step master class for the selected craft.
Materials
Depending on the project you will need:
- glue (gun, PVA or moment)
- scissors
- laces, ropes, ribbons
- paper and pencil
- paints, glitter or varnish (for coating)
- hammer and nail (for making holes)
- other auxiliary materials (specified in a particular project)
So, after making sure that all the necessary materials are available, you can begin.
Project No. 1. Decoration of frames and frames (for mirrors, photographs, paintings)

DIY frame “The Little Mermaid”
Exotic and photo frames look original, encrusted with “seafood”. A DIY frame is easy to make and will freshen up any interior. This is a very popular type of craft. See photos with examples below.
To make this craft, you will need glue, a photo frame or frame that you want to decorate, and shutters of various sizes in the amount necessary to cover the surface of this very frame. If desired, you can use additional marine-themed items - pieces of coral, stones, starfish. You will also need old newspaper (or any other unnecessary paper) to protect the mirror or glass from glue and tape (masking or regular) to secure this paper. After all the materials are ready, carefully read the master class and get to work.
Sequence of actions:
- Cover the mirror with paper or newspaper, securing it with tape.
- Sort them by size - this will allow you to decide on the composition and estimate possible options.
- Glue a row of medium or small shells along the inner perimeter of the frame, thereby outlining a contour around the mirror or picture.
- Then you can attach a larger size. If the sashes are of different colors, make sure that these colors are distributed evenly around the circumference.
- In the spaces between them you need to paste smaller copies, thereby filling the gaps.
- If using epoxy glue, it will be necessary to leave the product overnight to dry.
- If desired, you can coat the surface of the sinks with varnish (to preserve color)
The frame is ready! Hang it in its old place and expect compliments from your guests!
Project No. 2. DIY decorations

Decoration “Pearl”
Here there are several options. We will describe the process of making earrings, beads and bracelets, but the imagination of fashionistas is not limited. Experiment! Belts, keychains, rings - all the accessories in your wardrobe can have a nautical theme.
To prepare the sashes for work, you will need a nail and a hammer (or a very thick needle) to make holes in them. If you are using a hammer, place it on a hard surface with the inside facing up. Place the nail on the inside surface where you are making the hole and lightly tap the head. If you are using a needle, you can make a hole in the desired place using rotational movements. Having prepared the required amount, you can begin to work.
Earrings
You will need:
- Two identical (or very similar) sinks
- Two ear wires (can be purchased at a hardware store or craft store)
- Paint or varnish as desired (you can use either clear or colored nail polish)
The procedure is very simple - after making holes in them, attach the earrings and, if necessary, cover the products with varnish or paint. Wait for it to dry. Ready!
Bracelet and beads
You will need:
- Silk laces in your favorite color (can be purchased at a sewing or craft store)
- Clasps for jewelry (again, a hardware store, a craft store, a sewing store)
- Beads - you can buy or use old ones from a torn bracelet or other jewelry
- Scissors
Prepared sashes need to be sorted by size and color. Preliminarily think through the sequence of stringing on the base, the order of alternation with beads, and color combinations.
For the bracelet, we recommend making holes on two opposite sides. After cutting a piece of silk cord approximately 20 cm long, thread it through the first hole and tie a knot, leaving an end 3-4 cm long (for attaching the clasp). Next, thread the cord through the second hole and also tie a knot in it.

Great gift for any occasion
Keep stringing them on, fastening them with knots and alternating with beads until you fill the entire length of the bracelet. Attach a clasp to the ends. You have created a wonderful accessory for a beach regular. Such a bracelet will look good not only on the hand, but also on the leg.
You can make beads in the same way, changing the length of the cord to 30 - 50 cm. In making beads, it is not necessary to use 2 holes; in this case, they will hang. You can make a whole set of shells of a similar shape and color.
When you receive compliments on these original jewelry, you will feel proud that you made it yourself.
Project No. 3. Panel

Seahorse made of shells of different sizes and shapes
If you have an impressive collection of shells and are trying to find a use for them, creating a mural could be an excellent option. This is a great option for shell crafts for children. A variety of templates will help you and your child realize your imagination and spend time productively. Our master class will clearly demonstrate the sequence of work.
You will need:
- Cardboard
- Scissors
- Beautiful rope or twine
- A stencil or template of a panel shape, for example - a heart, a mermaid, a seahorse or a letter-initial (yours, a child’s or the person to whom you want to give this product).
First, you need to cut out the desired shape from cardboard and use scissors to make holes in it for the rope. Then, start filling out the shape, gluing them as close to each other as possible. Do not forget leave the twine holes open. When the mold is filled and the glue has dried, cut a piece of rope to the desired length and thread the ends through the holes, tying a double knot at each end on the wrong side. Ready!
Photo gallery


No vacation is complete without small souvenirs. You can quickly and beautifully make crafts with your own hands from shells. Their main difference from purchased products is originality and uniqueness. The souvenir will remind you of adventures and sea holidays for a long time.
Original craft made from shells
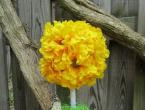
Candlestick flower
If you managed to collect enough mussel shells during your vacation, you can easily make beautiful candlesticks. Such things will be a wonderful decoration for your home. In addition, they can be used to create a romantic atmosphere.
 Candlestick made of shells
 Materials for work:
- mussel shells;
- small round base;
- paints;
- brush;
- glue gun;
- sparkles.

- Let's start preparing the shells. To do this, wash them well with soap and bleach with chlorine-containing products.
- Paint the base of the candlestick a light color. The white shade looks attractive.

- While the base is drying, we will select the shells for the craft.
- Using a glue gun, glue the shells to the base. We work slowly, first compose the first row, then the next. In this case, the sinks must be placed overlapping with the previous one.


- Starting from the 3rd row, we glue the blanks not to the base, but to the joints of the shells from the previous row.


- Decorate the finished product with sparkles. To do this, apply glue to the candlestick, add decorations, and shake off the remains.
The candlestick is ready, you can use it as room decor.

Big ship
When traveling to warm countries, vacationers bring various souvenirs, their cost is quite high. You can save money if you want. To do this, just collect the shells of rapans and purchase glue. With a little time and patience, you will be able to quickly and beautifully create a craft from shells with your own hands. 
Materials for work:
- large scallop shell;
- stick with a sharp nose;
- threads;
- matches;
- medium-sized rapan;
- shells;
- wooden thin sticks;
- stand;
- plasticine;
- glue "Moment".
Execution sequence:
- We determine the length of the match, divide the sticks into segments.

- Glue the sails from larger to smaller.
- We connect matches with matches and tie threads to the ends.

- We post matches. We put the plasticine in the rapana shell, and use glue to connect the sticks with the sails.
- We attach a pointed stick in front of the sail.
- We attach the front sails to the hull, and attach the rear sails to the stern.
- On the masts we thread threads between the matches and secure the edges with glue.
- We place the ship on the stand.

Marine Photo Frame
You can make crafts from shells with your own hands quickly and beautifully. Frames are of particular interest to needlewomen. In them, photos from your vacation will look harmonious, reminding you of a wonderful trip every day.

Materials for work:
- shells;
- wooden frame;
- glue gun;
- elements for decoration.

Execution sequence:
- Distribute the shells over the frame. You can attach them in a checkerboard pattern or chaotically.
- We fill the gaps with decorative elements. Stars, beads, and sparkles can be used as decorations.
The frame is ready, all that remains is to select a photo for it.


Heart made of shells
If you want to please your loved one, you can make an original heart. To complete it you will need a minimum set of materials and a little time. The recipient of the gift will appreciate the gift and will definitely find the most prominent place for it in the house.

Materials for work:
- sesal;
- scissors;
- glue gun;
- shells of different sizes;
- cardboard;
- a simple pencil;
- sackcloth;
- hole puncher;
- leg-split;
- elements for decoration.

Execution sequence:
- Draw a heart on cardboard and carefully cut it out.

- Using a hole punch, we make 2 holes in the cardboard blank. They will be needed so that the finished product can be hung.


- Glue the resulting heart to the other side of the craft.

- We thread twine through the holes.
- We tie knots on the reverse side.


- We decorate the figure with shells, stars, and beads.

- We glue the product along the contour with twine.

Shell candle
If you want to quickly and beautifully make a candle, you should choose a craft made from shells. Using scented candles and a sea shell, you can create an unusual souvenir. It can serve as a gift for a loved one or become a decoration in the home.


Materials for work:
- large sink;
- candle-tablet.
Execution sequence:
- We take out an aromatic candle from the metal base and place it in the center of the sea shell.

- Place the shell in the pan and turn on the heat.
- As soon as the candle melts, adjust the wick.

- Remove the shell from the pan and wait for it to cool.
- The attractive candlestick is ready, you can use it for its intended purpose.


The music of wind
Seashells make amazing souvenirs. In addition, you can use them to make something for your home that will help get rid of negative energy. Even a novice needlewoman can do the job. This will require a little time and patience.

Materials for work:
- shells of different sizes;
- leg-split;
- decorative elements.
Execution sequence:
- We prepare the shells and clean them of dirt.
- We make holes in the shells.
- Cut the twine into pieces and string the decorations onto the rope. It is best to alternate shells with beads, various shapes, and stones.
- We supplement the work with small bells. This will create stunning wind chimes that you will want to listen to again and again.
The talisman is ready, you can look for a place for it in the house. Such a thing will not get lost and will remind you of the wonderful moments of your summer holiday.

Crafts made from shells attract special attention. This is a great souvenir for a loved one or a decorative element for your own home. Such a product will remind you of the sea and a long-awaited vacation, and will give you a lot of pleasant impressions.