Is laminate flooring laid on a wooden floor? Video: how to put a laminate on a wooden floor with your own hands, instructions and tips. Substrate for laminate
In this article, we will talk about the experience of laying laminate on a wooden floor in a panel house. We are talking about budget repairs that everyone can afford.
This is what it looked like before the renovation...
The first problem that every inhabitant of a panel house faced was the creak of wooden floors. That's why it happens: the floorboard is nailed to the joists, which loosened over time, and the floor began to creak.
The next problem is a very uneven floor with large differences between the boards. To lay a laminate, such a floor must be leveled, while the maximum allowable height difference should not exceed 2 mm by 1.5 m.
To eliminate these problems, we decided to level the wooden floor with plywood. But if you just screw plywood over creaking boards, then, of course, it will not get any better. Therefore, first you need to strengthen the floor with screws.
We dismantle the old plinth. If it is plastic, there will be no problems, but the wooden plinth needs to be torn off with a mount or a nail puller. We pull out all the protruding nails, remove the large protrusions with a planer. Before laying plywood, do not forget to wash and vacuum the floor well.
 Getting the wood floor ready for renovation
 Now it is important to determine at what height the wooden floor is raised above the stove; for this, 1-2 holes are drilled in the boards. Knowing the distance between the base and the boards is necessary to determine the size of the floor screws. Usually it is 8-10 cm, but on the first floor there are all 25 cm.
After raising the floor level, the door may not open: the thickness of the laminate with the underlay is almost 1 cm + the thickness of the plywood (minimum 0.6 cm). If the door is old, then it can be filed with a hacksaw without any problems, simply by removing it from the hinges. And for trimming a door with a laminated coating, thick plywood must be placed under the bottom, otherwise chips will appear at the cut site.
Material calculation

Next, you need to calculate how many screws you need. To do this, we look at how many lags are in the room (they can be found by nails or seen through a gap near the wall). Then we count the number of boards in width and multiply the resulting amount by the number of lags.
Each board is screwed with 1 screw to the log, every 40-60 cm. For example, if there are 11 logs and 28 boards in a room, then 308 screws + 10-20% for the stock will be required.
It is better to fasten plywood every 15 cm, if less often - it will swell and dangle when walking. The length and width of the room are measured and the resulting amount is divided by 15 cm, and then the values \u200b\u200bare multiplied. For example, our room is 3x5.6 m in size. Divide 3 meters by 0.15 = 20 pcs, divide 5.6 m by 0.15 = 38 pcs. Now we multiply 20 by 38 and we get 760 pieces, + 10-20% for the stock. For plywood, wood screws 25-30 mm thick 3-3.5 mm are suitable.
Now we consider how much laminate is needed. To do this, you need to find out the dimensions of the room, and do the calculation already in the store, because the laminate panels have different parameters. Our room is 17 sq. m. In one box, a laminate with an area of approximately 2.6 square meters. m. Divide 17 by 2.6 = 6.53. We round up, which means we need 7 boxes, and half the box will be in stock, in case of marriage.
This should be enough if you lay the laminate in the usual way: cutting costs are approximately 5%. If laying diagonally, the margin should be at least 10%.
When buying a laminate, it is important that the delivery batch on all boxes is the same. In boxes with different batches, the shade of the picture may vary. Also, the pack must be intact, otherwise the locks may be damaged.
Now we count the amount of plywood. We chose plywood with dimensions of 1.43x1.52 m, that is, the area of \u200b\u200b1 sheet will be 2.17 square meters. m. We divide the area of the room (17 sq. M.) by the area of \u200b\u200bplywood and get 7.8 sheets. So, you need to buy 8 sheets of plywood. The thickness of the plywood must be at least 12 mm.
Strengthening boards with screws
So, all the materials have been purchased, we proceed to strengthen the floor with screws. The site has an article about what to do with the creaking of the floor in the apartment, it partially talks about this work.
Since the screws were difficult to penetrate into the wood, we first drilled holes about 70% of the length of the screw, and then pulled the boards to the joists with screws.
 We strengthen the floor in rows along the logs
 Of course, if you have a powerful screwdriver, you can do this much faster without additional drilling. In our case, the cheapest Chinese screwdriver, which quickly sat down, so all the work dragged on for several days.
The main thing is to tightly fasten the boards to the joists so that they do not hang out when walking.
Since the doors will soon be changed, we file the slopes to install the plinth.

During the work, it turned out that it was blowing too hard from under the floor from the side of the street, so I had to seal the gap with foam. In this case, it is necessary to moisten the surface before treatment with water, and also spray the foam after application, since moisture is necessary for the polymerization process of the mounting foam.
 There was a strong breeze from the street from this crack
  It got so much better
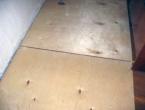
 Plywood leveling
To level the floor with plywood, lay the sheet on the floor and fasten it every 15 cm with screws. Do not forget to leave a small gap between the sheets and near the wall. The even arrangement of plywood sheets is controlled using a level. Sheets that require trimming are sawn with a hacksaw or jigsaw.
Substrate laying
 The cat is scared...
 We chose the cheapest substrate, made of polypropylene. Before laying, vacuum the floor again.
We lay the substrate with a margin on the walls, so that later we can cut off the excess, and glue it together with adhesive tape. The substrate should lie in one layer, butt to butt.
Laying laminate
Having finished preparing the floor, we proceed to laying the laminate. Before that, you need to store the laminate for several days in the room (to adapt the material to the temperature and humidity of the apartment).
Laying starts from the corner of the room, preferably from the most prominent place. However, there is a small nuance here: if the door opens into the room and no one plans to remove it, then they begin to lay the laminate from it, otherwise it will not be possible to lay the last row later.
 We start laying from the door
 It is best to place the wide joints of the laminate along the light from the window, so the gap will be less visible (they will increase over time).
Modern laminate is mounted without glue, using the locking method. This type of flooring installation is called floating, because it is not rigidly fixed to the floor, but rests freely on the substrate. During the change of season, the coating changes its dimensions a little, so it is impossible to screw the laminate hard to the floor with screws. Along the perimeter of the panel there are locks that are connected if one of the panels is inserted at an angle and then lowered.
To see how it works, watch the video tutorial:
The panel is laid in the corner and the next one is joined from the short side. Thus we collect the first row. The last panel, most likely, will have to be filed. This can be done with a jigsaw or saw, but make sure that the teeth are small, otherwise there will be chips on the laminated surface.
 First row done
 The main rule when laying laminate flooring is to leave a gap of about 1 cm near walls, pipes, doors and other obstacles. At the same time, you should not make a gap of more than 2 cm, because the thickness of the plinth will not be able to cover it later.
 The wedge is needed to withstand the same gap near the wall
 For ease of installation, stores sell a special kit for laying laminate. It includes wedges of the same thickness, a mounting foot for installing the last row and a wedge of panels.
For additional sealing of the seams, you can buy a special sealant paste and coat the locks with it before docking. However, in wet rooms it is better to use tiles or porcelain stoneware.
The second row is laid in the same way as the first, and then inserted into the previous one. To simplify the task, we recommend laying the panels as close to the lock as possible, so that later you can simply lift the entire row and snap into place. This is done by simply pressing the row at an angle.
 To connect, insert the panels at an angle
  Then we lower the panel so that the second row lies next to the first
  We join adjacent rows with our hands
  As a result, the joint should not be visible.
 Some types of locks allow you to join the laminate not in a whole row to the previous one, but one at a time. For example, Quick Step laminate has universal locks: they can be inserted horizontally or at an angle. At the same time, there are Click-locks that only hammer horizontally.
It is not necessary to immediately leave a gap between the first row and the wall. It will be more convenient to collect 3-4 rows, and then move them to the wall, and you can put something heavy on top. This is much easier, especially if the wall is not very flat.
Another important feature is that the panels are stacked in a checkerboard pattern. If the first row started with a whole laminate panel, then the second one should be started with a half, and the third again with a full panel. So the connections of the locks will be denser, and the cost of trimming will be minimal.
Half of the room is readyThus, in a checkerboard pattern, we lay the remaining rows of laminate. When we reach the heating pipe, cut out a round hole with a jigsaw or drill. Then the trim is simply laid and pressed with a plinth or glued onto liquid nails.
When we reach the last row, we need to file each panel in width, taking into account the gap. Installation takes place in the same way, we snap it with a strong pressure on the panel at an angle.
 The floor is almost ready
 Skirting board installation
Plastic plinth with cable channel consists of two parts. The first is a wall mount, and the second is a decorative nozzle that snaps into place at the top. There is another type of fastening - first, metal brackets are attached, and then a plinth is put on them.
We drill holes for dowels approximately every 30 cm and fasten one part of the baseboard. We fix the main part, hide the wires, then put on a decorative nozzle. For a beautiful docking, we use special accessories for the plinth: adapters, external and internal corners, plugs.
We put on a special stroke around the pipe to hide the gap (it costs about 50 rubles). In our case, the pipe was very close to the wall, so I had to cut the plinth and saw off the stroke, and then glue it on liquid nails.
Buy a skirting board and all accessories at once together with a laminate. Otherwise, if there is a shortage of material, you will have to travel to many stores before you can find the right color.
And the final touch is the fastening of the threshold at the door. It is needed to hide the height difference between the rooms. The rules for laying laminate flooring require that different rooms be separated by a gap so that the coatings are independent. However, in practice, if the same coverage is chosen for adjacent rooms, you can not use the threshold, but do everything without seams: it will be prettier, and cleaning will be easier. If some defect appears later, it is more convenient to actually saw off the coatings in the doorway.
floor repair cost
- Birch plywood 6 mm thick, 8 sheets - 2300 rubles.
- Laminate Kronostar Pear White 31 class - 7 boxes. 1 sq. m. cost in Leroy Merlin 235 rubles. Total 4112 rubles.
- Substrate for polypropylene laminate - 1 roll 2 mm thick, 25 m long - 320 rubles.
- Screws and dowels - about 600 rubles.
- Plastic plinth with cable channel 8 pieces, 2.5 m each - 150 rubles.
- Stroke around the pipe, connectors and corners for the plinth - 420 rubles.
- Porozhek - 160 rubles.
As a result, the amount is: 9112 rubles.
 The cat obviously did not like the new slippery floor
 - It is better to take plywood thicker, 6 mm is still not enough, so you should not save on this. Next time we would take at least 12 mm plywood. If the floor is too uneven, then you need to lay plywood in 2 layers, with offset joints.
- We advise you to choose not too thick or long screws, they will be difficult to screw.
- You can not buy a soft substrate thicker than 3 mm, it will strongly spring when walking, and the floor under you will be pressed through. For more information, we recommend reading our article on.
- If the laminate is laid on a concrete floor, then before laying the substrate, a layer of polyethylene must be laid for waterproofing.
- For productive work, you need a good screwdriver with a powerful battery. So you save a lot of time.
Spending a small amount to repair the old wooden floor, we got rid of the squeak, made it smooth and pleasant to walk on. It took three days to prepare the floor for the laminate, and one day was spent on laying alone.
At the moment, most repairs are not complete without laying laminate. Types of laminate in our time are not limited to the classic shades of wood. It can be glossy, matte, laminate with imitation of rough wood, stone, tiles and other species. Today we will talk about how to lay laminate on a wooden floor.


Peculiarities
To choose a coating, it is necessary to take into account in which room it will be used. Depending on some properties, laminated products are divided into classes:
- 21-23 grades the lowest, have low wear and moisture resistance. They can be used in areas with low traffic. For a home, a laminate of this level is quite enough, if you do not use it in the kitchen.
- 31st grade more durable and can be used in a small office.
- 32nd grade can last from 5 years in a store-type room and more than 10 years in an apartment.
- 33rd grade the strongest and most durable. It can be used in any halls, kitchens, restaurants.

Experts advise using a laminated coating in rooms with low humidity and a concrete base, but such a coating can also be used on a wooden floor.
In order to properly mount the laminate and avoid further problems during operation, you should know some features of the wooden floor:
- Over time, it loses its original properties and is susceptible to moisture and other external factors.
- It is deformed and prone to movement. All this can lead to swelling, creases of the laminated surface and other unpleasant consequences. Therefore, it is necessary to carefully analyze and prepare the surface.


Foundation Requirements
According to the standards, it is considered that the following conditions must be met for a laminated coating:
- a flat floor, the height difference of which should not exceed 2 mm at a distance of 2 sq. m;
- the floorboards must be securely fastened so that when walking they do not slip and do not make a sound;
- there should be no distance between the boards;
- Boards must not be damaged.


If defects are found, they must be corrected.
Material calculation
After evaluating the entire condition of the floor, it is necessary to determine how much and what materials will be needed. Let's start with the boards. If you decide to completely replace your existing hardwood floor, measure the width and length of the room. Next, divide the width of the room by the width of the new boards and select the desired length of materials.
Now we count how many logs and boards turned out. You will need 1 screw for each board. They are screwed every 50 cm to the log. Plus you need to take 20% for the reserve. For example, if there are 4 logs and 12 boards, then 48 screws + 20% will be required.


To calculate the amount of plywood, you need to know the dimensions of the room and the sheet itself. For example, the area of 1 sheet is 2.17 m2. For a room with an area of 8.7 m2, it turns out: 8.7 / 2.17 \u003d 4.09 pcs. 4 sheets may be enough, but it is better to take 5 pieces, taking into account trimming and possible marriage. The thickness of the sheets should not be less than 10 mm.
Plywood is fixed in increments of 15 cm. To calculate the number of screws for plywood, the length and width of the room are divided by 0.15 m. The two results are multiplied together. For example, there is a room measuring 2.80 m by 3.10 m. 2.80 / 0.15 = 19 pieces; 3.10 / 0.15 = 21 pieces Now 19 x 21 = 399 pcs. + 20% stock.

We calculate the required amount of laminate upon purchase, since there are various parameters of laminated boards. Do not forget to measure the size of the room before going to the store. For example, our room has an area of 8.7 m2. On average, one pack of coverage is 2.6 m2. So, you will need 4 packs (half of one pack will remain in stock).
With standard laying, the margin should be at least 5%, and with diagonal laying, at least 10%.

Please note that the batch and date of manufacture for all packages is the same to avoid differences in product shade.
Mounting technology
Floor preparation includes the following steps:
- First, inspect the floor and identify all its flaws.
- You should start with an analysis of the state of the lag and overlaps. If you have a high basement, then you can see it from there. If this is not possible, then it is necessary to disassemble the floor to the ground. Doubtful and damaged areas must be replaced with new ones. This will require thick bars.
- If everything is in order, determine if the boards are rotten and if they can withstand the load. To do this, remove the top layer of wood. If the color of the coating is uniform and close to the natural color of the wood, then the coating is in good condition.


You can use an awl and try to pierce questionable areas. If the awl is not included, then this instance is intact. Bad elements must be removed and new ones put in.
- If the boards are in fairly good condition, check them for sagging and squeaking. If any are found, it is necessary to fasten the old boards to the logs with self-tapping screws. Also, the cause of the creak may be friction between adjacent instances. This is eliminated with mounting foam or special solutions.
- Next, treat the tree with a scraper and cover with an antiseptic.
- If the floor was “moved” not so long ago, then these steps can be skipped.
- Further, it is necessary to level the floor if there are differences of more than 2 mm per 2 m2.


How to align?
This can be done in several ways.
Cycling


Laying plywood, OSB or GVL on the subfloor


When leveling with plywood, two options are possible: laying on a subfloor if the differences are less than 1 cm, and installation on additional logs if the differences are large.
You can lay plywood boards on the subfloor with small differences using glue and self-tapping screws. First you need to clean the surface and primed. Next, apply glue and lay the already prepared sheets. After the glue has completely dried, scroll the sheets with self-tapping screws at a distance of 15 cm.

It is possible to lay plywood on an uneven curved floor with differences of more than 1 cm using a crate, which will serve as a leveling. First, we also clean the surface, install beacons, along which the logs are fixed to the boardwalk. If voids form somewhere, it is necessary to put additional bars or plywood cuts.
Next, we cut the sheets into squares with a side of 60 cm, lay them on the crate so that the joints fall on the logs and fasten them with a slight offset so that a cruciform intersection of the seams does not form. We fasten the squares with self-tapping screws, having previously drilled holes so that the hats “drown” in the surface.

Base pour
This method is implemented using a self-leveling screed designed for wooden surfaces. It consists of fiberglass, which securely fixes the surface. To level the screed, we grind the base of the floor, close up large voids with putty, primer, and fix the waterproofing around the perimeter.
Using a stapler, we mount a reinforcing mesh with an overlap of 5-10 cm. Pour the prepared solution onto the surface and level the surface with a spatula.

We lay the substrate
The underlay serves as additional sound insulation, it hides small irregularities and prevents the laminate from rubbing against the wooden base.
At the moment, there is a large selection of substrates for laminate:
- The most environmentally friendly can be considered cork options. They hide unevenness well and are excellent thermal insulation. Of the minuses, only the high price can be noted.
- bituminous cork underlayment is also a good option. The production technology is as follows: special paper is treated with bitumen and cork chips are applied. The disadvantages include harmful emissions, but they are negligible.


- Styrofoam is a relatively cheap material that also absorbs noise well, hides irregularities, but is not as durable as previous types.
- Foamed polyethylene popular among consumers due to its low cost. It is convenient to mount it yourself, it has moisture resistant properties. But this material quickly fails: it sags and loses its shape. On a prepared and leveled floor, it is enough to use a substrate with a thickness of 1-3 mm.


After choosing the substrate, it is necessary to lay it on the floor. First, fix the damper tape around the edges of the room. It compensates for the expansion of the tree. Next, we cut the substrate into strips of the required length, lay them on the surface and glue all the joints with construction tape.

Laying laminated sheets
We bring the laminate into the room where it will be installed, and wait 2 days for it to adapt to climatic conditions. At this time, it is necessary to decide on the direction of laying the boards: parallel to the light, perpendicular or diagonal.
If the room has windows on one side, experts recommend laying the material along the sunlight so that the seams of the laminate are more hidden.

For DIY installation, you will need the following tool:
- A mallet to tap the place where the boards are attached.
- A bar on which we will directly knock to fit the boards to each other. Better if it is wooden. Remember that in no case should you knock directly on the laminate, as this can damage the surface or the locks themselves. In this case, the installation of the next level will not be possible.
- Wedges for setting the gap between wall and floor.

- A montage will be required to secure the last layer.
- Jigsaw for sawing laminate to size. If this is not available, do not worry, you can use a regular saw. Problems can only arise with the last row, when you need to saw the board along.
- Ruler, pencil, measuring tape.
There are 2 ways to attach laminate flooring: with Click, with Lock and with glue.

Installation with Click and Lock
We always start the flooring from the far left corner. First, we set the wedges for the gap between the future coating and the wall. They must be at least 10 mm for a room up to 10 m2. It should be borne in mind that with an increase in the area, it is necessary to increase the size of the gap. If this distance is not left, then with an increase in humidity or a change in temperature, the laminate may bend.
- Click lock. We put the first board in the left corner with a pre-sawn comb against the wall. We insert the next one at an angle of 30 degrees and press it to the floor to secure the lock. At the same time, you will hear a characteristic click, which will serve as a signal for the correct bonding of the layers to each other. Laminate surfaces must be laid in a checkerboard pattern so that the pressure is distributed and the seams do not rub against each other.

If the panel was cut in the last row, then the rest of it must be placed at the beginning of the next row. If the width of the room made it possible to lay the panels without residue, then at the beginning of the next row it is necessary to cut the board in half.
- lock. The difference of this type is that the spike of the next element is inserted into the hole of the previous one. The elements are assembled on the floor, and then knocked close to each other with a mallet and a bar. This is done every two layers.

How to cover with glue?
To do this, you need a special glue. The rest of the technology is similar to mounting with a Lock. The difference is that glue is abundantly applied to the ends of the laminate. We lay the first panel in the far left corner with a groove to the wall. To fix the second panel, apply a large amount of glue to the edge of the first, insert and tap the tongue of this panel to the first.
The wooden canvas must be assembled "on the run". To do this, before laying the second row, we cut the first board in half, apply glue to the entire length of the groove of the first part of the second row and fix it to the first row, tap it. For convenience, in the last row, you can use the montage.


Upon completion of the collection, the boards are glued together with small pieces of special construction tape, which are removed after the adhesive has dried. When you start collecting the surface in the doorway, you need to make holes equal to the width of the laminate in the box. Laminated boards are inserted into these holes so that there is no gap.

Small parts under the radiators, around the radiators and at the door can be fixed with glue. After the complete installation of the laminated elements, it is necessary to remove the wedges that were left between the wall and the floor, and fix the skirting boards. It is important to make the transition between rooms, joints with other surfaces.
This can be done using thresholds. The most reliable of them are metal.
The following threshold options are available:
- single-level is used if the floor height does not differ between rooms;
- multi-level is necessary for different heights of coatings;
- the corner is fixed on the steps;
- one-sided is needed for docking with the door;
- curved is used for a wavy joint.

How to lay a square laminate?
The square look is gaining popularity. Firstly, with its help you can create unusual interiors. Secondly, such a laminate comes with imitation of various coatings, which allows you to implement any ideas. Thirdly, its installation is somewhat easier than installing a rectangular laminate. This is true when you do the installation yourself.
When installing square plates, the same conditions are observed as for rectangular ones: they are laid with brickwork, spacer wedges are installed around the perimeter of the room, it also comes with the Click and Lock fastener system. The size of such sheets is 60x60 cm.


For smaller rooms, laminate flooring is made along the walls first, but for large spaces it is necessary to assemble it diagonally. It is quite difficult to make a laminate diagonally on your own. Usually specialists are involved for this.
Laying laminate diagonally is justified in rooms with irregular or rounded shapes. This method will visually expand the space of a small room, and the picture will look more unusual. When assembling the laminate not in parallel, you need to maintain an angle of 45 degrees relative to the wall. But it is not always possible to do this, since walls rarely have a 90 degree angle. Then the indicator of the angle of inclination of the laminate can deviate up to 30 degrees.

This material can be laid on any rough floors: concrete, tile, linoleum or boards. The most important thing is that they are strong, rigid and perfectly even. Today we will look at the basic nuances of how to lay a laminate on a wooden floor, and also describe this process step by step.
Surface preparation
Wood floors should be carefully inspected before laying laminate flooring to identify defects. The floorboard needs to be repaired if:Deflection or deformation;
Instability (displacement of boards when pressed);
The presence of large cracks, knots and depressions;
Damage caused by fungus.
Old wooden floors are best dismantled to support bars. It is possible that over the years of operation they have overgrown with mold and fungi. In this case, the damaged logs are replaced with new ones, and all the remaining ones are treated twice with an antiseptic.
Rotten logs need to be replaced
Remove and replace and all damaged floorboards. The gaps between the boards are filled with a special putty for a wooden floor. Small differences in height, including those formed by layers of paint, can be eliminated with an electric plane or scraper. In small areas, the influxes are removed with sandpaper.

Scraping painted floors
If the floors were laid recently, they can not be removed. In this case, only fasteners are checked, loosely fixed ones are replaced.
Important! Before scraping, the caps from nails and self-tapping screws must be sunk a few millimeters into the tree.
Eliminate height differences
As a rule, uneven floors are the main problem when laying laminate. Perhaps there is no apartment in which the floorboards are laid perfectly.The laminate lamellas (boards) linked together are, in fact, a single canvas (such floors are called floating). This explains the strictest requirements for their installation. Indeed, at the slightest deflection, the entire structure can be deformed.

Irregularly laid laminate
Permissible differences in the height of the surface on which the laminate will be laid is no more than 2 mm for every 2 m. Moreover, if its locks are damaged during the warranty period, the manufacturer may refuse to replace the lamellas or return funds due to a violation of the laying technology.

Permissible height differences
That is why, after repairing wooden floors and eliminating their damage, the surface must be perfectly leveled. In case of strong height differences, the linings are installed under the logs of the supporting wedges. The final leveling of the floors is carried out using linings from scraps of plywood sheets, fiberboard or wooden beams.

plywood flooring
Important! Do not lay plywood or fiberboard close to the walls. After all, when changing temperature or humidity conditions, it is able to change its size. The size of the compensation (technological) gap - the distance from the wall to the outer sheets - 0.5 cm.
Calculation of the amount of laminate
It is not difficult to calculate the floor area and determine how many square meters will be needed for laying. The only thing to consider is trimming waste:With diagonal laying, they will be 10-15%;
With the usual method of laying waste, there will be less - up to 5%.
Advice. Since the color of the lamellas can vary even in one batch, in order to obtain a uniform pattern, it is better to take the laminate alternately from different packs when laying.
Why is an underlay needed?
Another important requirement when laying this flooring is the obligatory presence of a substrate. It performs the following functions:Finally levels the floors;
Evenly redistributes the load between the lamellas;
Filling all the free space between the surface and the laminate, protects it from deformation;
Absorbs noise from footsteps;
Performs the function of a heat insulator.
The best option is a substrate polystyrene foam. It is much cheaper than cork, while keeping its shape perfectly. For flooring on wooden floors, a 2 mm underlay will suffice. It is better not to use cheap polyethylene foam - over time, it will quickly sag and lose its shape, and the floors will begin to deform and creak.

Polystyrene underlay for laminate flooring
Underlayment for laminate flooring
After leveling the floor and cleaning it of debris, a springy damper tape is laid along the walls to dampen sounds. So that the seams of the substrate do not fall on the joints of the boards, sheets or a rolled substrate are rolled out on the floor across the direction of the laminate lamellas.It is laid only with the smooth side up and is butted together, without overlap. To avoid shifting of the substrate, all sheets are fastened together with construction tape. If the damper tape is not used, you can bring the edges of the substrate a little on the wall for a couple of centimeters. In the future, the excess is cut off. In order not to crush the porous material when walking, it is not recommended to lay the entire substrate at once - it is better to spread it as needed.
Laying laminate step by step
1. To protect the laminate from swelling during temperature changes, small spacers from plywood or small bars 0.5-1 cm thick.

It is not recommended to lay laminate flooring close to the walls.
2. So that the joints between the slats are not conspicuous, they must be located in such a way that the light passes along them (with their narrow side towards the window).
3. The first row is located with a spike to the wall.
4. Further laying is carried out only with offset seams(in a checkerboard pattern), that is, the center of the board of the next row should fall at the junction of the previous lamellas. In order to obtain a similar offset, the first board of the second row is cut in half or (long boards) 2/3.
5. Lamels can have two types of fasteners. Each package has a pictogram indicating the type of attachment and how to connect it.
6. When fastening the click type (the most common), the board to be joined is slightly tilted at an angle of 30 and pressed against the second lamella with a slight effort until a characteristic click. To strengthen the connection, the connected boards are knocked together with a rubber mallet. Boards with a lock-type fastening are simply hammered into the neighboring boards with a slight tapping of the hammer until they click.

How to install laminate

Laminate padding
Advice. In order not to damage the fragile lamellas, when trimming the boards to each other, you can use a wooden block through which the boards are knocked out with a hammer.
7. The lamellas adjacent to the pipes are cut in half so that the cut falls on the center of the pipe. Further, holes are cut in the boards a couple of millimeters larger than the diameter of the pipe. To seal the connection and dampen sounds (metal and bimetallic pipes are very good conductors of sound), rubber gaskets are placed.

Battery laminate installation
8. To obtain a neat joint, the door jambs are slightly filed down along the thickness of the lamella.

The jamb is sawn down so that the lamella enters
9. The transition to another room can be made with an aluminum threshold, which is inserted between the laminate boards, or with a special wooden threshold with grooves.
Video: Laying laminate on a wooden floor
Manufacturers indicate on the laminate that it is best to lay it on a concrete base. But if you are planning a renovation in a private house, then there are most likely wooden floors. Can laminate flooring be installed on wood floors? Can. How is the laying of laminate on a wooden floor, we will understand in the article.
Wood is a rather whimsical material, and that is why laying a laminate on it is more problematic than on a concrete base. Material manufacturers still do not recommend laying laminate on a wooden floor, so you do the work at your own peril and risk. Of course, nothing terrible will happen, it's just that over time the tree is deformed, which can lead to distortion of the laminate.
The tree can change depending on weather conditions, high humidity causes it to swell, and dryness causes it to dry out. All this can affect the lining.
Before proceeding with the installation, it is still worth making sure that the wooden planks are intact. They should not have cracks or cracks. Planks should be straight without buckling. It will not be superfluous to check for the presence of mold or insects if the tree has not been treated with special means.  The wood should not crumble, check it for rot. If there are any, then it’s not only impossible to lay something on such a floor, but its complete replacement is also required. If you have only a few boards that have deteriorated, you can replace them and the neighboring ones. It is best to lift the entire floor and look at the boards for defects completely. If there are no defects, but the boards are shaking, then they need to be fixed.
Benefits of laminate
Laminate has been in great demand lately, which is not surprising. Its appearance can compete with many more expensive materials. The laminate pattern can imitate any other material, while it will look decent, and not ridiculous, as is the case with PVC panels. A wide range allows you to choose a laminate for any interior.  Laminate is divided into classes, and the higher it is, the better its characteristics. Accordingly, the price will be more expensive. But in general, the material is considered wear-resistant and durable enough.
  Laminate flooring is easy to maintain, just vacuum and wipe it down with a damp cloth. Just squeeze it well and use special detergents.
Laminate is made from wood shavings. Therefore, it is a fairly safe material. But, it is treated with special means for protection. And these are the ones to pay attention to.
Unscrupulous manufacturers can save on this, so contact only trusted suppliers. And so the laminate can be laid even in the children's room, it will not harm human health.
When repairing, the budget is often limited and the question may arise: is it possible to lay the laminate yourself? Yes, you can do the work without special training, installation is not difficult and laborious.
The term of operation of the laminate, subject to all conditions of installation and use, reaches 20 years. In the process, it will not lose its appearance if it is properly cared for.
Preparing the floor for installation
Laminate is installed in a locking way. You don't need glue during the process. Although it is sometimes used, but then it will not be possible to replace a separate element, and the quality of such a floor will be inferior.
Laminate is made on the basis of wood, which means that it cannot be used in rooms with high humidity. The only exceptions are waterproof species. Therefore, if you are going to lay it in the kitchen, pay attention to this fact.  Before laying laminate flooring, you need to prepare the floor. How to do it? First, check to see if the floor creaks. If this happens, then the boards can be fixed with self-tapping screws or anchors. Hats should not be higher than the surface of the bar, they must be carefully drowned.
Small cracks or holes can be sealed with sealant or foam. Rotten boards are best removed completely. But if the damage is minimal, you can sand the damage and treat it with an antifungal compound, and then seal the gap with foam.  If the base is uneven and there are high-altitude differences, then they must also be eliminated without fail. You can put wedges, and plywood on top, thus securing the bar in the desired angle.
How to lay laminate on a wooden floor
How to lay a laminate with your own hands on a wooden floor? Before proceeding with the installation, hold the laminate in the open package so that it adapts to the conditions of the room.
Laminate is laid only on the substrate. It depends on it the life of the material. Many manufacturers can even refuse a guarantee, since the instructions for the laminate always indicate the need for a substrate. Why is she needed? The substrate acts as an additional protective layer for the laminate itself. It takes over the function of the base leveler.  The substrate can absorb a certain amount of moisture without letting it through to the planks. The laminate will lie on it evenly and will not subsequently stagger and rub against the base, which significantly increases its service life. In addition, it acts as an additional material for heat and sound insulation.
The substrate is spread butt-to-leaf. There shouldn't be even the slightest overlap. Tape is used to fasten the sheets. The installation of the laminate starts from the wall, attach spacers 1 cm thick to it, so that later it does not swell or bevel. 
The first planks are installed with a spike to the wall. The boards are stacked in a checkerboard pattern, so the next row starts with half the board. Planks are attached to each other in two ways: click and lock. With the click system, the board tilts at an angle of 30-45 degrees and is pressed against another board with force. When the lock clicks into place, you will hear a click. You can additionally tap the board with a rubber mallet to consolidate the effect. 
The lock system immediately uses a rubber mallet. You just need to hammer one bar to another until it clicks. If there are obstacles in the form of pipes in your way, then simply cut the panel so that the hole is then placed on the pipe. A hole is cut into the board. You need to make it a little wider than the pipe itself, and then lay the rubber gasket. The last panel may be wider than necessary. In this case, it must be cut off. This must be done very carefully.
Sometimes the laminate is laid on the glue. More often this method is used in rooms with high humidity. The process is almost identical to the castle, only at the joints you do not attach the planks to each other, but glue them.
In the process, for better fixation, you can use adhesive tape at the joints. Then you need to wait until the glue is completely dry and you can remove the adhesive tape.
And many other options. One of the most common materials is because it is quite easy to install, does not require complex and specific care, looks stylish and has a high level of strength.
One of the most important criteria in choosing a laminate is the ability to put it on your own without contacting repair specialists: there are many information sites on the Internet and step-by-step instructions for laying a laminate on a wooden floor, after reading which you can put it on your own in a relatively short period of time.
The main advantage in the laying of the laminate is the absence of nails, since the tiles of the laminate are fixed to each other at the points of contact or lock.
- one of the most durable materials, located in the middle price category. In Russia, it appeared only in the 90s, although it became widespread in Europe 10 years earlier.
 - this is a panel with a thickness of 6 to 11 mm, the color of which can be anything - from classic wood colors and textures to imitation marble or natural stone. The panel itself is multi-layered: on the surface there is a durable film that protects the second layer - paper with an applied texture - from exposure to the sun, liquids and abrasion. The third layer is a fibreboard, which determines the level of strength, and at the very bottom is a layer of paper, which has a moisture-resistant impregnation.
To choose the right laminate for you, you need to focus on the class of laminate: the range of classes is large (from 31 to 34) and the intensity should be considered
loads on the floor to correctly select the class.
 The greater the expected load, the higher the laminate class should be chosen.
But one problem often arises: when the repair budget is limited, and the old one is already in critical condition, the cost of its complete dismantling and subsequent formation of a new one with alignment will be high, and not everyone has the opportunity to immediately carry out this expensive and rather dirty procedure.
Is it possible to lay laminate on an old wooden floor without additional measures?
- this is a material that easily fits on any floor coverings.
Preparatory work for leveling a wooden floor for laying laminate
Features of laying laminate on a wooden floor
You should take a closer look at such a process as laying a laminate with your own hands on a wooden floor (you need to take into account that the concept of "wooden floor" includes hardboard, parquet and plywood).
If we are talking about these surfaces as the basis for laying laminate, then we must remember that they are quite easily deformed under mechanical pressure, moisture, etc.
Therefore, before starting work on laying laminate, some preliminary procedures should be carried out, because the technology of laying laminate on a wooden floor has some features:

Solving potential problems and preparing a wooden floor for laying laminate
- If the floorboard is uneven, it can be treated with a parquet floor leveling machine, or, for example, covered with a thickness of 8 mm or more.
 In the event that you have chosen such an option as laying plywood, then it should be fixed with long self-tapping screws through the boards directly to the logs, this is necessary to ensure maximum tightness of all layers of the floor;
 - Existing floor slope can be eliminated using additional guides, and then sheathe the surface with plywood sheets. Two layers of plywood will add evenness to the surface, the top layer of plywood is fixed to the parquet glue;
- If the joists fail (which can be the cause of the floorboards sagging), you can find where they go and cut a piece of the floorboard over that place. If the inspection showed that the logs actually fail, you can remove the subsidence by driving a wooden wedge under the subsiding elements;
 If they don’t fail, and the wooden floor sags, you can cut out squares from plywood sheets and fix them to the floor with nails or self-tapping screws (remember that the hats need to be sunk). First you need to make sure that the floor does not creak, for which the floorboards are attached to the logs with long self-tapping screws. Self-tapping screws are screwed in where the nails were before. The nails and heads of self-tapping screws remaining in the boards should be sunk into the board (about 2 mm deep). After all these manipulations, the floor is leveled with an electric planer, then it is cleaned, processed /, and then dried thoroughly. Next, laying the laminate can begin in such a way that its joints are perpendicular to the floor boards;
- If there are bulges, potholes and noticeable irregularities in the wooden floor, they should be removed by placing plywood linings or bars that fit under the plywood sheets. It is recommended to use plywood grade 4/4 or higher. The larger the size of the irregularities, the more additional actions you will need;
 If, for example, their dimensions are about 5 cm, then you will need
additional guides from the bar to remove them. The bars help adjust the height, so to make your job easier, you need to calculate in advance the required number of bars with different thicknesses. To do this, lay plywood sheets on the old wooden floor, the joints between which are highlighted with a felt-tip pen to simplify the laying of the timber. The beam is fixed on self-tapping screws at a distance of about 50-60 cm, and where the plywood sheets are in contact, support bars are installed. If necessary, it is possible to make an additional layer or thermal insulation between the wood coating itself and the plywood sheets: it can be any one that suits you. The plywood is mounted on self-tapping screws, and be sure to use self-tapping screws with a cone-shaped hat so that it is flush with the surface. A 3-5 mm distance is left between the plywood and the walls. This method will make the floor rise in this room higher and it will probably be necessary to change the doors, plus it is worth considering how the laminate will be laid in other rooms;
- If the wooden base of the floor is in rather poor condition, you can resort to leveling it with special mixtures. To do this, the old floor is cleaned of paint and varnishes, polished, very large seams and holes are puttied. When the floor is dry, it must be treated with a moisture barrier, it will securely fasten the mixture and the wooden base. The walls around the entire perimeter should be pasted over with insulation, where the coatings pass - a seam is made of expanded polystyrene. The height of the floor is marked with a level, already

a reinforced mesh is attached to the primed floor, at which time the mixture is diluted according to the instructions. After all these procedures, using a rubber studded roller, air bubbles are removed from the poured solution, and the surface is leveled with a mop, spatula, etc. After everything is dry, the laminate can be laid; - You can level the floor with a PVA-based putty. The floor is pre-cleaned, beacon rails are installed on it, and a PVA mixture with pre-moistened sawdust is poured into the distances between them. You can use several layers of putty, which are applied as it dries.

Laminate flooring with different types of locks

When the installation is completed, the wedges are removed and mounted.