Shallow strip foundation in winter. Do-it-yourself shallow strip foundation. The main differences between a shallow foundation
An economical and at the same time the most reliable foundation is the dream of every beginning developer. But is this option possible? Quite. A direct confirmation of this is the shallowly buried strip base. Arranging such a foundation does not require large financial and time expenditures, but the result of the work is very pleasing - you get a high-quality and durable foundation. Moreover, you can even build it with your own hands, without the involvement of professional builders. To make sure of this, let's look at each stage of constructing a shallow foundation. In addition, we recommend watching the installation video - it will allow you to understand the technology of laying the base in even more detail.
Before we begin to analyze the laying technology, we will outline the main features of the shallow-type strip base:
- is a frame in the form of a monolithic reinforced concrete strip, outlining the perimeter of the future building;
- costs half as much as a deep foundation;
- suitable for the construction of one-, two- and three-story buildings made of wood, concrete, stone and brick;
- can be used on non-heaving areas, as well as on weak, medium and highly heaving soil;
Important! In the last two cases, it is necessary to ensure high-quality soil drainage.
- arrangement involves a minimum amount of land work;
- makes it possible to build a small basement or cellar within the perimeter of the building;
- You don’t need to use special equipment for installation.
A shallow foundation cannot be built on frozen ground, so all work must be completed before the frost arrives. Laying the base is carried out in four stages.
 Foundation arrangement
 Stage 1: Preparation of trenches
The first step is to prepare the trenches into which concrete will subsequently be poured.
First, mark the site on which the foundation will be located. Then accurately determine the corners of the future structure - they should be as even as possible. Next, proceed to creating the base - dig trenches around the perimeter of the marked area. The optimal foundation depth is 50 cm. The width of each trench should be at least 60-80 cm.
When the holes are dug, you need to compact the soil - arrange a special cushion on it. If the basis of the site is silty fine sand, the soil must first be covered with geotextile - it will prevent siltation of the site and protect the foundation cushion from weeds, which are likely to grow in it due to high humidity.
 Preparing the trench
 The pillow itself should reach a height of 30-50 cm - this will be enough to give the foundation the necessary strength. First, sand is poured in a layer of 15-20 cm. It must be thoroughly moistened and compacted. Then fill in 15-20 cm of gravel. Wet and compact the base again. Next, waterproofing is carried out - sheets of roofing felt are laid.
When the work is completed, check the level of the resulting base surface - it must be strictly horizontal.
Stage 2: Arrangement of formwork
The next step is working with formwork. To build it you will need a large number of boards. Keep in mind that when pouring concrete on the formwork there will be serious mechanical impacts, so stock up on a strong board - its thickness should be at least 5 cm.
The boards need to be knocked down in the form of shields. The optimal connection step is 80 cm. If the step is wider, the structure will not be strong enough. Finished wooden panels can be fixed to the base using supports or support beams. The latter need to be installed every 60-70 cm. The recommended cross-section of the beams is 50x50 mm. The shields must be tightly fixed between installed beams or supports. After installing the formwork, cover the panels with thick polyethylene or glassine.
It is also advisable to strengthen the formwork structure from the outside with special supports so that it does not deform during subsequent installation work.
Stage 3: Base reinforcement
High-quality reinforcement is the key to the integrity and durability of the entire structure of a shallow foundation, so this step should not be skipped under any circumstances.
 Reinforcement
 First, build a reinforced frame. To do this, prepare metal rods 14-18 mm in diameter. Their length can be any, but experts recommend using long products - 2-5 m. Remember: the longer the rods, the fewer connections and the stronger the foundation. Metal products are laid along the entire perimeter of the foundation on a cushion, thereby forming a frame.
To arrange a reinforced skeleton, rods of a smaller cross-section are usually used - up to 10 mm. The length of the products should be slightly wider than the trench. All reinforcement is installed strictly perpendicular to the frame elements. They can be connected in two ways: the more reliable is electric welding, and the more affordable is wire ligation. The latter must be very flexible so that it is easy to work with.
Advice. For the convenience of installing the reinforcement skeleton, you can use scraps of plastic pipes: saw them on a circular saw to make rings 5 cm high, install the resulting products on the base and fix the reinforced structure on them.
Stage 4. Pouring concrete
The most important stage is the actual pouring of the foundation. It can also be divided into several stages:
- Preparing the mixture. If you are laying the foundation yourself, you will probably decide to prepare the concrete mixture yourself. There is nothing complicated about this. The main thing is to buy high-quality consumables: concrete itself, crushed stone and sand. It is desirable that the latter be of a large fraction - it adheres better. The mixture is made from concrete, sand and water in a ratio of 1:3:1. After thorough mixing, 5 parts of crushed stone are added to the composition.
- Pouring the mixture. When the composition is thoroughly mixed, you can pour it into the prepared trenches. To prevent air pockets from forming when the foundation hardens, the concrete must be compacted after laying. This can be done either manually - using a wooden tamper, or using a special vibropress. The composition must be poured not at one time, but as it is compacted. As the concrete dries, check its level regularly.
- After the foundation has completely hardened, fill the remaining layers between the foundation trenches with soil and compact it.
 Pouring concrete
 As you can see, equipping a shallow strip foundation with your own hands is really not difficult. Adhere to the general technology and follow the installation rules that professional builders have long established - compliance with these two conditions will lead you to a positive result, even if this is your first time pouring a foundation.
In low-rise construction of wooden or brick houses, as well as buildings made of aerated concrete and foam concrete, a strip shallow foundation (MSLF) is most often used. This type of foundation combines the advantages of recessed and non-recessed structures, but its cost is much lower.
To determine the main differences between a shallow strip foundation and how to install it yourself, let’s consider its features, advantages and disadvantages.
Features of MZLF
For a standard buried foundation, it is necessary to dig a pit, the depth of which will be below the freezing level of the soil. If you live in a region characterized by harsh winters, then the depth of such a trench can reach 1.5 m, so during construction you will have to use heavy construction equipment.
If we consider the construction of a shallow strip foundation, then it represents a foundation laid along the perimeter of all load-bearing walls of the house. However, its depth rarely exceeds 50 cm.
Among other advantages of structures of this type, it is worth highlighting:
- The possibility of constructing a strip foundation for a house from aerated concrete, foam concrete and other lightweight materials, without the use of an excavator and mixer.
- Less building material and reduced labor costs.
- High structural strength.
- Large selection of materials and installation methods. For example, you can build a monolithic strip foundation, fill the base with concrete, or make a more complex structure made of brick.
Also, thanks to MZLF, you can easily insulate basement rooms.

Among the disadvantages of such a lightweight foundation, it is worth noting the fact that a shallow strip foundation on heaving soils will have insufficient strength. The fact is that during the changing seasons, such soil sinks and rises, which can, in turn, lead to deformation of the shallow belt. However, this problem can be solved with the help of a drainage layer and sand filling, which will significantly reduce the load from the soil.
Important! MZLF cannot be laid on frozen ground or left unloaded in winter. The foundation should be poured in a short time, before the onset of frost.
For more information about MZLF, watch the video:
In order to make a shallow strip foundation with your own hands, you must first assess the type of soil that prevails on your site.
Assessment of soil composition and type
In order to determine the type of soil, it is not necessary to order an expensive service to study the geology of the site; it is enough to use the “old-fashioned” method. To do this, dig holes at several points, take some earth in your hand and try to roll it into a ball. If:
- The ball is rolled tightly, and its consistency resembles plasticine, then this is clay soil.
- After pressing the ball, cracks appeared on it - loam.
- The ball crumbled, then it was sandy loam.
- If you can’t roll a ball at all, then there is sand in front of you.
For each individual breed, it is necessary to calculate the required resistance in kg/cm2. This is necessary to determine the bearing capacity of the foundation, which, according to SP 22.13330, will be the following values for:
- loam – from 1.8 to 2.8;
- sandy loam – 2-3;
- watered clay – 1-2;
- plastic clay – 2-3;
- medium-dense clay – 3-5;
- dense clay – 4-6;
- gravel with sand – 5;
- sand of different fractions – 3-5;
- wet sand – 2-3.
After assessing the composition of the soil, it is necessary to calculate the design and volume of building material.
Calculating MZLF
To make a shallow strip foundation with your own hands, you need to decide on the type of foundation and its dimensions. Let's say we plan to build a base with an area of 15 m2, with a width of 5.5 m and a length of 6.5 m, with 4 horizontal rows of reinforcement and 2 vertical ones.
Based on this, we get the following approximate drawing of the future fundamental foundation.


For such a construction you will need:
- 402 m of reinforcement (120 m for horizontal rows, 192 m for vertical rows and 90 m for connecting rods);
- 2.02 “cubes” of lumber for formwork;
- 153 bags of cement (50 kg each);
- 19,100 kg of sand;
- 27,550 kg of crushed stone.
This is an example of a standard MZLF design, 1,600 mm high. Depth is calculated according to the following parameters:
- 0.4 m if the base is protected from heaving soils;
- 0.45 m for sandy soil with low groundwater level;
- 0.5 m if clay soil prevails with a freezing level of 1 m;
- 0.75 if the freezing mark reaches 1.5 m;
- 1 m for soils with a freezing depth of 2.5 m.
In addition, pay attention to other types of foundation.
Types of shallow foundation structures
There are several types of MZLF presented in the table below.

Based on this classification, we will consider recommendations for choosing the type of a particular design:
- When constructing heated buildings with walls made of lightweight brick or aerated concrete, it is recommended to focus on the following indicators:

- For heated frame houses with wooden floors, it is recommended:

- For unheated log buildings:

After theoretical calculations, you can proceed directly to the construction of the foundation.
Construction of a shallow strip foundation
To build a non-buried strip foundation with your own hands, you need to complete the following stages of work:
trench preparation
Before making a shallow strip foundation, remove the top part of the soil from the area allocated for construction and mark the foundation. To do this, take wooden stakes and nylon thread and measure the corners. After this, check the distance between the walls with your project and dig a trench about 70 cm high and 30 cm wide.
![]()
Make sure that the walls of the trench remain vertical and the bottom is level. At the next stage, it is necessary to cover the trench with geotextile, which will prevent mixing of the sand cushion and soil.
After this, coarse sand (fine sand should not be used) or a mixture of sand and crushed stone, 10-15 cm high, is poured into the bottom of the trench. Backfilling should be done in layers, with each subsequent layer moistened and compacted. The final height of the sand cushion depends on the type of soil. It is recommended to lay insulation (for example, roofing felt) on top of the prepared waterproofing layer, this way you will insulate a shallow strip foundation.
Formwork
Formwork made from edged boards or OSB is installed on top of the insulating layer. It is best to make removable formwork by fastening its walls with ties in increments of 0.5 to 1 m.

On the back of the formwork, mark the concrete pouring level.
Reinforcement
Place reinforcement bars in the formwork, having previously cut the rods in accordance with the dimensions of the walls, both in cross and longitudinal sections. In corners and at wall joints, perpendicular reinforcement rods must be tied to increase the strength and durability of the reinforced frame.
Healthy! If the height of the foundation exceeds 30 cm, then you will need several layers of reinforcement.
For more information about MZLF reinforcement, watch the video:
After pouring the first layer, holes must be punched in the concrete surface using a rod. This is necessary so that all the air comes out of the solution.
Each subsequent layer of cement-sand mixture must be poured before the previous one sets, so it is better to hire a team for the work.

The final layer of concrete must be leveled according to the markings on the formwork. After this, it is recommended to reinforce the concrete in order to increase the strength of the foundation and avoid cracking of the surface. To do this, sprinkle the concrete that has not yet set with dry cement (it is most convenient to use a regular sieve for this).
Final processing
After 3-5 days, when the base has set, carry out vertical waterproofing of the foundation. You can do this in several ways:
- Coat the surface with bitumen mastic in 2-3 layers.
- Cover the foundation with roll material based on polymer or fiberglass.
- Saturate the surface with the penetrating mixture.
The foundation will finally gain strength in 28 days, after which it will be possible to continue building the house.
Strip foundation is the most common type of foundation for building a house. Therefore, everything is clear with it, but what is the difference between a shallow foundation (MZLF) and a shallow foundation, how to calculate it and how to do it?
Characteristics - design principle
A shallow strip foundation or simply MZLF is similar in installation method to its counterpart, but has important differences:
- foundation laying depth up to 700 mm;
- located above the soil freezing zone;
- Designed for installation on swollen (heaving) soils.
The main feature of a shallow strip foundation is that it makes it possible to level out frost heaving of the soil. This is due to the fact that, despite the general rigidity of the structure, the MZLF, together with the weight of the entire structure, moves up and down depending on the time of year. Since the foundation is not deeply deepened, but moves evenly, it therefore does not collapse from such vibrations.
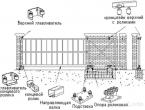
Schematic diagram of a shallow strip foundation

- Sand and gravel pad
- Foundation tape
- Waterproofing layer
- Vertical (or coating) waterproofing
- Armature (diameter 12)
- Armature (diameter 8)
- Base
- Wall
Where can it be used - application
Shallow strip foundations are suitable for the construction of low-rise residential buildings and other structures made from materials that will not create significant pressure on the base of the foundation. Such structures and materials include:
- log cabins;
- cellular concrete - foam concrete, gas silicate blocks;
- lightweight bricklaying;
- frame-panel buildings.
When arranging a foundation of greater width, heavy houses made of timber or logs can be erected on it. But in this case, the soil will freeze to a shallower depth and there is a possibility of deformation of the foundation. Thus, if you plan to build a monumental building, it is better to equip a strip monolithic foundation.
At the same time, you should know that increasing the width of the shallow foundation strip makes it possible to build heavier houses with an attic. The large width of the foundation strip (and, accordingly, the base) helps to reduce the depth of soil freezing in the space under the floor.
What to consider when installing a shallow foundation
Shallow foundations are installed on heaving soils
It is prohibited to pour MZLF on biogenic organic soils, for example, peat, sapropel (freshwater deposits), as well as on clay. The photo shows that their appearance does not bode well.

- Groundwater level
The closer the water is to the surface of the earth, the more unstable the MZLF will be

If the terrain is characterized by a significant difference in height (a house on a slope), then installing a shallow strip foundation on it is quite problematic. In this case, a regular strip foundation is installed or a significant area under the MZLF is leveled. In terms of time and money, both options are equivalent.
- Laying depth
It represents the height from the lowest point of the foundation, the so-called sole, to the zero level (ground surface).
- Climate (depth of soil freezing)
It is quite common among builders to lay a shallow strip foundation at a height that is calculated using the formula - freezing depth minus 20%. So you can be sure that the foundation will rise with the structure.
The minimum depth of a shallow strip foundation is regulated by SNiP II-B.1-62.

The depth of soil freezing for some Russian cities is shown in the table.

How to calculate the load on a strip shallow foundation
First of all, you should consider:
- structural features of the building;
- building height;
- planned number of floors;
- materials from which the walls will be built;
- coating weight;
Advice.
In general, the entire load can be divided into constant (calculated before the start of construction) and variable. The latter depends on the number of inhabitants, the weight of the furniture, etc.
- trench depth;
- pillow thickness;
- foundation tape parameters;
- quality of concrete.
You can additionally use
Calculation of a shallow strip foundation
1. The depth is determined by the proximity of groundwater and the depth of freezing.
2. Height above the ground surface = 4x width.
Good to know. The height above the ground is less than or equal to the depth.
3. The width is determined by the formula:
Where, D is the width of the foundation base;
q – design load on the foundation, t/m;
R – design soil resistance, t/m2. This indicator, for a laying depth of 300 mm, is given in the table.

 4. The thickness of the cushion is determined from the conditions of the strength of the soil of the area.
For highly heaving soils, the following formula is used:
 Where, tn is the thickness of the pillow;
А, С, W – coefficients;
A and C are determined from the tables below.
A W = 0.1 or 0.06 m2/t for heated and unheated structures.


Above the line - for MZLF with a laying depth of 300 mm, below the line - for non-buried foundations.
Advice.
Calculate the MZLF using both formulas and give preference to the larger value.
Cost of a shallow strip foundation
Varies between 4-6 thousand rubles. per linear meter. The price depends on the width, height, number of lintels and dimensions, for example, the cost of erecting the foundation of a 6x6 house will cost 70-80,000 rubles, and 10x10 = 120-150,000 rubles.
Types of shallow strip foundation (shallow foundation)
Depending on the type of MZLF, the technology of its design will differ. Therefore, you should briefly familiarize yourself with the main ones:
Strip monolithic shallow foundation
Poured directly on site to create a seamless tape.

Strip block shallow foundation
The blocks are purchased ready-made or manufactured separately and only assembled at the construction site. Cement mortar is used as a fastening material.

Each of them has its own advantages and disadvantages. But, in general, the service life of the second is three times less than the first. Therefore, in this article we will dwell in detail on such a type as monolithic MZLF.
MZLF technology or how to make a shallow strip foundation with your own hands
The instruction is easier to understand if all the work is divided into clear steps. We will not deviate from this scheme. So, the device of the tape shallow foundation is as follows:
Preparatory stage
1. The place where it is planned to pour the foundation is freed from everything superfluous.
Council. Trees that are nearby, uproot along with the roots.
2. All necessary material and tools are delivered to the workplace. Moreover, it is advisable to immediately determine the location of all this stuff, so as not to waste time searching for it later.
Marking for strip foundation
The importance of this stage is difficult to overestimate. Therefore, you need to not only “estimate” where you will dig a trench, but also make landmarks using a rope (if possible, a laser level would be better).
How to make markings for the foundation:
- take measurements around the perimeter;
- put beacons in the corners;
- check the diagonal between the corners;
- if necessary, move the beacons;
- make a blind area at a distance of at least a meter from the beacons;
- Attach a rope to the blind area boards, which will show the edges of the foundation.
The marking process is presented more clearly in the diagram.

How to dig a trench for a foundation
 A foundation trench is a strip of excavated soil.
The depth of the trench is determined by the depth of the shallow strip foundation and cushion.
 For example, the most common depth is 300 mm; the thickness of the cushion is about 200 mm, depending on the quality of the soil. Then the depth of the trench will be 500 mm.
Council.
To prevent the edges of the trench from crumbling, make small slopes.
Considering the type of soil, it is better to start pouring the foundation immediately. Otherwise, it will crumble and some of the work will have to be repeated.
The sand cushion for the foundation is a mixture of sand and gravel. You can mix them, but it’s easier to pour them in layers. Moisten each layer with water and compact well. Since the structure of the pillow is quite porous, it is separated from the main foundation with a waterproofing film.
In principle, natural soil can serve as the basis for a shallow strip foundation, but its bearing capacity is much lower than the proposed sand and gravel cushion.

Install the entire formwork structure vertically. The supports are attached in increments of 500-600 mm. They are needed to ensure that the formwork does not fall apart or warp under the weight of the concrete.
 Helpful advice.
Try to keep the boards adjacent to each other tightly and without sudden changes. Then you will avoid work on leveling the surface of the finished foundation for cladding.
Pouring strip foundation
Obtaining concrete is an individual matter - you can buy (or rather, order) and have the concrete delivered with a mixer or make it yourself, using (and the second option, how to make it).
As for pouring concrete, the procedure is standard for such work - concrete is poured into the finished formwork.
Council. If the formwork is watered, the concrete will lie more evenly around the edges.
When pouring concrete, try to beat it every 40-50 mm. height. This will “expel” air bubbles that could destroy the concrete in the future.
Reinforcement of a shallow strip foundation
If the foundation is not expected to bear a heavy load, this step can be skipped. But still, with MZLF reinforcement it will be much stronger.
Correct reinforcement of a shallow strip foundation:
- Fill the starting layer. This layer should be about 30% of the total height of the MZLF. The purpose of this action is to create a flat surface for laying the metal, as well as protect it from moisture.
- Knitting reinforcement for strip foundations. To do this, you need to tie it into blocks and lay it in a trench.
- Pour concrete to the desired height.
An example of a reinforcement cage for a strip foundation

 An example of tying reinforcement with wire.
 The example shows that the connection is made with wire. This is a relatively new approach to joining, since resistance welding is more common.
But methods of connecting reinforcement by welding have several significant disadvantages, including:
- require a welding machine and a specialist who can perform welding work;
- due to the high temperature of the welding arc, the strength of the hardened reinforcement rod is lost;
- welding work is not applicable for fittings with a diameter of more than 20 mm;
- The most important thing is to increase the rigidity of the reinforced frame. Since a shallow strip foundation “plays” depending on the season (being a kind of flexible foundation), increased rigidity will lead to its destruction. And as a result, it will be required.
 This is what the laid reinforcement will look like
Concrete protection
To avoid overdrying and the formation of cracks, the concrete poured into the formwork is covered with a film and periodically moistened with water.
Insulation of a shallow strip foundation
- Immediately after the foundation has gained the required strength, construction of the house should begin. Try to do all the work in one season. Because the soil under the foundation will freeze, and the MZLF, not pressed down by the weight of the house, will become deformed.
- If you cannot start construction, cover the MZLF and the area around it (200-300 mm) with straw or sawdust. To protect the soil from freezing.
- During the operation of the building, try to plant perennial plants and shrubs near the shallow strip foundation. They will help reduce the freezing depth of the soil. They will also be able to retain a significant amount of snow, which will also reduce the freezing depth.
Shallow strip foundation video
Conclusion
In this article, we figured out how to make a shallow strip foundation with your own hands. By understanding each stage in detail, you will be able to prevent annoying mistakes and lay the foundation on which your house will last for decades. Most importantly, do not forget that before starting construction, order geological surveys, otherwise, there is a risk that the soil on your site is not suitable for installing an MZLF.
When constructing buildings that are light in weight (wooden garden houses, bathhouses, garages, sheds and even houses made of foam concrete and other lightweight materials), shallow strip foundations are often used to reduce the cost of construction.
It differs from a conventional strip foundation only in depth. During frost heaving, it, being essentially a rigid frame, lowers and rises along with the building. Since the displacement is equal, no destruction of the foundation occurs.
Heave protection
When water freezes, increasing in volume, it lifts the soil and “swells” it. Moreover, a building in the warm Crimea will behave completely differently than a building built in Siberia or the Urals. Clay soils that have poor moisture permeability are most susceptible to heaving. In porous, dry soils, this phenomenon is noticeably less, because the rising soil fills the air voids.Soil heaving can damage even the strongest foundation
During construction shallow foundation located almost on the surface, the pressure on its walls is significantly lower. The action of the soil, which expands from below, is compensated by the weight of the building itself. In this case, a small depth must be compensated by the strength characteristics of concrete and a reliable reinforcement frame. However, such a small mass is being built - too much weight can damage the foundation.
Why do you need a blind area
In Finland and Sweden, where the air temperature in winter is quite low, houses built on a shallow foundation have long been not uncommon. Since the cause of soil heaving is freezing, builders once decided that they should fight not the effect (heaving), but the cause itself. On heaving soils, they stopped deepening the foundation and began to insulate it. Moreover, the further north the area, the greater the thickness of the insulation.The blind area is called a strip of waterproof material running along the perimeter of the building and tightly adjacent to its base. To drain water, it is made with a slight slope. Today, modern materials are used to insulate blind areas: expanded clay, polystyrene foam or penoplex.
Important! The width of the blind area should be equal to the freezing depth.

Insulation of the blind area
The thickness of the insulation layer depends on the type of soil and the structure of the building. Its width depends not only on the depth of freezing, but also on the extension of the roof: it must extend 20 cm from its edge. When erecting a small residential building on a shallow foundation, the basement itself is insulated simultaneously with the blind area to insulate the basement.
Important! The side parts of the foundation must also be waterproofed and insulated. The size of the trench for a shallow foundation should be increased by the width of the thermal insulation and bedding. When insulating the sole using polystyrene foam boards, the base area also increases.


Foundation insulation
If all the above conditions are met, shallow depth can be laid to a depth of 0.4-0.5 m. With highly heaving clay soils, this figure increases to 0.75 or even 1 m. It can be even greater when building on too mobile soil: on sand or in heavily swampy areas.
Foundation width
Minimum width strip foundation of shallow depth for light garden buildings and utility buildings is 25-30 cm. During construction small residential buildings this figure increases to 30-50 cm. Naturally, its width cannot be less than the width of the walls of the building, otherwise they will simply collapse.R – soil resistance: depends on the type of soil and is determined from the table;
P – support load; the specific gravity for each part of the structure made of different materials (roof, walls, etc.) is taken from standard tables SNiP II-3-79.
Knowing the total support area and length, you can calculate the width of the base of a shallow foundation, while the load per 1 cm2 should not exceed 2 kg. Moreover, the specific load from the building cannot be higher than 70% of the bearing capacity of the soil itself. If the calculated width is insufficient and does not satisfy this requirement, its size must be increased.
Important! The ratio of the depth of a shallow foundation to its width should not be more than 4:1.
Stages of foundation construction
1. Before starting work, the site and the area adjacent to it are carefully leveled. Next is done foundation marking:beacons (flags) are hammered into the corners of the future foundation, between which wire or a strong rope is stretched;
to check the correctness of the markings, a diagonal is drawn between them;
a blind area is marked at a distance of about a meter from the corners;
A rope is also fastened along its edges.
Important! The foundation should not be laid on a layer of fertile soil (chernozem); its loose structure cannot be considered a reliable foundation.
 2. Trench digging under the foundation of a small building is done by hand, while the edges and bottom are leveled with a shovel. Its depth should be equal to the sum of the heights of the foundation and the pillow. The width of the trench should be increased by the width of the formwork walls by approximately 2.5 cm.
3. To distribute the load evenly over the entire area, it is laid before pouring pillow made of sand and gravel 20 cm high. Its thickness depends on the type of soil in a particular area. To avoid silting, its walls should be protected with a layer of waterproofing, for example, roofing felt. After backfilling, the pillow is carefully compacted and additionally spilled with water for better settling.
4. After the pillow layer is laid waterproofing made of polyethylene film or roofing felt. To secure it, it is poured with a liquid cement solution.
5. Device formwork. For its construction, you can use ordinary boards that are suitable in size. It is advisable to trim uneven boards from the inside. To prevent the wood from absorbing the solution, they must first be soaked in water. For formwork, you can also use plywood or metal panels.
To prevent the mortar from protruding from the formwork walls, vertical supports are installed along its perimeter. When calculating the height of its walls, the size of the plinth (the above-ground part of the foundation) must also be taken into account. It is necessary to provide small openings in the formwork walls for ventilation, and temporary pipes to remove communications, which are removed after the solution has dried.

Formwork
6. The fittings are made of metal rods 10-12 mm. The number of its layers depends on the depth of the foundation: ideally it should be laid every 10-20 cm.
Foundation reinforcement rules:
the reinforcement should be placed as close as possible to the top and bottom of the foundation by 3-4 cm, in places that will bend the most; otherwise there will simply be no sense in such reinforcement;
the reinforcement must be located at least three rods horizontally without sagging;
it is allowed to connect reinforcement rods by welding or tying wire with overlapping each other; with a diameter of 10 mm, it must be tied with an overlap of 15-20 cm.
7. Pouring concrete. There is no need to save when pouring a shallow foundation. Cement is selected grades M200-300. Filling occurs in stages in layers of no more than 20 cm. In this case, each layer is carefully compacted, and the formwork is tapped to squeeze out the resulting voids. It is removed after the last layer has completely dried for 8-10 days.

8. Waterproofing. A shallow strip foundation is covered with a dense layer of bitumen mortar, on top of which waterproofing is glued.
Important! To avoid cracks after pouring, the foundation should be covered with film.
Basic mistakes when laying a foundation
In order for the building to stand for as long as possible, the following mistakes should be avoided when laying the foundation:before starting work, it is necessary to completely remove the entire plant layer of soil (turf) by 15-20 cm; otherwise, the plants, and behind them the logs, will rot;

Sod removal
It is prohibited to pour a shallow foundation without preliminary filling sand and gravel mixture capable of passing water; otherwise, wet soil, having frozen to concrete in winter, will simply “pull out” the tape up; this is especially dangerous in the absence of insulation;
a common mistake is incorrectly tying the reinforcement in the corners of the foundation with an overlap in the shape of a cross; for a perfect connection with rods running along, its ends must bend 90°;

Reinforcement errors
Tie porch or porch foundation to the main one is prohibited, they must be separated expansion joint, otherwise a gap may occur at the junction;

Expansion joint between the building and the porch or veranda
it is better to lay it with mineral wool or other heat-insulating material
The foundation cannot be left for the winter unloaded, the entire cycle of work on the construction of the building should be completed in one season; if the structure is left for a year, the soil will simply push it out or “tear” it.
One of the simplest foundations for buildings is a shallow strip foundation. Despite the ease of performing the work, there is always the possibility of doing something wrong, so before installing the MZFL you should familiarize yourself with the general technology. Today we will take a step-by-step look at the device of a shallow-depth tape.
Scope of application of MZLF
Shallow foundations are used for buildings with low loaded mass. As an example, we can cite houses on a steel or wooden frame, as well as buildings made of lightweight elements (foam concrete, PCB). Typically, the number of storeys in buildings at MZLF does not exceed two.
In the definition of MZLF, shallow means completely located in the frozen layer of soil; the underground part of the concrete strip rarely exceeds 500-700 mm. Frost heaving forces with this arrangement do not create tangential (bursting) loads, but the entire building, together with the foundation, dynamically moves following the expansion of the soil. For this and other reasons, it is not recommended to install shallow tape in areas with a general terrain slope of more than 2%. On steeper slopes, a shallow foundation can be built only after regrading the soil to form a horizontal terrace.

The feasibility of using MZLF lies in the much lower consumption of materials and ease of design. If a basement is not planned for the building, a shallow tape will reduce the volume of concrete mixture and reinforcement by 2-3 times, while providing equivalent load-bearing capacity.

It is worth noting, however, that it will not be possible to establish a shallow foundation on loose peat, silty soils and mudflow sandy loam. Such soils have too low a density and high plasticity, and therefore require the construction of pile-grillage foundations resting on denser layers of soil. You should not install MZLF on soils with heaving indicators of more than 4% or if the groundwater level is located above the depth of occurrence, despite the fact that drainage of the site is not planned, so that you do not have to deal with the consequences afterwards.
Calculation of cross-section and configuration
Since the MZLF acts as a beam and not a stiffening rib, usually the cross-section of the tape is close in shape to a rectangle or trapezoid. Tape in the form of a T-bar or more sophisticated sections is almost never cast due to the fact that the material savings look too insignificant in comparison with the installation of more complex formwork.
The calculation of MZLF is carried out in two directions: sufficient bearing capacity of the soil in the plane of occurrence and its own structural strength, which will allow the tape to maintain rigidity under the full design load from walls, roofing, snow, etc.

The width of the upper part of the foundation is determined by the maximum possible thickness of the wall, taking into account the layer of interior and facade finishing. When installing floors along joists, it may be necessary to form a protrusion or expand the foundation by about 50 mm.
The width of the tape in the plane of occurrence is determined entirely by the required load-bearing capacity. It is enough to divide the total mass of the building and calculate the average load per meter of the perimeter of the tape, and then calculate the sufficient cross-sectional area of the support in accordance with the characteristics of the soil. To create a sufficiently high safety factor, the thickness of the incompressible bedding is not taken into account.
 Scheme of a shallow strip foundation: 1 - mother soil; 2 - backfilling with gravel or gravel-sand mixture; 3 - blind area; 4 - foundation reinforcement; 5 - shallow strip foundation with a wide base to evenly distribute the load; 6 - wall; 7 - gravel filling of the internal area of the house foundation
The height of the tape is determined as the component of its underground and above-ground parts. With the above-ground part, everything is simple - it must be at least 80 mm and no more than four widths of the upper edge of the tape. In turn, the height of the underground part can be determined taking into account several factors:
- the foundation should not lie on the border of dissimilar soils;
- the minimum depth of the foundation is 35-40 cm, but, depending on the intensity of heaving and the depth of freezing, the height of the underground part can increase by an additional 60-80%;
- To maintain the required strength characteristics of reinforced concrete products, the ratio of width to height must be no less than 3:5.
Excavation and preparation
The trench profile for the MZLF device must have a width 2.5 times greater than the calculated width of the tape and a depth greater than the height of the underground part by two widths. This is due to the fact that MZLF is rarely installed on ground formwork, using board-and-panel formwork for reasons of containing cement laitance and the need to give the cross-section a trapezoidal shape. Let us immediately note that the distance between the pit walls and the formwork should be twice as large on the outside as on the inside.
Compensation for the forces of frost heaving is carried out through incompressible, non-heaving and hygroscopic bedding, as well as filling the lateral sinuses with similar material. A sand-gravel mixture with coarse sand and granite or basalt crushed stone of fraction 25-30 is used as backfill material. To stabilize the foundation, the prepared trench bottom is covered with a 30-50 mm preparatory layer of M 100 concrete without reinforcement.

The bedding at the bottom of the trench helps distribute the load on the supporting soil layer, increase the bearing area and bring into play forces with a horizontal vector of application. The recommendation regarding the thickness of the bedding, equal to two times the thickness of the tape, is rarely followed in practice; more often, on slightly heaving soils, preparation is limited to 25-30 cm.
However, you must remember that the more pronounced the heaving, the more responsibility falls on the bedding. Sometimes it is advisable to replace the soil down to the freezing depth and expand the external sinuses to the shape of an inverted wedge, the base of which corresponds to the width of the blind area.
Reinforcement and anchoring
For MZLF, the total content of steel reinforcement without prestressing is set to no less than 0.1%; a more realistic figure of 0.17-0.2% will ensure proper reinforcement without excessive strength, but with a significant margin of reliability.
The minimum value of the protective layer for the underground part of the foundation is 60 mm, the maximum is no more than half the width of the tape. Working reinforcement is made with bars with a periodic profile of such a diameter that the total cross-section of the reinforcement can be divided into 4 bars for the upper and lower reinforcement lines.

If in MZLF the vertical distance between reinforcement lines exceeds 450 mm, add another row with rods whose thickness is at least 60% of the thickness of the main lines.
Structural reinforcement is performed with clamps or tying wire in increments of 2-2.5 times the average width of the foundation. The diameter of the rods used for the manufacture of structural reinforcement should not be less than 50% of the diameter of the working reinforcement.

In addition, MZLF reinforcement is accompanied by a number of anchorages. At turns and T-shaped junctions of the tape, each row of reinforcement in intersecting directions must be connected with bent embedded parts of the same section, the overlap of which with the main reinforcement is defined as 25 nominal diameters of the reinforcement. Anchoring with embedded studs may be required to connect to the base of the frame or masonry walls.
Concrete works
Before carrying out concrete work, it is recommended to cover the internal cavity of the panel formwork with polyethylene film, which prevents the concrete mass from losing liquid until it sets. Afterwards, the reinforcement segments are installed, linked and distanced using plastic plugs.

Most often, bitumen mastics are used to protect against moisture, on top of which insulation based on fiberglass or cheaper roofing felt is rolled out. If the foundation does not require continuous waterproofing, the water barrier film remaining after pouring is sufficient.

The sinuses around the foundation are filled with ASG immediately after the waterproofing has dried. Backfilling is carried out in layers of 30-40 cm with careful compaction. After this, all that remains is to make a blind area around the house, and the MZLF will be ready for further many years of operation.