Do-it-yourself foundation for a bath: we make our own strip foundation for a bath. A reliable foundation for a bath with your own hands How to make a foundation for a bath
In this article we will talk about how to make a foundation for a bath with our own hands, we will consider options for a strip and column foundation.
Before building the foundation, it is necessary to determine the type of foundation, based on the type of soil on the site. If a house was built before this, then the type of soil is already known.
- Wet or bulk soil requires a strip foundation.
- Clay soil - columnar.
- Soil with a height difference - screw.
- On swampy soils, the foundation must be chosen monolithic.
The most optimal options are strip and column foundations. The choice of them can be made at the stage of deciding which building material the bath will be built from.

For example:
- if it is supposed to build a bath from blocks or bricks, a strip foundation is required.
- if wooden timber or logs become the building material for the bath, a columnar foundation will do.
Belt construction
- tape measure, cord, wooden stakes;
- shovel, fittings in the form of metal rods and light wire for tying it;
- sand, cement and gravel for making concrete mortar.
First, you need to mark the corners of the perimeter of the future bath with stakes using a tape measure. A stretched rope will help to get an even foundation.
![]()
Along the perimeter of the future bath, you need to dig a trench with a depth below the freezing level in the area. The width of the trench must be at least 30 cm. Its outer edge must pass along the markings made using stakes and rope.
At the bottom of the trench, you need to pour 20 cm of sand and gravel mixture, spill it and compact it well.
Reinforcement is laid on top - ready-made metal gratings, the thickness of the rods in which is at least 1 cm. If the reinforcement is separate metal rods, they can be connected to each other using soft wire.

After installing or laying the reinforcement on the prepared bottom of the trench, you can start filling it with concrete mortar. It is advisable to arrange the reinforcement so that it does not touch the edges of the trench and at the same time does not rise above the soil surface.
For a bath, it is advisable to use high-grade cement and fine-grained sand - this will provide additional strength to the future building.
If the strip foundation is to rise above the ground, a formwork of wooden boards must be installed before pouring the concrete mix. After a few days, the formwork can be removed and the foundation left to dry for another week or two.
Construction of a columnar

If a columnar foundation is required, the following building materials and tools will be required:
- stakes, tape measure and twine;
- manual or electric drill;
- piles - wooden poles, asbestos-cement or metal pipes or bricks;
- cement, sand and gravel.
First, the territory is marked out: the pegs are located at the corners of the perimeter of the future structure, a rope is pulled between them.

Places for poles are marked: each hole should be located at a distance of 1-1.5 m from the previous one. This distance must be observed for both external and internal load-bearing walls.
When using wooden logs, they must first be treated with an antiseptic to prevent premature decay of the building material.
If pipes with a diameter of 20 cm - metal or asbestos-cement - act as the base of the foundation, they must be poured with concrete mortar during the arrangement of the base for the bath.

First, with the help of a manual or electric drill, holes in the ground are organized in the marked places with a depth of 1.2 to 1.5 m and a width of 25-30 cm.
A 20-30 cm layer of sand and gravel cushion is placed at the bottom of each hole, it is spilled with water and carefully compacted.
A processed wooden pole or pipe of the required height is placed on the prepared bottom.
Reinforcement is placed in the middle of the pipe or around the pole, after which the pipe is poured with concrete, and soil is compacted around it, as well as around the pole.

If the bath is made of timber, then for such a building you can choose the following types of foundation:
- tape;
- columnar;
- monolithic.
Consider the features of their construction directly for a bath from a bar.

Concrete is poured along the planned perimeter. It has the following positive characteristics:
- This type of foundation is able to withstand two floors, since its design is quite strong.
- It is very beneficial for the construction of a bath, as it has a low level of thermal conductivity.
- There is an opportunity to build an underground room or cellar.

If the bath will have a small size and moderate weight of the structure, then a columnar foundation can be made. Mostly this type of foundation is used for the following types of soils:
- clay;
- gravel;
- sand.
Some of its advantages can be highlighted:
- Relatively low cost for construction.
- If the soil in your area is sloping, then the columnar foundation will allow the construction of a bath.
- It is very easy to manufacture, so you can completely do without the help of specialists.

This type of foundation is relevant for any type of soil. Its design is a reinforced concrete monolith. Among its advantages are:
- High strength and reliability.
- You can build multiple floors.
The main disadvantage of a monolithic foundation is the high cost.

A frame bath means the use of ready-made frames for quick construction. Given these and other features of such a building, let's compare the advantages of manufacturing a strip and column foundation.

It is important to understand that the construction of a frame bath implies the arrangement of sufficiently thick foundation walls to hold the entire building. Depending on the material used, the thickness of the foundation may be different:
- Reinforced concrete - thickness from 10 cm.
- Natural stone - from 5 cm.
- Concrete - from 25 cm.
- Flagstone concrete - from 30 cm.
When building a foundation, it is imperative to deepen it to a level below the freezing of the soil up to 20 cm. On the other hand, it makes no sense to equip the foundation with a depth of more than 70 cm. From this it becomes clear that the strip foundation is divided into two categories:
- Finely recessed.
- Buried.
For the construction of a frame bath, it is enough to use a shallowly buried foundation up to 60 cm deep.
Features of the column foundation

Although the strip foundation has many advantages, it is used in most cases for buildings made of blocks or bricks. Therefore, if the bath is wooden, then you can stop on a columnar foundation. During its construction, you will need much less financial costs for the source material.
Such a foundation is especially relevant for the construction of chopped, cobbled and frame structures. Since in the interval between the pillars there is no need to build special jumpers.
However, if the soil is weakly bearing, then this type of foundation is not relevant. If you want to equip the basement, then with such a foundation it will be problematic to do so.
Foundation for the furnace

If you plan to install a brick oven in the bath, you need to organize your own foundation for it.
At the site of the future location of the stove, a hole in the ground is prepared with a depth of 50 cm. If one of the foundation pillars is provided in this area, then it is not installed to its full height, but at a depth of 50 cm from the surface it passes into a square or rectangular mini monolithic base.
The bottom is covered with a sand and gravel cushion, compacted, and reinforcement is placed on top. At the end, the hole is filled with concrete mortar.
Video
Photo


The construction of any object on a suburban area is an important and responsible matter. Particular attention should be paid to all stages of work from the preparation or selection of a project to the finishing of walls and rooms. The foundation of a house or a bath is a foundation of one kind or another. Their choice depends on a number of conditions. Today we will talk about what a slab foundation is for a bathhouse, sauna and other buildings.
Types of bath foundations
The right choice of one or another basis for a bath depends on a number of basic parameters. The main ones are:
- The material of the walls of the building;
- Type of roof and proposed roofing material;
- Floors and area of the building;
- Soil conditions at the construction site;
- Estimated weight of the entire structure.

The main types of foundations for a bath
Based on this, the main types of foundations for a bath are as follows:
- Columnar - is a set of separate rectangular columns made directly during the installation process;
- Pile - is an analogue of the columnar and differs from it in the use of ready-made supports, driven (pressed) or screwed into the soil;
- Strip foundation - a type of monolithic foundation made of reinforced concrete or individual concrete foundation blocks;
- A slab foundation is sometimes called a floating foundation for its low depth and ability to move along with the soil when it is heaving.
Foundations from individual supports
The columnar foundation is quite widespread in the construction of small baths. Its advantages are high speed of installation, availability of materials and technology, the possibility of making it yourself even without experience in performing construction work.

Pillar foundation for small baths
For the manufacture of a columnar foundation, both traditional brick and concrete foundation blocks are used. They are laid on a conventional sand-cement mortar. It is possible to mount a columnar foundation only on solid ceramic bricks; silicate bricks are not recommended for these purposes. The depth of the supports should exceed the level of soil freezing in this particular region.
Unlike a columnar foundation, a pile foundation is more expensive, as it requires the purchase of ready-made steel or reinforced concrete supports. They can only be installed with the help of special construction equipment, which also increases the construction budget.
Tape support for a bath
Another common type of foundation is the strip foundation. It is also available for DIY, but requires significantly more time and materials to make. Such a monolithic foundation for a bath must necessarily contain inside a reinforcing frame made of steel rods with a diameter of 14-16 mm, which provides high bending and tensile strength.

Tape base for a bath
A strip foundation is also made from separate block elements, usually made under production conditions. Finished blocks must be brought and laid in a prepared trench. This can be done only with the use of cargo and lifting equipment, the rental of which is quite expensive.
There is an option for manufacturing a strip floating foundation, characterized by a slight penetration into the ground. It is possible to use such a foundation only on reliable soils that are not subject to strong fluctuations in the winter-spring period. Due to the smaller volume, the speed of its construction is even less than during the construction of a columnar foundation.
Sauna slab base
The most rarely used foundation is a slab for a bath. This is due to the greatest complexity during its construction, which we will discuss in more detail below. A slab foundation for a bathhouse or a house is an example of a flat floating foundation, which is a reinforced concrete slab made directly during the construction process.

The manufacturing technology of such a base requires a large amount of ground work, the manufacture of a complex reinforcing frame and the obligatory high-quality compaction of the concrete pour to give maximum strength. At the same time, a bathhouse on a slab foundation will reliably serve for decades on such problematic soils as peat and swampy soils, which are characterized by high seasonal mobility.
We build a slab foundation
If your site contains unreliable soils from the point of view of construction, you cannot do without installing a slab foundation. There are two main ways to get it - make it yourself, saving a lot at the same time, or involve one of the many teams of voluntary assistants. Thanks to the attached instructions, the first option will be the most acceptable for you.
The first stage of construction after drawing up the project and calculating the parameters of all structural elements is marking the site for the slab foundation. It is a drawing of the boundaries of the future pit, the dimensions of which are 1-2 meters higher than the external dimensions of the building.
It is desirable to preliminarily level the construction site to a level as close as possible to the horizontal. So it will be easier to observe in the future the horizontality of the bottom of the pit. This can be done manually using a bayonet and shovels or by renting a grader with a driver.

Terrain marking for slab foundation
Unlike a column foundation, a slab foundation is marked along the perimeter using a set of reinforcing bars 0.5 meters long and a strong cord. To do this, it is first necessary to orient the future base in the direction relative to the house and the cardinal points. The technology for marking a monolithic foundation is as follows:
- In one of the corners of the future pit, we drive in a steel rod to a depth of 30 cm.
- Along the direction of one of the walls of the bath, we set aside the required distance, controlling it with a tape measure, and drive in the second stake. We tie the rods with a strong nylon cord.
- From the first rod, perpendicular to the first line, we set aside the required width of the future recess under the slab foundation. To control the squareness, you can use the following methods:
- Calculate the length of the diagonal according to the Pythagorean theorem based on the known legs - the sides of the pit. It is convenient to postpone this distance with the help of the free end of the cord, having previously measured its desired length.
- Builders are well aware that the sides of a right triangle have a ratio of 3:4:5. It is enough to set additional marks for these distances in meters and get the desired right angle.
- Further from the second rod, we determine the location of the last rod, install it and control the squareness of the markup. To do this, it is enough to measure the diagonals of the resulting quadrilateral. They must be equal.
Having finished the planar marking, you can proceed to other stages of work on the construction of a floating foundation for a bath.
Digging a recess for pouring the slab
One of the most physically costly stages in the construction of a monolithic foundation with your own hands is excavation. With the help of a shovel, the process takes a long time. In addition, in work it is often necessary to use an ax to cut the existing roots of fruit trees or shrubs.

Preparation of the base for the tiled foundation
The depth of digging depends on the specific soil conditions of your site and can be from 0.5 to 1 meter. Construction engineers or communication with neighbors who already have a foundation slab for a bathhouse or other structures will help determine the required level of deepening. The soil removed during digging can be used to fill the lower sections of your territory or distributed evenly throughout its area.
Formwork installation is an important stage of work
In order for the monolithic slab under the bath to have the correct shape, and the concrete after pouring does not flow out of the future monolithic foundation, it is necessary to install formwork along the edges of the pit. It represents shields, the width of which is 30-50 cm greater than the depth of the pit. This value will allow the future base to be raised above the soil layer.
Formwork panels are made from edged boards, moisture-resistant plywood, OSB, flat slate. On the outside of the future slab, the formwork must be fixed with spacers, which are supported by cuttings of boards driven into the ground. Shields are mounted directly at the construction site of the slab foundation or ready-made ones are used. Installation, for example, of a columnar foundation does not require formwork.

Formwork for a monolithic slab
Often, slab insulation is also installed on the inside of the formwork for a floating foundation. This is due to the small thickness of the plate, which in turn does not allow it to have high thermal insulation properties.
Mandatory element - filling the bottom of the pit
After completing the earthworks and resting for a couple of days, you can continue to make a floating foundation with your own hands. The next stage is filling the bottom of the pit with crushed stone and sand. This is necessary to create a compensation layer that reduces the effect of soil movement on the base of the bath. The technology for performing this stage of work is as follows:

Filling the bottom of the pit with crushed stone and sand
- The bottom of a pre-leveled pit for a floating foundation is lined with several layers of geotextile - a special woven material that is widely used in the construction industry;
- Pure seeded quarry or river sand is poured onto the material. It is advisable to carry out backfilling in several layers with moistening and compacting each. The total thickness of the sandy layer for a monolithic foundation should be at least 30 cm. Bulk material can be compacted manually using the simplest device from a meter-long cut of a beam or log, to the ends of which a piece of thick plywood 40x40 cm and a wooden bar handle are nailed. There is also a mechanical assistant for performing such work - a vibrating plate.
- Crushed stone of the middle fraction is poured onto the sand layer and is also compacted.
Making a concrete pad
To obtain a perfectly flat base for pouring the main concrete layer and giving the base a horizontal surface, builders recommend making a small concrete pad for the future floating foundation. Before its installation, the entire bottom of the pit is lined with waterproofing and densely packed polystyrene foam insulation. As noted above, the small thickness of the plate does not contribute to the preservation of heat inside the bathhouse.
Various roll materials are used as waterproofing for a floating foundation. The most common and affordable is roofing material. Instead, it is also possible to use the already mentioned geotextiles. A waterproofing layer is also necessary when installing other bases for a bath, for example, a columnar foundation.
Giving high strength to the first concrete layer is facilitated by the use of a mixture of high quality. Since the consumption of the composition is not high, in this case it is better not to save on its components. After pouring the pillow, it is necessary to allow it to completely harden and gain sufficient strength, which occurs in 7-10 days.
Installation of the reinforcing frame
It is impossible to obtain a high-quality slab foundation without the use of a reinforcing frame. It is made from rods connected to each other in a grid with large cells. To obtain high structural strength, reinforcement is carried out both in the horizontal and vertical planes.
The first armored belt is installed at a height of about 5 cm from the pre-poured concrete pad. To fix this distance, pieces of crushed brick are placed under the rods. The rods laid along and across are connected by welding or twisting from a knitting steel wire. The second layer of reinforcement is laid at a distance of 20 cm from the first using a similar technology.

Reinforced frame for foundation slab
For a vertical bundle of two grids, many pieces of reinforcement 25 cm long are cut and placed vertically in the corners of the cells. The fastening of the connecting rods is carried out similarly to the connection of the rods of the armored belts. The top ends of the inserts should be located 5 cm below the border of the slab.
Installation of water disposal and power supply systems
An important stage in the construction of a slab foundation for a bath is the installation of sewage systems. For the convenience of subsequent operation, it is possible to place drainage elements directly in the foundation slab. This is much more convenient, will keep the details of the sewer in working order for a long time.
Similarly, elements of the water supply system that ensure the operation of the future bath can be installed in the installed sewerage system. The absence of air water lines makes it possible not to take care of their thermal protection in order to avoid freezing.

In addition to water mains, during the construction of this type of foundation for a bath, it is also possible to mount a power supply system in it. The absence of overhead lines will allow construction equipment to move around the territory, plant fruit trees without any restrictions.
Since the slab foundation can serve as the floor in the bath, the pouring process is often combined with the installation of its heating systems. It is a spiral or winding plastic or metal pipeline embedded in concrete through which heated water will move. This design is called a water heated floor.
Filling the slab foundation with concrete
If the columnar foundation does not require the use of concrete in its manufacture, then a lot of mixture is required for the installation of a floating foundation. In this case, the filling of the plate should be carried out in one go in full. It will not work to make the required amount of concrete with a small household concrete mixer.
To obtain a mixture in sufficient volume, it must be purchased at the nearest concrete plant. The advantage of such a purchase is the delivery of the full volume on the right day by the forces of automobile mixers. The disadvantage is the high cost of concrete. This is another important element of the total cost of making a do-it-yourself slab foundation.
The brought concrete is poured onto a previously prepared base, gradually filling the entire space inside the formwork. With this method of pouring the foundation, you can get a low-quality slab. This is due to the presence of air bubbles in the concrete mass. To remove them and compact the concrete, a special construction tool is used.
We are talking about a concrete vibrator, which creates far-reaching vibrations in a viscous composition during operation. Due to this, the density of the future monolithic foundation increases significantly, which leads to an increase in its strength characteristics. Without vibration compaction, it will be very difficult to obtain a high-quality concrete pour.
The final stage of construction
After the floating foundation is completely filled with concrete, it is necessary to give it time for the concrete to acquire maximum properties. To do this, the plate is covered with a large woven cloth and periodically moistened to prevent drying out. If this is not done, a network of small cracks may form.

Final steps after pouring concrete
The duration of the exposure of the slab, in contrast to the columnar foundation, can be from several weeks to several months, depending on weather conditions and the thickness of the base of the bath. After that, the formwork can be dismantled. On the finished slab, the construction of the walls of the bath from blocks, bricks or wood materials begins.
Bath - a traditional building on the site. Most owners of suburban real estate are thinking about its construction. But before starting work, it is required to prepare a reliable foundation for the bath.
There are several design options. The choice between them depends on the following features:
- geological conditions (type of soil, location of groundwater);
- the climate of the area;
- the size and number of storeys of the building;
- the need to equip the pool;
- operating features.
These factors must be taken into account before the design begins.
Before you make a foundation for a bath, you should understand its important differences from the main house. Here it will not be about sizes and materials, but about the features of use, which include:
- frequency of heating;
- high humidity and the presence of washing.
Unlike a residential building, the bathhouse is heated only during direct use. Therefore, problems with foundations can arise not only in winter (the effect of frost heaving), but also in the off-season. In warm weather, the underground structures of the building remain unheated, and condensate can settle on them. Moisture leads to mold and mildew.
Proper insulation and waterproofing is the way to solve problems. To protect against cold, it is better to use extruded polystyrene foam together with modern waterproofing materials (membranes, roll insulation, etc.). To build a foundation for a bath for many years, you need to provide the following steps of thermal insulation:
- floor of the first floor (on the ground or on the floor);
- outer vertical surface of the foundation;
- insulated blind area.

Foundation insulation
The presence of a washing room requires a competent organization of the drain. To do this, a foundation is made for a bath with a drain, water is collected and diverted to a septic tank, a drain pit, a drainage well, a pit, or to an open area of \u200b\u200bsoil (ground filtration method). The choice of abduction method depends on several factors:
- intensity of use of the bath;
- type of soil on the site and the depth of freezing;
- the ability to connect to the sewer system of a residential building.
The easiest way to discharge wastewater is if a slab or tape type foundation is provided (with floors on the ground). More difficulties will arise when using columnar and pile structures. In this case, the diversion system is thought out during the construction of the grillage or floor slab of the first floor. There are two most common options:
- slab grillage in the washing room and steam room;
- fastening under the floor of a galvanized sheet with a drain of the sewerage system.
Read more about how to arrange a drain in a bath on stilts.
Important! In winter, the soil under the bath freezes completely (due to intermittent heating). In the underground grillage or columnar foundation, sewer pipes need to be insulated.

Drain organization.
Choosing the type of foundation
When making a decision, the following features of the structure and site should be taken as a basis:
- soil heaving, groundwater level;
- proximity to a reservoir;
- material of walls and ceilings;
- site landscape;
- the need for a swimming pool.
Before you make the foundation for the bath, you should read the table below.
| Peculiarities | Recommended type of foundations |
| Pool availability | Caisson monolithic slab, strip foundation (often buried) |
| High groundwater level, location on the shore of a natural or artificial reservoir, strong elevation changes on the site | Piles (metal screw, reinforced concrete bored). When using reinforced concrete, temporary dewatering may be required for the period of pouring piles. |
| Bath according to frame technology on non-rocky soils* | Pillar foundations |
| Bath on heaving soil* | Shallow-depth tape with measures to protect against frost heaving (insulation, waterproofing, drainage, cushioning and backfilling with non-foaming* material). |
*According to SP 22.13330.2011, heaving bases include clayey soils, fine and silty sand, coarse rocks with small particles. Conditionally non-rocky soils include coarse or medium fraction sand, coarse clastic soils.
You can visually determine the type of soil on the site. To do this, you should familiarize yourself with GOST 25100-2001, which provides definitions for all types of bases.
slab foundation
The slab has a high bearing capacity, avoiding the need for flooring on the ground. This type of construction can be used when the GWL is located at a distance of more than 50 cm from the surface. To prevent frost heaving, the sole of the foundation is insulated and a warm blind area is used. The construction of a slab structure allows you to avoid the development and removal of soil, but it is worth considering the increased costs of materials: concrete and reinforcement.

- foundation marking;
- removal of the fertile soil layer (about 20 cm);
- backfilling of a pillow made of non-porous material (sand, crushed stone);
- sole insulation with extruded polystyrene foam (penoplex);
- waterproofing;
- formwork installation;
- laying reinforcement;
- pouring concrete;
- curing;
- removal of formwork (if necessary).
The tape base is perfect for baths made of brick or concrete blocks. The design can be shallow or deep. It is worth noting that the second option can be the most expensive of all the possible foundations for a bath. Construction features include:
- the need to carry out a full range of measures to combat frost heaving when the sole is supported at a depth less than the freezing depth;
- a large amount of earthworks;
- inability to use at high GWL (the distance from the water horizon to the base of the foundation must be at least 50 cm).
The strip foundation can be monolithic or prefabricated. For private construction, monolithic technology will become preferable, since prefabricated blocks can weigh up to several tons.

The order of work is as follows:
- breakdown of the foundation;
- soil development (digging trenches or pits);
- drainage device;
- backfilling of a cushion of sand or gravel with layer-by-layer compaction;
- formwork installation;
- reinforcing work;
- pouring concrete;
- concrete care and stripping works;
- insulation and waterproofing;
- backfilling;
- blind area device.
pile foundation
The easiest way to use screw piles as supports. They are low cost and do not require dewatering measures. Usually products with a diameter of 108 mm are used (suitable for a wooden or frame bath). The advantages of piles include the possibility of using at high GWL, heaving and weak soils, and the absence of earthworks.

According to the cut of the piles, it is required to make a grillage. It is recommended to use a combined option: in the washing and steam room, a slab-type grillage, in other rooms - a beam. This will allow you to easily provide for the discharge of wastewater and avoid unreasonable financial costs for construction.
It is important to take into account the small bearing capacity of the pillars. A columnar foundation is cheap compared to a tape and a slab, but it is recommended for construction only if there are solid foundations on the site (medium or coarse sand, rocks). Pillars are made of brick, concrete blocks or monolithic technology.

Foundation for the furnace
A well-built foundation is not everything. When erecting, it is necessary to take into account the design of the furnace. If you plan to install a furnace, support can be performed on the main foundation. In the presence of tape, columnar or pile supports in the floor structure, additional beams are provided to avoid excessive deflection.

Under the brick oven, it will be necessary to provide a separate support made of monolithic reinforced concrete. Only in this case the made furnace will stand reliably. The small foundation should not be connected to the main one.
Before you properly make the supporting part of the bath, you will need to carefully study the features of the site and recommendations in each case. It is also important to take into account the economic component and avoid unreasonable cost overruns.
The construction of the foundation is a fundamental part of the building. The reliability, durability and appearance of the bath depends on the successful construction of this design. You should follow the procedure correctly so that the bath pleases with aesthetics and a cozy atmosphere.
How to pour the foundation under the bath with your own hands - a step by step guide


The cost of building a foundation for a bath is about 17% of the construction of the entire building. The foundation is installed not only for walls along the perimeter of the structure, but runs along the line of load-bearing partitions. Also, sometimes a base for a furnace or a free-standing support is additionally produced.

An example of an equipped strip foundation for a bath. The tape runs along the perimeter of the walls and under the future interior partition
| Description | |
|---|---|
| It is necessary for the construction of a small and light structure, but it can also withstand heavy loads, depending on the depth and properties of the soil |
| Necessary for the installation of light structures. Looks great when you need to create several compartments of the bath, for example, for the main compartment and the pool |
| Recently, this is a common type of foundation for baths. It requires minimal labor and material costs, but is suitable only for one-story baths. A pile foundation can be used even with a heavy building structure and a high level of groundwater |
| They are rarely used for baths, but if you want to create a building on heterogeneous, quickly freezing or flooded soil, it is very difficult to do without them. |


Foundation materials
| Name | Explanations |
|---|---|
| These are limestone, shell rock in solid fractions, but also sandstone. |
| The foundation can be constructed in one piece or consist of separate blocks, that is, be prefabricated. |
| These elements are used for pile foundations. |
| When choosing, you need to make sure that it has a sufficient degree of firing. |
| Usually used only for wooden baths. |


Rules for the construction of foundations for a bath
According to the construction methods, the foundations are divided into the following types:
- industrial. They are built from separate blocks or modules;
- non-industrial. They are produced simultaneously, directly during the activation of construction work.
Building regulations
| prescriptions | Explanations |
|---|---|
| Before digging trenches or other recesses, it is necessary to clean off the top fertile soil layer. When it is planned to build a blind area or additional bath buildings, the soil is cleared under them once. If you ignore this rule and leave the topsoil intact, then after the foundation is erected, the plants can rot, and when a wooden structure comes into contact with the soil, there is a risk of damage to the building material, up to the need to completely replace it, which is a laborious process. |
| After removing the top soil, a significant depression forms under the future building. If a strip foundation is being created, new soil must be filled into empty areas. You should choose cleared land that does not contain debris and organic residues. If an underground is additionally formed, then they use the same method so that when the water level rises, there is no flooding of the bath building. |
Digging a trench for a strip foundation according to a template | Recesses and trenches break out to a certain depth. The exact size of the deepening is determined by the properties of the soil, the level of seasonal rise in groundwater, and the strength of soil freezing in the cold months. For each area there is a certain depth where the soil freezes to 0 °C, and for clay soils to -1 °C. To accurately know the depth of soil freezing in a particular area, it is enough to order geological surveys. If the trench is up to 100 cm deep and up to 60 cm wide, its sides must be completely vertical. When the depth is greater than this mark, the decision is often made to expand the faces upwards. If the ground is unreliable, temporary formwork can be installed, which must subsequently be removed. |


Foundations, located along the perimeter of the walls, and sometimes partitions, have the shape of a tape. They are made not only from reinforced concrete mix with reinforcement. Reinforced concrete blocks, which are stamped in the factory, bricks are actively used. The material is selected depending on the type of soil and the features of the entire design of the bath, including its shape, dimensions and weight. In frequent construction, strip foundations are made of rubble concrete, since the basis of their design is natural stone, which is densely poured with concrete mixture.


If the soil is not reliable or its properties are dangerous for the building, it is necessary to use a monolithic reinforced concrete foundation, which is a reliable foundation and a barrier to the movement of soil layers or floods, if it is properly deepened and located during construction.

When the soil in the area where the bath is being built is guaranteed to be safe, you can safely create a shallow strip foundation, as it is also able to withstand significant loads. The smaller the foundation structure, the cheaper and easier it is to build. For most baths, a shallow foundation is optimal and completely safe.


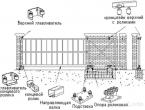
Symbols on the image:
- a - a rectangular foundation through the wall;
- b - stepped;
- in - rectangular under a wall from a bar;
- g - foundation wall for the underground;
- e - prefabricated structures made of reinforced concrete blocks.
The dimensions of strip foundations for baths with any number of floors are approximately the same. The loads that are transferred even from a three-story bath to the base are not very large, while the area of \u200b\u200bthe foundation is often several times greater than that necessary to support the weight of the structure.

The width of the sole is determined depending on the type of foundation:
- rubble - more than 60 cm;
- reinforced concrete and others containing a significant percentage of concrete - more than 40-60 cm;
- brick - 51 cm.
These parameters must be maintained, as they provide ease of use and the possibility of trouble-free dressing of stones located in the vertical direction.

Foundation for strip foundation
To ensure the durability of the strip foundation, it is necessary to install it on a sand cushion. Typically, a layer of sand in height should be more than 20 cm, which should be taken into account when digging a trench. If the soil is recognized as heaving, the sand cushion can be placed more than 60 cm, since it limits the impact zone on the foundation.
 Sand cushion - scheme
 Excess water leads to the opposite - loosening of the soil cushion
Typically, building codes provide for compacting sand when backfilling the base by pouring water. If you perform this action on soft soils, significant erosion of the base is possible. When the foundation is installed on silty soils or loams, it is advisable to fill in pre-moistened with water, that is, weighted sand.

An alternative to completely sandy can be sand and gravel bedding, which is made up of sand and gravel in a ratio of 4:6. Weak soils affect not only the features of the formation of the foundation for the foundation, but also the construction of the strip foundation. The entire internal surface of the trench must be completely insulated with geotextile prior to sand bedding. This feature during construction will help protect the sand bed from mixing with silt or erosion during the rise of groundwater to a high level.
Video - Sand cushion under the foundation

 Formwork installation - scheme


Formwork is mounted in a pre-prepared trench. It is necessary to protect the exact contours of the foundation and prevent its spreading. To do this, pegs are driven in along both edges of the trench, which insure wooden shields, beams or metal ceilings from falling. It is also possible to install fixed formwork. In this case, after the end of the work, it remains in its original place and can act as the front part of the foundation.
For arranging removable formwork, not only wooden structures are suitable, but also slate, plywood and other sheet materials that can be placed along the trench in an even row. A roofing material is laid inside the formwork, which is a waterproofing for the foundation.


Video - Wooden formwork

It is desirable to perform foundation reinforcement when creating any bath, even a small economy option design, since excessive strength will help the foundation survive for many years. A frame consisting of several faces is enough.

Before mounting the reinforcing cage, it is necessary to substitute chairs for reinforcement or stable stones under all elements standing on the lower surface. The reinforcement cannot be installed directly on the sand cushion, since when pouring concrete, all faces must be covered by it in order to ensure maximum structural strength.

Dense reinforcing bars are driven into two rows. Perpendicular to them are long, but thinner elements, which are fastened with vertical stripes at all joints. For this, welding or a special wire is used.

Manual for SNiP 2.03.01-84 and SNiP 2.02.01-83. Download file
Rebar prices
fittings

The proportional composition of the concrete mixture is calculated after the acquisition of the cement powder, since its strength characteristics vary depending on the brand of all components, their class, as well as the presence of additional elements in the composition of the mixture.
A common scheme is usually used, in which cement, sand and gravel are mixed in a ratio of 1:3:5. Water is added as much as necessary to create a complete mixture, however, it should be remembered that the proportional ratio of water to cement is 0.5.
dry concrete prices
dry concrete
Video - Preparation of concrete for the foundation of the bath

The mixture is placed in the formwork immediately after the end of its preparation, as it is able to quickly harden. It is necessary to release bubbles from the cement composition in parallel. For this, a shovel or an ordinary stick is used, but if possible, it is worth buying or renting a deep vibrator.


To ensure that the concrete is positioned correctly without the initial formation of significant air pockets, it is necessary to tap the formwork along its entire length. If the concrete mixture is poured in the cold or rainy season, then immediately after it is placed in the formwork, the concrete should be covered with plastic wrap, insulation should be placed on it, and the structure should be carefully laid on top with high-quality waterproofing.

The formwork can be removed until the concrete has completely hardened. Usually it is enough to wait a week or a little less.


The columnar foundation is designed for heavy loads that are carried out on it from wooden structures or under the action of brick baths. The depth level is calculated individually. The parameters are affected not only by the severity and length of the building, but also by the natural conditions of the area in which the construction is carried out. A shallow strip foundation can be safely used if predominantly sandy soils are located, and groundwater is at a considerable depth, floods are not typical for the area.
When should a columnar foundation be erected?

Column foundations can be chosen for most baths. The exception is buildings for which it is planned to create basements or underground. When it is necessary to save on construction, a columnar foundation should be built, since it is much cheaper than a strip foundation, and its construction is not difficult.
It is only necessary to clearly measure the depth of the columnar foundation if the soil on the site is prone to heaving. Reinforced concrete pillars must fall below the level of maximum freezing of the soil so that there is no risk of the bath being skewed. It is advisable to deepen them taking into account the most severe frosts, and not focusing on averages.

Materials for creating a columnar foundation

Column-strip foundation with a base for a furnace
The foundation is formed from many small pillars on which the entire structure rests. In some cases, large natural stones serve as supporting pillars. They are placed in the corner parts of the log house, and in between it is allowed to use smaller stones.


In most cases, reinforced concrete blocks are used, which can be purchased in advance or built independently directly during the construction of the foundation. Recently, builders have learned to skillfully use bricks or asbestos-cement pipes as poles, which is a very relevant and convenient idea. In this case, these materials are first placed in the ground, and then poured with a concrete mixture. Formwork is necessarily used, a frame of several reinforced concrete rods is provided in each recess.
Creating a column foundation
The construction scheme of the columnar foundation practically does not change, regardless of the material chosen.
| Stage | Description |
|---|---|
| For this, a drilling rig is used. It turns out a small well. |
| The resulting space is filled with sand to a level of about 20 cm. |
| The sand cushion is compacted by pouring water into the holes. |
| When the pits are dry, the chosen material for the posts should be placed in them. Usually these are reinforcing bars, after installation of which concrete mixture is poured into the recesses. |
| Outside, reliable waterproofing is used for the pillars. These are volumetric layers of roofing material and bituminous mastic, which are used in several steps, that is, they form several alternating rows of coverage. |


Pillars must be installed in the corners of the structure. Sometimes the bath has two separate rooms connected by a small partition. In this case, the corners of all departments are taken into account. Also, poles are needed at the intersection of internal partitions. Along the entire perimeter of the walls, you can place poles of a slightly smaller or the same length at a distance of 1.5 m to 2 m from each other.

A shallow foundation can be designed both from monolithic concrete and when using a brick structure. Pillars are often installed, the walls of which gradually narrow.

Often, a columnar foundation is made from a mixture of concrete, which is poured either into a hole with reinforcing bars inserted, or into an asbestos-cement pipe, which is a kind of structure frame. Less commonly, columnar foundations are made from pre-prepared blocks that have undergone factory processing. They also need a sand cushion.
If the building has a heavy structure or the terrain is characterized by unreliable soil, it is possible to organize a grillage, which is made in the form of a reinforced concrete belt. It is a structural link that unites all elements. Usually, a grillage is necessary when building a brick bath, but it is often used for a wooden one.

Column foundation - the nuances of arrangement

The technology for creating this foundation involves drilling wells. You can make recesses both using a special installation and manually. For wells, the optimal diameter and depth are pre-assigned. The holes are then reinforced and filled with concrete.

Supports should be placed under the walls of the bath and often along the line of its partitions. Their number is calculated taking into account the total load created from the building. The diameter of the piles supporting the outer frame and located inside is different. The width of the internal supports is influenced by the total load from the floor, partitions and other elements inside the structure.
You can manually create pits with a maximum depth of 3 m. If the design of the bath has a significant load or the work is done with heaving soil, a drill should be used. With the help of this installation, wells of 5 m in depth and more are created. If the bath is being built in areas where the supports have to be buried at a distance of more than 6 m, it is necessary to use an electric or motor drill, since a manual one will not cope with this task.
Video - Column Foundation
Reinforcing and concreting the foundation
It is necessary to choose roofing pipes. Their length is always greater than the depth of the wells, since they must come out of the ground for a considerable distance. The upper sections of these structures are formwork. To do this, they are wrapped with roofing material in 3 layers and connected with a thin steel wire.

When the formwork is formed, it must be lowered into the finished well. Sometimes groundwater is visible in the wells. If their level does not exceed the surface of the earth, you should not worry, since pile foundations are designed specifically for those areas in which floods occur or the groundwater level is too high. If water accumulates so much that it exceeds the level of the well, it must be pumped out using a special pump. Only after the elimination of water from all the pits can concrete be poured.


The roofing material serves as a protection of the pillar from destructive processes. If you do not use these pipes, there is the possibility of some inconvenience.
- When there is not enough cement laitance in concrete, the setting and hardening of the structure is problematic, because if there is no roofing material pipe, part of the cement laitance is transferred to the surrounding soil.
- Symmetry is not observed in the walls of the foundation supports. Only with the help of a roofing material base can you make them absolutely even. If irregularities are left unchanged, destruction of these areas is possible due to the action of low temperatures in winter.
Reinforcement of the pile foundation for the bath is carried out using rods with a diameter of approximately 6 mm. They must be connected to each other with special crossbars. When arranging the rods, it is necessary to take into account the height of the future grillage, since the reinforced concrete rod should be slightly lower than it. This will ensure proper connection of structural elements. To lower the level of reinforcing bars, it is enough to deepen them a few centimeters into the ground.

The concrete mixture is poured in batches. It should be measured so that each time the layer does not exceed 5 m. Concrete must be compacted in wells. Vibrators are used for this. It is necessary to pour the entire foundation in a short time so that it dries evenly.


Prices for roofing material
ruberoid
Creating a grillage
When erecting a pile foundation, two types of grillages are used.
- Monolithic.
- Consisting of reinforced concrete structures.

For the correct construction of the grillage, it is necessary to follow some rules.
- The height of the foundation is over 3 meters.
- The width of the grillage should be similar to the thickness of the basement structure if the piles are standing in the same row. When the piles are spread apart, to determine the width of the grillage, the thickness of the walls on the first floor is estimated. It should be remembered that the width of the structure cannot exceed 4 meters.

Rostverk - photo
When the grillage is assembled from several components, special attention must be paid to the correct fastening of the piles in the head. During concreting, another object is connected to the grillage - a special rod with the shape of the letter T. The pile head must be covered with an additional reinforcing rod with restrictive plates.

The plates should be slightly thicker than the piles. The height of the head is optimal in order to be able to horizontally cover the pile and the section of the grillage to which the structure is mounted. When all the parameters are met, you can start concreting the joint. All reinforcing elements that go beyond the structure must be attached to the mounting loops by welding. At the end of the work, the formed seams must be filled with cement mortar or concrete.
The level accuracy of the grillage affects the possibility of safe wall construction. If it has a significant skew, it is necessary to level it by adding a layer of cement in the necessary areas. Before completing the construction of a pile foundation for a bath, it is necessary to measure all its sides and check their compliance with the originally planned parameters.

This is the most reliable and easiest type of bath foundation to manufacture. It requires high-quality materials, since more requirements are imposed on a monolithic slab than on other structures. The work process is not complicated, many developers are pleased that there is no need to use construction equipment.
| Stage | Description |
|---|---|
| Usually, a pit is dug for a monolithic slab with an allowance for creating a special cushion of gravel or sand. The surface needs to be exactly level. Creation of slopes is prohibited. If you neglect this rule, the foundation is guaranteed to undergo cracking and deformation. |
| To create formwork, it is necessary to select boards of at least 25 mm thick. They are installed with supports. Before laying the reinforcement, it is necessary to check the rigidity of the fasteners so that after pouring the concrete there is no deformation or destruction of the formwork. |
| Drainage is created for subsequent water supply and sanitation. Layers of waterproofing are applied to the sand cushion, if necessary, insulation. When using the latter, care should be taken that it is covered on both sides with a material that does not allow moisture to pass through. |
| The reinforcing mesh is knitted with the use of reinforced concrete rods of various sections. Initially, it is necessary to provide a base on which the reinforcing cage can be placed. It should be remembered that it is impossible to lower the reinforcement into the pit directly on the insulating layers. When pouring concrete in this case, the mixture will not cover the lower edges of the reinforced concrete mesh, which will significantly reduce the strength of the entire structure and may lead to cracking of the foundation. Special chairs for fittings are installed on the surface of the pit. It is advisable to use these elements. Volumetric bricks and other rigid structures can be an alternative, but it is very difficult to attach a reinforcing cage to them. The widest reinforcing bars are selected. They are necessary for the installation of a vertical row. To make it convenient to work with the structure, you can immediately install all the rods on the chairs for fittings. Horizontal frame elements are laid out in 1-3 layers, depending on the depth of the foundation. The distance between the layers can be made from 10 cm, since a tighter fastening is rarely justified. At all intersections, the reinforcing bars are fastened by welding or steel wire. |
| You can independently create a concrete mixture, guided by a common recipe. Crushed stone, sand and cement are mixed in exactly the proportion of 5:3:1. If this work seems too long, you can purchase a ready-made mortar, which is sold dry. To dilute the mixture, both self-preparation and factory preparation, it is necessary to use water. The exact framework is not determined, however, the concrete should be brought to a consistency resembling low-fat sour cream. Immediately after dilution, it is necessary to start pouring the mixture. It is very difficult to do this manually. If necessary, the work is carried out in several stages, that is, in layers. This technique negatively affects the strength characteristics of the foundation, however, it is allowed in building codes. It is advisable to use special equipment. The device can be rented or borrowed from friends. In this case, the device will take the finished mixture from the mixer and feed it to the object using a tray. During the pouring of the concrete mixture, it is necessary to work in parallel with a deep vibrator. With its help, the structure becomes strong and even, as excess air is removed in time. It is impossible to do without this measure. |
| After pouring the foundation, you must wait 24 hours and moisten it. This requires a sprinkler. It is forbidden to flood the structure with a strong jet of water. If the work is carried out at low temperatures, the foundation must be covered with a waterproofing polyethylene film. The slab foundation dries for a long time. It is advisable to refrain from further construction work for 3-5 weeks. |


Anyone can pour the foundation under the bath with their own hands. To do this, it is necessary to choose the appropriate type of construction, correctly carry out all stages of work and use only high-quality materials. If the foundation is poured carefully, all building codes are observed, the base of the bath will be strong and durable.
Video - How to pour the foundation under the bath with your own hands
Your own bathhouse in your backyard is not only a sign of a zealous owner. It has a direct practical application. A bathhouse built with love will be invariably popular not only with the owners, but also with the guests.
As well as any capital structure, the construction of a bath begins with the construction of the foundation. Pouring the foundation, it would seem, is the simplest operation in construction. But not everything is as simple as it seems.
As in every business, there are subtleties and nuances here. This article is just for those who want to learn how to build a foundation for a bathhouse with their own hands.
The main types of foundations in the construction of baths
The construction of the foundation of the bath, as, in general, of any other structure, should begin with determining the type of soil. The type of foundation to be applied will depend on the type of soil.
In order to understand for yourself how to build a foundation for a bath with your own hands, you should consider in detail all their types and features of use.
- Columnar - the simplest type. It can be used for hard soils that are not subject to displacement, landslides, etc. If your site has clay soil or fine gravel, this foundation will suit you perfectly.

- pile foundation used on swampy soils or soils with low density, such as sand.
- Tape. Traditional type of foundation. Great for almost all types of soil.

- Screw. It is used in areas that have a difficult terrain or tend to subsidence.
- bored foundation It is mainly used for the construction of buildings on slopes and soft soils. It is considered one of the varieties of columnar, however, in comparison with it, it has greater strength.
- Monolithic slab it is used only for very difficult types of soil or severe climatic conditions. The price of such a foundation hurts. In this case, it makes sense to think it over very well. Perhaps the construction of a temporary, for a year or two, the structure will be more justified.

In the photo - pouring a monolithic foundation
Before making a final decision on which type of foundation to give preference to, it should be borne in mind that brick, block and frame types of structures require a strip foundation. If you are planning to build a traditional log Russian.
The main thing when constructing a columnar foundation is the correct calculation of its depth, otherwise you will simply be tormented by repairing the building.
We build a strip foundation for a bath
The foundation is the basis of the whole structure, so it is very important to observe the accuracy of this process, since in case of error it will be very difficult to correct it. In addition, this error can appear already at the stage of installing the roof, and even worse - during operation. This, for example, is uneven settlement and, as a result, the occurrence of cracks in the walls, and even the complete destruction of the building.
Not every site owner knows how to properly build a foundation for a bath. The whole process of the device is divided into several stages.
Each of them is important in its own way. Our detailed instructions will help you deal with them.
The pouring of the foundation can be divided into several stages:
- preparation and clearing of the territory;
- marking and land works;
- foundation cushion device;
- production of formwork and reinforcement of the foundation of the future building;
- direct filling.
Preparation
At the preparation stage, it is important to carefully study the project and clear the territory. This is necessary for convenient access to equipment and proper marking. Even if you are going to pour the foundation by hand, you will still need a place to store materials and mix concrete.

The space for construction should be cleared of debris and large stones. Uproot stumps, shrubs, remove extra trees, if any. If the area is uneven then the surface should be leveled with shovels, rakes or a bulldozer.
Marking and earthworks
For marking, you need two people, a long tape measure, a skein of twine and pegs. It is important to remember that any foundation consists of rectangles. To build a right angle on the ground, just a tape measure and elementary knowledge of geometry are enough.
In a right triangle, the sides are related as 3x4x5 i.e. if you have 3 meters on one side, then you should set aside 4 meters on the second, and the distance between these marks should be 5 meters. In addition, you can check yourself - the diagonals in the rectangle must be equal.

In earthworks, everything is simple - we take a shovel and dig, throwing the earth away so that it does not crumble back into the trench. Trench width - the width of the shovel i.e. 20-30 cm. The walls of the trench must be kept vertical.
If the soil is sandy, in the process, you can moisten the walls of the trench with water so that the earth does not crumble back into the pit. Trench depths of 60-70 cm are more than enough.
![]()
Making a pillow
Here it is worth contacting a specialist. He will advise what to make it from, depending on the soil on which the bath will be built. If there is no specialist “at hand” and the soil is not super difficult, we arrange the pillow ourselves.
To do this, we fill the bottom of the trench with coarse sand. The thickness of the sand layer is 20-30 cm. The pillow must be well compacted.
Formwork and reinforcement
Next, we mount the formwork. Usually, the formwork is made of boards, with which the concrete will be covered from spreading. Its height should be greater than the planned height of the foundation, and the boards should be thick enough to withstand the pressure of concrete.
You can also use used plywood, OSB or chipboard. From the outside of the formwork we hammer pegs. For strength, it is possible to bandage the formwork on top with slats every 70-100 cm.
In the presented video in this article you will find more information on this topic.