How to make sliding gates - expert advice. DIY sliding gates. Drawings, design diagrams How to start making sliding gates
Swing gates are good for everyone: they are simple and cheap. But in winter, with a lot of snow, you can open them only by thoroughly working with a shovel. When you need to go to work, it's not at all happy. Retractable or, as they say, sliding / sliding gates are deprived of this drawback. The one-piece structure, covering the entire entrance, drives off to the side, hiding behind the fence. They can stay on a regular or cantilever beam, or they can simply ride on rails. In any case, you can make sliding gates with your own hands. It's not exactly easy, but it's possible.
Constructions
Which is better
Which design is better is hard to say. If we talk about reliability, then the best choice is a suspended structure. Everything is easy and reliable, almost indestructible system. Gates of this type have been operated at enterprises for decades. Their disadvantage is that the beam limits the height of the incoming transport, which is sometimes important. But today there are models with composite beams that allow you to remove the jumper over the entrance with the gate open, and then return it to its place.
The cheapest and easiest to implement is the rail system. These sliding gates are the easiest to assemble with your own hands. But the problems that arise during operation make it unpopular.
Of all the above structures, the most expensive and difficult to perform is the cantilever, however, it is the one that is installed most often: correctly made, it does not cause inconvenience during operation. When choosing, you need to keep in mind that when it is arranged to the right or left of the gate, a distance of one and a half times more than the width of the leaf is required: in addition to the sash itself, there is also a technical part that protrudes from the side by about half the length.
The types of sliding gates, design features and construction are discussed in detail in the video.
How to make a cantilever sliding gate
This design is good because there are no beams above the driveway. But it is the most expensive in the device. The point is not so much in the system of rollers, but in the need for a foundation with metal mortgages, to which the cantilever beam will then be attached. If there are already pillars, the foundation is poured in front of it and along the fence to the length of the technical extension, which is necessary to compensate for the load created by the canvas.

Even if they make cantilever sliding gates with their own hands, a kit consisting of a guide beam, rollers, end rollers and traps is usually bought from a company. All spare parts are calculated based on the dimensions of the canvas, the material of the frame and the type of sheathing: weight is essential. Therefore, it is desirable to decide with all these parameters in advance.
Knowing the length of the supporting beam, you can calculate the required size of the foundation. By type, this is a strip foundation, a foundation pit is dug under it below the freezing depth of the soil (it has its own for each region), in which reinforced supports are laid under the plates with rollers, and racks are also installed. A set of upper rollers is then attached to these racks, holding the canvas and preventing it from swinging.
How to calculate the foundation for fixing a cantilever beam
There is nothing difficult in the calculation. The length of the foundation is almost half the length of the span. If the span is 4 meters (the width of the passage or the distance between the pillars), then the foundation should be 1.8-2 m. Its width is 40-50 cm, the depth is below the freezing depth of the soil for the region.

The pit is dug another 10-15 cm deeper - under a gravel-sand cushion. This foundation is reinforced (by type), in its upper part a channel (18 or 20) is welded to the reinforcement, and all this is poured with concrete. The channel is set to the “zero” level, that is, it must be on the same level with the ground level or the material with which the yard is finished.

There is a cheaper and faster option, but in terms of reliability it is inferior to the one described above. Three screw metal piles are screwed into the ground, a channel is welded to them.
Installation of roller bearings
Studs are welded to the embedded channel, then platforms with rollers are attached to them on bolted joints. Sometimes you can find options when the platforms are welded immediately to the mortgage. It is not right. There is a fairly high probability that the foundation or fence post will shrink. Even a small shift - and your gate will not work. If the rollers can be removed from the studs, the studs can be digested and everything put back together, then how to correct if the platform is welded? Cutting down? Difficult, long, no guarantees. So in this case it is better to do everything according to the rules.

When buying, pay attention to the roller carriages and the rollers themselves. These are necessarily sealed rolling bearings. They are usually arranged in two rows of 4 pieces each. The lubricant in them must be frost-resistant - the lower temperature limit is -60 ° C. Examine the platform on which they are mounted. It should be steel, cast, good metal with a galvanized surface, coated with a protective lubricant.

Roll rollers. Everyone should ride effortlessly, and should not have play (should not wobble from side to side). Then you can be sure that the gate will move easily and the sliding mechanism will work for a long time (some companies give a guarantee of 10 years). After all, most of the load falls on the rollers, because their quality is a key point, as is the balanced design of the canvas.
The remaining stages of installation will be more clearly described in the photo report: the gates were assembled independently, without the involvement of specialists.
Do-it-yourself sliding gates: photo report with explanations

These gates are made on the basis of a ready-made kit, they made the frame themselves, they also mounted it themselves
The gates were placed in Moscow, respectively, the prices are capital. They were installed in 2010, since then the kits have become much cheaper. For example, the “fresh” price of a drive for a web weighing no more than 400 kg (up to 1.2 tons is available) is about $ 100, but this is a budget option. During construction, components from Rolling Center (the best on the market at that time) with a 6-meter-long drive beam were purchased. The top catcher and bracket were also ordered separately. Everything cost about $600 including shipping.
The following items were also purchased:
- profile pipe 80*60 mm - 6 m, 60*40 mm - 18 m, 40*20 mm - 36 m;
- channel - 180 mm - 3 meters, 200 mm - 2.4 meters;
- reinforcement 12 mm - 6 m;
- electrodes - 2 kg;
- paint - 3 cans, brushes, rivets;
- cement M-400 - 5 bags;

First of all, we welded the frame for the gate with a counterweight. The frame (in black) was made from a profile pipe 60 * 40 mm, jumpers and the inner frame (lilac) from a pipe 40 * 20 mm. At the bottom, a guide beam is welded with a cut down.

The inner frame was welded indented from the edge - 20 mm on each side. So it is more convenient then to fix the profiled sheet, if desired, you can sheathe it from the inside.

First, the foundation was poured. Reinforcement was installed in it, on top of the channel with the back up. Close to the channel are two racks made of profiled pipe 80 * 60 mm. One stand is adjacent to the post, the second is set vertically at a distance of 120 cm. Then rollers are hung on them, which hold the canvas from above. On the other hand, a 180 mm channel was installed along the counter post.


Catchers are fixed on the counterpart to the channel at the top and bottom, which will not allow the gate to hang out in the wind.


The next step is to install the roller plates. They are attached to mortgages. In this case, it is a channel, because the space turned out to be large. When they made the foundation, they made it too high, because the plates were welded directly to the mortgage. This is impractical: if the roller breaks, it will be problematic to change it. Usually a platform is welded, to which a platform with rollers is then bolted.

Roller platforms are welded and they are “run over” by rollers
The finished gate frame is simply rolled onto fixed rollers.

After installation, plugs are put on the support beam at both ends. On the far side, a thrust wheel is also installed, which, in the closed position, drives into the lower trap, lifting the gate and removing the load from the rollers.

Now, so that the gate does not “walk” in the upper part (they are not fixed by anything now), sets of upper rollers are attached to the racks (80 * 60 mm) - one per rack. They are practically put on the frame. Now the rollers inside will hold it at the top.


All do-it-yourself sliding gates are assembled and ready for operation.
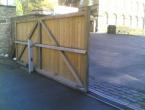
What do sliding gates look like from the yard
If you have any questions, watch the video. A ready-made kit is assembled in it, the whole process will become clearer.
Video
Several videos with different designs of sliding gates. The first is cantilever on the middle beam. There will be no problems with snow, but the appearance from the yard is below average.
Economy option: sliding gates for summer cottages. The design is extremely simple.
Another do-it-yourself option. Here in the pipe 60 * 60 mm, propylene clearance, into which the rollers are inserted. The design is taken standard, assembled from different components.
Sliding gates have long been used only in industrial buildings, as it was believed that their design is complex. With the advent of new technical solutions and a wide selection of components, they began to gain popularity among developers. Now the installation of sliding gates is so simplified that their installation is available for do-it-yourself.
Sliding gate device
sliding gateThe design of sliding gates consists of a plane, or panel, which has the ability to move in a horizontal plane on rollers. Such gates are also called retractable or sliding.
Such a structure allows rational use of space: there are no overall doors, as in swing gates. The structure moves along the fence, so a minimum area is required for its operation. The device does not require laying rails, which eliminates contact with the ground surface. This is important in winter when it snows.
The standard design of sliding gates provides for mechanical opening and is available for independent execution. Modern designs are equipped with an automated drive, which makes their use more comfortable, but significantly increases the cost.
Ease of operation of such gates, as well as their reliability and durability, determine the wide popularity among developers. The design can be assembled from materials of different cost and texture, which makes it possible to create original gates without loss of quality and functionality.
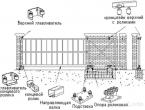
 Element names
 If a decision is made to build gates equipped with automation, then you can easily purchase ready-made units at specialized outlets. Management of such systems occurs in manual or remote modes. Install circuit breakers for general protection, mount an alarm that works synchronously with the drive.
Choice of gate details
The right choice of accessories for sliding gates during self-assembly determines the reliability and durability of the structure. The gate consists of the following main elements:
- roller carriages;
- guide;
- holders and traps.
 sliding gate
 Before choosing sliding gate fittings, determine the space required for the sliding door. The choice of material is influenced by the load, it depends on the dimensions and weight of the product.
Sliding gates are classified depending on the size of the opening and weight:
- small (width up to 4 m and weight up to 0.4 t);
- medium (up to 6 m and 0.6 t);
- large (from 6 m and over 0.6 t).
If the gate belongs to the category with a weight of up to 400 kg, then the use of light materials is allowed: corrugated board or siding. There are no additional hardware requirements. With a massive door structure, reinforced auxiliary elements must be used.
A mandatory requirement for the frame is its rigidity. This is due to the fact that in addition to the usual loads there is an increased windage. In order to reduce the mass, a profile pipe is widely used, and when choosing a web material, they are guided by its ability to withstand its own weight without deformation.
Foundation pouring
The installation of sliding gates requires the construction of a foundation. Its construction begins with markup. To determine the length of the base, measure half the size of the opening from the extreme point. The width of the foundation is taken about half a meter.
If the design of the fence is thorough, then its pillars can be used as supports. Otherwise, mounting of a reciprocal support is necessary. Moreover, a pit for it is made adjacent to the inside of the fence, but without reducing the width of the opening.
If you plan to install automation, then it is necessary to provide for the laying of a power cable. According to the rules of safe electrical work, it is placed in a pipe.
When excavating soil for the foundation, the freezing depth is taken into account: the foundation pit is carried out below this level.
It is recommended to build a base, which is based on an embedded part. Channel No. 16 is used as it, to which pieces of reinforcement with a diameter of 12 mm are welded at a right angle. Then a lattice of reinforcement of the same size is welded to the structure.
After assembling the embedded element, it is immersed in the pit so that the free ends of the reinforcement are directed downwards. In this case, the end of the channel should be in close contact with the fence post. The work is carried out with constant control of the horizontal position of the channel.
The installation of the embedded part takes place taking into account its position in relation to the horizon of the road surface. If they are on the same level, then the distance from the bottom of the canvas to the road surface will be about 100 mm. If necessary, it can be slightly increased using special linings for adjustment.
Reducing the gap will lead to an unacceptable violation of the fastening technology.
With an opening width exceeding 4.5 m, the installation of two supporting pillars is required. This will provide the necessary rigidity of the structure and will make it possible to work in conditions of high windage of the canvas.
The posts have a height equal to the distance from the foundation to the top of the gate plus 50 mm. To increase rigidity, the lower part of the supports and the mortgage are connected by welding.
During the pouring of concrete, the embedded part must not be completely covered. After that, it takes about three weeks for the concrete to harden and gain operational properties.
Step-by-step installation instructions for sliding gates
 Roller carriage
 First, they indicate the path along which the gate will move. A stretched cord acts as a beacon. It is positioned so that the distance from the roadway is 200 mm, and 30 mm recede from the location of the response post. In this case, the cord plays the role of a guide for the correct location of the carrier profile.
The carriages with rollers prepared for installation are inserted into the bearing profile and shifted towards the central part of the door. Then the sash with carriages is installed in the embedded channel. After that, the supports are installed and adjusted so that they touch the cord. In this case, the parallelism of the relativity of both surfaces must be observed.
Fastening roller trolleys to the channel
When installing sliding gates, a crucial step is the correct fixation of the roller carriages. During this process, the following procedure must be observed.
The platform for adjusting the second carriage is connected by welding to the channel.
After that, having rolled out the gate into the opening, the actions are repeated and the platform of the first roller bearing is mounted.
The roller carriages are dismantled from their supports, which are then also removed from the platforms intended for adjustment.
After that, the mortgage is welded along the perimeter with the adjusting platforms and the roller supports are mounted to them. After that, the supports are connected and attached to the canvas.
To adjust the structure horizontally, the gate is completely closed.
The process consists in screwing or loosening the fastening of the platform with a wrench, which leads to a change and acceptance of the required position by the structure.
 Roller carriages and fittings
 Free play adjustment
The roller supports are adjusted by loosening the nuts connecting the part to the adjustment platform. After loosening the fastening, it is necessary to move the gate several times in the closing and opening directions. In this way, the supports find a position that corresponds to their unhindered and easy movement. At the end of the adjustment, the previously loosened fasteners are securely tightened.
Mounting the end roller and plugs
The location of the end roller is the front side of the profile. For its fastening, a bolted connection is used.
The set of sliding gates has a plug, which is located on the rear of the profile. Fixing it is carried out by welding. The function of this element is to prevent the penetration of foreign objects and precipitation into the cavity of the bearing part, which makes it possible to achieve trouble-free operation of the mechanism.
To install the upper guide, you must first loosen the fastening of the rollers. After that, the bracket is mounted with the rollers and the top of the blade touching so that the mounting holes are facing the support post. The parts are pressed against each other and secured with a threaded connection.
Sheathing the door leaf with a profiled sheet
Having completed all the activities described above, you can begin to install the corrugated board on the frame, which is a frame. Before this, the marking and cutting of sheets is carried out, depending on the dimensions of the sliding gate.
 Gates sheathed with corrugated board
 The front edge of the gate is chosen as the starting point for attaching the profiled sheets. Self-tapping screws or rivets are used as fasteners. Moreover, the latter are preferable, since they are less susceptible to corrosion. The sequence of laying corrugated board implies the imposition of subsequent waves into the previous sheet.
Installation of traps
The final step in assembling sliding gates with your own hands is the installation of traps. The lower one is mounted after the gate is fully assembled, that is, when exposed to maximum effort. It takes on some of the loads, which facilitates the work of roller bearings. The place of its installation is determined with the gate completely closed, while the catcher and the end roller must be aligned.
The task of the top catcher is to prevent the web from swaying due to wind. The position of the protective corners serves as a reference for the place of its installation. In this case, the latter are installed so that the brackets of the catcher touch them.
 Do-it-yourself gate installation
 Self-installation of automation
Do-it-yourself installation of automatic sliding gates requires general knowledge in the field of electrical engineering. If the existing knowledge is not sufficient, the accompanying documentation supplied with the drive will assist in this task.
Even during the design period, gate structures are determined with their type. In the case of installation of automatic gates, when pouring the base of the structure, cables are laid. For this purpose, special holes are made in the channel.
 Gate details (automatic)
 On the supports, the trajectory of wiring and placement of automation elements is marked. Further, the wires are mounted in accordance with the designated route.
An important parameter that determines the quality of the assembly of the structure is the gap between the gear and the teeth of the rack: it must correspond to the value specified by the manufacturer in the instructions.
When mounting the toothed rack, please note that it is delivered in a length of one meter. Therefore, when joining its sections, it is necessary that a whole tooth is obtained at the joints, which will prevent jamming when moving the web.
The crucial step is to connect the gate to the automation. It is recommended to immediately monitor the performance of the system during the connection of structural elements. If this is not done, then subsequently there will be difficulties in determining the area where the mistake was made.
There is a lot of incomplete information on the Internet on the installation of sliding gates with your own hands, after reading it, the progress of work or the installation of sliding gates is not particularly clear.
In this manual, we will try to visually demonstrate the installation of cantilever sliding gates from and to, and help you calculate the height and width of the gate for you.
To proceed with the installation, you need drawings, there is no one drawing for all gates, it all depends on the width and height of the opening in the fence.
Sliding gate fittings
The first thing you can start assembling the gate with is the fittings, but only after calculating the weight and dimensions of the gate, the fittings can be purchased separately or made with your own hands from bearings, the fittings kit includes:
- guide rail is usually 6 m long;
- 2 roller bearings
- 1 top roller bracket to avoid the swing of the gate;
- 1 end roller;
- 1 end roller catcher, so that the gate docks correctly during the wind and does not break the automation.


Additional accessories for fittings:
- Mounting and adjusting support for roller bearings.
- Mechanical lock.
- Rack toothed.
- Fastening element for toothed rack.
Now about the load. Sets are different, for different weights of the gate, see the table, it shows the dependence of the weight and width of the gate.
| Opening width no more | Gate weight |
| 4 m | 300 kg. |
| 4 m | 400 kg. |
| 4.5 m | 500 kg. |
| 6 m | 600 kg. |
| 10 m | 1000 kg. |
| 12 m | 1200 kg. |
These data will be useful to you when choosing accessories, but most craftsmen try to make all the details with their own hands, since the kit is not cheap.
To make the hardware yourself, you need to know where and why it is attached, read about it below.
How to choose quality fittings
The main part, the guide rail, the best choice would be the rail of the European manufacturer. A good quality item has a mirror-smooth surface and clear geometric shapes. The part must be galvanized, free of scale and rust on its surface. A quality guide has a metal thickness of 3.5 mm to 5 mm.
When choosing roller bearings, pay attention that they are made entirely of metal, plastic or rubberized ones will not last long. All geometric shapes of the metal must be correct, the slightest deviation indicates a poor-quality assembly.
As for the rest of the metal parts, they must be coated with zinc, the zinc shade must be uniform, the minimum thickness of the metal is 3-4 mm.
Sliding gate dimensions
The cost of fittings will depend on the size and weight of the sliding gate. The width is calculated in this way, another 50% of the width is added to the width of the opening in the fence. For example, you have an opening width of 4 meters, divide by 2, we get 2 meters + 4 meters opening width, the total length of the guide rail will be 6 meters.
To make it easier to understand and remember, I propose a formula and a diagram:
- B - opening width;
- A - counterweight length;
- L is the length of the guide rail.

After you have decided on the size of the frame, you can begin to manufacture it, the frame is made of a profiled metal pipe 40x40x2 mm and 40x20x2 mm for the inner crate. For aluminum frames, a profile from 60 mm is used.
It is better to make the height of the gate frame equal to the length of the corrugated board. Decking is better to choose tougher. Before fixing the corrugated board to the frame, drill holes in the frame half the diameter of the roofing screw, since the self-tapping screw may not drill the profiled pipe of the frame, blind rivets can be used instead of self-tapping screws.
The width of the lower profiled tube must match the width of the guide rail.
If you have a gate width of more than 4 meters, then it is better to use rectangular pipes to assemble the base of the frame!


The photo below shows how to properly make a frame for different widths of the opening.


Gate foundation
It is quite easy to determine the size of the foundation, since it has a length equal to 1/2 of the width of the opening, according to the formula:
- B - opening width;
- L is the length of the foundation;

If everything is simple with the length of the foundation, then with the installation we have many options.
The foundation can be made of the following materials:
- Monolithic U-shaped.
- Monolithic solid.
- From screw piles.
There are also small features in the installation of a monolithic foundation, you can use reinforcement welded to the channel, anchor bolts or long threaded studs.


Consider the option with a channel (power frame), it can be with one or two supporting pillars or without them, in both cases, the power frame is attached flush to the existing fence posts. The height of the supporting posts corresponds to the height of the gate itself + the height of the roller bearings. The use of two supporting pillars near the power frame is advisable for wide gates that are strongly swayed by the wind. If support pillars are not provided, then metal mortgages are made into the stone fence instead.


In the photo, laying the foundation.


Scheme without metal racks.


Location of carrier rollers


In order to evenly set the power frame on the opposite side, where the support post with the end roller catcher is located, retreat 10 cm (post thickness) from the fence and pull the cord to the last corner of the channel, along its entire length, the edge of the channel should repeat the line of the cord.
Gate installation and adjustment
After the load frame is ready for use, level the roller bearings, install the upper roller bracket, the installation depends on the design of the bracket.


To determine in advance where to mount the lower trap, a guide rail without a gate is put on the roller bearings. The lower trap is designed not only to hold the gate horizontally, but also to remove the load from the roller bearings; for this, the end roller must roll into the trap so that the gate rises 3-5 mm.


If, after installing the frame, the end roller sags a lot, adjust the roller bearings.
If everything is done correctly, but you have not achieved the correct operation of the sliding gate, then most likely you do not have a high-quality set of fittings, it is designed for a different weight, or the frame is assembled incorrectly, because of this, the gate sags heavily and cannot fall into the lower trap.
After all the above mechanisms are adjusted, you can proceed with the installation of automation. The video below shows how you can make an electric drive with your own hands.


Let's start with the gear rack, they are metal and nylon, metal is naturally better and more reliable. Their thickness varies from 8 to 30 mm. The standard rail size is 1 meter. For fastening, use the number of rails equal to the width of the opening + 1 rail for automatic limit switches. The gap between the teeth of the drive gear and the rack should be 1-2 mm. The rack is attached to the bottom tube of the door frame using a fastener for the toothed rack. Holes in the rail allow it to be adjusted in height.

In the picture there are two options for fastening the toothed rack, we do not recommend attaching the rack to the guide rail, during welding the guide may bend, if bolts are screwed into the guide, this can also cause difficulties during installation and during operation of the gate.
Fasteners are often welded, although there is a special C-profile for the rack for their fastening. Pictured below are both options.


If you buy an electric drive, then 4 meters of gear rack are included in the kit.
For those who do not want to spend money on a gear rack, it can be replaced with a bicycle chain or, as shown in one of the videos, a Zhiguli chain.
Gate automation
Both retractable and swing can open automatically. Their operation is controlled by a remote control and switches installed in the house, and possibly at the gate. One remote control can start not only the gate, but also the garage door, and even lighting. Automatic drives consist of an electric motor, a moving rack and a control device. They can be purchased as a separate device, although it is better to order them immediately with the gate. Then you will be sure that the drive was correctly selected and there will be no surprises during assembly.
Sliding gates require one motor to move the toothed rack attached to the bottom edge of the leaf. And for sliding gates, two cylinders are required, one is attached to each of the wings. The drive has a mechanism that allows you to open the gate in the event of a power failure. Modern drives can be powered by a battery charged from the mains or solar panels. The gates open automatically and require the installation of devices that ensure the safety of their use. Photocells are needed, thanks to which the leaves do not move when an obstacle appears in their path. A signal lamp installed in a conspicuous place will inform you that the gate is opening or closing.
Drive selection
When choosing a drive, it is important that the gears of the gearbox are made of steel or brass, but not plastic or silumin. The second important element is the limit switch, it controls the points to which the gate can be opened and closed, the limit switch can be mechanical and reed switch (magnetic), as practice has shown, the mechanical one can freeze in winter. As a rule, the quality of drive parts depends on its power, the higher the power of the drive, the better its assembly. As for the carrying capacity, it is indicated in the documentation.
Basic equipment of the drive:
- 4 meters of gear rack;
- photocells;
- signal lamp;
- remote control and receiver;
- mounting plate.
For those who do not know what photocells are for, they are 2 sensors that are mounted along the edges of the gate. When an obstacle appears between the photocells, the gate opens or closes, depending on how you program the automation.
Installation of automation


The first step is to weld or screw on the mounting plate for mounting the drive, it is supplied with the drive, it can be used to adjust the height and angle of the drive.


After mounting the drive, magnetic sensors, photocells and a signal lamp are mounted. As a rule, drives are connected to the network 220 and after software configuration they are immediately ready for operation.


Sliding gates are just the perfect option for a country house or cottage. They are comfortable, durable and reliable in operation. Now on the building materials market there is a very large assortment that is required for accessories for gates, so you can easily make sliding gates with your own hands. To do this, you only need a drawing, and in order to fully understand the principle of operation and take into account all the features of a sliding gate, you can watch a video clip or photo, which shows in detail how to make a sliding gate.
Description and principle of operation
Still relatively not so long ago, sliding gates were very rarely set up and the most common fence was simple swing gates. This explained by the high cost accessories for sliding gates. To date, a set of accessories for automatic gates has become much more affordable, and more and more homeowners are interested in how to install this design with their own hands.
Sliding gates for a private house can be of two types:
- Console;
- Rail.
The last option is an outdated variety; such gates can often be seen in factories. The most popular is the first option, which is now ubiquitous. These gates are equipped with an additional console, which is a continuation of the leaf. The console is located behind the fence adjacent to the gate and is hidden behind it.
The principle of operation of sliding gates of the cantilever type is as follows. A guide (aka a console) is rigidly welded to the frame of the sliding gate, due to which the leaf moves. The guide moves on retractable trolleys attached to the foundation.
Each cart equipped with 8 bearings with pressed metal or polymer rollers. Retractable trolleys are located inside the guides, which additionally protects them from atmospheric influences and prolongs the operating time.
Under normal conditions, the operation of the sliding gate system must withstand at least 60 thousand cycles - this is approximately 20 years of average use.
The main advantages of sliding sliding gates include:
- can be controlled mechanically or using automation;
- the possibility of passage of cars of any height (there are no guides at the bottom and top of the opening);
- ease of installation (you can mount sliding gates with your own hands);
- do not require additional maintenance.
The main disadvantage of installing sliding gates is the use of a rather large area for opening them. Often, due to lack of space, people refuse sliding in favor of swing structures.
Accessories
To install sliding gates with your own hands, you need to buy special accessories for mounting a sliding system.
Accessories for cantilever gates must include the following elements:
If automation is planned, then you need additionally purchase this kit, it consists of the following elements:
- Gear rack (it is desirable to choose a galvanized rack). For large (more than 5 m) and heavy gates, a toothed rack with a thickness of at least 9 mm is required.
- Reducer.
- Remote control.
- Photo sensors or light elements - they synchronize the arrival of the IF beam between the receiver and transmitter, prevent closing when an object is located in the opening.
- Base for mounting.
- Signal lamp.
Automation, installed from components of Italian and German manufacturers, is the most reliable and suitable for operation in various climatic regions.
When installing sliding gates with your own hands, you need to make provision for opening in the event of an automatic failure.
Sliding gate manufacturing
Let's consider in more detail how to install cantilever sliding gates with corrugated board sheathing.
Materials and tools
Of the tools you will need:

The most expensive tools (grinder, welding machine) do not have to be purchased, they can be rented - it will be more cost-effective.
For the construction of sliding gates, it is necessary prepare the following materials:
- profile sheets for cladding;
- profile pipe for assembling the frame (65x44x2-3) and lintels (45x25x1-2);
- sealant;
- primer and paint;
- console equipment;
- channel 15-25 mm;
- reinforcement with a diameter of 12-16 mm;
- wires for automation (cable size - distance from the foundation to the electrical panel);
- cladding fasteners (tacks and self-tapping screws).
Getting started: site preparation and drawing development
 One of the most important steps in installing a sliding gate with your own hands is drawing up a drawing with a description of all dimensions (length, width, height, rollback space and clearances). The weight of the gate and the further choice of the console set will depend on the size of the structure and the material of the frame.
The width of the opening must be sufficient for the normal arrival of vehicles. In addition, it is necessary to take into account the width of the street - in narrow lanes it is better to build wide gates for the normal passage of the car.
To determine if the opening is convenient, you can insert a few pegs into the ground along the width of the gate and try to enter the yard by car.
The size of the opening determines the space required for rolling back the canvas. As a rule, the height of the gate is taken into account 10 cm less than the fence itself.
After creating the drawing, you can begin preparing the site for mounting the sliding gate. The opening must be leveled and cleaned of dirt and debris.
Separately, it is necessary to prepare a place for cutting, welding and painting the canvas and metal pipes. For this work, you can collect and put a few "goats".
Foundation laying and construction of supporting pillars
Installation of sliding gates must begin with the installation of support pillars. As this material, you can choose: concrete or brick pillar, steel pipe, oak beam, channel. It is necessary to install a support column to a depth of at least a meter.
Post installation steps:
- Make a hole more than a meter deep.
- Level it up.
- Fill the hole with concrete.
It will take about a week for the concrete to completely harden. Therefore, in order not to waste time, you must first take care of the construction of support pillars.
Foundation laying is done like this:

The top of the channel must be located on the same level with the ground, forming a flat platform for the passage of the car. We leave the foundation to dry for another week, and during this time we are still making the frame of the gate and lining it with profile sheets.
Frame construction
According to the developed drawing, we cut pipes for jumpers and for the main structure. It is necessary to cut and measure the metal very carefully, controlling the accuracy of the inclination of the angles of the jumpers.
Before welding, all parts of the frame must be cleaned with a metal brush (scale removed from them), treated with an anti-corrosion agent for metal and degreased with a solvent.
Stages of welding the crate and frame:
- To simplify the work, you can build a stand for welding: hammer stakes into the ground and lay out jumpers.
- Pipes (transverse and longitudinal frames of the gate) are laid on the stand, they are seized with points, the diagonal of the frame is checked, and the joints are welded.
- We lay the crate of the gate, grab it and determine its evenness. We weld the crate with small seams (one centimeter every 0.5 cm).
- We clean the welding joints, degrease and paint the entire frame.
Frame installation and cladding
It is done in the following sequence:

After installation, you can begin the installation of automation. First you need to get acquainted with the instructions for the electric drive, watch the video and photo of the installation, since various automatic systems have certain differences and nuances of installation. But there are rules that apply without exception to all models:

DIY sliding gates will be much cheaper rather than ordering them from a specialized company. But still, to install them, you will have to purchase components and an automatic system. In addition, you need to be prepared that installing sliding gates with your own hands is a rather laborious process that requires accurate calculation, some skills and knowledge in construction.
All that is needed for this is the appropriate tools and the ability to understand drawings and diagrams. With some diligence, the finished result will look and act no worse than a factory-made design. Such gates can be successfully manufactured and installed in a country house, in a country house, in a parking lot, etc.
As you already understood, we are talking about cantilever type gates, the leaf of which moves along roller bearings. There is another design option - rail, which is considered obsolete today, and we will not consider it. And for those who are interested in a cantilever (retractable) structure, we offer detailed instructions for its installation, including a set of works on preparing the gate opening, laying the foundation and the installation sequence.
Do-it-yourself sliding gates, concrete base or piles
Video on how to make a sliding gate with your own hands
Sliding gate device
- Guide - is integral with the gate leaf and takes all the load from their weight;
- Roller support (trolley) - 2 pieces, gates are installed on them in the cantilever part;
- Removable end roller - serves as a support for the edge of the gate in the closed state;
- Lower catcher - takes the load from the support roller when the gate is closed;
- Upper catcher - reduces the windage of the gate when closed;
- Bracket (upper retainer with rollers) - holds the sash from lateral rolling;
- Stand - supports are mounted on it, which ensure the movement of the gate leaf.
The process of manufacturing and installing sliding gates with your own hands provides for the construction of the foundation. A guide beam is welded to the lower edge of the sash, the load from which is taken by two roller bearings installed on the foundation. It is thanks to them that the gate leaf moves in the right direction.
The support rollers are located inside the carrier console. Gates of this design can be automatic (operated by an electric drive), or opened manually. It is very convenient to use them at any time of the year.
gate leaf requirements
In order for the structure to maintain stability and rigidity during strong winds, its sash must be sufficiently rigid to withstand wind loads.
Also, the canvas should not sag under its own weight.
It is better to purchase metal for the gate leaf of high quality, without signs of corrosion, in a satisfactory condition. The total required amount of metal and fittings can be calculated from the drawings.

Gate drawings

From different manufacturers you can find many different models of sliding gates. Finding their drawings, if desired, is not difficult, including on the Internet. We offer you the best, in our opinion, option from a technical and financial point of view.
The gate leaf is made of a metal pipe. The frame will require a profile pipe 60x40x2 mm; for the crate - 20x20x1.5 mm. We suggest using the drawing, with which you can make a frame for sliding gates with an opening width of 4 m.
After the frame is ready, a guide beam should be welded to it, which can be purchased ready-made from our company that sells accessories for sliding gates with your own hands. After that, the frame is primed and painted in the desired color with paint for metal.
A- opening width; B- guide length (opening width + 40%); Pipe - 60x40 mm.(main frame); Pipe - 20x20 mm.(crate);
Gate painting
The first step is preparing surfaces for painting and degreasing them. For this purpose, it is necessary to clean the surfaces with a sandpaper or treat them with a grinder with a grinding disc. Cleaned areas should be wiped with acetone. You can start priming.
The primer should be applied to the surface evenly, avoiding streaks and drops as much as possible. After complete drying of the primer layer, a paint layer is applied. Such a thorough approach will provide confidence that the paint will lie evenly, and the structure itself will not be subject to corrosion.
The second paint layer is applied after the first has completely dried. If the result is not too aesthetic, you can paint a third time. The time of complete drying may vary, depending on the time of year, and ranges from several hours to 2-5 days. After painting is completed, you can proceed to the next steps.


Choice of accessories
The selection criteria in this case are the width of the opening, the height of the gate leaf, and their total weight. The main element of the gate, on which their reliability and performance depends, is the guide.
The key to efficiency when installing sliding gates with your own hands is the correct selection of components that are present in our catalog in the form of ready-made sets:
- Russian - Roltec and Doorhan
- Italian - Came
- Belarusian - Alutech
The selection of components should be carried out taking into account the following requirements: The total length of the gate leaf is calculated using the formula "opening width + 40%". Components are selected according to the length of the guide beam and the permissible load.

Calculation example
For example, the width of the opening is 3.8 m. Therefore, the length of the gate leaf will be 3.8 m + 40%, i.e. 5.32 m. In this case, you can buy a standard set with a guide of 6 m. Usually, when the width of the opening does not exceed 4 m, they purchase ready-made sets of components designed for loads up to 500 kg. The guide beam in them has a section of 71x65 mm and a wall thickness of 3.5 mm.
If the opening width exceeds 5 m, a set of components designed for more serious loads exceeding 600 kg is required. In such cases, before buying a ready-made kit, it makes sense to consult with the company's specialists for the best choice.
Sliding gate installation
Having a certain idea about the design of the gate and the features of their installation, you can carry out self-assembly. The movement of the canvas occurs from the inside of the site, along the fence (fence). Therefore, first of all, you need to take care of the place where the sash will roll back so that there are no obstacles in its path.
We suggest you consider the option of rolling back the canvas to the right side. The distance required to roll back the gate leaf is equal to the width of the opening plus the size of the cantilever, which, in turn, is about half the width of the opening. If this requirement is met, the process of opening and closing the gate will not cause problems. The console part itself does not close the opening, but plays the role of a counterweight.
Sequence of work
- Foundation device: pit development, excavation, installation of a mortgage element, concreting;
- Cabling device (in case it is planned to install automatic gates);
- Installation of gates and return post;
- Automation installation, gate testing.
Concrete foundation device
1st stage
In order to mark the pit for the foundation, it is necessary to set aside a distance equal to ½ of the passage width along the fence of the site, starting from the edge of the gate opening, on the side of the gate rollback. This will be the location for our concrete base (length). Retreat from the fence about half a meter towards the site - this will be its width. Thus, we get the perimeter of the future foundation.
In some cases, fence posts can be used as support posts for sliding gates. If this is not possible, a return pole must be provided. A pit under it is placed on the opposite side of the opening, strictly opposite the pit under the foundation. This is done taking into account that the reciprocal post adjoins the fence from the inside and does not reduce the width of the opening.
If you plan to make automatic sliding gates with your own hands, it is necessary to provide conditions for laying an electric cable under the driveway. You will need a plastic or metal pipe with a diameter of at least 25 mm.
2nd stage
Excavation is usually carried out to a depth of at least 2 m, i.e. greater than the depth of freezing. As for the Moscow region, where the freezing depth is less, it is enough to remove the soil from the foundation pit at a depth of 1.7-1.8 m.
3rd stage
In order to make an embedded element, you will need a section of channel 16, along the length of the pit for a concrete foundation. Reinforcing bars and connections can be made of reinforcement d 12. The sequence of actions is as follows: first, pieces of reinforcement are welded to the channel, then transverse connections (see image).

4th stage
The finished embedded element is placed in the pit with the reinforcement down, so as to ensure a snug fit of the side surface of the channel to the fence post. Use a level to make sure that the body of the channel is fixed in a strictly horizontal position, parallel to the opening line of the gate.
Important point
The height of the top of the embedded element in relation to the plane of the road surface. If they are located on the same level, then the minimum gap between the road and the lower edge of the gate will be about 100 mm. With the help of adjusting platforms, it will be possible to slightly increase this gap. But it is not possible to reduce it without violating the manufacturability of the fastening.

If the standard gap size of 100 mm for some reason does not suit you, a deeper installation of the embedded element is needed.
When it is planned to install blind sliding gates with an opening width of more than 4.5 m, two support posts will be needed in order to ensure the stable operation of the leaf and its ability to withstand windage during opening and closing. Also, in some cases, the existing fence posts cannot be used as support for sliding gates.
In such cases, it will be necessary to prepare support pillars in the amount of one or two, the size of which is calculated as the height from the foundation to the top of the gate plus 50 mm. Finished structures are installed in the pit and connected in their lower part with the embedded element (see figure).

5th stage
Concreting for do-it-yourself sliding gates performed after the final installation of the embedded element. The pit is filled with concrete mortar in such a way that the concrete level is above the surface of the embedded element. Freezing time - at least six days.
1st stage
The marking of the sash movement line is performed as follows. A cord is pulled along the line of the gate opening, not reaching the return post by 2-3 cm. This will be the trajectory of the leaf movement. The cord must be pulled at a height of 15-20 cm.

2nd stage
The figure shows how to fix the adjusting platforms on the trolley platform.

3rd stage
Now it is necessary to determine the extreme positions of the first and second roller bearings. Step back 150 mm from the edge of the opening along the plane of the embedded element and draw a line for the extreme position of the first trolley. Outline the tangent of the second trolley as follows: measure the length of the gate together with the cantilever part and set aside this length, minus 100 mm, from the edge of the counter post along the plane of the embedded element. We get the extreme position of the second cart.
4th stage
The assembly of the gate is carried out as follows. Insert the roller bearings one by one into the carrier profile, placing them in the center. Bring the gate to a vertical position, move both supports to their tangents, install the gate close to the cord.

5th stage
Actually, we mount. The adjusting platforms of the second trolley must be welded, after which the sash should be completely rolled out into the opening and finally adjusted to its position. After that, weld the adjusting pads of the second trolley by welding.
- Remove the canvas from the roller carts;
- Remove the trolleys themselves from the adjusting platforms;
- Weld platforms to the embedded element;
- Attach roller carts to them;
- Push the sliding gate leaf onto roller trolleys;
- Close the gate;
- Use a wrench to make final adjustments to the door position.

6th stage
In order for the roller carts to fit correctly inside the carrier profile, the following steps must be taken. Loosen the top nuts securing the carts to the platforms and roll the gate back and forth several times, from one extreme position to the other. After making sure that the leaf moves freely, tighten the nuts and make sure that the quality of the gate movement remains at the proper level.
If the belt is found to be difficult to move, it is necessary to slightly loosen the fasteners and correct the misalignment of the roller carriages, especially in a plane perpendicular to the movement of the belt.
7th stage
At this stage, you need to install the end roller. We insert it inside the carrier profile and tighten the fixing bolts. We weld the cover of the end roller to the profile - so that the roller reliably plays the role of an end stop during manual movement of the door leaf. The welding point in this case will be a more reliable fastening than a bolted connection.
The end cap of the carrier profile is installed on the inside of the door and welded in place. This element is needed in order to prevent snow from getting inside the carrier profile in winter. Otherwise, the snow will be rolled by the rollers of the trolley, and this may lead to jamming of the gate. When installing do-it-yourself sliding gates this point must be taken into account.

8th stage
Now you need to install the upper retainer with rollers. To do this, loosen the fasteners of the rollers and install the bracket above the door leaf so that its side with holes is directed towards the support post, and the rollers capture the top of the door leaf.
Press the bracket to the pole and secure it. Bring the gate to a vertical position, aligning it with a level, and fix it with the rollers of the upper lock.

9th stage
If you plan to sheathe the leaf of sliding gates, for this purpose you can use, for example, a profiled sheet, after ordering it to be cut to the desired size. Installation of the profiled sheet should be carried out from the front edge of the door leaf. It can be fastened to the gate crate in two ways: using self-tapping screws or by riveting, however, the second method is more reliable.
The second sheet is mounted overlapping with the first (superimposed on one wave and fixed). Thus, it is necessary to mount the required number of profiled sheets until the door leaf is completely sheathed. The last sheet, most likely, will have to be further trimmed in order for it to fit within the perimeter.
10th stage
After the sheathing of the gate is completed, you can proceed with the installation of traps - upper and lower. Since the role of the lower catcher is to reduce the load on the roller carriages when the gate is closed, it is mounted with the gate fully loaded. With the gate fully closed, the bottom catcher must be brought under the end roller so that the support plane of the catcher is above the level of the end roller.
The installation of the upper catcher is carried out in such a way that when the gate is closed, its upper brackets touch the protective corners of the front edge of the door leaf.

11th stage
On do-it-yourself sliding gates can be set to automatic. In this case, the movement of the sash will be carried out using an electric drive. For this purpose, a toothed rack is attached to the door leaf - a universal part compatible with electric gate drives of all manufacturers. Such a rail is usually included in the kit of fasteners.
As a rule, a set of automation for gates is accompanied by instructions for its installation, which should be followed.
Automation selection
Sliding gate automation – more freedom, more comfort!
Don't want to manually open and close sliding gates?
The drive with remote control will allow you to do this without leaving the car.
Tools and equipment
For the manufacture and installation of sliding gates you will need:
- Welding machine, better inverter. It does not damage the metal and ensures optimum welding seam quality.
- Bulgarian with discs of various types. With its help, it will be possible to cut metal blanks for the gate.
- An air compressor that will ensure uniform painting of the gate. In its absence, you can paint the gate with an ordinary roller.
- Pliers, hammer, drill, tape measure, level, riveter.
If you have any questions regarding the installation of sliding gates, or you want to find out the cost of services for their installation, please contact us by phone.
Get the guide for free!
Get a free consultation!