If the foundation “walks. Why does the fence poles squeeze out of the ground and what to do about it What to do if the foundation is kicked out
*information posted for informational purposes, to thank us, share the link to the page with your friends. You can send interesting material to our readers. We will be happy to answer all your questions and suggestions, as well as hear criticism and wishes at [email protected]
In the spring, in some garden plots, there is a deformation of the fence, installed no more than a year ago. Damage to the fence causes, as a rule, uneven settlement of adjacent posts. An unprofessional approach leads to damage to the building material and additional repair costs. Unfavorable consequences are excluded if the corrugated board fence with installation is performed by qualified specialists with the necessary knowledge.
Any construction is based on Newton's law of the balance of forces. If the pillars pushed out the soil, it means that the efforts from the soil are greater than the mass of the fence. Why is this happening? It's all about the soil. Some types of soil in a dry and wet state have different technical characteristics.
Soil types
Fine sand, when saturated with water, turns into an unstable quicksand. Clay in the dry state has greater strength, but in its raw form it increases significantly in volume. Peat soils are also dangerous due to swelling. Consider the causes and types of deformation if a fence was erected in the summer, and the pillars rested on a solid foundation.
- Option 1. An increase in soil moisture led to changes in structural relationships, a decrease in bearing capacity. The fence supports in this case sag.
- Option 2. In winter, the water in the soil turned into ice, increased its volume, and returned to its original state after thawing. The pillars in this case give deformations.
Conclusion. Prior to construction, it is necessary to study the type of soil and the level of moisture in the territory. If necessary, carry out land reclamation work, monitor the timely removal of flood and rainwater from the boundaries of the site. The base of the fence post should rest on firm, dry ground below the freezing depth of the soil in your area. Weak soils are replaced with a gravel-sand cushion. The pillars are butted with stone and poured with concrete.
fence repair
The type of repair depends on the cause of the damage. In some cases, it is enough to dig the foundation, by force to besiege the pillar. Sometimes it is necessary to completely replace the support. It all depends on the source of the violation. When constructing a fence, constructive errors are possible. We will study the causes and methods for their elimination.
An overturning moment occurs from the gate or gate. Separate supports are mounted for opening canvases. When combining the functions of the fence and the entrance, the poles may squint. Corrects the situation by installing additional racks.
Drilling pits under the pillars without observing a strict vertical leads to an unstable position of the supports. Large spans of the fence can overturn strong gusts of wind. When erecting a fence, it is necessary to take into account the rigidity of the structure.
The main destructive causes in construction are water and structural errors. You can choose how to repair an existing fence after analyzing the circumstances. Identification and timely elimination of the causes will be the key to effective further operation.
Today, many developers choose to build a columnar foundation for their house due to its cheapness. In addition, such a foundation is built quite quickly - in just 1 day. Such a foundation is considered ideal for the construction of garden and country houses, a light bathhouse, residential buildings from a small bar on non-rocky soil. But there are cases when the columnar foundation begins to quickly collapse, fall on its side or bulge. In such conditions, the only way to prevent further subsidence of the base is to replace the columnar foundation.
The need to replace the column foundation
Many rural houses that were built in the last century have a primitive columnar foundation as their foundation. Such an ancient structure is made of brick or stone, often quite dilapidated, unreliable and outdated. They require immediate replacement with a more durable, high-quality and reliable foundation. The main reason for the destruction of the columnar foundation is sediment, which naturally causes a change in the position of a wooden house, the appearance of cracks in the walls, jamming of windows and doors.
This process comes from various physical, mechanical and hydrological changes that take place in the lower soil and reduce its bearing capacity. The foundation actually ceases to fulfill the tasks assigned to it. Often, changes in soil properties are caused by construction work that is carried out in the backyard. But such problems are inherent not only in old houses.
And when installing a new house on a columnar foundation, the latter very quickly begins to squint or sag and pull the house along with it. Especially when it comes to large and heavy log houses (9 by 9 meters or more) and cottages. In these cases, such a foundation is categorically not recommended to be used, because there is a significant load, and here it is more rational to equip a pile-screw or strip foundation. It is also irrational to build a columnar foundation on heaving soil.

I would like to immediately make a reservation that this is most often not the fault of the masters who carried out the construction. This is due to the phenomenon of heaving of the soil during its thawing after winter freezing. The earth thaws earlier on the south side of the house, pushing up the south posts, which end up on loose, sized earth, while the north posts stand in place on the hard frozen ground.
Even if you dig 2 meters into the ground and pour concrete asbestos pipes that are strong in compression and bending, they will not be able to withstand heaving of the soil. All the same, the level of the columns along the horizon will be violated, and the house as a whole will be skewed. In this case, the foundation cannot be repaired and it is pointless to try to align the foundation pillars, you need to remember: if the blocks have moved at least once, then they will change their horizontal position every year after winter, and it must be replaced as soon as possible.
In such cases, the only correct solution is to replace the foundation. This procedure is rightfully referred to as radical measures designed to restore the safety and reliability of the house, as well as increase its lifespan. However, it is worth remembering that it is advisable to replace the base for buildings whose construction, after replacing the soil, can last for several more decades.
Methods for replacing a columnar foundation
As a rule, the replacement of a column foundation with another one takes from 5 to 10 days, and the lifting of a residential building is carried out from below, which allows workers not to dismantle the floor, thus facilitating work. But the replacement of the base during the subsidence of the internal walls of a residential building requires to open the floor covering to correct the defect.

There are several methods for replacing the foundation under a wooden building:
- Cosmetic repair is the simplest technique that does not involve large financial investments. In this situation, you simply need to cut out the rotten area, and instead insert a suitable wooden element. However, it must be borne in mind that with such a partial replacement of the base, the integrity of the house is inevitably violated.
- The dismantling of the walls is a type of construction work, which involves the complete dismantling of the walls, after which the lower crown of the log house is replaced. The method is reliable, but it requires a fair amount of patience and time from the masters to disassemble and assemble the structure.
- Dismantling the foundation. To do this, you will have to remove a layer of 20 centimeters, replace the wooden crowns and then restore the base under the house.
- Replacing crowns by raising a building with a jack is considered the most popular method, according to reviews of replacing a columnar foundation, as it allows you to replace the foundation quickly and efficiently.
Choosing a new foundation for the house
It is important to understand that the procedure for replacing the foundation of a house is a complex process that requires careful preparation. To begin with, it is worth deciding on the design of the future foundation, which will replace the old columnar foundation. There are such types of foundations that are suitable for wooden houses:
- The columnar foundation is a system of pillars that are installed in places of maximum load - the intersection points of the walls. The pillars are made of stone, concrete or brick and set at a distance of close to 1-2 meters. It is adapted to support light residential buildings with wooden, frame or panel walls, which do not create significant loads on the foundation. Despite the simplicity, columnar foundations can be chosen to provide reliable support for a country or garden house, as well as other outbuildings.
- A bored pile foundation is a type of columnar foundation, only asbestos-cement pipes are used as load-bearing elements, which are filled with a special mixture. The design of such a foundation consists of piles and a grillage that connects them. Bearing elements are similarly located under the most significant points of the house, for example, in places where the main walls intersect, and at the corners of the building. A bored pile foundation is considered optimal for buildings on ground with high water.
- The pile screw foundation is considered the most interesting type of foundation for the house, as it was originally intended for military purposes. Today, such a foundation is widely used in civil engineering and is valuable because you can use it on any terrain, even on an uneven site with height differences. In addition, the low price of replacing a columnar foundation with a screw pile foundation and the possibility of repeated use of screw piles are additional advantages of such a foundation. The disadvantage is the hiring of special equipment.
- The strip foundation allows you to build heavy houses and at the same time provides high reliability and security of the house. The most popular shallow strip foundation is monolithic and prefabricated. Prefabricated structures are made of concrete based formwork, monolithic - from blocks of reinforced concrete and concrete.
Replacing the columnar foundation with your own hands
Of course, you can replace the old columnar foundation yourself, but you must be confident in your own abilities. In this case, you will need the information below, as it allows you to navigate the issue of replacing the foundation and control the situation.
Preparatory work
Despite the creation of a reliable foundation and the correct calculations when laying it, sometimes small cracks appear on the facade of a residential building, window sills, plinth and other horizontal lines are bent. This indicates the subsidence of the house under the columnar foundation and requires an immediate replacement of the base.
However, before starting work, you need to make sure that the deformation of the base has already stopped. To do this, on a surface moistened with water, install gypsum beacons across the crack. Watch these lighthouses for two weeks: if cracks do not form on them, then the deformation of the house is over, and you can safely proceed to replace the column foundation with your own hands.
You can raise a house without special construction equipment, you just need to use hydraulic jacks, which are able to develop sufficient force, which allows you to lift a load of 10 tons. In their absence, it is not advisable to think about buying such equipment, since this equipment can be rented at any railway depot.
You will also need steel scrap, a sledgehammer, wedges - tools that are mostly needed to dismantle the old foundation. To create temporary supports, you can use massive beams, chocks, bricks, as well as boards of various thicknesses that act as spacers. As a platform for installing a jack, you can use bars and boards knocked into a shield, or any durable material.
For uniform transfer of force from the jack rod to the lower rims of the house, it will be necessary to cut a steel plate that has a thickness of at least 5 millimeters. If you have to work with a columnar base with a pickup, then before starting work, the latter will have to be disassembled. Also, at the preparation stage, it is recommended to remove all heavy things, furniture from the house and disassemble the floors.
The rise of a wooden house
Raise the building with jacks. They are usually installed on both sides of the house at a distance of 0.5 meters from its corners. Jacks allow you to evenly raise the house, otherwise the logs of the lower strapping will bend during uneven lifting, which will lead to their separation and subsequent breakage. The jack should be installed in places where the tree is not damaged by rot.
Remember that it is necessary to install spacers in the form of steel plates so that the force is correctly transmitted to the logs from the jack rod. Instead of metal plates, you can take pieces of wooden blocks. Jacks are fixed on a pre-prepared support platform, if necessary, they need to be buried in the ground to give it maximum stability.
The number of pieces of logs that are used to construct temporary supports depends on the chosen technology for lifting the house. If you plan to immediately raise the entire building, then the number of temporary supports should be twice the number of foundation pillars. The support is assembled from pieces of logs, like an ordinary well

The height of the supports should exceed by 10-15 centimeters the difference in the distance from the soil surface to the height of the jack, because when the house is raised, the supports will settle and be pressed into the ground. Raise the house, if possible, from both sides at the same time, evenly, no more than 1.5-2 centimeters at a time. The result obtained is immediately fixed with temporary supports.
If you find bends in the lower crowns as a result of lifting the house, additional jacks should be installed. At this stage, it is recommended to control the process so that the house does not move to the side, because when lifting, its center of gravity will change.
The wall must be raised to a height of at least 6 centimeters, the rotten extensions removed and the building lowered onto the trimmings of the beams, which are placed on temporary supports. Tow is laid between the logs and beams, which is treated with an antiseptic, in width, which is equal to the double thickness of the beam. Brick battle and gravel of 10 centimeters are poured under the proposed base tape.

When you have raised the house to a sufficient height and secured it securely with temporary supports, you can begin to dismantle the old columnar foundation. It is necessary to break the rubble and brickwork using chisels, crowbars and other tools that are easy to use. Old poles are dug out or pulled out of the ground, swinging them in different directions. You can use some of the materials that have retained their quality indicators to form a new base.
Building a new foundation
Consider replacing the columnar foundation with a strip shallow foundation, which is best suited for one-story houses. As the name implies, this type of foundation is considered to be something between a non-buried and a capital buried strip foundation. It consists of monolithic reinforced concrete strips that run along the perimeter of a residential building and in places where load-bearing walls will subsequently be located.
Now let's talk about the advantages of a tape shallow foundation:
- Tape shallow foundation is an economical solution. If you compare this foundation with recessed types of foundation, then it will cost you two to three times cheaper.
- A shallow foundation requires less work than a deep foundation. This includes both modest earthworks and the ease of arranging formwork. Therefore, the replacement time of the foundation is significantly reduced.
- A shallow foundation of a strip type allows, unlike non-buried foundations, to make a small basement in a residential building, and it is also less prone to heaving phenomena.

The construction of a new foundation should begin with excavation: dig a trench, the depth of which must necessarily exceed the depth at which the sole of the old foundation was located. A U-shaped trench is dug - this is necessary to form a frame with reinforcement to combine all sections of the foundation into one rigid structure.
If it is planned to erect new buildings adjacent to the house, then it is necessary to dig a trench, based on the project documentation. At the bottom of the trench, arrange a sand cushion. Then proceed to the manufacture and installation of formwork. The easiest way is to make it from boards that are planed on one side. They are easily knocked into shields of the desired size. In this case, the cost of replacing the columnar foundation will be lower. For their installation, spacers and support stakes are used, which must be driven in along the perimeter of the trench.
Carefully check the correct vertical and horizontal position of each shield. Then you need to waterproof the internal parts of the formwork with roofing paper or other material and proceed to reinforce the new shallow foundation. For this, steel reinforcing bars are used, which have a diameter of about 14-16 millimeters. The rods are tied into a frame using smooth rods with a cross section of 8-10 millimeters.

At this stage, it is very important to maintain the distance from the longitudinal bars to the future surface of the strip foundation. Usually it is taken equal to 5 centimeters - this is enough to provide reliable protection of the metal from corrosion. When the frame is ready, you can fill the formwork with concrete. At the same time, avoid the formation of air voids in the solution, so compact the solution every 200 millimeters.
The formwork can be removed 3 days after the concrete has been poured. Then the upper and side parts of the foundation should be waterproofed with roofing material or mastic. Cover the sinuses with sand and protect from the outside with a blind area. After the concrete has acquired sufficient strength (about two weeks), it is necessary to lay boards on the first element of the strip foundation, on which temporary supports should be installed.
New foundation load
After installing a new foundation, you can begin to load it. Proceed according to the scheme for replacing the columnar foundation - simultaneously with two jacks or each of them in series. Raise the corner of the building until the wedges are free, carefully pull them out, then gradually unload the jacks, lowering each corner of the building onto a new waterproofing foundation.

When loading a new foundation, check the marks of the top of the base and, if necessary, use antiseptic impregnated wood gaskets or corrosion-protected metal elements if, after applying the load, the top mark is lower than required. Or trim the lower crown if it turns out that the top mark is higher than necessary.
Thus, if you find that the old columnar foundation began to collapse, cracks appeared on the basement of the house, and the building itself began to squint to one side, you should immediately replace the old foundation. You can choose the type of a new foundation among several options - a column foundation similar to the old one, a bored pile foundation, a screw pile foundation or a strip foundation. But it is most preferable to equip a shallow strip foundation.
Foundation construction- the most important and responsible stage of construction of the house. The reliability and durability of a building are determined by the choice of the type of foundation and its parameters, as well as the quality of workmanship. Mistakes made can lead the house to an emergency condition already at the stage of its construction.
But what if the house has already been built, and the builders have saved money, hoping for the traditional “maybe”. Most foundation problems arise when building on heaving soils. Soil heaving is a very insidious and powerful phenomenon, which is very difficult to deal with after construction is completed. Why is it happening?
If the foundation (tape or pillars) was laid above the freezing depth, then the wet under the support, freezing, expands and squeezes out the structure. This process is most active in the spring on the south side of the house, which freezes at night and warms up during the day. With each passage of the "thawing - freezing" boundary through the lower support platform of the foundation, the latter rises higher and higher. Extrusion forces exceed tens of tons. At the same time, cracks appear in the stone walls. Wooden and panel houses, on the other hand, get noticeable distortions, the walls crack, collapse, doors and window sashes do not close. What to do?
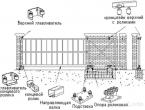
The owners of stone houses have several options for improving the work of the foundation. In places with difficult terrain, it is possible to lower the level of groundwater by organizing their removal using an effective drainage system (Fig. 1). Dry soil - not heaving and "warm". Considering that in heaving soils with a silty structure, moisture rises, drainage should be located 0.5 m below the freezing depth. Job.
You can also go the way of artificially reducing the depth of freezing. To do this, a layer of soil is poured around the house, bringing the depth of the foundation to the freezing depth (Fig. 2). By the way, the visual image of the house will benefit somewhat, it will be on some elevation.
The freezing depth can be increased by replacing part of the soil with a heat-insulating layer, made, for example, in the form of a mixture of expanded clay and coarse sand in a volume ratio of 1.5:1. A layer 20-30 cm thick and about 2 m wide, laid at a depth of 20-40 cm over a layer of coarse-grained sand 20-30 cm thick, will make it possible to insulate the soil, reduce its freezing depth by 60-80 cm. and from polystyrene foam boards 8 cm thick wrapped in polyethylene film (Fig. 3). Slabs laid at a depth of 20 cm on a layer of coarse sand 20-30 cm thick are a very effective tool. The width of the laying of slabs around the house is about 2 m. The gap between the slabs is no more than 5 cm.
The depth of freezing will also be reduced by a thick layer of snow around the house. If closed for the winter vent windows in the basement of the building, it is thus possible to somewhat reduce the degree of soil freezing. All options can be combined. So, when warming the soil, it is possible to reduce the depth of the drainage system. Soil warming can be combined with raising its level around the house. Now about light houses (wooden, panel). Heaving phenomena are reflected in them to a greater extent, since such houses are lighter in themselves.
Sometimes the poles rise even when they are laid below the freezing depth, if the house turned out to be too light, or too many poles were installed, which is the same thing. This is due to the adhesion of the side surface of the pillars to the ground, if a layer of waterproofing (glassine, roofing paper, polyethylene, bitumen coating, etc.) has not been laid between them or the side surface of the pillar is uneven, rough. Then it turns out that the adhesion forces of the soil with the pillars are greater than the weight of the house. By the way, it is for this reason that when laying a conventional columnar foundation, it must be loaded with a house in the same season.
If such a foundation "walks", then it is necessary to evaluate the real weight of the house and the bearing capacity of the soil. With a large margin for bearing capacity, you can reduce the number of poles by excluding some of them from work. To do this, it is enough to dig out extra pillars or destroy their upper part.
Sometimes, for wooden and panel houses, it is possible to recommend the methods proposed for stone houses (for example, warming the soil around the house reduces the area of adhesion of frozen soil to supports). But it is better to replace the previous supports with poles (Fig. 4), made according to the TISE technology using the TISE-F foundation drill. How to do it?
 First you need to determine where to place the pillars. If the lower crown of the house is “powerful”, then new pillars can be placed near the old supports at a distance of no more than 1 m. It must also be taken into account that the bearing capacity of each such pillar is very high - from 5 to 10 tons, that is, they can be installed less often . New supports are installed around the entire perimeter of the house and under its inner walls. After that, the house is raised a few centimeters, leveling pads are installed on the new supports through the waterproofing and then the house is lowered. You can raise the house using a jack, levers. Old supports extract or destroy their upper part.
If the crown of the house is weak and it can fully absorb the load only in the place of existing supports, then on both sides of it, at a distance of about 1 m, it is necessary to place reliable temporary supports (Fig. 5), having developed upper and lower surfaces. The house in this place must be raised by 1-2 cm, freeing the old support. Then it should be dug, and the hole should be covered with soil, carefully compacting it. To prevent the house from coming off the temporary supports, they are replaced sequentially.
 To create foundation pillars using TISE technology, it is first necessary to prepare formwork in the form of pipes. Their design depends on the capabilities of the developer, his means or imagination. The main thing is that they must have a constant cross section - 500 ... 700 cm2 (square, rectangular or round). The length of the pillars should be taken from such a calculation that they are buried 30 cm below the freezing limit, and from above they do not reach the crown of the house by 3-5 cm. Asbestos-cement pipes, boxes welded from steel sheets can be used as formwork (Fig. 6). In the upper part, they should all have a support bar located at ground level.
Before starting drilling under the house of an inclined well, it is advisable to first draw a section of the building on a reduced scale. Attention should be paid to ensure that the bottom of the well drilled below the freezing depth falls under the middle of the wall and that the drill handle does not rest against the wall. For convenience, you can make a template that marks the distance from the wall to the drilling point and the angle of inclination of the well (Fig. 7).
Having outlined the drilling point, they begin to work. After the inclined well is drilled below the freezing depth by 10-15 cm, they begin to expand it for the vertical installation of the formwork of the foundation column. To do this, a drill is brought into the well, the soil is cut with a shovel and periodically, as the drill storage tank is filled with soil, it is raised to the surface and emptied. The well is expanded until the formwork is freely placed in it in an inclined and vertical position. The lower part of the well (up to 30 cm from its bottom) is not expanded.
Having installed the plow on the foundation drill, they begin to expand the lower part of the well. First, they work with the drill rod fully extended. In this case, the bottom of the expanded part of the well turns out to be inclined, but it is easier to work. You can level the bottom of the well with the drill in a vertical position, for which the bar will have to be folded a little so that the handle is located under the wall.
The installation of reinforcement and the filling of the well with concrete is carried out through the formwork, which is located with an inclination and rests with its crossbar on two boards laid near the well. As the concrete is laid, it must be compacted by bayoneting, tapping on the side wall of the formwork.

Immediately after filling the formwork with concrete, the upper part of it is shifted, setting the formwork in a vertical position (Fig.). It doesn't take much effort to do this. The concrete at the bottom of the formwork should be compacted by tapping on its side wall.
Concreting of one well must be carried out continuously for 30-40 minutes until the concrete sets. The side gaps around the foundation pillar must be covered with soil, laying it in layers of 10-15 cm, compacting with a rammer and slightly moistening. Concrete is put into the formwork and the upper surface of the formed foundation column is leveled.
For normal setting of concrete during the first week, it is necessary to periodically moisten it, and to preserve moisture, wrap the top of the column with plastic wrap. The foundation pillar is loaded no earlier than after three weeks. The part of the wooden formwork protruding above the ground is carefully removed by sawing it off with a hacksaw.
When creating foundation pillars under the inner walls of the house, difficulties will arise: one cannot do without opening the floors.
According to the magazine "DOM"
The vast majority of self-confident men believe that with a shovel, you can make any foundation yourself. Their motto is "who does nothing, he does not make mistakes." A small part of the pragmatic, and probably boring people in this matter trust only the geo-exploration data, the calculations of the design engineer and the construction team. It's fair to say that hiring professionals doesn't guarantee success. Many stories have accumulated on our forum about “mowing” foundations, both of our own manufacture and “professional”. We discussed some of them with a specialist.
“I poured the foundation in frost in two stages. When the second layer was flooded, a small layer of snow remained at the previous level. As it got warmer, I removed the formwork, and there a small gap of 0.5-1 cm remained between the two layers (through in many places) along the entire length of the tape. Now I’m wondering how to stuff the repair mixture there. ”
“It’s easy enough to solve the problem,” he says. Construction Director of Terem-Teremok Aleksey Aleinik. - This gap needs to be widened, additional vertical cuts should be made, dust removed, primed. Lay reinforcement in the slot and vertical strobes and cover with a quick-hardening repair mixture, for example, Ceresit CX5.
“Help with advice. The gas silicate house stands on concrete blocks of the foundation on the ground. In the basement room, the old owners planned a small pool, but when they tried to dig a hole, the soil began to crumble, and work, apparently, was stopped for this reason. Now it looks terrible - it seems that the blocks are half hanging in the air (in one place a fragment of the block is completely missing). What to do?"

- You need to start with the repair of the foundation, namely, its deepening. There is a fairly simple and effective way. The perimeter of the foundation is divided into meter sections. In order not to weaken the entire foundation, every two meters, meter-long grips are dug to the depth of freezing on both sides. Start from the corner. The bottom of the excavated grip is rammed, covered with rubble. They make a concrete pad with reinforcement, put up the formwork and pour it with concrete. The gap between the fresh fill and the old foundation is minted with mortar. Such grips are used to deepen and strengthen the existing foundation. The technology is long, but it works. At the same time, you can make the waterproofing of the base.
“The summer frame house stands on a slope. The soil is loam. The foundation of the blocks was made a long time ago and it is not known how. Then concrete slabs were laid on top. For several years he stood on his own, and only five years later they put a house on him. And this year, a picture is observed: inside under the house it is clear that the outer slab has sagged (by 5 centimeters). The foundation has cracks on both sides. That is, crawling ... What to do?

— The situation is deplorable, the house is in disrepair. Most likely, the foundation was laid shallow, by 60–70 cm. In winter, the loam under it freezes and increases in volume, heaving forces push the foundation up along with the slab and the house. When thawing, the blocks fall again, that is, the base of the house “walks”. The owners need to think about strengthening the foundation in the way suggested above - it needs to be supported on a new foundation, buried below the freezing level of loams (1.5 m).
“The formwork was removed, and I saw such a crack in the corner. The builders said - it's okay - reinforcement is laid in the foundation. What to do?"

- If there is no through crack, then this is not a problem. Most likely, this happened due to the fact that the foundation was poured in the heat. The concrete began to dry out quickly and cracked. If the tape is properly reinforced, then the crack will not open further. To check this, it is necessary to put a stamp of cement mortar on this slot. If within a month or two the mark remains intact, then the crack does not increase. Otherwise, the corner will have to be strengthened or re-reinforced - ditch the old reinforcement, lay a new one and fill it with a repair compound.
“Input data: the foundation is a simple rectangle 9 × 12 m, the main wall is in the middle. The soil is terrible clay. A trench of 120 cm was dug, 10 cm of sand was poured, a frame of 5 reinforcement bars was laid on the bottom, roofing material was laid along the walls, it was poured with concrete to ground level. Verticals are stuck. This stage went well. But there was a problem with the formwork. They fixed it poorly, as a result, it almost completely dispersed along the bottom, there is not a single even wall. How to level protruding walls vertically? For now, I imagine it like this: carefully cut the strobes with a grinder and gently beat off the pieces with a chisel. Catch up with the rest of the curvature of the foundation either with mortar, or with plaster, or with 2 cm insulation.

- If the architecture of the house allows, then you can make a protruding foundation, and hide these irregularities with some kind of finishing material. You can level the plane by pouring concrete. It is also possible to cut off these irregularities, but it is more difficult. This will require a large and powerful grinder. But as advised on the forum, it is impossible to knock down excess concrete with a puncher - cracks can go deep into the foundation.
But I would recommend this reader to pay attention to another problem. The depth of its foundation is very small for "spooky" clay. Sand (10 cm) under the base of the foundation does not level the forces of heaving. It is needed there so that the base of the house rests on a soft pillow, which is then compressed and becomes firm. The heaving is leveled by sand, covered around the foundation. Now, perhaps, this is irrelevant, but it was right to do this: dig a trench a meter wide, set up the formwork, install a frame of reinforcement into it and pour it with concrete. Then remove the formwork, waterproof and insulate the foundation walls. Fill the space between the soil and the foundation with sand without stones in layers of 20 cm with a rammer. This backfill will compensate for the heaving forces.
There is also such a technique as a warm blind area. If, for example, you didn’t immediately backfill, you need to dig a 15–20 cm wide recess around the foundation perimeter, lay a film or roofing material, extruded polystyrene foam there, and pour a concrete blind area at an angle from the foundation. In this case, the soil surrounding the base of the house will not freeze through.
“The tape monolithic foundation along the perimeter of the already folded and covered box of the house was filled in as expected, but later it was poured under the partitions and directly onto the ground (not sandstone), after which the foundation was covered with sand inside. Partitions (from gas silicate) sagged (gaps appeared at the junction with the walls somewhere up to 1 cm. Beams lie on these partitions. The roof is metal. The floors have not yet been filled, so I’m considering the option of linking the foundation of the partitions with the subfloor by means of reinforcement. Does it have meaning? Or maybe not touch anything?

- Apparently, these are not just partitions, but load-bearing internal walls, - says Aleksey Aleinik. And the foundation must match them. Therefore, we return to the issue of reinforcement - you need to dig under them captures with a depth of at least 0.5 m and make reinforcement with concrete. But before doing this, you need to remove the load from the partitions from the beams. To do this, you will need to install supports (you can use wooden beams) and jack them up. Linking the existing foundation of the partitions to the subfloor with the help of reinforcement will not help - it will break the screed.
“We are building a private house, some bewilderment and distrust is caused by the technology of the contractor. A trench was dug in clay to a depth of 1.7 m. Concrete was poured into it without any reinforcement to the surface of the earth, only the base was rammed. It started to rain, clay washed up on the surface of the tape. They put up a formwork. Holes were drilled in the hardened concrete, vertical reinforcement was inserted into the holes. Moreover, the holes themselves are only slightly larger than the diameter of the reinforcement, concrete, in my opinion, will not be able to leak into the gap between the reinforcement. They laid the reinforcement (4 rods welded together with wire, the structure is a square in cross section), tied all the reinforcement between themselves and the vertical reinforcement with wire. Now they are going to wash off the clay from the hardened concrete and pour the above-ground part of the foundation. Knowing the indifference of the workers, I fully admit the idea that they can pour concrete on the sly without washing off the clay (or washing it poorly) - how critical is this?

- The fact that the bottom of the trench is below the freezing depth is good. But pouring concrete without reinforcement is wrong. It was necessary to install a reinforcing cage at the bottom of the trench. And make vertical outlets from the reinforcement to which the frame of the upper monolithic belt is knitted. From the fact that the builders drilled holes and inserted vertical reinforcement into them, it is neither hot nor cold. We can say that the underground part of the foundation is done correctly by 30%, the above-ground - by 100%. Of course, the builders saved on fittings. But such savings are doubtful, since it is not clear what problems may appear in the future. Pouring a strip foundation in two steps is not entirely correct - a monolithic foundation is called that for a reason - it should be exactly a monolith, and not a layer cake. In the described case, the clay must be washed off. If you are not sure about the builders, you should check them. And before building walls, I would recommend contacting the designer, telling him about what kind of house and what materials will be built, what kind of foundation is already there. He will calculate the load, say whether it fits or not. There is no need to save on this.
My advice to anyone starting to build: if you see hack work at the foundation stage, stop the workers and say goodbye to them. Further it will be even worse.