How to draw an old vase. How to draw a vase with a simple pencil step by step. Video: how to draw a vase of flowers with a simple pencil
Hello dear friends!
Today we have a fairly simple and very practical lesson. This material will be useful to many beginners when writing a still life with objects. We will look at simple rules for how to draw a vase, decanter, jug or similar vessel, avoiding basic mistakes.
- simple pencils of different hardness
- eraser
- Blank sheet.
Draw a vessel
Often, the image of vessels of an uncomplicated form is not given much importance, one or two and you're done. What to do if you need to depict a beautiful, slender vessel of an elegant shape, but it still does not stick? Read this article and watch a short video, I think simple tips will help you create a good still life.
For the first sketches, look for some suitable nature at home. It can even be a glass, a bottle, a cup or a decanter. The principle of construction of all these objects is the same.
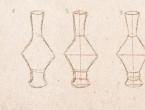
If you still find it difficult to work with nature, try to first create a few sketches in stages of the lesson in order to better understand and remember the basic principles. Here is an example of two vessels:
Centerlines and symmetry
In order to build any vessel on a sheet of paper, you will need at least two center lines: horizontal and vertical. The vertical line should bisect the object. The horizontal line is best placed at the level of the widest or narrowest point of the vessel.
It is best to mark horizontal lines in place of all protrusions and depressions, so you will get the most accurate result.
Looking at a quick sketch without centerlines, it is difficult to determine whether the shape of the vessel is shown correctly and symmetrically. With these lines, we immediately see where we made a mistake and what needs to be corrected. This is clearly shown in the illustration below.

(In the illustration: 1. A quick sketch by eye. 2. Center lines were easily drawn on the same sketch to identify inaccuracies and errors. 3. Corrections were made and a symmetrical drawing was obtained.)
Form
Most types of dishes can be inscribed in symmetrical geometric shapes. For example: a jug - into an oval with trapezoids, a bottle - into rectangles of different heights and thicknesses, a decanter - into a trapezoid and a rectangle.

Figures are outlined in the photo above, into which vessels of various shapes can be entered. After, we will make straight lines smoother and rounded corners.
Refining the disclosure of ovals
We have already built a symmetrical silhouette, consisting of simple geometric shapes. Now we need to refine the shape, smooth and round the corners and protrusions, make its shape more interesting and elegant.
The illustrations below show the step-by-step creation of a pencil drawing. At the last stage, we completely refine the linear drawing, and erase the previously outlined auxiliary lines and figures.


When drawing any vessel or dishes, make sure that the ovals that underlie it open equally. The round bottom of the vessel, in most angles we will see it as an oval.
It is necessary to clearly imagine or easily outline the ovals that make up the vessel: the oval of the bottom of the vessel, the oval of the widest ledge, the oval of the neck, etc.

In the illustration, the visible part of the oval is shown in red, the hidden part in green, it is better to easily mark this part with a pencil.
The degree of opening of the oval depends on the angle at which you look at the vessel. Make sure that in your sketch with dishes all the ovals are of the same "roundness". These ovals help turn a simple line drawing into a more voluminous one.
Volume light and shadow
To give the image volume, you need to determine where the light comes from, and, accordingly, where the shadow falls. The awning is always on the opposite side of the light source.

Pencil vase with step by step tips
Vase is one of the most beautiful and successful elements of interior decoration. Of course, all the beauty and elegance of the vase
it is very difficult to convey in the picture, but we will try to do it with maximum ease with the help of our lesson.
If you need to draw a beautiful still life, then this lesson is for you, as the drawing of a vase is perfect for this genre in painting. On our site you can also find other vase drawing lessons. You can see a vase with a beautiful sakura pattern by clicking on the picture on the right.
As in any drawing, and even more so in a volumetric one (which this vase is), it is important to observe all proportions. To do this, you need to draw auxiliary lines.
We'll start by drawing vertical guide lines. We draw them like this:
 |
Now let's draw horizontal auxiliary lines, as shown in the figure below:
Now we proceed directly to drawing the vase itself. We will start by drawing the neck, its contours approximately coincide with the auxiliary lines drawn earlier. We make them smoother
The next thing we will draw is the vessel itself, namely its upper part. With the help of auxiliary lines, this will be easy to do. We draw our vase strictly within the limits from the extreme left auxiliary line to the extreme right.
The final stage of drawing the vase itself is the drawing of the lower part of the vessel. The lines of our vase should be rounded. We look at the following picture, and draw:
You can remove all auxiliary lines, and move on to drawing a beautiful flower pattern on a vase
Our pattern consists of beautiful roses. For convenience, it is better to draw it in several stages. The first step is to choose the location of the roses, and in drawing the middle of the flowers. In the second step, we draw the first row of petals for some roses.
Next stage. Draw the next row of petals as shown in the picture.
Now we add petals to our beautiful roses
To decorate a vase so that it does not seem empty, you can add falling petals as follows
That's all, our magnificent vase is ready. At your request, you can decorate our vase with colored pencils, felt-tip pens, and any paints. Please post pictures of your finished vases in the comments below. We are very interested to see what you have done!
Still life - the image of inanimate objects. It is difficult to imagine a beautiful still life without a vase. They come in a variety of shapes - from rectangular to cone-shaped, with and without handles, transparent and not. The principles of drawing all types of vessels are very similar. Consider the main stages of drawing a vase.
Any object has a center, so we draw an axial line - a center line. It will help to control the symmetry of the subject. We designate the boundaries of the object, in our case, a vase, with transverse lines. Visually divide the vase in half also with a transverse line.
 Where the width of the neck changes, we also draw a line.
 A vase is a round object, in order to draw it correctly it is necessary to “build” it: ovals will help to convey the volume of a round shape. In order to draw them, we put points - borders. We connect these points into ovals.


When you have outlined the ovals, connect the dots, so you get the perfect vase shape.
 Erase the extra parts of the circles and axial lines. The vase is almost ready, to give it volume we shade only those areas where the shadow falls. For beginners, this can be difficult. After all, the angle of view shifted slightly - the shadow areas also changed their position. But there is a simple solution - if the light source (window or lamp) is on the left, then the shadow is on the right. And, on the contrary, the light pours from the right - we draw the shadow on the right. Remember that the darkest shadow in the picture is outside the subject, falling from it.
 Finishing touches: you need to place on the opposite side of the vase, but they should be lighter, the so-called penumbra. But with a visible neck, the situation is the opposite - we darken the left side more (as in the example). So the drawing looks more believable.

After reviewing the simple steps of drawing a vase, you can easily repeat and draw your little masterpiece. Recall that we have passed the steps of drawing vases in a realistic manner, but no one cancels your imagination and creativity in any chosen style. After all, in addition to still lifes, you can depict a vase of an unusual shape, give an interesting color or texture. Or maybe you want to collect a whole collection of vases and other items on one sheet?
Each student of the art school takes a lesson about how how to draw a vase with a pencil. Such a picture is a good material for giving volume to objects. Let's try to draw a vase by placing a rose flower in it. If you want, you can draw any other flower or bouquet.
The vase in the picture looks quite simple, you just need to know the rules of perspective, symmetry, proportions, as well as techniques for creating volume for objects. Add patterns on its walls to make your drawing more attractive, for example, in the form of flowers. After this lesson, you can draw or come up with a vase of some other shape.
How to draw a vase in stages with a pencil
1. The basics of the initial layout of the drawing
You need to start with the main marking lines, i.e. those lines along which we can navigate in the future (including the lines of the opening, as well as the lines of the support of the vase). At the same time, the opening lines drawn in the neck will be slightly smaller than the bottom line of the vase support. 
2. Height limit line
Let's draw the topmost and bottommost line of the vase. This will help draw the base and neck without any distortion. Draw side lines representing the angle of the neck. Draw two side dots. Such points are necessary in order to distribute the side walls. Keep track of the neck lines and side lines to be drawn at the same distance from each other. 
3. Preliminary outline
We draw the approximate shape of the vase, based on the previous contours. We barely press the pencil, because this circuit may need to be corrected. Now you need to draw a neck so that later you “insert flowers” into it. It is worth noting that later, in a drawing already made with flowers, it will be almost completely invisible. At the same time, let's draw the lower base of the vase. 
4. Refine the contours of the picture
Having slightly specified the basis of the pattern and the neck of the vase, we will begin to make a pattern for it. My pattern is in the form of roses surrounded by leaves. Choose a pattern of your choice and draw the main outlines to help you complete it more accurately. 
5. Drawing the pattern of your vase
By connecting the preliminary lines into one, draw a pattern in detail. It should not be "striking" in the eye, because. is not the main element of the picture. Instead of a pattern of flowers, there may be, for example, some geometric shapes. 
6. Shadows that give volume to the vase
Having colored your pattern with a pencil, begin to create volume for your vase. To draw shadows on an object, you need to imagine where the light will come from. Shadows will be "thicker" the farther they are from the light source. Shade the neck more strongly, because the light almost does not get into it. After that, you can draw a flower in a vase. 
Vases made of glass or ceramics, painted and decorated with your own hands, can be a great gift, wedding decoration or decor item for your home. Hand painting on glass / ceramics, depending on the desired pattern and technique, can be either complex, requiring skills, or very simple, accessible to beginners.
Master class number 1: Stylish geometry for beginners
To create such a laconic and stylish vase decor with your own hands, you do not need to be able to draw - even and neat stripes, zigzags and intersecting lines can be created using masking tape.
You will need: spray paint, acrylic or stained glass paint for glass and ceramics, a brush (a synthetic brush is suitable for acrylic paints, a natural brush is suitable for stained glass), masking tape (better of different widths), as well as nail polish remover or alcohol to degrease the surface, cotton pads and sticks.
Drawing technique:
- Degrease a ceramic or glass vase with a cotton pad and any degreaser;
- As soon as the surface dries, we glue the vase with adhesive tape according to the stencil principle, for example, as shown in these photos (scroll to the right).

Tip: A very beautiful effect can be achieved by pasting the vase with narrow tape as shown below.

- We put the vase on the newspaper and begin to carefully paint over the unglued areas and the bottom, going over the adhesive tape so that the edges of the pattern on the vase are clear. This master class uses spray paint, but you can use acrylic or stained glass paints, and also add contours to the drawing.
- Now it remains to wait for the paint to dry completely. Drying time for all paints is different, so you need to focus on the manufacturer's instructions. Spray paints dry very quickly and do not require baking, but acrylic and stained glass paints can usually be baked by placing the vase in the oven for 15 minutes at 150 degrees, or allowed to dry naturally for 2-4 hours.
For your inspiration, we have selected the most beautiful ideas for decorating vases with your own hands using adhesive tape. Take a look at the photo below - this simple decor can decorate even the most elegant wedding.

Floor vases are very large, and therefore hand-painting on them is a long and laborious process, but using adhesive tape as a stencil, you can decorate them as quickly as possible.

Be careful when choosing paint colors. Unusual shades, such as gold, silver, copper, pastel, as well as white and black, will immediately turn an ordinary glass or ceramic vase into a designer decor item.


Master class number 2: Dot painting of a vase
For those who are not looking for easy ways and want to decorate a vase with a more complex pattern, we suggest mastering the dot painting technique, which is also called pique or point-to-point.

You will need: alcohol or acetone, cotton pads and sticks for degreasing and correcting the pattern, and for drawing, prepare high-quality contour paints, for example, from Marabu or Decola. You can also use acrylic paints and a small synthetic brush, cotton swab or toothpick.
Drawing technique:
- First you need to degrease the vase and wait for it to dry.
- Dot painters can apply a design to a vase without the help of sketches, masterfully improvising in the process of creation. But it is better for novice decorators to first outline the outlines of the desired pattern.

- You can transfer the picture to an opaque vase using a soft simple pencil: print or draw a picture in a suitable size, cut it out, and put it on another sheet of paper “face down”, and then carefully paint over the wrong side of the leaflet with a drawing with a pencil. Your task is to generously cover the entire area of \u200b\u200bthe picture with a lead. Now you should attach and fix with adhesive tape a piece of paper painted inside out to the vase, and then draw the outlines of the picture with the same pencil (preferably blunt) as shown in the photo on the right. Thus, a barely noticeable sketch will remain on the surface, which will make your work easier;
- To paint a glass vase, just print or draw an auxiliary sketch by hand, and then glue it on the back.
Tip: when choosing a pattern for a transparent vase, remember that the patterns or images on its walls will intersect with each other. Therefore, it is better to place the main drawing on one side of the vase, and apply a background, that is, an unobtrusive painting, to the rest of it.
- Before you start painting vases, practice putting dots of the same size on paper, maintaining an equal interval, which should be such that the dots are distinguishable, but at the same time form a single unbroken line.

Test all contours - they should not be liquid and thick. Also prepare a needle to clean the tip of the tube and a cotton swab to correct a failed drawing.

If applying a bitmap directly from the tube seems difficult to you or you don’t have contour paints, it doesn’t matter, use acrylic paints. Dots of different sizes can be set using improvised means - an eraser on a pencil, toothpicks, needles, a cotton swab, a small brush, and even its blunt end, as shown in the photo.


- When the drawing is finished, put the vase in the oven to bake according to the manufacturer's recommendations. As a rule, paints dry completely in 24-72 hours naturally or by baking in the oven for 30 minutes at a temperature of 170 degrees (if you used baked contours). Of course, large floor vases that do not fit in the oven should be dried naturally.
Ideas for decorating a ceramic vase can be gleaned from the following selection of photos.

And here are examples of spot painting on glass.


Master class number 3: Stained glass painting of a glass vase
Contours can be drawn not only in dot technique - in combination with stained glass paints, hand-painted vases can imitate stained glass.

You will need: degreaser, cotton pads and sticks, contours, stained glass paints, a natural brush, as well as an auxiliary sketch, printed or hand-drawn (if necessary).
Tip: stained glass paints come in different bases. For painting a vase, paints on alcohol or water are suitable. Also keep in mind that non-baking paints need to be fixed with a special varnish for stained glass painting. This option is more suitable for decorating a large floor vase that does not fit in the oven, otherwise it is better to buy baked paints.
Drawing technique:
- Degrease the glass;
- Secure the sketch from the inside of the vase;
- Starting from the back of the drawing, draw closed contours, adjusting the lines if necessary. Then let the contours dry for about 2 hours. A hair dryer or baking in the oven for 15 minutes (150 degrees) will help speed up the process;
- Now you need to fill the contours with paint, spreading it evenly with a brush. Stained glass paints are fluid and liquid - you need to get used to them. The main principles are that the stained glass paint must be in contact with the contour, and “non-painting” must also not be left. (Rate the content! Already voted: 25 average rating: 4,80 out of 5)
What flowers have we already painted:
- - I did pretty well, I recommend to look;
- - the lesson is difficult, and not everyone can do it
Try to draw them all! And today, at the request of our reader Dmitry Istomin, we will study, how to draw a vase of flowers with a pencil. Here's what should happen: So, let's start.
How to draw a vase of flowers with a pencil
Step one. We draw the outline of the vase. First, a circle in the center of the sheet. Leave a place on top to place the neck of the vessel and the flowers themselves.  Step two. Now let's imagine that our circle is a ball similar to Smesharik Krosh, only without ears, we need to place a cylinder on top. Let's draw from our ball up its edges. And then draw the upper and lower bases of the neck. It is clear that we do not see the lower base, but for now we will leave all our auxiliary lines.
  Step three. Now let's show how flower stems stick out from the neck of our vase in different directions. Some are shorter, some are longer, some are more curved and some are straighter. Next, draw the outline and shape of the bud. It can be any flowers: irises, carnations or poppies. In our example, .
  Step four. We carefully look at the picture. Now we need to shape the vase. At the same time, we circle our circle, show the neck and the horizontal base.
  Step five. Now responsibly draw the flower itself. We already had. I suggest that you carefully look at it in order to beautifully draw the petals of a tulip. The buds will be collected.
  Step six. Well, we got the base. It is necessary to carefully erase the invisible auxiliary lines. Now you can color. We will try to color the vase, drawing lines along its contour to emphasize the shape and add volume. Consider the drawing carefully: the left side is darker, and the right side is lighter, since light falls from this side. The transition must be gradual. There are darker lines at the base of the vase itself and at the neck. We will also draw them along the contour, continuing the shape of the vase. And it remains to paint the flowers themselves. See also a video about how to draw a vase of flowers with a pencil:
On this, perhaps, everything. I look forward to your comments and new ideas for writing lessons. Join our Facebook group and show off your work!
Special for DayFun
The wise man was asked what love is. “This is a high feeling, like a flower that needs to be looked after,” he replied. We all love flowers without exception. Some like field daisies, others like majestic roses. Today we will devote our fine art lesson to the story of how to draw a vase of flowers.
Yellow tulips - messengers of separation
Scientists have long found out that drawing is an excellent sedative. The game of contrasts, the thickness of the lines allow the author to express emotions, convey feelings and fill his canvas with life.
If you have never painted before, and school art lessons were a real torture for you, there is no need to despair. Now you will learn how to draw a bouquet of flowers in a vase. Thanks to step-by-step instructions, even a novice artist can paint a beautiful picture.
Necessary materials:
- simple pencil;
- eraser;
- paper;
- markers;
- watercolor paints;
- brushes.

Her majesty is a rose
The rose is the royal flower. She looks great, smells lovely. White, red, lemon, yellow, rose buds. Regardless of the shade, the rose is the favorite flower of many women. Now we will learn how to draw a vase with roses. The drawing is done with a pencil. We will give texture and volume to it with the help of shading, the play of shadows and strokes.

Necessary materials:
- simple pencil;
- eraser;
- paper.
Step by step description of the creative process:

Let's help the younger family members
Many children from an early age begin to show their creative potential. No one has canceled fine art lessons in preschool institutions and schools. And now the kid needs to do his homework and depict a bouquet of flowers in a vase. And who, besides parents, will tell their child how to draw a vase of flowers in stages?
Let's draw together.

Necessary materials:
- simple pencil;
- ruler;
- eraser;
- paper.
Step by step description of the creative process:

Vases with flowers drawn in pencil


A vase filled with fresh and fragrant flowers is a classic subject for a still life. Many painters, who knew perfectly well how to draw a vase of flowers, created magnificent canvases that adorn the halls of museums to this day. Of course, a vase of flowers, the drawing of which is easiest to draw from nature, can also be used as a plot for any greeting card.
Before you draw a vase of flowers in stages with a pencil, you need to have the following items at hand:
1). Pencil;
2). Colour pencils;
3). Eraser;
4). A piece of paper;
5). Black gel pen.
If all those things that are listed a little above are already ready, you can proceed to learning how to draw a vase of flowers in stages:
1. Draw a vertical line and outline the vase in the form of a rectangle;

2. Draw a vase;

3. Draw a massive handle to the vase. Outline the outline of the table;

4. Sketch the flowers with light lines;

5. Draw the middle of the daffodils;

6. Draw the petals of daffodils. Of course, it is most convenient to draw flowers from nature, having familiarized yourself with their structure in detail. But you can use a high-quality photo as a source;

7. Draw tulip flowers;

8. Draw stems and leaves;

9. Draw circles on the vase;

10. Of course, now you know how to draw a vase of flowers with a pencil. But in order for the image to look really beautiful, it is recommended to make it in color. Outline the sketch with a pen;

11. Using an eraser, erase the sketch;

12. Shade the surface of the table with gray and blue shades of pencils. Color the vase in red, except for the circles, and paint the strip on it with yellow;

13. Color the centers of the daffodils with yellow and orange. Shade flower petals with blue and lilac tones;

14. Color three tulips with pink, lilac and purple pencils;

15. Color the fourth tulip with yellow, orange and red hues;

16. Green and dark green paint over the stems and leaves;

17. Darken the vase with a brown pencil.

The drawing is ready! Now you know how to draw a vase of flowers! Such an image will look no less beautiful if you choose paints instead of colored pencils for coloring it, for example, watercolor or gouache. The main thing is to carefully color the flowers, and then the bouquet will be simply charming!

Watch the video: "How to draw a vase of flowers"