What can you make a passe-partout for a picture from. Photography and passe-partout - ways of registration. Passepartout making. Step-by-step instruction
A passe-partout is a cardboard figure, usually a rectangle, square or oval. It is often used in two ways: a photograph is glued to the center or a small frame is made in its middle - a hole into which a picture, photograph or embroidery is inserted. This hole should be in harmony in form with the content of the image, the shape and color of the frame. Passepartout fills the space between the frame and the picture. In this article we will figure out how to make a passe-partout with your own hands.
Antique but modern
Where and when did it appear? It is unlikely that it will be possible to name the exact date and creator. If we talk about the history of occurrence, we only know that this art has come to us since the time of Leonardo da Vinci. It was he who first began to protect his paintings with frames, approaching this issue with all seriousness.
Depending on what the passe-partout will frame, its tasks can be completely different. If, for example, it is used for a photo, then this can significantly expand the perception of the image. It also performs an informative function, it records when, who or what is shown in the photo. Sometimes there is an autograph of the person depicted in the photo on the passe-partout.


An important function of the passe-partout is protection. A photo, embroidery or painting, thanks to the mat, is at a small distance from the glass, which keeps it from deformation for a long period of time.

decorative feature. This is the main thing for which it generally makes sense to decorate an embroidery or a picture in a passe-partout. Depending on the material of which it is composed, a mat can create a variety of visual effects: increase the depth of the image, create a color balance between the work itself and the frame. In the photo below, you can see how the perception of the image changes depending on the color of the mat.


You can make a passe-partout for your own painting or embroidery using simple materials and tools, as described in the master class below.
You will need:
- colored cardboard that will enhance the beauty of your image and blend with the frame;
- white or plain cardboard;
- paper knife;
- scissors;
- glue;
- your picture (embroidery, photo).
Cut off a piece of cardboard equal in size to our work. Mark it, determining the center of the embroidery and the mat, draw a rectangle of the desired size on the cardboard. Measure 2 mm from each line and draw two more rectangles - more and less than the size of the first rectangle, equal to the size of the embroidery.


Now cut a line along the iron ruler along the inner marking with a paper knife, and push the line along the outer marking with the blunt side of the scissors or something not too sharp. In each corner, you need to make small cuts from one corner to the other and bend inward the fields that have turned out.

Usually the frame consists of three parts: glass, the frame itself and the back, which fixes the picture. Here, to the back of the picture, you need to attach the embroidery with double-sided tape or a stapler.

To make the passe-partout more voluminous, you will need to cut strips of white or plain cardboard and glue them around the perimeter from the inside out, as in the photo.

Assemble the embroidery with the finished passe-partout: first the frame, then the glass, then the passe-partout, then the embroidery attached to the back wall.

The picture with the passe-partout is ready.

This design option will look very good and will cost you quite a bit.
In framing workshops, there are various types of passe-partout, different in color, texture, composition and decor. These are professional products, and they are made on special equipment. There are mats with decorative embossing or engraving.
Depending on the number of layers of cardboard, there is a single-layered (for modern graphics) and multi-layered mats (to create a depth effect).


If you are engaged in professional activities and create expensive works, then you need to understand that in terms of their composition they distinguish between a museum, reservation and ordinary passe-partout.
Museum passe-partout: made of special cotton fibres, free from chemicals that could damage the work it has been decorated with over time. Used for valuable exhibits or expensive photographs or paintings.

Reservation mat: made of sawdust, with cotton fibers. Contains a small amount of chemicals that maintain the desired level of acidity for a long period of time.
Standard passe-partout: made of cardboard. Such a passe-partout has only a decorative function, without protecting the work from the influence of the environment.


Since embossed and textured mats are very expensive, scrapbooking or embroidery enthusiasts use different materials to create a mat, for example, make it from fabric or paper for decorating gifts. Some even use pieces of wallpaper to create beautiful mats.

A painting without a frame is like an actor without an audience. Both are inadequate. Nothing enhances an image quite like a well-chosen frame and passe-partout. This adds to its spectacularity and completeness. A painting, like a photograph, becomes an independent object that attracts attention and delights.
What is a passe-partout and what is it used for?
On the question of definition. Passepartout is a wide frame made of multi-layered cardboard that frames a drawing, photograph, collage or other work of art. As a result of this, a border is created between the picture and the frame. In this way, it is customary to highlight portraits.
The passe-partout frame is used for several purposes. Among them are the main ones:
- focus on individual details of the image, which enhances the impact on the viewer;
- facilitating the perception of the work by separating it from the rest of the interior;
- protection of the art object from the negative effects of the environment.
In addition, the passe-partout often acts as an element of art.
Why is symmetry bad?
Most of the finished passe-partout has the same dimensions on all sides. Such a move is justified from a commercial point of view, it can be used for both directions: book and landscape. However, this format of the passe-partout is not always appropriate from the point of view of aesthetics.
This fact is explained by the peculiarities of human visual perception. When considering vertical objects, the most harmonious will be the one in which the lower part has more weight. This fact is known and widely used in the press. For example, the Latin letter S or the number 8 are not symmetrical. Their undersides are slightly enlarged, but in general they look very harmonious.
The same thing happens with the passe-partout. If it is slightly increased at the bottom, then the whole picture will be perceived better.
It is worth noting that a symmetrical passe-partout frame is not always a bad thing. For example, if the image itself has a bright accent at the bottom, then additional amplification is not required. Another situation where there is no need for an asymmetrical mat is for educational and scientific illustrations.
Selection principles
The first thing you need to pay attention to is the color of the cardboard. First, it must be different from the shade of the frame. Then everything is based on the effect that you want to achieve. If you need to highlight the image, then it is better to place it on a very light background, almost white or even completely white. When it is necessary to achieve a reduction in the pattern, it is limited to a dark mat. The most neutral is gray. It practically does not interact with the image.

When choosing a shade for a passe-partout, it is recommended to focus on calm and muted tones. Let it overlap a little with the tint that is used in the image itself. Then the passe-partout for the drawing will effectively emphasize the dignity. In some cases, in this way, you can muffle or completely hide the flaws.
In addition, ornaments and lines can be applied to the passe-partout. Then they are simply obliged to form a single whole with the object of art.
The second point is the choice of frame. It should match perfectly with the image. A common mistake is the selection of a frame for furniture and the color of the walls.
There are times when it is worth abandoning the passe-partout - these are oil paintings and a huge image format. In the first case, there is simply no need to decorate them additionally, and in the second case, the size of the frame can disrupt the perception of the art object. There are still situations when the engravings themselves already contain decorative elements located along the edges. Then they also do not need to be removed in the passe-partout.
A few words about cardboard
Its thickness usually varies from 0.5 to 3 millimeters. Cardboard for passe-partout can be colored or plain. In the second case, the color of the cut does not differ from its front side. But the first option has a different shade on the cut. There is such a passe-partout that its surface has a texture pattern.
In addition, cardboard may be different in composition. The most popular has a neutral level of acidity. It is made from cellulose, which contains lignin. The latter undergoes oxidation and spoils the drawing paper.
Museum-quality cardboard has the best properties. It is less susceptible to fungus.
On the last step is cardboard with the quality of conservation. It is made of natural cotton and does not allow the fungus to develop at all.
How to determine the size of the passe-partout?
Too small fields will not perform their function. But, on the other hand, an overly wide passe-partout will divert attention from the subject of art. As a result, the image will simply be lost.

For the side and top margins, there is a rule: the width of the passe-partout should lie in the range from one third to one half of the side of the image that is smaller. This is in most cases. But there are special situations when the side parts can be made larger. An example would be an unbalanced or very dense image.
A wide passe-partout can be used in such cases:
- a large object is depicted for almost the entire drawing;
- portrait or still life;
- the landscape lacks the sky (increase the bar at the top) or the sea (make the bottom even bigger).
An example of a passe-partout frame for a 10 x 15 photograph can be the following dimensions: 5 cm on the sides, 4 cm on top, 6 cm on the bottom.
What are the options for Passepartout
With edging. This is a plank made of wood or plastic. Its appearance can be very diverse. From smooth to carved, tinted and painted to aged. Kant plays the role of a partition between the passe-partout and the pattern and is an additional decoration.

Multilayer passe-partout . When two or three cardboard options are used. They have different shades, but are necessarily combined with the image. Moreover, the inner layer can be made lighter or darker than the outer.
Passe-partout arrangement methods
First: passe-partout under the picture . In this case, the image is fixed on a solid sheet of cardboard. For this purpose, you can use rubber glue, which is easy to remove, and the pattern will not deteriorate. Another approach: take corners or double-sided stickers.
This method will not work if you plan to place the photo under glass. It can stick tightly and be irretrievably lost. It should be noted that such a drawing pass will add rigidity to the children's crafts, as a result of which it can be easily placed on the wall.

The second way: passe-partout over the picture. It looks like a tight frame under which the finished product is placed. Here you need to take two sheets of cardboard. The thinner one will go to the substrate, and the frame will be made from the thicker one. In the latter, you need to cut a window to fit the pattern, leaving an allowance of 3 mm. It will go to a 45 degree angled cut. This bevel gives a smooth transition from the image to the mat. You need to fix the picture on the substrate, and then glue the top frame to its edges with double-sided adhesive tape.
The latter option requires more material costs, but also looks more solid. In addition, with its help, you can close the photo with glass and not worry that after the time it will be impossible to get it.
Passepartout Notes
To the question of the design of photographs
____________________________________________________
Paraphrasing a well-known thought, we can say that everything in the image should be perfect: the work of the creator, and the passe-partout, and the baguette, and the hanging of works in the exhibition hall. This short article will discuss how not to ruin a good job with bad design.
What is a passe-partout and why is it needed?
Passe-partout is a colored thick cardboard (or other similar material) framing a drawing, painting, photograph or other work of fine art. In other words, a mat is the margin between the physical frame and the image.
Why is it needed? Firstly, the passe-partout facilitates the perception of the work, helping the viewer to concentrate their attention on the image. Secondly, the passe-partout and the entire frame as a whole protect the work from adverse environmental factors. Thirdly, a well-chosen passe-partout can accentuate certain details of the image and, thereby, enhance the aesthetic impact on the viewer. Fourthly, the frame and passe-partout are elements of image coordination both with the wall surface and with other closely spaced objects. Fifthly, it in itself can be an object of art. Surely more could be added to this list, but the purpose of this article is mainly to cover basic practical issues. Therefore, this is where we will end the discussion of high theory and move on to practice.
About the dangers of symmetry
Unfortunately, most commercially available mats are symmetrical. This means that the fields on opposite sides of the image are equal for such mats. This allows the same passe-partout to be used to design images in both horizontal and vertical formats. This approach is very practical, but from the point of view of aesthetics, it is rarely justified. This idea is often challenged. So, for example, Sharon Himes writes in her article on the ArtCafe website: “If the image is large or intended to be hung above eye level, then sometimes the bottom field of the passe-partout is made wider, which allows the viewer looking from the bottom up not to notice the decrease in size bottom margin compared to side margins. Since such situations are rare, it is usually done with the same margins on all four sides. It is difficult to disagree with the fact that the upper hanging requires an additional increase in the lower field of the passe-partout. But what we can’t agree with is the fact that when hanging at eye level, you can always limit yourself to using symmetrical mats.
The visual perception of a person is arranged in such a way that for a harmonious perception of an object vertically, its lower part must have a slightly greater visual weight. This "secret" has long been known to everyone who is somehow connected with the printing process. And that is why the letter S in almost all regular fonts is not symmetrical: its lower part is slightly larger than the upper one.

|
This "secret", of course, is known to all manufacturers of frames and baguettes. In English literature, it is called the "bottom weighting effect". Thus, the only reason for the widespread use of symmetrical mats is commercial expediency. In fairness, it should be noted that symmetrical mats in some cases look good. This happens mainly when the function of increasing the visual weight in the lower sector is performed by the image itself. Symmetrical mats are also appropriate in cases where we are dealing not so much with works of art as with educational or scientific illustrations. But more often than not, the lower field of the passe-partout should still be increased. |
|
|
Rice. 2 |
Take a look at fig. 2. In its upper part, examples of symmetrical placement of the image in the frame are given (option A). Option B differs from Option A in the increased bottom margin. In my opinion, even in these small-sized illustrations, it is clear that option B looks generally more harmonious.
Sometimes just a little increase in the bottom field is enough - and the perception of the image is significantly improved.
How to properly frame an image
In all cases, when it comes to human visual perception, strict formal rules cannot be formulated. Everything that will be stated below is nothing more than a recommendation. Sometimes they quickly lead to success. Sometimes they require significant corrections. The wisest thing to do is to treat them as a good starting point. It should also be remembered that in this article we are talking exclusively about single mats framing a single image in a frame.
First of all, you should answer the question: what size should the passe-partout be? Zero fields are usually used when framing paintings. If we are talking about graphic works (including photographs), then it should be noted that small fields practically do not perform any function. They just visually merge with the physical frame. Very wide margins are also inappropriate in many cases, as an excessively large passe-partout can distract attention from the image itself.
The width of the side margin is typically between 1/3 and 1/2 of the narrow side of the image. The left margin must be equal to the right margin. The top margin is often chosen to be about the same size as the side margins. The bottom field for the reason mentioned above is made somewhat larger.
Often you can also find the following recommendations: for vertical images, the top margin should be larger than the side margins. For horizontal images, on the contrary, the side margins should be wider than the top margin. And only in the case of a square image, it is necessary to observe equality between the upper field and the side ones. However, in practice, it is these rules that are most often violated, so they must be treated very critically.
Sometimes it is still allowed to make the side margins very wide. Such a situation may, for example, arise if the image itself is not balanced. As another example of this kind, engravings (as well as images similar to engravings in terms of execution technique) can be cited. A certain increase in fields is also required for "dense" images (in this case, the depicted objects densely fill the picture and, as it were, press from the inside on its borders).
For vertical photos with aspect ratio a/b = 2/3, the following formulas work well: side margin = a/3; top margin = b/5; bottom margin = b/3. These ratios make it possible to determine not only the size of the mat, but also the location of the image itself.
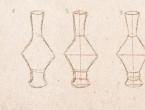
If, based on certain considerations, you have already chosen the size of the passe-partout, but have not yet decided on the placement of the image, then you can use the recommendation from V.P. Mikulin "25 photography lessons". According to this book, the image should be in the optical center of the frame. The optical center can be found using simple geometric constructions (see Fig. 3).

Rice. 3
In general, the constructions are clear and without additional explanations. In the left drawing, blue dotted lines bisect the right and bottom margins. In the point A found in this way, the lower right corner of the image should be placed.
A few words about the color of the passe-partout
If we are talking about black and white images, then most often it makes sense to choose a mat of some gray shade (from white to black).

Rice. 4
White color visually increases the work, while black reduces it (Fig. 4). On a white background, the image seems to come forward to the fore. The black mat is, as it were, a window through which we look at what is behind the plane of the picture. Gray color performs an intermediate function. In relation to the image, it is as neutral as possible.
Each color has its own disadvantages. So, for example, the white color of the passe-partout can unnecessarily distract the viewer from the image itself, and black can negatively affect the correct perception of tonalities. Not ideal and gray. “Gray underlays look good with the corresponding image, but care must be taken that this tone does not clog the subject, which will otherwise look monotonous and boring,” writes J. Wade in the book “Landscape Photography Technique”. In addition, while maintaining neutrality in relation to the image, the gray color can be discordant both with closely spaced objects and with the interior as a whole.
I must say that a lot depends on the interior in general. It hardly makes sense to hang two works with significantly different frames on the same wall next to each other.
Hanging and designing works require a creative approach. There can be no unambiguous solutions here. In any case, the final decision is always largely determined by the taste and views of the author, designer or organizers of the exhibition.
Often there is a recommendation to choose instead of white a color that is slightly darker than the lightest elements of the image. (Or, accordingly, instead of black, use a color that is slightly lighter than the darkest shadows.) This advice is not bad, but in practice it is far from easy to use.
For color images, you can use a passe-partout both in black and white (see Fig. 5) and color (see Fig. 6).

Rice. 5
When using colored mats, it is advisable to focus on calm, muted tones. Catchy poster colors are appropriate only when solving special design problems.

Rice. 6
The color of the passe-partout is most often chosen to match any element of the image. On fig. 6 is respectively the color of greenery, the color of the sky and the color of stone buildings. With the help of colored mats, you can emphasize (or, conversely, mute) any details in the image.
At the beginning of the article it was said that the frame and passe-partout also serve to protect the work from the adverse effects of the environment. In this regard, it is important to understand that both the frame as a whole and its individual elements themselves must meet certain requirements. Following a few simple recommendations will ensure the safety of the work for many years.
1. Among other things, the passe-partout must prevent the work from coming into contact with the glass of the frame. This is especially true for photographs, the emulsion of which can tightly stick to it. For this reason, when decorating "under glass", you should not stick a photo over a passe-partout. Instead, you need to use an overlay frame. Cheap frames with glass (without passe-partout) should only be used for decorating works of low value.
2. Fix the work in the frame in a non-destructive way. To do this, you can use, for example, branded or homemade paper corners. An example of such a secure mount can be found in an article by Dale Cotton.
3. The materials from which the frame elements are made must be chemically neutral (neutral pH). This is especially important for those elements of the frame that are in direct contact with the photograph.
More detailed information about the preservation of works can be obtained from other publications, for example, from.
The cost of quality work can be quite high. In the case of amateur photographs, the cost of processing can even significantly exceed the cost of creating the work itself. (We are talking, of course, only about those costs that can be expressed in monetary terms). However, no chic design can ever smooth out the imperfections of the work itself. When making sketches and sketches, you should not use expensive stylish frames and baguettes. In this case, the impeccability of design will only emphasize the shortcomings of the work itself.
conclusions
Ready-made passe-partout and frames, which are widely available, rarely help to harmoniously design a work of fine art. Therefore, standard solutions should be preferred to an individual approach. In this case, it is necessary to take into account:
- laws of perception;
- properties of the work itself;
- features of the interior in which the image will be placed.
It is simply impossible to give an exhaustive description of the issue within the framework of a small publication. There are a great many other aspects regarding the design of works, as well as the design and manufacture of frames and mats. For more information, the reader should refer to other sources.
1 Sharon Himes Matting: step by step.
2. How to finish and formalize the work. - Here you can find a good example of how the perception of the image changes depending on the color of the passe-partout.
3.Special thanks to Artur Ionauskas for the kindly provided formulas for optimal placement of the image in the frame, as well as to Ignat aka LetterEater for constructive comments regarding the text.
Passe-partout is a colored cardboard that fills the space between the artwork and the frame. It may be needed for graphics, watercolors, embroidery, as well as photographs and other creative works that you would like to frame.
A passe-partout for a drawing or embroidery is a neat decorative element, carefully selected in color and texture, that can focus on your work or place a small text inscription. In addition, with a passe-partout there is no need to select a frame according to the size of the work being drawn up.
Features of the choice of passe-partout
It is important to choose the right passe-partout so that it looks harmonious. It is important to pay attention to color, it should contrast with the main work and support the color scheme of the frame. In addition, it must have a certain ratio in width between the frame and the size of the inscription.
A double passe-partout looks spectacular, as well as a variant with different widths of the upper and lower frames. But it is equally important to carefully cut out the passe-partout. Following a simple instruction, you can easily make a passe-partout with your own hands.

To create you will need:
- Cardboard or a piece of thick paper of the selected shade. It can be both matte and shiny options. It all depends on what design you choose for yourself.
- You also need sharp scissors or a clerical knife
- Ruler, preferably metal
When working with a knife, be sure to use a special substrate that will prevent damage to the table during cutting.
How to cut a passe-partout?
First, decide on the size of the frame. It should be 5-7 centimeters larger than the finished painting on each side and fit the shape (proportional rectangle, square, elongated shape).

- Before you start making a passe-partout with your own hands, be sure to measure the internal size of the frame. The underlying cardboard and the cardboard from which you will cut the mat should be a few millimeters smaller than the frame itself. But do not overdo it, otherwise the work will fall out of the frame, since it cannot be tightly fixed
- Next, you need to decide on the internal dimensions. Measure the width and height of the design (embroidery), adding 2-4 centimeters from each edge, depending on the size of the work
- Now you need to calculate the width of the passe-partout for embroidery. Simply measure the inside length and width of the frame, subtract the length and width of the picture respectively, and divide in half. This will be the width of the passe-partout along the long and short sides of the picture
- Set aside the required dimensions on the passe-partout blank, draw with a pencil, cut along a metal ruler with a sharp knife, using a bedding
- Next, you need to glue the work to the passe-partout from the inside, carefully observing the location (stepping back 2-4 centimeters from each edge). For gluing, it is better to use double-sided tape.

It remains only to place the work in a frame. The task of how to make a passe-partout is solved.
Unusual solutions for paintings
In addition to the classic mat for paintings, there are non-standard solutions. For example, it can be a passe-partout made of paper with a pattern or ornament, both floral and figured.
In addition, photographers and embroidery lovers are wondering how to make a passe-partout double. To do this, it is enough to cut out two mats, one 3-5 mm wider than the other, and put them on top of each other and glue them with double tape. However, care must be taken to ensure that both sides of the inner passe-partout are the same size. Only then the design of the picture will look neat.

A stylish passe-partout allows you to give your painting a truly finished look. It is not difficult to make it, but a lot depends on how harmonious the color and texture of the material you choose will be. It should also be in harmony with the frame of your work.
Only by trying several options, you can be fully confident that your picture will look like a real masterpiece.
In order for a photograph to be noticed, the mere fact that it is of high quality and well taken is not enough. Like any painting, a photograph needs an appropriate decoration. If, in order to give greater depth and expressiveness to a picture, it is usually framed in a beautiful frame, then in the case of photography, a passe-partout is used for this purpose.
This is a kind of layer between the frame and the photograph, which helps to focus the viewer's attention on the photographic image, visually increasing its volume and perspective. Properly selected, the passe-partout makes it easier to perceive the photo, give it an additional charm and emphasize the beauty of the color scheme.
Currently, many photo printing centers provide a service for decorating photos in a passe-partout. This service is often used by photography enthusiasts and professionals preparing to participate in photo exhibitions. But there is the possibility of making a passe-partout for photographs at home.
What is a passepartout?
Perhaps not all novice photography lovers are familiar with what is hidden under the word passe-partout, but in fact, almost all of them have seen photos on the Internet or at exhibitions decorated with the help of a passe-partout. In general terms, a passe-partout is a small space between the frame and the image itself. With the help of the correct design of this space, you can focus the viewer's attention on the color scheme of the photo, as well as place individual accents. Passepartout has both a dividing function, separating and giving "air" to the image, and decorative. In addition, a passe-partout is able to protect a photo image or a picture from the adverse effects of the environment.
In photography, a passe-partout is a multi-layered cardboard of various thicknesses used as a frame or frame for photographs. When framing, the cardboard is placed between the frame and the photo image, thereby solving the decorative tasks of decoration. The photograph becomes the center of attention of the viewer due to the fact that it is separated from the environment. Professional designers-artists skillfully operate the passe-partout to create a sense of depth in the image in two-dimensional space. Any photo framed with a passe-partout becomes more spectacular.
In fact, the history of the use of the passe-partout in photography dates back to the time of the first daguerreotypes in the 19th century. It is hard to imagine photographs of that time without appropriate frames with a passe-partout. In the old photographic publications, increased attention was paid to the selection and manufacture of the passe-partout, since even then it was widely believed that the perception of the viewer largely depends on the correct design of the photographic image.
The fields of the passe-partout for exhibition photography have always been wider than for ordinary family shots. It was recommended to use only thick gray or cream-colored paper for making a passe-partout. In the pre-revolutionary photo studios on the passe-partout, which served as decorations for photographs, information about the photographer, the awards he received and the location of the photo salon was necessarily indicated. Today, ordering a passe-partout in a photo studio, you, thereby, expand the boundaries of your photos, visually enlarge the images and draw additional attention to them.
Passe-partout for photos at home
Another way to make a passe-partout at home is more laborious, but a photograph designed in this way looks more attractive, since it creates the effect of a smooth transition from a photo image to a passe-partout. This is the so-called passe-partout with a window. To make it, we need not only a ruler, a pencil, photo corners or double-sided stickers, but also a knife for cutting a passe-partout. In this case, we plan the passe-partout in such a way that a thick sheet of cardboard will go to the window, and a thinner one - to the photo substrate.
On a thick sheet of cardboard, we must first mark out our window - we take into account the margins that we have chosen for a particular photo. Using a pencil and a ruler, we mark out an even rectangle of a given length and width. Next, using a passe-partout knife, we carefully and slowly cut out the window, making sure that the corners remain exactly at 45 degrees. After the cut, you can slightly process the bevel with sandpaper. Then we need to make a substrate, for which we need to place our image in the optical center of the mat of the substrate.
The photo can be attached to the passe-partout using corners or double-sided tape. It remains only to connect the lower substrate with the passepartout to the window. This is done, as a rule, by means of paper tape on the top, reverse side of the cardboard. Our passe-partout with a window is ready, and now, in order to hang a photo decorated in this way on the wall, it is enough to find an attractive frame for it.
Photo studios quite often offer standard types of passe-partout, which are used only for the usual framing of the work, but they do not emphasize the beauty of the photo itself. Therefore, it makes sense to make a passe-partout for your photographs at home in order to provide them with a decent decorative design to your liking.