Decoration from natural stones with their own hands. How to make stone jewelry. What are natural stones
And here are ways to create rings from wire or pins. (I will call this a "loop" not to be confused with a real ring, like this.
You may need a loop in a lot of cases. With their help, you can connect beads into a chain, you can hang a bead on a bracelet or earring, attach a clasp ... The most important thing is to learn how to make them even and beautiful, as well as unbend them correctly.
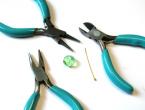
We take: wire or pin (I will have a pin), round-nose pliers, pliers, wire cutters, bead.

[b] Wires and pins can leave unsightly marks due to the rough surface of the tools. To avoid this, wrap them with electrical tape, tape or plaster.
In order for the bead to sit tightly, there should be no free space between it and the loop, and the hole in the bead should be such that both ends of the pin fit tightly into it.

If the pin and the bead are not friendly in this sense, then you can place a spacer or cap with a hole of a suitable size between the bead and the loop. You can also not cut off the tail of the pin, but wrap it several times between the bead and the eyelet. Choose what suits your project best.

The circle of the loop is formed due to the fact that the wire wraps around one of the working rods of the round-nose pliers. The rods of the round-nose pliers are not uniform, but in the form of a cone. Look at them carefully and decide for yourself what diameter you need a loop. Remember the place on the rod of round-nose pliers with a suitable width, your eyelet will have the same inner diameter. You can mark this place on the round-nose pliers with a marker. Let us have it be 3 mm.

We put a bead on the pin. On one side of the bead, we have a ball or a carnation head sticking out, and on the other, a pin tail, and we work with it.

To make our loop even and symmetrical, along the center line of the pin, we need to bend the pin at a right angle. This is done with pliers. To prevent the bead from dangling, make a bend as close to the bead as possible.

Now the most important thing in our business is to correctly calculate the length of the section that will form a loop. If the length is not enough, then the loop will not “close” into a circle; if it is too long, then the circle will not be even.
If you recall the geometry, then the circumference is calculated by the formula 2piR. We estimate: we need a loop with an inner diameter of 3 mm, the thickness of our wire or pin is 0.3 mm, which means that the total diameter of our future ring, taking into account the thickness of the wire, is 0.3 + 3 + 0.3 \u003d 3.6 mm, which means the radius is 1 .8 mm. Accordingly, for a regular and even circle, we need a length of 2 * 3.14 * 1.8 = 11.16 mm.
Of course, we will not measure the tail of the pin with a caliper to fractions of a millimeter, we will round the number and cut off all unnecessary. Having made ten to twenty loops, you yourself will determine by eye how much you need to leave - a centimeter, one and a half ...
Cut off:
- if you need a loop, which you will then unbend to attach other parts, then cut the wire without a margin;
-if you need a bead on a loop, for example, for a pendant, then add an extra millimeter or two, this tip will then need to be “threaded” into the bead like a thread into a needle;
- if you wind the pin with your own tail, then do not cut it off at all;
- if your pin is thick, for example, like cast pins for pendants, then I advise you to cut it not exactly across the wire section, but at an angle. Then the cut will fit very neatly and tightly to the main part.

So, we have a bead on the pin, the pin is bent at a right angle, the tail is cut to the estimated length.

Now take the round-nose pliers in your hand, turn your hand over so that you see your palm, and not the back of the hand.

At the same time, the round-nose pliers hold the pin just in the place that we remembered or noted, where the width of the rod is 3 mm. And now we hold the bead with one hand, and with round-nose pliers we wrap the tail of the pin into a ring by moving towards ourselves (this is more convenient for me personally).


The resulting ring itself is located evenly and symmetrically in the center. We have a neat loop that can be opened and closed by attaching new elements.

There is another way: the pin is not bent at a right angle, the length needed for the loop is simply measured, the pin is cut off, the loop is bent, which is obtained to the side of the central axis of the pin and bead. Then, with pliers, the pin is aligned in the center, like this. With this method, the rings turn out uneven.

If your loop should not be detachable, then direct the very tip of the pin (that millimeter or one and a half that we added when calculating the length) inside the bead, as if threading a needle.

The photo shows why two pin thicknesses are needed.

If you want to wear a spacer, a daisy, a hat, a small crimp or the like, then first estimate its height. When bending the pin at a right angle, leave the same distance to the bead as the height of your part.
Due to the fact that the jaws of the pliers also have a certain thickness, a small distance from the bead to the loop often still remains. The second part, suitable in thickness, can just compensate for this.
Put the part on the pin AFTER it is bent.

Next, a regular loop is performed, which can also be made detachable and one-piece.


How to wrap a ponytail around a pin.
We put a bead on the pin. We leave a distance between the bend and the bead for future turns (as we did when adding the spacer) and bend the pin at a right angle. We leave the length for the future loop and bend the right angle again (it turns out where we would cut the wire).

We grab the round-nose pliers at the place of the second bend and make a loop as usual. It turns out like this.

Now, so that the circumference of the loop does not deteriorate, we thread the rod of the round-nose pliers into it until it stops and take it in my non-working hand (I am right-handed, I have a non-working one - left). We take pliers with our working hand, clamp the tip of the wire with them

and wrap between the loop and the bead. Soft wire can be wrapped with your fingers.

You can not put round-nose pliers into the loop, but clamp it well with pliers. The effect is the same. Cut off the excess tail.

I saw such a variant of a one-piece loop. If it does not bother you that it is not located in the center - just make a double ring on the rod of the round-nose pliers.

And finally, how to open the loop and put something on it without spoiling such an even and beautiful circle.
We hold the main part of the loop with one tool, grab the second barrel with the second tool and move this hand towards ourselves (or away from ourselves, as you prefer). Just do not pull the loop to the sides, otherwise it will turn into an oval.


The photo shows that one side of the loop has left the common plane, we carefully thread the desired element into this gap and close the loop back with a reverse movement (toward or away from ourselves).
It is impossible to imagine any modern image without jewelry. Brooches, bracelets, rings, earrings - all these accessories complement a fashionable bow and make it complete. And sometimes they play not only the role of additions, but are the basis around which the outfit is built. What do fashionistas wear now, and what kind of jewelry can be made with your own hands so that it looks fresh and organic? Present to your attention top 5 jewelry you can make yourself, using beads made of natural stones, as well as a variety of accessories, with the help of which the products will become fashionable jewelry.

In the first place - earrings-studs "Dior". These are stud earrings, consisting of two balls, one of which lies on the earlobe, and the second adorns the ear from below. Earrings became extremely popular when the fashion house "Dior" released a collection of jewelry designed by designer Camilla Michelli. You can also make similar ones, just do not use cheap plastic, but rather buy beads made of natural stones in Moscow or in any specialized needlework shop. How to make Dior stud earrings? Check out fashion blogger and designer Xenia Kuhn's "Fashionrolla.com" blog for a tutorial on how to make these wonderful earrings in "Double Pearl Earrings". Now any of us can please ourselves with fashionable double studs! You will find another option for making stud earrings at the end of the note in the video clip.

The second place belongs to the sautoir, an ornament that has been undeservedly forgotten for many years. These are long beads, or a bunch of them, which were originally intended to be worn on a bare back. In the modern world, the sautoir is worn in front, like ordinary beads. For the manufacture of sautoir, natural beads and artificial pearls, various kinds of tassels, as well as cabochons are used. Of course, you will have to work hard to make a sautoir with your own hands, but this trendy jewelry will not leave you unnoticed. A nice bonus: the sautoir visually stretches the silhouette, making you more elegant. How to make a sautoir with your own hands? Watch the lesson on making a sautoir you will find at the end of the note in video format.

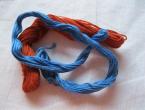
The third place is rightfully given to bracelets made of natural stones. They can be worn one at a time, but several bracelets look much more interesting at once, or one long one with several turns, such as in the picture. Do not limit your imagination: you can attach not only various ready-made pendants, but also homemade tassels to the bracelet. Feel free to use metal fittings, leather straps, and silk cord. Combine different types of crafts, like macrame plus natural stone beads look great together! But this cute bracelet from the picture is suggested by the needlewoman Hannah, the author of the blog "Hann made it". In addition, look at the end of the article and you will find a tutorial on making another bracelet with your own hands in the video clip.

Fourth place goes to brooches, a very fashionable piece of jewelry. Shirt collar, coat lapel, headpiece, stole - this is a list of potential places to wear a brooch. Everyone can make a beautiful brooch with their own hands, you just need to choose the option that best suits you personally. There are many ways, and some of them are quite intricate. For example, braiding cabochons from natural stones with beads is a rather time-consuming method, but if desired and diligent, it can be done. We recommend you to choose a beautiful cabochon on the page of the Mirbusin online store: https://mirbusin.ru/catalog/cat-540-kaboshoni. Well, for those who want simpler methods, we suggest watching the video master class at the end of the article.

Well, the pendant takes the fifth place. This type of jewelry is simpler than a sautoir, but it also gives harmony to its owner, provided that it is large enough and worn on a long pendant. But at the same time, it is not so easy to make an original pendant from natural stone. Of course, the easiest option is to take a stone with a hole, but this, you see, is boring. You can go the route of braiding cabochon beads, and you can also use wire to secure the pebble. By the way, the option that you see in the photo is fundamentally different from all of the above. Here, sheet copper is used to frame natural stone without a hole. Of course, this method requires special tools and devices, but what a beauty it turns out! The latest video clip under this article will tell you how to braid a natural stone pendant with wire using the Wire wrap technique.
Have you already decided what your personal jewelry set made of natural stones will be like this fashion season? Make up your mind, because spring has already begun!
Discussion of the article
Jewelry is always in fashion, and when beads made of natural stone also have healing properties, this is simply an invaluable thing in every wardrobe. Beads made of stone look presentable, but it should be borne in mind that a stone of a certain breed is not suitable for everyone.
There are many lessons on creating jewelry with your own hands (which means unique, not replicated) on the Internet. MK on jewelry is in Li.ru at Katra I http://katrai.ru/post210281637/ or you can download the book on "Royal jewelry with your own hands" http://depositfiles.com/files/221exh7mu, or try to bead cabochons following instructions from http://snivli.blogspot.com/2009/11/blog-post.html
 .
.
In this article, I will look at what to look for when making your own stone jewelry.
 .
.
Age, skin color, hair, eyes of a woman, all this plays a big role when choosing stone jewelry. What type of stone suits you personally, see the table
 .
.
 .
.
A common practice is to collect beads from small stones to large ones, as if collecting a mass towards the center. On the neck, it looks like the beads are gradually flowing down. Very beautiful.


Amber is perhaps the most versatile material for beads. There are few people who do not like amber. It should be noted that the use of this stone requires careful attention to the design of the beads. For young girls, a silver thread with round amber beads, between which there is a fairly large distance, is suitable, while adult women are more likely to wear two-level beads with medium-sized pebbles, and older women - a thread of large amber, like an accumulation of sunlight and a clot of energy, with great magical and healing power .
 .
.
Looking at aventurine beads, I want to say not about the jewelry itself, but about the stone from which it is made. Aventurine is an absolutely amazing material. It seems to consist of billions of sparkles in every way iridescent and changing color in the light. The color of this stone is almost always light brown. Perhaps the only disadvantage of aventurine is its fragility, so it is better to use larger stones. Pearl loves warmth very much (because it grew in the body of a living being) and has magical properties: it is a stone of longevity and unfading beauty.
 .
.
 .
.
Who said that stone beads should only be made of this material and no other? You can make a braid of beads from beads and this will radically change, “rejuvenate” the decoration
 .
.
 .
.
By the way, it is quite possible that the braid of the bead will save the damaged pebble from falling into the wastebasket. And in soutache braid, cabochons will look absolutely masterpiece
 .
.

A few pictures of cabochon braiding in the figures below:

 .
.


5.


7.
Making beautiful beads with your own hands is not difficult, even with children. And it doesn’t matter what kind of beads you have, made of natural stone or artificial. Your desire to create something beautiful, stylish and unique is important, because no one else in the World will have such an ornament! Dare!
 .
.
Jewelry made of natural stones is not only exquisitely beautiful, but also symbolic. Since ancient times, people believed that they have magical properties: some heal the soul, body, others protect, energize. The right stone in a piece of jewelry can work wonders. Age, character, skin color, hair and eyes, zodiac sign - all this plays an important role in the choice. There is a whole correspondence table, where each zodiac sign has its own stone. Beads, necklaces, brooches, bracelets made of natural materials are not cheap. We offer the best way to remain a fashionable lady - to learn the art of making jewelry from natural stones with your own hands.
Creativity lessons for beginners
Stylish exclusive hand made jewelry is an integral part of a fashionable image. Its value lies not so much in the cost of materials, but rather in a unique design idea. Getting to work on the author's collection of accessories, the choice of stone is the main task.
Original jewelry made of natural stones with your own handsThe most universal is amber, which combines sunny beauty and amazing magical properties. It suits almost everyone, but it is important to choose the right shape for decoration.
 Charming Mila Kunis presented the jewelry company in a green amber necklace
Tip: For young girls, stone chips or small round beads are suitable. Adult ladies prefer voluminous jewelry.
Another popular breed for creating stylish jewelry is turquoise, popularly referred to as the stone of happiness. Many fashionistas were captivated by the original aventurine jewelry - a surprisingly fragile, but very glamorous stone, shimmering with billions of sparkles.

You can talk about the properties, types of rocks endlessly, the topic is very exciting. But, as they say, skill comes with experience. We offer a visual lesson on making elegant, original, stylish stone jewelry with your own hands.
 Graceful stone jewelry will complement your look
lucky necklace
A simple master class will be appreciated by beginners in the art of needlework. A fashionable, useful, bright accessory can be made in just a couple of hours.
 A necklace made of natural stone will be a great gift
To work, you need a crumb of turquoise, crimps, round agate beads, gold-colored beads. In the process of creating a necklace, you will need a special tool - round nose pliers, pliers and side cutters.
 Tools and materials for creating a necklace
Let's get to work:
- As a basis for jewelry, we take a jewelry cable 1 meter long. We fold it in half and string the crimps, but not completely, leaving a small loop. We clamp the crimp with pliers, fixing it on the cable.
 So, let's start the process of creating our necklace.
- Let's start assembling the decoration. First we string a bead, bring it to the crimp. Then we disconnect the ends of the cable, on each we begin to string several turquoise crumbs. Next, we string an agate bead, we wind the ends of the cable alternately through the hole, fixing the first weaving element.
 Let's start assembling jewelry stringing crimps and agate beads
- We collect again a crumb of turquoise on each tail, tighten it with a bead, then string two more beads and fix it. Again crumb and fixation with an agate bead. We repeat this rapport until the end of weaving.
- When the necklace of the desired length is ready, at the end we form a loop. We fasten the fastener at the ends of the weaving.
 We collect a crumb of turquoise, string beads and weave until the desired length is obtained.
A delicate, graceful turquoise necklace can be worn at a friendly party, a romantic meeting or to dilute a strict office look.
Master class "Lucky necklace"
Stone beads
Having shown imagination, experimenting with design, combining different materials, you can create unusual stylish jewelry.
 Unusual jewelry made of natural stones
We offer to make beautiful beads of stone and wooden buttons with your own hands. The basis of the beads will be a thin leather cord, we will fasten the elements with a wire.
 Tools and materials for creating beads from stone and wooden buttons
Work algorithm:
- First you need to cut the wire 7-8 centimeters long. The wire should be thin enough, but flexible and strong. We pass one end of it through the hole of a wooden button. With the help of round-nose pliers, we wrap both ends into loops, and cut off the excess wire. The first element of decoration is ready.
 We begin to string wooden buttons on the wire
- We cut the wire again, we stretch it into the hole in the pebble. We turn the wire with round-nose pliers, form a loop, cut off the excess end.

- Let's start assembling. We lay out all the elements in the right order, we tie all the elements in pairs with a leather cord until we collect the beads.

Important: We form so many separate elements to make long beads.
In such an unusual and simple technique, you can make a whole set of jewelry from stylish beads, a bracelet and earrings. Original jewelry will harmoniously complement a fashionable look in the style of boho-chic, Provence, hippie or country.

Weaving jewelry from stones
There are many ways to make jewelry from stones with your own hands. One of the simplest and most popular is weaving accessories from stones on a thread.
 Bright multi-colored beads made of natural stone
To work, you will need a strong hemp rope and round stones with large holes. You can use elements with patterns, various shapes and colors. The more unusual elements, the more original weaving will turn out.First, take the largest bead, thread a string through the hole, tie a tie knot. We string a bead on one end of the thread, tie two knots under it.
 We start weaving beads on a rope
Now we stretch a stone through both ends of the rope, tighten it with a knot. We continue stringing beads, randomly alternating stones and knots until the end of weaving. Fasten the clasp at the ends.
 So, our stylish beads are ready.
Using a variety of types of natural stones, any colors and shapes, creating unusual combinations of materials, using a similar technique, you can weave very original necklaces and bracelets from stones.
 Set of necklaces and earrings made of natural stones
Natural stones in the skillful hands of craftswomen can work wonders. No wonder people have been using them for decorative and magical purposes for many centuries. Bright, original, luxurious jewelry made of stones will not only decorate the image, but also, if desired, heal, fulfill wishes and protect from evil.
 Jewelry made of natural stones will not only decorate your look, but also give you a good mood.
Jewelry is always in fashion, and when beads made of natural stone also have healing properties, this is simply an invaluable thing in every wardrobe. Beads made of stone look presentable, but it should be borne in mind that a stone of a certain breed is not suitable for everyone.
In this article, I will look at what to look for when making your own stone jewelry.

Age, skin color, hair, eyes of a woman, all this plays a big role when choosing stone jewelry. What type of stone suits you personally, see the table


A common practice is to collect beads from small stones to large ones, as if collecting a mass towards the center. On the neck, it looks like the beads are gradually flowing down. Very beautiful.


Amber is perhaps the most versatile material for beads. There are few people who do not like amber. It should be noted that the use of this stone requires careful attention to the design of the beads. For young girls, a silver thread with round amber beads, between which there is a fairly large distance, is suitable, while adult women are more likely to wear two-level beads with medium-sized pebbles, and older women - a thread of large amber, like an accumulation of sunlight and a clot of energy, with great magical and healing power .

Looking at aventurine beads, I would like to say not about the jewelry itself, but about the stone from which it is made. Aventurine is an absolutely amazing material. It seems to consist of billions of sparkles in every way iridescent and changing color in the light. The color of this stone is almost always light brown. Perhaps the only disadvantage of aventurine is its fragility, so it is better to use larger stones. Pearl loves warmth very much (because it grew in the body of a living being) and has magical properties: it is a stone of longevity and unfading beauty.


Who said that stone beads should only be made of this material and no other? You can make a braid of beads from beads and this will radically change, “rejuvenate” the decoration


By the way, it is quite possible that the braid of the bead will save the damaged pebble from falling into the wastebasket. And in soutache braid, cabochons will look absolutely masterpiece