LED lettering. Do-it-yourself flexible neon signboard. Create neon text in Photoshop The subtleties of making neon signs
A homemade neon sign can be used not only for its intended purpose, but also as a bright and extraordinary lighting element in the interior of a suitable style. Details of making a neon sign in the form of an inscription with your own hands, below.
materials
For work you will need:
- flexible neon for 12 or 24 V and a power supply to it;
- 2-pin connector for flexible neon;
- end caps;
- aluminum profile;
- flat aluminum tube in width corresponding to flexible neon;
- epoxy adhesive for steel products;
- sandpaper;
- wire;
- electrical tape or heat shrink tubing;
- primer;
- paint;
- hacksaw;
- vise;
- transparent silicone adhesive.

Step 1. You need to make a layout of the inscription, which will become a sign. In fact, it needs to be transferred to a large sheet of paper, for example, drawing paper, etc. Since neon tubes can end up bending differently than you imagined, it's worth making a rough layout out of round wire. Fix it with pieces of adhesive tape and evaluate whether this is what you want to see. After transferring the layout to paper.

Step 2. Based on the prepared template, bend the flat aluminum tube to form a frame. At bends and intersections, it will need to be welded.
Step 3. On the back of the frame, weld two metal fasteners that will be needed to hang the inscription on the wall.
Step 4. Cut the prepared aluminum profile into small pieces, 1 - 2 cm long. They need to be fixed along the entire length of the prepared frame. Be careful when attaching them, as the profile pieces should be installed strictly on the side where the flexible neon will pass. The twists and turns will make them appear to be on either side of the tube, but they are not.
Step 5. Before fastening the profile, sand the metal frame along the entire length, paying special attention to the places where welding was used.
Step 6. Attach the profile pieces to the frame at the predetermined points using epoxy glue. Leave everything until the adhesive is completely dry.
Step 7. Apply a primer to the surface of the resulting frame. Leave everything again until the material is completely dry.

Step 8. Attach flexible neon to the frame. If it does not fit tightly enough into the fasteners, use epoxy glue.

Step 9. Cut off the excess flexible neon.
Step 10. Install the power supply connector, observing polarity.

Step 11. Check if the assembled structure works.
We tell you how to make such a decor with your own hands (and save a lot!). We train on the most popular words: love and hello.
To make DIY lettering, you will need an electroluminescent wire. We sell it as "cold neon", and in Western stores - as EL wire. Such neon consists of a PVC cord and a core covered with an electroluminophor. To power it, you need a high-frequency current, so it’s better to have a set of a cord and an inverter right away (it can work from the mains or from batteries).
HELLO
A project from the author of the blog I spy DIY Jenny, ingenious in its simplicity: instead of attaching the inscription to a rigid base, we glue it to a wire base. It turns out a weightless decor that can even be hung on a wall with colorful wallpaper.
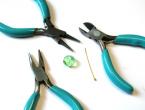
You will need:
- marker;
- whatman paper or other large sheet of paper;
- steel wire;
- wire cutters;
- universal glue;
- neon cord powered by batteries or an inverter for the electrical network;
- paper clips.

1. Write your word without lifting the marker from the paper.

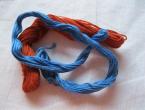
2. Bend the wire into the shape of a word, using the lettering as a template.

3. After you have bent the wire, glue the neon cord to it. Starting from the end of the cord, every 5-10 cm, drip glue on it and fix the junction with paper clips. Leave until dry.

4. Put the inscription on the console or hang it on the wall, insert batteries into the power supply, turn it on. Ready!
Every business owner wants to stand out from their competitors. At present, the technologies for the production of illuminated advertising have stepped far forward and offer the widest choice of materials and technologies for the manufacture of signs for every taste and budget.
Let's consider duralight and LED-neon as an affordable material for the manufacture of not only signs, but also decorative and lighting design of the entrance group, the facade of your building, or even the interior (both reception and interior design elements). Why duralight, or LED-neon? The fact is that these materials do not require any special knowledge of the sign manufacturing technology, which requires taking into account many nuances. In addition, modern duralight is made on the basis of the same LEDs, due to which its light output will be maximum, applicable to its manufacturing technology.
WHAT IS USED IN LIGHT BOXES AND SIGNS?
Let's figure out why LED duralight, light modules, strips and LED neon are better than good old neon tubes, morally and technologically obsolete incandescent lamps and fluorescent lamps. I think that incandescent lamps are immediately swept aside. In outdoor advertising, such lamps were used about 40 years ago, and even then because of the lack of other alternatives. The only case is duralight (more recently it was assembled on the basis of miniature incandescent bulbs).
OBSOLETE MATERIALS FOR BOXES AND SIGNS.
- Incandescent lamps- high heat transfer is not applicable for our conditions. In winter, such a lamp, during operation, melts the snow and ice around it, the plastic elements of the sign, fills it with water, when it turns off and cools down, it overgrows with ice, which eventually melts again and safely burns out along with the electrical wiring elements. Extremely low efficiency - high power consumption, low light output. Let's forget about them.
- Luminescent electrics- it is impossible to create complex elements from fluorescent lamps. Such an electrician turns on for a long time and poorly at low temperatures. A small selection of lamp color options. Recently, it has been used only in light boxes, or for illuminating shop windows. It is successfully superseded by LED technologies, which have a higher light output efficiency, many times longer time between failures and are less demanding on ambient temperature. In isolated cases, energy-saving lamps are found in small signs made by a handicraft method. I consider such use unacceptable, if not from an aesthetic point of view, then at least because of the low IP class, which can be very fraught for those who like to "save".
- Neon (gas light) tubes- Being one of the oldest technologies at the moment, it has not so many disadvantages compared to LED neon and even LED duralight. But there are also significant drawbacks - for gas-light tubes, a relatively narrow range from -25 to +50 C is considered to be the operating temperature. At a lower temperature, higher currents are required for the operation of the tube, which drastically reduces the life of the tube itself. Under real operating conditions, it has been noticed that a temperature of -15 and below leads to a significant drop in the brightness of the neon tube, as a result of which the key inscription of the name of your store, made in neon, is inferior in luminosity to the lower box on fluorescent lamps. Also, neon advertising requires a very high supply voltage, which is dangerous for interior use, and you have to think about where to place bulky and heavy power transformers. Another significant disadvantage - the glass is fragile! Well, besides, we are considering the possibility of making advertising with our own hands, and neon tubes cannot be dispensed with without the help of competent specialists and expensive equipment.

MODERN LIGHTING MATERIALS FOR Illuminated Signs and Boxes.
As a result, it turns out that for the manufacture of illuminated advertising, or its elements with our own hands, neither luminescent nor gas lighting technologies are suitable for us. This is where we return to using for our purposes LED duralight, LED neon, LED strip and light modules as to the most accessible and profitable materials for us .

- Round duralight.
- LED modules.
- Flexible LED neon.

PLUSES AND MINUSES OF USING NEON AND DYURALIGHT.
Pluses (+).
- Durability- LEDs mean up to 100,000 hours of continuous operation. I have not seen the MTBF declared below 30,000 hours even from Chinese manufacturers.
- Extremely low power consumption- LED-neon flex consumes 4-8 watts per linear meter (neon tube is about 20 W-meter). In general, as practice shows, with the same luminous intensity, LEDs consume 4 times less energy than fluorescent ones, and about 10 times less than incandescent lamps.
- Operating temperatures- The range recommended by LED manufacturers ranges from -70 at the lower end of the range to +85 (cautious manufacturers limit this threshold to +50) - at the top. At the same time, the brightness of the glow is preserved, as well as the instant start.
- Flexibility- both duralight and LED-neon are essentially flexible plastic tubes with LEDs and electrical circuit elements laid out inside. I would like to note that duralight bends easier, with a smaller bending radius and along any axis, unlike LED neon. As a result of this factor, it is more convenient to lay out flat and fairly large elements of a signboard with LED neon (for example, the contours of letters), while duralight can easily repeat any contour of a design element.
- High IP65 ratio- most of the tubes produced at the moment can work absolutely without problems when completely immersed in water.
Minuses (-).
We have analyzed a lot of advantages of LED neon and duralight, but surely there are also disadvantages? Yes, both LED neon and duralight have their drawbacks.
- A common disadvantage is the multiplicity of cut. Due to the fact that elements of the electrical circuit of the device are located inside the tube, both duralight and LED neon have a certain cutting step (multiplicity) that varies from 0.15 to 3.0 meters for duralight and from 0.91 or 1, 52 meters for LED neon. In this regard, some restrictions are imposed on the design performance, since you have to hide the excess length of the light cord somewhere.
- It is believed that the disadvantage of duralight compared to LED neon is discreet glow of duralight. Those. you can save money and make contour lighting of the sign from a cheaper, compared to LED-neon, duralight, but in the end we will get either uneven light with pronounced points of illumination (when the illuminated surface is close to the sign), or too weak and inexpressive glow (when increasing the distance from the sign to the illuminated surface). Naturally, this point can be considered a disadvantage only when performing certain tasks, but when choosing a design solution, you should still always take into account that the step between the LEDs in duralight is very noticeable and amounts to 0.5 - 2.5 cm, while LED- neon has a smooth, indistinguishable from neon, glow along its entire length.

- And finally, I want to note once again that LED neon bends well only in one plane, and in other planes the bending radius is much inferior to duralight, which cannot be ignored if you want to highlight a complex small-sized shape.
USEFUL LINKS ABOUT DURALIGHT.
A cool effect for those who are good at Photoshop! Surprise your subscribers or just learn how to make a glowing inscription is quite simple. Let's see how to make a neon inscription in Photoshop?
Background preparation
First you need to open the background image in Photoshop. In most cases, they take a picture of a brick, stone or metal wall. It is enough to enter “brick wall” in the search engine.
Option 1
How to prepare a background for a neon inscription:
- Open a picture of a brick wall (or any of yours).
- On the right in Photoshop there is a panel with "Layers". It is there to the right of the small image of our picture that you need to click on the lock and unpin the layer by double-clicking on it.
- In the window that appears, you can set absolutely any name for your layer (or you can not set it) and click OK.
- Next open Images-Image Size. And set the width and height parameters to 1280*720.
- Then open Filter-Distortion Correction.
- On the right, click on the "Custom" tab and set "Remove Distortion" to -1.00. Press OK.
- In the right menu, where all layers are shown, hover over the small circle at the very bottom. Click on it and select "Hue/Saturation".
- Set the Brightness to -60 (minus 60) and the Saturation to -90.
- Fasten the layers together. On the same tab, where the parameters were previously set, there is a box with a down arrow at the bottom. It must be pressed.
Option 2
How to make a neon inscription in Photoshop and a background:
- Open image.
- In the Layers section, click on the small circle and select the "Levels" tab.
- Reduce the white color to a value of 65-75 (any range).
The Control command and "+" on Windows, the Command and "+" command on Mac enlarge the picture. A similar effect can be configured in the settings so that the photo is enlarged by scrolling the mouse wheel.

Making magic
Then the matter will remain small. You need to choose and download the font that you like. Don't forget to install it on your computer! You can eat French rolls and drink tea during installation.?
How to make a neon inscription with your own hands:
- Write text and scale the inscription to the desired size.
- In the Layers panel, double-click on the layer and bring up the menu with the Layer Style settings.
- Set the Fill Opacity to 0%.
- In point "Stroke" put Size by 4 pixels, and Position select "From center", select Stroke color optional.
- In point "External glow" ask Blend mode- "Normal". Choose any color from the palette as desired. Size set to 12 pixels.
- In point "Inner Glow" ask Blend mode- "Normal". Choose any color from the palette as desired. Size set to 12 pixels.
- In point "Shadow" And "Inner Shadow" put Size by 7 pixels, Bias by 7 pixels.
- Create a duplicate layer with Ctrl + J.
- Turn off all settings in the layers panel except "Strokes".
- Customize in "Stroke" the following options: Size by 2 pixels, Color- white.
- Neon inscription is ready! And you are great!
Backlight
The final, but optional step, which creates an unusual highlight around the letters. It's like a neon tube reflects a little on the wall.
How to make a neon sign glow:
- On the Layers panel, where the layers of your labels are located, there is a small arrow in the very corner that allows you to collapse all settings. You need to do this procedure with 2 layers of text.
- Hold Ctrl and create a new layer. It should be below the label layers.
- Hold Ctrl and click on the pentagram of the text layer (letter T). The entire text layer should be selected.
- Select a tab from the top menu Selection - Refine Edge.
- In the window that appears in the tab "View" select mode "Overlay".
- feathering put on 50, and Move Edge at 70.
- Press Ctrl + Delete and fill the label with white.
- In panel Layers choose Blend Mode - Overlay.
- Next, double-click on the same layer, in "Color overlay" choose any shade for the inscription, and Blend mode put "Color".
Life hack for phones
The developers have not yet created a similar application for phones. But there are two programs where you can make a neon inscription online. Applications are called Draw pictures and take notes And Kids Doodle. The only negative: in both editors you need to draw by hand.

WITH applause
Be the most stylish! Use super effects.
Outdoor signs are one of the most effective tools to attract customers who are in close proximity to the advertised object. Unfortunately, this method has disadvantages, which appear at the moment when the natural street lighting "goes out". So that after sunset the object of trade, entertainment or the provision of services can continue to work efficiently, signs made of neon tubes are used.
Owners of restaurants, pharmacies or shops whose opening hours fall in the evening or at night, in order not to lose a significant part of their customers, are forced to purchase and install this type of lighting equipment. Considering the fact that such facilities open almost every day, the business of making neon signs to order can bring significant dividends in the first months of production. This article will discuss the main aspects of this business, indicating the size of the initial financial costs and the expected profit.
Our business valuation:
Starting investment - 400,000 rubles.
Market saturation is average.
The complexity of starting a business is 4/10.
Equipment for the production of neon advertising
 In order for the production of advertising neon signs to be effective and not stop due to the failure of any elements and parts, you need to know how to choose high-quality equipment for a neon mini-factory.
For the production of neon signs, you will need to purchase:
- Table made of heat-resistant material.
- Gas-burners.
- Gas equipment.
- Vacuum pumping post.
A table with a good quality heat-resistant coating can be purchased for 10 thousand rubles. and despite the significant dimensions, this product will be one of the cheapest in the kit for the production of neon signs. For work, you will also need several burners, with a total cost of about 100 thousand rubles. When organizing a workflow, one cannot do without a tape burner, which is used to heat a long piece of tube. The cross burner is used for making sharp corners and for efficient spot heating. For the production of signs, it will also be necessary to purchase cylinders for inert gases and propane, the total cost of which will be at least 12 thousand rubles. If it is possible to connect the workshop to the central gas supply, then this option for operating the equipment will allow you to work more comfortably.
An evacuation post is necessary for the safe saturation of the cavity of glass tubes with mercury vapor and an inert gas. You can buy foreign-made equipment for at least 500 thousand rubles, but you can save a lot of money if you pay attention to the products of domestic manufacturers. An exhaust post, which is not inferior in its characteristics to the best imported samples, can be purchased at half the price. When buying a domestic pumping station, there will also be no problems with the purchase of spare parts and the repair of this equipment.
The minimum total cost of purchasing equipment will be about 400 thousand rubles, but for organizing this type of business, financial expenses will not be limited to this amount.
Renting or building a workshop space
For the workshop, you will need to rent or build a room with an area of at least 120 m2. Given the large number of orders for the manufacture of bulk products, such an area is needed to accommodate materials and finished signs, as well as equipment for the production of neon products. Renting a room will cost about 50 thousand rubles. per month, and when building a building for a mini-factory, you will need to spend at least 1.5 million rubles. The advantage of the latter option is that, despite the significant initial investment, you will not need to pay rent every month, which will allow you to fully recoup such investments within the first 3 years. Also, in the event of termination of business activities, it will be possible to profitably sell the shop for the production of neon advertising.
Thus, the amount of the initial investment, taking into account the necessary expenses for renting the premises, will increase by at least 50 thousand rubles.
Workshop staff
To start making neon wall inscriptions, you will need to hire highly qualified personnel. 2 people are enough to work in a small workshop. You will need to hire a glass blower and a pumper, whose work experience should be at least 1 year. An inexperienced specialist will need to spend several times more time doing the same amount of work compared to a master who has been manufacturing neon signs for several years. If the search for qualified workers is unsuccessful, then you can train the staff at your own expense. For example, a full glass blower training course will cost only 100 thousand rubles. You can pay for work with this approach to hiring staff on a progressive scale. At first, the salary of a glassblower can be no more than 20 thousand rubles. per month, but when the productivity of work increases significantly, you can raise the salary to 50 thousand rubles.
Significant savings in labor costs can be achieved with a small volume of orders. If the glass blower combines the duties of a pumper, then such work can be paid in the amount of 60 - 70 thousand rubles. per month.
Before you start hiring workers, it is recommended to study the literature on how to make a neon sign with your own hands. After getting acquainted with the theory, it will be possible to more effectively assess the qualifications of employees.
Purchase of consumables
It is impossible to start the production process without consumables, so it is necessary to include an expense item in the business plan for the purchase of everything you need. It will be possible to engage in the manufacture of neon inscriptions only if the following are purchased:
- Neon tubes.
- Electrodes.
- inert gas.
- Accessories.
Neon tubes are quite expensive material. One meter of such a product will cost at least 100 rubles. Initially, you will need to purchase neon tubes with a total length of at least 500 meters. Such large volumes of consumables are explained by the fact that in order to manufacture an element of a certain color, it is necessary to use a tube with a phosphor for a certain color.
Electrodes for the manufacture of neon signs will require a large number.
The average price of this element is 150 rubles, but to start the production process, you will need to purchase electrodes in the amount of at least 10 thousand rubles.
The consumable also includes inert gas, the cost of which is also high. The approximate price of 1 liter of neon is 300 rubles. To get started, it is recommended to purchase a cylinder with a volume of 40 liters. Various hoses, gaskets, adapters and other parts necessary for connecting burners and equipment will also need to be purchased at the stage of organizing a business. The price of such products is not very high, so the total cost of opening a workshop for the production of neon signs will increase slightly.
Profit calculation
 The price of a neon sign cannot be less than 3,000 rubles, so even taking into account the high cost of production, you can count on profitability, with a sufficient number of orders. From each order, the net profit will be about 60%, and if you complete at least 30 orders per month, the monthly income will be at least 50 thousand rubles. Upon receipt of orders for the production of volumetric signs, the cost of an advertising object may increase by an order of magnitude, therefore, when organizing a workflow involving several glassblowers, the monthly profit is usually at least 1 million rubles.
With properly organized advertising on television and radio, it is possible to significantly expand the range of manufactured products by receiving orders from individuals. Neon signs for a loft-style house can be made according to the wishes of the client, and the cost is calculated at the preliminary design stage of the object.
The production of neon devices can be performed not only for outdoor advertising objects, but also for indoor premises. Some customers want to buy a neon sign for their room, so when making advertisements, this type of neon production should also be indicated.
For the convenience of selling finished products, it is recommended to open a small store of ready-made neon signs. Despite the additional costs of renting premises and paying wages, such an object will allow moving production outside the city limits, where renting a room for a workshop can be several times cheaper. Also in the store you can calculate the cost of advertising objects and place orders.
Summary
To open a business for the manufacture of neon signs, you will need to spend at least 500 thousand rubles. If the advertising campaign is properly organized and qualified specialists are hired, these investments will be returned in full and the business will generate a stable income throughout the calendar year. To make it as easy as possible for potential customers to order a neon sign, it is recommended to create your own website. On such an Internet resource, you can place not only product descriptions and contact information, but also provide the buyer with the opportunity to calculate the approximate cost of the order using an online calculator.