Castle made of colored paper for children. How to build a castle from cardboard boxes. The theoretical side of the issue
Cardboard is a universal item for creativity and handicrafts. Not only adults, but also children can use it to implement their ideas. This article will tell you how to make a castle out of cardboard with your own hands.
Looking at the photos of finished models, it may seem that it is very difficult to make them, but this is only the first impression. In fact, you just need to familiarize yourself with the basic rules of construction and working with cardboard, and you will be able to create real masterpieces. For this kind of activity, you need to be patient, because a large castle is not built in one day, but at least several days. You can share this activity with your children and have a great time building the walls of your castle. We have prepared a step-by-step master class, which will be presented below.

Delightful locks are made in stages: first, suitable models that you like are found on the Internet. Then prepare your own drawings. You should also prepare cardboard boxes of different sizes, which will be the material for creating the castle.

To clearly know where to start and how to move forward, it is best to familiarize yourself with a certain sequence of work. The first step after you have decided what kind of castle you will build is to draw outlines on cardboard; it is most convenient to do this with a pencil, since if some details change, you can erase unnecessary lines.

Next, using a stationery knife, clearly cut out all the elements of the castle along the lines: drawn towers, arches, walls, and so on. Both tape and glue are suitable for connecting parts together. If you decide to use tape, then stock up on both narrow and wide ones, they will definitely come in handy. PVA glue is suitable; it perfectly glues cardboard and paper surfaces. When the castle is glued, its decoration begins - pasting it with colored paper, painting it with paints, adding small details.
It is very convenient to use this manufacturing scheme; if you follow its steps, building a castle will not be a problem.

Simple lesson
Having tuned in to the structure of the castle, be patient, draw on a sheet of paper what it should look like, draw out all the details, even better if the drawing is in color. Then, having created your drawing, prepare the materials and start building.
What materials should be prepared:
- Graph paper, cardboard sheets of various sizes or boxes;
- Tools: scissors and a sharp stationery knife, compass;
- Glue or tape, or preferably both the first and the second;
- You will definitely need a simple pencil and a ruler;
- Everything for decoration: paints, brushes, colored paper, beads, sequins and so on.
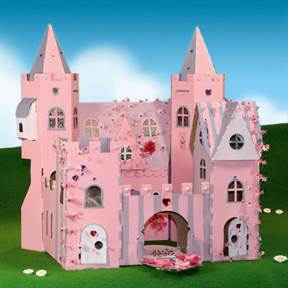
An example of a decorated castle can be seen in the photo:

Now let's proceed to the step-by-step master class:

- The first stage, as mentioned above, involves drawing up a drawing; for this we will use graph paper.

- Now we are making a template, or rather templates, because each element needs a separate one. Small and large parts, no matter how many times they are used, are cut out once. Take into account the seam allowance, that is, the place where the parts are fastened together.

- When the templates are ready, place them on cardboard sheets, trace them with a simple pencil and cut them out along the contour. In order not to get confused in the finished elements, number them, it will be much easier.

- We start gluing with large parts, so we will build the base of the castle. And then small elements are added, for example, such as a staircase, a balcony, protrusions on the walls.

- For the finished castle, if desired, you can make a stable base that will support the entire structure. It is most often made from foam plastic; it is very light and will not make it difficult to move the lock, and at the same time is quite stable. If you do not have a suitable piece of foam, use the same cardboard.

- Now you can start decorating. Here you can fully use your imagination, or if you don’t want to invent, then just take ready-made sketches of castles from the Internet and implement these ideas. Here are several options for decorating castles using colored paper, paints, and decorative elements:


To recreate the effect of a brick wall, the entire wall is painted in one base color. For example, in shades of gray or brown. Next, the foam sponge is cut into squares the size of a brick, dipped in a paint darker than the base paint and applied around the entire perimeter.
The pitfalls of such handicrafts may be that the size of the part found on the Internet does not match with the real lock, or problems with deformation of paper and cardboard, because when using glue after drying, slight changes in shape are possible. Try to think through all these points in advance so as not to be disappointed when looking at the finished work.
Video on the topic of the article
I have already written that if you treat unnecessary cardboard packaging as an unusual construction set, you can make a lot of interesting things. Today I propose to make a castle with turrets from toothpaste boxes. Children will be happy to take part in its construction.
Materials and tools for the “Paper Castle” master class
four toothpaste boxes, white album sheets, orange and blue cardboard, double-sided tape, regular tape, a ruler, scissors, a simple pencil.
Instructions:1. Take four identical toothpaste boxes. Measure the length of the box and the width of each side. The length of the box turned out to be 19 cm, and the width of the sides was 3.5 and 4.5 cm.

2. Now let's solve a simple example of addition. Let's add up the width of all the edges at one end of the box and add another centimeter. I got 3.5 + 4.5 +3.5+ 4.5 + 1 = 17 cm.
Now you need to cut out four rectangles measuring 17 x 19 cm from white album sheets (19 cm is the height of the box).

3. Take one box and cover it with one rectangle. The fastest way to do this is with double-sided tape, but you can also glue it with PVA glue. I additionally glued the edges of the rectangle at the junction with a strip of ordinary narrow tape - for reliability.

4. We will paste the remaining boxes in the same way.
The bases for the turrets are ready.

5. Cut out two circles with a diameter of 16 cm from orange cardboard. Cut each circle in half. From these semicircles we will make roofs for the turrets.

6. Roll each semicircle into a cone and glue it together using strips of tape. Additionally, you can secure the edges with a stapler.

7. Glue small pieces of tape to the corners of the box. It is better to take foam double-sided tape - it is stronger.

8. Remove the protective layer from the tape and glue the roof-cone on top.

9. We will also glue the roofs to the rest of the boxes.

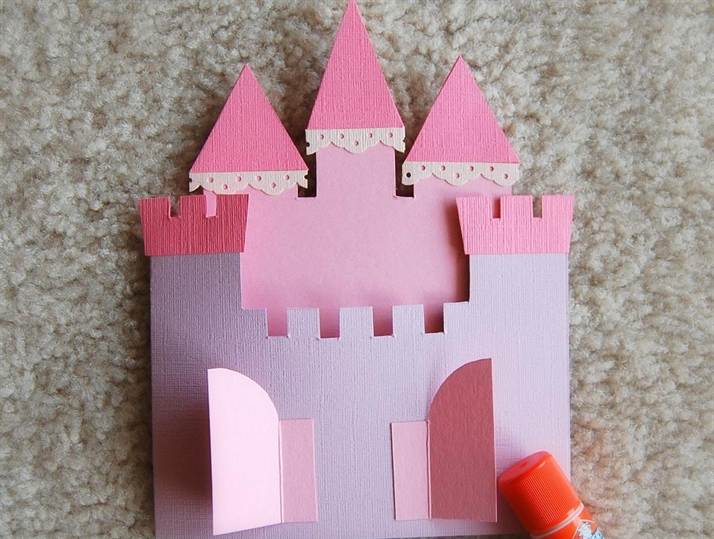
10. Cut out a rectangle measuring 19 x 11 cm from album sheets. We will use it to make a wall for our castle. Mark and cut out the top side of this rectangle as shown in the photo. We will get a wall with battlements. In the same way we will cut out three more walls.

11. Cut out a gate 7 cm wide and 9 cm high from orange cardboard.

12. Cut the gate in half.

13. Place the gate on one wall of the castle and outline it with a simple pencil.

14. Cut the wall along the pencil line so that the gate can open.

15. Glue pieces of orange cardboard to the gate.

16. Glue the wall with the gate to the two turrets using double-sided tape or PVA glue.

Natalia Kuzmina
My daughter and I really love spending evenings together. Sometimes we just sit quietly next to each other in an embrace. We often talk heart to heart with her. Sometimes we work out together needlework: we knit, embroider, cook different delicacies together. But just recently we finished work with her on creating layout"Medieval castle". This work required a lot of patience because many things according to the drawing did not match, but in the end we succeeded. And most importantly, we enjoyed communicating with each other and sharing creativity.
1. Armed with a tube of glue and scissors, we got to work. Every evening we devoted our a little time for the layout, and the desire to do it was great.

2. At first, the work progressed slowly, much of the drawing was not clear and the details did not coincide with each other. We even ruined one detail, but we didn’t lose heart. My daughter Dashunya quickly reconstructed it from an ordinary sheet paper.


The most difficult thing in our work is the castle towers.
DIY cardboard crafts for children will most of all occupy the attention of parents and heirs if they meet the vital interests of the growing child. It almost always turns out that not a single family is able to buy all the desired Barbie houses, or castles for Disney princesses, or parking lots for cars.
Moreover! This is not necessary, as psychologists and conscious, successful parents advise us. The unwritten rule says the following: a child should get only half of what he wants easily - from the store shelf, and he needs to “earn” the other half. And here it is appropriate not so much to demand good behavior, promising an incentive purchase of a toy, as to captivate the child with the joint construction of an exclusive long-lasting model.
Cardboard opens up truly limitless spaces for you – for creativity and construction based on your children’s favorite characters. Let's look at two cardboard crafts that any parent can make with their own hands!
DIY cardboard crafts for children. Castle stage with cross-shaped structure
It is no coincidence that we introduce you to this idea. Evaluate it carefully to understand its main and wonderful advantage: you can play with such a building anywhere, because it quickly and completely disassembles! You will not have any difficulties transporting not only from room to room, but also to a picnic, cottage or kindergarten.
In addition, the very principle of the cross-shaped representation of the walls allows you to create not only castles, but also shops, a school, a pharmacy and a cafe. In general, all those buildings and social circumstances in which your baby happens and in which he may become actively interested by the age of 2 or 3.
What do we need:
- Cardboard from boxes (household appliances, dishes, computer peripherals)
- A simple pencil, eraser and ruler
- Scissors and construction knife with replaceable blades
- Any means for wall decoration (pencils, paints, self-adhesive tapes of different colors, fabric, colored tape and paper, remnants of wallpaper after renovation)
How we build:
- We draw a template with a simple pencil, carefully correlating the sizes of those slots with which the walls will be connected into a full-fledged volumetric structure.
- We cut out the relief of the walls at the top and through doors on each wall. It is important here that the themed figures for games with crafts fit into the prepared holes.
- We paint and decorate – as you please!
- We insert the two halves into the grooves - and you can start the game!


DIY cardboard crafts for children. Simple big box lock

We suggest you build another option - from the most ordinary box of some small household appliance, akin to a vacuum cleaner or food processor. When choosing, the main thing is that the cardboard box is large enough for the baby.
The set of tools is the same as in the DIY craft above.
What we do in an effort to diversify everyday life for children:

We use our imagination by choosing a fairy tale or trusting a spontaneous story about a beautiful princess and valiant knights. And we are happy to devote more than one evening to playing together with a young lover of the Middle Ages!
We hope that the DIY gifts presented to you for the children we want to attract will bring a lot of joyful communication and joint creativity to your home!
Cardboard is a universal item for creativity and handicrafts. Not only adults, but also children can use it to implement their ideas. This article will tell you how to make a castle out of cardboard with your own hands.
Looking at the photos of finished models, it may seem that it is very difficult to make them, but this is only the first impression. In fact, you just need to familiarize yourself with the basic rules of construction and working with cardboard, and you will be able to create real masterpieces. For this kind of activity, you need to be patient, because a large castle is not built in one day, but at least several days. You can share this activity with your children and have a great time building the walls of your castle. We have prepared a step-by-step master class, which will be presented below.

Delightful locks are made in stages: first, suitable models that you like are found on the Internet. Then prepare your own drawings. You should also prepare cardboard boxes of different sizes, which will be the material for creating the castle.

To clearly know where to start and how to move forward, it is best to familiarize yourself with a certain sequence of work. The first step after you have decided what kind of castle you will build is to draw outlines on cardboard; it is most convenient to do this with a pencil, since if some details change, you can erase unnecessary lines.

Next, using a stationery knife, clearly cut out all the elements of the castle along the lines: drawn towers, arches, walls, and so on. Both tape and glue are suitable for connecting parts together. If you decide to use tape, then stock up on both narrow and wide ones, they will definitely come in handy. PVA glue is suitable; it perfectly glues cardboard and paper surfaces. When the castle is glued, its decoration begins - pasting it with colored paper, painting it with paints, adding small details.
It is very convenient to use this manufacturing scheme; if you follow its steps, building a castle will not be a problem.

Simple lesson
Having tuned in to the structure of the castle, be patient, draw on a sheet of paper what it should look like, draw out all the details, even better if the drawing is in color. Then, having created your drawing, prepare the materials and start building.
What materials should be prepared:
- Graph paper, cardboard sheets of various sizes or boxes;
- Tools: scissors and a sharp stationery knife, compass;
- Glue or tape, or preferably both the first and the second;
- You will definitely need a simple pencil and a ruler;
- Everything for decoration: paints, brushes, colored paper, beads, sequins and so on.
An example of a decorated castle can be seen in the photo:
Now let's proceed to the step-by-step master class:

- The first stage, as mentioned above, involves drawing up a drawing; for this we will use graph paper.

- Now we are making a template, or rather templates, because each element needs a separate one. Small and large parts, no matter how many times they are used, are cut out once. Take into account the seam allowance, that is, the place where the parts are fastened together.

- When the templates are ready, place them on cardboard sheets, trace them with a simple pencil and cut them out along the contour. In order not to get confused in the finished elements, number them, it will be much easier.

- We start gluing with large parts, so we will build the base of the castle. And then small elements are added, for example, such as a staircase, a balcony, protrusions on the walls.

- For the finished castle, if desired, you can make a stable base that will support the entire structure. It is most often made from foam plastic; it is very light and will not make it difficult to move the lock, and at the same time is quite stable. If you do not have a suitable piece of foam, use the same cardboard.

- Now you can start decorating. Here you can fully use your imagination, or if you don’t want to invent, then just take ready-made sketches of castles from the Internet and implement these ideas. Here are several options for decorating castles using colored paper, paints, and decorative elements: