DIY paper castle diagram. DIY cardboard castle: a universal material for creativity. How to make a plasticine castle with your own hands
Master class on making a medieval castle from waste material
Author: Yunusova Alsu Rifkhatovna, teacher, MBDOU "Kindergarten No. 177", Kazan.
Description: master class for educators, preschool teachers and parents.
Purpose: the castle can be used for role-playing, story games and activities, as a piece of furniture and props for various events.
Target: developing children's imagination and interest in games and activities.
Tasks: to awaken the interest and desire of adults to create a beautiful and useful play environment for children.
Background
- Mommy, I’m very glad that I have a Princess Sofia doll! But princesses should live in a castle! Let's make her a big, beautiful, real castle! - my six-year-old daughter told me. Indeed, what about a princess without a castle?! After walking around the Internet, inspired by the works I saw, I created in my head the image of my daughter’s dream castle and, probably, mine. So, our castle for Princess Sofia.
We needed:
4 square-shaped boxes (for example, milk), 4 cylinder-shaped jars (for example, chips), a cardboard box - the base of the lock, scissors, a pencil, a stationery knife, a glue stick, a ruler, toothpicks, paper with a pattern imitating two types of stonework, paper with prints of windows and flags in a medieval style (I downloaded the images and printed them on a color printer).


Progress
From a cardboard box around the perimeter I cut out a base for a 15 cm high castle.

I made cuts on the jars to place them on the corners of the cardboard base. This must be done before pasting paper under the stone, otherwise when cutting the paper will crumple and deteriorate.

I checked whether the jar sat well and reached the base.

Next, I covered 4 boxes and 4 jars with paper to resemble stonework in a medieval style (the pattern of the stones is smaller than that of the fence). After gluing, you need to go through the cuts on the jars again to cut the paper. For the rear towers I took higher jars. It is best to use a glue stick; liquid glue spreads and the paper becomes soft.


Now it's time for the fence. I opened the cardboard base and covered both sides with masonry paper. I used a pattern with a large stone.


After I covered the fence on both sides with paper, I assembled it back into a rectangular base, sealed it and placed jars in the corners.


I made teeth on the fences to make it look as much like a real castle for princesses and knights as possible. I cut them out with a stationery knife at equal distances.


These are the windows I glued to each box and jar.

For the roof I used paper with a tile print. I cut out circles and made roof cones out of them for all the cans and boxes. I cut out a gate on the front side of the fence with a utility knife and decorated the edges with brickwork. I glued the coat of arms of the castle on top of the gate (I downloaded the picture and printed it out).

It's time to assemble the castle. I glued 4 boxes like this: 2 on the back fence, one on the side fences and their windows looked at the castle courtyard.

All that remains is to decorate the roofs with the flag. To do this, I printed out drawings of the flag in regular and mirrored form.

I cut them out and glued them together, leaving a toothpick inside.

I placed a flag on top of each box and jar. Our castle is finished and ready to receive princesses, knights, dragons and all other inhabitants. It turned out that such a castle is interesting not only for girls, but also for boys. I found out when I took it to kindergarten and showed it to my kids, they were delighted!
Cardboard is a universal item for creativity and handicrafts. Not only adults, but also children can use it to implement their ideas. This article will tell you how to make a castle out of cardboard with your own hands.
Looking at the photos of finished models, it may seem that it is very difficult to make them, but this is only the first impression. In fact, you just need to familiarize yourself with the basic rules of construction and working with cardboard, and you will be able to create real masterpieces. For this kind of activity, you need to be patient, because a large castle is not built in one day, but at least several days. You can share this activity with your children and have a great time building the walls of your castle. We have prepared a step-by-step master class, which will be presented below.

Delightful locks are made in stages: first, suitable models that you like are found on the Internet. Then prepare your own drawings. You should also prepare cardboard boxes of different sizes, which will be the material for creating the castle.

To clearly know where to start and how to move forward, it is best to familiarize yourself with a certain sequence of work. The first step after you have decided what kind of castle you will build is to draw outlines on cardboard; it is most convenient to do this with a pencil, since if some details change, you can erase unnecessary lines.
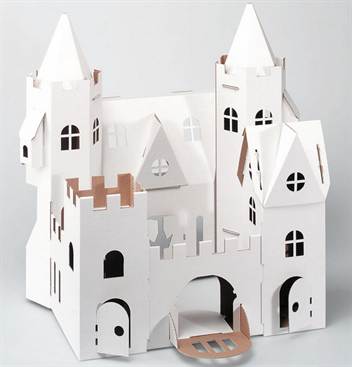
Next, using a stationery knife, clearly cut out all the elements of the castle along the lines: drawn towers, arches, walls, and so on. Both tape and glue are suitable for connecting parts together. If you decide to use tape, then stock up on both narrow and wide ones, they will definitely come in handy. PVA glue is suitable; it perfectly glues cardboard and paper surfaces. When the castle is glued, its decoration begins - pasting it with colored paper, painting it with paints, adding small details.
It is very convenient to use this manufacturing scheme; if you follow its steps, building a castle will not be a problem.

Simple lesson
Having tuned in to the structure of the castle, be patient, draw on a sheet of paper what it should look like, draw out all the details, even better if the drawing is in color. Then, having created your drawing, prepare the materials and start building.
What materials should be prepared:
- Graph paper, cardboard sheets of various sizes or boxes;
- Tools: scissors and a sharp stationery knife, compass;
- Glue or tape, or preferably both the first and the second;
- You will definitely need a simple pencil and a ruler;
- Everything for decoration: paints, brushes, colored paper, beads, sequins and so on.
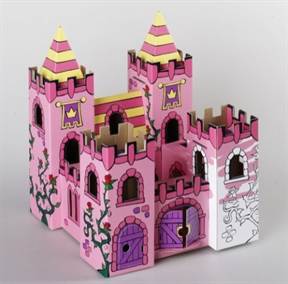
An example of a decorated castle can be seen in the photo:

Now let's proceed to the step-by-step master class:

- The first stage, as mentioned above, involves drawing up a drawing; for this we will use graph paper.

- Now we are making a template, or rather templates, because each element needs a separate one. Small and large parts, no matter how many times they are used, are cut out once. Take into account the seam allowance, that is, the place where the parts are fastened together.

- When the templates are ready, place them on cardboard sheets, trace them with a simple pencil and cut them out along the contour. In order not to get confused in the finished elements, number them, it will be much easier.

- We start gluing with large parts, so we will build the base of the castle. And then small elements are added, for example, such as a staircase, a balcony, protrusions on the walls.

- For the finished castle, if desired, you can make a stable base that will support the entire structure. It is most often made from foam plastic; it is very light and will not make it difficult to move the lock, and at the same time is quite stable. If you do not have a suitable piece of foam, use the same cardboard.

- Now you can start decorating. Here you can fully use your imagination, or if you don’t want to invent, then just take ready-made sketches of castles from the Internet and implement these ideas. Here are several options for decorating castles using colored paper, paints, and decorative elements:


Natalia Kuzmina
My daughter and I really love spending evenings together. Sometimes we just sit quietly next to each other in an embrace. We often talk heart to heart with her. Sometimes we work out together needlework: we knit, embroider, cook different delicacies together. But just recently we finished work with her on creating layout"Medieval castle". This work required a lot of patience because many things according to the drawing did not match, but in the end we succeeded. And most importantly, we enjoyed communicating with each other and sharing creativity.
1. Armed with a tube of glue and scissors, we got to work. Every evening we devoted our a little time for the layout, and the desire to do it was great.

2. At first, the work progressed slowly, much of the drawing was not clear and the details did not coincide with each other. We even ruined one detail, but we didn’t lose heart. My daughter Dashunya quickly reconstructed it from an ordinary sheet paper.


The most difficult thing in our work is the castle towers.
Find suitable cardboard boxes. Cereal boxes, tissue boxes, toilet paper rolls, etc. work well. Just make sure to gather enough cardboard, depending on how big the castle needs to be.
Create a template. This step is optional, but it will help you get accurate measurements, a sophisticated design, and stocked up on material. For inspiration, look at photos or illustrations of real castles and make a template and design on paper. Cut out the templates you made to transfer them onto cardboard. In the example given in this article, the castle will be very simple, so you won't need a complex design: just four walls and four rolls as towers. If you are doing a more complex castle project, you may need:
- Make templates for the towers, which should be cut out separately and be able to stand on their own (insert small pieces of cardboard through the slots made in the base of each tower).
- Make the walls according to the traditional rampart design.
- Add a moat around the castle.
- Make one central high tower where the prince or princess is imprisoned, with a window through which the unfortunate royal can look.
Assemble the cardboard pieces. For the simple project shown here, you simply need to install four long rolls in each corner of the printing paper box (don't secure them at this stage; you'll need to do that later).
- At this stage also cut out the ramparts (defensive walls). To do this, you usually just need to cut evenly squares around the perimeter of the top of the box (which will be the top of the castle walls). It is recommended to use a ruler and measure out the squares evenly so that the wall does not look lopsided (unless, of course, the owner of the castle is a drunkard or a pirate).
Cover the entire lock and parts that will need to be attached later with foil. This will get rid of the cardboard look, and will create a smooth, shiny surface under the wall paneling that you will add later. At this stage, the lock should be very strong.
Wrap each side of the box with thick paper of a color suitable for the castle. The best colors for a castle are usually gray or silver, as they give the impression of weathered stone that is commonly seen on castle walls. Of course, if you prefer a pink castle, that's your prerogative!
- Once you've measured and cut out the shapes for each wall, use a black marker (such as Sharpie) to mark them with a pattern of old stone and brickwork to add dimension and realism.
- Then glue the front wall (right side out) to the base, followed by the other walls.
Attach to the walls any elements that are not already part of the castle. In our case, in this simple castle, we need to glue towers in each corner on the castle walls. You may have to cut gaps in things like towers to get a good fit. If you are inserting pieces inside the box, be sure to attach them tightly to the base so that they do not tip or fall out when you move the lock.
Cut a square piece of thick blue paper, larger than the castle, that looks like a lake or moat surrounding the castle. This will create the effect of having water on the castle.
Today, stores offer a huge range of toys, but they cost
quite expensive. For a child, try making them yourself. You can also invite your child to participate in the process, this will develop his imagination and logic, and in addition, you will get great pleasure from joint creativity. Below we tell you how to make a castle out of paper that both boys and girls will love. You can take the schemes described in this article as a basis, but this does not mean that you need to end there - use your imagination and create your own unique palace. Additionally, this product can be used as a decoration - a stand for confectionery products.
Tools for work
For a craft like a paper castle, you will need:
- cardboard box;
- sand;
- paints;
- textile;
- sawdust;
- chip cans;
- glue;
- scissors;
- pen.
Step-by-step instruction
To learn how to make a castle out of paper, you need to study the following information:

Now all you have to do is come up with an interesting story and please your beloved child with a new fairy tale.
How to make a castle out of paper
When you have children, it doesn’t matter at all whether it’s a boy or a girl, the main thing is that they all love fairy tales and believe in miracles. Any child will be happy with such a gift. To make a castle with your own hands as accurately as possible, you need to spend a lot of time and effort, but your beloved offspring deserve it.
To work you need to take the following accessories:

Instructions
In order for the castle, made with your own hands from paper, to be the most accurate copy of the original, adhere to the following rules:

Helpful information
A paper castle, the diagrams of which are presented in this article, will help you realize your child’s dreams and give him a piece of happiness. If the craft will be used not only as decoration, do not forget about its sustainability. For example, you can fix each part with tape, which must be secured on the inside. The same palace can be made for a little princess, simply by decorating it in bright fairy-tale colors. Now you know detailed instructions on how to make a castle out of paper. Go ahead, please yourself and your child.