Bee from plastic bottles step by step. DIY beehive made from plastic bottles. To install a fence you need
Having various available materials, a beekeeper can make crafts with his own hands. Such creative crafts are an excellent decoration for the garden. It’s not difficult to make them with your own hands; you just need the usual instructions and desire. A bee made from a plastic bottle is a quick craft. For small flower beds, bees are made from small bottles (preferably mustard bottles). For large flower beds, plastic containers up to 2 liters are suitable.
Materials for plastic bees
- Yellow or transparent plastic bottle.
- Black electrical tape.
- Small black buttons, black acrylic paint.
- Wire and glue.
- Yellow acrylic paint (if you use a transparent bottle).
Stages of constructing bees from a plastic bottle
A master class on how to properly make bees from a plastic bottle can be read below. It is necessary to carefully study all the details.
- You need to take an empty plastic container, preferably yellow.
- Wrap it with electrical tape, so you get stripes on the bee’s body.
- If you take a transparent bottle, it must be painted with yellow acrylic paint. After the product has dried, black stripes are applied. If electrical tape is not available, you can use black acrylic paint.
- After drawing, eyes and nose are glued or drawn. Secunda glue and double-sided tape will help give the product volume. However, it is recommended to use glue when making crafts with your own hands, since the tape does not hold the structure so tightly.
- The antennae are made of wire, which is bent with pliers.
- The master class separately examines the making of wings for bees from a plastic bottle. The wings must be cut from the middle part of the transparent bottle. Make small slits at the top of the craft and insert the finished wings into them.
The handicraft master class offers various options for bees made from plastic bottles. You can make crafts that create the effect of bees flying over a flowerbed. To do this you need to use a support.
If you want to place your plastic bees on a tree, you will need to make two holes in the middle of the craft. Then thread the transparent fishing line (rope) and tie it tightly. This way the bees can be placed on the branches.
Construction of a hive for bees from plastic bottles
A master class for handicrafts teaches how to quickly and easily make a hive for bees with your own hands.
- To make a hive, it is better to use a 6-liter eggplant. You can also take a large plastic bottle.
- Cut out doors and windows in the selected material.
- Paint the house yellow using acrylic paints.
- The master class advises using wash brushes to build the roof of the house. They are cut into fibers and then tied. Then the finished brushes are glued to the house. If in some places the brushes begin to peel off, you need to apply another layer of glue and wait until the craft is completely dry. The hive is ready.
Making drinking bowls from plastic bottles
Beekeepers prefer to use a vacuum drinker, which is installed during the cold season when insects are in danger. The vacuum drinker is filled with water without the participation of the beekeeper. Constructed from transparent plastic bottles, which allows you to control the water level.
From an ordinary bottle you can make both a drinking bowl and a feeder. You can fill the feeder with sweet water, which is food for bees. The device is installed inside the hive in winter. In autumn, summer, and spring, the drinking bowl can be installed outside. The handicraft master class shows in detail how easy and simple it is to construct a drinking bowl from plastic containers.
- You need to take tape, a knife, a plastic bottle, polystyrene foam, and a pencil.
- Cut a rectangle from foam, taking into account the size of the hive. Divide it into two parts: width 20 mm, length – 10 mm.
- On one half you need to mark a hole for the bottle. The neck of a plastic container is inserted into the finished marking and pressed firmly.
- The circle formed from the neck is divided into 2 parts. One of them is cut at an angle.
- Mark the hole through which water will flow. This can be done with a nail.
- Mark and cut out the gutter.
- Apply tape along the entire length and cover the gutter with it.
- Fill a bottle with water, screw it into the drinking bowl and hang it in the hive.
This drinking bowl can hold a two-liter bottle.
Construction of a plastic feeder
The master class offers an economical and simple version of the feeder. You must use a dark two-liter bottle. The nail is preheated and a 2 mm hole is made in a plastic container. It is important to make more than one hole so that the bees quickly collect all the liquefied syrup. To stretch the amount of syrup over a longer period, the holes can be sealed with tape. This is also done when pouring syrup into the feeder. Advantages of DIY crafts from plastic bottles:
- Convenient to clean.
- Easy to make.
- Can be used for hives with low roofs.
- Adjustable hole size, which allows you to control the flow of syrup.
DIY fakes are beautiful, simple and convenient. A master class from handicraft lovers will help you construct a beehive, bees, drinking bowls and feeders from plastic bottles.
Artificial bees will decorate your garden plot and will look harmonious among the abundance of greenery in your dacha!
And you will learn about one of them below.
To create a bee with your own hands, you don't need a lot of tools and a lot of skills - use your imagination and simple instructions.
There are several ways to make a three-dimensional toy bee:
You will need:
- plastic bottle (0.33 l)
- scissors
- plastic cup
- glue
- acrylic paints
- tassels
- black electrical tape
- wire
- stationery knife.
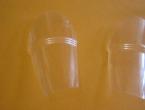
1. Cut out bee wings from a plastic glass.

2. Using a utility knife, cut a small hole in the sides of the plastic bottle where you will insert the wings.
3. Insert the wings into the holes.


6. Draw an outline on the butterfly’s wings.

How to make a bee and a hive with your own hands

- plastic bottles (one with a capacity of 5 liters, and several bottles of 1 liter each - their number depends on the number of bees)
- yellow acrylic paint
- black electrical tape
- tassels
- glue gun or superglue
- plastic eyes and nose beads
- leg-split
- synthetic thread.
1. Prepare plastic bottles and paint them yellow.

2. Use electrical tape to create black stripes on the bottles.

3. Using a glue gun or superglue, glue the plastic eyes and nose onto the lid.

4. Prepare another plastic bottle and use scissors or a stationery knife to cut wings for the bees out of it.

5. Glue threads so that your toy bee can be hung on a tree, for example.


Creating a hive for bees
1. Prepare a 5-liter plastic bottle and cut a square hole in it.

2. Paint the bottle yellow - it is advisable to paint in several layers.
3. To make the roof of the hive, use tassels that need to be tied with twine.

4. Using glue, glue the brushes to the bottle cap. Add more glue if necessary.

Now you can decorate your garden plot or other room with crafts.
Read also:Beautiful DIY crafts made from natural materials

Plastic bee and cardboard hive


If you are thinking about how to decorate the area in front of your house, then we suggest considering one very fun and interesting option - crafts from plastic bottles. A bee is an ideal option for the garden. As you most likely already understood, the main material will be an ordinary eggplant, from which a cute creature will subsequently turn out. Such crafts are most suitable for decorating trees on the territory of a summer house or country house. You can also decorate clubs with them, but in this case you will need smaller bees.
Since it is very easy to do, you can do it together with your child. Crafts of this kind will develop the child’s imagination, imagination, and finger motor skills, which is very important for our child. In addition, you can please him with a beautiful and bright toy that you can hang on a tree and enjoy the work done together.
First, let's decide on the place where she will “sit”. If you plan to decorate a small flower bed with it, then it is not necessary to choose a large bottle. The best option in this case would be a mustard bottle, since you don’t even have to paint it. If your plans are to decorate a large tree in your country house, then we advise you to take an ordinary bottle, which with the help of paint and other small details can be turned into a cute creation.

Before making a bee from a plastic bottle, we collect all the necessary materials. We will need:
- several mustard bottles (for small bees) or large ones (for larger bees);
- black electrical tape;
- black paint;
- small buttons;
- thin aluminum wire.
It is preferable to use buttons as the gouache may bleed on rainy days. The wire should be taken longer so that it is enough for the entire decor. If there is any excess left, cut it off using scissors or pliers.
So, now we’ll tell you how to make a bee from a plastic bottle, thereby delighting your child. If you have chosen large plastic containers, then we begin with the process of painting them with yellow paint. After it is completely dry, glue strips of electrical tape. If you have clear varnish, we recommend covering the bee with it, again because rain can ruin your artwork.
Wings can be cut from a transparent plastic bottle and glued to the back of the insect. They can also be inserted into specially made slots. In addition, you can initially draw a sketch of the wings on the bottle from which the body is supposed to be made, and then cut them out using a sharp knife (this action should be performed before painting and taping so that the wings remain transparent).
Using Moment glue we fix the bee’s eyes. It is best to use it, since it fixes all the parts securely and for a long time, therefore, you do not have to redo the bee after a week.

After the glue has dried, we make small antennae for our bee from the wire. In addition, it is necessary to make a mount on top so that we can hang our creation on a tree.
Since it is quite easy to make a bee from a plastic bottle, you can create a whole swarm. We hang the finished product on a tree and enjoy the result.
Almost every home has plastic bottles that are of no interest for home use. However, they can be used as improvised material to create “bee” crafts from plastic bottles.
How to make a bee out of a plastic bottle?
It’s easy to make bees from plastic bottles, you just need to prepare the materials in advance:
- plastic bottle with a volume of 0.33 l;
- scissors;
- glass 0.5 liters;
- glue;
- acrylic paints;
- tassels;
- black electrical tape;
- wire;
- stationery knife.
It is worth remembering that in order to paint a bee made of plastic, you should use only acrylic paints, since oil paints will take a very long time to dry and will adhere worse to the surface being painted.
To make a bee from a plastic bottle, you must strictly follow the instructions:


You can make not just one bee, but a whole hive. To do this you will need:
- plastic bottles of different capacities: 5 liters (1 piece, 1 liter bottles according to the number of bees);
- yellow paint or enamel;
- black electrical tape;
- wash brushes - four pieces;
- glue gun;
- decorative elements: eyes, nose beads;
- leg-split;
- synthetic thread.


In a similar way, you can make a large number of bees. By hanging them on a tree, your site will be transformed and will look like a real beekeeping center.
Creating bees from bottles does not require special skills. Making such a craft is not difficult. Even a preschooler can create it with his own hands. A bee made from a plastic bottle by a child can be used as a gift for grandparents so that they can decorate their garden plot with it. It will look spectacular among the abundance of greenery and shrubs in the country. Also
Tatyana Oparina
Having various available materials, you can make crafts with your own hands. Such crafts are an excellent decoration not only for the preschool site, but also for the garden and vegetable garden. It’s not difficult to make them with your own hands; you just need the usual instructions and desire. A bee made from a plastic bottle is a quick craft that will delight you and your child all summer.
Purpose: making a bee from plastic bottles to decorate a preschool site.
Target: teach teachers and parents how to decorate a preschool site with their own hands using waste materials.
Required materials for making crafts:
Plastic bottles 5 liters and 1.5 liters
Yellow enamel
Black electrical tape
Brush any size
Decorative eyes and mouth

Step-by-step production:
Step 1: We paint a 5-liter bottle with yellow enamel (wait for it to dry).

Step 2: Using black electrical tape we make stripes for our bee.

Step 3: Glue on decorative eyes and a mouth (I used cosmofen glue).

Step 4: For the wings we make slits in the body. We cut out the wings from another plastic bottle (1.5 liters, make them a little wider at the end so that when we insert them into the slot they will hold tighter. Using electrical tape, we glue the contours on our wings.


Step 5: Next, we make the legs of our bee using a cable. We cut the cable into 3 equal parts. Using a knife, we cut 6 small holes in the bottle, pull the cable through the bottle into the holes so that it sticks out on the sides. We bend the stretched cable so that it looks like paws.

Our bee is ready!

Publications on the topic:
Sakura is one of the most beautiful trees. Flowers fascinate with their tenderness, simplicity and beauty. In Japan, sakura is not grown for its fruit.
You will need: 60 empty plastic bottles of the same shape; foam rubber - 1.5 x 1.1 m; calico - 1.5 x 1.1 m; fabric ribbons - 7-8 wide.
Master class on making dolls from plastic disposable spoons. Goal: to develop the ability to construct crafts from scrap materials.
A little about this flower. Lilies are very beautiful flowers, they belong to the Liliaceae family. The lily has large buds of various shades.