How to lay laminate flooring on an old wooden floor. How to lay laminate flooring on a wooden floor with your own hands. Maintenance and care of laminate flooring
Laying laminate flooring on an old wooden base constantly raises many questions. Some argue that it is undesirable to do this, others do not see any problems. How to understand this issue?
If the choice in favor of panel parquet has already been made, then it will be useful to know some of the nuances and rules for placing laminate flooring on a wooden floor.
Laminate on a wooden floor: installation features
Laminate is an affordable alternative to expensive parquet. This coating is used in residential and commercial premises. Laminate flooring is quite easy to install, but at the same time it is demanding on the quality of the subfloor.
Owners of old houses and apartments in which the floor is made of wood are often faced with the question: “Is it possible to lay laminate flooring on a wooden floor?” Experts assure that this technology is quite acceptable if the basic requirement is met - high-quality preparation of the wooden base.

To understand the features of laying panels, it is necessary to understand the specifics of the wooden base and determine the possible reasons for the violation of the integrity of the laminate.
- Wood is not a stable enough material. It is characterized by drying out, spoilage, etc. These processes lead to the formation of gaps between the boards. If laminate panels are laid on top of a loose wooden floor, the load on the parquet locks will increase significantly. The lock joint is the weak point of the floor covering.
- Wooden floors lose their characteristics over time. Therefore, it is very important, before laying the laminate, to inspect the floor and identify the weaknesses of the floor itself and the underground structures (support beams, joists). If any problems are identified, repair work must be carried out.
You will have to avoid laying laminate flooring in unheated rooms and in rooms with high humidity - bathrooms, kitchens. Under the influence of moisture, the planks can become deformed and lose their original appearance.
Laying laminate on a wooden floor: choosing a material
The durability of the floor covering largely depends on the correct choice of laminate. There is a certain classification of panels, the main selection parameter is the purpose of the room.

- Class 31 - for installation in houses, apartments and commercial premises with low traffic;
- Class 32 - suitable for finishing rooms with medium traffic - kitchens, corridors;
- Class 33 - laminate is intended for public buildings with high traffic;
- Class 34 - scope of application - large shopping centers, airports, clinics, schools and other premises where many people constantly gather.
Its cost also depends on the type of laminate. Class 31 coating is the most affordable. Class 34 laminate is very durable, wear-resistant and can withstand significant mechanical loads. The only drawback is the high cost.
The pricing policy of flooring is also influenced by additional characteristics:
- thickness of the HDF board (laminate base) - the larger this size, the more expensive the coating;
- thickness of the protective layer;
- presence of embossing, chamfers, additional processing, etc.;
- country of origin - European manufacturers price their products more expensive than Chinese and domestic ones;
- brand - laminate of popular brands that have proven themselves in the construction market will cost more than panels from unknown companies.
Preparing a wooden floor for laminate
Diagnostics of old flooring
The subfloor must be carefully inspected before laying laminate flooring. It is recommended to check the serviceability of both the external covering and the internal frame. Usually there is no need to dismantle the floor - a visual inspection is sufficient.
A number of factors indicate the satisfactory condition of the floor and the possibility of laying laminate:
- The floorboards do not sag while walking. Minor changes in floor level under heavy pieces of furniture, for example, under a cabinet, are acceptable.
- The wooden covering has no depressions, protrusions or knots.
- Horizontal level of the floor - the maximum permissible difference in height of the base plane is 2 mm for every 2 meters.
- No gaps between floor boards. The presence of places affected by rot is unacceptable.
- The wooden floor does not creak when walking.

If the listed requirements are met, then you can proceed to the next stage - placing the substrate. Otherwise, the base will have to be repaired.
Important! To identify rotten floorboards or make sure the wood is in good condition, you need to get rid of the old layer of paint. The appearance of the coating should be almost the same color over the entire floor plane.
Repair of wooden base
Eliminating squeaks. It is necessary to walk along the floor and identify places where the base creaks strongly underfoot. If some of the floorboards sag, then the boards are additionally fixed to the joists with nails or self-tapping screws. In the event that the measures taken did not produce the desired result, more major repairs may be required - strengthening the logs themselves. Bricks or beams are installed under the inner body of the floor - they securely fix the wooden base, preventing it from loosening.
Important! If, after strengthening the subfloor, it is planned to level it with an electric planer or scrape, then nails must be used to secure the joists. Nail heads should be buried into the wood before scraping.
Floorboards may squeak due to friction against each other. To eliminate this phenomenon, sometimes it is enough to fill the gap with talc or graphite and fill the visible gaps with putty.

Damaged/rotten boards must be replaced. To identify them, tap the floor surface with a hammer. The sounds from tapping on healthy wood are louder, while on rotten wood they are dull.
Even if the boards are only partially rotten and at first glance look reliable and durable, they still need to be replaced, otherwise the rot will spread to the “healthy” elements of the floor.
It will be possible to prevent the appearance and spread of mold/fungus by treating the wood with an antiseptic composition and providing the base of the floor with good waterproofing.
Important! If there are depressions (small grooves) on the floorboards, then the surface must be treated with a bioprotective compound. The presence of grooves indicates that the flooring is infested with woodworms.
Floor subsidence. The damaged area is dismantled - several floorboards are removed. Several support wedges are placed under the logs. If the vast majority of wooden joists are in unsatisfactory condition, then the floor will have to be dismantled and new frame parts installed.
Leveling the floor for laying laminate
Let's look at three ways to level a wooden floor:
- surface scraping - the method is optimal if the unevenness is not significant;
- laying sheet materials;
- arrangement of wet screed.
To scrape the floor you will need the following tools:

- sandpaper;
- rubber spatula;
- scraping machine;
- hand plane;
- building level.
Before treating the floor, you need to deepen the nails. After passing through the scraping machine, check the evenness of the coating with a level. If chips and cracks are found on the floor, they must be repaired using wood putty. When the solution is completely dry, the floor must be sanded again.
Floor scraping is a very dusty and noisy process. Upon completion, shavings and dust must be removed with a vacuum cleaner before laying the laminate.
You can qualitatively prepare the base for the laminate using chipboard, OSB, GVLV, plywood and other sheet materials. For these purposes, sheets of plywood with a thickness of 12-15 mm, dimensions 50*50 cm or 75-75 cm are well suited. It is advisable to use moisture-resistant material.
Some nuances associated with the use of plywood:
- The coating is laid out in a staggered manner, the offset step being half a sheet. Thanks to this technology, the load on the floor covering is distributed evenly.
- The plywood is “set” with glue and secured to the wooden base with self-tapping screws. The glue is applied with a notched trowel over the entire area of the sheet, the screws are distributed along the edges of the plywood.
- There must be technological gaps (10 mm) between the plywood slabs, as well as between the wall and the plywood covering. This distance is necessary for the thermal expansion of plywood.

The laid plywood sheets should be processed with a sanding machine and, upon completion, covered with drying oil.
Another way to level a wooden floor is with a wet screed. A smooth concrete surface is an ideal option for installing laminate flooring. To implement it, you will need to strengthen the structure of the beams and joists. This is necessary so that the base can easily withstand the weight of the concrete solution.
The process is quite labor-intensive, but the result will allow you to use the laminate coating for a long time without carrying out repair work. This is due to the practicality and immobility of the concrete layer.
Choosing a laminate underlay for an old wooden floor
Before laying laminate flooring on a wooden floor, it is necessary to cover the base with an underlay. This layer performs a number of important tasks:
- eliminates minor floor unevenness;
- increases heat and sound insulation;
- serves as additional protection against moisture;
- prevents contact of the subfloor with laminate slabs, preventing friction and rapid wear of the floor covering.
The construction market offers three main types of underlay for panel parquet.
Polyethylene foam backing- the most popular option, as it has an optimal price-quality ratio. The material contains a layer of aluminum foil or metallized film. Main characteristics: thermal insulation, moisture resistance and biostability. Disadvantages: sagging and exposure to UV rays.

When choosing a polyethylene foam substrate, you need to pay attention to the density of the material - the higher it is, the better and more durable it is. A 2 mm thick substrate is suitable for “apartment” laminate. For laminated panels with a thickness of 9 mm or more, it is necessary to select polyethylene with a thickness of at least 3 mm.
Good performance characteristics are shown by two-layer polystyrene backing. The protective material consists of aluminum foil and a layer of polystyrene. The substrate is not affected by fungi, mold, is not afraid of moisture and is relatively inexpensive. Disadvantages of the material: polystyrene is pressed under heavy load and does not roll out well when laid.
Advice. Extruded polystyrene has minimal moisture absorption rates. Laying such a substrate under the laminate allows you to do without a moisture-proof layer. When placing polystyrene along the walls, leave a ventilation gap of about 10 mm.
Cork backing made from pressed oak bark chips. Such material can be completely natural or combined with bitumen or rubber.

The main advantages of the substrate include:
- rigidity of the material - the substrate is not pressed under loads;
- safety of use;
- good heat and sound insulation qualities;
- better than others, the coating masks uneven subfloors;
- biostable;
- unlimited service life.
The main disadvantage of cork material is the fear of moisture. Therefore, such a substrate is not suitable for installing heated floors or for furnishing kitchens, bathrooms and rooms with high humidity levels.
Advice. The high quality cork backing is not translucent. For laying laminate on a wooden floor, a “cork” 2 mm thick is suitable.
Laying laminate on a wooden floor: installation technologies
Laminate flooring can be installed on a wooden floor in several ways:
- Click system;
- Lock system;
- glued laminate.

The Click connection is the most common way to install laminate flooring. The panels are easy to install - fastening the tongue into the groove at an angle of 30-40°. The laminate panel is lowered onto the adjacent lamella and fixed in the lock. The seam is almost invisible. Installation work should begin from the corner opposite the door.
Lock fastening is rarely used, since such a laminate needs a flat base. Lock is installed by hammering the groove of one lamella into another with a hammer. Due to this fixation, it will be difficult to disassemble the coating for repairs.
The most expensive method is glue. This method is reminiscent of parquet laying in the use of tenon grooves and screed. Glue is applied to the ends of the panels, after which the planks are securely fixed to each other. Adhesive fastening is used where the floor is subject to high loads - public spaces with high traffic. For domestic use, this method is rarely used due to the high labor intensity of the process.
Laying laminate flooring differs not only in the method of fastening, but also in the layout options for panel parquet:

- Classic masonry is the most common and economical. Waste from such an installation is about 5%. The laminate spreads from the window in the direction of the light. Panel trims 30-40 cm long are used at the end of the row.
- Diagonal laying is identical to the classic arrangement, but the panels are laid at an angle of 45°. This type of masonry looks very beautiful and visually expands the room. The disadvantage of the diagonal method is the increase in waste of finishing material up to 15%.
- Brickwork - each subsequent row of panels is shifted by half relative to the previous one. The brick method ensures maximum durability of the coating. The disadvantage of the layout is the high overconsumption of laminate (15-20%).
- Herringbone masonry - arrangement of lamellas at an angle of 90° according to the principle of parquet. For this method it is necessary to use strips with special locks.
How to lay laminate flooring on a wooden floor: step-by-step instructions
The first step is to decide on the method of laying the laminate and calculate the required material. The procedure for calculating the amount of laminate when arranging lamellas using the traditional method:
- Calculate the total area of the room - multiply the width of the room by its length.
- Increase the resulting value by 10%. This gap will compensate for the consumption of panels when cutting.
Laminate laying sequence:

If there are heating/water supply pipes in the room, you will have to bypass them:
- Measure the distance of the wall to the pipe and mark the lamella where the cut will be.
- Measure the diameter of the pipe.
- Cut a circle in the laminate with a diameter 15 mm larger than the pipe.
- Cut the panel crosswise, passing through the center of the cut circle.
- Lay the laminate pieces on the floor and connect them together. It is advisable to “plant” the laminate fragments with glue.
- Secure special plugs around the pipe.

Maintenance and care
In order for the laminate to please you with its beautiful appearance for a long time, you will need to follow some rules for the maintenance and care of the floor covering:
- avoid getting large amounts of water at the joints of the panels;
- place soft fabric or use felt pads under the legs of sofas, armchairs, massive tables and cabinets;
- clean the laminate immediately after contamination, using special products;
- It is not advisable to sweep panel parquet with a broom - it is recommended to use a vacuum cleaner or mop for dry cleaning.
Laying laminate flooring on a wooden floor: video
Laminate is a coating that requires the preparation of a perfectly flat base. But what if it is not possible to dismantle the old floor and install a new cement screed? Is it possible to lay laminate flooring on a wooden floor? These questions are of interest to those who have decided to refresh the interior without resorting to capital investments. You can learn about methods of laying material on an existing surface from the recommendations and video given in the article: how to lay laminate flooring on a wooden floor with your own hands.

Is it possible to lay laminate flooring on a wooden floor?
The question of the possibility of laying laminate flooring on an old wooden floor often arises due to the fact that the cost of dismantling and installing a new cement base largely exceeds the cost of purchasing the floor covering itself. In addition, the feasibility of carrying out a major overhaul is not always justified, since it is associated with the duration of the process, while the interior of the room can be changed by resorting to cosmetic repairs.

Is it possible to lay laminate flooring on a wooden floor and not be afraid that the coating will deform, creak when walking, or come apart at the seams? Knowing how an old wooden base behaves and what measures need to be taken to comply with the basic requirements for laying laminated floors, you can safely begin the work. The technology for laying laminate panels on a wooden floor is similar to the procedure for installing a covering on a screed.
Despite the warnings of manufacturers and some laying specialists, it is possible to lay laminate flooring over a wooden floor, taking into account two main differences between a wooden and a cement base:

In order for the laminate to be perfectly smooth, not come apart in locks and serve for a long time, it is necessary to prepare the base taking into account all the requirements for the surface when laying this material. The base should be:
- flat - deviation from the horizon should not exceed 2 mm per 1 linear meter of surface;
- absolutely dry;
- clean - it is necessary to remove from the surface all debris and dust that arose during the preparation process;
- stable - there should be no displacement of the base elements relative to each other.
How to level a wooden floor under laminate
There are several options for leveling wooden floors under laminate:
- scraping a wooden floor;
- covering the floor with plywood or chipboard;
- leveling with plywood using pads and bars.

The choice of one or another surface correction option depends on the degree of unevenness of the wooden base.
Repairing an old wooden base
Work on preparing a wooden floor for laying laminated flooring is carried out either immediately before installation, or in advance. It depends on how complex the process will be and how long it will take to fully meet the technical requirements. First you should check the condition of the wooden floor for any possible defects.
Most often, boards that have been in use for more than one year have a slightly convex surface as a result of applying several layers of paint to them. The edges of the boards or parquet slats may be damaged in the form of cracks, holes and gouges. In addition, it is possible that the floorboards do not adhere tightly to the joists at the joining points. Sometimes there is a significant slope of the floor in one or more directions. All these shortcomings require elimination.

Before laying laminate flooring on a wooden floor, you should fill all the potholes, wedge and secure the loose elements with glue and screws. If there are cracks in the wood, they are stapled together using a construction stapler. Moldy and rotten boards must be replaced with new ones. To eliminate the creaking of a wooden floor, you need to go through all the floorboards.
You can also get rid of squeaks in wooden flooring by driving wedges between poorly fixed boards and joists, as well as between adjacent floorboards. This method will help neutralize the friction of the boards against each other. If the plank flooring is very worn, this method may not be effective. However, the main threat to the integrity of the laminate remains the unevenness of the base.

How to lay laminate flooring on an uneven wooden floor: surface treatment by scraping
If all the floorboards of the wooden base are well secured and the surface does not have a significant slope, you can use a scraper or power planer for leveling. This method is appropriate for surfaces whose unevenness does not exceed a slope of 5-6 mm per square meter. Local irregularities are eliminated by sanding the defective areas with sandpaper or using a hand scraper. This treatment is also used in hard-to-reach places.
To facilitate the process, it is recommended to begin leveling by dividing the entire surface into several sections. After processing, the plane of each section and the quality of grinding are controlled. Before starting work, it is necessary to deepen the heads of all self-tapping screws 2 mm into the wood in order to avoid contact with the metal knives of the power grinding tool, which can lead to their damage.
Upon completion of leveling, check the entire surface of the wooden floor using a level, then carefully sweep or vacuum away sawdust and dust. If the small debris remaining after leveling is not removed, there is a possibility that it will get into the locks of the laminated covering, and this, in turn, will lead to unwanted squeaking when moving on the laid laminate.

Before laying the laminate on a wooden floor after leveling, it is necessary to treat the entire surface with an antiseptic compound or dry it and dry thoroughly. To reduce possible deflection of the laminated coating, it is recommended to lay panels of material perpendicular to the direction of the boards.
Leveling the floor with plywood under laminate
One of the simplest and at the same time low-cost methods of adjusting the surface to the required level is the method of laying plywood on a wooden floor under a laminate. To perform such work, you should purchase plywood sheets with a thickness exceeding the thickness of the finished laminated coating. It is recommended to choose the thickness of plywood for laminate flooring in the range from 12 to 15 mm.
Before starting installation, it is a good idea to check the humidity level in the room. This can be done by placing a sheet of polyethylene on the floor measuring approximately 1x1 m. The polyethylene should be pressed tightly to the floor and left for three days. If after this time no condensation forms on the inside of the sheet, plywood sheets can be used in such a room.

The process begins by cutting plywood sheets. They are cut into squares measuring 60x60 cm. Individual outer sheets are adjusted to the contours of the room, fill niches and go around protruding areas. When laying, gaps of 7-10 mm are left between the sheets, acting as expansion joints. The distance between the outer sheets and the wall should be between 15 and 20 mm. In order not to mix up the cut plywood sheets during assembly, it is recommended to number them.
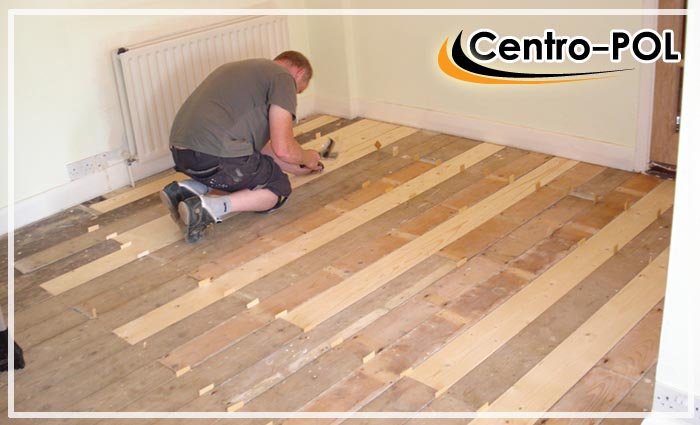
You can attach plywood boards to the floor using glue, but you can do without it. Using the laying diagram and numbering, the sheets are laid out on the wooden floor in their place and fixed with self-tapping screws in the corners of the square and along diagonal lines in increments of 15 cm. For fastening, it is important to use self-tapping screws, the length of which is three times the thickness of the plywood. After final assembly, the plywood sheets are carefully sanded with coarse sandpaper.
Laying plywood under laminate on a wooden floor with fastening to joists
Before laying laminate flooring on a wooden floor, you can use the surface leveling method of laying plywood and attaching it to joists. This method is quite labor-intensive and expensive. The principle of this method is to install the logs in such a way that their upper edges are in the same horizontal plane. To achieve this position, wedges or blocks of wood are placed under the joists. When laying adjustable joists, their position is fixed using adjusting screws.

Plywood boards are cut using a circular saw and laid on joists, while the horizontal level of the plane of each sheet is checked. Laying is done in a checkerboard pattern to avoid combining the seams at one point. The sheets are fastened to a wooden base using self-tapping screws along the perimeter and diagonally in increments of 20 cm. For quick and convenient installation, it is recommended to pre-mark the fastening locations.
After complete installation, the sheets are sanded and treated with an antiseptic solution, and then the laminate is laid on the plywood. On wooden floors leveled in this way, the floor covering will remain durable and long lasting. The only drawback of laying plywood on joists is that this option is not very suitable for rooms with low ceilings, since their height can be reduced to 8-10 cm. In addition, trimming the door leaf may be required.

Is it possible to lay laminate flooring on fiberboard?
When renovating an apartment, many people wonder whether it is possible to put laminate flooring on a wooden floor covered with fiberboards? Some recommendations note that if the fiberboard boards are laid flat and held tightly, they can be used as a base for a laminated coating. However, some experts do not agree with this statement.
The thing is that wood fiber panels do not have the ability to redistribute the load over a large area, unlike plywood or chipboard sheets. In addition, when fiberboard sheets are laid, there is no way to carefully examine the condition of the old wooden floor. How to lay laminate on a base whose elements may be rotten or worn out? This can lead to the fact that over time, all existing defects will appear on the finished floor covering.
The use of fiberboard, which is based on pressed paper, as a base for a laminated coating raises serious doubts about the durability of the repair. On old floors, under load, a play of up to 0.5 mm may appear, which will cause the laminate locks to become loose. This can lead to squeaking and broken locks. And if you consider that wooden floor joists can be cracked, the gap can be significantly larger.

Considering that not everyone has the opportunity to dismantle an old wooden floor or rebuild it (which is also expensive in itself), you can lay laminate flooring on fiberboard. However, the condition must be met that the fiberboards are sufficiently firmly fixed to the wooden floor. And if the base for the laminate is strong, then there is not much difference whether the base is chipboard, plywood or fiberboard.
Laying laminate flooring on a wooden floor with your own hands
To understand how to properly install laminate flooring on a wooden floor, you need to have an understanding of the material itself, its classes, types of substrate used, calculations and installation technologies. This information will help when carrying out work to avoid mistakes that lead to damage, waste of material, and will also contribute to high-quality and durable installation.

Selecting material: calculation and purchase of laminate
The amount of laminate required is calculated based on the area of the room, the material consumption rate and the installation method. First of all, you should determine the surface area to be covered. The number of square meters of the room is divided by the area of one laminate board. As a result, the required number of coating strips is obtained. Knowing that each pack contains 8 boards, you can easily determine the number of packs.
When purchasing material, you should also take into account the consumption coefficient, which varies from 5 to 14%. This or that coefficient value depends on how the laminate panels are laid. If you decide to lay the laminated flooring diagonally, the maximum coefficient is taken. Consequently, there will be more material waste.
In addition, it should be taken into account that during installation work, the plate lock may be accidentally damaged or incorrect trimming may be performed. In this case, it would be useful to purchase several boards in reserve.

To work with laminate in residential premises, choose a coating with certain technical parameters. Manufacturers present four classes of material, the main indicator of which is wear resistance. The most common slabs are 6, 8 and 10 mm thick. The thicker the board, the stronger the coating. For household use, grades 31 and 32 of material are quite suitable.
In addition to strength indicators, laminate slabs are distinguished by locks. There are two types of locks – CLICK and LOCK. The CLICK lock is more common; it holds the seam perfectly and allows unevenness of up to 3 mm per linear meter of surface. Panels with the second type of lock are difficult to install, require a perfectly level base and are used less frequently.
Preliminary preparation of the base
Before laying laminate flooring on a wooden floor, you should analyze the condition of the existing subfloor. It is necessary to identify all existing defects: potholes, cracks, holes. Loose boards should be wedged and secured with glue and screws. Potholes should be filled with wedges using glue, and if possible, the ventilation holes should be cleaned.

A completely old floor should be dismantled down to the supporting joists. If the inspection reveals that some elements are rotten, they should be replaced. Flooring boards that are leaky on one side can be turned over with the unworn side up, and completely rotten ones can be replaced with new ones. Checking the slope of the floor is carried out using a building level and a lath.
If a difference in the floor surface of more than 3 mm is detected, the scraping method should be used. If you don't have a sanding machine, you can always rent one. It will be more reliable to level the floor by laying chipboard or plywood. In addition to the leveling function, such a coating will provide additional insulation and sound insulation of the floor.
Leveling a wooden floor with chipboards
Laying chipboard slabs is done after strengthening all elements of the wooden floor and impregnating the base with an antifungal compound. The baseboard is dismantled and unnecessary objects that could interfere with the process are removed. The slabs are laid from the corner of the room. A gap of about 10 mm is left from the wall. Place the chipboard sheets so that the joints of the material fall on the lines of the beams.
Chipboard slabs are secured with self-tapping screws, and care must be taken to ensure that the heads of the fasteners do not extend beyond the surface. The pitch of the screws should be about 30 cm. After laying all the chipboard panels, the joining lines must be putty with thin-layer compounds specially designed for working with wood. When the solution dries, the surface of the chipboard boards is sanded.

The base of freshly laid chipboard should be thoroughly dried. Ideally, the slabs should be left for about a week to allow acclimatization and excess moisture to evaporate. If during this time it turns out that some joints have swelled or shifted, they should be sanded, puttyed and cleaned with sandpaper.
Necessary tools for work
For people who do not do professional repairs, but are planning to lay laminate flooring themselves, a logical question arises about a set of tools for the job. To lay laminate flooring on a wooden floor, you will need a tool that should be in the arsenal of every owner:
- construction tape;
- ruler, pencil;
- construction knife;
- hacksaw or jigsaw;
- rubber mallet;
- pliers.

Do not forget about the plinth, for fastening it you will have to slightly expand the range of tools. If you intend to install wooden baseboards, you will need a miter box. In the case of plastic skirting boards, this device will not be needed. You will also need a screwdriver or drill to tighten the screws.
A hammer drill can also be useful for making holes for mounting baseboards. Not everyone has this power tool, but it can be rented for the duration of the work.
Choosing a laminate underlay for a wooden floor
Before laying laminate flooring on a wooden floor, it is correct to cover the surface with underlay. This layer allows you to compensate for minor unevenness, provide moisture and sound insulation of the laminate, as well as the space between the coating and the base. There are quite a lot of types of substrates, and they differ in composition, properties, cost, appearance and other characteristics.

The material for making substrates can be synthetic (polyethylene foam), natural (cellulose, cork, pine needles, etc.) or combined. The most budget option is foamed polyethylene - lightweight, easy to install, but fragile material that quickly compresses and does not provide proper moisture exchange. A more durable substrate is made of polystyrene in the form of 1x1 m slabs; it does not cake and provides high-quality sound insulation. But these types of substrates are more often used when the base is made of concrete.
Before laying laminate flooring on a wooden floor, it is recommended to arrange an underlay layer of natural material. The cork substrate has excellent properties; in combination with laminate, it demonstrates excellent heat and sound insulation. Its cost is quite high, but this is compensated by the long-term preservation of the wooden base. The thickness of the substrate is selected based on the same parameter of the laminate board.
For example, a 3 mm thick substrate is selected for an 8 mm board. As for laying the material, it should be noted that the strips of the substrate are placed end-to-end without overlaps and permanently attached to walls or a wooden base. The connecting lines are taped along the entire length or in periodic places.

How to lay laminate flooring on a wooden floor: installation technology
Once all the preparatory work has been completed, you can proceed directly to laying the laminated panels. The process of laying laminate flooring is relatively simple and does not require special knowledge and skills. However, it is still worth familiarizing yourself with some installation nuances. Choose a place where the laminate packages will be located, remove the doors from their hinges, and clear the room of unnecessary items.
Before laying the substrate, it is necessary to remove all debris and thoroughly remove dust from the surface of the base. The backing strips are laid parallel to the future location of the laminate boards. If a single piece of backing is not enough, you need to connect several parts with tape, cutting them using the mirror cut method. All connecting lines are also taped.
Next, lay the first row of covering. Don't forget that the laminate panels should be positioned across the wooden base boards. Carefully connect the slats of the first row to each other. First, we assemble solid panels, and then we measure the length of the last board of the row and mark the cut line. When trimming, you must turn the board 180 degrees, otherwise the locks will not match. At the mark, cut off the excess part. As a visual aid, use the video: how to lay laminate flooring on a wooden floor with your own hands.
Don’t forget to leave gaps between the end of the panel and the wall, into which you can place 8-10 mm wide stops made from laminate scraps. After the starting strip is formed, the next one is assembled. The distance between adjacent rows should be small to make it easier to connect them. The formation of the next row begins with the cut lamella.

After assembling the second strip, it must be carefully lifted, holding the end joints, and turned slightly so that the lock snaps into place. You need to go along the entire length of the strip, alternately lifting the end joints and snapping the locks. In order for the locks to fasten tightly, it is necessary to tighten them by tapping them with the palm of your hand or a mallet.
All other rows of coverage are assembled using this principle. It is best to lay laminate panels in a chaotic order, i.e. Some of the rows should not be started from the cut board of the previous strip, but from the whole board or from a shortened piece.
Features of laying the last row of laminate
The closer the installation moves to the last row, the more inconvenient it will be. When the room is 80% covered, you need to lay the panels, turning in the opposite direction and standing on the already laid laminate. Some difficulties are caused by laying the last row, which must be carefully measured and cut along the strip.

When the laying process reaches the last strip, the distance from the edge of the penultimate row to the line of the opposite wall along the entire length may not be the same. In view of this, marking the last row is done in stages: first, the first board is marked and cut, then the next one is measured and cut, and so on until the end of the row. We outline the outlines of the first panel with a pencil and cut out the required strip according to the markings.
As soon as the laminated coating is laid, begin attaching the baseboards. The connecting points between rooms are covered with special thresholds to prevent dust from entering there. At the end of the work, remove sawdust and debris from the coating and wipe the surface with a slightly damp cloth.
How to properly lay laminate flooring on a wooden floor in hard-to-reach places
Laying laminate flooring in places where pipes pass, heating radiators, around doorways and in other hard-to-reach places does not present any particular difficulties. Bypassing the pipes is done in the following way: make marks on the board with a pencil and cut out the corresponding holes in it, not forgetting to take into account the temperature gap between the coating and the pipe (8-10 mm).

Gaps around pipes and other iron elements should be treated with a matching acrylic sealant, while expansion joints near walls should be left unfilled. Subsequently, their unaesthetic appearance will be covered with baseboards. The material is laid in a similar way near thresholds, steps and other protrusions.
As for going around doorways, before laying laminate flooring on a wooden floor, it would be correct to remove the panel from its hinges and determine whether the door will close after laying the coating. To do this, you need to sum up the thickness of the laminate, the substrate and the leveling layer (if there is one). Subtract the resulting value from the distance from the edge of the door to the wooden floor. If less than 3 mm remains, the door leaf will need to be trimmed.
After all the calculations, lay the laminate around the door frame, leaving an allowance of 8-10 mm, return the door to its place and check its movement. If necessary, file the door to the required size.

Training video: how to lay laminate flooring on a wooden floor with your own hands
According to the principle that it is better to see once than to hear a hundred times, home craftsmen are invited to familiarize themselves with the instructional video of laying laminate flooring on a wooden floor. From the videos you can learn everything related to the installation of coating on a wooden surface.
Video: DIY laying laminate flooring on a wooden floor
On the Internet you can find a whole series of courses on how to lay laminate flooring. Video instructions for installing floor coverings contain visual information and practical advice from both experienced craftsmen and those who have tried to level a wooden base and lay laminate flooring on their own for the first time.
In the training videos you can see master classes on leveling the floor with plywood and chipboard, learn about the features of a wooden base, choosing a substrate, as well as step-by-step instructions for laying laminate flooring. In addition, in the video materials you can find recommendations for eliminating possible defects in wood flooring.
Video: how to lay laminate flooring near a doorway
There are many educational videos about the installation of skirting boards, the features of interlocking floor coverings and the technology of fastening panels of material to each other. Thematic video tutorials contain information on how to lay coating around radiator pipes, in niches, ledges, near doors and steps, as well as in other hard-to-reach and inconvenient places.
Some video tutorials are devoted to eliminating and repairing defects on already laid laminated flooring. From them you can learn how to disguise scratches and dents formed on the laminate from fallen heavy objects or heels, as well as how to eliminate damage caused during the installation process: chipped corners and edges, seam divergences, swelling of the coating.
Leveling a wooden floor using any of the existing methods allows you to use it as a base for laminate flooring. If all work on preparing the floor surface is carried out in compliance with technical requirements, the floor covering will last a fairly long time, without requiring repairs and while maintaining an aesthetic appearance.
For any decorative finishing coatings, the most optimal base is considered to be a base made of concrete, mineral screed with a strength of 15 MPa. A wood subfloor is less desirable. Some reputable manufacturers do not directly recommend installing laminate flooring on such flooring.

Permitted and prohibited bases for laminate flooring.
The reason is that wood is a very capricious material, which is influenced by seasonal, biological and other factors. The concerns of manufacturers are understandable: the geometric dimensions of the base periodically change due to changes in humidity, the planks can bend and warp. All this violates the integrity of the finish. Therefore, most often factories indicate that warranty obligations do not apply to products mounted on top of wood.
If you still plan to lay laminate flooring on a wooden floor, then the base must meet the following conditions:
- Integrity. The coating installation guidelines from reputable manufacturers indicate that the wood must be healthy, free from cracks, deterioration, loose areas, fallen areas and other similar defects. In difficult cases, it is possible to carry out a complete overhaul of the flooring and replace defective areas.
- Humidity - 8-12% (which corresponds to 40% Rh at a relative surface temperature of +20 ° C). When using the “warm floors” system, the boards should have an indicator of 5%, no more.
Do not underestimate the problem of water vapor diffusion, which leads to the formation of dampness inside the floor structure. That is why manufacturers of laminated and vinyl flooring recommend installing them on wooden structures with bottom ventilation. This arrangement of the floor “pie” will allow the wood to “breathe”, and therefore achieve a unique temperature and humidity balance. Even when using a waterproofing film and a substrate with zero vapor permeability.

Thus, it is allowed to lay laminate flooring with your own hands or by an experienced craftsman on a wooden floor, but provided that the base is of good quality or has been carefully prepared.
Preparing the base for installation
The best subfloor is considered to be stabilized old parquet or plank flooring. It is quite dense and dry, that is, it does not absorb water, is not afraid of seasonal changes in humidity and temperature, and any deformation changes are already a thing of the past. But at the same time, such a base is characterized by multiple irregularities, the presence of gaps between the planks and other defects.

Old wooden base.
Regardless of the age of the base flooring, the installer's first priority is to check the condition of the subfloors in all rooms where laminated parquet is planned to be installed. It is necessary to identify:
- Local irregularities;
- Rotten, moldy or blackened areas;
- Damaged planks;
- Areas with gaps between boards;
- Loosely attached or falling out elements;
Areas with damaged lamellas must be replaced; they cannot be covered with putty or a mixture of sawdust and PVA. Poorly fixed planks are repaired in two ways:

It is easy to close the gaps between the planks yourself using elastic wood putties or sealants. It is advisable to use colorless, non-pigmented formulations.
But you will have to tinker with the unevenness. When installing a laminate, each defect will appear in the form of a damaged section of the coating, so deep grooves and chips are filled with putty or a paste made from wood flour and PVA, which you can prepare yourself. And differences and bumps are leveled in the following ways:
Grinding
Small areas with curved slats can be treated with a plane, a hand angle grinder with an abrasive attachment, or regular sandpaper. If the surface is uneven over the entire area, then it is better to use a professional parquet sanding machine complete with a construction vacuum cleaner. All necessary units should be rented, but consumable components will have to be purchased separately.

Dry prefabricated screed
For differences of more than 5 mm, it is recommended to completely level the base using sheet materials for the floor: moisture-resistant plywood, chipboard, OSB, gypsum fiber board, etc. Slabs with a thickness of at least 16 mm are laid in 1-2 layers, along the perimeter they are rigidly pulled to the base with self-tapping screws, dowel-nails, and suitable hardware in increments of 30-40 cm. Before leveling, preventive treatment of the wooden flooring with antiseptic primers is allowed.
Dry screed is a great way to additionally insulate the floor. The most common options:
- place on the floor dense thermal insulation boards made of standard or extruded polystyrene foam (PSB-50, Penoplex Foundation), mineral wool with a density of 125 kg/m³. Sew plywood or chipboard on top of the insulation;
- form a frame from logs, lay a vapor barrier membrane, fill in the gaps or put insulating material - expanded clay, ecowool, stone wool, pine mats, etc. Place sheets of gypsum fiber board, chipboard, and SML on the slats and secure them.

Dry plywood screed over joists with insulation.
Self-leveling filling compounds
If the floor has differences of more than 10 mm? The sanding machine will remove too much layer, and the prefabricated screed is inapplicable in some cases. To minimally raise the floor level and get a perfectly flat surface, you need to use industrial bulk mixtures. Moreover, not all are suitable, namely elastic ones, on the label of which in the section “type of base” boards, plywood, chipboard are indicated.
Although many people believe that it is possible to pour the solution directly onto the wood, excess moisture can cause damage. Therefore, it is better to make a so-called floating screed on a separating layer of film or waterproofing membrane. It is recommended to lay the material over the entire surface of the floor, placing it on the walls and installing a damper tape. This will eliminate the risk of cracks. The thickness of the filling layer varies - from 20 to 70 mm.

Instead of film, you can use waterproofing compounds for wood: polymer primers, water repellents, etc. That is, any liquid product that is absorbed into wood without leaving an oil, bitumen or other film on the surface.
The procedure for working with bulk mixtures is described in detail in the instructions on the packaging of the material. The composition is mixed with water, thoroughly mixed until smooth, carefully distributed over the floor and rolled with a roller or brush to remove air bubbles. After 5-7 days, the base for the laminate is ready.
Laying technology
Our step-by-step instructions will help you cope with the last stage and avoid mistakes when installing the finishing coating.
For work you will need the following tools and materials:

- Laminate of suitable design with a margin of 1-4 m². Decide in advance whether to lay the covering along the walls or diagonally. In the first case, a reserve of 1-1.5 m² is sufficient, in the second, at least 3 m² will be required;
- Coniferous substrate, made of foamed polyethylene, cork, extruded polystyrene foam with a cross-section of up to 3 mm;
- Waterproofing film 150-300 microns or membrane, tape for fixing layers;
- Hydraulic level;
- Cutting hand or power tools for adjusting the lamellas to size;
- Kit for laying laminated floors, including spacer wedges to create a temperature gap around the perimeter 8-10 mm wide, mounting bracket and tamping block made of wood or PVC;
- Square, pencil and tape measure.
Installation of the laminated coating is carried out in 5 steps:
Checking conditions
Can I start styling immediately after purchase? No. First, check all the packs to ensure they are from the same batch or identical year of manufacture. Otherwise, there may be a difference in tone, a mismatch in the decor or even the locking part. This is especially common when purchasing finishing materials on sale. You can, of course, return or exchange the product within 2 weeks from the date of purchase, but do not forget the receipt or invoice.

The optimal period for acclimatization of the floor covering.
Check the climate conditions. They must comply with the requirements of the instructions:
- Air temperature – from +16 to +25 ºС;
- Relative humidity - 40-70%;
- “Warm floors” - switched off 5-7 days before the start of work, in winter 3 days;
- The normal moisture content in flooring boards is 8-12%, if there is a heating system - no more than 5%.
The laminate must be brought in and, without unpacking, left in the room for 2 days.
Preparing the base
As noted above, the surface must be dry, smooth, solid and clean. Even the slightest defects must be eliminated in advance so that you do not have to disassemble the laminate or repair it later.
Laying waterproofing and underlayment
It is necessary to lay strips of film or membrane on the base with an overlap of 10-20 cm. It is recommended to glue the joints with tape. Then the substrate is laid end-to-end, the slabs or layers are secured to each other using adhesive tape.
Floors made from natural wood planks have previously been used very widely, and nowadays many developers want to have such coverings. But old structures have already exhausted their service life and require major repairs or complete replacement, and not everyone can afford new ones.
Floors can be repaired in several ways and using materials of varying costs. Laminate is considered a budget option, which is why it is very popular among domestic builders. The technology for performing work on a wooden floor has its own characteristics.
Requirements for substrates largely depend on the physical and operational characteristics of the finishing coatings. Manufacturers obsessively advertise the advantages of laminate flooring, but are silent about their weaknesses. This is understandable and is explained by the desire to increase product sales and company profitability. What negative features of laminate should be taken into account?

For all floor coverings there is one feature: the worse their physical characteristics, the more stringent the requirements for the base.
Disadvantages of wooden bases
A wooden floor is not a static, but a dynamic architectural structure. It constantly changes its parameters, and such deviations can be critical for the laminate. They should definitely be kept in mind and eliminated.
- Fluctuations in linear dimensions. Wood constantly changes relative humidity levels taking into account the indoor microclimate or due to contact with humid underground air. As a result, the boards increase or decrease in size, and the base under the laminate is unstable. Before laying the finishing coating, it is necessary to apply a set of special construction measures to minimize the negative impact of this effect.

- Heaving of floors. If the existing arrangement of old wooden floors does not allow the boards to move slightly, then there is a risk of heaving on the floor surface. Laminate coatings react very negatively to such changes; the adverse consequences can only be eliminated after dismantling the coatings. This is expensive and difficult; it is much more expedient to prevent unpleasant situations from occurring than to eliminate their consequences.

- Development of putrefactive processes. Not all builders comply with the requirements of building codes and regulations, and when laying boards they allow defects. As a result, wooden floors become rotten and lose their load-bearing parameters, the floor collapses, and further use is impossible. This is the most unpleasant situation that requires a lot of time to eliminate. The fact is that natural boards rot for one reason - the underground space does not have effective ventilation. There is no point in replacing individual damaged elements without eliminating the causes of their failure. And it is very difficult to make natural ventilation of the underground space in exploited premises.

We specifically provided the most objective analysis of possible situations and the reasons for their occurrence. Such knowledge will help you make the right technical decisions when laying laminate flooring.
Stages of laying laminate
Regardless of the specific condition of the wooden floor and the chosen laminate laying technology, all work should be divided into several operations.
Table. Procedure for preparing the base for laminate flooring
| Preparation stage | List and brief description of work performed |
|---|---|
| You should start with a visual inspection. If the boards have large cracks, and the surface is severely deformed or bends under load, then further examination of the load-bearing elements is necessary to select a method for repairing them. Damaged boards must be replaced. At the same time, you should check the horizontal accuracy of the floor surface - the deviation cannot exceed two millimeters per linear meter. If it is larger, then you need to decide on the alignment method. There are many technologies, from the use of special leveling systems, screws, linings and to pouring self-leveling mixtures. | |
| If the floors are wobbly or there are completely rotten boards on the surface, then this indicates a high probability of damage to the joists. It is necessary to carefully inspect suspicious places; if problems with lags are detected, they will have to be changed. | |
| As mentioned above, dry boards can last for many decades, but problems arise due to their use in wet conditions. In the case of floors, this means that natural ventilation is ineffective or completely absent. How to fix this problem? The decision can only be made by a technically competent specialist; he must study and analyze the arrangement of all premises and only after that develop an optimal plan for eliminating the problem. | |
| It is recommended to lay laminate flooring on special pads that reduce noise, minimize the risk of squeaks while walking, slightly reduce heat loss, etc. But this is not a load-bearing base, but a purely auxiliary one. The load-bearing base can be directly floor boards, plywood, OSB boards or cement-bonded, self-leveling screeds. When making the final choice of material and technology for preparing the load-bearing base for laminate floors, it is recommended not only to take into account the current state of old coatings, but also their behavior in the future. Floors are installed for a long period of time, mistakes made will definitely show themselves, and this is a very unpleasant consequence. |
As an example, we will look at a rather complex, but one of the most reliable options for laying laminate flooring on a wooden floor. Each master can adjust some technological operations depending on the actual state of the base, but the decisions made should not worsen the technical and operational characteristics of the structure.

The modern building materials market is rich in a variety of types of flooring: ceramic tiles, linoleum, carpet, cork flooring, parquet and others. Currently, more and more often, buyers prefer laminate, since this material is durable, easy to use, has an affordable price and beautiful appearance. This article describes the secrets of properly installing laminate flooring on a wooden floor. Questions that concern many readers are also answered. Is it right to install laminate flooring over an existing uneven wood floor? How is a wooden floor prepared for laminate? How to lay laminate flooring with your own hands?
So, first things first. You bought laminate flooring. Now you need to install it, spending minimal resources of time and effort, and also ensure the high quality of the work done so that the repair is preserved for many years.
Step 1. Assess the condition of the existing pavement

It's no secret that dismantling an old wooden floor is a labor-intensive and dusty process. Often consumers want to avoid dismantling work, but have doubts about the correct installation of laminate flooring on the existing flooring.
To assess the feasibility of laying laminate flooring on a base made of wood, it is necessary to carefully check the entire floor area for the absence of fungus and mold, sagging and creaking of floorboards, and large deformation changes in the surface.
Requirements for a wooden base
- Dryness. Old material should not have signs of rotting or fungal formations. This factor is very important, since the process of damage and decay of the tree will continue even after laying the lamellas. After some time, the laminate will also become susceptible to mold and mildew;
- Hardness. The base must remain strong so that new structures do not undergo deformation and retain their original appearance;
- Evenness. The height difference of the existing coating is not allowed to be more than 2 mm per 2 m of length. An uneven old floor will cause creaks of the lamellas and deformation of the laminate joints.
A more detailed description of the requirements for a wooden base can be found by watching the video:
Advice. If the existing flooring in your apartment does not meet these standards, you can bring the wooden floor into proper shape by locally replacing sections of the base. A plywood flooring will help level the surface.
Step 2. Preparing the wood flooring
Important! When partially replacing a wooden floor, it is necessary to use only dry and high-quality material. Otherwise, the base structure may deform during use and drying of the wood, which will lead to the destruction of the laminate coating.
Eliminating creaking floorboards
A common cause of unpleasant sound is poor fixation of the boards to the joists. The old fasteners have become loose over time and need to be replaced with a new one. In this case, it is not necessary to remove the previous nails; you can make holes nearby. In this case, it is better to use self-tapping screws that are 2–3 cm less than the thickness of the floor. It is necessary to screw each board to the joists, recess the caps so that they do not stick out. A visual guide is given in this video:
Leveling an existing wooden floor
The first step is to identify differences in height using a building level. It is better to use this tool with a length of 1.5–2 m in order to maximally cover the entire surface area and make more accurate measurements.
If you have an uneven floor, then don't despair. Level the convex areas of the coating, preferably cutting them off with a grinder or electric planer. If you lay down sheets of plywood, you can easily eliminate differences in height and make the base of the floor more durable and level.
Step 3: Laying plywood on an uneven wood floor

Installing plywood is an effective way to eliminate defects in wood floors.
Advantages:
- Strength, resistance to deformation, durable laminate flooring;
- High thermal insulation. The material retains 30% more heat;
- Soundproofing;
- Moisture resistance;
- Ease of use. You can lay this material yourself, without involving helpers;
- The large dimensions of the product allow you to quickly level the surface of large and small rooms;
- Low cost.
When choosing plywood, it is necessary to take into account that the thickness of the sheet must correspond to the floor covering or be greater. Therefore, for laying under laminate it is better to use plywood sheets with a thickness of at least 10 mm.
There are several brands of plywood sheets. For the construction of industrial buildings, this material is used, grades FB and FOF; for work in residential premises, grades FSF and FC are used. At the same time, thanks to special adhesive compositions, FSF plywood sheets have an increased level of moisture resistance. However, such products are not recommended for use inside apartments and houses, since they can cause harm to human health due to the toxins contained in phenol-formaldehyde glue. It is better to lay an environmentally friendly and cheaper brand of FC plywood.
It is necessary to lay plywood correctly in a checkerboard pattern. It is impossible to allow 4 angles to meet at one point. Preliminary cutting of the sheets and their numbering will help you avoid confusion when it comes time to lay down the covering. The technology for laying plywood requires the presence of gaps between the seams of 2–3 mm and a space around the perimeter of the walls of 10–12 mm. This will allow the wood to expand without deformation due to temperature changes.
To level an old wooden floor using plywood, you need to fasten the screws at a distance of no further than 20 cm from each other along the perimeter of the sheet, while retreating 2 cm from the edge.
Details of cutting sheets, the diagram of fastening the sheets and the secrets of checking the quality of the work performed can be found by watching the video:
Advice. You can additionally glue the uneven floor with sheets of plywood. This will avoid unwanted loosening of the boards when walking, thereby increasing the durability of the laminate flooring.
Once you have leveled and prepared the wood flooring, you need to consider laying an underlay underneath the laminate.
Step 4. Selecting a substrate for the laminate

The underlay is a special rolled material that helps prevent the subfloor and laminate from coming into contact. By compensating and distributing the load, the substrate softens the pressure of gravity, thereby ensuring the strength of the entire coating structure. Thanks to this rolled product, the locking connections of the lamellas are not deformed. This material also performs the functions of noise absorption and vapor barrier; it can be used to level out minor deviations.
The substrate comes in the following types: polyethylene foam, polystyrene, cork.
What do you need to know to choose a laminate underlay? Requirements for this product. The following video will help you answer these questions:
Attention! A correctly selected substrate will increase the service life of the laminate and its performance properties.
Step 5. Laying the laminate on the prepared wooden floor base

The technology for laying laminate flooring is simple. You need to lay the underlay end-to-end on the prepared floor base, securing the edges of the strips of rolled material with tape or masking tape. It is better to start laying the slats from the window to the door, close to the wall. Having inserted a wedge that will ensure a temperature clearance of 10–12 mm from the walls, you can begin laying laminate boards. The last laminate plate in the row must be cut with a jigsaw, carefully measuring the distance remaining to the wall. It is important to lay the second row, moving the laminate board relative to the first row at a distance of 40 cm. This will give additional strength and integrity to the laminate flooring, and also improve the appearance of the floor.
Installation of laminate boards requires ease of clicking of locking joints. However, sometimes it is necessary to perform additional careful manipulations with a hammer to get rid of gaps and achieve a tight fit of the lamellas.