Do-it-yourself wooden country house. Do-it-yourself summer house - the main stages of construction and decoration (95 photos). Selection of materials and step-by-step construction
A house on a plot of land is simply necessary, because a dacha is not only a vegetable garden, but also a place for relaxation, and there will always be somewhere to hide from bad weather. As a rule, the design of such houses is not particularly complex, so even beginners in the construction business will not have any problems. Read more about how to make a country house with your own hands in this article.
Choosing the type of house taking into account the budget
The budget for an upcoming construction project is not always unlimited; quite often, financing for the construction of a country house is carried out on a residual basis, but even in this case, you can choose a good option.
The following types of houses in summer cottages can be distinguished:
- capital (made of natural stone, brick or wood);

- small houses, usually made of wood - frame construction technology is used;
- country houses made from block containers - almost ready-made structures;
- The houses for children stand apart - they are more like a combination of a playground and a small gazebo.
At the same time, the time and financial costs of building a small house will be comparable to the costs of building a medium-sized barn. And the use of modern technologies will reduce construction time to a minimum.
Start of construction
In the case of using frame construction technology, the entire process can be divided into separate stages:
- foundation installation;
- bottom trim device;
- securing frame elements– racks and braces, installation of joists, if necessary, assembly of the second floor frame;
- wall cladding;
- creating a roof frame and covering it;
- laying roofing elements, interior decoration of the house, protecting wood from climatic influences.
None of the listed operations require special skills, so anyone can build a house in the country with their own hands.
What should the foundation be?
There is simply no alternative to a reinforced strip foundation for a brick house. But if wood is used, then the main task of the foundation will be not so much to carry a heavy load, but to raise the house above ground level.

Therefore, with frame construction technology, they often make do with concrete or brick pillars (pile foundation), the top of which is 30 - 50 cm from the ground. It is important that the tops of the pillars are in the same plane. This is an inexpensive option, especially compared to .

The basement is built from brick after the construction of the house itself. It is not recommended to make it continuous; this will lead to the fact that moisture from under the house will evaporate very slowly.

Note!
In the area that the foundation will occupy, you need to remove the plant layer of soil and replace it with sand.
Thanks to this, water will not stagnate under the house and the wood will not rot.
Bottom harness
This is the basis for the future floor and support for the wall frame. It is assembled from 10x15 cm beams and attached directly to the foundation.
Advice!
It is undesirable to connect the beams end-to-end in the corners - this will not provide the required rigidity.
It is recommended to use a connection using cutting, which is additionally reinforced with self-tapping screws or an anchor.

Sometimes, during the laying process, reinforcing bars (10-15 cm) are left in the foundation itself, onto which the framing bars are then simply placed. This method of fastening can be considered optimal in terms of rigidity and strength of the connection.
Frame for walls
At the planning stage, the main attention should be paid to developing the frame of the structure. You can prepare drawings of a country house with your own hands, or you can choose a suitable option on our website.

The main element of the frame is a vertical post, rigidly connected to the upper and lower trim. You can attach it to the strapping beams either using metal corners, or select a groove in the strapping beam and simply insert the stand into it.

The corner connection is less rigid, so it is advisable to use it only in small houses. If the structure is large enough, then these 2 methods can be combined.
To ensure that the racks do not warp during the assembly process (as long as they are fixed only in the lower part), they are additionally fixed with temporary braces in the form of ordinary strips. Permanent braces are installed only after work on the top trim is completed.

Note!
The holes in the top rails must be located exactly above the holes in the bottom rail.
A displacement of even a couple of centimeters will cause the frame racks to bend.
When assembling the frame, you need to remember about window and door openings. The main rule is that the load from the structure should not be transferred to (so as not to warp it). Therefore, openings are always made wider than the window or door itself. The cracks then simply foam and disappear behind the platbands.

In the corners of the house, for greater strength of the frame, you can install not frame slats, but beams with a section of 10x10 or 10x15 cm. Grooves are drilled in the end of the beam and in the trim into which a wooden cylinder is inserted. Additionally, the connection is fixed with metal corners. In general, when assembling the frame, each connection can be strengthened with corners, but in this case the cost of construction will increase.
In parallel with assembling the frame for the walls, you need to start building the floor.
In frame construction, there are 2 options for flooring:
- when grooves are selected in the strapping bars and logs are attached to them. Reduces the load-bearing capacity of beams, suitable only for small construction sites;
- when the logs are assembled into one whole (it turns out to be a kind of box), then it is laid on top of the strapping and attached to it with self-tapping screws.
If you plan to build a do-it-yourself cottage for your dacha for winter living, then you need to insulate the floor. For this purpose, ordinary polystyrene foam is suitable, which is simply placed in the spaces between the lags. The gaps formed after installation can simply be foamed with polyurethane foam.
Installation of the top trim and wall covering
The instructions for installing the top trim contain the same points as when installing the bottom trim. After completing its installation, you can remove the temporary braces and finally strengthen the wall frame with permanent braces.
After this, selections are made in the beams of the upper trim for the joists for the installation of the ceiling. If desired, these logs can not be hidden, but rather turned into an interior detail. The joists should extend slightly beyond the walls; this will be needed when installing the rafters.

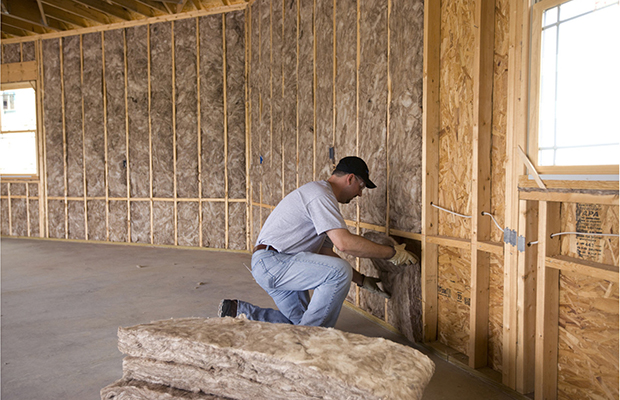
As for wall cladding, you can use regular boards, lining or siding for this - the choice depends more on the budget. But regardless of the material chosen for cladding, the walls need to be insulated, especially since the price of insulation is not so high.

To do this, insulation, for example, mineral wool, is simply inserted between the frame posts. Then a special film is fixed on the outside with a stapler (it allows moisture to pass in one direction), and sheathing strips are placed on top of it. And only after this the framing of the frame begins.
Roof frame construction
The simplest and cheapest option is a flat roof. In this case, it is enough to simply maintain the required slope at the stage of assembling the wall frame. But the classic gable roof is much more common.
The rafter system is selected depending on the size of the house. So, for a small building you can use a hanging system. In this case, the rafter legs rest only on the walls or on the logs.

A layered system will be needed if the house has internal load-bearing walls - additional supports are installed to prevent the rafters from sagging.
A sheathing (solid or lattice) is placed on top of the rafters and a waterproofing carpet is laid out. After this, all that remains is to secure slate, tiles or any other covering to the slopes.
Children's country houses
They are a combination of a small house and a playground. Therefore, the main requirement here is that parents have imagination. You can build a house for a child in your country house with your own hands in just 1-2 days.

When working on the design of such a structure, you can use the following tips:
- you can make it 2-story, and place, for example, a sandbox on the lower floor;
- a slide adjacent to the house would not be out of place;
- an external staircase to the second floor is required;
- you can equip it with a “warehouse” for toys (shovels, buckets, etc.).
A child, of course, will not live in such a house. The main purpose of the “new building” is to have fun with friends.
Block containers as a country house
Standard cargo containers can be used, unless, of course, the elongated shape of the future “house” bothers you. If you wish, you can cut out the side walls with a grinder, arm yourself with a welding machine and use the container frame as the basis for the house. Welding will require electricity, but renting a diesel generator for your dacha will solve this problem.

Summarizing
A house is an integral component of any dacha plot; in fact, this is what distinguishes a dacha from a simple vegetable garden. A small house on a plot of land will require a minimum of time and financial costs, but will make outdoor recreation unforgettable and will become a cozy corner for all family and friends.
In the video presented in this article you will find additional information on this topic.
How to build a garden house with your own hands, stages of construction, how to insulate a house, tips on building a foundation, walls and roof. Interior and exterior finishing.
A large number of people, if they don’t already have it, then at least in their minds want their own summer cottage and, of course, to have a garden house built on it. To save on construction, many create small structures with their own hands, but if opportunities allow, it can be built to a more impressive size.
This article will help you create the garden house of your dreams, after reading it you will learn the design features of the garden house, what tools are used for this, how to lay a reliable foundation, the nuances of constructing the frame and the correct execution of the cladding. How to perform high-quality insulation, what a foam coat is and why you need a ventilated façade.
How to correctly create and take into account the design of a garden house, proper space planning, technology for constructing a garden house, the reliability of wall construction, the formation of high-quality floors and ceilings, how to install a roof, the nuances of creating a country house. How much does it cost to build a garden house?
Proper construction of the roof and attic, high-quality interior and exterior finishing of the structure, how to install ceiling joists.
What are economy class houses, revealing the issues of building a panel structure, what materials are best used for this.
Design features
Today, construction technologies offer the construction of garden houses not only from classic materials (logs, cinder blocks, bricks), but also to use plywood sheets, OSB, aerated concrete blocks, foam blocks, timber, etc. as the main building materials.
But it is plywood garden houses that have excellent soundproofing and thermal insulation characteristics, along with ease of work and inexpensive construction costs.
Another advantage of this construction is the opportunity to make a house out of plywood with your own hands. This allows you to significantly reduce the cost of hiring professional teams. But it must be borne in mind that garden houses made of timber and plywood have some disadvantages, for example, the vulnerability of the latter to aggressive actions of the external environment. Accordingly, additional measures must be taken to protect this building material, and this, in turn, increases costs.
Plywood is also an unsafe building material for home residents in terms of penetration by intruders. Therefore, when building a garden house from timber and plywood, external finishing work is required, for example, siding, which, in addition to decoration, also hides the main material used in construction from prying eyes.
Expert opinion
Filimonov Evgeniy
Professional builder. 20 years of experience
Ask a question to an expertCountry houses are built using frame technology, which is gaining increasing popularity in many
Countries of the world.
This is explained by its main advantages:
- there is no need to rent special construction equipment;
- no strong foundation required;
- the country house has excellent energy saving characteristics;
- the ability to quickly complete construction work;
- Due to the lightness of the structure and the materials used during construction, the walls do not shrink.
But the wood that is used to build a house (boards for roof sheathing, bars for wall frames) must be dry, and plywood sheets must have a minimum of chips at the edges. In addition, all wood materials must be additionally treated with special compounds that can provide the required fire safety and also protect against moisture.
The construction of a frame plywood house can be divided into the following stages:
- foundation construction;
- construction of wall frames and plywood cladding;
- roof installation;
- insulation;
- finishing works (internal and external).
After a week of work and the bustle of the city, I want to relax in the lap of nature and breathe fresh air. The ideal option is a small summer cottage with a house. Dachas are often simply called plots of land that are distributed to citizens for growing crops. Sooner or later, the owner of such a plot has a desire to have a house where he can relax after working in the garden beds and spend a weekend in nature. Hiring a crew is expensive; you can build a simple small summer house yourself.
How to build a country house without outside help?
When thinking about a house on a summer cottage, you should decide whether they will live in it temporarily during the summer season or whether it will be possible to live in it throughout the year. This determines how much money will be spent on construction. For year-round living, you need to build a permanent structure with communications and heating. This requires a lot of funds and manpower.
If you plan to live only seasonally, you can build a house with your own hands. At first glance, it may seem that this is a complex and difficult task for a person far from construction. But, starting to understand the nuances of construction, it is clear that you can gain construction experience during construction, if you wish.
There are several technologies that allow you to easily and quickly build a small country house. The simplest and most economically advantageous technology is frame construction. It allows you to build a house yourself without outside help. This is the cheapest option when choosing materials, since you can use used materials. True, they must be of high quality for the structure to last a long time. Another advantage of frame construction is speed. If you put in the effort, you can build a house for finishing in a season.
What material is suitable for the walls of the dacha - choose the appropriate options
The construction market has a large selection of different materials from which walls can be built. The choice depends on the preferences of the developer, the purpose of the future home and operating conditions. For a country house, you should select inexpensive, easy-to-install materials that do not require a solid foundation. Let's consider several options for such building materials:

You can build a country house from other materials. For example, you can use building materials from a dismantled house if they are in a condition suitable for construction. But all loads must be correctly calculated.
It must be remembered that the heavier the walls, the stronger the foundation needs to be made.
Layout – convenience and ease of use
Any construction consists of stages and begins with design. Even a simple country house needs a plan and construction project. A country house must have a kitchen, which can be combined with a living room to save space, dividing the rooms with a light partition. If a second floor is planned, then it is better to place bedrooms on it. For a summer cottage, a good option for obtaining additional space for relaxation is a veranda.

After design, further steps include:
- Floor installation.
- Preparation of the site for construction and installation of the foundation.
- Walling.
- and ceiling.
- External and internal finishing works.
Each stage requires certain knowledge and skills. Therefore, before starting this or that type of work, you should study the nuances associated with their implementation.
How to make a strong foundation and save money?
Having decided on the place where the house will be located, you need to carry out preparatory work for the construction of the foundation. To do this, stumps are uprooted, bushes are removed, the top fertile layer of soil is removed and the surface for the foundation is leveled. Then, using a tape measure and a corner, markings are made for future corners and walls. Pegs are driven in at the corners, and threads are stretched between them to limit the size of the pit. The foundation depth should be below the freezing depth. Usually a pit is dug about a meter deep.
Since a lightweight foundation is needed, it can be made from railroad sleepers. First of all, a geotextile fabric, Dornit 150, should be laid at the bottom of the pit. It is used as an additional reinforcing layer, as well as preventing the penetration of capillary moisture into the house structures. Next, sand is poured in several layers, each of which is well compacted. A layer of gravel or crushed stone is placed on top of the sand. At the next stage, sleepers are laid on the concrete layer and tied together. The structure is then filled with concrete.

For a small house, a strip foundation made of concrete is suitable. To do this, you need to dig trenches about 50 cm wide around the perimeter of the house and internal walls, install formwork, lay reinforcement in it and fill it with concrete. The foundation must stand for about 3-4 weeks for the concrete to gain strength.
More thorough, but also more expensive. It can be used if a basement is being built. In this case, the blocks will play the role of walls. The ceiling can be made of slabs or a reinforced frame can be arranged, formwork can be built and poured with concrete.
A popular foundation for light frame houses is a columnar foundation. A sufficient diameter of the pillars will be 30 -40 cm. The pillars are either dug into the ground to a depth below the freezing depth, or are installed on a solid foundation directly on the ground. Corner posts must be installed. Intermediate ones are placed at a distance of 2-3 m from each other.
The floor is made of tongue-and-groove boards along joists laid on the foundation. First, the subfloor is installed. Beams are laid along the perimeter of the installed pillars. Then you should install the cross beams on opposite posts. This creates a subfloor frame. Beams can be made of wood, metal, concrete - depending on the financial capabilities and preferences of the developer. Moisture-resistant insulation is laid between the joists, and a floor covering is laid on top of the entire structure. A simpler way to install a floor is a concrete screed.
Reliable and warm walls – longevity of the building
The simplest house for a summer residence is a house with frame walls. The technology for constructing walls is simple:
- 1. To protect the walls from moisture, two layers of roofing material are laid on top of the foundation. The timber frame is laid first on the foundation. At the ends, the beam is cut in half to connect the beams to each other at the corners.
- 2. Next you need to install support posts in the corners. For stability, they are temporarily strengthened using jibs.
- 3. Racks along the walls are installed at a distance of 50 cm from each other and also secured. Window and door blocks are attached to support posts.
- 4. After placing all the beams, it is necessary to secure the upper beam for strapping and secure all the posts well. To one support post, you need to attach two slopes to the bottom trim beam and two slopes to the top trim. The installation of the beams must be checked with a building level to prevent vertical and horizontal deviations.
- 5. The outside walls of the frame must be covered with a special windproof and waterproofing film, which, in turn, is secured with a counter-lattice.
- 6. The walls are sheathed on top with either OSB boards or sheets of plywood that are resistant to moisture.
At the same time as the wall frame, the ceiling frame is made. Beams are installed along the perimeter, and then transverse beams are installed. At the stage of interior finishing, the ceiling is sheathed with plywood, plasterboard or other finishing material.
Roof – reliable protection from bad weather
For a country house, a simple pitched roof is best suited. But if you want to have a large attic space, which, if desired, can be landscaped and provide additional usable space, then you need to install a gable roof.
A rafter system is installed for the roof. It consists of several farms. It is more convenient to assemble individual roof parts on the ground using a template. After the individual elements have been assembled, they begin to install the rafters and install trusses on them. First, the façade truss is installed. The correct installation is checked by the building level. The façade truss is then secured using slopes. A similar truss is installed at the opposite end of the roof, and is also temporarily secured using slopes.
A cord is stretched between the installed outer trusses, along which all intermediate structures are installed. When all the trusses are installed, their lower ends are secured with brackets to the floor beams. The trusses are secured at the top using a ridge beam. The outer part of the roof is covered with a windproof and moisture-proof film, on top of which a counter-lattice is mounted.
The roofing material should be selected before installing the roof, as the manufacturer of the roofing material indicates which rafter system is needed. To avoid problems when working with roofing materials, when purchasing them, you should take a laying diagram. The roof can be made of ondulin, bitumen tiles, slate or any other roofing material that will be most beneficial.
Cottage for a summer residence - comfort for the soul
During construction, it is important to treat all wooden elements of the house with special chemicals that protect the wood from rot, fungus, and biological effects, and increase fire safety.
When the walls and roof are ready, all that remains is the exterior and interior finishing. A budget option for facade finishing is painting OSB boards with oil paint. Another attractive finishing material is siding. With its help, you can give your home a beautiful appearance and choose the color of your choice. The slats are easily attached to the frame of the house using screws.
You can use the remaining cladding boards to cover the slopes of windows and doors. Window openings should be carefully processed with a jigsaw and plane. Window slopes should be covered with wooden slats 19 mm wide. Cladding boards are nailed to the slopes on the outside. If wall insulation is necessary, it is better to do it from the outside so as not to take away the usable space inside the house. Mineral wool is an inexpensive and easy-to-install insulation material.
To conduct electricity, you need a waterproof power cable, which is best laid underground. To protect the cable from damage, it must be laid at a depth of at least 60 cm, sprinkled with a layer of sand about 10 cm on top. To protect the cable from shovels when digging, it is better to put a protective film and bricks on top.
If you do not have extensive experience in electrical work, then it is better to entrust the electrical wiring to specialists.
Interior decoration can create an atmosphere of comfort and peace, where you would like to relax and unwind. Therefore, despite the fact that the dacha is a seasonal habitat, you want it to be cozy and comfortable like home. This is achieved by interior and furniture corresponding to the chosen style. Often frame houses are lined with clapboard from the inside. For a small dacha, a rustic style is suitable. You can also make furniture with your own hands, then the house will be filled with homely warmth. The more work you do yourself, the cheaper the construction will be.
If you prepare in advance all the materials necessary for the construction of a frame house, then you can build a house on your own in one summer season. Finishing work can be done gradually, whenever possible, the main thing is to build the box of the house and install the roof. The better the work is done, the longer the house will last.
Today's ideas for summer residents are dedicated to small country houses - the photos will be beautiful, inspiring and memorable. Many of you, dear readers, dream of having, in addition to the main country house, a small, so-called guest house. My husband built my house - a workshop and I am very grateful to him for that.

In such a house I paint my paintings, draw inspiration from solitude and contemplation, and take a break from dacha worries and worries. This, believe me, is extremely important, otherwise you can start to lash out at your family, but why would they need that? Therefore, a small house is a godsend for such unloading moments in life.

By the way, materials for the construction of such a house can be purchased at bargain prices, or even obtained practically for free, as in the case of my husband’s brother. He lives in the Novgorod region and at a sawmill they sold him a slab car for 500 rubles.

But croaker is also a very good building material. The main thing is to process and trim it at home - with a circular saw, a grinding machine, etc. Therefore, such small country houses are quite affordable for any family with a small budget.

However, a small house can also be the primary building at your dacha if you are just starting to improve your own territory. No matter what, you will have comfort and a roof over your head.

The best option for initial buildings could be a small country house. In the future, it can be used either as a guest room or as an additional room for living and recreation. Or you can give it to the children to play with - all the kids love it when they have their own corner.

I talked to many developers and they all unanimously claim that such small buildings will cost very little money. As I already said, you can actually make such a house from recycled materials, process it and it will look like a million!

Now you can watch various training videos that show in detail how to build such a small country house with your own hands. In my memory, there are even examples where a simple pensioner, alone, made herself a nice house for summer living.

To build any dacha structure, you must adhere to some basic construction principles. They are not complicated and quite understandable.

Pay attention to the foundation - in any case, your house should be on an elevation so that the wooden logs of the lower frame do not rot. By avoiding dampness, you will preserve your building for a long time. The ideal option for the foundation of a small house would be concrete blocks or brick pillars.

I don’t consider strip foundations, I don’t consider piles, because it’s expensive and doesn’t make sense. Concrete blocks are ideal. Lay a layer of roofing felt waterproofing between the block and the bottom frame of timber, then moisture will not be drawn into the wood from the ground through the block.

In the photo example above, these concrete blocks are very clearly visible - they are simply mounted on a gravel bed. Since the house is light, this is quite enough.

Wood is an ideal option for small country houses. Moreover, it is best to take frame construction as the basic option. If the house is summer, then you don’t have to put anything inside the frame at all. And if the house is planned for the off-season, then you can lay a 100 or 50 mm layer of insulation between the walls.

Separately, I would like to show ideas for container houses. They are good in their own way - because they can be closed with shutters and thereby completely protect their contents from thieves. The only disadvantage of such structures is that they get very hot in the summer sun.

A container house may be suitable if you have access to cheap used containers. In all other cases, it is more optimal and expedient to build from wood. It's my opinion.

Very beautiful and cozy small hut-style country houses. The building itself is triangular in shape; the role of the walls is taken over by the roof down to the ground. The space in the corners of the house can be used for cabinets and shelves for storing things and household equipment.

By the way, this house design is very energy efficient. In winter, a hut-style house retains heat much better than a classic square. Of course, provided that the roof and end walls are well insulated.

If you are only interested in the summer option, then you can plan large windows to contemplate your own summer cottage. In summer, all the windows can be opened, turning the house into a terrace with the possibility of living on hot nights.

Any, even a small country house, will look more attractive if it is equipped with a veranda or porch. This is both convenient - you can take off your dirty shoes, and practical - you can sit in front of the entrance, admiring the garden and flower beds.

Small country houses are easy to build with your own hands, with a minimum of financial investment. Such a structure is quite suitable for summer living for a family of 4 people, because in the summer at the dacha during the day we spend most of our time outdoors.

I hope you enjoyed these small cottage house ideas. I have already had several publications of this kind and I will be happy to share links to them with you.


In the material about I tell you what they can be built from and give beautiful photo examples.

And in the material about I talk about all the stages of its construction. I hope that there is enough information for you, I wish you pleasant viewing and inspiration!
The dream of many city dwellers is a beautiful small house outside the city, where they can escape from the hustle and bustle of the city, hide from the heat, and feel the pleasant freshness of the earth under their feet instead of hot asphalt. But not everyone’s dreams come true; it seems that a country house is complicated, expensive, and time-consuming. In fact, building a country house with your own hands is quite simple.
Planning the space
Choosing a location for a future country house is not the time for hasty decisions, because there is not that much space. Thoughtful, competent planning will help you use every piece of land as efficiently as possible. Even though this is your land, you will have to fulfill a number of requirements, maintaining a minimum distance:
- from the street – 5 m
- from the passage – 3 m
- from the neighboring plot - 3 m
We are not considering the option with a low area - water will accumulate there. Optimally, the highest place on the site is in its northern (northwestern) part.
Projects of small country houses
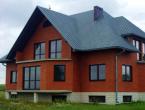
Considering typical designs of country houses, it is easy to notice that the undisputed favorite is a one-story building with an attic. This is a time-tested option for a country house, but you can dispense with the utility unit, because equipment and household supplies can be stored in the attic.
You can add a terrace to the house - in summer it can be used as a dining room. Two-story country houses often obtained without actually constructing a “clean” second floor, having arranged instead attic. Then on the ground floor you can plan a kitchen and living room, and the second floor - for the personal space (bedrooms) of the owners.
Advice! You can save significantly on the heating system - even at the most modest prices for installing a classic one (boiler, pipes and radiators) accounts for 15-20% of the total budget. If you are building a small country house with your own hands, where you plan to live only during the “season” (late spring - early autumn), then to heat it in bad weather, you can get by with electric or infrared heaters.
Prefabricated country houses are becoming very popular - unpretentious, outwardly monotonous parallelepipeds with roof We replaced architecturally interesting buildings with an improved layout, one or two floors.
You are buying a kind of construction kit; such a country house can be easily erected with only basic knowledge about construction. The main thing is that it already includes all the systems - electrical wiring, ventilation, air conditioning, plumbing. This will help avoid many mistakes that beginners make when they decide to build a country house with their own hands.
A prefabricated country house is designed for a long holiday with family or friends; it is larger in area, can be one or two floors, with an improved layout. Such a house is equipped with a technical room, a kitchen, rest rooms and a bathroom, equipped with a heating, ventilation, air conditioning system, and supplied with electricity.
The house can be equipped with a water heater, sink, countertop, hanging shelves, shower cabin, necessary plumbing. After installing such a country house, no additional repair work is required; it is completely ready for use.
Laying the foundation
The choice of foundation type is directly related to the choice of material from which the house will be built, as well as the number of storeys. Light houses (from rounded wood, timber, frame houses and modular) can be erected on a columnar or screw foundation; heavy (brick, aerated concrete, stone, concrete blocks) and two-story houses will require the laying of a strip foundation (as an option - a prefabricated one, made of reinforced concrete blocks) along the entire perimeter and under the load-bearing walls of the house.
It is important to know the depth of soil freezing - the foundation should be laid below this level, taking into account the level at which groundwater lies.
In the basement part it is required to install waterproofing at a level of 0.2-0.5 m from the ground. If the soil is dry enough (sand), a cement-sand screed 2-4 cm thick can be used as a screed. For wet soil, roofing material will need to be laid on top of such a screed - in two layers. As an option, roofing felt can be glued onto a dry screed using hot mastic. Waterproofing is installed below the expected level of laying the floor beams.
Advice! In the basement, to ensure ventilation of the subfloor, small holes are made, which are covered with a protective mesh.
A blind area is created around the base, its width is at least 70 cm (it should protrude further than the overhang of the cornice), with a slight slope directed from the walls of the house. To do this, the top layer of earth is removed, clay (sand) is poured, a layer of crushed stone (gravel, broken brick) is poured on top of it and filled with concrete (rolled with asphalt).
Floor and walls
Flooring begins with laying joists. To insulate the floor, insulation is laid between the joists, on top of which a vapor barrier is laid. It is attached to the joists with a stapler, and the joints are taped. Then the subfloor is laid, for which they use an unedged, cheapest board, having previously treated it with an agent against dampness and rot. And only then the finished floor is laid out. In a two-story house, the frame for the floor on the second floor is the ceiling beams of the first.