How to sew a patchwork quilt with your own hands? Patchwork bedspread with your own hands - a master class. Patchwork quilt: creation technology, selection of optimal fabric and design recommendations (110 photos)
Does it happen to you that old things are already worn out, but it's a pity to throw them away? If yes, be sure to use the patchwork technique - patchwork, so that you can sew interesting and useful things for the home from bright fabrics that you don’t feel sorry for - a patchwork quilt, for example.
How to sew a patchwork quilt?
The patchwork technique involves the collection of many shreds of bright fabric, after which they could be sewn together to form a continuous fabric. This material can be used for sewing various things, but patchwork quilt is the simplest product - it is with him that beginners are advised to start learning patchwork.
There are three main stages in working on a blanket from fabric pieces.
Sewing the front
Patchwork itself involves the creation of a beautiful upper part of the product - matter from bright shreds.
You can use any fabric, the main thing is that the details are combined with each other in color, texture and density.
Quilt assembly
If you leave only the upper part of the work, you will get not a blanket, but a thin sheet. The product itself should consist of three layers: the upper part, the filler and the lining.
Some craftswomen refuse the filler, choosing a sufficiently dense and warm lining layer for the winter and a thinner one for the summer.
Edge processing
The raw edges of the item will begin to crumble and take on an ugly shabby look. As a rule, do-it-yourself patchwork quilts are processed along the edge with an inlay - a wide fabric ribbon that wraps the side of the product so that the edge takes on a soft, pleasant outline.
Patchwork Quilt - Schemes
Depending on your level of knowledge and skills in this type of needlework, select a pattern for patchwork fabric of the desired level of complexity. The simplest is the use of equilateral geometric shapes: squares, triangles, rhombuses, polygons.

The alternation of parts of different shapes also looks interesting - first try to make identical patches from smaller squares and rectangles, then sew them into a single whole.
To make a patchwork product with an interesting pattern, develop patterns of repeating parts.
For example, a product created from patches that look like mosaic details will look more interesting compared to a simple blanket made of rectangles.
Another way to diversify the pattern of future creations is to alternate the same elements of different colors. Create a checkerboard blanket with an X or V symbol from identical square patches.

This method can be used for sewing products in calmer colors - for example, if you want to get linen not for the nursery, but for the parent's bedroom.
Patchwork Quilt for Beginners
If you are just getting into the art of patchwork, try making the simplest patchwork quilt with your own hands - photos of the workflow are given below. So you will not only get a cute bedspread for a crib, but also understand the basic principles of working in this technique.
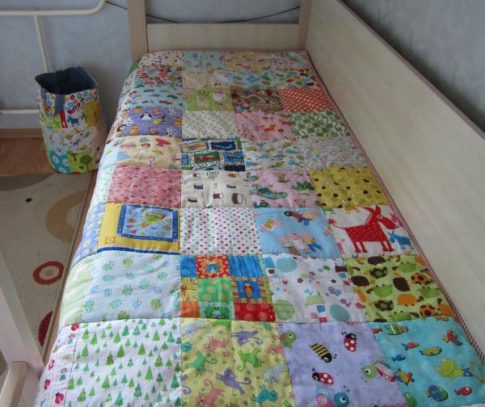
You will need large pieces of fabric of different colors, a long thin sheet of synthetic winterizer and lining fabric - plain calico, for example. If you want the same patchwork quilt as in the photos, follow the instructions exactly.
- Cut out 50 squares of fabric pieces with a side of 21 centimeters. You can combine shreds of two, three or more colors, building your own original pattern. But in the master class, all the details are different.

- Lay out the elements on a wide flat surface - the floor, the table - to form the desired pattern and see how even the bedspread will turn out.
- Start sewing the patches. First, combine the squares into strips along the width of the product.

- Sew the resulting ribbons together with the long sides to each other. After each sewing with a machine, be sure to smooth the product with an iron - it is easier to work with a flat fabric than with a wrinkled one. In addition, this way you reduce the possibility of skewed matter.

- Fold the same size parts of the blanket together: the finished patchwork, the filler and the lining. Sew them together along the length lines of the ribbons. If you are doing such work for the first time, professionals advise measuring the lining 5 centimeters wider and longer than the rest of the parts - even if the fabric is slightly warped during the joining process, you will have a margin.

- If you look at the quilt from the side, you will see a stratified thing. Take the inlay of such a width that it can freely cover the edge of the product from the bottom and top sides.

- Sew the bey almost along the very edge with the right side to the lining of the product.

- Now straighten the tape and wrap it on the front side so that its free edge is folded inward. Sew.

Your blanket is ready! Complete the bedding set with suitable bright pillowcases, sheets, and decorate the room in which the set will be located with a kinusaiga panel made from the same fabrics.
Patchwork quilt - master class
If the previous sewing method seemed too simple for you, read how to sew a patchwork quilt with your own hands from the same elements created by combining rectangles and squares of different sizes.
In this case, a mock-up rug for needlework is very useful for you - with its help you can most accurately calculate the length and width of the parts. Moreover, the squares that you prepare for the plaid are sewn in three different ways in this master class.
- Prepare 2 long and 2 short rectangles from one fabric, and from the other - a small square. Sew the pieces together to form one large square.

- Cut 4 identical ribbons of such a size that when they are connected, they again form an equilateral figure.

- The third way is to sew an element of 16 small squares.
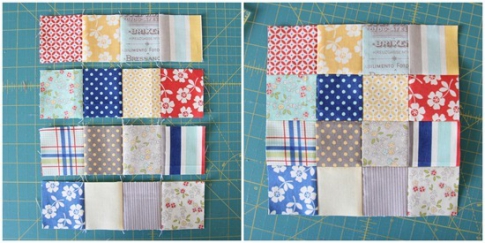
- After you have sewn the desired number of pieces, join them in the same way as in the previous lesson - lay them out on a flat surface, prepare ribbons connected in width, and stitch them together.
- Follow the rest of the steps in the same way as in the instructions above.

You can prepare as many details as you want, in the right size, from fabrics of different colors and patterns. For the first time, you can use the parameters of the first master class - 50 pieces with a side of 21 centimeters to make the quilt of your dreams using the “patchwork” technique.
If you like to cope with difficult tasks, watch this video tutorial that will tell you how to sew a complex, but very beautiful patchwork quilt with original Irish pattern.
The tradition of finding a use for each piece of fabric appeared in those days when clothes and interior items were sewn on their own. Everything in the house was made and decorated by hand. Now the patchwork technique is experiencing a new surge in popularity, but already as an opportunity to make a unique thing for the home, expressing the taste and talents of beginners and experienced craftswomen. A bright spot in the interior, a good gift for newcomers or a young family can be bedspreads, blankets, a patchwork quilt with your own hands, created without much hassle and expense.
Sewing and assembling a patchwork quilt or bedspread begins with the preparation of the workplace, because a huge number of patches require significant space, for example, a large table. When choosing fabrics, the material for the front side is selected first. Experienced craftsmen combine silk and chintz, linen and satin, satin and drape in one product. For beginner needlewomen, it is better to sew bedspreads, blankets or a patchwork quilt from chintz, satin, linen, coarse calico, knitwear.

You can buy ready-made sets of fabrics for patchwork, which the fair of craftsmen offers, but for beginner needlewomen it is more interesting to revise the cabinets, selecting unnecessary things and remnants of fabrics.
The original blanket can be made from patches, cut out denim items. Before you start sewing, you need to prepare the fabric - cut out the thickening of the seams (on old clothes), dilapidated sections, wash, iron, make patterns.

Even if everything that comes to hand is used, it is necessary to think over the combinations of colors and the overall composition of the blanket. It is advisable to depict your ideas on sketches - checkered sheets, colored with pencils. For beginner needlewomen, this technique is convenient: take one fragment assembled from several parts as a basis, and then duplicate it several times. When choosing color combinations, it is important to take into account the color of curtains, tablecloths, so that new textiles harmoniously complement the interior. For sewing the lining and borders, they usually take a solid solid fabric.
In addition to the lining and top, the structure of the patchwork quilt should have a heater - batting, synthetic winterizer, holofiber. The filler can be natural (cotton, wool, wool mixture) or synthetic. The most popular synthetic winterizer is light warm and moderately voluminous. For sewing a blanket, choose a canvas with a density of 150-200.

For beginner craftswomen, as an economy option, you can use the master class to use an old blanket as a heater, if it is not too heavy. The rest of the assembly and tailoring are similar.
To sew bedspreads, blankets or a patchwork quilt, as in the photo, you need to prepare:
- Quality threads No. 45 or No. 50. The color is chosen to match or contrast. You will also need simple threads for basting.
- Sample made of thick cardboard or plastic. The shape - round, square, hexagonal, rhombus, striped - is chosen in accordance with the plan. For beginners, the first blanket is easiest to sew from squares using patterns. The size of the detail depends on the overall size of the product and is 5 - 10 cm + 1 cm for the seams. For example, for a blanket made of 8 x 8 cm squares, you need to add an allowance of 1 cm on each side and draw a frame 1 cm wide. The total size of such a template will be 10x10 cm.
- Tools- in addition to an iron and a sewing machine, you need needles, pins, chalk or soap, scissors and a centimeter tape.
Stripe to stripe sewing technique (video)
How to sew a patchwork quilt
Having sorted the flaps, you need to make patterns using a template. It turns out many identical squares with a seam line outlined inside. For example, you can take a baby blanket 110x140cm. Taking into account the border, it is necessary to make 192 squares of 8x8 cm in size for it.

A convenient technique for assembling a bedspread is to sew square blanks first into long strips, and then connect these rectangles to each other. If the circuit is in the form of triangles, they are sewn together in pairs in the form of rhombuses or squares, in the future the assembly is similar to the first option.
In order for the seams to be accurate, neat, without distortions, before sewing, the flaps must be ironed along the contour of the intended seam.
We fold two squares inside out, pin them together and sew. All seams must be ironed from the inside, placing them in different directions so that there are no thickenings.

When the most time-consuming part of the work is completed - assembling the top, you can assemble blankets, blankets, bedspreads using patterns. On a flat and hard base, lay out the ironed lining inside out. To fix it, you can fix it on the table (or floor) with tape.
From above, the filler is laid out and leveled with the expectation that the lining protrudes from the layer and the upper part by 5 cm.

Now blankets, blankets or bedspreads need to be quilted correctly. The machine stitch technique involves starting from the center, stitching the squares diagonally to the edge (see diagrams in the photo). To do this, you need to install a special foot for embroidery on the machine. In addition to the usual line, you can also choose a figured contour - the sun, hearts, etc. The upper thread is selected to match the flaps, the lower thread is tucked into the tone of the lining. We sew with low thread tension. After finishing work, you need to trim the edges of the blanket. If the stitch is done by hand, then the edge of the blanket is processed first.

Assembly technique:
- Stitch all layers of the blanket and the border from the long sides;
- Everything is also stitched from the short sides;
- With a secret seam, it is necessary to make the processing of the corners of the blanket, hiding the extra pieces.
If there was no machine stitch, after edging, manual stitching is performed. To do this, you need to take strong threads and quilt along the perimeter of the parts with a seam of 3-5 mm or at the joints of 4 squares, pointwise.
Patchwork quilt in the technique of "ladder" (video)
Sewing a patchwork quilt: master class
The master class “How to sew a patchwork quilt with your own hands”, which the crafts fair offers, is suitable for both beginner needlewomen (with a step-by-step description) and experienced craftswomen who can quickly navigate the instructions and save time. In finished form, the size of the product is 1.2 x 1.3 m. The technique is also used for sewing bedspreads, but instead of the “charm pack” patchwork set, you need to take “layer cake”, cutting parts 11.2 x 12.5 cm in size. blankets or blankets with stitches about half a centimeter. This master class uses fabric 112 cm wide.
Tools and materials:
- 80 patches 12.5 x 12.5 cm or 2 charm packs.
- Monochromatic fabric in two shades (light and dark) - 120 cm.
- The border of a suitable color is 45 cm.
- Textile for lining - 1.3 x1.4 m.
- Sintepon - 1.4 x 1.3 m.
- Iron and sewing machine.
- Cutting mat, circular knife and measuring tape.
- Sewing accessories.

Step-by-step instruction:
- Cutting technique. From a light plain fabric, cut 9 strips 6.25 cm wide and 80 parts measuring 6.25 x 11.25 cm. From a dark fabric - the same number of the same blanks. (Set "charm pack" - 160 pieces of the same size.) From the fabric prepared for the border, prepare patterns - 5 strips of 5.6 cm in width. See diagrams.
- Procurement of parts. Fold the printed and plain fabric pieces together and sew along the long side. Prepare 160 rectangles in a similar way. Iron the seams, folding the seam allowances towards the printed fabric.
- Upper Assembly Technique. Lay out the rectangles so that the plain halves lie in steps (right-left, etc. - like the diagrams in the photo). Assembly: alternating 2 fragments with a light border and 2 with a dark border, you need to form a row of 12 blocks.
- In the next row we sew the first block, laying it so that the plain fabric is perpendicular (either on the side, or on top). For the next block, the border must be chosen in a contrasting color.
- Ironing. If you expand all the details, taking into account the schemes, you get 13 rows of 12 blocks. Iron the top first, and then the rest of the blanket.
- Quilt making technique. On the floor, lay the lining inside out and fasten. Lay insulation and a patchwork top in sequence on top. When the assembly is finished, chop everything with pins and make a line for 3 layers.
- Stitch. You can quilt a blanket in both straight lines and random zig-zags, like the diagram in the photo. The “zig-zag” technique in the second version will be softer and acquire a cozy bulge.
- Border. Sew all the details of the border in one strip, smooth the seams in different directions. Fold the strip in half along the length right side out and iron in 2 layers. In the middle of either side, you need to fasten the strip to the edge, leaving a tail up to 30cm. it is desirable that the joints of the strips do not fall into the corners of the blanket. Sew a border around the perimeter (stitch width - half a centimeter). The edges of the layer can be processed with an overlock, wrap the border and sew the other edge.
A master class for beginner needlewomen with detailed tips on designing a patchwork quilt and assembly scheme can be seen in the next video.
DIY patchwork quilt (video)
We hope that the master classes offered by the crafts fair, photos and videos inspired you to create your own patchwork masterpieces.
Successful product!
DIY patchwork quilt (photo)


Probably everyone wants to buy some kind of plaid or blanket to wrap up in it on winter evenings and enjoy a mug of coffee. A patchwork quilt with your own hands can be sewn quite decently. The main thing is to be patient and be careful in the process of work.
A patchwork quilt with your own hands can be sewn quite decently
A patchwork quilt is a quilt made from different fabrics. Seeing this in stores, you immediately want to buy it. But why waste money when you can make it yourself?
Step by step instructions for beginners:
- First you need to prepare your workplace. In the process of work, you will have to shred a lot of fabric, and all the shreds will not fit on a small table.
- As soon as the time comes to choose the material, pay attention to the fact that this fabric will be the front part of our future blanket, so we sew everything carefully.
- For beginners, it is best to choose fabrics such as chintz, knitwear or linen. Of course, in specialized stores you can buy ready-made fabrics for sewing a patchwork quilt, but it will be much more interesting to disassemble all the cabinets and give life to old things.
- Be sure to prepare an iron and a sewing machine: they are simply necessary in order to achieve the desired result.
- Before you start creating, think about the combination of colors: what goes with what or what exactly you want to see in your blanket. Make a few sketches to make it easier to decide later.
- Without fail, your future blanket must contain: a lining (it is best to use a plain fabric), a colorful top, a heater (it can be made of synthetic winterizer or batting), you can fill the blanket with both natural and synthetic means.
- You will need scissors, thread, needles, special chalk, measuring tape, pins.
- Download the template. It can be of different geometric shapes. Thanks to him, you will be able to evenly cut the flaps of the shape that is required.
- Once you have cut out the flaps, you will need to take several pieces of fabric in turn and pierce them with pins on the wrong side. Then sew on the sewing machine.
- Having finished making the top, you will need to iron it so that there are no thickenings.
- Next, lay the pre-ironed lining on the wrong side on the floor. On top of it we put a filler (cotton, wool). Please note that the lining should protrude five centimeters. Then we put the top and fix it all with pins.
- After we sew everything on a sewing machine.
- The last step is processing the edges. Prepare four ribbons and sew through all layers.
Here is the finished blanket. The work, of course, requires a lot of strength, but it is very exciting. You will be pleased with the result, as this blanket will be one of a kind.
You can also pick up a lot of bright and colorful colors to sew a baby blanket for your baby.
Gallery: DIY patchwork quilt (25 photos)


Quilt in 30 minutes (video)
Bedspread or plaid: sewing from jeans or just old jeans
Surely everyone has old and unnecessary jeans lying around in the closet, maybe not even alone. It’s a pity to throw it away, but you don’t know what to do, so they can be stored for years and take up quite a lot of space in your closet. It is for this reason that you can use them as a material for making an unusual bedspread. Such a thing will easily fit in a teenager's room or on an ordinary sofa. A very interesting and original bedspread, which is also not ashamed to give.
 Surely everyone has old and unnecessary jeans lying around in the closet, maybe not even alone.
 In addition, you can make small cuts on denim, and somehow shred the edges into stripes, it will look quite creative and interesting. Dress up your furniture in timeless classics and surprise your guests with this piece.
Master class for beginners:
- First of all, calculate the size of your future bedspread. The standard is 1.5 meters by 2.3 meters.
- Cut your jeans into about sixty square pieces. You can use a template to make sure all the squares come out the same.
- Next, you will need to sew several squares with separate ribbons. After you finish sewing, be sure to iron them.
- Sew all the ribbons together, preferably from the wrong side. Sew a padding layer over the jeans. The work is certainly not easy, but what will be the result if you try.
This is where your work ends. The bedspread really looks very cool, you can lay it on a bed, armchair or sofa. With the rest, you can sheathe a couch or a bench.
In addition to the bedspread, you can sew a plaid out of jeans. The principle of operation is the same as when sewing a bedspread, you just need to additionally sew cotton filler to the blanket so that it can warm you on cold days. Try clearing out your closet and turning your old jeans into a new and original throw or throw that will delight your eyes. Also take photos of your masterpiece and post it on social networks so that everyone can appreciate your needlework.
Do-it-yourself patchwork quilt in the style of a patchwork or bonbon: a scheme of work
A patchwork quilt will always be in style. It will perfectly harmonize with your interior. By letting your imagination run wild and combining colors, you create a truly unique piece. This technique is used not only for sewing patchwork quilts, but also for the manufacture of clutches, clothes, and bed linen. Sewing in this way will be very interesting for beginner seamstresses. Of course, few manage to get a satisfactory result the first time, but if you improve in this, then there is an opportunity to become a truly professional in this matter. The main thing is to try and you will succeed.
The most common mistakes are listed below:
- Don't try to pick fabrics at random. You need to carefully approach the choice of material. Be careful and make sure that all colors harmonize and combine with each other.
- Do not combine fabrics of different thicknesses.
- Don't be lazy and iron all the seams.
- Never stretch the edges of the fabric.
Try to think things through in advance. What patterns will be present in your blanket, what shreds will be, diamond-shaped or square. It is best to create a sketch that you can work on later.
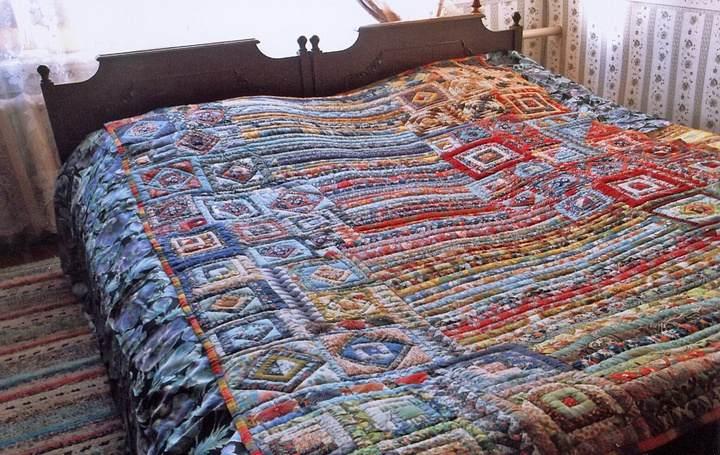
The most distinctive part about this blanket is that there are voluminous patterns on the fabrics.
Follow a certain style. Make sure that all fabrics are as a whole. The scheme of work is the same as when sewing a regular blanket.
In fact, much attention is paid to the selection of colors and patterns. For starters, you can only focus on two colors and patterns. Try to stitch different elements as carefully as possible to get a fairly flat plane without wrinkles. In no case do not try to fit all the colors into your masterpiece, as this looks very ugly and strange. Believe me, this combination of colors is not very successful. To better understand whether your fabrics are combined or not, it is worth laying them out on a large table and moving away. So you will see an approximate picture of your future blanket.
 Sewing a bonbon style blanket is quite difficult.
 Sewing a bonbon style blanket is quite difficult, as it takes a lot of time. Basically, it is better to take cotton fabric, and satin ribbons will be great decorations for your blanket. You will have to stuff the ottomans with cotton or padding polyester.
- In a mandatory order, a fabric is selected that will blend perfectly with others.
- The so-called ottomans are easy to do with your own hands. The fabric should be cut and stitched in a row (do not forget to smooth the seams!).
- When stitching the upper part, apply the same folds on the elements. Sew your bonbons so that you get a kind of pockets.
- Next, fill them with cotton and sew pockets.
- A satin ribbon is suitable for edging.
Thus, you will get a very voluminous and airy blanket.
Pillows from old jeans
Did you know that you can make a real bed set from your old jeans? To do this, you only need your desire and a little time, and of course, the appropriate tools.
 Pillows from old jeans look quite stylish
 Instructions for creating denim pads:
- First, take a pair of jeans and cut off the legs from them.
- Using the template, draw circles on the leg.
- We draw a line of about ten centimeters with a marker in order to make a seam along it with another circle.
- We put two circles on top of each other and make a line along the line. Similarly, we connect two more circles with them. Then we smooth out all the seams.
- We take pre-prepared cotton and thin sintepon squares and insert them into our circles in order: the first are sintepon squares, and the next are cotton ones.
- We will do the same with the rest of the circles, and combine it all into a single canvas.
- We cut off all rounded edges and install a zipper at the bottom.
- It remains to fill the pillow with padding polyester.
This concludes the creation of a pillow from jeans. Enjoy your masterpiece and sleep well.
Patchwork decor items
There are many ideas to diversify the interior of your home. For example, items in the style of patchwork. They are created on the principle of assembling flaps from different tissues.
- You can make the most beautiful curtains out of silk or organza. It will look very comfortable.
- Create a tapestry and hang it in your living room or hallway.
- In addition, you can sew bath curtains.
- Use your imagination and come up with unique patchwork toys.
- You can also order plates with different patterns and install them in the bathroom or in the kitchen. Thus, you will get a patchwork floor.
 There are many ideas to diversify the interior of your home.
 Even ordinary papers that look harmonious with each other can be a great cover for your notebook. Although it seems strange, you can also take a chance and buy wallpaper with different patterns and stick it in your bedroom. The most important thing is that they match.
A patchwork style rug will also fit perfectly into any interior and give your home a little warmth and coziness. Experiment and find exactly what you've been looking for.
Top 10: what to do with old jeans?
- Soft and comfortable ottoman that will fit perfectly in a teenage room.
- A cool blanket made of different denim and cool pillows with beautiful embroidery.
- Stylish bag suitable for all occasions.
- Stylish rug for jeans fans.
- Cover for homemade notebook.
- Lovely toys.
- Bracelets and necklaces with the addition of zippers from jeans.
- Nice pencil case.
- Case for phone.
- Slippers.
Master class: patchwork baby blanket (video)
Be creative and create original things. Take a peek inside your closet and start an epic restoration of old things! Do not be lazy and do such an entertaining and useful thing as needlework!
The art of patchwork originated in the last century, when our grandmothers and great-grandmothers, in order to save money on new materials, used old fabric cuts left over from the manufacture of other products to create beautiful blankets, blankets and other interesting details of interior decor and interior decoration of their own hands. modest houses and apartments.
Now patchwork technique(it is also called patchwork) is becoming popular again. It does not require special costs and seamstress skills. After all, any beginner can do simple work using the patchwork technique. It is also a good way to get rid of excess old patches and scraps of fabrics stored at home, usually in excess, and completely idle. If you don’t have too much of such goodness, it doesn’t matter. One has only to pay a small visit to your beloved grandmother or ask your mother, and you will be provided with materials for patchwork in full. Thus, technology is not only economical, but also very useful in the household.
But in addition to its practicality, it is worth noting that products made from multicolored, bright patches of fabric, fit perfectly into many modern interiors and look very unusual and original, adding an interesting twist to gray and monotonous city apartments. They will help to create comfort in any private house, whether it is an exquisite cottage or a small house in a distant village. It will look interesting in a cute interior of a children's room. Also make a great gift handmade which is doubly nice. Even a child can perform such work, with basic sewing skills, and present such an interesting children's gift, having greatly pleased the hero of the occasion.
Using this technique, you can create various bedspreads, blankets, pillows, children's soft toys, decorative panels, even whole paintings, kitchen potholders, even bags and wardrobe items from scraps of fabric. Perhaps the simplest here are bedspreads and patchwork quilts. And since it is better to learn any needlework from the smallest, this article provides step-by-step instructions on how to sew a patchwork quilt with your own hands, which will suit even a novice master.
patchwork ideas


How to sew a patchwork quilt with your own hands
Tools and materials

Do-it-yourself patchwork quilt: schemes
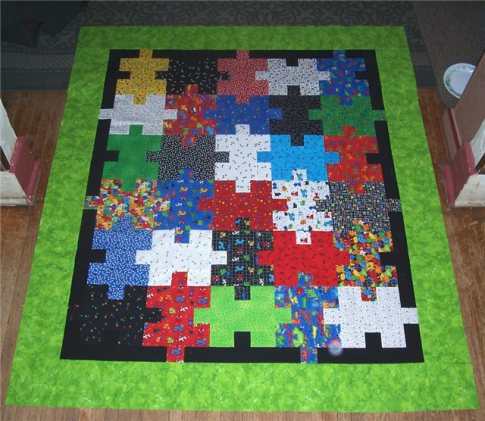
As a rule, canvases in the technique of patchwork are made according to certain schemes, there are many of them. Here, for example, is one of them. It is simple, but it looks quite interesting and at the same time simple, well suited to the bright interior of the nursery.
It is necessary to give a little explanation to this scheme.
 Capital Latin letters here indicate the “type” of the fabric, that is, its certain color, which will repeat from element to element. That is, the parts painted in the same color on the diagram and marked with the same letters must be cut from the same fabric. Of course, this condition does not have to be fulfilled unquestioningly, it can be better to swap some details for a more holistic composition and combination of colors.
It is important to consider the principle of color selection. Nearby colors will look good either very similar, related to the same shade, or, on the contrary, contrasting, such as green and red, yellow and blue. In addition to color combinations, it is important to consider the ornament on the fabrics used. You should not combine several patches side by side with a large heavy ornament. It is better to let there be more solid colors or colors with light stains.
The number of centimeters indicated in the diagram is the width of the part, the height of each of them is the same - 22 cm. Moreover, all dimensions are indicated taking into account allowances, which are approximately 1.5–2 cm on each side.
patchwork technology


Patchwork quilt: master class
This masterclass describes sequencing for the manufacture of bedspreads according to simple schemes, such as ours. For more unusual variations containing irregular shapes and polygons, a slightly different technique is used. Also, in addition to the traditional method described here, other varieties of patchwork are known, for example, the double-sided technique.

 If everything is done carefully and soundly, it should turn out very beautiful, as in the photographs below. Well, if not everything worked out the first time, then don’t be discouraged, because it’s sure to work out the next, you just need practice.
After doing several works in patchwork technique, you will develop a skill, and soon you will be able to create a wide variety of products - not only blankets and pillows both according to patterns and without their help, but also create patterns for patchwork on your own. In addition, it will be possible to experiment with fabrics, you can use, for example, jeans or knitwear. On the Internet, you can find a huge number of master classes on a wide variety of products that can be sewn from shreds of fabric. Try more complex schemes if you feel that already mastered the right technique patchwork as a novice master.
The process of making a patchwork quilt


Most of the townsfolk will agree that patchwork blankets are warm memories from childhood associated with trips to grandmother in the village. These various pieces of fabric, tied together, really create a cozy home environment, especially with the onset of cold weather.
The technique of patchwork or patchwork is rooted in the distant past, but today it is reviving again and enjoying wide popularity. Naturally, over time, patchwork technologies have changed and become more modern, as shown in the photo of patchwork quilts.

Creation technology
The process of sewing a product from small pieces of fabric is, in fact, a very exciting experience. In addition, it does not require huge financial investments. After all, the necessary materials in the form of a variety of pieces of fabric can be purchased in a set or use old things that may be in your closet.

As a result, things that have gone out of fashion will be able to continue their existence in a new way and will remind you of a wonderful past. But you should not use very dilapidated things so that zeal is not in vain.
Even more instructions for creating homemade products can be found on this site: https://podelki.org/category/svoimi-rukami/

To create a patchwork quilt, you need to prepare 6 or more different colors of fabric. To embody a unique design with the help of your irrepressible imagination, you should use different colors, fabric structures and patterns on them. Slightly gathered details will give volume of the invoice and effective appearance.


How to sew a patchwork quilt with your own hands? To do this, just look at the master classes from the Internet, which will help you learn the patchwork technique on your own.

Selecting the right fabric
To sew a patchwork blanket with your own hands, you need pieces of fabric of the same thickness and texture. The color palette of fabrics is chosen in accordance with the interior style, wall colors and furniture.

Contrasting combinations of fabrics look most advantageous against the discreet background of the main canvas. You should not allow excesses of variegation, it is better to give preference to moderation.

Before starting the sewing process, it is necessary to make a preliminary layout of the blanks on the leading base of the fabric, move away from it a little and evaluate the resulting masterpiece. So to say, a look from the outside will help to understand the success of the combination of pattern and color scheme.

Blanket filling material
A patchwork blanket has three main layers: a beautiful top, insulation and a lining bottom. If you pull out the insulation from the blanket, you get an ordinary bedspread.


For the insulation of the product, a synthetic winterizer is most often used, which does not shrink after washing. Therefore, it does not need to be soaked before sewing, as it will not change its original appearance and size.

Its only drawback is that it is synthetic. For children, the use of synthetics is undesirable, it is better to use the most natural materials.

As alternative options, you can use natural fillers:
- made of cotton, similar to lightweight batting without threads. It is milky in color, 2 or 3 mm thick, does not crumble. But after contact with water, it can shrink by about 5%. In this regard, it should be pre-soaked, carefully squeezed in a towel and dried.
- from 100% natural wool. Its main property is considered to be excellent thermal insulation, which is great for needlework.

Used sewing patterns
Do-it-yourself patchwork compositions can contain patches of various configurations: quadrangles, triangles or stripes. At the beginning, they are cut out of cardboard or thick paper. The easiest way is to create a patchwork masterpiece from large squares, which will undoubtedly appeal to novice needlewomen.

Schemes of increased complexity of a patchwork quilt can be viewed on special sites so as not to suffer on your own, or you can buy it in a needlework kit.


Patch Quilt Stitching Technique
To avoid deformation of the form during operation, when washing or cleaning the product, the layers of the blanket must be interconnected. In addition, the stitches perform the mission of decoration, hide the defects that appear during work.


The joining of the layers can be machine or manual. To save time, it is better to use a typewriter, in addition, you can perform the necessary line. A self-quilted product is softer to the touch and in use.

After the border is sewn, the blanket stitch begins. First, the layers are securely fixed. The blanket is turned inside out and hand basted from the center to the edges. This stage must be approached very responsibly.

If the basting is done poorly, then the machine line will be of poor quality with bubbles and assemblies, which cannot be fixed. To avoid material run-on, a preliminary basting and stitch should be made from the middle to the edges.


Required materials and tools
To organize and create a patchwork quilt, you will need: a table, threads, a template, prepared fabrics, insulation material, lining fabric, inlay, needles, pins, chalk or remnants, scissors, a centimeter, a sewing machine and an iron.

Using various fabrics, you can get various masterpiece patchwork blankets that will become a real decoration of the interior, besides warm and cozy. To create children's patchwork quilts, use only natural materials. Keep it up and you will succeed!

Photo of a patchwork quilt