Products from hogweed with their own hands. How to get the cow parsnip out of the site. Hogweed on the site ways to fight. What to make a staff of rain
Schoolgirl Varvara Bykova learned how to make a musical instrument from a plant that the whole country is unsuccessfully trying to exterminate. While adults are inventing ways to deal with poisonous hogweed, a little resident of the Komi-Permyatsky district has figured out how to use it creatively and for the benefit of people.
Varya shared her methodology with the correspondent of the AiF-Prikamye website.
In the New Year, Varya made more than 10 instruments and presented them to friends. Photo: From the personal archive of the Bykov family
Music of rain and wind
In the Komi language, "zer" means "rain", and "pu" means "wind". Another name for the instrument is the staff of rain. Its melodic rustle will both calm the nerves and relax at the end of a hard day's work. Making it turns out to be quite simple.
Varya shared the technology for making tools on your Youtube channel. The girl has been blogging for a long time. With her followers, she shares everything she finds interesting: from cooking to a variety of hobbies that she enjoys. By the way, in addition to creating a story for the video channel, Varya goes to karate. But the girl who learned how to make such a melodious-sounding instrument is not engaged in music.
“In search of an interesting plot, she found information that in Chile and Peru they make percussion instruments from a cactus. Cacti do not grow here, and Varya began to look further. It turned out that our neighbors, craftsmen from the Komi Republic, are doing something similar. Only not from a cactus, but from a hogweed. Having looked at their version, Varya came up with her own, ”says Olga Bykova, Varia’s mother.
Two species of this plant grow in the Kama region - Siberian and Sosnovsky's hogweed. The first is not dangerous, but it turned out to be unsuitable for making a tool, since its barrel is thin, and such a tool needs a large hollow tube. The second type of hogweed releases a toxin that can cause severe burns. However, the tube is just the right size for him.
Melody lentils
Varya found out that cow parsnip is completely harmless after frosts and in early spring, when the toxic juice dries completely. That's when you can cut the stems and harvest them. Next, Varya washed, cleaned and dried the workpiece. Then I made holes in a spiral with an awl. I inserted toothpicks into them, and then cut them off.

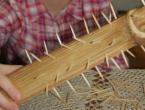
Toothpicks are inserted into the dried hogweed trunk so that the filler, in contact with them, sounds melodious. Photo: From the personal archive of the Bykov family
After that, she painted the pipe with wood stain. Then she closed it from one end, and filled the filler from the other. The filler can be any: rice, buckwheat, lentils, river sand. The experiments turned out to be very interesting, as the fillers produced a variety of sounds. Lentils sound the most melodic; buckwheat has a very pronounced, bright sound. You can also vary the sound using the length of the tube. The longer the instrument, the more melodic its sound.
“I became interested in this tool because it can be made from available materials. Making it interesting and not very difficult. And most importantly, this is the sound of Zer Pu. Very relaxing, impossible to put down! It usually takes several days to make one instrument. Of course, if you do everything carefully and carefully. For the New Year, I made a little more than ten instruments and presented them to my relatives and friends. Everyone is happy! ”, Varya said.
The employees of the Kudymkar Drama Theater helped to record "Zer Pu" and carefully listen to the nuances of its melodic rustling. Theater actors also became interested in the instrument. They plan to use it to create musical pieces. The rain staff turned out to be a wonderful gift: it can be decorated individually. You can enjoy the sounds of the instrument or just hang it at home as a design element.
Music of the rain.
Oh, how I have long wanted such a flute for myself. And so, I came across a wonderful master classwith a very detailed manufacturing process by Alexander Shustov Leto. + You can watch the video, how beautiful it sounds.Thank you very much. It's not too late to collect cow parsnip (only dry!), not green, and make yourself magic tool.
Materials and tools: dry hogweed stalk, hacksaw, toothpicks, sandpaper, table knife, papier-mâché mass (egg packaging), PVA glue (construction can be used), acrylic paints, acrylic varnish, stains of two colors (I have water-based) , cheap toilet paper, hard brush, awl, blender, cereal.
![]()
Fees:
First we need to get the stem of the plant itself. This is easy enough to do, because hogweed grows along roads and in large numbers near villages. You can collect cow parsnip from mid-October, all winter and early spring. Most importantly, we need a completely dried trunk. No poisonous juices remain in it, and no one will suffer from burns. I beg you to never touch this plant in its green form. It is very poisonous! If the juice of the plant gets on the skin, very severe burns are formed. But in dry form, it is harmless.
The easiest way is to cut the cow parsnip with a hacksaw. It is better to choose a trunk that is longer and thicker. The sound of our rain flute depends on this.
With such dirty sticks sometimes you have to work. But I couldn't leave her. No cracks, long and wide. We'll take it :)

Cleaning:
So, we stocked up on a few sticks - the basics of our future flutes. Now we need to clean them up. We take our table knife with a rounded end and pry off the upper, unnecessary to us, "skin" of the plant. Don't be discouraged if you can't clear everything at once. The rest we will wash off with water.


I go to the bathroom and under running water, I clean off the remnants with a stiff brush:

We got a very beautiful straw-colored textured stick. Now we need to dry it, so we leave our future flute aside for at least a day. And we're going to cook a lot of papier-mâché.
To do this, we take paper packaging for eggs, tear it into small pieces and immerse everything in water, preferably warm. On this, our today's exploits are over and you can rest until tomorrow.
![]()
Cooking papier-mâché:
We thoroughly mix our future papier-mâché with our hands and take out all the contents from the water on a towel, wrap it up and wring it out. We spread the resulting wrung out paper in a deep container. I use a metal saucepan. We divide into smaller pieces and fill everything with PVA glue. We take a blender and turn everything into a homogeneous mass. Then transfer to a container with a tight lid. If we squeezed well, then this mass will serve us for a very long time. It will not dry out and deteriorate. PVA will keep it for a long time.

Create partitions:
We will need an awl and our dry stick.
We need to make punctures with an awl along the entire length of the flute, descending in a spiral. For the uniformity of the partitions, at any edge, we tie a thread and wind it in a spiral in several turns along our trunk and fix it at the end.

Let's distribute the turns evenly and start making punctures with a small step. When we reach the end, we remove the thread and arm ourselves with toothpicks. Now we need to stick toothpicks into each hole from the awl and drown all the toothpicks in the opposite wall so that the tip of the toothpick comes out.


When the work is finished, we break off all the sharpening parts of the toothpicks. So far, it's not very elegant. We take a piece of the skin and grind each toothpick so that it is flush with the surface.


Fixation:
We need to fix the toothpicks in our flute. Many craftsmen spill the same PVA glue inside. I glue the surface of the flute with paper in two layers. It turns out very solid.


Creation of the "bottom":


All work for today is over. Yes, tomorrow too. Now we will wait for the complete drying of our cork. In winter, I dry my flutes by leaning them on a radiator, but now I will use a heater. We leave our flute and be patient. Next time it will sound. And it will be magic. It remains only to wait.

![]() (after a two - three day break) Not long, but very pleasant:
(after a two - three day break) Not long, but very pleasant:
Today we will not do much, but we will already be able to enjoy the sound of our flute.
Our cork is completely dry and will serve as our bottom today.

We prepare the cereal, put our rain flute vertically and begin to fall asleep. I use different cereals: rice, buckwheat, lentils, sometimes peas. Each grain gives its own sound. Rice rustles on the partitions, lentils tap, and all together gives a unique murmur of rain. In terms of volume, from half to one and a half glasses of cereal is usually enough - it all depends on the thickness and length of the rain flute.


After we have enjoyed the sound of our rain to our heart's content, we make a cork on the other side and again leave it to dry for 2-3 days.
After the final drying of the flute, it remains for us to sand it and apply a pattern. Today, all the time we work, we will listen to the raindrops rolling. My work will be longer by a couple of days, since I am still sculpting the faces of the rain keepers from the same mass of papier-mâché, and they must dry.


Now you need to choose a color. In this flute, I use two water-based stains: mahogany and oak. We make markings on the flute with a simple pencil. We try to draw only one line. After the markup is done, I cover the entire surface of the flute with a light stain color. The water-based stain dries very quickly and this gives us the opportunity to finish our flute today. After drying, we draw the elements with a whiter dark color.


After the paint has dried, cover the flute with varnish. We dry and enjoy the sound of rain, delight guests and the whole family.
Alexander Vetoshkin made an analogue of an Australian musical instrument
Artist of the Komi National Music and Drama Theater Alexander Vetoshkin has been making Komi traditional musical instruments for many years. In addition, he invents and author's tools. For example, he made an analogue of the didgeridoo (a musical instrument of Australian aborigines) from a dry stem of hogweed and presented it to Syktyvkar residents at the Birth of Music exhibition that had just opened.
“The idea to use cow parsnip as a pipe came spontaneously,” Alexander Vetoshkin told Respublika. – This, of course, is very similar to the DJ, but the sound is a little weaker due to the loose structure of the hogweed stem. Yes, and we still do not master the playing technique that is used when playing the didgeridoo. I have already made a “rain staff”, kalyuks, from hogweed, and here it is. The sound is different from a real DJ, but we had no pretensions to create a “Komi didgeridoo”. In general, there are quite a few analogues of this instrument, including among the Finno-Ugric peoples: for the Mari, for example, it is a puch, for the Mordovians it is a torom. To be honest, I would like to be closer to the Finno-Ugric culture than to the Australian one.
According to Alexander Vetoshkin, he is interested in using natural material to create any musical instruments, as it has always been in the traditional Komi culture. In Australia, didgeridoos are made by nature itself. During the dry period, termites eat away the soft core of the eucalyptus, and a cavity forms inside the trunk. Australian aborigines find such trunks, cut down, knock out dust from them and make a mouthpiece from beeswax.
Alexander Vetoshkin presented the Komi didgeridoo and his other interesting musical instruments to the public last Thursday at the Birth of Music exhibition of musical instruments that opened in Syktyvkar. The exhibition is dedicated to the twentieth anniversary of the republican creative union of master artists and restorers of musical instruments. The hall of the Finno-Ugric Cultural Center of Russia presents wind, bow-string, keyboard instruments, as well as traditional Komi musical instruments restored or created by the masters of the union.
Masters of production of Komi folk musical instruments Alexander Vetoshkin and Alexander Zaboev told the visitors of the exhibition about the history, technique of making some wind and stringed Komi folk musical instruments and showed them in action. Masters made a bias not so much on the instruments themselves, but on the materials from which they are made. Alexander Vetoshkin and his theater colleague Anna Popova performed a vocal-instrumental composition on the theme of the ditty-suffering "Micha pujassa me borji" to the accompaniment of Komi instruments - sigudök and ötika pölyan.
The exposition also presents a collection of musical instruments by the famous master Vladimir Pavlov from the funds of the Museum of Culture and History of the Syktyvdinsky District. At the exhibition you can also see the work of his daughter - Tatyana Pavlova, a master, a member of the Union of Artists of the Russian Federation. The works of the chairman of the union Valery Ostroukhov are also shown. A professional violinist, teacher, master of musical instruments, he has been making and restoring violins for more than thirty years.


Angelica forest
Many saw in the summer tall plants with white umbrella inflorescences on thick, hollow stems. This is an angelica. It was named so not by chance - pipes were made from its stems, because the stem of the angelica is a ready-made flute, just make holes. Angelica stalks are also good for many other things - earlier candles were cast in them (this is a ready-made mold for casting), they were used as a breathing tube under water, and we use them as cases for knitting needles or pencil cases, and also as convenient boxes for storing spices or other suitable materials. Once angelica was useful to us even as an envelope.
spice boxes
stems of angelica
Making a case is very easy. Look carefully at the angelica stem - it is not even, but divided into separate tubes, as if glued together at different angles. And at the junctions of these tubes (at the nodes), the stem is full-bodied, and the tubes themselves are empty inside. Therefore, the nodes are ready-made bottoms, you just need to carefully saw off the stem below the node, and that's it. The cuts - both the lower and the upper ones - need to be cleaned with sandpaper (sandpaper), and the stem can also be cleaned with it. The knife blade also copes well with such cleaning, if you hold it at a right angle to the surface to be cleaned.
knots on angelica stems
Now that you know exactly what you need to do, it's time to go get the angelica. It grows in wet meadows, on forest edges, in thickets of willow or alder. You can collect angelica at any time of the year, even in winter, if you do not get tired of climbing snowdrifts. In early spring, you can collect overwintered stems of a beautiful gray-brown color, in summer or autumn - pale green. The stems need to be dried, then sawn and cleaned, and then decorated.
Wrap the upper part of the case for strength and beauty with a thick thread or cord
knitting case
rum, putting it on glue. Then make a plug from any material - wood, birch bark cork ... And finally - paint. Just don't forget that although angelica looks like bamboo, it is much less durable: if you accidentally step on the stem with your foot, crush it, so it's best to store the cases somewhere in a drawer or hang them on the wall. Well, if the case is still broken, it doesn’t matter - nature will grow a new one.
overwintered stems of Sakhalin rheinutria
rum angelica for boxes and cases are suitable stalks of rheinutria sakhalin(the old name is the Sakhalin highlander) and the famous hogweed Sosnowski, whose dry stems are wide, strong and not at all dangerous. If you collect cow parsnip in the summer, do it with gloves and in cloudy weather, because. its juice contains photosensitizing substances that cause severe and long-lasting burns on the skin under the influence of the sun. Is there some more siberian hogweed, native to Central Russia and not a dangerous plant at all, but it is smaller than Sosnovsky's hogweed.
painted blank
Beautiful pencil cases. You can make them with children, but older ones can do it on their own, great, it seems to me that it will be very interesting!
Is it possible to confuse angelica and Sosnovsky's cow parsnip with similar poisonous plants? How to distinguish them, especially in winter? ..
Do you paint with anything, acrylic, gouache, oil?... Do you varnish from above?..
Sosnovsky's hogweed in dry form is not at all dangerous, while other types of hogweed are edible. They have been eaten for a long time in the cuisines of different nations. Angelicas are not poisonous either.
You can distinguish cow parsnip externally. B. sosnovsky stands out for its growth, often exceeding 2 meters. It grows in very large groups (populations) mainly along roads and in weedy places, as it is an alien species.
We paint crafts from angelica with acrylic without varnishing.
I just remember something from my childhood - it was impossible to make pipes out of some cow parsnip, and therefore the ban automatically extended to cow parsnip in general. :-) Despite the fact that they read that the plant is very useful and edible.
Pencil cases are certainly not for eating. :-)) Something Indian reminds...
In the same family (umbrella), in addition to Sosnowsky's hogweed, there are other poisonous plants - milestones (hemlock) and hemlock. They are rare and easy to confuse with angelica. But even their rhizomes are poisonous, not the stems. And the fear of poisoning with pipes is only from general botanical illiteracy: unfortunately, people know very little about the plants they live among, and with the flow of people to cities, everything has become even more deplorable ...
And that the pattern resembles something Indian is very nice to hear, because it was intended that way :)
Illiteracy is such a thing ... you start to be afraid of everything, not a step to the right or left - there are dangers everywhere. :-)))
We have a lot of umbrella plants growing here, some of them are near the river, in swampy places, some are higher. About those that are taller they say that this is hemlock, but I looked at the directories a lot - it seems not to be him, but I can’t establish for sure. :-)
It's good that you can easily make crafts from them. Children really like sticks-pipes.
In the distant bins, everyone will find things that at one time it was a pity to throw away, and now they lie idle. Some of them can find application in your country house or garden plot. Let's try to figure out what you can make a useful craft for giving and how unnecessary things can come in handy.
New life for old things
Using things that have worked out for a long time, you can significantly save on the purchase of new materials, and the implementation of the idea will give impetus to creative imagination. You will get a lot of pleasure, realizing your ideas. Especially if you manage to involve children in the cause and inspire other family members to work together.


To help you, we have collected interesting ideas and clear instructions on how to make crafts yourself.

Material that can be used:
- large stones, pebbles;
- wood;
- used tires;
- plastic bottles;
- barrels;
- Styrofoam.

Of course, the list is incomplete, a lot of other unnecessary things will come in handy to implement the plan. The main thing is a creative idea, the embodiment of which will give you a reason to be proud of your work.

We hope that the photo of the original crafts for giving will awaken your imagination and inspire you to be creative.

bottle crafts
Interesting crafts for giving can be created using ordinary plastic bottles. This practical material is great for recycling. Let's look at just a few useful ideas.

Curtains. Openwork curtains for a doorway or gazebo look unusual and very creative.

Fence. You can fence off your site from the neighbor's with a fence made of bottles. Additional coloring and decoration of such a homemade fence will give it even more originality.

Flowers, animals. Beautiful artificial flowers, figures of animals or insects from this material are obtained easily and look original and bright.

feeder. In winter, you can use a plastic bottle to make a handy bird feeder.


Flowerbed. It is easy to get a small, pretty flower bed for plants in the garden from a plastic bottle. The advantage of such a flower bed is that it is mobile and will be able to migrate throughout the summer cottage.

Working with plastic is not difficult: it is easily cut with any scissors. You can find a use for any part of the bottle, from the bottom to the cap. Elements of crafts are connected with glue, fishing line or wire.

wood crafts
Any owner can find a tree. The easiest idea to use is to make tables, chairs and benches out of it. Usually log cabins, hemp are used for their construction.

In addition, it is useful to make:
- swing;
- fence;
- flashlight.
- birdhouse;
- tool boxes.

There are an incredible amount of ideas for crafts in the country from improvised materials with your own hands, the main thing is to start!


Crafts from old tires
Old tires - the material from which excellent ones are obtained:
- benches;
- swing;
- flower beds;
- puffs;
- sandboxes;
- decorative elements.

By combining this material with others, you can create simply masterpieces! Below you will find workshops on crafts from tires to decorate the site in the country.

Flowerbed "Frog"
You will need a couple of watches and a jar of green paint. The process of making crafts is quite simple.

At the first stage, we take two tires and put them in such a way that they are tightly in contact with the edges. The third tire is laid in the middle of the structure from above - this is the future place for the flower bed.

The middle of the tires must be filled with earth. The base is ready.


Now you need branches: two short ones and two longer ones. Using a hacksaw, cut out the frog legs from wooden blocks. We attach them to the branches - the legs are ready.

From a plastic bottle we cut out eyes and, if you want, a crown for the frog princess. All other details can be drawn using colored paints.

Flowerbed of tires
The idea of creating a flower bed from tires is simple and very popular. On the selected piece of land, you must first dig a shallow hole in which the tires will be placed. You can paint them in one color or come up with an original drawing - it depends on what your imagination tells you.

The inside of the tires is covered with soil, in which you can plant your favorite flowers. That's all, the flower bed is ready. The main thing is to water the plants in time so that the homemade flower garden will please you as long as possible.

Decorations and garden figurines
If fantasy requires the implementation of even more interesting ideas, then the summer cottage can be decorated with whole sketches featuring your favorite cartoon characters or various, even fantastic, animals. Trust the creative idea and create something unique in your summer cottage!


Materials that are suitable for the realization of ideas:
- gypsum;
- mounting foam;
- clay;
- pebble.
When the figurine is ready, paint it with paints. From above it is necessary to fix with varnish. Such garden figurines cost a lot of money in specialized outlets. And this means that you will not only enjoy the process, but also save money.

In addition to all of the above, you can find a use for old dishes, shoes, clothes, metal gizmos, obsolete furniture, records, CDs.

At first glance, it seems that the implementation of such ideas is a complicated matter. But as soon as you start implementing them, you will see that everything is quite simple. All you need is a few unnecessary things, materials at hand and a vivid imagination!

Photo crafts for giving