Concrete wall socket, detailed installation instructions. We select a crown for concrete to install a socket
The drywall crown, whose diameter is 68 mm, is narrow-profile and is used for drilling holes intended only for installing socket boxes.
Milling cutter for working with a 6.8 cm socket (solid)
The socket consists of two parts: a visible decorative part and a sock - a terminal block hidden from the eyes, which serves as the junction of various wires to ensure safe electrification. It is round and is available in certain sizes in diameter and height, the compliance of which is checked by the standards and norms of GOST.
There are three types of sockets:
- for concrete, they are a plastic cup without fixing elements; installation is carried out in a cement mortar;
- for wood - made of metal;
- for drywall, the material of the case is plastic, special vertical pressure plates, plastic or metal, are placed on the side walls, with the help of these fixing elements the socket is attached to the back of the GKL sheet.
The usual diameter of the produced socket boxes is 68-70 mm, which provides for the use of special drills for installation. As for the decorative part of sockets, it is also divided into subtypes:
- with a closing shutter to protect children from electric shock;
- with protection against moisture and other aggressive environments - suitable for installation in extreme rooms (kitchen, bathroom);
- equipped with grounding contact.
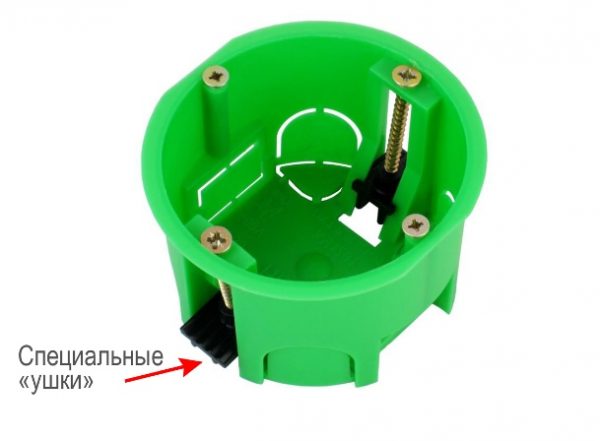 Mounting box device for a power outlet
 Characterization of crowns
For sockets, a special drill (milling cutter) of a cylindrical shape with a cutting edge in the form of pointed teeth placed at a certain angle at the end is used. In the center of the device is a drill around which a crown is placed. First, a drill penetrates into the material being processed, fixes the nozzle in a predetermined position, and performs centering for the cutting edge. This shape is optimal for efficient drilling and crown longevity.
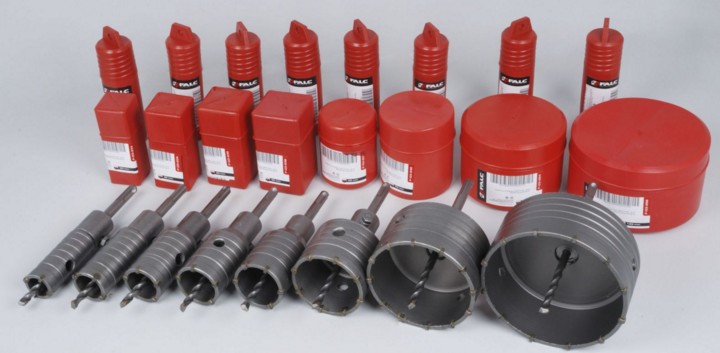
For the installation of podrozetniki, a crown is used, the diameter of which is 68 or 70, although the size range can vary from 33 to 150 mm. The length of the installation tool for installing the electrical terminal block is 60-65, although there are nozzles with a depth of 30 to 80 mm.
Crowns are divided into types:
- solid - consist of one thin-walled metal glass with cloves;
- collapsible - are a design of a universal disk, on which several glasses of various diameters are placed in the form of an unfinished cylinder.
Bimetallic mills are also available, which, in addition to processing brittle materials, are suitable for drilling metal and steel with sheet thicknesses from 1 mm. Popular manufacturers that produce 68 mm crowns include Bocsh, HSS, Sigma, MTX, etc.
The cutter of the Carat series (Bosch) is used in conjunction with an adapter and a centering drill, which allows you to process drywall walls, marble and wood. The HSS crown (Makitta) chambered for 13 mm is suitable for surface treatment of gypsum plastics, plastic, plywood and chipboard. Allows you to make holes in the wall with a depth of 3.2 cm. Complete with countersink.
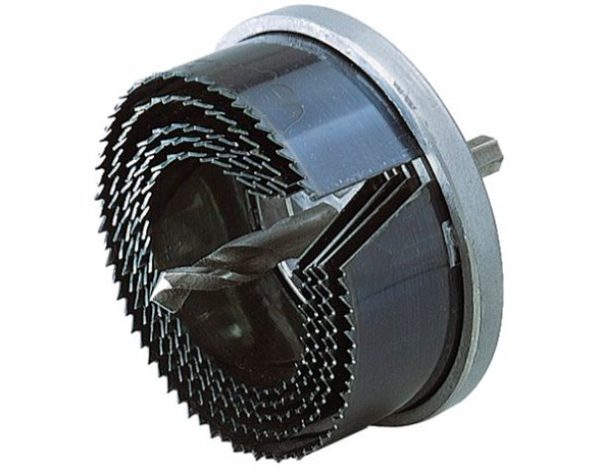 Crown 6.8 cm (collapsible)
 Installation methods and types of tools for its implementation
There are three ways to install the rosette:
- with reference to the profile;
- without reference to the frame;
- installation of the outlet block.
Before choosing a mounting method, a tool is prepared, in addition to crowns and socket boxes, a drill, a screwdriver and the external part of the socket are used.
Additionally, you will need:
- building level;
- ruler or tape measure (to control the distance between the block socket boxes);
- pencil for marking;
- construction vacuum cleaner, which is used when making holes in a drywall with a drill so that less dust is collected and the lungs are not clogged.
For accurate marking, a laser level is used, which will allow for work with minimal deviations in the calculations.
 Type of markup made using a level
 Profile-based installation
This type of installation is the easiest. It is used if there is a metal frame, and on the sheets of drywall following the traces of the screws, you can confidently determine where the profiles are located. There is no risk of hooking up the wiring or getting to the middle of the profile when making holes, which guarantees installation safety.
Stages of work:
- marking is made for the location of outlets (a horizontal and vertical line is drawn at the construction level, the intersection of which indicates the location of the center of the future outlet);
- a cutter with a diameter of 68 mm is put on the drill;
- a hole is being made;
- a socket is taken, a plug for breaking the power cable breaks out on the side walls;
- a wire is threaded into the holes from the former plugs;
- the socket is inserted into the wall from drywall, with a screwdriver, it is fixed to it with clamping legs;
- wiring is connected in the terminal block;
- during the finishing work, electricity is turned off, the hole is closed with masking tape;
- at the end of all work, the outer part of the outlet is worn.
If the drywall sheets are already plastered and it is visually impossible to determine where the metal profiles or conductive cable are located, they resort to using a conventional magnet, which they lean against the surface of the gypsum board and make the necessary notes. You can also cut holes on the GKL sheet even before the frame sheathing stage.
 The layout of the mounting block under the outlet in a sheet of drywall
 Installation of a block outlet
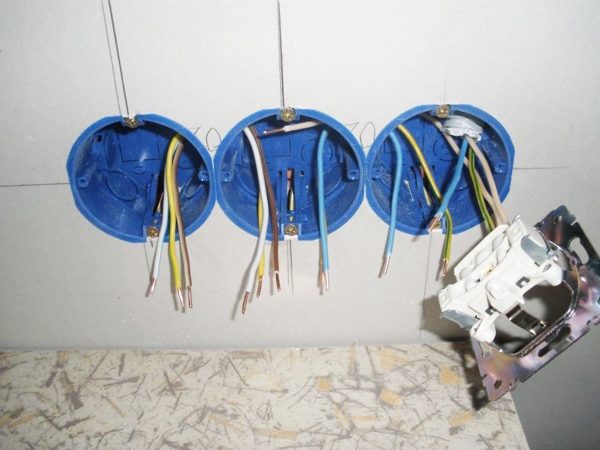
Block outlets are sockets that consist of several terminal blocks for simultaneously connecting to a 220 V network, the Internet, TV, etc.
Installation Nuances:
- the distance between the centers of the block outlets should be 72 mm;
- calculations using the level are transferred to the wall;
- the cups of the rosettes are interconnected by a C3A3 cable or “butterflies”, which are taken with a margin of 2 cm and are arranged in a block;
- under the control of the level, circles are cut out from the GCR on the wall, to which the block is applied and the correctness of the calculation of the recesses is checked;
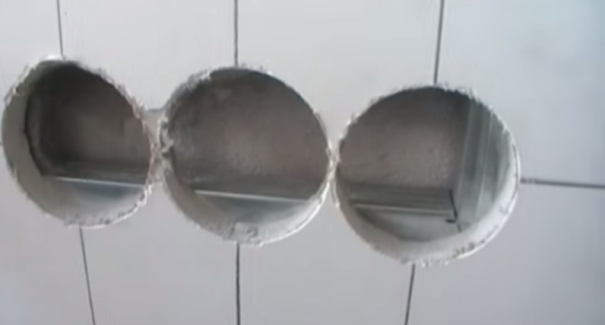
- the resulting holes are interconnected with a chisel;
- a block is inserted, fixed to the wall with clamping bolts;
- cables are held between the sockets.
 Connecting a block outlet
 Additional Installation Requirements
In order for the installation of podrozetniki to pass according to the rules of fire safety, be distinguished by quality and accuracy, follow the following rules and recommendations:
- installation of electrical wiring should be completed before the start of the sheathing of the frame with GKL sheets, for these purposes it is preferable to use a non-combustible flat cable of the type VVGng LS, which is placed in a corrugated sleeve with a self-extinguishing probe and secured with brackets to the side shelves of the profile, the wiring should go to the location of the socket;
- so that the material does not crack, when working with a crown, it is not recommended to press strongly on the surface of the drywall sheet;
- installation of the socket should be carried out 30 cm from the floor, before the start of finishing work with gypsum plaster;
- the size of the recess between the native wall and drywall should be 45 mm or more, otherwise the undergrowth will not fit through the hole and it will have to be deepened further;
- if there are wooden floors between the frame and the wall of the gypsum board or in order to increase the level of electrical safety, it is recommended that the edges of the installed undersocket be treated with plaster.
 Plaster plugging in plaster
 You can learn how to install the outlet using a bimetallic crown, the diameter of which is 68 mm, in compliance with the installation standards, using the video below.
Installation without reference to the profile
Sometimes it happens that the calculations are done incorrectly and after drilling in the hole for future outlets, a profile is visible, because of which it is impossible to push the unit in and securely fix it in the recess. In this case, the crown is replaced with an ordinary metal knife or chisel and holes are made manually, removing 5-10 cm of the visible profile.
 Incorrect installation, in which the profile prevents the socket from being placed in the prepared hole.
 The frame of the structure will not suffer from this, but the drywall sheet itself may be deformed, and due to an inconvenient viewing angle, there is a risk of injury. When trimming the profile, it is recommended to wear special mounting gloves - they will protect your hands from unwanted cuts.
In contact with
After the completion of the construction of your own home or in the process of repairing the apartment, there is a need for electrical work. Installing switches and electrical outlets is something that almost every landlord faces. And in order to install these everyday electrical devices on the wall, you will definitely need a crown for concrete sockets.
Podrozetnik: purpose and design
Podrozetnik is a cylindrical plastic box that is installed in the hole in the wall using a quick-hardening solution. This product is intended for reliable fastening of electrical elements of hidden wiring (using screws or self-tapping screws). The mounting box has technological holes for electrical wires.
Dimensions of standard mounting boxes (sockets) for concrete and brick walls from the main manufacturers of this product category (Schneider Electric, Hegel, PlastElektro, Greenel): Ø \u003d 65-68 mm, depth 42 ÷ 47 mm. That is, for a standard socket, it is necessary to make a neat hole in the wall with a diameter of 68 mm and a depth of about 50 mm. A drill or drill bit for a socket is the most convenient device for performing such work. For this purpose, a crown with a diameter of 68 mm and a working drilling depth of 60 mm (the most popular and common size) is quite suitable. But if your mounting boxes large sizes, then you will have to purchase crowns for drilling to the size of a certain model of sockets (now there is a large selection of such devices for drilling concrete on sale).
Varieties of crowns
When drilling holes in concrete walls, two main types of crowns are used, which differ in the material used for the manufacture of cutting elements: carbide and diamond.
Carbide
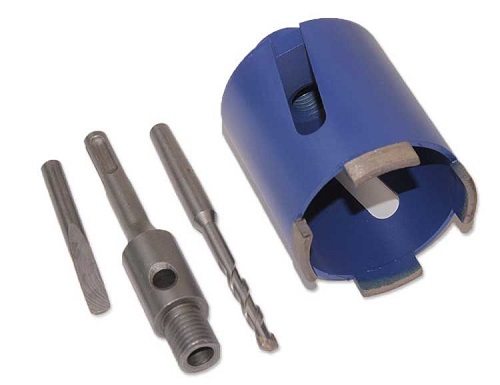
Carbide core drill bits are a collapsible design, which includes:
- case (in the form of a glass), at the end of which cutting teeth are welded;
- shank for crowns on concrete (SDS-Plus, sometimes an adapter is included in the kit for attaching to a regular cartridge);
- centering drill (fastened in the shank with a fixing screw).
For the manufacture of cutting teeth, special composite alloys are used (for example, the winner is an alloy of tungsten carbide and cobalt), which have high hardness. On the other side of the crown body there is a shank for installation in a perforator cartridge. A hole is provided in the bottom of the shank for attaching the guide drill. These crowns are designed for dry drilling (without supplying coolant) using a hammer drill in hammer mode.

The main advantage of carbide concrete crowns is their low cost. The price of a typical size (Ø \u003d 68 mm, L \u003d 60 mm) varies from 400 to 900 rubles. However, the scope of these products is limited. Holes can only be made in unreinforced concrete, brick, foam concrete, aerated concrete and similar building materials. If the reinforcement bars or large fractions of the concrete composition hit the rods, the crown teeth break.
Advice! How to drill crowns on concrete safely: use the detector to search for reinforcement in the wall (you can rent it). With its help, it is possible to determine the location of reinforcing bars and the thickness of the concrete layer above them. Put the location of the rods with a marker on the wall, and only after that plan the location of the holes for sockets and switches.

Diamond
Crowns for concrete of this type are divided into two types:
- for use with coolant supply;
- for dry drilling.
Wet diamond crowns can only be used with special drilling rigs that provide water for efficient heat removal from the working cutting elements of the crown. Scope: openings in superhard building materials such as, monolithic reinforced concrete with a high degree of reinforcement, granite, marble. The standard length of these products is 450 mm, the choice of diameter is very wide: from 12 mm to 1.2 m. The use of such devices is advisable only in industrial construction or production overhaul with high intensity of use.

The most widespread in the production of small amounts of electrical work found crowns for dry diamond drilling. They can be used with a conventional household electric drill (with a power of at least 800-900 W) or a hammer drill in shock-free mode. They have several advantages over analogues with carbide cutting teeth:
- increased resource;
- higher drilling speed;
- suitable for making holes even in reinforced concrete;
- small dust formation during the performance of work;
- no cracks after drilling;
- low noise and vibration.
Structurally, diamond crowns for reinforced concrete are very similar to carbide analogues. They are a pipe segment with a shank and diamond cutting segments welded at the end (the number of segments varies from 3 to 8). To fasten segments to the crown housing, laser welding is used, with which you can achieve a strong connection. In order to protect the product from overheating and deformation during its intensive use, longitudinal slots are made in the body of the crown, through which air cooling is carried out.
The main manufacturers of diamond drill bits for punch: “KEOS” (South Korea), “Practice” (Russia), “Adele” (Russia), “Diam” (Russia), “Dr. Schulze "(Germany). The price of the size of interest to us (Ø \u003d 68 mm, L \u003d 60 mm) varies from 1900 to 3300 rubles.
Safety and comfort requirements when installing sockets and switches:
- Electrical outlets must be installed at least 250–300 mm from the floor or table surface (if installed in the kitchen).
- The distance from the corner or edge of the wall should be at least 150 ÷ \u200b\u200b200 mm.
- The most comfortable switch arrangement for use is 900 ÷ 1000 mm from the floor surface.
Before purchasing a drill bit, carefully measure the available sockets. The diameter of the crown must match the diameter of the mounting box (or be slightly larger).
Tools required:
- hammer drill or electric drill;
- a hammer or a small sledgehammer;
- crown for concrete or brick (depending on the material of the walls);
- chisel or punch.
On a note! If the crown is designed for concrete walls, then using it you can easily make a hole in the brick. But a crown designed for brick is much cheaper, so you should not overpay if you carry out electrical work in a brick house.
See the video for details:
Work procedure:
- Using a detector to search for reinforcement, we determine the location of metal rods in the wall and the thickness of the concrete layer above them. If the concrete layer above the rods exceeds the landing depth of the undergrowth, then you can start marking future holes without taking into account the reinforcement of the walls. If the reinforcing rods are close to the wall surface, then it is necessary to put the marker with their location, and only then start marking the future holes for installing the mounting boxes.
- Considering the recommendations for installing outlets and light switches, mark the holes on the wall with a ruler, level and marker (or pencil).
- Set the crown in the punch.
- We make a circular slot in the wall.
Attention! When using carbide crowns, it is necessary to take short technological breaks to prevent overheating of the cutting elements.
In custody
Correct installation of socket outlets ensures reliable fastening of any sockets, switches and their safe operation. Special devices for arranging holes (crowns) greatly facilitate their installation and installation of electrical wires.
Diamond drilling of holes in concrete using special crowns is much more convenient and faster than carving holes for socket boxes with a grinder or with a perforator. This material is devoted to the tools with which diamond drilling concrete - to diamond and victorious crowns.
From this article you will learn what types of crowns for concrete exist, and how to choose their size. Also, diamond drilling of concrete and the correct installation of the socket boxes in concrete or in a wall made of drywall (80 and 100 mm) using a concrete crown and a perforator will be fully disassembled.
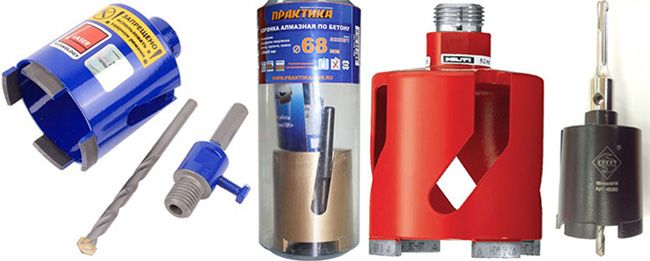
Types of crowns
Crowns for socket boxes for concrete are classified according to the standard of fasteners (trihedral, hexagonal, SDS Max, and SDS Plus), and according to the material of manufacture.
Based on the materials of manufacture, the following tool is distinguished:
- carbide steel winning crowns;
- reinforced concrete diamond crowns;
- crowns made of carbo-tungsten alloys.
Most simple and a cheap option is a metal crown on concrete for Hegel outlets in a wall of drywall (80 and 100 mm), on which the victory tips are soldered.
Such a tool is well suited for domestic use: it copes with drilling holes in foam concrete and brick, however, with regular drilling of concrete surfaces, it quickly wears out and becomes unusable.
Due to the small resource of work, such a tool is poorly suited for professional use.
Optimal for drilling concrete is diamond drilling of reinforced concrete with crowns on which spraying is made from industrial diamonds and a perforator.
Diamond crowns for concrete, in comparison with metal winning tools, have the following advantages:
- accuracy of drilling in the wall - you will get a hole in the wall from drywall or concrete of the correct geometry, without chips, cracks and other defects;
- the equipment has any penetration depth - while metal equipment and tools can lose their effectiveness when deepened into concrete, diamond crowns have the same efficiency over the entire thickness of the concrete slab being processed;
- universality - in addition to concrete, diamond equipment can be easily used for drilling any materials with similar strength characteristics;
- the equipment has a low level of vibration and noise - this is far from the last factor that should be taken into account when installing a large number of Hegel sockets in apartment buildings;
- drilling with a diamond column is not accompanied by a large amount of dust;
- speed - due to the high functional characteristics of diamond spraying, such a tool performs drilling much faster than installing a similar hole with a metal nozzle.
Virtually all quality equipment from trusted manufacturers comes with SDS Plus shank mounts. This shank technology Suitable for all modern lightweight rotary hammers. The diameter of the SDS Plus shanks is 100 mm.
The depth of immersion of the shank in the perforator cartridge is 40 millimeters. The standard SDS Plus for the tool was proposed by Bosch about 20 years ago, and most leading manufacturers today produce crowns for this type of mount.
1.1 What size crowns should be used?
The diameter of the crown for the sockets is determined based on the dimensions of the housing of the sockets, which will be installed. As a rule, all undergrowths are standardized in the sizes of 68 and 100 mm, and most crowns on the market go exactly for such installation.
The concrete equipment for the 68th and 100th diameters of the sockets from different manufacturers have, oddly enough, different diameters. In general, the depth and scatter of the actual diameter of the crowns under the 68 mm case is from 69 to 74 millimeters.
The increased diameter of the crown relative to the size of the case is due to the fact that the c3m3 undersocket itself sits on a plaster or alabaster mixture in the hole drilled on concrete, for which it is also necessary to make free space.
There are also crowns for concrete and foam concrete for 80 mm and 100 mm socket boxes. Recently, 100 mm socket boxes have become increasingly popular, a wide range of crowns for which has appeared at all leading manufacturers such as Bosch, Makita, SDS, Kraftool.
In general, the key rule when choosing a crown for concrete in order to make a 100 mm s3m3 socket is that its actual diameter is 3-4 mm larger than the diameter of the socket box.
Do not neglect this, since it is much easier to make an opening with an additional amount of gypsum mortar than to buy a new undergrowth suitable for the wrong crown. If you have already purchased a podrozetnik and have not asked what its diameter is, then measure it with a vernier caliper.
When choosing a crown for concrete, you need to proceed from what it is needed for and what it needs to be done. If you need a crown for a single drilling on concrete or aerated concrete, for example, for installing outlets during apartment repair, then you can especially not hesitate to take an inexpensive product from ordinary hard-melting steel from a domestic manufacturer - its capabilities will be more than enough.
Such crowns, as a rule, are not particularly durable, and the winning teeth on them can fly off quite quickly, however, with intermittent use in everyday life, the life of such crowns is quite long.
The main thing is to maintain the basic operating rules - do not drill for too long, allow the crown to cool normally, and process only those materials for which this tool is intended. Good budget manufacturers include domestic firms Zubr and Stayer.
If you need concrete crown for professional work for a long time, then preference should be given to SDS Plus tools with diamond spraying, which have much greater efficiency and service life than winning crowns.
Moreover, high-quality diamond crowns for concrete are subject to restoration, so that when the tool is worn out, you do not need to buy it again. Among the manufacturers of high-quality SDS Plus crowns are Makita, Bosh, Hilti.
2 Installation of sockets
It is possible to install podrozetniki in a concrete wall without problems yourself, you just need to get a puncher and a quality crown for concrete.
Saving on crowns is not recommended, since good products from trusted manufacturers have a very long working life, and will last you more than one year, while Chinese consumer tools, although they have a lower cost, become worthless after several weeks of regular use.
In general, the installation of 68 × 45 mm sockets can be divided into five stages: preparation, marking, drilling, installation of the sockets, and finishing work.
The installation of podrozetniki in concrete will require the following tools and materials:
- pencil;
- ruler;
- building gypsum, or plaster mortar;
- putty knife;
- hammer drill or electric drill;
- crown for concrete;
- level;
- stationery knife;
- a container for mixing gypsum mortar;
- master OK;
- chisel;
- hammer.
2.1 Preliminary work
Often trimmers are mounted on the place where previously open sockets were installed, which requires the preliminary dismantling of old sockets.
Before starting dismantling, turn off the power to the house, unscrew the plugs and turn off the circuit breaker on the electrical panel, and check if voltage is present in the outlet using a low voltage indicator (electrician's screwdriver). When you are sure that there is no voltage, unscrew the screws that secure the socket cover and remove it.
Next, unscrew the screws that secure the wires supplying current to the outlet, and disconnect them. After the wires are disconnected, we unscrew the screws with which the plastic case of the outlet is attached to the wooden base.
The wooden base, as a rule, is attached to the wall with one or two dowels that you need to pull out. Use pliers or a screwdriver for this.
2.2 Marking
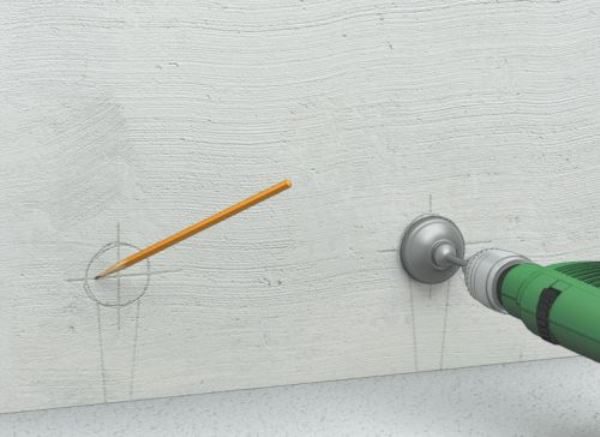
With a construction or clerical pencil in place, draw two perpendicular lines so that they intersect in the place where the center of the future hole for the socket is to be located.
![]()
There are basic rules by which electricians are guided in determining the place where the socket will be installed:
- the minimum height of the hole above the floor is 30 centimeters (take into account the height of the future flooring if you are drilling concrete in a room with an incomplete repair);
- in the kitchen, the Hegel outlet should be located above the countertops (approximate height 110-120 centimeters);
- if you are drilling concrete under a power outlet in the bathroom, be aware that the hole must be at least 1 meter from the washing machine.
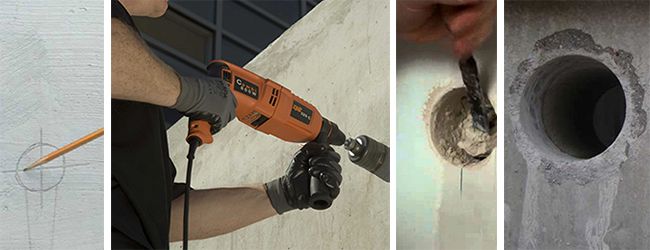
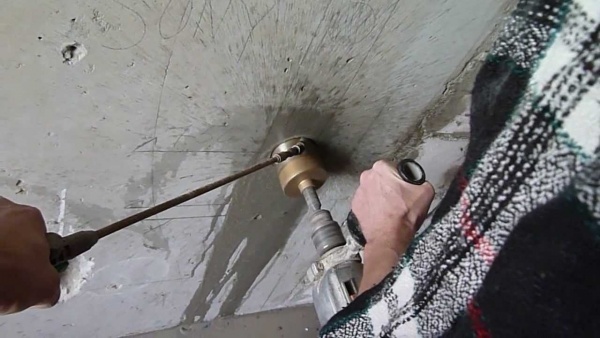
2.3 Concrete drilling
Place the crown for drilling concrete on the rotary hammer, and connect the tool to the power supply. To facilitate the drilling of holes, if you are not sure about the quality of the used tip, single holes can be drilled around the perimeter of the socket, in increments of 5-10 mm.
To do this, attach the block socket to the wall, circle it with a pencil, and make holes along the resulting contour using a small diameter drill bit to a depth equal to the length of the undergrowth.
Further, drilling the holes for the dimensions along the same contour. The bottom line is that the crown will not pass solid concrete, but only its individual sections, which will greatly simplify the work and reduce the time of drilling. The hole for the undercutter should be such that the dimensions of the body are immersed in it by 5-10 mm, since it will be necessary to plant the undergrowth on gypsum mortar.
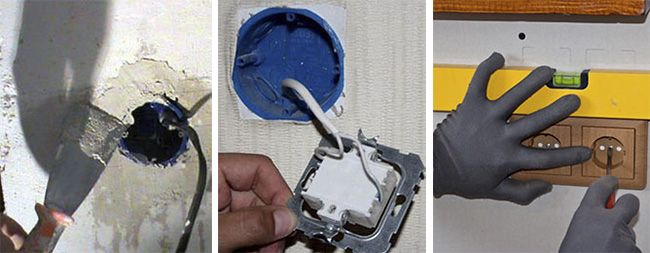
2.4 Installation of the socket and completion of work

Installing the socket in drilled hole performed by the following algorithm:
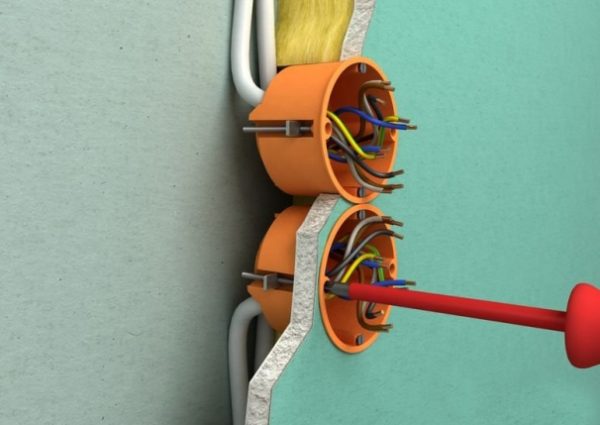
- In the upper part of the hole with the help of a chisel and a hammer, a strobe is made for the supply of power wires.
- If concrete is not amenable to manual processing, an impact drill can be used.
- If you are working on foam concrete, then it will be very easy to crumble, an ordinary stamstka will be enough to create a strobe.
- Take the socket and use a clerical knife on the back of its body to cut openings for the wires (there are special slots).
- Thread the wire into the socket.
- Prepare a gypsum mortar. His the consistency should be approximately like that of sour cream. Since the gypsum mortar hardens very quickly - immediately proceed with the installation of the socket.
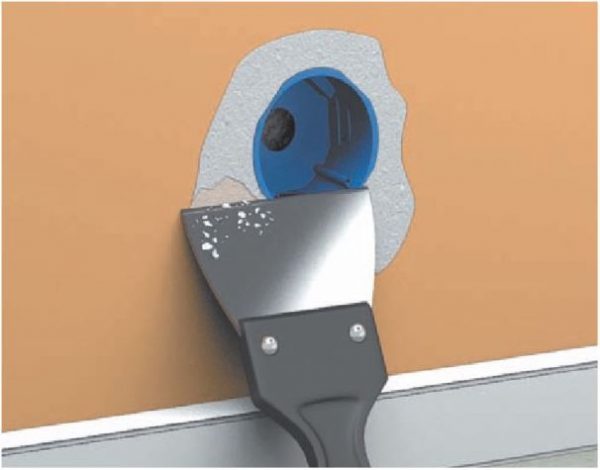
- Moisten the hole in concrete wall water, and with a spatula or trowel, fill it with gypsum mortar, so that the back of the hole is completely covered with gypsum.
- Insert the socket and lock it in the required position (use the level to check if you have plunged the case to the correct depth, it is important that it does not protrude outside the wall).
- Fill the solution with all the side gaps, and coat the concrete around the socket.
- Remove excess solution only after it has completely solidified: you can use sandpaper for this.
2.5 Features of drilling holes for sockets with crowns on concrete (video)
During major repairs, it is often necessary to relocate or install an additional outlet. The overhead type is not popular. Despite the complexity of the installation, preference is given to internal outlets. Reliable and proper installation requires an undersocket: a plastic box that secures itself to the wall.
Before installing the socket, you need to drill a hole of the required diameter in the wall. For these purposes, you need a crown for sockets: a special design that is worn on a punch or a powerful impact drill.
The design and construction of the crown
To make a neat hole in the wall for sockets, a concrete crown is used. This device is similar to a pipe segment, with teeth for cutting on one end and a flange for clamping in a drill or perforator cartridge on the other. To center the drilling, a concrete drill is installed in the center of the crown.
So that the dust generated during operation does not clog the device, special holes are provided on the sides of the tube. The mounting flange can be trihedral (for a perforator) or hexagonal (for installation in a drill chuck).
We also note that the diameter of the crowns can be different, which allows you to make holes for the rosettes having different sizes. For home use, devices having a diameter of 68 mm are most suitable.
Types of crowns
In order for the crown to serve for a long time and without much effort drill holes in the wall from various materials, reinforcement of the cutting edge with various particularly hard materials is used. Depending on what material was used for the cutting edge, and a classification of devices for drilling rosette is made.
The following types of crowns are most popular:
- winning;
- tungsten carbide;
- diamond.
Consider the features of each model in more detail.
Winning crowns
In the manufacturing process of such devices for drilling holes for the socket, special inserts from Pobedit are used. Cutters from this high-strength material are soldered along the cutting edge of the product. Such cutters have proven themselves well and are able to easily make a hole having the required diameter in the most durable concrete.
To facilitate and center the drilling process, it is recommended to use a drill bit, which is inserted in the middle of the bowl and fixed with a bolt.
The work of such a crown is designed for shock loads, but care must be taken not to run into rebar when drilling reinforced concrete slabs. It is also necessary to ensure that the device does not overheat: with significant heating, victorious soldering can fly out. Therefore, during operation, you need to take small breaks or use water to cool the cutting part.
Choosing a crown with victorious soldering, do not save. Cheap models will fail by barely drilling one or two holes.
Tungsten carbide spraying
Worktop crowns are ideal for cutting ceramic tiles, bricks or stone. It is important to know that such products are not designed for shock loads, so it is better to switch the hammer to normal mode.
Such devices have the lowest price, which in most cases depends on the manufacturer. In addition, it should be noted that the size and diameter of the bowl also affects pricing.
It is not necessary to use such crowns for making holes for sockets in concrete, and even more so in reinforced concrete slabs. In case of contact with metal, the spraying is guaranteed to “fly off”.
Diamond crowns
Diamond crown - a product on the cutting surface of which a layer of industrial diamonds is applied. It is not inferior in strength to the diamond wheel, it easily cuts any surface. It is used in cases when it is necessary to quickly do a large amount of work: for example, when laying new wiring in a large house.
Such a crown is designed for drilling holes with a large diameter: in concrete, reinforced concrete structuresin other difficult cases. An additional advantage of this type of tool is the ability to restore the diamond layer: there are special workshops for this.
Advice! An important condition for the long-term operation of such a product is the need to control the operating temperature: the product must be protected from overheating. Also, the diamond core is not designed for hammer drilling.
Diamond coated products have a large number of types. For example, the KS series diamond crown, which uses polycrystalline diamonds, is in demand among professionals. Such a tool requires certain skills: you need to monitor the speed and pressure while drilling. In addition, such crowns have different sizes: from small (diameter 8 mm) to large, whose diameter is 100 mm.
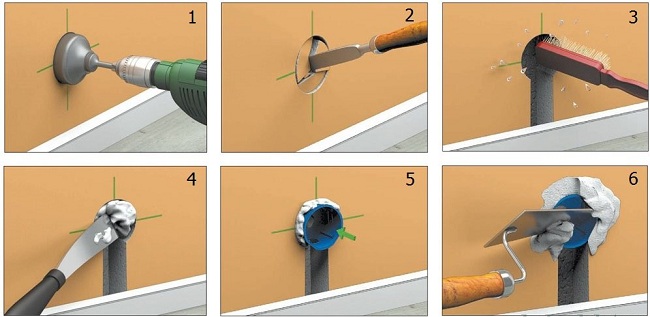
Installation technology for socket boxes
Below is the detailed step-by-step instruction, how to drill a hole with a crown and install a socket in it:
- First of all, you need to decide on the place where the outlet will be installed. If an internal outlet is installed in place of an external one, it is dismantled, having previously disconnected the voltage;
- Marking is made at the installation site: two lines are drawn, the intersection of which indicates the center of the future hole;
- After that, the crown is inserted into the perforator. Depending on the type of spraying, the mode of operation of the punch (shock or unstressed) is selected;
- Having set the centering drill to the mark, a hole is drilled under the socket. The time and speed of drilling depends on several factors: the material of the wall, the type of crown, the power of the punch;
- The depth of the hole should be 5–10 mm greater than the height of the undergrowth;
Note! To drill holes, you need to consider the size of the socket. It is better to take a crown whose diameter is slightly larger than a plastic box. Excess space is easily sealed with gypsum mortar.
- Having drilled a hole to the required depth, the inside is knocked out with the help of a chisel and a hammer. You can also use a hammer drill in jackhammer mode;
- Then a plastic bowl is tried on in the hole;
- If everything is normal, gypsum or alabaster is mixed;
- The hole is filled with a thick solution of about half or 3/4, after which the undergrowth is inserted. Excess solution should be squeezed out;
- The edges are gently smeared and leveled, after which time is given for the gypsum mixture to solidify completely.
Plaster or alabaster mortar sets quite quickly. Therefore, all installation work on the socket should be done quickly, but carefully.
To summarize
Now you know how not only to choose a crown for a socket, but also how to install it with your own hands. This is not difficult, it is important to observe safety measures and use a respirator, since the drilling process is quite dusty.