Laying lags on the foundation step by step instructions. Wooden floor without screed: what to put under the logs for sound insulation and to prevent creaking
Today, there is a wide variety of possibilities for arranging a concrete base in private houses or city apartments. In the course of work, you can use all kinds of flooring, insulation, insulation materials, you can level the concrete surface with a self-leveling mortar and use the “warm floor” system.
Laying logs on a concrete floor does not lose its relevance. Especially this way of arrangement is in demand in the construction of private houses in which the ceiling height allows you to carry out all the necessary operations. One of the advantages of this method is the possibility of using relatively inexpensive insulation.
In this article we will talk about how to attach lags to concrete floor.
About the features of lag mounting
When fastening to a concrete base of a building material, various tools and fasteners can be used. The fastening of wooden logs is relatively simple. The work is carried out in several stages.
Choosing materials and tools
Today, one of the most popular methods of laying logs does not provide for their fastening to the floor. With this option, the rigidity of the structure is achieved due to the fact that the log boards are fastened together using boards or other material. The method is quite reliable, but there is still a big risk of shifting the flooring.
Therefore, it is best to use the traditional version, which involves fastening to the base using anchors or self-tapping screws.
Choose lags

When choosing a lag, you need to pay attention to the following criteria:
- The type of wood that can play a key role in the strength of the substrate.
- The price of the purchased material. It is best to use inexpensive coniferous wood (fir, pine, spruce) when carrying out these works. At the same time, a tree of 3 varieties will do. The main thing is that the humidity indicator does not exceed 20%.
- The dimensions of the bars in cross section.
Advice!
The choice of section sizes depends on what type of insulation you will be laying between the lags.
In addition, last but not least, you should think about the height of the ceilings.
If the height is small, you should not raise the floors much, since this way you compress the interior space of the room.
Choosing Tools
To carry out the installation of the lag, you will need tools designed for working wood and for drilling concrete:
- Hammer drill.
- Anchors (such fasteners are selected depending on the cross-section of the beam).
- Self-tapping screws 6 mm in diameter, the length of which depends on the size of the bars. They must be supplied with polypropylene dowels.
- Some carpentry tools: planer, hacksaw, circular, etc.
Many home craftsmen are interested in how to fix the logs to the concrete floor. The choice between self-tapping screws with anchors should be based on the planned financial costs.

The first option is more economical, the second is much more reliable. In practice, in most cases, dowel fastening is enough, in addition, cheap screws should be screwed in with a much smaller step.
The main advantage of anchor fasteners is that they not only fix the position of the bars, but also press them to the base. This is very important if the final flooring is massive enough and subject to frequent mechanical stress.
Do not forget about the waterproofing. It must be installed on a concrete floor before installing the lag.
Advice!
As a waterproofing, you can use roofing material or building polyethylene.

Features of the installation
After all the materials and tools have been prepared, you can proceed directly to the installation.
The instruction provides for several stages:
- We lay roofing material on a concrete floor. Joints between sheets must be glued using construction tape.
- We distribute the base lags. Two of them are laid along opposite walls. The rest should be arranged with a certain step, given the stiffness and density of the material laid on top of the lag. Accordingly, the stiffer the material, the smaller the pitch. The average parameters are 40-80 cm.
- In the event that the length of the room exceeds the length of the bars, then they fit butt-to-butt. If high logs are used in this case, or a high load is expected on the floors, it is necessary to produce end cuts for connecting the elements.
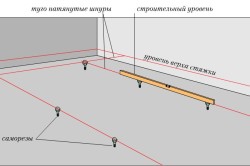
- Having laid two logs along the walls, we set their height using the level.
- We pull the cord between the extreme lags, on which the rest of the bars should be laid.
- Drill holes in the bar and base.
- In the hole in the floor we lay the spacer of the anchor or dowel.
- We screw bolts or screws. On one bar there are two or three anchor fasteners. The screws are screwed in increments of 60 to 80 cm.

Conclusion
As you can see, installing the floor on the logs with your own hands is much easier than it might seem at first glance. To create a reliable foundation is quite realistic if you listen to the advice of specialists. The video in this article will help you learn even more. "Width \u003d" 640 "height \u003d" 360 "frameborder \u003d" 0 "allowfullscreen \u003d" allowfullscreen "\u003e
Conclusion
As you can see, installing the floor on the logs with your own hands is much easier than it might seem at first glance. To create a reliable foundation is quite realistic if you listen to the advice of specialists. The video in this article will help you learn even more.
Our reader asks:Dear expert, I would like not to splurge on screed in a new building (every penny is not superfluous and the ceiling height, alas), and we want the floor from boards. Is it possible to make a completely presentable coating (not creaky) on the floor slab? If so, then what and why lay under the lags? And what kind of sound insulation to arrange, sparing the neighbors below.
Expert Answer:
You are probably being built in a brick, block or frame house. Otherwise (panel house) you would not have enough space between the door and the floor mark in order to arrange a screed or mount the logs. In this case, it would be possible to lay a laminate or parquet board using the “floating” method. It provides for the placement under the rigid floor structure of a soft and elastic layer - a substrate, which also performs a soundproofing function.
When installing the floor on the logs, we recommend resorting to a similar technique: to separate the boards and logs along which the sound is perfectly distributed from each other and from the reinforced concrete slab with soundproof gaskets. Soundproofing is all the better if the gaskets are located on two levels: below - between the stove and the lag, and above - between the lag and the board. Hardboard sheets used soundproofing earlier, fiberboard has the worst properties. Today, more efficient foamed polymer materials are available. They can be called in different ways, for example, "Izoshum" or simply foamed polyethylene, but the properties are similar. Another good option is cork sheets 2-4 mm thick.
In this design of the wooden floor (though plywood, not plank), the noise is suppressed by a soundproofing pad laid on top of the log. It consists of two layers: foamed polyethylene and cork. We recommend laying the film down on the floor slab.
If the concrete base has a large slope, and the logs are not very even, it makes sense to firmly fix the beams to the plate with self-expanding dowels. In this case, it is necessary to lay a soundproofing gasket under the wedges, and fill the gap between the concrete and the log with mounting foam.

In addition, it helps to reduce the noise level and the heat and sound insulating material laid between the lags; you can use inexpensive glass wool or fill the gap with expanded clay.
So that moisture does not penetrate into the floor structure from the bottom, before starting work, we recommend that you lay a plastic film on the floor slab, leading it to the walls just above the level of the plinth. It is not necessary to use construction with reinforcement; you can use the usual greenhouse.

Fix the floor boards to the logs not with nails, but with self-tapping screws. It is very convenient to work with special Spax floor screws
As for a possible squeak, the presence of an elastic gasket between the lag and the boards will already largely prevent its appearance. Another trick: use phosphate or galvanized screws instead of nails. By the way, if for some reason you have to disassemble the floor, this can be done with screws without problems. It is also very important to carry out work in a room with normal humidity and apply well-dried wood. If the walls and ceilings have not yet dried out after construction work, it makes no sense to start laying the floor. Logs and boards, if you are not sure about the quality of their drying, it is better to carefully fold them in a room with normal humidity, shifting the gaskets. To logs and boards dried out faster, you can send them turned on fan heater, installed at a safe distance.
Today, there are many floor coverings, however, a tree that has been tested for centuries has not lost its relevance, and is still very popular. As a result, many homeowners decide to mount wooden planks on top of the concrete screed. This procedure is not too complicated, but requires certain knowledge, so we will further consider in detail how to install a wooden floor on top of concrete.
General information
Often before performing repairs do people think which floors are better - wooden or concrete?
At first glance, concrete floors may seem more practical for the following reasons:
- They do not rot, as a result of which they are more durable;
- Over time, they do not begin to creak, unlike a wooden floor;
- They have good strength.
- They have moisture resistance, etc.
However, it is no secret that the concrete floor is colder than wood and, of course, less comfortable. As for the shortcomings of the boardwalk, such as the tendency to rot or loosen and creak, then subject to modern technology installation, they cease to be a problem.
Therefore, when deciding whether to lay a floor - concrete or wooden, the conditions of its operation should be taken into account. For example, in the bathroom or in the kitchen it is more appropriate to use concrete screedcovered, for example, with tiles. But in the hall or bedroom, where comfort and cohesion comes first, it is more expedient to cover the floor with wood.
Technology for laying a wooden floor on concrete
Now let's take a closer look at how to lay a wooden floor on a concrete base.
It should immediately be said that there are several installation technologies:
- Bonding boards to concrete;
- Logging;
- Laying on plywood;
To choose the appropriate technology, you should familiarize yourself with each, so that we will do further.
Foundation preparation
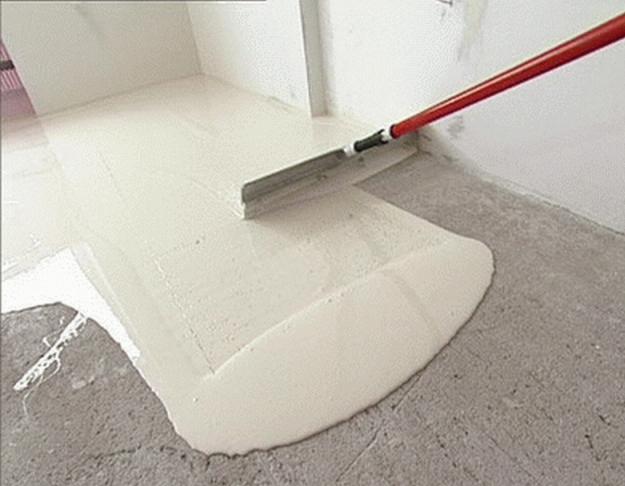
Before laying a wooden floor on concrete, you need to prepare the foundation, regardless of which installation technology will be used. Preparation consists in drying the screed if the floor has been recently flooded and leveling. If the surface of the base has knolls, then they can be removed by grinding, if there are "holes" then such a flaw is most easily eliminated using a self-leveling mixture.
Note! You can only start installation work if the moisture content of the screed does not exceed 3 percent.
At this stage, you should also make holes in the concrete for communications, for example, sewer or water pipes, cables, etc. The most effective way is diamond drilling holes in concrete.
If the area of \u200b\u200bthe room is large, then in freshly screed, expansion joints should be made. For these purposes, reinforced concrete is cut with diamond wheels. The final step in preparing the base is to coat the surface with a primer.
Impregnation will serve as a waterproofing, and also prevent the formation of fungus and mold under the wooden floor. As a primer, a polyurethane one-component primer mixture is usually used. After the primer dries, you can proceed with the installation of the floor with your own hands.

Glue laying
This technology consists in mounting boards directly on a concrete base. Recently, it is the most common way of laying wooden planks on the screed.
True, installation can only be started if the base complies with SNiP 3.04.01-87. If the concrete is loose or contains cracks, it is necessary to use special reinforcing soils or cover it with a dividing substrate, for example - Multimoll Vlies.
If it is planned to lay a wide massive board, then for gluing the boards apply a modified elastic one-component polyurethane adhesive. The installation of a narrow massive or engineering board is carried out using two-component polyurethane adhesive.

The device of a wooden floor for concrete in this case is as follows:
- First of all, you need to measure the room and cut the boards of the required length.
- Then, starting from the wall opposite the entrance, glue is applied to the surface of the base and leveled with a notched trowel. The layer thickness should be no more than 3 mm.
- Next, a board is laid on the surface covered with glue and pressed over the entire area. In this way, 2-3 rows of boards are mounted. When laying boards, they must be tightly joined in the longitudinal and transverse directions, for this you can use coupling belts or wedges.
- After glue polymerization, the rest of the boards are laid. In this case, the boards of the last row must be cut in width.
Note! A gap of at least 15 mm must be left between the walls and the coating.
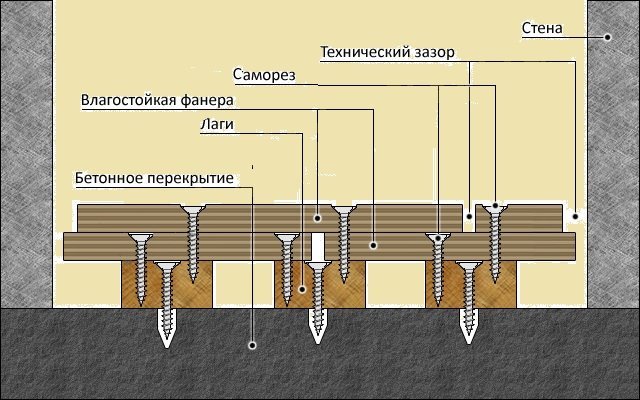
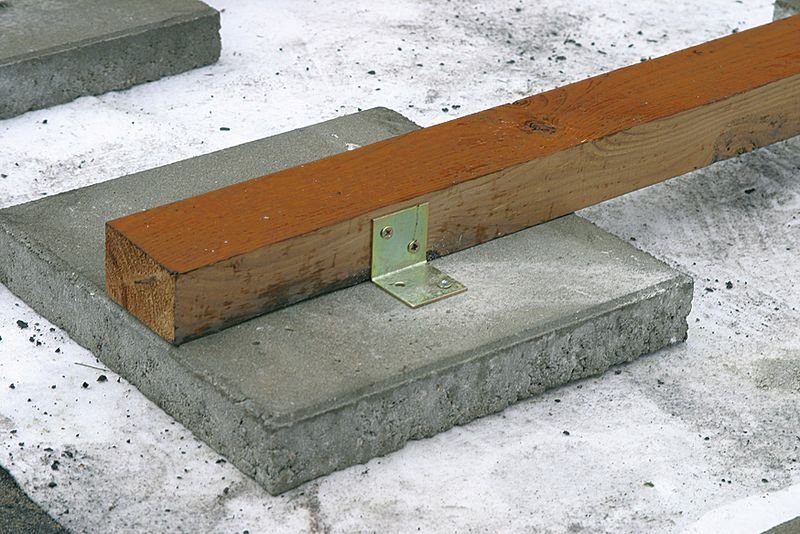
In the photo - lag mounting diagram
Installation of the floor on the logs
This technology involves the installation of boards to wooden logs (rectangular bars). It can be used for boards from 20 mm thick. Thinner boards should only be mounted on plywood.
Installation instructions are as follows:
- Logs are attached to the concrete floor with dowels and screws. At the same time, their hats should be recessed a few millimeters below the surface level. The axial distance between the lags should be 25-30 cm.
I must say that there is another way to fix the lag - on glue and bitumen-containing mastics. This technology is justified if drilling concrete is likely to damage the communications.
- After installing the lag, you need to level them. Places that protrude above the level must be removed with a plane. As a result, the deviation from the level should be no more than 2 mm per two meters.

- Further along the walls you need to lay soft wood-fiber boards, which will serve as a soundproofing between the floor and the wall.
- The space between the lags is preferably filled with insulating material, for example, expanded clay or mineral mats.
- After this, the installation of the boards is carried out, which are attached to the logs using self-tapping screws. Of course, nails can also be used for these purposes, but over time, such a fastener begins to loosen, resulting in a characteristic creak when moving around the floor.
This technology is good in that it allows for communication under the floor, as well as the use of insulation. However, the price of the structure increases, since in addition to the boards it is necessary to purchase more bars.
Laying on plywood
A wooden floor on a concrete base can be laid using moisture-resistant plywood 12-18 mm thick.
In this case, the procedure is as follows:
- Standard sheets of plywood need to be cut into squares measuring 40x40 cm or 80x80 cm.
- The resulting fragments are laid diagonally towards the future coverage. Moreover, the gap between them should be about 4 mm. The plywood is first glued and then shot with dowels.
A distance of about 10 mm must be left between the edges of the plywood and the walls. The sheets are stacked with offset according to the principle of brick luggage, while the hats of the screws must be recessed by 3-4 mm.
- Before laying, rough grinding is performed.
- The leveled base should be dust free.
- Then boards are attached to the plywood using self-tapping screws.
That's all the main points of installing a wooden floor over the screed. I must say that in some cases it is necessary to perform the operation on the contrary, i.e. pour concrete over a wooden floor. Most often in this case, a concrete screed is made on wooden logs.
![]()
To do this, metal corners are attached to the side walls of the lag, onto which a reinforcing mesh is laid, while the space between the lags is covered with expanded clay. After that, pour the concrete mixture, which should be above the level of the lag.
This technology is used in old apartments in which wooden beams are used as floors.
Conclusion
Laying a wooden floor on top of the screed is an affordable operation that every home craftsman can perform. The only thing is that you must strictly observe the installation technology, and perform the work very carefully and accurately. In this case, the floor will be strong, smooth and durable ().
From the video in this article, you can get additional information on this topic.
Considered the best option for topcoat. It is environmentally friendly and warm material. But the installation of such floors on a concrete base is associated with certain difficulties. In order to technologically correctly perform this process, preliminary fixing of the log to the concrete floor is necessary. It is not recommended to lay wooden floors immediately on a concrete screed. Use as additional elements provides ventilation of floors and optimizes heat transfer in the apartment. Accordingly, the flooring will last much longer. Fixing the structure to the concrete floor is a simple process and does not require special knowledge and skills. We will familiarize you with all the subtleties of performing these works.
Preparation of materials and tools
Before starting work, you need to stock up on everything you need. Given that you have to work with wood and concrete, the list of necessary tools will be as follows:
- pencil;
- building level;
- roulette;
- hammer drill;
- woodworking devices (planer, hacksaw or circular saw);
- a screwdriver or a set of screwdrivers;
- fasteners (usually self-tapping screws, dowels and anchor bolts).

Having prepared the tools, you can go to the nearest construction market for material. Usually, sellers of lumber, in pursuit of personal profit, are advised to purchase expensive varieties of wood, referring to the reliability and long service life of the material. No need to succumb to this trick. Spruce, fir and pine may well be suitable for your purposes. Varieties of wood of category B or BC are quite suitable, the moisture content of the material should not exceed 18-20%. At the same time, the appearance, color and even evenness of the details do not play a big role. The only thing you should pay attention to is the absence of mold and traces of the bark beetle.
The lag section depends on the thickness of the flooring and insulation. Experts do not recommend using a beam with a cross section of less than 20 millimeters as a log.
Installation process
Immediately it is worth clarifying that the use of lag under the floors is advisable only in apartments with high ceilings. This technology of floor installation pretty much “steals” the height of the premises. So, the installation of the lag occurs according to the following scheme:
- or the concrete base is recommended to level. Otherwise, the elements will not be in the same horizontal plane. Accordingly, they will need to be aligned by inserting plates. This can lead to the fact that the floors in the apartment will creak.
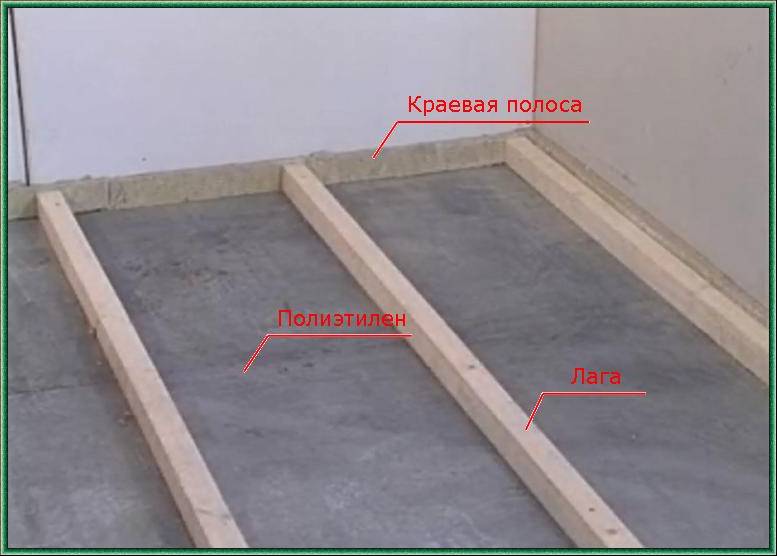
- On the base you need to lay a layer, or treat concrete with special mastic. In the first case, the use of soft materials should be avoided. Over time, they will sink, and the floor will no longer be reliable and monolithic. For the waterproofing layer, roofing material or a plastic film is perfect.
- Logs are treated with an antiseptic composition and are cut according to the size of the room.
- The installation process begins with the installation of a lag at two opposite walls. These elements are aligned using the building level and are immediately fixed to the concrete floor. Then between the established lags a string is stretched. It will serve as a guide for the installation of the remaining elements.

- The remaining lags are stacked. The distance between the elements depends on the thickness of the future.
- Between the lags a heater is filled up. Ecowool or roll materials can be used for this. In the second case, you need to mount the material as densely as possible without leaving gaps between the layers.
- A layer of vapor barrier spreads. This is a necessary condition for protecting the insulation from external influences. The vapor barrier can be attached with a stapler, the joints need to be glued with tape.
- You can lay a layer of plywood. This will serve as the basis for the installation of flooring.
In order for the floors to last for a long time, it is necessary to strictly observe the step between the laid parts. You can use the table for this.

When laying plywood bases on the logs, the distance between the elements can be increased.
Ways to install lag
There are four ways to install the log on a concrete base. After reviewing the above material, you can choose the best option for you.
Screws
This mounting scheme is considered the simplest and fastest. It looks like this: lags are laid in place and drilled through. Note that the drill must go through the wood and go deeper into the concrete coating. A dowel is driven into the hole and a self-tapping screw is twisted.
The recommended distance between fasteners can vary from 40 to 80 centimeters. The length of the fastener depends on the thickness of the log. Note that the self-tapping screw must go into the concrete no less than 50 mm. For better adhesion of the lag to the surface, it is recommended to use self-tapping screws with a thread not reaching the hat.
Anchors
This method is used not only for fastening elements, but also to give the structure additional strength. Pulling the anchor out of the concrete base is quite problematic, so it can be difficult to dismantle such a structure. Anchors are installed, like self-tapping screws, by drilling through holes. A locking element is inserted into the concrete, into which the bolt itself is screwed through the lag. To the head of the bolt "drowned" in the wood, the holes must first be countersinked.

Metal corner
Another way to install wooden elements on a concrete base. For this you will need a galvanized metal corner. The installation process looks like this: the corner is attached to the log with a self-tapping screw (the fastener must go into the tree at least 3 cm). Then, with a screw through the dowel, the corner is attached to the concrete coating.
Adjustable lags
This is the most expensive design, greatly simplifying the alignment of elements in the horizontal plane. It looks like this: plastic stands are built into wooden elements, which, in turn, are attached to the base of the floor. Alignment occurs with the help of an adjusting bolt. Using this design will allow you to perform work without prior alignment of the screed.

- Preparation of the base before laying the log
- Filling the base for logs in a country house
- Repair of the floor in the apartment
- Preparing the base for leveling
- How to prepare the bars?
- Laying support bars
- Adjustable Lag Installation
New technologies for laying the floor have not been able to displace logs from the construction, which are used as the basis for a wooden floor. The only drawback of the lag is that after their installation, the height of the room is significantly reduced, so it is more advisable to lay the lags in houses and apartments with high ceilings.
How to fix the lag to the concrete floor will be described below, but for now it’s worthwhile to talk about the advantages of such a floor covering device over others. In the space under it, you can put electric and other cables, as well as pipelines, for the installation of which you do not have to wall the walls. In addition, the floors on the logs are much warmer, not only because they are made of wood, but also because of the ability to lay insulation between the boards. In addition, additional soundproofing is provided. It is worth adding that the concrete base will be the most reliable support for the lathing of the wooden floor.
Preparation of the base before laying the log
Most residential buildings have concrete floors. To lay lags, they need only to be properly prepared. Of course, such work is rather laborious, but for the sake of the long service life of the wooden floor you should probably try.
Back to the table of contents
Filling the base for logs in a country house
Those who build houses on suburban areas can be advised not to lay logs on the ground, but to arrange them on concrete, because even compacted soil does not have the same strength as concrete floor. The easiest way to fill the concrete base in the perimeter of the strip foundation.
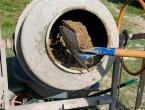
Concrete is poured onto a compacted and horizontally lined bed of sand, gravel or sand and gravel mix, the surface of which must be carefully smoothed to prevent breakthroughs of the waterproofing film laid on it. The overlap must be reinforced. To do this, reinforcement or rods are placed on top of the waterproofing. There should be a gap between the reinforcing grate and the backfill so that the reinforcement is thicker after pouring the concrete. After the concrete has completely solidified, which lasts about a month, a leveling screed is poured.
Back to the table of contents
Repair of the floor in the apartment
Those who are going to lay logs in apartments where concrete floors were arranged even during the construction of houses should also not “relax”. Most often, it turns out that repairing the base is inevitable. True, in some cases, it is possible to lay logs on a concrete floor without its exact alignment (one of the sections will be devoted to this method), but it is necessary to bring the overlap into a suitable form.
The primary task in the preparatory measures is to remove the old floor covering. After that, the previous screed is removed. Often she is in a dilapidated state. To remove it, you will need:

- hammer drill;
- construction hammer;
- shovel.
With a puncher or crowbar, the old screed is removed to a solid foundation. Noticeable protrusions also chip off from it. After cleaning construction debris, the cracks and depressions in the floor are closed with a solution. After that, the base should be thoroughly dried. In the future, all operations in apartments and in houses under construction are performed in the same way.
Back to the table of contents
Preparing the base for leveling
An antiseptic composition and a primer are applied to the dried base. After this, the overlap is processed with bituminous mastic in 2 layers. Mastic is also applied to the walls, to a height equal to the thickness of the future screed. Please note that the smoother you make the screed, the easier it will be for you to mount the logs, which can only be put on an ideal horizontal surface. Therefore, create a plane before filling it. This operation is simple, but requires patience and accuracy in markup. To execute it you need:
- masking cord;
- water level;
- dowel nails;
- roulette;
- synthetic threads;
- gypsum;
- beacon profiles.
Make a chalk mark on one of the walls (near the corner). Apply it at any height. Using the level, put a point on the opposite end of the wall. Pull the cord grated with chalk between the marks and, pulling it off, beat off a horizontal line on the wall. Make lines on other walls in the same way. Using a tape measure, determine the floor point that is least distant from the chalk line. Put a mark opposite this point on the wall, step back from it up 2-3 cm and put another mark. This will be the level of future screed.
Measure the distance between it and the Cretaceous line and put it near the corners of the walls of the mark. Pulling a cord between them, beat off the horizontal lines. Drive 3-4 dowel nails along each of them along each wall. Pull between the opposite surfaces of the thread.
The screed plane is ready. Now under it you can lay the beacons. They head from the far wall towards the entrance. Extreme profiles are located 15 cm from the walls. The distance between the beacons should be less than the rule length by 20 cm. The profiles are fixed to the base with gypsum cones, the step of which is 30 cm. After the gypsum has hardened, the solution is poured and leveled with the rule.
Back to the table of contents
How to prepare the bars?
While the screed is drying, start preparing the lag. For them, it is best to use coniferous wood. When buying, choose the most direct bars. Calculating their number, you need to consider:
- the distance between the walls of the room (it is better to abandon the installation of composite lags);
- the thickness of the floor covering, on which the distance between the beams depends.
The table shows the dependence of the step of the lag of the floor on its thickness.
The following table provides data on the dependence of the distance between the lags on the thickness of the floor from plywood or OSB.
It should be noted that plywood and OSB are superior in strength to materials made of wood.
After purchasing a log floor, they must be thoroughly dried.
Drying of the beams is carried out in a room closed from direct sunlight.
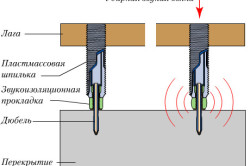
Figure 1. Diagram of an adjustable soundproof stand.
Drying time takes 10-12 days. Logs are laid at a certain distance from each other, between their rows (after 0.7-1 m) transverse bars are laid. Gradual drying of wood does not guarantee that all logs will leave their original shape, so they should be purchased with some margin.
The screed froze, and the logs dried out. You can proceed with their installation. In front of him, waterproofing from polyethylene or bitumen spreads on the floor. Bars are treated with antiseptics and a flame retardant. After that, their styling begins.