Concrete screed on cement-sand. Standard concrete floor screed, manufacturing technology and proportions. Preparation and proportions of cement-sand mortar
First you need to decide whether you will prepare the cement-sand mixture yourself or purchase ready-made and packaged products. If you are going to prepare the mixture yourself, then you need to purchase river sand ( cement-sand screed) and gravel fractions 5-10 ( concrete screed
), as well as cement. When preparing concrete or a cement-sand mixture for screed, we recommend that you follow clauses 8.3-cl. 8.5. SP 29.13330.2011:
".... 8.3. To level the surface of the underlying layer and cover the pipelines, as well as to create a slope on the ceiling, monolithic screeds must be provided from concrete of a class not lower than B12.5 or from cement-sand mortars based on dry building flooring mixtures on a cement binder with compressive strength not lower than 15 MPa.
8.4. For bulk polymer coatings, monolithic screeds should be provided from concrete of a class not lower than B15 or from cement-sand mortars from dry building flooring mixtures on a cement binder with a compressive strength of at least 20 MPa.
8.5. Screeds laid on an elastic heat and sound insulating layer shall be provided from concrete of a class not lower than B15 or from cement-sand mortars from dry building flooring mixtures on a cement binder with a compressive strength not lower than 20 MPa .... "
For floor screed you can also order factory concrete of the indicated brand, and for cement-sand screed you can buy ready-made dry sand-cement mix.
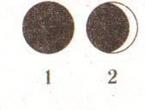
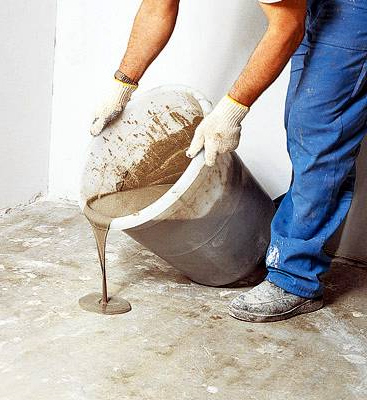
IMPORTANT: When buying a ready-mixed cement-sand mixture, pay attention to its color. A quality mixture should have a pure gray shade. If the mixture has shades of yellow, red or brown, then this is a sign of the presence in it of an excessive amount of sand mixed with clay, which ultimately affects the quality of the screed.
This cleans the floor and removes any scratches or scratches. While concrete and liquid screeds contain the same properties, there are notable differences between them and their use. Concrete is used for a wide range of projects, such as building construction, laying foundations, track and driveways, floors and more. Concrete is a relatively cheap material and is incredibly durable with low maintenance requirements.
The layer is used as the final layer for the floor, it is laid to prepare the installation of flooring, such as carpet, wood or tile. Liquid screed is quickly becoming the industry standard in leveling the floor. Some people refer to a liquid screed as a “self-leveling screed”. Thanks to our extensive knowledge and experience in the field of concreting and the production of liquid screeds, we have developed our liquid screed after deep development and vigorous testing.
High-quality cement-sand mixture |
And yet, do not add extra cement to a quality finished mixture. Contrary to your expectations, this will only worsen its properties and lead to loss of plasticity and mobility of the solution, which may result in cracking in the screed. In addition, the replacement of special plasticizers added to the solution with PVA glue also leads to the formation of cracks in the screed.
Before laying the finished screed mortar, it is necessary to carefully prepare the floor base, cleaning it of dust, delaminations, remove (if any) “ironing”, repair large cracks with a special thick cement mortar and, of course, insulate the building structures in contact with the floor using a damping tape ( walls, columns, pillars, technological issues).
Our goal was to ensure that it meets the specific needs of our customers and produces a high-quality product. Our fluid screed is self-sealing and eliminates the need to seal the floor before laying. The liquid screed is mounted on heating pipes and insulation, and the screed actively conducts heat evenly over the entire surface of the floor. One of the main advantages of a liquid screed is that it helps retain heat longer.
It is important to ensure sufficient drying time when laying the screed, otherwise cracking may occur. Like concrete, our liquid screed contains mixed cement, water, sand, limestone, dust, as well as more unique materials such as anti-track fibers, superplasticizer and anti-shrink agent.
 |
Reinforced cement-sand screed |
Screed reinforcement made according to calculations in the design documentation. But as a rule, metal nets (in cards or rolls) 3 mm thick are used for reinforcement. with cells 100x100 mm. and an overlap of at least 100 mm. Most often, the grid is arranged at the bottom of the screed, raising it to a level of 15-25 mm. from the bottom edge of the screed to create a protective concrete layer.
After the base of the floor is prepared for pouring screeds, you can proceed with the installation of beacons.
Reference:Lighthouses - guides along which the horizontal of the plane and the surface of the screed are aligned.
Final stage of screed installation
Installing a fluid screed can be less time-consuming than other floor sewing solutions, and using our own fluid screed can increase the thermal efficiency of your building, which will be more efficient both in terms of money and energy consumption.
Preparation of the base for pouring concrete screed
A liquid screed does not require the same depth as other floor screed mixes, which means that you also significantly reduce both weight and drying time! Aesthetically, you can usually tell the difference between a concrete and a fluid screed as it looks. Concrete has a rougher texture, and the liquid screed has a smoother finish. Liquid screed is traditionally used only as a finishing layer on interior floors, while concrete can be used for both internal and external flooring.
Correctly installed and securely fixed beacons are a guarantee that your screed will be flooded evenly and without elevation changes. Most often, metal profiles are used as beacons, which are installed either on tubercles specially prepared from cement or gypsum mortar, or mounted on technological adjustable racks and screws. In both cases, one problem is solved - to align and securely fix the guides along which, during the installation of the mortar, the surface of the screed is leveled using the rule. Accordingly, the beacons are installed parallel to each other with a distance allowing to support the rule-rail on them. Do not forget to install enclosing formwork in places of contact of different levels of floors.
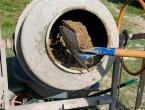
Once the lighthouses have been installed, you can proceed to monolithic work, which begins with solution preparation.
As we have already noted ready-mixed concrete or cement-sand mixture (DSP), you can order at the factory, or you can cook it yourself in portable concrete mixers. You can learn how to prepare mortars of the M150, M200 brand or concrete B15 in special SNiPs for building mixes and concrete. We suggest that you familiarize yourself with the table, which shows the proportions of the constituent concrete and DSP of the indicated grades of components.
It contains in a short form important basic knowledge, general technical information and a description of specific technical terms. Other minor changes relate to the marking of cement in accordance with the European Chemicals Law and the indication of future possible European technical approvals for cements instead of the generally accepted building inspection approvals used to date. Performance, hardening, hardening or frost resistance - change. Sometimes it is necessary to accept an unwanted change to another specific property. A prerequisite for the successful use of concrete impurities is the inclusion of accepted principles for mixing the composition and processing and subsequent processing of concrete. It should be designed in such a way that it can be processed using the provided procedures, i.e. h.: \u200b\u200bcan be transported, introduced and compacted. Hardened concrete must have the required properties of hardened concrete. The “Fresh Concrete” sheet of the cement-concrete industry contains information on all relevant aspects. The publication explains the importance of water content and the value of cements for water and their definition. Concrete by properties is concrete, used in practice. Since the lower the porosity and permeability, the denser the cement, the higher the resistance to external influences. Therefore, an early start, continuous and sufficiently long processing of concrete is necessary so that it actually achieves the desired properties in the near-surface areas due to its composition. This sheet describes the necessary measures. This requires proper and materially suitable construction, design, selection of building materials and construction. The basis for this requirement is the provisions on strength. In addition, there are brief comments on planning or specific use. Cracks cannot be fixed at all, but they are not fundamentally harmful. For reinforced concrete components subject to tension or bending, cracks are part of the principle of load transfer. Because before the reinforcing steel completely absorbs the tensile forces, the concrete is already torn. The width of the cracks should be limited only by a safe level, or the crack should end on schedule. They can be used immediately after hardening or can be coated. This brochure reports on all important facts. Authors: Wolfgang Schaefer, Dr. Additives and fiber. When mixing raw materials, fresh concrete is obtained. Cement and water form a cement paste. Reinforcing cement paste in fresh concrete to cement stone gives hardened concrete. Both fresh concrete and hardened concrete must meet certain requirements set forth in the instructions or required by the user. Distinguish between the measures that a particular manufacturer, usually a ready-made concrete plant, and the user can take. For a finished concrete plant, this is the adaptation of the concrete composition to the temperature and production of concrete by controlling the temperature of fresh concrete. On the construction side, this is the preparation of concreting, concrete processing and subsequent installation after installation, which has been carefully adapted to the construction project. They are found especially at an early age on the affected surfaces of the components. Fading can spontaneously disappear or become very stable over time, depending on the composition of concrete and local moisture conditions, and in rare cases can also accumulate in cortical deposits. They are a natural part. concrete structure and do not affect specifications component or design. If the occurrence of space is architecturally relevant, precautions must be addressed and planned at an early stage. The following are reasons for fading and prevention. Currently available for download only. Concreting is much easier because jitter is eliminated. At the same time, production requires a lot of experience and care. They can take on the support and compaction function as a monolithic structure in one. In this simple design, this is a decisive advantage over other prints. This brochure provides an overview of common joint sealing methods. In this section, the term pavement cement has also been replaced by pavement cement. . Cement screed - our high-quality cement screed is versatile and is one of the best building materials currently available on the market.
Proportions of components for the preparation of cement-sand mix and concrete
| Mark | Cement (M500) |
Sand (river) |
Gravel (fraction 5-10) |
Plasticizers | Water |
| M150 solution | 1 | 4 | --- | Instruction manual | 1,3-1,8 |
| Solution M200 | 1 | 3 | --- | Instruction manual | 1,0-1,4 |
| Concrete B15 | 1 | 2 | 5 | Instruction manual | 1,0-1,4 |
The prepared mixture must be laid within 1.5-2 hours. Therefore, be sure to determine the approximate time of the work shift, since the screed should be filled in a separate room at home at a time. Leaving part of the room with the screed laid, and part without it is impossible categorically. This is possible only when the screeds are installed in different rooms, and on the border of screeds of different levels or shared by the damper tape.
There are two types of screeds
Cement screed convinces primarily of its insensitivity to moisture and its high strength. Cement screed can be laid both outdoors and indoors. For any repairs and work on the new building, we can recommend our cement screed, which is characterized by a uniform surface structure. Even a composite screed, a floating screed or a screed on a separation layer can be easily made. Our highly qualified specialist will be happy to help you find the right screed for your construction project.
Freshly laid floor screed needs care. To do this, it is enough to moisturize it regularly during the first 3-6 days. After the screed is able to withstand the pedestrian load, and this usually occurs 48 hours after its installation, it is necessary to moisten its surface twice a day for 2 days. Also, two days after laying the screed, it is necessary to remove the beacons, and priming the gaps and recesses left from them and priming with a solution. After the first 2-3 days of the screed setting, it must be abundantly moistened with water and covered with plastic wrap for 10 days. If for some reason this cannot be done, it is recommended that the freshly screed be regularly moistened for another two weeks.
How can I determine whether the work on laying the screed is done in a quality manner?
To do this, you must first make a visual inspection of the surface of the screed. The surface of the screed should be uniform, gray in color. Then you pick up a long rule-level and check the flatness of the surface and its slope at various points on the floor surface. According to standard indicators, the gap between the rule and the surface of the screed should not exceed 4 mm. Deviation from the horizon should be no more than 0.2%.
Example: If we have a screed in a room 5 meters long, then the permissible height difference according to the standards is no more than 10 mm.
After checking the screed for homogeneity, horizontal and curvature, they begin to tap the screed over the entire surface of the floor. With a wooden hammer, gently tapping the surface of the screed, they listen to what sound it makes. The sound should be equally ringing and solid at all points of the tapped surface. If in some places it is "empty", then in these places it is very likely that the screed was detached from the underlying layer. This is a marriage. Builders, for this reason, have a specific expression " screed coils".
If you find excess deviations from the horizontal level or the curvature of the screed, then you can eliminate these flaws using self-leveling mixtures, following the instructions of the manufacturers of these products.
DIY floor leveling - photo
We offer a wide range of cementitious screeds, so we can offer the right product for every application. We will also be happy to arrange help for a local partner in laying screeds. Let us know without obligation. For high mechanical loads and, if there are no special requirements for sound and heat insulation, suitable composite screeds are suitable. An outstanding design feature is their full-blown and strong connection to the ground. Often they are used directly without further coating, then they are also called communal screeds.
To level the floor surface or to form the base of the floor on a dirt surface, a screed is made. Depending on the type of surface, its condition, the need for heat and sound insulation or the placement of additional structures, the process of surface preparation and the characteristics of the screed, as well as the choice of materials, differ. By choosing the right technology and materials for yourself, you can simply do the floor screed with your own hands. Now we will analyze all types of wet screed and methods for its formation in stages. You can learn how to form a dry screed.
In principle, however, accommodation is possible. Composite screeds are used in residential construction as directly used floors in basements and adjoining rooms. If there is no load due to high loads, then the screed on the separation layer is preferable because it is cheaper. The structure of the composite screed is shown in cross section from bottom to top as follows. Coating for rough ceiling. . Performance Cement slurries are most often used for composite screeds. Compensation with plastic additives leads to so-called hard steel screeds.
Varieties of “wet” screeds
You can divide the floor screed device into four main types according to the features of surface preparation, its type and the formation of the final screed layer:
- Knitted. The most common option for an apartment where screed is performed on top of floor slabs.
- With a layer of waterproofing. This kind is necessary in the bathroom or in the kitchen, where there is constantly high humidity and there is a chance of getting a large amount of water on the floor. The screed layer is thus formed over the laid waterproofing material.
- With the presence of a layer of thermal insulation. By default, a thermal insulation layer is necessary when forming a screed over the ground. Also, if necessary, it can be used in apartments and houses for fencing from the basement or other unheated rooms.
- With a final bulk coating. In this case, after performing the main screed, a thin layer of liquid solution is used, which independently forms a perfectly smooth surface. This is necessary to level the floor under the laminate or linoleum, which are sensitive to any, even small, bumps. It can also be formed using a more liquid solution, which, under the force of gravity, will independently distribute over the entire surface. However, to use separately only bulk floors without the formation of the main screed is not recommended.
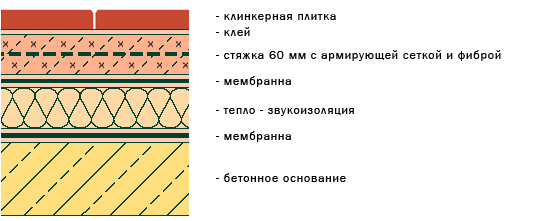
An example of a standard floor screed device:
Composite screeds with other binders, such as magnesia, anhydrite or mastic asphalt, have only a small market share. Screed thickness does not have a significant effect on the bearing capacity of composite screeds. The reason for this is the distribution of static and dynamic forces on earth. Typical layer thicknesses are from 25 to 30 mm for cement screeds and 20 mm for mastic asphalt screeds. The screed mixture is introduced in a rigid and plastic consistency, distributed and compacted.
Installation of additional equipment
Depending on the intended use, abrasion or smoothing is required after removal. To ensure perfect bonding, the substrate must have a rough, porous surface and be clean, which is best subjected to steam blasting. Fresh, fresh, screed can be applied to the concrete surface from 1 to 2 days. In principle, a later installation is possible, a prerequisite is a wet floor.
How thick should the “right” screed be?
In any case, you should determine the total thickness of the screed and, specifically, using cement or concrete screed, which must be formed on the floor. All this depends on the type of overlap or the required value of thermal insulation and strength. A restriction can be both the load of the screed on the floor, because it is the main technological part of the design, and the resulting load on the screed itself. In the case of the construction of a new building, you must adhere to the instructions of the construction project. If you need to make a floor screed with your own hands to replace the old one, then you should observe the characteristics of the old one and in acceptable standards improve it by adding thermal insulation or installing underfloor heating if necessary.
The thickness of the solution layer can vary from 25 to 80 mm, but not less, otherwise the screed will subsequently turn out to be brittle and fragile.
At this stage, it is important to correctly calculate the amount of required materials. For a layer over 30 mm, it is better to use concrete based on sand, gravel, crushed stone, etc., only it can form such a thick layer and at the same time not crack. In any case, it is better to familiarize yourself with the phased implementation of the screed using all types for the most complete understanding of the process.
Stages of preparation for the main work
Basic surface preparation
The old screed is dismantled, especially if it already has cracks or damaged places. Floor slabs are cleaned of dirt and dust and primed. The primer is poured directly onto the floor and evened over the entire surface with a roller or brushes. After that, it will take up to 5 hours before the primer dries.
For soil bases, a layer of expanded clay or sand is formed on a base cleared of vegetation. Expanded clay is still subsequently also covered with a layer of sand. The thickness of the sand layer should be at least 10 cm. The entire surface is compacted. If necessary, the layers of the embankment are wetted with water for normal shrinkage. Using an expanded clay embankment, an uneven floor screed will come out much cheaper and easier, because less solution will be used.
At the same stage, installation and wiring of drainage pipes or water pipes is carried out, if the work is carried out in the bathroom or toilet. Subsequent layers of thermal insulation and waterproofing are laid with bypassing all communications.
Thermal insulation
For this, either an expanded clay mound or dense polystyrene foam slabs are used. The main thing is that the insulation is tough. Expanded clay has slightly worse heat and sound insulation parameters, but is more durable and reliable. In most cases, it is enough. To form a screed on a soil surface, warming is mandatory. For floor slabs in the apartment - only if necessary.
Waterproofing
The waterproofing layer may be stacked strips of thick film or ruberoid rolls. Strips of material are overlapped by about 10-15 cm and with an approach of 10 cm to the walls, including the outgoing water supply pipes and sewer drains, if any. In the latter case, it is necessary to additionally coat pipes and thermal insulation material with sealant or mastic to a level higher than the solution will be poured. Waterproofing is necessary for rooms such as a bathtub, toilet and kitchen. In other rooms, it can be formed only to protect the apartment on the ground floor from the cold and damp basement.
Read more about waterproofing floors and walls using the example of a bathroom.
Reinforcement
The screed layer is reinforced with reinforcement only in cases of laying on the ground. It is carried out by forming a grid of welded reinforcement or a special steel mesh. As an alternative, a fibrin additive, which is a fibrous material made of metal or plastic, can be added to a solution of concrete or cement.
Installation of additional equipment
If you need to install a system of underfloor heating or distribute wiring, then this is done at this stage. All work is carried out taking into account technological features. Pipes for or heating elements for electric underfloor heating are laid and fixed.
Screed process
Lighthouse
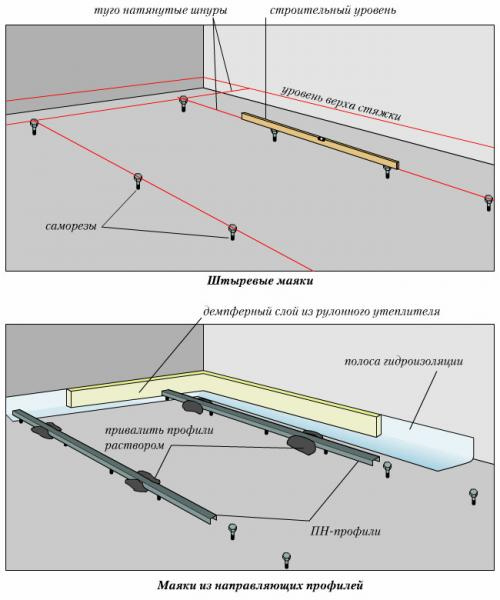
Beacon placement examples (clickable)
In order for the concrete or cement floor screed to turn out smooth, a beacon system is used. These are special rails that need to be distributed across the floor. In order to install a beacon rail, the same solution should be used, which will subsequently form the screed itself. Stepping back from the wall by 20 cm, screws are screwed into the floor in a straight line parallel to the wall. Screw caps should be at the same level as a result. This can be checked using the manual or laser level. The height at which the caps are located should be lower than the resulting screed layer by 6 or 10 mm, depending on the height of the rails. The distance between the screws is best chosen within 60-80 cm so that the beacons installed on them do not subsequently bend.
The next line with screws should be placed already at a distance of 1-1.5 m from the previous one (the distance should be slightly less than the length of the rule by which a layer of concrete or cement mortar will be leveled). The solution is applied to the screws and a beacon rail is installed on top of it. Having finally put all the rails in one plane in level, it is necessary to wait until the solution on which they lie is completely seized and dried.
Use of beacons is necessary in any case. Even if the area of \u200b\u200bthe room in which the work is carried out is very small, at least two lighthouses should be strengthened, with the help of which leveling will be carried out.
Video: a good way to set up beacons
Preparation of mortar for screed
To do this, you can use ready-made mixtures for leveling the floor, which have recently appeared in large quantities on sale with various properties and features. To prepare them, you must strictly adhere to the instructions for use.
For a conventional cement-sand screed, the proportions of cement and sand are 1: 3. For better strength, you can add a bag of adhesive mixture for tiles. As a result, the resulting solution should not spread much, but should not be dry.
Concrete is best ordered ready-made, it will come out both more economically and better. Moreover, the concrete screed is justified only for private houses and the first floors of apartment buildings, so there should be no problems with delivery. It is rare when you need to perform a thick screed on the upper floors of a building on top of floor slabs.
Floor filling
It is best if the entire process of filling the floor in one room is completed in one go. It should be borne in mind that the cement mortar sets in about 40-60 minutes, after which it can no longer be properly leveled, and even more so you can not add water to it. This will significantly affect the quality of the result.
The first is the strip between the beacons on the far side of the door. Using the rule, the surface is leveled. In this case, the rule rests against the lighthouses and with small movements from side to side is carried out along them. If necessary, the solution is added in places where it is not enough. Then you can fill in the following bands between the beacons. After leveling the next section, you should pierce a layer of the solution in some places with wire. This is necessary to release air that could get into the thickness of the solution during distribution and alignment.
Only after a few hours, or even a day in the case of using ordinary cement-sand mortar, you can safely stand on the surface of the screed. It is best to use a sheet of chipboard or drywall to form a support island. At this time, it is possible to remove the beacons from the screed layer and seal the resulting grooves with the solution. The surface in these places is leveled with a trowel or grout.
Video: screed pouring example
Grinding
When using concrete as a pouring material, it should be polished after it has completely dried. This will help level the surface and prepare it for any floor covering. Alignment of the concrete floor can only be done in places where irregularities are especially noticeable using a grinding wheel mounted on an angle grinder (grinder).
Actions for bulk floor
If you need a bulk floor, then in order to get a perfectly smooth surface, you must form another surface layer of the solution. To do this, either a sufficiently liquid cement-sand mortar is prepared in a ratio of 1: 2.5, or special mixtures are used. To the cement-sand mortar, you can add a little starting putty.
Previously, the entire floor area must be additionally primed and moistened. The solution is poured over the entire surface of the room immediately and leveled with a mop or rule. Distributing it evenly to the floor gives time for complete drying. In this case, under gravity and due to its fluidity, the solution independently acquires a perfectly flat surface.
Particular care should be taken to finish the alignment of the solution under the walls, because in these places, if it does not fit into the wall surface, a small tubercle will form, which will subsequently dry out by the wave. A perfectly flat surface is perfect for installation of such floor coverings as: linoleum, laminate, carpet, carpet tiles, etc., since small roughnesses of the rough screed can appear through them.
Points to consider
- The surface of the screed completely ready for further work will be only a week or two after its formation. It will be a mistake to start subsequent work until the screed is completely dry.
- In no case can you accelerate the drying process of the solution. Indeed, the main strength of concrete and cement mortar does not occur due to the evaporation of water, but due to adhesion and adhesion. On the contrary, if during the first day you can see that the surface is too dry, it is better to moisten it with a roller. For the concrete or cement screed to dry completely, it will take a whole month, during which the room should be protected from drafts and mechanical damage. But the result is a reliable and durable screed that can last the longest possible operational period. If such a long waiting time is not suitable for any reason, then it is better to pay attention to the formation of a screed in a semi-dry or dry way. The latter can be completed in one day and immediately continue the formation of the finish flooring. Just keep in mind that dry screed has a number of limitations and features in terms of operation and determination of places of use.
- In the case of drafts or excessive heating, the concrete may become covered with a network of small cracks. By their nature and in view of the drying of the mortar, starting from the lower layers, such cracks for the most part appear along the entire depth of the screed. As a result, this will affect the strength and moisture resistance of the layer and lead to its early destruction. If nevertheless cracks appeared, they should be immediately moistened and wiped with a solution. In order to protect yourself from cracking or any other damage to the surface of the screed, specialized dry mixes can be used instead of cement, which additionally contain special additives that give concrete greater viscosity, strength and moisture resistance.