Lubrication of skis at home. How to lubricate wooden skis? Do-it-yourself wooden ski grease
It is believed that, unlike plastic, wooden tourist skis absolutely do not need any additional lubrication. They say that resin perfectly protects them from water, the necessary slip is provided by a paraffin primer, and self-made know-how - silver ointment - protects from sticking. This is not entirely true. If the ski trip will take place at low temperatures and many long ascents are expected on the route, then the return of wooden skis can bring a lot of trouble, exhausting hikers, reducing the speed of the group.
So, within the framework of this article, we will talk about how to lubricate wooden skis and how this procedure is carried out. We bring to your attention instructions for lubricating wooden skis. By default, it is assumed that the skis are pre-tarred and after that they stood at least a day warm.
Useful articles:
Lubrication of wooden skis: applying the “base”
 It is necessary to prime the ski in advance, at home. To do this, either special paraffin is used, or a paraffin (not stearin) candle, preferably a tablet candle in a metal cup (it is also called floating), because. more paraffin content.
- Before lubricating wooden skis with ointment, rub them with stronger paraffin, iron them using something hot for this, for example, or a spatula heated on the stove.
- Remove the cycles (with a special scraper) that have not absorbed excess melted, smeared paraffin.
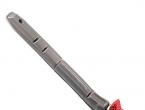
- Wax your ski regularly, before each outing on the snow. This is a good remedy for podlip. But it’s even better to use a “self-made” silver ointment for this.
"Serebryanka" adheres well to skis without preheating (unlike paraffin). Since it is gray, you can clearly see where the skis are smeared with it. Another advantage of the "silver" is the resistance to abrasion by snow.
Ointment for wooden skis "silver". Recipe.

- Melt the paraffin or paraffin candle in a metal container that you don't mind throwing away (tin can).
- Pour, stirring, aluminum powder (silver), in a ratio of 1: 2. Add a little bit of ski resin left over from ski resin. It will soften the ointment, which is especially important if you smear your skis with it in the cold.
- Pour the mixture into a pre-prepared plastic cup, holding the temperature of boiling water. After half an hour - an hour the ointment will harden.
- Cut off the glass with scissors. Ready!
When solidified, the aluminum will settle a little and on the one hand the bar will turn out to be more gray. This part of it can be used in warm weather, and the reverse (with the resulting notch) - during frost.
Useful articles:
June 23, 2015
Skiing is a useful and interesting activity for the whole family. But it’s not enough just to buy skis, they need competent care, including lubrication. Lubrication of sports equipment made of plastic is different from the same process with wood. This article is about how to properly lubricate plastic skis.
Lubrication of skis "for slip"
The technology for lubricating plastic skis is different depending on how you are going to ski. In order for the skis to glide, they are lubricated with hot paraffin, and to keep them on the snow, with a special ointment. How to smear plastic skis for better glide?
How to lubricate plastic skis "on hold"
The ski lubrication technology "on hold" differs from that described above. In order for the skis to have a tighter grip on the snow cover, they are lubricated as follows:

Related videos
Ointments for skis
You have already learned how to properly lubricate plastic skis, but what kind of ointment should be used for this? Ski treatment products are conventional, low-fluorine and high-fluoride. Ordinary ointment is suitable if the air humidity during skiing does not exceed 55%. In other cases, it is better to use products containing fluorine in one quantity or another. Such ointments are more expensive, but the skis glide much better after they are applied. Be aware that if the temperature of the iron exceeds the expected limit, harmful substances will be released from the ointment containing fluoride. Lubricate inventory in a respirator or in a well-ventilated area.  If you are wondering “how to lubricate plastic skis”, then go straight to the sports equipment store, where sales assistants will select the ointment that suits you.
Even the highest quality ointment will not bring your skis in order if you do not familiarize yourself with the basic rules of lubrication:
- Apply lubricant only at room temperature. Skis must be kept clean and dry.
- If you use a solid ointment, always apply it in several layers. Moreover, each layer must be ground separately, and the skis must be cooled after the procedure. If the temperature outside the window is up to -15 ° C, then 15 minutes will be enough for cooling, but if it is frosty outside, cool the skis longer.
- How to lubricate plastic skis? For classic skiing, apply ointment or wax to the front and back of the skis, treat the surface in the middle with a compound for holding on the snow.
 Want to know if you've lubricated your inventory correctly? Take a ski trip at least a couple of kilometers long. How to lubricate plastic skis in case of failure? If your skis roll too poorly, use a harder wax. If they are too slippery, use a higher temperature ointment.
Lubrication secrets of skis
In order for skiing to bring you only joy, you must clearly know how to properly lubricate plastic skis. In this case, as in any other, there are tricks and secrets.
Always check the weather forecast on the day of skiing. If the weather was sunny in the morning, and by the afternoon they promise an increase in the level of humidity and fog, be sure to take an extra bottle of ski wax with you. This will allow you to adjust the lubrication on the spot. Not sure which ski wax to choose? Get a special notebook and write down in it all the nuances of the "behavior" of the skis after using this or that tool. This will allow you to find the perfect ointment!
Be sure to keep ski wax out of the reach of children and make sure that moisture does not get into it. Otherwise, the tool will simply be damaged. On the street, close the tube immediately after use. 
Proper storage of plastic skis
Careful processing and lubrication is required for skis at least once a year. Of course, professional skiers and people who rent equipment at resorts do this much more often. As a rule, this is done after each ride. For an ordinary person who prefers to take a leisurely ski trip on a weekend, this is useless.
How to properly lubricate plastic skis, you already understood. But how to properly store them? Be sure to store them lubricated, tied in two places (at the heel and toe). Place your skis in a dry place at room temperature!
And now, actually, the letter of our reader.You have reached the page of questions and answers following the results of the article “How to smear cross-country skis for a beginner”? It so happened that after reading this article, our readers began to ask me a variety of questions not only about lubrication, but also about skis and ski poles. I try to answer all these questions within my competence. In search of an answer, sometimes I call the best experts in the country in their field, and they help me give you the right answer. If you still have questions after reading this article and all the answers, please email me. [email protected] I will definitely answer them.
Chief editor of the magazine "Skiing",
Master of Sports of the USSR in cross-country skiing
Hello! I am 60 years old, the second year I go skiing. I have cross-country wooden skis, they do not slip at all. I read a lot of articles and did not find anything specific, how to make them slippery?
Tatyana Pavlovna, Primorsky Territory, Dalnerechensky District.
Tatyana Pavlovna, with your question, in fact, you are addressing all of us in the 60s and 70s of the last century, when there were no plastic skis and people rode (and ran in competitions) exclusively on wooden skis. Still, today most of humanity has chosen plastic.
However, since the question has been asked, how do you get wooden skis to glide? You will need to do two things with them: desired(done once every two or three years) and mandatory(completed before each skating).
DESIRABLE
Wooden skis need to be tarred along the entire length. This is done so that the skis are saturated with water-repellent resin and swell less from moisture on the track. Remember that the more the ski swells with moisture, the slower it glides. You will need resin to impregnate wooden skis. For example, this one is produced by Ray.
You may not be able to find ski resin for sale. Then we can recommend several other simple ways: use resin-containing holding ointments or paraffins.
So, the resin is applied over the entire ski with a brush and then heated with a burner to the point of boiling, gurgling on the surface of the ski. This process is delicate - if you underheat the ointment, it will not become liquid, will not boil on the surface of the ski and, accordingly, will not be absorbed into the wood. If you overheat the ointment, then the wood of the sliding surface of the ski may begin to char, rendering it unusable. In general, as soon as the ointment begins to bubble, you must immediately shift the burner to another part of the ski. This procedure must be done at least several times so that the resin (ointment, paraffin) is absorbed deeper into the pores of the wood. Here's how to tar wooden skis. Yes, and do not be afraid if the resin suddenly flares up - there is nothing to worry about - just quickly slam the fire with a rag (prepare the rag in advance).
MANDATORY
Before a ski trip, wooden skis must be lubricated with a holding ointment along the entire length. The name of the ointment, the brand itself are not so important - it is much more important that you have a complete set of these ointments (for example, four or five). Here is a good set of ointments from the same Ray company.

Or - here's a set of four jars from Ski Go:

Or - from three jars from Zet:

So, suppose you have a temperature of minus 5 degrees outside your window. Let's try to "smear" with ski ointments, for example, VISTI.

At this temperature, you will need to put blue ointment minus 2 - minus 8 on the middle part of the ski (under the block), and put colder ointment minus 5 - minus 12 on the ends of the ski.

And here is how you will need to be smeared at minus 12:

And like this - at minus one degree:

Along the way, the question inevitably arises: is it possible to ride wooden skis at zero or positive temperatures? The answer is yes, but it involves much more fuss and inconvenience.
Firstly, you should keep in mind that at zero or above zero temperatures, wooden skis swell quite quickly from moisture and begin to glide not a little, but much worse than plastic ones. And secondly, they will need to be smeared under the block with either klisters (this is an ointment that resembles condensed milk in its consistency) or semi-solid ointments (something like slightly hardened honey). And after skiing, do not forget that you will also need to remove this ointment from the ski (for example, with cotton wool or a rag soaked in gasoline). That is, there is definitely more fuss with lubrication in positive weather ... But if you are determined to ride wooden skis in positive weather, then nothing is impossible. You will just need to buy, in addition to one of the budget sets of ointments listed above, a set of semi-solid ("medical") or liquid (klisters) ointments.
Modern houses have a lot of wood. Of course, there used to be more. But even now there are a lot of wooden parts in the house (knife handles, window-sills, cutting boards, door handles, door jambs, handicrafts, and so on). Like any other element, wood can age and deteriorate. Therefore, the question How to treat wood with oil to make it last longer? - this is a topical issue not only in antiquity (when wood was the main building material), but also now.
How to treat wood with oil? Well, you probably know that there are building supermarkets. And in construction supermarkets there are entire departments with varnishes, stains and other wood impregnations. But on our site, we prefer methods, so this article is mainly about what you can do to process wood yourself.
So let's get started. And let's start with the simplest way to process wood - impregnation with simple vegetable oil.
Impregnation of wood with vegetable oil is one of the oldest ways to process it. The main purpose of wood impregnation with oil is to increase the moisture protection of wooden products. So, wood itself is hydrophilic (loves water) and swells when water enters. Then it dries. Then it swells. And after a few cycles (depending on the amount of water, air humidity, etc.), the wood cracks. Which does not improve either its mechanical or its aesthetic properties.
Whereas impregnating wood with oil
- a) closes the smallest pores of wood, polymerizing on the surface;
- b) makes large pores and the entire surface hydrophobic (water-repellent).
Well, besides this, the impregnation of wood with oil increases its aesthetics, showing the structure of the tree. What looks prettier than when the tree structure is not visible.
How oil works: vegetable oils, remaining in the air, under the influence of oxygen, light and heat, thicken, and in a thin layer they “dry out” (polymerize), turning into a semi-solid mass. This characteristic property is inherent in those vegetable oils, which include polyunsaturated fatty acids, in particular linoleic and linolenic. The more of them, the greater the drying ability of the oil. Oils differ in the highest content of glycerides of linolenic and linoleic acids:
- linen
- hemp.
Sunflower oil works worse because it has fewer polyunsaturated fatty acids.
Let's see how this is applied in practice.

How can linseed oil be used in wood processing.
For example, you have a wooden knife handle that you want to process. The easiest way is to pick up the oil and rub the handle well. Wait for absorption. Rub again. And so on - until you get bored. In principle, this is enough for the household level. But if you want more (for example, increased resistance to water), then you can do the following.
The knife handle (or other product) should be placed in linseed oil for several days. To do this, the knife can be placed in a jar with a screw-on lid with a thin slot for the blade, which, after placing the knife in it, must be hermetically sealed.
When the wood of the cutting is soaked through, it must be wiped with a smooth, dry rag. After that, let it dry completely for a few weeks. When the oil evaporates, the surface is oxidized and polymerized, which after some time becomes strong and elastic.
As you noticed, the period is several weeks for the oil to dry when processing wood.
Why? Everything is very simple.
Vegetable oil in its natural form, even with a high content of linolenic acid, oxidizes extremely slowly. To reduce the drying time, the oil is subjected to heat treatment with the addition of metal compounds (desiccants) to its composition. When heated in oil, substances that slow down hardening decompose, and metal salts provide faster oxidation.
Thus we get drying oils- compositions that, within 6-36 hours (depending on the composition, preparation technology and additives used) after being applied to the surface, turn into a hard, elastic film. As you understand, the use of drying oil significantly speeds up the process. Drying oil can be bought at any store.
But, as we said at the beginning, we are trying to find ways to process wood ourselves. So let's go further.
The first way to accelerate the polymerization of oil. You can buy both linseed oil and desiccant at the art store. Well, to provide heat treatment with the help of friction - rub the oil well into a wooden product for, say, half an hour.
It's easy and simple 🙂 Although it's cheaper - it must be considered ...
Second way to speed up the drying and polymerization of the oil is to dilute the oil by half with turpentine. Turpentine is a mixture of essential oils, which are obtained by extraction from the resins of coniferous trees (i.e., from resin).
In the case of dilution with turpentine, the drying time is reduced to 1-2 weeks. Also keep in mind that turpentine is a toxic substance (see Wikipedia on this) and should not be allowed to come into contact with the skin, let alone breathe or drink it.
If you want not only to speed up the drying of the treated product, but to change its color, then you can dilute the oil by half with tar. Tar is a product of dry distillation of wood (wood is burned without air access). That is, this is the same turpentine, only in a coarser and much less toxic form.
Linseed oil can also be mixed with wax. Wax dissolves in linseed oil (if you do this by heating, then use a water bath and keep a fire extinguisher handy), and when treating wood with this composition, you not only oil, but also wax the surface. This enhances the water-repellent properties of wood many times over.
Naturally, the wood processing methods do not end there. But we will finish for now, leaving other ways for next time.
Happy woodworking!

To enjoy a ski trip, you need to carefully prepare the skis by applying the appropriate lubricant. How to oil your skis at home- more on that later.
Why oil your skis
If earlier the range of skis was limited only to wooden models, today you can buy plastic and combined ones. However, this does not detract from the merits of wooden skis, and their use is still relevant.
The need for lubrication of wooden skis is partly due to the characteristics of the material: the tree must be protected from moisture. Also, a lubricated surface glides better and reduces friction with snow.
Therefore, if you are wondering whether it is necessary to lubricate the skis, we give you a definite answer: yes, this procedure is required. And it concerns not only wooden, but also plastic products.
What you need to lubricate skis
"Paraffin skis" - this is the definition that skiers came up with for this procedure. Use of paraffin a is one of the most famous ways to lubricate skis in home conditions.
You will need:
Iron. Every skiing professional has a special ski lubrication iron that makes the procedure twice as fast. The economy option is an ordinary old household iron. Attention: we need an old iron, which has not been used for ironing for a long time. It is highly likely that after lubricating the skis, it will be impossible for them to iron their clothes.
Working surface. You need a large table on which you can put your skis. Do not forget to cover unnecessary oilcloth or newspapers so as not to spoil the surface.
Paraffin lubricant for skis. Go to a sports store - there you will be offered several types of paraffin lubricant to choose from. The price range is very wide; for amateur skiing, an inexpensive universal lubricant with a wide temperature range is suitable. The economy option is an ordinary paraffin candle, which you will probably find at home.
Ski brushes. Ideal if you buy a set of 3 brushes: thin metal, medium hard nylon and soft nylon. But you can get by with a brush made of nylon of medium hardness. Attention: ordinary household brushes can be too hard, and there is a risk that you will damage the surface of the skis.
Scrapers. They are used to remove excess wax and clean the groove.
So, everything is ready. Skis, clean and dry, lie on the table, iron and lubricant at the ready. Now let's move on to the process itself.

How to oil wooden skis yourself
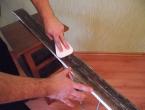
The first step is to prepare the skis. Obviously, they must be clean and dry. Take a brush and lightly clean the surface of dirt.
Next, we take the lubricant and rub it on the sliding surface of the skis. By the way, many of them end there. However, keep in mind that without exposure to high temperatures, the lubricant will not be absorbed, and it will last for a maximum of 2-4 km.
Now turn on the iron to the lowest temperature and carefully iron the surface of the ski. The grease will melt and soak into the wood. If you don’t know how to properly lubricate your skis, or you are doing it yourself for the first time, then keep in mind: holding the iron in one place for a long time is not worth it, 2-3 seconds will suffice.
After that, take a break. Let the skis cool to room temperature. Then pick up a scraper and remove excess from the surface and groove.
That's all. You know how to lubricate classic skis with paraffin. As you can see, the process is not the most difficult, but you will have to tinker.
How often should skis be oiled?
Do not forget that you need to lubricate your skis regularly, at least 3 times per season. Thanks to this, you will be comfortable riding them, and the life of the skis will increase several times.
How do you know when it's time to oil your skis? A sure guide will be the appearance of a light gray coating on the surface of the skis.
If you do not want to devote too much time to this procedure, contact a specialized workshop in your city or a sports store. Now various paste-like lubricants are sold, lubricants in cans, which can be used even outside the home while skiing.