We repair the electric kettle ourselves. How to repair an electric kettle at home How to connect a kettle directly without a button
Recently, a kettle broke in our office. On the same day we bought a new one, because... There is nothing to do at work without a kettle. Nowadays, a kettle is not expensive, but, nevertheless, I want to tell you how you can bring an electric kettle to life without special knowledge and tools.
Unfortunately, I didn't take any photos because I didn't intend to write an article on this topic. In general, let's take a little break from design.
Our kettle was from BOSH. The company is good, but to disassemble such a kettle you need to sweat a lot. After 5 minutes of analysis, I realized that I needed to ask Yandex for help. Fortunately, I found a video on YouTube of the analysis of exactly such a kettle.
Somehow, but I almost took it apart, although it was only possible to unscrew the lower part where the heating element is installed.
To repair a kettle, like any other electrical appliance, you need to know its design.

The main elements of the kettle are: heating element, thermostat, button, signal lamp.
Always try to improvise. If you don’t know something, don’t be afraid. First of all, check all contact connections. Then you need to check the heating element.
If the heating element in your kettle burns out, then you can throw the kettle in the trash.
In my case, it was necessary to remove the bottom part of the kettle to get to the heating element. To find out the condition of the heating element we need a multimeter.
If the heating element is working properly, then its resistance will be about 25 Ohms. The resistance depends on the power of the kettle:
R= U 2 /P=220 2 /2000=24.2 Ohm
If your kettle stops working, it is most likely due to the failure of the button with the contact. You can try cleaning the contacts. I didn’t succeed - I broke it, perhaps it was already broken.
Due to the fact that at home it is practically impossible to find a spare button or another element of the kettle, we have only one way to bring the electric kettle back to life - to connect the heating element directly to the power wire.
One wire that comes from the network will already be connected to the heating element, and the second wire needs to be reconnected bypassing the button. I think it will not be difficult for you to connect the two necessary wires.
I got it all quite primitive:

This scheme has more disadvantages than advantages, but the kettle works if used correctly and does not require complete disassembly of the kettle, and this is very important.
These simple steps can extend the life of your kettle. Of course, using such a kettle is not entirely convenient, since you need to control its operation.
Only after I assembled the kettle did I realize that it was possible to leave the thermostat and lamp in the circuit, removing the contact with the button from the circuit.
Ideally, it should have turned out like this:

If the design of the kettle is repairable, then this will not be difficult. In the case of BOSH, it is better not to try, because... it will be very difficult to assemble it, and some of the latches will simply break during disassembly.
I was fiddling with the kettle not because I wanted to fix it. I was just wondering, and if an old thing can be revived, then it’s also nice.
Don't rush to throw away household appliances. Perhaps minimal repairs will extend the service life
Electrical equipment today is in every home, because it allows a person to live in full conditions and save time. Such installations include electric kettles. They heat up water in a matter of minutes. But during operation, a variety of breakdowns occur.
Not everyone is ready to take such a device to a specialist, because it also needs to be found. But how to fix an electric kettle with your own hands? This is not a difficult process if a person knows how to hold a screwdriver. Before you start repairs, you need to understand what the main reasons are, as well as what breakdowns occur.
Please note that all equipment must always be handled carefully - this will increase its service life. It is better to purchase high-quality products from well-known manufacturers.
Types of breakdowns
Damages may be the following:
- Leaks.
- The device does not turn on.
- The lid is broken.
These are the main problems with which people come to the workshop. But you can restore the integrity of the entire unit with your own hands. To do this, you should take into account any available instructions and begin work. If you have no experience, you cannot skip more than one point, because we are talking about an electric unit. Statistics show that more than half of all people throw away a broken kettle, but you can always try to restore the device.
Principle of operation
To understand how to repair an electric kettle, you need to know its operating system. To heat the water, a special electrical device is built into the bottom. Depending on the manufacturer, its shape varies. For fastening, special bushings and metal screws are used, which are firmly fixed to a waterproof seal.

The shape of such protective elements is varied. This could be a washer, gasket, bushing. When this element breaks its seal, water begins to leak. To fix such a breakdown, you simply need to replace this component. They are sold in the store. To avoid mistakes, you will have to take the kettle with you or remove this element.
Before you repair an electric kettle, it is worth understanding the principle of operation. When water heats up, steam is formed - this is a natural process. It, in turn, exits through specially formed outlets. And in this process, the operating principle of the entire unit is important. Because if it approaches the biometric plate, then the toggle switch is automatically activated. The device turns off.

What's on the kettle:
- Indicator and button block. Thanks to this addition, you can know what the current water temperature is and create suitable working conditions.
- Unique water level sensor. It shows the level and is capable of transmitting data to the application.
- Two heaters. They are necessary for spot heating and full heating.
These are the features that every kettle has. Although today manufacturers, trying to occupy a larger part of the market, are coming up with other possibilities to make the operation of the unit more convenient. In addition, there is always a protective element. Its main task is to turn off the kettle when the water boils. It also triggers if, by mistake, the element was started without liquid. Thus, the manufacturer tries to protect users from accidents (for example, from fire of the device).
Statistics show that it is empty kettles that often end up being switched on. It was accidents that prompted manufacturers to create such additional conditions for the operation of the entire device. Therefore, modern kettles are considered to be completely safe.
What needs to be checked before repair?
Before repairing an electric kettle, it is worth checking the obvious things:

When these reasons have been verified, but the unit has not started working, it is worth continuing work. If an electric kettle breaks, how to fix it? To avoid creating a more complex breakdown, you need to follow simple steps.
What actions should be taken?
It is important to disassemble the unit, but without making mistakes and remembering the entire procedure. What you have to do:
- The base of the kettle is removed - this is the lid.
- After this, you need to remove all fasteners. They are on the handle of the kettle. It is necessary to unscrew it carefully so that the thread remains in the same form. They often get damaged, so sometimes you have to buy new ones.
- The handle is carefully removed from the kettle. Sometimes you have to make an effort. But it is important not to break the installation itself.
- Before repairing the Tiffany electric kettle, you need to remove the rocker arm. It is made of the same material as the unit itself. This is an important component of the entire structure.
- Next you need to go over the entire surface and remove any plastic components that interfere with disassembly.
- The kettle switch is removed.
- Next, you need to visually evaluate the biometric plate so that there is no damage to it. If something is detected, then this is the reason why the kettle is not working. If there are no defects, you will have to continue troubleshooting.

Once you have disassembled the entire installation and have not found the problem, you need to continue searching.
What should you pay attention to?
Sometimes the kettle starts to work slowly and the water heats up ineffectively. The difference may occur over time, but why is this observed? The fact is that scale accumulates on the heating element, and its performance is reduced several times. If an electric kettle breaks, how to fix it? The problem can be solved using special cleaning products. They are sold in stores. After purchase, you should refer to the instructions, because they are different for each device model.
The fact is that everyone creates anti-scale products according to their own principle. The application process will depend on the composition inside. Therefore, when answering the question of how to fix a broken electric kettle, you should not exclude such a situation as the formation of plaque. Some people try to clean it with a sharp object, but this solution will not bring the desired result and can damage the heating coil.
Another unexpected thing that is not a breakdown is the open lid. If it is not tightly fixed, the kettle will not turn on. The work does not start because the steam that comes through the hole may be blocked. This happens rarely, but it does happen. And the hole becomes clogged with a coating of lime. The steam has no way to the biometric plate and nothing happens.
Nuances
How to fix an electric kettle if it doesn't turn on? This is not uncommon, and it is worth understanding why this occurs. It also happens that the switch simply fails. The reason is ambiguous - this happens because the signal to the biometric plate is blocked. The simplest reason is that the pusher is locked in the wrong position. But the plate itself breaks down due to damage.
But is it possible to repair an electric kettle with such a breakdown? Here everything is more complicated, and not everyone can cope with the task. It should be noted that when the switch fails, only a professional can help. You will need to not only perform all actions correctly, but also have the necessary spare parts.

The actions of a professional may be as follows: he will have to change the element. The procedure itself is not complicated, but you need to find where the switch itself is located. How to fix the switch of an electric kettle? Most often this toggle switch is located on the handle. If this is so, it will be easy to deal with, but if not, then it will not be so easy. The difficulty is that the kettle has many different fasteners.
In addition to the bolts, there are also some parts - they will also have to be removed and then installed in place. To prevent the procedure from being delayed, you will have to remove the handle and cover of the unit itself. These steps will help answer many questions and make the recovery procedure simple.
How to fix the problem?
There are statistics by which experts can tell what problems arise most often. If the electric kettle does not turn on, how to fix it? Since it is the switch that is constantly in operation, it fails for many people. Do you really have to go to the master? Not at all. The recovery procedure itself has several stages.
It is important to inspect the part. If it is cracked, then without replacing it it will not be possible to return the unit to operation. Finding such parts is not always easy, because many people simply get rid of such a kettle and do not repair it. This means there is not much demand for parts.
Sometimes the button just gets stuck. There is a special spring here. It stretches, and after that it will be difficult to work with starting the unit. When analyzed, it will become clear what the main reason is. Replacing it is not that difficult. But when something is done incorrectly, even after assembly the situation does not return to normal.
How to fix the lid of an electric kettle?
Sometimes it simply stops closing, which is why the device does not turn on. We need to figure out why this happens. It happens that scale accumulates on the rim, and it becomes a barrier between the lid and the kettle. In this situation, you will have to wash it using special means. The principle of action of such substances is the same. Required:
- Pour into a kettle, pour water.
- Boil.
- Drain.
If nothing has changed, you will have to repeat the procedure. As all the experts say, it is better to prevent this than to restore it afterwards. Preventive cleaning procedures will not be superfluous and can extend the service life of the electrical device. There is no big difference in how to repair a Vitek electric kettle or any other. Also, the instruction manual always contains a lot of useful information. The manufacturer tries to talk about weak points and suggest how to solve some problems in the work.
Please note that when using special chemicals for descaling, you should remember safety precautions. Such products are very aggressive, so work is performed with rubber gloves. In addition, the kettle itself must be thoroughly rinsed with running water. The inner surface must be completely rid of any remnants of this chemical.

Presence of leaks
This is another problem that many people face. The kettle is used frequently, so water leaks are inevitable. But how to understand this problem? First it is important to understand why this happens:
- One of the common reasons is a violation of the sealing of the plastic case. Another reason is the failure of the water indicator. You need to give it a visual assessment. Often small cracks are simply visible. It is from them that water begins to ooze.
- Another reason is when the heating element loses its original rigidity. If an electric kettle leaks, how to fix it? Everyone can solve this problem themselves by simply tightening the existing fasteners.
- Sometimes leaks occur due to wear of the seal. How to fix an electric kettle if it is leaking? In this situation, even tightening all the fasteners will not help remove the damage. In this case, you cannot heat the water, otherwise a short circuit may occur. Leaks will stop when this is the only solution that is relevant in the fight against this breakdown.
- The worst damage is the formation of holes in the bottom of the kettle. Not everyone is ready to understand that their kettle is seriously out of order. This happens for various reasons, but they all boil down to one thing - careless handling of the device. In such a situation, you definitely won’t be able to solve the problem yourself. There is no point in taking the device to a service center, since few technicians will restore such a device. Of course, if the kettle is expensive, then you can spend money on repairing it. But this is the case when it is better to buy a new one.

There are many reasons why an electrical appliance fails. Before you panic, you should eliminate basic operating errors.
Summing up
An electric kettle can be repaired in half of all cases. Each device has its own operating principles, and if they are violated, breakdown cannot be avoided. But if something happens (water leaks, the button sticks, does not turn off on its own), you should not continue to use the device. This can lead to short circuits, fire and other problems.
When starting a repair, you need to be prepared for any situation, which means preparing the necessary tools (screwdriver, soldering iron, knife, electrical tape). During the repair process, you should not make sudden movements, because the teapots are plastic and therefore fragile. When disassembling them, it is worth remembering the sequence of work, otherwise it will be difficult to assemble them again.
Household appliances for cooking are widely used by mankind, and the leader of them, perhaps, is the electric kettle. But the service life of any electrical appliance is not eternal, and there comes a time when you turn on the electric kettle, but the water does not heat up.
An electric kettle is one of the simplest household electrical appliances, and in many cases it is quite easy to repair it with your own hands, even without the skills of an electrical engineer.
Operating principle and electrical circuit of the electric kettle
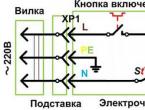
To repair an electric kettle, you need to know the principle of its operation. This is easy to do using an electrical diagram. Although there are many models of kettles, they are all assembled according to the same electrical circuit, regardless of appearance and capacity. There are some differences in the schemes, for example, the presence of a timer, but the basis of the scheme is still the same.

The electric kettle works as follows. Through the electrical plug, the mains voltage is supplied using a flexible cord to the XP1 contacts of the stand, on which the electric kettle is installed when heating water. At the base of the kettle there are mating contacts, which, when installed on the stand, are connected to the contacts on the stand.
Next, the current passes through thermal switch S1, which is turned on using the key on the kettle and turns off automatically when the water boils. The thermal protection switch S2 is not directly involved in the operation, it is always on and only triggers if the body overheats, if the kettle is turned on without water. From the switches, voltage is supplied to the terminals of a tubular electric heater, abbreviated as heating element. The HL lamp serves to indicate the on state.
Arrangement of electric kettle components
If the voltage of the electrical appliance differs from 220 V, for example, a 12 V car electric kettle, then you can calculate the current consumption using an online calculator.
Attention! When repairing an electric kettle and any other household electrical appliances connected to the household network, extreme caution should be used. Touching an unprotected part of a person’s body to live wires and live parts can cause serious damage to health, including cardiac arrest. Don't forget to unplug the electric kettle from the socket!
How to disassemble an electric kettle
To accurately determine the cause and eliminate the malfunction, it is necessary to remove the cover from the bottom of the electric kettle. You may encounter some difficulties when removing the cover.

Usually the bottom cover is screwed to the base of the electric kettle with self-tapping screws with slots for a Phillips screwdriver. Sometimes the heads of the screws are recessed into the lid and covered with decorative plugs, which must be removed using a sharp object to be able to unscrew the screws.

Some manufacturers, to complicate the possibility of self-repair of the electric kettle, install all or one of the screws with a slot under the shaft of a two-pronged fork type screwdriver, which is called Spanne, as in this photograph. A screwdriver with a Spanne blade is rarely available to DIYers. If you do not have such a screwdriver, you can unscrew the screw using side cutters or tweezers.

If you can’t unscrew the screw in this way, then you need to make a special screwdriver with your own hands from a screwdriver with a flat blade, making a hole in the middle for the slot profile using a needle file.

During repairs, it sometimes happens that it is impossible to unscrew a plastic screw. In this case, you can try to move the screw from its place in the direction of tightening. If it moves, it will unscrew easily.
If you can’t unscrew the screw this way, you need to heat it with a soldering iron, applying the tip to the head. When heated, the plastic around the thread of the screw will soften, and it will easily unscrew. The same technology is used to disassemble the electric kettle stand.

In some models of electric kettles, after unscrewing the screws, the lid can be easily removed. But more often it is additionally secured around the entire perimeter with latches. There are models in which the lid is held in place only by latches.
At the top of the photo there is a lid with a latch, and at the bottom the base of the electric kettle with a square hole into which the latch fits when the lid is installed. On the right side of the base, one of the kettle handle latches is caught in the frame.

To release the latches, you have to carefully insert the flat blade of a screwdriver into different places at the junction of the cover and the body in search of the location of the latch.

When it is possible to remove one of the latches from the hole, the screwdriver is left in this place and the second screwdriver is used to look for the next latch located nearby. When a couple of latches are released, the rest are no longer clamped, and the cover can be easily removed. Often, removing the cover from the base is more difficult than troubleshooting.
The electric kettle does not heat water, the power indicator light is on
This behavior is the easiest way to determine the malfunction. As can be seen from the electrical diagram, the indicator light or backlight is connected directly to the terminals placed on the terminals of the heating element. Therefore, if the light is on and the kettle does not heat the water, it means that the cause of the malfunction lies in poor contact of the terminals with the terminals of the heating element or a break in the spiral inside it.
Restoring contact in slip-on terminals
After removing the lid from the base of the kettle and inspecting the connecting contacts, the cause of the breakdown became obvious. One of the contacts of the heating element was burnt, and the terminal was practically hanging in the air.

On the second terminal of the heating element, the terminal was also in poor condition, the whole thing turned black along with the contact. It’s amazing how an electric kettle could heat water before.

The terminal was completely burned out, and its further use was impossible. Although the contact on the heating element output was partially burnt, it did not require spring properties, and the remaining part after cleaning will ensure good contact.
There was no new terminal available and I had to use a used terminal. If there is nowhere to get a new terminal, then you can use the terminal from the stand, which is used to connect the ground wire (yellow-green wire). In the vast majority of apartments, the electrical wiring does not have a grounding conductor, and removing this terminal will not affect the operation of the kettle.

Before using the old terminal, it must be freed from the wires pressed into it. To do this, you need to clamp the terminal as in the photo with small pliers and a faceted awl, pressing and rotating it, push the antennae apart. The remaining wires will fall out and the terminal will be ready for reuse.

In the photo on the left you can see two wires that were pressed into the terminal. The supply voltage is supplied through a thick multi-core wire, and through a thin single-core wire it is supplied to a neon light bulb or water lighting system. These wires need to be inserted into the terminal shank and crimped with pliers, after which the terminal will be ready for connection to the heating element.

In the next step, you need to clean the contact on the terminal of the heating element on both sides until it shines using fine sandpaper. After this, all that remains is to put the terminal on this contact, and reliable electrical contact will be ensured.

After removing the terminal from the second contact, it turned out that both the terminal itself and the contact on the heating element were in good condition, only covered with oxide. After removing the black deposit from the contact using sandpaper, it became as good as new. Before putting the terminal on, it was slightly squeezed with pliers to make better contact. To remove oxides from the internal contacting surfaces of the terminal, it must be put on and removed several times onto the flat contact of the heating element.
At this point the repair can be considered complete. All that remains is, without replacing the bottom cover, pour water into the kettle to the minimum level and check its functionality. If the kettle does not heat the water, then most likely the heating element coil is broken, but there may be other reasons. In order to continue troubleshooting, you must first check the serviceability of the heating element. It is impossible to replace the heating element in an electric kettle, since it is welded to its base. This kettle cannot be repaired.
Restoring welded contacts
A backlit glass electric kettle, model Polaris PWK 1719CGL, was repaired; when turned on, the indicator light was on, but the water did not heat up. This malfunction indicated a broken contact at the connection point of the heating element leads.

The bottom cover was easily removed after unscrewing three screws. I liked the build quality. The assumption was confirmed; in this model, the connection to the electrical circuit was made in an unconventional way using slip-on terminals, but by spot welding a flat brass wire directly to the terminal of the heating element, one of which came off. Obviously, due to a technology violation, the conductor was poorly welded.

A slight mechanical impact with your hand on the second flat wire also caused it to fall off. Flat conductors were connected to the kettle's electrical circuit using slip-on terminals. They were removed and the wires were brought under the heating element terminals from below, as shown in the photo.


To ensure reliable contact of flat conductors with the terminals, they were pressed using metal strips with screws. The strips were taken from a Soviet power plug (the power cord was pressed against them) and a socket. When installing the slats, you need to make sure that they do not touch the metal body of the kettle.

Checking the electric kettle showed excellent performance. The boiling water was beautifully illuminated with blue light thanks to the LED lighting. I liked the design of the kettle, as well as the build quality. It’s a pity that the welding of the wires with the heating element leads turned out to be of poor quality. After the described repair, the electric kettle has been serving without fail for several years.
The electric kettle does not heat water, the power indicator does not light up
Like any other electrical appliance, an electric kettle is connected to the electrical network using a C6 type electrical plug, and the first thing to do if the kettle does not heat water is to make sure by external inspection that the plug is working and there is voltage in the socket. You can check the outlet by connecting any electrical appliance to it, for example, a table lamp.
Repair of the contact group of an electric kettle with a stand
Since voltage is supplied to the electric kettle through the stand by touching its contacts with the contacts of the current collector, it is necessary to check the contact pairs by external inspection for burning. A sign of contact failure in a contact pair appears at an early stage, and is manifested in the need to rotate the kettle on the stand so that it begins to heat the water. To prevent more serious consequences, you must immediately clean the contacts from carbon deposits.

To check, you need to turn the kettle over and inspect the condition of the slip rings. In the photo of this kettle, the inner ring on the left side is oxidized and burned out by several millimeters. To restore the contacted surface, it is enough to clean it until it shines with sandpaper. The ring contact has become poor due to insufficient pressure and oxidation of the contact located in the stand.

The flat contact plates in the contact assembly of the stand are secured with screws or hooks. To remove a plate secured with hooks, you must first remove the plastic insert with a screwdriver, and then, using an awl to pick up the hook, remove the plate.

After removing the cover from the stand and removing the contact plate from which current was supplied to the burnt ring, it became obvious that the end of the plate had bent and the contact pad was severely burned. Although the contact plate itself darkened a little due to heating, it did not lose its springy properties. After restoring the shape of the plate and sanding the surface of the contact pad, the plate was installed in its original place.

After installing the contact plate, before screwing the bottom onto the stand, you need to attach it to the bottom of the kettle and make sure that the contact plate moves a couple of millimeters, the contact fits in the center and does not cling to the walls of the stand. If everything is so, then you can screw the bottom to the stand and test the kettle after repair by boiling water in it.

But you're not always so lucky. There are contacts that are burnt to such an extent that stripping and straightening the plate no longer helps and you have to replace part of the plate with a new one. The photo on the left shows a contact that has burned almost to the ground. To replace, you need to cut off the plate with the contact to the first bend, clean the surface of the remaining plate until shiny with sandpaper and tin it with solder.

If you have an old electric kettle and the contacts in the stand are in good condition, then you can use them for repairs. A new replacement plate can also be taken from any powerful relay, for example RPU. There are even relays with silver contacts.

A plate of the required length is cut off from the relay, bent and tinned with solder. Next, the prepared contact plate is pressed against the pre-tinned stand plate, and the assembly is heated with a soldering iron. As a result, the contact element of the stand becomes no worse than new.

After installing the contacts in the stand, it is necessary, as after the previous repair, to check the accuracy of their positioning and freedom of movement. The photo shows a stand in which both contacts were replaced by soldering.
Repairing the electric kettle switch button
Another malfunction of electric kettles that I have encountered is the failure of the power control button into the handle.

The switch may not work due to a failure of the switching mechanism or a broken key, which is what happened with the kettle that I received for repair.

An autopsy showed that one of the axes with which the key is fixed in the handle body broke off. As you can see in the photo, the left axis is missing. It immediately seems that it is impossible to repair the key, but if you think about it, you can often find a way to restore the broken plastic part.

For repairs, a brace was bent from copper wire with a diameter of 2 mm, shown in the photograph. The bracket can be made from aluminum wire or even a nail. The diameter is selected based on the diameter of the axis seat in the kettle handle.


After the plastic hardened, the key was installed in the handle. The test showed that the button began to work no worse than before the breakdown. The electric kettle has been working flawlessly for over a year during daily use.
Electric kettle switch repair
The switch in an electric kettle is placed on the handle or at the base. The switch may not work due to burnt contacts, oxidation of the bimetallic disk (when water boils, water vapor enters it and over time the disk may rust), weakening of the flat spring, or wear of plastic parts.

The photo shows the electric kettle switch taken out of the handle. It is small in size and works on exactly the same principle as any wall switch. The only difference is that it can automatically turn off when the water boils.
By the way, the switch is a complete independent product and can be used for emergency shutdown of any electrical appliance when the temperature in the controlled area reaches more than 100°C.

Two stable switch positions are provided by a flat, arc-curved spring. In the photo on the left, the kettle switch is in the upper off position. On the right picture in the lower position when the electric kettle is turned on in water heating mode. The switch motor is connected to the contacts and thus, when transitioning from one stable state to another, closes or opens the contacts, thus turning the kettle on or off.
If the switch key does not lock, then the flat spring is to blame. It may lose elasticity or pop out. To restore the operation of the switch, it is enough to remove the flat spring and slightly increase the radius of its arc (straighten it).

A bimetallic disk is installed at the bottom of the switch. When heated by steam, the disk tongue moves upward, presses on the engine through the pusher and it moves to the upper stable position, opens the contacts, thereby turning off the power supply to the heating element.
Another malfunction that occurs in electric kettles is burnout of contacts in the switch. Contacts can be placed directly next to the power key or at a distance from it. In this case, the key is connected to the contacts using plastic rods.

In the photo on the left are the thermal protection contacts; they practically do not work and are always in perfect condition. On the right are the switch contacts, which open frequently and therefore always burn out. To clean them, you need to apply a strip of sandpaper to a narrow tool, for example, to the flat blade of a screwdriver, and remove the carbon deposits using a reciprocating motion. You can also use a needle file.
The handles of some models of electric kettles are equipped with closed-type switches and must be disassembled to clean the contacts.

To disassemble, you need to unscrew one screw and remove the switch from the handle. Next, press in the two small clips that are located on the sides of the switch and pull the part with the contacts out of the housing by the wires. The contacts will become accessible, and all that remains is to clean them in the manner described above. When disassembling, you should not lose the small pusher that connects the bimetallic plate to the moving part. Without it, the kettle will not turn off.
How to fix a water leak from an electric kettle
When repairing electric kettles, I had to deal with their leakage in the following places:
- at the junction of the measuring window with the body (repair is impractical, since sealing the crack with any adhesive composition gives a short-term effect);
- from a crack in a plastic case (cannot be repaired at home);
- at the junction of the metal disk bottom with the kettle flask.

Therefore, when purchasing a new electric kettle, to replace one that had failed due to a cracked body, I purchased a kettle with a glass bulb. I hoped that the electric kettle would never develop an irreparable leak, since the glass body, if handled carefully, is practically eternal, and a leak that occurs at the junction of the glass and the metal base can be successfully eliminated.
After several years of operation of the glass electric kettle, water began to appear on its contact pad after boiling water and dripped from the bottom. After each boiling, the puddle of water on the platform grew larger, and drops dripped from the bottom of the kettle more often. I had to start repairing it.
To determine the location of the water leak, it was necessary to disassemble the electric kettle by unscrewing two screws in the upper part of the handle and three self-tapping screws holding the lower part.

After disconnecting the bottom, to continue the repair, all that remains is to remove the plug terminals from the contacts of the heating element and the overheating protection system. To avoid problems during assembly, before removing the terminals, you should remember or sketch which of the terminals was put on which of the contacts.

The glass flask was secured to the bottom using silicone sealant. Upon careful examination of the joint, it was discovered that at the factory, as a result of a violation of the gluing technology, air bubbles had formed in several places in the silicone seam. Over time, water began to flow through one of them.
At first I wanted to seal only the water leaks with silicone, but I wasn’t sure that the leak wouldn’t appear in a new place. Therefore, it was decided to detach the glass flask from the bottom and glue them together again.
Using a knife blade, the silicone was cut to the maximum possible depth, both along the inside seam and on the outside. After this, the glass flask was separated from the bottom with little effort.

Next, the remaining old silicone was completely removed from the mating surfaces using a knife, and then the bonded surfaces were degreased with a solvent (acetone or alcohol will do). If you don’t have a solvent on hand, you can wash the surfaces with hot water and baking soda or laundry soap, and be sure to dry them before gluing. In addition, the surface of the metal bottom was cleaned to a shine using sandpaper.

The bottom of the kettle is made of stainless steel, which was tested using a neodymium magnet - it was not attracted to the bottom. But to my surprise, in the place where there was a leak, a hole appeared, shown in the photo. How a hole could form in stainless steel remains a mystery to me; perhaps it is a manufacturing defect.

A hole formed in the lower part of the interface between the glass bulb and the bottom and would be closed with sealant when gluing. But I decided to use an electric soldering iron to close the hole with soft solder.
Selecting a sealant for gluing
The surfaces of the electric kettle parts are prepared for gluing and the time has come to select a sealant that should be harmless to the human body, withstand temperatures up to +180°C and be elastic. Silicone sealants fully comply with the requirements.
The best of them is food-grade silicone adhesive-sealant RTV 118 Q from an American manufacturer, which can withstand temperatures up to +260°C. But the price of an 82 ml tube of this sealant is comparable to the cost of a new electric kettle.
There is a silicone sealant on the market from the Russian manufacturer VGO-1, which is also intended for sealing joints of hot and cold water supply pipes, withstanding temperatures up to +260°C. It is packaged in 300 ml tubes, but is also expensive and costs half the price of a kettle. To seal an electric kettle you need no more than 20 ml of silicone, so it is economically feasible to purchase a VGO-1 tube if you plan to use it for other work.
When choosing a silicone sealant, a reasonable question arose. Do manufacturers of electric kettles, and all of them are made regardless of the brand in China, use expensive food grade silicone? The answer is obvious; they use the cheapest sealant for sealing. Therefore, I came to the conclusion that the simplest silicone sealant, which does not contain any additives, is quite suitable. After boiling the water several times, even if the sealant contains contraindicated substances, they will all dissolve in the water and the silicone will become safe for the human body.

I had a universal construction silicone sealant on hand, Soudal, which I decided to use. It contains no additives and the sealant can withstand temperatures up to +180°C, which is quite sufficient for the heat resistance of the joint.
Gluing parts of an electric kettle
All that remains is to take the most important step - fill the bottom groove around the entire circumference with silicone sealant and insert a glass flask into it. Before applying sealant, surfaces must be degreased with alcohol or solvent.

The bottom area mating with the glass bulb was large, so after applying a strip of sealant I had to smear it with a screwdriver blade.

The glass flask was inserted into the groove in the bottom. The excess silicone squeezed out by the flask was removed using a rag soaked in a soap solution. Then the seams are smoothed with a finger dipped in soapy water to give a beautiful look. The picture shows the result of the work.
Checking the tightness of the connection of the kettle parts
Silicone in bulk usually hardens at room temperature at a rate of 2 mm per day. Taking into account the fact that the depth of the seam in the glued electric kettle was about 10 mm, we had to put it aside for a week, and only then carry out tests.

For testing, the electric kettle was connected to the power supply in disassembled form, directly, without a protection and control system. To do this, terminals were put on the ends of the cord with a plug, which were then put directly on the contacts of the heating element. The kettle was placed in the working position, water was poured into it and then the plug was inserted into the socket. It is unacceptable to leave the electric kettle unattended with this switching circuit.
According to the scheme, all Soviet electric kettles were previously connected directly and you had to wait until the water boiled and turn them off manually by removing the plug from the socket.

A few minutes later the water began to boil. There were no traces of water leaks; the silicone sealant reliably sealed the junction of the parts. To prevent accidental harmful impurities from getting into the water from the silicone seam, after assembling the kettle, three portions of water were boiled in it and completely replaced.
Attention! It is unacceptable to pour cold water into any heated electric kettle immediately after completely draining the boiled water from it. Due to thermal shock, microcracks may appear in the body of the kettle, from which water will begin to leak over time.
Let me note that this glass teapot, after the repair described above, has been serving flawlessly for more than three years. I didn't even have to clean the contacts.
How to clean an electric kettle from rust
Over time, due to rusty metal water pipes, despite the transparency of the water flowing from the tap and even its subsequent filtration, a coating of rust forms on the inner surface of the electric kettle. Many people don’t like it, and it clearly doesn’t bring health benefits.

The simplest and safest rust remover is citric acid, which is sold in any grocery store.

To remove rust, fill the electric kettle at least half full with water and pour one packet of citric acid into it.

Next, turn on the kettle and bring the water to a boil. Rusty marks can be removed from the top edges and lid using a brush dipped in boiling water. Water turns brown after boiling. If there are several kettles in the house, then water can be poured into each of them and boiled again.

After boiling, let the kettle cool, drain the rusty water and rinse with clean water. As you can see in the photo, the electric kettle began to look like new, citric acid completely dissolved the rust.
As you can see, repairing an electric kettle with your own hands is not at all difficult and, if desired, any home craftsman can do it.
Good afternoon dear readers! Electric kettles have become a part of our lives and are one of the main appliances in the kitchen. Modern electric kettles come in a variety of shapes. Their body can be made of either stainless steel or heat-resistant plastic.
Most electric kettles turn off automatically when the water boils; there are also outdated models with manual shutdown. Let's look at the principle of operation and repair of electric kettles with our own hands.
And so the water is heated in the kettle using a heating element. It is attached to the housing using a threaded sleeve, or metal nuts, or screws that press it to a waterproof base. In different models they are washers, gaskets or bushings. Due to their damage, water leaks often occur.
The most common are kettles with a disk heating element. When water boils, steam passes through a small hole onto a bimetallic plate, which bends and acts on the electric kettle switch.
Many kettles have special protection that will turn it off if the water boils over or if they forget to pour water into it before turning it on. In order to control the water level in kettles, special water level indicators are provided.
The heating element is connected to the network using a flexible cord or wire equipped with a connector block and another plug. In cordless kettles, the power connector block is located on a stand, which is connected to the network using a cord. You can take such a kettle without unplugging it from the network.

 For long-term operation of the kettle and safe operation, it must be filled with water correctly. Before filling it with water, first unplug it from the mains. Be sure to remove the cordless kettle from the stand.
If you don’t want to fill the kettle full, pour water into it so that the water completely covers the heating element. Pour at least a glass of water into a kettle with a disc heater. If there is not enough water, the heating element may burn out or the overheating protection will trip.
Overfilling the kettle is also strictly prohibited. This may cause burns when the water boils as water will splash out. Now let’s directly look at the malfunctions of our favorite electric kettles.
There are foreign particles in boiling water.
The appearance of foreign particles in boiling water is caused by damage to the mesh filter. It is installed in the vast majority of kettles and is designed to filter water from scale particles. Remove and inspect the filter. If it is damaged or clogged with scale, replace it with a new one.
The kettle heats up slowly.
The reason for this is most likely the formation of scale on the heating element. If scale is not removed in a timely manner, it may cause the heater to burn out. Therefore, it is necessary to remove scale from it as quickly as possible. There is one good descaling solution. To do this, purchase sachets of citric acid in the store. Pour water into the kettle, pour two bags of citric acid into it and let the water boil. If one boiling cycle is not enough to remove scale, boil the kettle several times in a row, allowing the water to cool slightly. Then drain the water, fill with clean water, and rinse well.
The kettle does not turn off.
1. The kettle lid is not closed properly. As a result, the steam does not fully affect the bimetallic plate. As a result, the plate cannot turn off the switch. Always close the lid tightly after filling the kettle.
2. The steam outlet is blocked. As a result of the formation of lime deposits, the steam outlet may become blocked and steam will not reach the bimetallic plate. This is especially true for older models of electric kettles, since they have a small hole. On modern ones it is larger, so it is much more difficult to clog it. Descale the kettle and clean the steam outlet.
3. The switch is faulty. Perhaps the switch itself is damaged or the bimetallic plate is not able to act on the switch. If the plate or pusher of the switch is damaged, it is ignited. The contacts of the switch may also become soldered and it will be constantly on. On classic-type kettles, it will be difficult to check the switch paired with a bimetallic plate, since they are structurally integral with the heater (heating element).
The switch on the kettle-jug is made as a separate part. It is mounted in the handle of the kettle. To check it, remove the casing from the handle and carefully inspect it. Check the status of its contacts. If they are burnt or the switch housing is tampered with, replace it with a new one. Using a tester, check the operation of the switch. If you find out that the switch is faulty, replace it and reassemble the kettle. Install all wires and parts in their places.
4. Kettle switch switches off too early . The cause of this malfunction is too sensitive protection or a faulty switch. This occurs as a result of the natural aging properties of the bimetallic strip. Replace the switch block with a new one. If you want to experiment, you can try changing the sensitivity of the bimetallic strip by bending it.
Also pay attention to the protection against overheating of the kettle. It is possible for contacts to open at temperatures below the boiling point of water. Opening of contacts must occur at a temperature of at least 110 degrees Celsius. In disk heaters it is pressed against the plate on the reverse side. You can completely remove it from the circuit and check the operation of the kettle. If the kettle turns off normally, then you can operate the kettle as is. But the main thing here is to remember that when the water boils, the kettle will not turn off and the heater will burn out! This could cause a fire!
Water is leaking from the kettle.
1. Water level indicator is faulty . Most likely the indicator has cracks or connections are leaking. Replace the indicator if it is removable.
2. The heating element is loose . Carefully tighten the nut and screws securing the heating element. Then fill the kettle with water and see if there is any leakage again.
3. The sealing gasket is damaged . By tightening the heating element, the leak will not be eliminated. Replace damaged gasket.
4. Damage to the kettle body. Dropping a plastic kettle on the floor or corroding a metal kettle can cause a leak. In this case, the kettle can no longer be restored. You'll have to buy a new one.
The kettle doesn't heat up at all.
1. The plug is faulty. Check the condition of the plug.
2. Break in the power cord. Using a tester, check the serviceability of the cord. If the wires are broken, replace them with a new one.
3. No power supply. Check the operation of other household appliances. If they do not work, perhaps the protection on the power panel has tripped (the circuit breaker has turned off, the fuses have blown).
4. The switch on the kettle does not stay in the on position. If the wear is severe, the switch will not turn on. Replace it.
5. The kettle's overheating protection has tripped. This can happen if the kettle continues to work after the water has boiled away. In this case, wait about 10 minutes. During this time it will cool down and turn on again.
6. The heating element is faulty. The formation of scale on the heating element significantly shortens its service life. Therefore, periodically clean it as it accumulates scale. Check it with a tester by applying probes to its terminals. It should indicate the presence of a circuit. The resistance of a working element should be about 20-30 Ohms. Replace the faulty element with a new one or buy a new kettle.
7. The kettle base is faulty. Remove the lid from the kettle stand and carefully inspect the wires and contact connections. If they are damaged or burnt, try cleaning and bending them. Carry out the same check of the contacts on the kettle itself, after first removing the cover on the bottom of the device. Reassemble the kettle and check its operation. Do-it-yourself electric kettle repair.
Often such an unpleasant situation arises as the kettle breaking down, and at the most inopportune moment. You can return a broken electrical appliance for repair, but this will take time. There may also be no available craftsmen and you will have to go without a kettle even longer. Or, perhaps, the cause of the failure could be a minor, easily fixable malfunction - then it would be a pity for the money wasted on repairs.
In general, why not try to do the repairs yourself, saving time and money? In this article we will provide recommendations that will help you identify a malfunction of the electric kettle and, if possible, eliminate it.
Electrical circuit and operating principle of an electric kettle
Most electric kettles, regardless of their cost, have a similar design. For clarity, here is a typical diagram of an electric kettle:

In order to troubleshoot an electric kettle, you need to understand the principle of its operation. Let us briefly describe the principle of operation of the above diagram, clearly showing all the elements of the scheme. Electricity from the household network flows through the plug and wire to the stand.

Next, the current flows from the stand to the kettle through a special contact part. Directly in the electric kettle, the grounding conductor is connected to the metal parts of the electric kettle. The neutral and phase conductors in a special unit are routed to terminals 1 and 2 (see diagram).

The same unit contains thermal protection - a thermal relay. The electrical diagram shows that the thermal relay is located in a phase conductor break.
Thermal protection serves to protect the kettle from damage if the kettle is turned on without water, or if the kettle lid is open and it works for a long time without automatically turning off. In normal mode, the thermal relay contact is in the closed state. It opens in case of excessive overheating for the above reasons.
The kettle power button allows you to manually turn the kettle on and off; it has a bimetallic plate, which, when a certain temperature is reached, turns off the button - that is, when the water boils, this button automatically turns off the electric kettle.
An indicator lamp or backlight is connected parallel to the terminals of the heating element of the kettle, depending on the design features of the electric kettle. This can be a regular lamp or LED backlight connected via a power driver.
So, let's start troubleshooting. First of all, you need to make sure that the reason for the kettle’s inoperability was not the activation of the above-described thermal protection. If there was an operation, then you need to wait until the protection returns to its original state - that is, until the contacts close. If the protection did not operate, we proceed to troubleshooting.
Don't rush to disassemble the kettle. Very often, the reason why the kettle does not heat is a lack of contact between the contact elements of the electric kettle and the stand or a broken contact in the power cord and plug.

Unscrew the screws on the stand and remove the cover. We take a multimeter and check the integrity of the cord from the plug to the contacts. In inexpensive electric kettles, in order to save money, the manufacturer uses a cord with a cross-section that is lower than the permissible load of the electric kettle.
For example, for a 2 kW kettle, a supply wire with a cross-section of 0.75 square meters is installed. mm, but in fact there may be an even smaller cross-section. During operation of the electric kettle, such a wire heats up, which can ultimately lead to its damage or burnout at the point of connection to the plug.
If the test shows a broken wire, then you need to purchase a new wire with a larger cross-section that matches the load of the kettle. For example, for a 2 kW kettle, a wire with a cross-section of 1-1.5 square meters will be sufficient. mm. You also need to purchase a new plug - a Euro plug designed for a load of 16 A will do.
Regardless of whether this is the reason why the kettle is not working at the moment, you should clean the contacts from carbon deposits and bend them a little, ensuring greater rigidity of contact with the electric kettle.

You should put the stand on the kettle, and pay attention to the contacts - they should bend when installing the kettle on the stand. If the contact does not press, it means it is loose and needs to be slightly bent upward. You cannot bend the contacts too much, so as not to move them out of place.
We assemble the stand and check the functionality of the electric kettle. If the kettle still does not work, then we proceed directly to troubleshooting inside the electric kettle.
Checking the functionality of the electric kettle heating element
A situation is possible when the indicator light (backlight) of the kettle lights up, but the kettle itself does not heat. In this case, there are two reasons - the heating element has burned out or the contact at the point of connection to the heating element has been broken. Remove the lid of the kettle by unscrewing several screws. Certain types of kettles, including the one discussed in this article, in addition to screws, have special grooves that hold the kettle lid.
Without experience in opening electrical appliances, you can damage the electric kettle, adding another one to the existing fault. To remove the cover, you need to bend it inward. Insert screwdrivers into the existing holes - first into holes 1 and 2, then into 3 and 4. By bending the cover inward, the grooves securing the cover come out and it is removed.

Let's go back to troubleshooting. We check the integrity of the circuits inside the kettle. Next, we check the integrity of the heating element by sliding the insulation to access the terminals. We set the multimeter in resistance measurement mode to the lowest limit - in this case 200 Ohms and measure the resistance of the heating element.

The device showed a resistance of 24.1 Ohms, which indicates the serviceability of the heating element. A burnt-out heating element shows a very high resistance - the multimeter will show several megohms. You can also check the heating element with a multimeter in dial mode.
If the heating element is working properly, the device will show a small voltage drop, and if the heating element is faulty, the device will show a break - one.
If there is a need to remove the terminals, then you should not rip them off, as is often done out of ignorance. When put back in place, a torn terminal will not ensure normal contact and will cause the kettle to fail next time.
The terminals are easily removed if you lightly press a sharp object into the hole, while simultaneously tightening it. If there is insulation on the terminal, it must be moved before removing the terminal.

A normally removed terminal is also easy to put back on. But in any case, it is necessary to check the reliability of the contact, and if the terminal is not put on tightly enough, then it should be removed and slightly pressed with pliers.
If the check shows that the heating element is faulty, then in this case it is necessary to think about whether it is advisable to purchase a new heating element. If the kettle is inexpensive, then installing a new heating element will cost the same as a new kettle.
If the heating element is working, but the kettle does not heat, then you should check the integrity of other circuits. It is necessary to check whether voltage is supplied from the contact part of the kettle to terminals 1 and 2.

We use a multimeter as shown in the photo. If one contact rings and the other does not, this indicates that the thermal relay contact, which was mentioned at the beginning of the article, is open. There are cases of spontaneous opening of protection contacts.
If there were no signs of overheating, the kettle did not turn on without water, but the thermal protection contact was open, then this indicates a malfunction of this element. You can try to bend the bimetallic plate (or plates, depending on the design of the electric kettle), ensuring the closure of the protection contact.

If the fault cannot be eliminated, it is recommended to completely replace the unit. It is also possible to turn on the circuit directly, without thermal protection, by forcibly closing the contacts in this node. But you should remember the consequences of the lack of thermal protection.
If you turn on the kettle without water and there is no protection, the heating element will heat up until it burns out. This may cause the kettle to catch fire. To avoid negative consequences, you should not operate the electric kettle without a thermal relay.
Another reason for the electric kettle not working may be a broken kettle power button. The inoperability of the button is determined by making a connection between terminal 1 and the output of heating element 3 (see diagram).
If, when the button is in the on position, the device shows a break between contacts 1 and 3, this indicates that the button is faulty or the integrity of the contact at the point of connection to the button is broken. It is necessary to open the part of the electric kettle body on the handle, gaining access to the button and, depending on the malfunction, restore the integrity of the contact or replace the button.
There are also certain types of electric kettles with built-in electronic devices that provide timer functions and adjust the temperature of water heating. If such a kettle malfunctions, you can check the components discussed in this article - heating elements, contacts, connecting conductors. But if the cause of its malfunction is the failure of electronic components, then to eliminate such a malfunction you need to have the appropriate skills and qualifications - therefore it is better to have such a kettle repaired by an experienced specialist.
See also on our website:
Andrey Povny