Drawings on wooden products. Wood carving lessons for beginners. Tools for woodworking, cutting blanks
Interested in wood carving for beginners, as a rule, people who do not have an artistic education. For them this art is a hobby. Due to the fact that the knowledge of most of these carvers is scattered, we will try to organize it. There is nothing complicated about wood carving itself. In Russia, this type of creativity has always been the main one. Even in stone processing, at first they used techniques that they had long been accustomed to.
Applying a pattern to a wooden piece
Today this type of art is of genuine interest, despite the fact that many skills are already being lost.
Generally speaking, wood carving can be classified as a plastic art. Traditionally, a distinction is made between relief and. A novice carver should first master the techniques of creating relief.
This technique has several thread options:

The list doesn't end there. There is still a lot left outside the scope. From the names you can understand how this or that performance technique differs. Classification is often complicated by the fact that our country is large. In different regions, the names of the same equipment may differ. However, the essence does not change, so we will outline the general working methods.
All beginning carvers are introduced to geometric carving. She is simple but beautiful. This type of carving is divided into three types:
- contour;
- triangular-notched;
- nail or staple.
For execution you will need:
- linden board;
- blunt knife;
- Ruler and pencil.
Drawings in the form of a geometric pattern are applied to the board. The carver can come up with his own or copy the one he likes. You don’t need to immediately take on complex elements if you don’t have the skills and your hand isn’t strong enough.
 Several ornaments for wood carving
 The board should be smooth. This surface is achieved through planing. Under no circumstances should you sand the surface with sandpaper. If abrasive particles remain in the fibers, they will prevent the threads from becoming clean and neat. In addition, the cutting edge of the knife will become dull faster.
Beginner carvers are recommended to choose hardwood to make geometric patterns.
They allow you to draw straight lines with a knife. Creating straight lines on softwood boards is much more difficult. So, the tip of the knife cuts vertically into the surface. Depth - 1.5-2 mm. Then the entire line is cut, pull the knife towards you. In this case, the blade tilts at an angle of 40°. Movements should be smooth. Note that you need to start and finish carving the line with the tip of the knife. 
Having made one line or cut, we make the next one. Only now the blade should be tilted in the opposite direction. The chips will separate, and a geometrically shaped depression will appear on the board. If the edges are clear and the surface is shiny, then everything was done correctly. Gradually we cut out the entire element, and then the entire ornament.
Read also
Hand carved wood furniture
It must be remembered that the knife goes easier along the fibers. When cutting through cross fibers, you have to apply more effort. Your hand may slip, and here you need to know the rules:
- work safety;
- organization of work space;
- tool preparation.
Carver's workplace
Work with sharp tools should be carried out at a workbench that meets all the requirements for stability and strength. If it is not possible to make such a workbench, you can limit yourself to a tabletop. It can be of any size, but the height should not be higher than the level of the carver’s belt.
The countertop should always be smooth and clean. Often, while working, the knife slips and hits the table. Jagged edges form and need to be removed. Professionals always monitor the condition of the workbench surface. They do not recommend hammering nails, chopping with an ax, or throwing a sharp tool onto a workbench, as all this can damage the countertop. The board on which the ornament is cut is carefully secured with clamps. Working on your knees or on an unstable table or stool should be avoided.
 An example of a carver's workplace
 The workbench for wood carving should be well lit. You can install it near a window. However, there is little daylight.
If there is only one light source, dull dark shadows appear, which interfere with making the carving clean. Therefore, 2-3 more lamps are installed above the table.
They should illuminate the work from different sides, especially if it is dark outside the window. The lamps must be installed above the carver's eyes. While working, your eyes feel strained. Even experienced craftsmen notice this. A novice carver gets tired faster, and high-quality lighting makes the working conditions comfortable and safe.
Tool requirements
Modern ones open up wide opportunities for artists. They are used successfully in wood processing. But we will consider a tool for manual work.
 A selection of chisels for wood carving
 After all, gaining the skill to work with such a tool is more important and more difficult.
The master always has in his arsenal:
- saw;
- hand drill or brace;
- plane;
- semicircular and flat chisels;
- knives of different sizes;
- small axe.
Many manufacturers have already taken care of cutters and are creating a variety of sets. It is impossible to unequivocally assess their quality and benefits. There is some debate about this. Let us only note that not a single professional master has such a set. All tools are purchased separately and finished by hand.
Wood carving is a real art, complex and fascinating, requiring a steady hand, patience and some artistic skills. With great inspiration and desire, it is quite possible to master basic simple techniques, and then take on more complex ones. The work will require special tools, with the help of which the carving process will be more comfortable.
A selection of wood carving sketches
The basic tools for wood carving also include sketches, templates and. It will be much easier and clearer for a beginner to navigate a ready-made diagram than to try to create sketches on their own.
Before creating a wooden craft, you need to decide on a design or pattern. On the Internet you can find many ready-made stencils for wood carving, from simple patterns to real paintings. You shouldn’t choose, and options of medium complexity can be simplified at first by removing overly complex elements.
When creating a sketch, you need to do the following:

Stencils can be made using a text editor, which allows you to develop your own sketches, as well as add or remove details from the finished drawing. All that remains is to enlarge the sketches to the desired scale and print them out.
Next, the paper patterns are attached to a wooden base and copied in any convenient way, for example using carbon paper. If the template will be used repeatedly, the finished paper stencil can be transferred to a thicker cardboard or other surface. 
Stencils for slotted carving are usually used more than once, so it is advisable to make them from dense material: cardboard, plywood, hardboard, plastic panels.
If you have to make a lot of sawn carved parts, for example, when decorating a house or to build a fence from a carved picket fence, you can use a milling machine.
For it, special ready-made stencils made of metal or polymers are used. Such a rigid template is installed on the workpiece and limits the movement of the machine strictly according to the pattern. Such templates are quite expensive, so it is not advisable to purchase them for single products.
Ornament (lat. ornamentum - decoration) is a pattern based on the repetition and alternation of its constituent elements; intended for decorating various objects. They arose from the need of people to decorate objects. Using a knife, chisel and other objects, you can cut out a beautiful ornament that will please the eye and even protect from evil forces. This was believed in ancient Rus', so each house was decorated with a certain pattern, for which the wood was carefully selected. Nowadays, carved objects are a kind of rarity, which you most often find in antique stores. In this article we will learn how to select the most suitable ornaments for wood carving.
There are thousands or millions of ornamental patterns, but you can also see the same elements that will symbolize different entities, such as “sacred” animals, such as a horse, a deer, a bird, which are depicted on the top of the product. The most common is a wavy pattern of ornaments or a pattern of “towns”, which from a distance are perceived as waves. Circles, drops of dew or rain are also depicted.
Various patterns are found in books or on the Internet. You can find a pattern to suit your taste and find out its symbol.

Variety of options
As they say, the facade is the face of the house, and the windows are its eyes. Therefore, now during house carving, great attention is paid to sketches of various ornaments. They must have the same length or thickness - a fairly important rule for beginners.
To perform these works you will need tools such as knives, chisels and other tools, and the best types of trees are pear, linden, cedar, alder, maple.
To carve a design, you need to draw it on the wood. There are a very large number of ways to transfer a picture to wood (carbon paper, tracing paper, double-sided tape) that will help a beginner draw a sketch clearly and evenly.
There are different sketches: those that are dedicated to animals and people, plants, or those that will be intertwined or, conversely, will be geometric. Geometric carving makes ordinary things extraordinary. As an example, we recommend looking at amazing works decorated with geometric carvings; they are also desirable for beginners. This ornament is used in contour carving; it consists of simple details, which are subsequently combined into a complex, voluminous (or not, as in contour carving) composition. The main element of geometric carving is a trihedron with straight, concave or convex sides, the edges of which form a pyramid. They also often depict lines, curved lines, dots, and spirals.


Well, another great way is stencils, which are good because these templates will be long-lasting if they are made of thick material (plastic, PVC sheets), which in the future should be covered with olive. A stencil is a device that is used to apply a large number of identical symbols or patterns to a specific surface. It especially helps beginners or craftsmen who are trying to complete very complex jobs.
There are several types of stencils: tape, ornamental for boards, towels, and also specialized for a specific tool.
The photo shows one example of a tape stencil:

There are a variety of ornament designs. They can be obtained from thematic magazines, newspapers and also video lessons. For example, artists from the Tatyanka center draw various ornaments quite accurately:


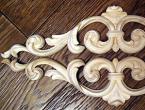
Very often you can find floral patterns in products.

It is made in stripes that are repeated one after another, but in general the appearance will be of a whole picture, with images of trees, flowers, and the addition of geometric carvings. This type of ornament is very popular and is found everywhere, in almost every product, except those that are only geometric.

You can find certain types of ornaments that are often used by craftsmen. Among them are varieties of oak, grapes, hops, ivy, which in ancient times carried meaning.
Ornament is the greatest value for the Russian people, because they believed that it contains a secret message to their followers. Russian ornament also has its own rules: the overall composition should look like sketches that go one after another. It is quite important to know the symbols, which elements scared away evil spirits, and which, on the contrary, drove the spirits towards themselves, what color symbolizes what, because very often you could find out the character of an unfamiliar girl just by looking at the ribbons on her wreath.
The Slavs believed that the ornament could protect and fulfill their desires. A picture that will show simple sketches of Russian ornaments:

They most often depicted infinity symbols, curly lines or simple geometric signs, symbols of the gods, various flowers, and droplets.


In pursuit of extravagance in design solutions, we sometimes go too far. Wood carving with a jigsaw is a real example of how you can surround yourself with beauty with the help of simple little things. Today, such decor is both an ancient craft and a current trend in the interior. Carving has artistic value, and therefore carved objects will only increase in price over time - the style will come back again and again.
Volumetric wooden patterns will decorate furniture and become the basis for wall panels, trim, headboards or screens. The editors of the publication offer to master carving techniques in a few clicks.
DIY wood carving with a jigsaw: where to start?
Tools and workplace preparation
Like any other activity, wood carving begins with preparing the workplace:
- choose a comfortable chair and a stable table;
- Pay special attention to good lighting. The table should be placed so that the light falls on the face, and for artificial lighting it is better to install a table lamp no more than 20 cm high at a distance comfortable for the eyes;
- everything you need should be at hand - a sketch, a board, tools.
To complete the ornament you will need:
- jigsaw (manual or electric);
- special machine for volumetric carving;
- plywood or wooden board;
- set of files;
- awl and chisel;
- drill;
- glue for gluing individual parts;
- brush;
- stain and varnish.
Good tools can be found from Proxxon, Arbortech, Ryobi, Pfeil, Dremel, Kirjes, Foredom.
Photo 4 - An alternative to the classic version - a painting - above the bedTree selection
Photo 5 - Carved decorative elements in a modern kitchenIMPORTANT! The most practical types of wood are linden, birch, alder, and aspen. They have the necessary properties of hardness and moisture content (8 ± 2%), which reduce the risk of cracking of the product.
It is better to prepare the wood in advance; it is very important to dry it thoroughly and sand the surface first. It should be plain, smooth, and free of knots. Coniferous species are practically not used. The size of the board depends on the size of the future product, but the thickness should be at least 6-8 mm and no more than 15-20 mm.
Photo 6 - Ethno in the interiorSketches, templates and stencils
Photo 7 - Wooden products are good for their versatility: wood is suitable for both an ascetic interior and ornate modernismPreparing a sketch is the first stage in creating wooden decor. A sketch is usually called a contour drawing of a future product.
Photo 8 - Appropriate tree in room designA stencil is a specialized template that is used to create three-dimensional ornaments and patterns. Samples with images for carving will help with markings. Stencils made of cardboard, three-layer plywood, PVC sheet can be used repeatedly, and for convenience it is better to sign or number them.
Photo 9 - Wood lace in the bedroom interiorFrom halves of one or several templates, ready-made combined ornaments are often created for the design of long interior elements.
Photo 10 - The color and texture of the product depends on the choice of breedHow to make the right template?
- select the appropriate sketch;
- Using a compass and ruler, we transfer the ornament onto cardboard or paper.
IMPORTANT! Check that all elements of the drawing are transferred accurately. Each element, pattern or ornament requires a separate template.
Wood carving with a jigsaw is carried out using strict technology. In addition to the standard manual one, they often use an electric jigsaw, special tables for volumetric carving, chisels, cutters, carpentry pipes and clamps, drills and grinders, and spoon cutters.
Photo 12 - Vintage carved door in bedroom designWood carving technology
Photo 13 - Carved element made using a jigsaw and chisel- Using ordinary black carbon paper and a pencil, the drawing is carefully transferred to the board. For convenience, the edges of the sketch can be secured with pushpins;
- insert the file into the jigsaw. Adjust the tension of the file;
IMPORTANT! Remember that too much or too little tension can cause the saw to break during operation.
- Using a jigsaw, we cut out the outline of the product along the previously outlined line. The jigsaw should move up and down without distortion, with light pressure so as not to damage the product and the tool itself. The position of the file during operation should be vertical. When making figured carvings, the product should be rotated, not the jigsaw itself;
- If the product contains internal parts, additional holes must be made. At this stage of the work you will need an awl and a jigsaw. In the middle of the part to be removed, you need to pierce a hole with an awl;
- Having loosened the upper clamp of the jigsaw, insert the file into the punctured hole;
- cut out the part of the picture to be removed;
- the product can be varnished, sanded or painted.
IMPORTANT! In house carvings, a special place is occupied by the decor of platbands - on windows, cornices, doors, which will ideally fit into the interior of a dacha or gazebo.
Wood carving: window trims in country style
Photo 15 - Design project Doorway to the Ozarks by Matthew MeersWood carving is often chosen for decorating private homes. House carving is used in exterior design - trim on doors or windows. Here a combination of different types of carving is possible - from slotted to relief.
Photo 16 - Wooden mural by Matthew Meers (A 26′ x 6 1/2′)The platbands cover the gap between the window frame and the opening. They protect the window from dust, precipitation, drafts and even external noise; can change the parameters of the house - make it visually higher or wider.
Photo 17 - Carving in minimalismIMPORTANT! Window trims should be designed in the same style, and the material should be resistant to precipitation. Linden or oak are best.
When designing platbands, you can’t do without sketches. Their long design requires careful handling, since it consists of many small parts. All these microelements must be identified and taken into account when carving - it is better to pre-mark the locations for the holes inside the pattern. In complex ornaments, they begin to cut out from the internal patterns, and then move on to the external ones.
Photo 18 - Carved elements in an eclectic interiorAnother way to apply a design to a workpiece is copying. You can also transfer the drawing using carbon paper. The sketch is secured with push pins. Use a pencil to trace the outline, which is copied onto the plywood.
Photo 19 - Clamp for fixing a wooden product. In the background: a set of chisels for making small indentations in wood and contour carvingsThe stencil for the platbands must be made of cardboard. It differs from standard stencils in that its dimensions are made immediately in full size. The finished template is attached to the board, the outline is outlined with a pencil. To create a holistic image of a door, carved rosettes are often used to help connect the trims.
Photo 20 - Fragment of a mirror frame. Window or door frames are cut using the same principle.Decorative trims are suitable for all door sizes, even the most non-standard ones. You can find a wooden frame in the catalogs of manufacturers Saloy, Fenster Baum, DoorWood.
Photo 21 - Carved window frame Photo 22 - Details using a chiselDisadvantages of carved frames: Photo 24 - If vases are used for their intended purpose, they must be soaked in drying oil or sunflower oil Photo 27 - Classic ornament
3D milling has a number of advantages:
- accuracy of image transmission;
- high production speed;
- lower cost compared to hand carving;
- the ability to create complex volumetric structures.
$ 3D machine: price for popular models
- Esfero 3D engraving and milling machine for 2D/3D processing and cutting of wood, plastic, plexiglass and even non-ferrous metal. Price: 490,000 rubles;
- milling and copying machine for volumetric thread MPWOOD tm. Price: 101,930 rub.
Master class: cutting with a jigsaw
Sketches for wood carving:
All photos from the article
As soon as wooden houses began to come into fashion again, the tendency to decorate their facades with all kinds of patterns and ornaments was revived. It has been used by people for many centuries and today, thanks to many technological innovations, it is becoming available to an increasing number of homeowners. Next, we will look at the main types of this direction and the nuances of do-it-yourself wood processing.

Varieties
It is worth noting that carved ornaments can decorate any wooden product, be it a box, a cornice, a gazebo or the facade of a residential building. So, if you want to experiment, then you don’t have to build a wooden building; for the first time, for example, a stair railing or the door of an old bedside table will be enough.
Through thread

This is a very common method of creating patterns, which is used most often in the process of decorating houses. It involves the complete end-to-end removal of some elements of the wooden surface. If previously all the necessary work was carried out mostly with chisels and cutters, now the task is performed mainly with a jigsaw.

Blind thread

When implementing this method of applying patterns, the cutters do not pass through the wooden canvas, which is most conveniently done with a milling cutter.
In turn, blind threads are also divided into several types:
- Flat-notched. In this case, there is a background plane, and the ornament goes deeper into it. Subspecies:
| Thread name | Description |
| Contour | The simplest execution instruction, which consists only of cutting out an even groove along the contour of the pattern that does not change its size. |
| Bracketed | Here the main element is no longer a groove, but a semicircular notch created by a chisel in two approaches. It is from such peculiar brackets that the ornament is created. |
| Geometric | In this case, there are two fragments: a triangular pyramid buried inside the canvas and a peg. First, the area to be treated is outlined, and then all excess is cut off according to the planned figure. |
| Black-lacquered | Unlike the first option, here the primary plane is first coated with black varnish, and only then the grooves are cut out, which results in an amazing play of light and shadow. |

- Relief. Here the fragments of the ornament are either on the same level with the background, or even higher than it. The method itself is similar to contour carving, but when it is implemented, the edges of the grooves change their shape, fitting into the overall design.

- Flat-relief. A very common way to decorate wood surfaces in architecture and applied arts. It consists in removing part of the material with a recess of several millimeters and at different angles. The result is a volumetric composition.

Sculptural carving

Of course, creating wooden sculptures from wood is the most complex type of processing. But with such works of art you can safely decorate not only your home, but also any place in your summer cottage.
Advice: after applying patterns to wood, be sure to treat it with antiseptics, especially when it comes to external work. This will significantly extend the service life of your masterpiece.
If you decide to decorate your own house or gazebo, then all of the above methods of applying patterns can be used in combination. But if this is the first time you’ve touched on such a task, then it’s better to stick to the simplest options.
First of all, it is worth considering wood carving patterns for beginners:

Wood selection

When choosing a suitable material, you should pay attention to the following factors:
- Texture features. So, if you want to create a complex ornament with a semantic load, then it is better to take a block with a weakly expressed wood pattern. And if you prefer to only emphasize the natural beauty of wood with your pattern, then opt for a clearly defined texture.
- Try to place the pattern itself along the fibers. This will make it easier to apply.
- Pay attention to wood damage caused by rotting or other diseases. Discard such samples immediately.
- It is also worth weeding out products with such defects as knots and pockets with tree sap.
Purpose
When decorating your home, remember the main functions performed by wooden patterns:
- Decoration of appearance. This is the main purpose. It is noteworthy that in ancient times many ornaments had a specific mystical meaning and served as amulets.
- Protection from direct sunlight. A visor with a through thread does an excellent job of dispersing light.
- Fencing of dangerous places. A balcony or staircase railing can become much more attractive thanks to this finishing.

Preparation
Once you have chosen the appropriate block or board and decided on the carving method, prepare the work area. You may need a vice or clamps, a pencil, a jigsaw, a chisel and a router.

Next, use a pencil to draw a sketch of your design onto the wooden canvas. Securely secure it and start working. Be extremely careful when applying the pattern, as the slightest miscalculation can ruin the entire workpiece.
At the end of the work, coat the resulting ornament with varnish and install it in the place where it will be located. As a result, you will receive an original product that is made with your own hands. Even if you don’t get a masterpiece the first time, don’t despair, a little practice and your craft will become a real decoration of your home.
Conclusion
Patterns used to decorate wooden buildings hundreds of years ago are back in trend and gaining popularity. With their help, you can not only revive the monotonous grayness of a classic facade, but also make it absolutely original, something that no one has ever had before.
A little imagination, the right choice of application method, purchasing a suitable workpiece, patience and attentiveness are the most important things you need to successfully complete your plan.

With patterns you can not only decorate your home, but also express your thoughts, create a kind of business card for guests and passers-by.