How to make a family tree. Family tree: simple step-by-step instructions for creating a visual family diagram. Ways to obtain information from sources
A family tree is a great way to visualize your family history. In the process of creating a tree, you can learn more about the life path of your ancestors. Communicate with close and distant relatives, hear from them a lot of interesting things about the fate of people close to you. You can decorate the tree you create in the form of a real work of art and hang it like a painting on the wall. How can a schoolchild create such a tree and decorate it in a way that is pleasing to the eye? There are special templates for this, and below we will look at how to choose a family tree template for a schoolchild, and what we will need for this.
What is a family tree?
As is known, the term “family tree” is understood as a pedigree (genealogical) tree, which schematically represents family ties between members of the same family. A family tree is the most common form of visual representation of a person's ancestry. It usually includes a field for each person and their relationship to other relatives, expressed in the form of connecting lines. In addition to the person's name, such a field may also contain associated dates, place of birth, and other useful information.
As a rule, one generation in a family tree represents one level. Thanks to this, it is clearly visible which ancestors preceded each generation.
A horizontal line between two fields indicates a defect. The downward arrow from the couple indicates the children from that marriage. Although most family trees grow vertically, they can also grow sideways. Later in the article I will present several family tree templates for schoolchildren.
The founder of the clan (ancestor) is often represented in the form of a tree root. Trunk - representatives of the main line of the clan (usually the male line). The branches of the family tree are the genealogical lines, and the leaves of such branches are their descendants.
Many people often mistakenly call a “family tree” a family “tree,” which is completely wrong. Genealogy recognizes precisely the term “family tree,” and the name “family tree” is a distortion of a professional thesaurus.
How to Create a Family Tree Chart
How to create a family tree for a student at school? Let's walk through the steps to create a family tree diagram:

For example, write your name below. From your name, draw a line a little higher, to your mother. Then draw another line on your behalf, to your father. Draw a horizontal line connecting your father and mother.
If you are a schoolboy and have brothers and sisters, draw lines to them from your father and mother.
In case your brothers and sisters have a pair, then write it down. Connect such a pair with a horizontal line.
If your siblings have children, write them down and connect them with lines to their parents
- Enter information about the generation of your parents and grandparents. This could be the sister (brother) of one of your parents, having a husband (wife), and so on. Connect such a pair with a horizontal line, and draw lines to their children.
For example, above your mother's name, write the name of her mother (your grandmother) and father (grandfather). Connect them with a line between you and your mother. Do the same for your father.
If your mom (dad) had brothers and sisters, then add a line from your grandparents to them. Add to such siblings the names of their couples (husband or wife). Connect such a pair with a horizontal line.
- Decide how far you can go. As the tree grows, it can become huge. Perhaps at first you should limit yourself to your close relatives (you, brothers and sisters, mom and dad, grandparents).
- Decorate your tree beautifully, making it unique. Once the text portion of the tree is complete, get a little creative and draw your tree beautifully. Take a huge sheet of drawing format, use a beautiful felt-tip pen or paint to decorate your tree. Get a little creative and make your tree colorful.
Best Family Tree Templates for Students
If your schoolchild has received the task of creating his own family tree, he will be helped by templates-tips that clearly display what a particular tree might look like. We offer you a family tree - templates to fill out, which can be used in a graphic editor, or directly printed on a printer. 


You can download this template for filling out a family tree for free. To do this, just hover over the template you like, right-click, and select “Save image as.”


You can also use an English template for a schoolchild that displays a family tree.


If you use a graphic editor, you can insert photographs of your relatives into the empty fields of the template. The result obtained will be printed on the printer.
Conclusion
Above, we discussed what a family tree is, how to create one, and also provided a template for a schoolchild that clearly demonstrates what a family tree should look like. Use the templates we provide to create your family tree, which will become a visual representation of your family's genealogy. If you don’t want to draw a family tree yourself, use services like Ancestry, Myheritage, Findmypast to create a family tree online.
If a child at school or kindergarten was asked to draw a family tree of his family, with the help of this article you can easily complete the task.
Many people are drawn to their roots. They are interested in who their ancestors were, what their fate was. Therefore, the fashion for family trees and family trees has returned. The path of least resistance is to use an online program on the Internet or download an application that allows you to quickly create a colorful family diagram with photos. But a family tree created with your own hands will have much more soul. The child is often asked to do it.
How to correctly draw a family tree: template, diagram
A family tree is a diagram of family ties within a family, sometimes, for convenience and beauty, depicted in the form of a tree with a trunk and crown.
IMPORTANT: In a big city, it is not always possible to regularly communicate even with your closest relatives. Most of us know or remember at most great-grandparents. Family ties weaken and are interrupted, but a person without a family is like a tree without roots, lonely and weak.
Today there are a lot of sites on the Internet that allow you to create a template family tree with a photo using special programs. You can also download a frame for several photos and insert portraits of family members into it in Photoshop. It's fast, convenient and, of course, beautiful.

 Family tree: example of a children's frame for Photoshop.
 But drawing up a generic diagram with your own hands has a lot of advantages:
- You have the opportunity to spend time in the creative process yourself, with your relatives and children.
- You will pay tribute to your ancestors, return to the origins of your family, learn or remember many interesting and funny stories.
- If you make a diagram with photos, you will organize pictures of your family members.
- A beautiful and neat family tree is an interesting interior decoration.
- If you make a family tree with the birthdays of relatives, with the designation of the wedding days of the spouses, you will never forget to congratulate them.
So where to start? How to draw a diagram correctly?
First of all, you need to figure out what type it will have. After all, a tree is a conventional name. The pedigree can be depicted schematically, where male relatives are “leaves” in the form of squares, female relatives are round “leaves”, and the connection between them is indicated by branches - arrows. If a tree is created together with a child, it is worth considering its artistic design, depicting it in the form of a tree, cutting out and pasting photographic portraits of relatives on its branches.
Next, decide what your pedigree will look like:
- Descending is the most common and convenient type. Such a tree begins to be compiled from the most distant relative. Usually, this is a man, since traditionally our family is passed down through the male line. The vertical “branches” of a tree pass down to its descendants, the family ties between them are indicated by horizontal “branches”.
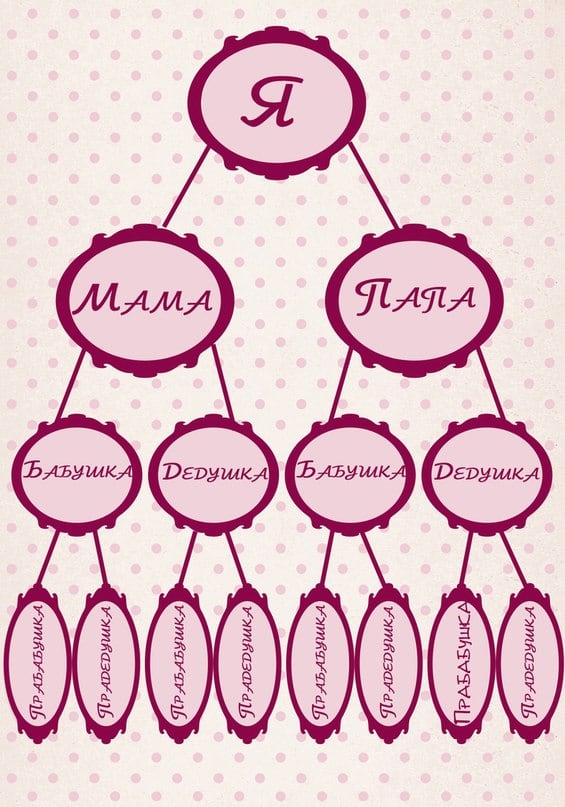
- Ascending is a type of scheme that is used when there is little information about a person’s ancestors. In the “trunk” of the tree is the person for whom it is being compiled. And at the top, in ascending order, his relatives in past generations are placed. When drawing up a family tree with your child (and it most often ends with great-grandparents), choose this option.
 Family tree: descending diagram.
 Family tree: ascending diagram.
 Now take a pen and notepad, try to remember your relatives, if necessary, their dates of birth, death, marriage dates, and other information. This may require raising documents.
No matter how detailed a family tree is, it will not be possible to indicate on it all the information about relatives. If you take the issue seriously, make a card for each relative with all the information known and important to you.
If you want to make an artistic family tree with photos, choose the ones you will use in advance.
VIDEO: How to make a family tree correctly?
How to make a family tree for your family: sample
Are you an active Internet user? To compile a family tree, use free programs:
- "SimTree"
- "GRAMPS"
- "GeneWeb"
- "GeneoTree"
- “Family Chronicle”, “Tree of Life” (only demo versions are free)

 Family tree in the Family tree program.
 Family tree in the “Chronicle of Life” program.
 Are you drawn to independent creativity? Take one of these circuits as an example.

 Family tree: diagram.
  Family tree: example.
  Simple family tree template.
  Antique pedigree.
 How to draw a family tree with a pencil step by step for a child?
In order to draw a family tree with a child, you will need:
- simple pencil
- eraser
- colored pencils, markers, paints
- ruler
- scissors
- photo of family members
IMPORTANT: Primary school or preschoolers are usually asked to draw a family tree. In family lessons, the child is asked to talk about all the family members shown in the diagram, so do not make the tree extensive. Show on it only those relatives whom the child knows and about whom he can talk.
- Place the sheet in front of you, preferably horizontally.
- Using a simple pencil, draw a tree trunk and branches.
- Draw the crown. How realistic it will be depends on the age of the child and his creative abilities.
- Designate a space on the table at the top of the tree for the child's name and/or photo.
- Just below, accurately identify his parents.
- On the branches of the trees, place relatives from mom and dad's side, respectively (grandparents, uncles, aunts, nephews, if there are any).
- Draw a family tree so that the generations are next to each other in ascending order: mom and dad, lower down - grandparents, even lower - great-grandparents.
- Draw relatives from the same generation side by side horizontally.
- Connect all relatives with horizontal and vertical arrows.
- Color the background as you wish, the trunk and branches of the tree – brown, leaves – green. If there are photo frames, frame them too.
- Take the prepared photos, carefully cut out portraits of family members, and paste them on the appropriate places.
- Label the family tree. For example, “Petrov Family Tree”, “Anya Petrova and her family”, “My Family”, etc.
 Family tree in pencil: step 1.
 Family tree in pencil: step 2.
 Family tree in pencil: step 3.
  Family tree in pencil: step 4.
 Family tree in pencil: step 5.
 Family tree in pencil: step 6.
 Family tree in pencil: step 7.
 Family tree in pencil: step 8.
 Family tree in pencil: step 9.
 Family tree in pencil.
 IMPORTANT: Frames for photos of each relative can be made in the form of leaves, apples, etc., then the tree will turn out brighter and more beautiful.
 Draw a tree trunk and branches.
  Draw a crown. We schematically outline places - “apples” for family members.
  We detail the drawing and color it.
 We design the background. We write family members into the “apples” or paste in their photos.
 VIDEO: Drawing your family tree
Family tree: pencil drawing for children
Here is another example of how to draw a family tree with a pencil with a child. The principle is almost the same, but the leaf is placed vertically, and for the child the place is determined at the bottom of the tree.

 Designing a descending family tree: steps 1-3.
 Designing a descending family tree: steps 4-6.
 Be creative when designing a family tree for your child. Use techniques:
- quilling VIDEO: DIY family tree: scrapbooking
A family tree is an interesting option for children's creativity. At first glance, the child is doing his usual things: drawing, sculpting, making appliqués. But in fact, he is exploring an important topic - his family. This will make him feel like he is part of something bigger, understand what family ties are and learn family history.
Why is it important to study your gender?
Historically, most of our families know very little about the history of their family. And today we limit ourselves to communication only with close relatives, so a child most often grows up in a narrow family circle. But while he is small, this family is his whole world, which has a huge influence on the formation of his personality and worldview. By drawing up his first simple family tree, the child better understands what family and clan are.
Surprisingly, family history gives children self-confidence. Therefore, you can tell preschoolers and primary schoolchildren interesting stories from the lives of their parents, grandparents, great-grandparents.
But high school students, together with their parents, can engage in more serious research and collect information about their family with the help of living relatives and archives. In this case, you will be able to create a real family tree of your family.
How to make a family tree with your own hands
From the age of 5-6, a child is deeply interested in how he was born, what happened before he was gone, what his dad and mom were like when they were little. Invite him to create a simple family tree and learn more about his relatives. Explain that a tree is a symbol of a family, all of whose branches are connected to each other and the trunk. Each of us is part of such a tree.
We have selected ideas on how you can design your family tree with your child.

The next time you look through your childhood photographs or listen to your parents’ stories, you involuntarily become interested in your ancestry. Since ancient times, genealogy has been compiled in the form of a family tree. It can be called a convenient option for presenting information about your family and ancestors. Nowadays, even in schools, schoolchildren are asked to compile a pedigree, which is why it is necessary to know how to make your own family tree.
Family tree represents a set of people related to each other by some kind of relationship. Their listing should occur according to a hierarchy, which is based on the years of life of relatives, as well as on who they are to each other.
Family Tree Definition
The main trunk of the tree indicates the married couple who is at the head of the clan. After this, you need to arrange children, grandchildren, cousins. Generations should be at the same level. This option is considered classic - where is it used? building people from ancestors to descendants. But besides this, there are other options for the family tree:
- Personally from myself. Here the branches will be parents, grandparents, and other relatives. This method is convenient in that the entire family is indicated along the line of only one person. It will be quite difficult to supplement such a family tree.
- Family tree. In this case, only relatives related to the paternal or maternal line should be indicated, since the surnames of the spouses were also different.
But how to draw a tree correctly? Nowadays you can find many special templates for family trees. You just need to download and print them, and then simply fill in the empty spaces with photographs of relatives at the specified location.
Creating a family history with your own hands
But as draw a family tree with your own hands without using a template? To do this, all the work will have to be divided into several stages. The first step is to collect information about your relatives. This stage is considered the most critical, since how complete the database will be will depend on the amount of information collected. If you miss someone, the meaning of the tree will be partially lost. If you have collected all the information successfully, then all that remains is to choose an option for constructing a diagram: from you personally - from the founder of the family, or from several surnames at once.
Compiling a family tree
Before you start compiling your tree, you need to pre-draw a diagram all relatives, distributing them according to degree of relationship. In this case, you need to decide in advance how many generations you want to go back. Those with a large family are advised to limit themselves to only immediate relatives and not to include great-aunts and uncles, otherwise the family tree will have to be expanded by making side branches in it. Such branches, as a rule, serve to record more distant relatives: sisters and cousins, grandparents.
Self concept of kinship includes a lot of things besides blood kinship, this can include marriage or spiritual kinship. In the first case, people have common ancestors, in the second case they are married, and the third case includes such forms of kinship as nepotism and twinning. But in any case, the main thing will be blood relationship. It distinguishes several degrees of relationship. One of them is a generation, the chain of which already forms a line.
Such a chain includes as many degrees as there were births in the family. Each of them follows each other in order. Thus, it turns out that the construction of the tree will proceed over generations, from oldest to youngest or vice versa, if the scheme is carried out personally. On the main branch, all siblings and grandparents should be indicated, and on the side branches, second cousins, grandparents, and grandparents can be indicated. Thus, the distance between relatives is a reflection of the distance of their relationship.
The video will help you correctly create a family tree.
Construction rules
If you have drawn up a rough diagram with a list of all relatives, you need to decide how best to depict the family tree. There are several options for the development of events:
- Classic image- when the main bearer of the surname is placed at the bottom of the tree. Most often this is a married couple, such as grandparents or great-grandparents. Next, you need to indicate all their children, grandchildren and other relatives in order. On the main branch you need to place your line, that is, the one along which you can come to your parents and specifically to yourself. Cousins and second cousins are placed on the side branches.
- Personal tree, which is based on yourself, and then parents, grandparents on both lines are indicated, and so on. This will be considered the main branch. The side branches reflect siblings, parents, their children, grandchildren, and so on.
- is the most voluminous option of all; several surnames are reflected here at once. In this way, the line of the father and mother can be traced. Before marriage, they had different surnames, but in relation to their children they have the same degree of relationship. It is for this reason that such a tree is the most interesting, since one half of the branches reflects all the relatives of the father, and the other - the mother.

Drawing by hand
If you want to draw a family tree with your own hands, then you can follow the following instructions:
- Draw a thick trunk, using a soft pencil so that you can remove unnecessary lines.
- At the base of the trunk, write inscriptions indicating the full name of one person or several family members. A little higher you need to draw branches for the rest of the relatives. They must be positioned correctly so that subsequent generations are located slightly higher than the previous one.
- After this, you need to finish drawing several branches: as many as you still know of your relatives. In this case, you need to take into account the size of your Whatman sheet in order to fit all those whom you want to indicate.
- When you have placed all your relatives on the family tree, you need to erase the extra lines and circle the necessary ones more boldly. Finish your creation with colored pencils to make the tree beautiful and vibrant.
Design options
Every person should be proud of their ancestry. When you have already embodied the results of your search work on a piece of paper, there is no need to put them in an archive folder. Introduce your ancestors to all guests who come to your home. To do this, you need to show a little diligence and imagination to uniquely demonstrate your ancestral family. There are a great many options for executing the idea here.
For example, take a display that is made up of decorative branches attached to the length of the entire wall of the rooms. A photo frame of the family tree must be attached to it at various levels and to each branch. Thanks to the original layout, it will be possible not only to attach photographs of your ancestors, but also to trace the most important historical milestones with which the fate of the entire family or its individual members was firmly connected. If you cannot make a branch in an original way, you can make it hand-drawn or use decorative material like papier-mâché to create it.
Try painting a family tree on the wall in your room with special acrylic paints and decorate it with photo frames. In the end, you can depict your family tree on a large sheet of whatman paper, decorating it in a baguette.

Special programs for creating a family tree
If you are not good at drawing and do not consider yourself a creative creator, then you should pay attention to interactive ways to translate your creative ideas into reality. To do this, you can use special programs and perform an online operation to create a family tree on the Internet. For this purpose, there are currently many simple programs with which you can easily achieve your technical goal.
You can also use computer photo editing programs. The simplest such photo editing program is Photoshop. You just need to use the search bar in your browser and write in it, for example, “family tree template for Photoshop.” This way, you can find many different template options that you can use to create a family tree in Photoshop. You just need to choose the best option for yourself and download it to your computer.

Many users believe that multi-layer templates are considered very interesting for working on a family tree. They are quite simple to use; to do this, you just need to understand them and also perform simple operations. Step-by-step editing of family tree templates:
- Open the Layers palette and find several background options.
- Next, you need to decide on the dimensions for each frame using the rectangular selection tool. With its help, you can increase the nodal and central frames of your tree to the required size.
- After this, the image must be cropped; in the end, a frame remains.
- In the same command you can adjust the size of the image.
- Next, through the “story,” a step is taken to restore the image with the family tree.
- You need to open the required photo and, using the “frame” option, adjust it to the required size using the “size and resolution” command, double-click on the picture, and the cropping will be applied.
- Next, you need to activate the “tree” layer under the frame layer using the “move” tool. With it, you can drag and drop photos onto the family tree field and place them directly under the frame.
Using the same algorithm, you can perform operations with other photographs until you finally complete your family tree. It is worth paying attention that under each photo you must leave space for text information about each family member. It is recommended to save your work and, if necessary, print it in order to visually evaluate your creation.
Video
In this video you will find an overview of the program with which you can create a family tree yourself.
Examples of family trees.


Modern education pays a lot of attention to the formation of a patriotic personality. Patriotism is, first of all, knowledge of the heroic past. And the past is the origins, the roots. Therefore, compiling a family tree is almost the primary task of properly raising a child. Genealogy studies heredity through direct and mixed lines. It’s better to start building a tree with a straight line: only parents, parents of parents, etc. are indicated in it. (that is, only married couples, without brothers, sisters, aunts, uncles...) Due to the small number of components of information, generations can be easily distributed “in rows”.
Materials for work:
A4 sheet – 1 pc.;Colored paper - 2 sheets of different colors;
Simple pencil, eraser, brush, paints, PVA glue, stationery tape.
Stages of work:
First stage: ruling.
On sheets of colored paper we print out information about our ancestors (full name, dates and places of birth and death, number of years lived). Colored sheets are used to separate information about men and women. Carefully cut out the rectangles and lay them out on an A4 sheet, following the lines of the “rows” (me - my parents - my grandparents - my great-grandparents, etc.).We outline each rectangle with a simple pencil. For convenience, you can also draw row lines.
Second stage: draw the outline of the tree.
With a pencil we draw the outline of the trunk (this is me) and branches (thick branches connect me and my parents, thinner branches go from my mother to her parents and from my dad to his parents, then follow the same principle). The further the generation of ancestors is from me, the thinner the branches flowing into each other become.
From the edges of the tree (at the end of the generation information) we draw completed branches.


The third stage: we add color to the family tree.
First, we paint the entire tree (both trunk and branches) with light brown paint. Rectangles can be left unpainted so as not to disturb the clarity of the branching. Allow the previous layer to dry completely before applying the next coat of paint.

Then, using long strokes in a random order, apply paint several tones darker than the main one. It is important not to get carried away and not paint over the light paint completely.


On top of the second layer of paint we also randomly draw lines with dark brown paint. Dark paint does not completely cover the previous color.

Draw the outermost completed branches.

Stage four: draw the foliage.
We form the crown of the tree: we apply foliage simply by applying a brush to the paper next to the branches. Paint with light green paint.

After the paint has dried, apply a stroke of dark green paint to each leaf (or next to it).