Oyster mushrooms: cultivation, care and proper harvesting. Growing oyster mushrooms on stumps in the country Growing oyster mushrooms in the garden
Today I want to show you how I grow oyster mushrooms at home.
It's very simple and not troublesome. Once you sow the mycelium and collect mushrooms for 3-5 years. With this method of growing, the mushrooms turn out to be very aromatic - like those grown in the forest and are radically different in taste from store-bought ones.
Each of you has the opportunity to grow eco-mushrooms in your garden plot on a stump.
The first time I sowed mycelium 3 years ago - today is already the fourth spring. This spring I decided to expand my plantations and at the same time tell everyone - because I always get asked a lot of questions.
Coniferous wood is NOT SUITABLE for planting oyster mushrooms. The best types of trees for planting are deciduous trees: poplar, apple, cherry, oak, alder, beech, chestnut, ash, maple, poplar, birch, aspen, walnut.
Oyster mushrooms grow especially well on walnut and poplar stumps.
The harder the type of tree, the longer the stump will last, and the more mushroom harvests will grow on it.
The location where oyster mushrooms are planted is a very important factor.
Oyster mushroom does not really like places where there is too much sun or large open space. Therefore, it is better to plant oyster mushrooms under trees in the garden. For example, oyster mushrooms grow well under spreading walnuts, or under other trees. The trees will shade the stumps with their crowns. Remember that the oyster mushroom planting site must be open to precipitation. This way you will save yourself from having to water the mushroom bed.
You can use areas along barns and other buildings on the north side.
Initially, I placed stumps along the fence - between the building and the fence. There the distance is about half a meter. It's enough. The main thing is not to place it under a canopy - so that the stumps are watered by rain.
To colonize the mycelium, we need stumps of deciduous trees - the sizes of the trimmings can be different - from 30 to 50 cm in length and from 15 to 40 cm in diameter. The main thing is that the wood is healthy and there are no signs of infection with mold fungi.

For direct planting, prepare a stump. It must be freshly cut, not old (dried out). If the hemp is about a month old, place it in water for a day so that it becomes moist. But, of course, it is better to use freshly cut stumps for growing oyster mushrooms. Then a successful result will be guaranteed.
We take stumps, drill holes in them with a diameter of about 1-2 cm. You can do less, but the smaller the diameter, the more difficult it is to put mycelium into it. The number is in random order: 6-8 holes on top and 4-6 holes on the side. IMPORTANT: The stump must stand vertically with the top up, i.e., as the tree grew in nature, place the stumps, do not change the direction by turning the stumps upside down.

We fall asleep the mycelium. For convenience, we take a pencil (or other tamping device), pour the mycelium into the holes, tamping it tightly with a pencil (stick, mortar, suitable in size) - don’t worry, nothing will happen to the mycelium. The holes must be closed. You can close it in various ways - you can use plasticine, moss, adhesive tape, and the most convenient way is with garden varnish. Some are even covered with cement. Mushrooms do not necessarily grow from these holes; they grow inside the stump and come out anywhere

To install a stump, dig a small hole - approximately 5 centimeters deep, place the stump in the holes and sprinkle the sides with earth. This is so that the stump stands more stable and draws moisture from the ground. Grass may grow around the stump. For greater moisture, you can sprinkle mowed grass, fallen autumn leaves, etc. around so that the soil remains moist longer.

They planted it, watered it around and that’s it. We are waiting for the harvest.
If the summer is dry, the stumps can be watered. But do not pour water directly on the stump; the mycelium does not like direct contact with water, only moisture. That is, you can water the stumps with a fine sprayer

This year I decided to increase my mushroom plantation.
My husband just howled at my message that we needed to “prepare” the stumps again. By the way, drilling them is not easy at all.
While purchasing mycelium from a mushroom growing community, I got into a conversation with their technologist (butted with questions) and he suggested a less labor-intensive way to populate stumps with mycelium.


Everything ingenious is simple.
We dig a hole - a little smaller than a bayonet - 15, well, 20 centimeters.
The width is slightly wider than the prepared hemp.

We put a pillow on the bottom - about 5 centimeters. A little more is possible - it doesn’t matter.
This could be sunflower husks, dry moss, shavings or sawdust from deciduous trees.

We generously water the hole with the cushion and pour mycelium on top - about 2 centimeters. About a handful of grain mycelium per stump.

My mycelium is colonized on a grain base (wheat). I bought this mycelium from a mushroom growing society in our city. A pack of mycelium - 2 kg costs 106 rubles today. This pack is enough for 5-6 stumps. You can search for mycelium in an online store or look for a mushroom growing society in your area.

Prepared hole

We place a stump on the mycelium.

Sprinkle the sides with earth (no need to tamp) and water around generously.


This is a general view of the place where I “planted” a stump this year - along the fence under the raspberry bushes, with the crowns of large cherry trees providing shade on top.
An excellent place for stumps is under spreading walnuts.
There is virtually no need to care for your mushroom plantation.
Nature itself will take care of a good harvest. However, if the planting was done in the wrong place, for example, too sunny, periodic watering will be necessary.

This method of growing oyster mushrooms will allow you to harvest mushrooms in the same season. Moreover, you will receive mushrooms all year round - from the beginning of warm days to December (in the conditions of the south, when there is no frost). Each stump will bear fruit until it completely disintegrates into pieces. Such a mushroom plantation can feed you for 3-5 years, but the largest harvests occur in the second and third years. There are more than enough mushrooms from 10 stumps for one family - we fry, pickle and preserve them for the winter.

If there are stumps left from felled trees on your site, you can use them, but you should sow them with mycelium only in April-May, when the temperature is above zero.
Oyster mushrooms appear on stumps during spring planting in August-September, and during a prolonged autumn, the harvest can be harvested until December. In cold regions, stumps are well covered with spruce branches, straw or leaves for the winter.
I don't hide anything.
Now you know how to grow oyster mushrooms on stumps.
Growing oyster mushrooms in a garden plot. Sowing methods. Caring for a mushroom plantation
Methods for cultivating edible mushrooms can be divided into extensive, when production is carried out under natural conditions, and intensive - under artificial conditions in special cultivation facilities.
Despite a number of disadvantages inherent in the extensive method, expressed in the seasonality of harvesting and its dependence on climatic conditions, it can still be widely used when using waste from the forest industry: stumps, stumps, non-standard wood; and in local farming, cultivation of, for example, wood-decaying fungi on stumps ensures biological cleaning of the forest and uprooting of stumps.
The substrate for the growth of oyster mushrooms in natural conditions is certain species of tree and shrub plants. These fungi are usually found on the stumps of deciduous trees (poplar, aspen, beech, oak), logs, and on weakened and dead deciduous trees.
Wood is the main source of food for species of mushrooms from the genus Oyster mushroom (Pleurotus). In recent years, the method of growing oyster mushrooms on cuttings of deciduous trees has become very popular in personal gardens.
In garden plots, sections of deciduous tree trunks are used as a substrate, preferably poplar and aspen, that is, tree species with soft wood on which oyster mushroom mycelium grows much faster than on hard wood (oak, beech, ash). The segments should be 20-30 cm long and at least 15 cm in diameter.
To ensure good, rapid growth of oyster mushroom mycelium, sections of freshly cut tree trunks are most suitable, but pre-harvested wood can also be used if it is not too decomposed and not covered with mold. The bark is removed from the cuttings.
Before planting the fungal mycelium, pieces of wood are placed in a container with water and kept there for 3-5 days, and very dry ones for a longer time. Then the wood is removed from the water, slightly dried and the mycelium is inoculated.
Sowing methods
Several sowing methods are used. For example, before soaking the cuttings in wood, holes with a diameter of 1-1.5 cm and a depth of 5-7 cm are drilled in a checkerboard pattern, at a distance of 8-12 cm. Mycelium is sown into the holes made. In this case, it is convenient to use a small funnel and a tamping stick, which helps compact the grains with mycelium in the holes in the wood. The optimal temperature for mycelium growth is 26-27°C, for fruit formation - 14-16°C. Mycelium, usually based on rye grain, is very convenient for uniform sowing, regardless of the substrate used.
The other method is quite simple, but it takes longer for the cuttings to become overgrown with mycelium. The cut is placed in a hole, where the mycelium is first poured onto a layer of moistened sawdust or straw in a layer of 2-3 cm; after installing the cut, the edges of the hole are covered to limit the evaporation of moisture. A layer of mycelium is also placed on the upper surface of the cut and another cut is placed on it. In a column 1-1.5 m high, from 3 to 5 can be placed. On the uppermost section, after laying the mycelium on the surface, a wooden disk (circle) is placed, which will limit the evaporation of water.
At a summer cottage, the cuttings are placed in a shady place: under bushes or near a fence, where direct sunlight practically does not reach, but there is enough light for the development of oyster mushroom fruiting bodies.
The installed cuts are covered with plastic wrap. To do this, use an arched cover for all cuts or an individual one - a bag is put on each column of cuts. Using the film, the required air humidity around the cuts is maintained.
Sowing of mycelium on cuttings is carried out in late April - early May, when the ambient temperature does not fall below 0°C. 3-4 months after the active growth of the mycelium in the wood, fruiting begins, the cutting is covered with a white cobwebby film.
Caring for a mushroom plantation
Caring for a mushroom plantation after sowing the mycelium consists of maintaining a sufficient level of soil moisture at the location where the cuttings are installed. To do this, regularly moisten the soil, and if necessary, water the cuttings themselves. Before fruiting, the cover is removed from them.
At the end of August - September, groups of solid formations similar to match heads appear on the wood. This is the beginning of fruiting. In 5-7 days they grow into a cluster of oyster mushroom fruiting bodies. At first they are dark gray in color, then as the fungus develops they lighten and acquire a characteristic color. The bunch is cut with a sharp stainless knife. Oyster mushroom fruiting lasts until frost and repeats annually. In winter, the cuttings are covered and sprinkled with snow.
In the first year of fruiting, oyster mushrooms receive the highest yield. Mushroom picking can last up to 3-5 years until the wood is completely destroyed. Over the course of three years, an average of 12-15 kg of mushrooms are collected per 1 m2. Careful care of the cuttings is required in the first year; subsequently it comes down to watering only before fruiting begins, but in dry times the “plantation” should also be watered in the summer.
Mushroom storage
Mushrooms are perishable products, therefore they are a favorable environment for the proliferation of pathogenic microorganisms. To avoid poisoning from oyster mushrooms and other edible mushrooms, as well as to properly use this valuable food product, the following rules must be followed:
- do not remove the skin from the oyster mushroom cap, as there are aromatic substances underneath;
- do not soak the mushrooms, rinse them quickly with clean cold water, place them in a sieve and immediately carry out final cooking;
- oyster mushrooms should be cooked for no more than 20 minutes at a temperature of 90-95 °C so that the broth boils gently in an enamel or aluminum pan (the mushrooms are immediately removed from the latter after boiling);
- Do not use cast iron, copper or tin utensils;
- mushrooms that are used for frying or drying are not washed;
- after processing, oyster mushrooms should be stored in wooden, glass or enamel containers (aluminum, iron, zinc can contribute to the formation of toxic substances);
- Mushroom dishes are best consumed on the day they are prepared, but can be stored for 24-30 hours in the refrigerator at a temperature of 2-4 °C;
- It is better to store fresh mushrooms in the refrigerator (not washed or cut) than mushroom dishes;
- harvested mushrooms should be stored in a cool room at a constant temperature of 0-6 °C.
Mushrooms are a wonderful product that can be a worthy alternative to meat or fish in the kitchen. They can be used in preparing first and second courses and various snacks. You can find mushrooms in the forest or on the store counter, but the best way to stock up on fresh produce is to grow it yourself. A mushroom such as oyster mushroom grows well in open and protected ground conditions. So, growing oyster mushrooms on stumps will not be difficult and will delight you with a good harvest. We will talk about the rules of such cultivation later in the article.
Oyster mushrooms on stumps: possible growing methods
Oyster mushroom is one of the most tame types of mushroom. Man has long learned to grow it in his garden and even in a greenhouse. Growing oyster mushrooms in open, unprotected soil is called the extensive method. It does not require significant financial costs, but it also allows you to get only a seasonal harvest. The intensive cultivation method allows mushrooms to be grown in the protected conditions of a greenhouse or, for example, a basement. The method is more labor-intensive, but effective, since the harvest can be obtained all year round, regardless of the season.
Growing oyster mushrooms on stumps can be carried out using an intensive or extensive method, because the stump in this case serves as the basis for propagating the crop. And the stump does not necessarily have to be stationary, because mushrooms grow well on individual pieces of solid wood or other lumber, for example, sawdust.
Stages and rules for cultivating oyster mushrooms on stumps
Oyster mushroom is distinguished by its unpretentiousness. In nature, it can be found on oak, rowan, linden, alder and other deciduous trees. If there is a stump from a fruit tree in the garden, it can also be used as a basis for growing mushrooms. In the absence of natural hemp, you can stock up on artificially prepared wood lumps.
For some owners, oyster mushrooms can become a real helper in clearing the garden of unnecessary stumps. After all, literally in 2-3 years this crop makes dust from a fresh stump, which avoids uprooting.
When deciding to grow oyster mushrooms, you need to remember that they do not tolerate direct sunlight, so the best place for their cultivation is a shaded area of the garden or a ventilated, illuminated cellar. In the case when we are talking about using a stationary stump or it is not possible to place artificially cut stumps in the shade of trees, you can use a trick and install an artificial canopy.

Stump preparation
You need to take care of growing oyster mushrooms at the end of winter or with the onset of early spring. If a naturally created, stationary stump in the garden was chosen as the basis, then the period of its preparation and planting of the mycelium falls on April-May. The temperature at this time should be consistently warm to preserve planting material. If you plan to grow oyster mushrooms on separate, artificially created stumps, then at home you can take care of applying mycelium at the end of winter. This will speed up the harvesting process.
You can artificially prepare stumps for growing oyster mushrooms from freshly cut or already dry trees. The only condition in this case is the absence of mold. The stump can have different sizes, but it is preferable to use logs 30-50 cm long and 15-30 cm in diameter.

A prerequisite for the normal development of mycelium is high wood moisture. Thus, logs of fresh wood, as a rule, have the required level of humidity, but dry or long-cut logs must be soaked in water for several days. In this case, the wood will be able to absorb the necessary amount of moisture inside.
Methods for sowing mycelium
There are at least four different ways to introduce mycelium into a stump:

Stumps with mycelium (except for columns) must be wrapped in burlap, matting or perforated film. Place them in the basement, shed or closet. The optimal temperature for oyster mushrooms at this stage of cultivation is +15 C. At the same time, it is important to maintain increased humidity of the stumps themselves and the air in the room.
Columns with mycelium need to be stored a little differently. This is due, first of all, to the dimensions of the created structure. Proper storage of columns involves placing them vertically in several rows with small intervals. The free space between the columns is filled with damp straw or sawdust. Along the perimeter, the rows of stumps are wrapped in burlap or perforated film. On top of such a “planting” it is also necessary to pour a layer of wet sawdust or straw.
You need to store hemp with oyster mushrooms in a room with good air circulation. At the same time, drafts can harm the entire growing process. It is also recommended to monitor the level of humidity in the room, periodically spraying it with water. The period of such storage should be 2-3 months. That is why it is recommended to prepare artificially created stumps at the end of winter, so that with the arrival of consistently warm temperatures, the plantings can be taken out into the garden.

Stationary stumps in the garden can be infected with oyster mushroom mycelium with the arrival of spring. The recommended infection period is April-June. The stumps of apple, pear and other fruit trees can be used as a base. The hemp chosen for growing oyster mushrooms must be healthy, and there must be no signs of the presence of other mushrooms on their surface.
You can introduce mycelium into a stump using the technologies proposed above; the only difference is that the wood does not need to be wrapped in burlap or any other material. Holes or slits on the stump are made closer to the surface of the earth. You need to retreat at least 4 cm from the top cut.
Placing stumps with oyster mushrooms in the garden
A few months after the mycelium is introduced into the stump, provided that it is properly stored, a white coating appears on the surface of the wood. It indicates the formation of a fungal body. At this time, you can take the stumps into the garden, to open areas of land. As a rule, this is done in May. Oyster mushrooms are placed under the canopy of tall trees, in the shade of gazebos, or under a canopy.
You need to prepare a place for placing stumps with oyster mushrooms as follows:

To save free space in the garden, individually infected stumps can be stacked on top of each other, forming a wall of several tiers. Columns with oyster mushrooms can be connected to each other according to the principle of a solid wall using wire or nails. This wall can be installed both vertically and horizontally on the ground.
Another option for sowing stumps with oyster mushrooms
You can introduce oyster mushroom mycelium into stumps at any time in the spring and autumn. In this case, you can use a very original and productive method of infection. This can be done as follows:

The proposed method is quite simple and allows you to create an entire plantation of oyster mushrooms on the site at any time during the warm period. If you take care of planting in the spring, then by autumn you can expect a mushroom harvest. Otherwise, you will only be able to enjoy mushrooms next year.
Crop care and harvesting
To obtain a full mushroom harvest, it is very important to properly care for oyster mushrooms in the first year of cultivation. You need to monitor the humidity level especially carefully. Dry soil must be watered regularly until the end of the fruiting period. With a decrease in temperatures and sufficient humidity, within a week from the moment the rudiments of the mushroom body appear, it will be possible to begin harvesting.

Oyster mushrooms on stumps do not require any special preparation for the winter period. Stumps overwinter safely in open areas of the ground without insulation. Oyster mushroom mycelium can exist in such conditions for 5-6 years. The maximum mushroom yield can be observed in the second year of fruiting.
Oyster mushrooms on stumps in a greenhouse all year round
Many farming enthusiasts are wondering how to grow oyster mushrooms on stumps all year round. But such cultivation is quite possible if you have a heated greenhouse. Oyster mushrooms are grown on an industrial scale under such artificial conditions. It's all about regulating temperatures and humidity. Oyster mushrooms can be grown on stumps in a heated greenhouse or illuminated cellar, observing the following conditions:
- To grow in a heated greenhouse, hemp is sown with mycelium in October-November using any of the above methods.
- The stumps are buried 10-15 cm into the greenhouse soil.
- At the initial stage of growing oyster mushrooms, the temperature in the greenhouse should be maintained at +14-+15 C. The humidity should be 90-95%. Under such conditions, oyster mushroom mycelium should last 1-1.5 months. After this period of time, it will begin to form a mushroom body.
- During mycelium germination, it is necessary to reduce the temperature in the room to 0-+2 C. Such conditions for 2-3 days will contribute to accelerated fruiting.
- After a few days, the temperature in the greenhouse should be increased to +10-+14 C and maintained until the end of fruiting.
- The temperature cycle in the greenhouse can be repeated an unlimited number of times. The fruiting cycle of oyster mushrooms on stumps in a heated greenhouse is 2-2.5 months.

Growing oyster mushrooms on stumps in a greenhouse allows you to enjoy fresh mushrooms all year round, including during severe winter frosts. An alternative to a greenhouse can be a basement or cellar, but you need to remember that light is required for mushrooms to grow. Otherwise, the stumps will rot without producing a harvest. A good example of growing oyster mushrooms in a greenhouse is shown in the video:
After watching the video, you can learn from the positive experience of a specialist in the field of mushroom growing.
Growing oyster mushrooms at home is quite easy if you know the basic principles and rules. Tree stumps in this case are the best basis for growing. Wood retains moisture well and is able to supply the crop with essential substances. You can harvest oyster mushrooms in the fall in the garden in accordance with the life cycle of the mushroom or all year round in a heated greenhouse. If desired, the mushroom can be used as an assistant in eliminating unnecessary stumps on the site. Over the course of several years, the mycelium will repeatedly produce a fresh product and destroy the wood. Each farmer decides on his own how to grow oyster mushrooms on stumps at home, but we have given several methods and examples of successful cultivation of this mushroom.
Growing oyster mushrooms on stumps in the country
Summer and autumn are busy times for avid mushroom pickers. The forest beckons with a scattering of mushrooms. Boletus mushrooms, butter mushrooms, boletuses, boletuses, milk mushrooms and honey mushrooms just beg to be added to the basket. It is a great success for a mushroom picker to find a family of oyster mushrooms - very useful mushrooms for humans. You can no longer leave the forest with an empty basket. But you don’t have to go to the forest to pick these mushrooms. It is very easy to grow oyster mushrooms in the country.

Description of oyster mushroom
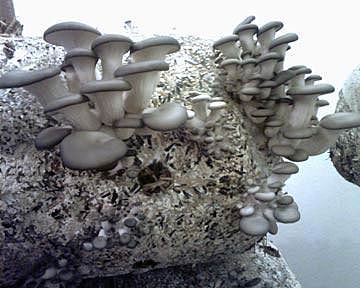
This lamellar mushroom belongs to the pleurotaceae or oyster mushroom family, which is very numerous - about 100 species. All of these fungi, with rare exceptions, grow on dead or dying wood because they feed on cellulose. Oyster mushrooms can often be found on tree stumps. Mushrooms are saprophytes; they do not require symbiosis with tree roots.
The cap of oyster mushrooms is shaped like an ear; in adult mushrooms it can reach a diameter of up to 30 cm. The stem is short, sometimes it is not there at all - the mushroom is attached to the tree directly by the cap. The color of the plates and pulp is white. Mushroom caps are colored differently. In the oyster mushroom they are dark brown, in the late oyster mushroom they are lighter, and in the pulmonary oyster mushroom they are very light. There are very elegant oyster mushrooms with lemon yellow, bright pink and orange colored caps. The photo shows an oyster mushroom growing wild in the Far East.

Not all types of these mushrooms are suitable for home or industrial cultivation.
A little about the history of mushroom growing
People have been trying to grow mushrooms artificially for centuries. The first experiments in growing oyster mushrooms date back to the 40s of the last century. They turned out to be successful. In the 60s, this mushroom began to be grown industrially. Oyster mushroom production is increasing every year. Now in Russia they are harvesting a considerable harvest of artificially grown oyster mushrooms - 3.8 thousand tons.
Anyone can grow oyster mushrooms at home. You can do this at your own summer cottage. Oyster mushrooms in the country can be grown on stumps or on an artificial substrate.

What you need to grow oyster mushrooms in the country
This requires very little:
- healthy hardwood;
- mushroom mycelium.
- The ability to maintain a constant temperature (ideally, equipment in several zones with different temperature indicators). Stable room humidity (adjustable humidity with the ability to set specific indicators). Complete disinfection of the basement (the absence of any pests and mold, since mushrooms in the basement in conditions of high humidity are very vulnerable). Possibility of installing lighting equipment (at the final stage of growth, the crop requires additional lighting).
- If the basement is still being completed, then it is advisable to make the ceiling and walls concrete. The floor must be cemented or concreted, since compared to wooden or soil surfaces, concrete is less susceptible to mold and various diseases. For additional protection of the surfaces, it is better to whitewash the walls and ceiling with lime, then dry fan heaters. (See also the article Features of basement insulation.) Before adding mushrooms, you can additionally spray the basement with a solution of bleach and close it for a couple of days. After whitewashing and processing, it is necessary to thoroughly ventilate the room (at least two days).
- The basis is straw and sawdust from deciduous trees. Sometimes corn stalks and sunflower husks, finely chopped reeds, etc. are added to the mixture. Some prefer to grow oyster mushrooms on stumps (as in the case of sawdust, only deciduous trees with soft wood are suitable) . When planting mycelium in hemp, we make notches or holes, fill them with mycelium and press sawdust on top.
- We put a 7-8 cm layer of substrate into the bags. Next we put a 3 cm layer of mycelium and again 15 cm of the nutrient mixture. We alternate layers to the top of the bag. The top layer of the substrate should be approximately 7-8 cm. These bags must be pierced with a clean knife or nail every 5-6 cm and placed in a warm room.
- We carry out germination at a temperature of 250 C. When the mixture in the bags turns white, the mycelium has germinated. After 5-6 days, the bags must be cooled to a temperature of 3-5 degrees. This will stimulate the growth of fruiting bodies.
- We send the bags with mycelium to the basement. We make vertical slits on them up to 15 centimeters in order for the oyster mushrooms to germinate. The distance between the blocks should be at least 30 cm. We set the temperature within 150 C. After a week and a half, the first fruiting bodies will appear from the bags. After this, it is necessary to increase the humidity in the basement. To do this, either spray the bags with mycelium from a spray bottle or wet the floor in the room daily. Also, as mushrooms grow, the percentage of carbon dioxide in the air will increase, so daily ventilation is necessary. After the first week in the basement, it is advisable to turn on the lighting for the bags. A light bulb of 40-60 W is enough for one block.
- We drill a hole in the log house, the diameter of which is 15 cm. If the wood is not very wet, soak it in water. Introduce mycelium into these holes and seal with adhesive tape. Transfer the bars to a room where the temperature is +20 degrees.
- After some time, you will see a fluffy whitish coating on the surface of the log houses - this is aerial mycelium. The period is approximately 3 months. After this, move the stumps to a dark place on the site. Do not water the stumps themselves! Moisten the soil around them. Do not harvest too early, otherwise the mushrooms will grow smaller and smaller. But there is no need to delay the harvesting process. If the edges of the oyster mushroom cap are bent upward, it means the mushroom has formed spores and is undesirable to eat. Usually the plant is harvested a week after the rudiment of the fruiting body is formed.
- This mushroom loves wood, which seems to be fresh, but already shows signs of damage. Only the tree should not be rotten. This circumstance is the most important. Only hardwood is needed. Neither spruce nor, especially, pine are suitable, since they retain resinous substances that have a detrimental effect on the mycelium. The place for growing must be dark and humid. The sun and dry air are not our allies. It happens that the oyster mushroom planting site even needs to be watered to achieve results. And not all the time, but once a week.
- We are preparing the stumps. From a tree (healthy, just cut down) we cut logs 35-55 cm long. We dig holes so that the stump rises 15-30 cm. We place the log and cover it with a mixture of manure soil with leaves, paper, and rags. There are also pieces of manure somewhere. Lightly tamp and water. On the stump we make transverse cuts with a saw (up to 1-3 cm) around the entire circumference and on top. The “bed” for oyster mushrooms is ready. We purchase oyster mushroom mycelium. Now you need to get the mycelium of the fungus. Organizations that grow this crop will help you here. Place the mycelium on the stump. For each stump (its weight is about 5-8 kg) 250-300 g of mycelium are required. We apply the mycelium with our hands along the cuts on the stumps (one half) and around the stump into the hole (the other half). We apply powder around the stump so that everything is level. On top of the stumps, a “cap” of the same mycelium and wood is required. All that remains is to put a damp burlap or rag on the sown areas. Make sure it doesn't dry out. And cover all these “crops” together with film (make a greenhouse).
What kind of oyster mushrooms can be grown in a summer cottage?
Initially, naturally occurring oyster mushrooms or oyster mushrooms were grown. Thanks to the efforts of scientists, special hybrids of these mushrooms have been developed that are characterized by higher yields. They are better suited for growing in artificial conditions.

These mushrooms grow well both on artificial substrate and on stumps.

If you are going to grow mushrooms in a small volume, it is better to buy ready-made mycelium. When starting a large plantation, it is more economical to grow it yourself. Unfortunately, manufacturers do not always sell high-quality mushroom mycelium. Therefore, there is a risk of wasting money and labor and ultimately being left without a harvest.
What should high-quality mycelium look like?
The color of the mycelium should be white or light cream. The only exception is oyster mushrooms with brightly colored caps. Their mycelium may be a different color. The contents of the package must not include unhealed stains. They say that the mycelium is weak. It is clear that such mycelium will not produce a good harvest.

They indicate that it is infected with mold. A mushroom harvest cannot be obtained from such mycelium, and the seeded woody material will become unusable.
Often, bags with mycelium are equipped with a special gas exchange filter, which not only improves its quality, but also allows you to control the smell of the product. It should be intensely mushroomy and under no circumstances sour.

Recently, special wood sticks overgrown with mycelium have been increasingly sold. There are also criteria to check their quality. The sticks in the bag should be a single whole due to the white threads of the mycelium completely entangling them. The color of the mycelium is white, without green or gray inclusions. The smell is rich mushroom.

How to grow oyster mushrooms in the country on tree stumps? This process is simple. Let's take a closer look at it.

Stages of growing oyster mushrooms
To get a good harvest when growing oyster mushrooms in the country, you need to plant the mycelium on time already in the year of planting.
Landing dates
All operations for growing mushrooms should be carried out in April or May, or, as a last resort, in early June. During the summer, the mycelium will have time to take root well and grow.
Selecting a location
Any piece of free space in the garden is suitable for planting a mushroom plantation. But it must meet certain conditions. For growing you need to choose a shaded place. Without access to direct sunlight, moisture in wood is retained much better. This will not only increase the yield of the plantation, but will also reduce labor costs - it will be possible to water the wood less often. If there is an excess of carbon dioxide, mushrooms will not grow well. Therefore, you should not grow mushrooms next to rotted manure or compost heaps - there is always an increased concentration of carbon dioxide there. The place where the mushrooms will grow must be well ventilated.

Wood preparation
If you have stumps from recently felled hardwood trees on your property, you're in luck. Mushrooms grow very well on such stumps. If they are not there, you will have to take care of suitable wood. The diameter of the log should not be less than 18 cm and no more than 40. The wood should be fairly fresh. Trees that have been cut down for a long time are not suitable. The logs should be cut into lengths of about 40 cm.

The side surface of each prepared log needs to be covered with holes into which the mushroom planting material will be placed. They are made up to 10 cm deep and up to 1.5 cm in diameter. They are located at a distance of 12 to 15 cm from each other.
Prepared log trims need to be soaked. Soft well or rain water is suitable for this. Soaking time is 2-3 days.
Installing logs and planting mycelium
At the selected location, we dig holes about 20 cm deep. Their diameter should be slightly larger than the diameter of the logs being dug in. The distance between the logs should be at least a third of a meter. Place a layer of moistened material in the hole. Sawdust, straw, and shavings are best suited. It should not be thick, 1.5 cm is enough. Add a layer of mushroom mycelium. Its thickness is 1 cm. We place logs on it.

The drilled holes also need to be filled with mycelium or wood sticks with mycelium inserted there.
After placing the mycelium in it, each hole must be closed with raw sawdust or sealed with wax. This is necessary so that moisture does not evaporate from them. We also close the top cut of the wood.

Add soil and compact it. We cover each log separately or all together with clean perforated plastic film. It needs to be pressed well so that it does not blow away with the wind. It can be removed after 3 weeks.
In conditions of constant humidity, the mycelium will take root faster, and the mushroom harvest can be harvested earlier.
Plantation care
You need to make sure that the ground next to the logs is moist. If necessary, water. If the weather is dry, watering should be done up to 3 times a week.
When to expect the harvest
If everything is done correctly, mushrooms can be collected already in the first year, starting in September. Plantings bear fruit for 3-4 years. Mushrooms appear in waves.

Conclusion
Mushroom growing is a fascinating activity and a tangible help to the family budget. If you decide to grow mushrooms in your summer cottage, it’s better to start with oyster mushrooms. A simple technology that requires a minimum of material costs, and a guaranteed result if you follow all the rules of planting and care, will allow you to enjoy delicious and healthy dishes from mushrooms grown by yourself.
We grow oyster mushrooms on ordinary stumps
In the previous article about oyster mushrooms, we wrote about how to grow them in an intensive way.
That is, indoors in plastic bags on a straw substrate.
But not everyone has the opportunity to grow oyster mushrooms in this way.
Some people don’t have a suitable room, while others don’t have a suitable substrate, like, for example, one of our readers.
Don’t be upset, you can resort to an extensive method of growing oyster mushrooms - growing them on stumps in the open air.
Material and labor costs with this method are minimal, so this is an ideal option for beginning mushroom growers.
But the harvest will be seasonal, because... it will completely depend on the climatic conditions in your area.
Preparing stumps or logs
Cultivation of oyster mushrooms begins in late winter - early spring. If there are stumps left from felled trees on your site, you can use them, but you should sow them with mycelium only in April-May, when the temperature is above zero.
If not, you can take scraps of hardwood: beech, chestnut, ash, maple, poplar, birch, aspen, etc. The sizes of the scraps can be different - from 30 to 50 cm in length and from 15 to 30 cm in diameter. The main thing is that the wood was healthy and showed no signs of mold infection.
Before adding mycelium, dry logs should be soaked in water for 2-3 days to create a high level of humidity inside, which is so necessary for the development of mycelium. Fresh wood does not need to be soaked.
Methods for sowing mycelium
There are several ways to add mycelium:
In the hemp, holes are sawed or drilled in a checkerboard pattern with a depth of 5-6 cm and a diameter of approximately 10 mm. Grain mycelium is poured into the resulting holes and covered with adhesive tape or moss. The stick-shaped mycelium is simply inserted into the drilled holes and covered with plasticine.

A disk of small thickness (2-3 cm) is sawed off from the log, the end is covered with a layer of mycelium and covered with this disk on top, fixing it with nails.

The end of the log is covered with a layer of mycelium 1-2 cm or 100-150 g thick. A second one is placed on top, the end of which is also sprinkled with mycelium. Then the third, etc. Such a column can be grown up to 1.5 m and even 2 m. To make the column more stable, the diameter of the cuttings must be at least 20 cm.

After sowing the mycelium, the logs must be stacked somewhere in a barn or basement, where the temperature is kept at 15 °C. If the mycelium was introduced using the first two methods, then the logs can be stacked horizontally on top of each other and covered with perforated film or matting or burlap.

The third method involves a vertical arrangement of logs. Such columns are installed in several rows with small intervals, which are covered with wet sawdust or straw. The top of the columns is covered with the same sawdust, and the sides are covered with film or burlap to maintain high humidity.

The logs should remain indoors for 2-3 months. At this time, it must be regularly ventilated, but without drafts, and the air must be constantly humidified.
Planting stumps in the ground
When you see that the stumps are covered with a white coating, it’s time to plant them in the ground. This is usually done in May. For fruiting, choose the most shaded place on the site, for example, under the crowns of trees or under a canopy.
The logs are buried in the ground in rows to a depth of 10-15 cm, and the bottom of the holes is covered with wet leaves or sawdust. The distance between the stumps should be 35-50 cm. Further care consists of carefully watering the soil around the stumps in dry weather.

Oyster mushrooms appear on stumps in August-September, and during a prolonged autumn, the harvest can be harvested until November. For the winter, the stumps are well covered with spruce branches, straw or leaves.
Now you know how to grow oyster mushrooms on stumps. Such a mushroom plantation can feed you for 3-5 years, but the largest harvests occur in the second and third years.
www.domrastenia.com
Growing oyster mushrooms at home on tree stumps video
In the last article about oyster mushrooms, we wrote about how to grow them in an intensive way. That is, indoors in plastic bags on a straw substrate. But not everyone has the opportunity to grow oyster mushrooms in this way. Some do not have suitable premises, and others - then - a suitable substrate, as, for example, one of our readers. Don’t be upset, you can resort to an extensive method of growing oyster mushrooms - growing on stumps in the open air. Material and labor costs with this method are minimal, so this is ideal for beginner mushroom growers option. But the harvest will be seasonal, because it will completely depend on the climatic conditions in your area.
The sizes of the cuttings can be different - from 30 to 50 cm in length and from 15 to 30 cm in diameter. The main thing is that the wood is healthy and there are no signs of infection with mold fungi. Before adding mycelium, dry logs should be soaked in water for 2- 3 days to create a high level of humidity inside, so necessary for the development of mycelium.
Fresh wood does not need to be soaked. There are several ways to introduce mycelium: In the hemp, saw or drill holes 5-6 cm deep and approximately 10 mm in diameter in a checkerboard pattern. Grain mycelium is poured into the resulting holes and covered with adhesive tape or moss.
Such columns are installed in several rows with small intervals, which are covered with wet sawdust or straw. The top of the columns is covered with the same sawdust, and the sides are covered with film or burlap to maintain high humidity. The logs should be kept in the room for 2-3 months. At this time, it must be regularly ventilated, but without drafts, and the air must be constantly humidified.
The distance between stumps should be 35-50 cm. Further care consists of carefully watering the soil around the stumps in dry weather. Oyster mushrooms appear on stumps in August-September, and if autumn is prolonged, the harvest can be harvested until November.
It is practiced for harvesting in open ground and in basements. Mushroom mycelium takes root on whole wood a little slower than substrates with small particle sizes, but the fruiting of such plantations lasts about 5-7 years! Arranging them does not require a lot of time and effort and, in fact, this is the simplest way to grow oyster mushrooms!
How to grow oyster mushrooms on stumps
It is important to know that only deciduous wood is suitable for growing oyster mushrooms on stumps, and it is better to choose hard varieties (pear, beech, oak, maple, ash). The mycelium will not be able to take root on coniferous trees: they are saturated with caustic resins, which are destructive for fungal cells. When growing oyster mushrooms on stumps (logs, pieces of solid wood), they are pre-soaked in water for 3-5 days.
During this time, the wood becomes damp, and therefore more susceptible to infection with mycelium. Mycelium can be sowed in different ways - in a trench, on stump cuts or inside them. Let's look at each option in more detail.
Technology for growing oyster mushrooms on stumps in a trench
To set up a plantation for growing oyster mushrooms on stumps, a trench 15 centimeters deep is dug in the ground, at the bottom of which boiled wheat or barley grain (barley) is poured. This is the so-called nutritional “cushion” for oyster mushrooms.
Sterile grain mycelium, previously kneaded by hand, is laid out on it at the rate of 300-400 grams for each stump. Wet stumps with light pressure are placed in a trench, directly on the mycelium layer, and lightly covered with garden soil. If you did everything correctly, then the stumps should look like they are “growing” from the ground.
How to grow oyster mushrooms on stumps by sowing mycelium on stump sections
This seeding method involves infecting the ends of the stumps with grain mycelium. Planting material is applied by hand or with a spatula like a spatula to the sections of stumps, in a layer of 1.5-2 cm. The stumps are placed on top of each other to form a “wall” (stack).
How to grow oyster mushrooms on stumps by introducing mycelium deep into solid wood
You can make deep cylindrical holes in stumps using a drill. They contain grain mycelium. From above, all sowing points are plugged with wood plugs or wet sawdust.
But in dry weather, it won’t hurt to spray the stumps with water from a spray bottle: oyster mushroom loves moisture! After about a month and a half, when the mycelium colonizes the wood, your plantation will begin to bear fruit. During the open ground season, mushrooms can be harvested several times.
Oyster mushroom on stumps - a harvest for several years!
Order from us a kit for cultivating oyster mushrooms with high-yielding grain mycelium!
Included: 1. 6 liters of oyster mushroom grain mycelium. 2. 10 bags 350x800mm for preparing substrate blocks 3. 10 pack. dietary supplements.
4. TGO-1 thermohygrometer for measuring air temperature and humidity. 5. Video on growing oyster mushrooms (DISC 3.5 GB) 6. Technology for growing oyster mushroom, shiitake, champignon mycelium at home - without an autoclave
Growing mushrooms on wood chocks (stumps) The technology for growing oyster mushrooms, SHIITAKE, and honey mushrooms on wood chocks is approximately the same.
Let's consider it using the example of the use of sterile substrate mycelium produced by the Viola mushroom farm in Beloozersk, Brest region. This mycelium has the form of small blocks, measuring 6x6x50 mm.
The package contains 20 blocks, which is enough to sow 4-5 small chocks. Preparatory work: 1. We prepare logs of any deciduous tree species.
The diameter and length can be arbitrary, but it is more convenient to use chocks with a diameter of 150-200 mm. and length 300-400mm. 2. It is advisable to moisten the lumps thoroughly.
The most effective way is this: place the chocks vertically in an appropriate container, fill with clean, hot water and cover with a lid. Leave for several days, but better for 1-2 weeks.
3. Drill holes in the chocks with a diameter of 9-10 mm and a depth of 60 mm, placing them evenly. Approximately one hole for every 100 mm of length. 4. Insert a block of mycelium of the Viola GC.
5. Close the hole with cotton wool soaked in clean water. 6. If the air temperature outside is less than +10 degrees, then wrap the wooden chocks with film (to avoid moisture loss) and place them in a room with a temperature of 15-20 degrees.
At this temperature, the mycelium actively germinates within 3-4 months. 7. After some time, the mycelium grows inside and comes out in the form of a white, cotton-like coating.
When the air temperature outside rises above +10 degrees, the logs are taken outside. It is best to dig the chocks vertically into the ground, leaving no more than 1/3 of the chock’s height on top.
Choose moist, ventilated, shaded places: near the house, under bushes or trees. Let the grass grow around. Care consists of moistening the soil around the chocks in hot weather.
The mycelium overwinters well (for the winter the plantings are covered with spruce branches, burlap, and branches) and fruiting lasts for several years until the wood turns into dust. material taken from the site gribovet.narod.ru Is something not working out? Ask on the forum If you see an error in the text, select it and press ctrl + Enter Below we will look at all these steps in more detail.
Premises requirements
If we decide to start growing mushrooms for ourselves or for testing, then an already equipped basement will do. If our decision is to start a new business, then it is better to prepare an underground space specifically for this purpose. There are several standard requirements:
Advice! It is very important to equip the outlet of the supply ventilation system of the basement of the house with a mesh with small cells. Then, even in windy weather, insects, plant debris, and therefore pathogens of various diseases will not get into the basement.
Preparation procedure
Even if growing mushrooms in the basement has the status of a hobby, it needs to be made effective.
Whitewashing the basement before growing mushrooms
Growing technology
So, the basement is ready. Next, we head to the nearest specialized store for mycelium. Its price is quite affordable and most of the cost will not be at all. The most expensive is the substrate (the medium in which the mushrooms will germinate), since on average 100 kg of wood yields up to 20 kg of harvest. Thus, we can independently calculate the required volume of substrate depending on the desired harvest. Please note! The instructions on the packaging of mycelium can suggest the preferred substrate for the selected variety. Via the Internet or at special mushroom farms, you can immediately buy not only raw materials for cultivation, but also ready-made sprouted mycelium or mushroom blocks (mycelium mixed with substrate). However, in order to save money, many prepare a mixture for growing yourself:
Advice! To speed up germination, we wrap the stump with polyethylene. Whatever substrate is chosen, the main thing is the absence of pathogens of fungal diseases in the wood. To avoid infection, you must at least pour boiling water over the prepared mixture and leave overnight. When preparing mushroom blocks with your own hands, we proceed as follows:
Advice! It is worth making more holes at the bottom of the bag so that all the liquid that formed during the germination process can flow out freely.
Fruiting and harvesting
The most important process remains - fruiting:
One mycelium layup provides up to three waves of fruiting. The most massive harvest is the first, the second can be up to 70% of the first (on average - about half, i.e. 50%). The third wave is minimal and is not taken into account. Next, the bags with mycelium are considered spent.
We empty the basement, disinfect it and prepare a new stash.
We hope that after reading this material you have an idea of how to grow oyster mushrooms in the basement. This process is not labor-intensive, but quite profitable, especially if basement premises are already available. Whether you want to create a business out of it or leave it as a hobby is up to you, but in any case, the video in this article will help you understand the technology in more detail.
Growing oyster mushrooms on stumps
Our site has already written about how to grow mushrooms at home. Then we talked about champignons in our garden. As it turns out, the topic is extremely popular not only among gardeners, but also among mushroom hunting enthusiasts.
Therefore, we will be happy to tell you about growing oyster mushrooms on stumps. Naturally, the logs, or stumps, should be located in the open air. That’s why you will harvest crops not like in a greenhouse - all year round, but like in nature - in spring and autumn. It’s good if you thought about preparing compost in advance, but you can completely do without it.
What trees will be useful to us? Oyster mushroom loves soft wood: poplar, aspen, linden, willow. It’s good if they were cut down quite recently; if not, soak the log house in water for 2-3 days.
There is no need to make large logs; stumps 35-40 cm long are also suitable. But they must be at least 15 cm in diameter!
Regarding the timing of growing oyster mushrooms on stumps: if you sow the mycelium in the spring, then it is quite possible to harvest the harvest this fall. A pleasant surprise: once sown, pieces of wood bear fruit for up to seven years!
How to grow oyster mushrooms on stumps?
If you achieve excellent results in growing mushrooms, you can turn it into a home business, such as growing seedlings for sale. Do you love mushrooms, but don't like mushroom hunting? There is a way out. You can grow oyster mushrooms in the garden or vegetable garden.
And you don’t need to walk through the copses, just take a basket and chop as many delicious delicacies as you need from your garden. To create the right conditions for growing these mushrooms, you should know the main “predilections” of oyster mushrooms.
What you need to grow oyster mushrooms
How to grow oyster mushrooms on a stump
It is good to grow oyster mushrooms on the stumps of birch, aspen, pear, and apple trees. The stump size needs to be at least 20 cm in diameter. You can make the stumps yourself from the same aspen or birch, bury them in a damp, shady place, cover them with leaves, paper, straw, various debris, and rotted manure.
The mushrooms will begin to grow in three to four weeks. Then you can remove the film; the rains will no longer wash away the mycelium. It is better to plant oyster mushrooms in May: just before the warm days it will germinate. Ideal conditions for its development are 20°C, moisture and lack of sun.
After sowing in May, the harvest will be in August-September. For the winter, cover the stumps with leaves, sawdust, and chopped straw. Put down anti-mouse devices. Next year the oyster mushroom will sprout again and produce two crops in summer and autumn.
After 3 years, you need to start all over again by digging holes, cutting logs, getting the mycelium.
Tricks for growing oyster mushrooms
Some gardeners uproot apple and pear trees. Stumps that remain are the best place for the fungus. In 3 years, the oyster mushroom will completely destroy the stump.
In addition to the harvest, there will also be practical benefits; there is no need to uproot the leftovers. By the way, mushrooms such as boletus, russula, and boletus are also grown using the same principle. Only trees and branches are buried in the ground, sprinkled with dust, leaves, humus soil, grass, straw.
Mushroom peelings are placed on the top layer and sprinkled again. Wet them systematically. By following these recommendations, you can be sure that you will soon have your own mushrooms growing in your dacha.
Growing oyster mushrooms on stumps
How to grow oyster mushrooms on stumps
Preparing stumps or logs
Cultivation of oyster mushrooms begins in late winter - early spring. If there are stumps from felled trees left on your site, you can use them, but you should sow them with mycelium only in April-May, when the temperature is above zero. If not, you can take scraps of hardwood: beech, chestnut, ash, maple, poplar, birch, aspen, etc.
The mycelium in the form of sticks is simply inserted into the drilled holes and covered with plasticine. A small disk (2-3 cm thick) is sawed off from the log, the end is covered with a layer of mycelium and covered with this disk on top, fixing it with nails. The end of the log is covered with a layer of mycelium 1-2 cm thick or 100-150 g. A second one is placed on top, the end of which is also sprinkled with mycelium. Then the third, etc.
Such a column can be grown up to 1.5 m and even 2 m. To make the column more stable, the diameter of the cuttings must be at least 20 cm. After sowing the mycelium, the logs must be stacked somewhere in a barn or basement, where the temperature is kept at 15 ° C. If the mycelium was introduced using the first two methods, then the logs can be stacked horizontally on top of each other and covered with perforated film or matting, burlap. The third method involves vertical arrangement of the logs.
Planting stumps in the ground
When you see that the stumps are covered with a white coating, it’s time to plant them in the ground. This is usually done in May. For fruiting, choose the most shaded place on the site, for example, under the crowns of trees or under a canopy. The logs are buried in the ground in rows to a depth of 10-15 cm, and the bottom of the holes is covered with wet leaves or sawdust.
For the winter, stumps are well covered with spruce branches, straw or leaves. Now you know how to grow oyster mushrooms on stumps. Such a mushroom plantation can feed you for 3-5 years, but the largest harvests occur in the second and third years. Growing oyster mushrooms on stumps is an extensive method of growing mushrooms.
It is tied with wire to strengthen it. While the mycelium is growing in the wood, the stack is covered with polyethylene.
The stumps are wrapped in plastic film with slits for the mycelium to breathe.
How soon to harvest oyster mushrooms on stumps?
Damp wood nourishes the mycelium well. Consuming water, lignin and cellulose from wood, it begins to grow. With normal air humidity and sufficient precipitation, watering the plantation is not required.
The technology of growing oyster mushrooms on stumps is successfully used all over the world, even on an industrial scale. By setting up your own such plantation, you will be able to regularly harvest mushrooms from spring to late autumn! And, for example, oyster mushroom mycelium on stumps in the basement can bear fruit all year round.
Cultivating mushrooms is a pleasant and rewarding activity! You can create your own high-yielding plantations with our unique oyster mushroom growing kit!
It contains high-yielding grain mycelium of mushrooms, obtained using sterile technology, and all other components for home mushroom growing! Planting material is produced in a specialized laboratory and meets high sowing standards. Delivery throughout Russia - by mail, cash on delivery! Place your order by filling out the form, or call us toll free on 8 800 700 63 90!
Our managers will advise you on all your questions! Price of a kit for growing oyster mushrooms Included: 1. 6 liters of oyster mushroom grain mycelium. 2. 10 bags 350x800mm for preparing substrate blocks 3. 10 pack. dietary supplements. 4. TGO-1 thermohygrometer for measuring air temperature and humidity. 5. Video on growing oyster mushrooms (DISC 3.5 GB) 6. Technology for growing oyster mushroom, shiitake, champignon mycelium at home - without an autoclave
GROWING oyster mushrooms on stumps
can be carried out, for example, in clearings or in a garden plot. So, if you decide to get rid of old trees in your garden by cutting them down, then the remaining stumps can be used to grow oyster mushrooms using the extensive method.
By the way, this is a good way to uproot stumps - oyster mushrooms are a natural destroyer of dead wood, and in two to three years, oyster mushrooms will completely destroy stumps. If you don’t have stumps, you can make them artificially. Below is one way to do this.
Below we will describe one of the methods using the extensive method. In this case, wood scraps are used as stumps. Oyster mushrooms can grow on a variety of types of wood.
In nature, it is found on elm, oak, alder, poplar, linden, rowan, white acacia and many other tree species. The extensive method of growing oyster mushrooms means that cultivation is associated with a quantitative increase, distribution, that is, without the use of technologies aimed at qualitatively changing growing conditions. The extensive method of growing oyster mushrooms can be carried out indoors or outdoors. In the first case, any suitable method can be adapted for growing oyster mushrooms area, such as a shaded area in a garden.
You can also equip a special canopy. The main requirement for a place to grow oyster mushrooms is that it must be well shaded at any time of the day. This method of growing oyster mushrooms is seasonal.
Oyster mushrooms can be grown indoors using the extensive method all year round.
GROWING OYSTER MUSTERY ON STOOMS - INOCULUTION
Oyster mushrooms can grow on a variety of types of wood. In nature, it is found on elm, oak, alder, poplar, linden, rowan, white acacia and many other tree species.
To grow oyster mushrooms, you can use low-grade wood from the species on which it is found in nature. Oyster mushrooms can be grown on artificially made stumps. For this purpose, bars or logs 30-40 cm long and about 25 cm in diameter are prepared.
and soaked in water for a week. In this case, freshly cut wood does not need to be soaked. These bars or logs will act as stumps on which oyster mushrooms will grow. The next stage of growing oyster mushrooms is adding mycelium.
Before adding mycelium, the wood moisture content should be at least 80-90%. Here are some ways to introduce mycelium.>Drill or saw holes in a log or block1.
After that, the mycelium is introduced, and then these holes are sealed with adhesive tape. 3. A disk 1.5-2 cm thick is sawed off, mycelium is poured onto the end, and the disk is nailed.
4. Logs or bars are placed on top of each other and 100-150 g of mycelium is poured onto the end of each of them. The next stage is the period of overgrowing of the logs with mycelium. This period lasts 2-2.5 months.
After adding the mycelium, the logs are transferred to a room where it is possible to maintain a temperature of 15-20°C. Any barn, cellar, basement is suitable for this. To prevent drying out, the logs are periodically watered.
For the same purpose, they are covered with perforated polyethylene film. The method of covering depends on the method of introducing the mycelium. If the mycelium is introduced using the first three methods, then you can cover the logs like this. If the mycelium is introduced using the last method, then they are placed in columns, wrapped in plastic wrap, and the top row is sprinkled with wet sawdust or straw.
There are also wet sawdust or straw between the columns. After two to two and a half months, as soon as the logs are overgrown with mycelium, you can begin the final stage of growing oyster mushrooms. For this, logs overgrown with mycelium are “planted” by placing them vertically and burying them in the ground for about two-thirds in a shaded area or under a canopy. Caring for the plantation during this period consists of periodically watering the ground around the logs in dry weather.
On top of these stumps you can place other stumps in a pyramid, as shown in this video. This will allow for more efficient use of the space allocated for growing oyster mushrooms. Mushrooms usually appear when the temperature reaches 8-14°C.
In central Russia, this temperature is established in September-October. The plantation method is the cheapest way to grow oyster mushrooms. It is suitable for both amateur mushroom growing and for growing oyster mushrooms on an industrial scale.
There is nothing easier than growing your favorite mushrooms on wood at home. This does not require a lot of time, labor and money. There are 2 main ways to grow such mushrooms: on cuttings and on stumps.
When growing oyster mushrooms, hardwood logs without signs of rot are used. The best are: aspen, maple, hornbeam, willow, poplar, birch, beech and oak.
You can also use the wood of fruit trees: pear, apple, walnut, etc. On deciduous trees with soft wood (willow, hornbeam, poplar), the mycelium develops faster than on trees with harder wood (oak, beech), but the yield is lower .The mycelium is purchased in advance (in early autumn or spring) and stored in the refrigerator at a temperature of 0-2°C until use. At this temperature, mycelium grown on compost lasts for about a year, and grain mycelium lasts 3-4 months. At elevated temperatures (20-22°C), compost mycelium is stored for up to a month, and grain mycelium for 5-7 days.
Growing mushrooms on cuttings
With this type of cultivation, the mycelium is germinated indoors, and fruiting occurs in an open area or in the same room. Freshly cut trees with natural moisture content and a diameter of at least 15cm are best.
The log is cut into pieces 25-30 cm long. Dried logs are soaked in water for 2-3 days. Infection of fresh cuttings with mycelium is carried out at the end of winter or early spring.
In the lower part of the prepared cut, slits are cut in a checkerboard pattern at a distance of 10-15 cm from each other or holes are drilled with a diameter of 1-2 cm and a depth of 4-5 cm. With clean hands, insert “mushroom sticks” and cover the holes with pieces of bark, wet sawdust, moistened cotton wool or paraffin.
Wrap in damp burlap and place in a dark and damp room for overgrowth with mycelium. At a temperature of 15-18°C and relative humidity of about 90%, the cutting is overgrown with mycelium in 2-2.5 months. The burlap is removed after a white fluffy coating appears in the areas of mycelium infection.
The cutting is taken out of the room, dug into the ground 1/3 - 1/2 of its length in a shaded place and watered. There is an easier way to sow mycelium. The mycelium is poured into the center onto thick, clean cardboard and the freshly cut end of the cut is placed on top, in which small holes are made with a knife.
The free ends of the cardboard are lifted and tied with tight twine around the cut. The end of the cut with cardboard is planted in the ground and watered well.
Oyster mushrooms are grown in the garden under fruit trees, under a canopy, in the shade of a fence or building, where the soil is constantly moist and the mushrooms are protected from sunlight. Such conditions prevent the cutting from drying out and help increase the yield.
In dry weather, water the soil. The cutting is most carefully cared for in the first year; in subsequent years, it is watered before fruiting begins. 2-3 months after planting the cut in the soil, when the temperature drops at night, fruiting begins.
7-10 days after the appearance of the primordia of the fruiting bodies, harvesting begins. The deadline for collection is when the mushroom cap reaches a diameter of 8-10 cm, and the legs reach 4 cm in length.
The cuttings overwinter in open soil; they are not recommended to be moved anywhere. The cuttings do not need to be taken outside, but left in the same room where they were overgrown with mycelium, with the same temperature and air humidity of 60-85%. In this case, you can harvest all year round.
When growing oyster mushrooms in a greenhouse, the cuttings are infected with mycelium in October-November and deepened into the soil by 10-15 cm. The mycelium applied to the end of the cut is covered with a wooden disk 2-3 cm thick and with a diameter corresponding to the diameter of the cut.
Overgrowth of cuttings occurs within 1-1.5 months at an air temperature of 13-15°C, soil temperature of 20-22°C and relative air humidity of 90-95%. After the mycelium grows, the air temperature is reduced to 0-2°C for 2 days to stimulate fruiting, and then again increase to 10-14°C. Fruiting in a greenhouse occurs 2-2.5 months after the introduction of mycelium.
This cultivation allows you to extend the period of consumption of mushrooms or obtain them during the winter. Fruiting is wavy in nature.
Growing mushrooms on stumps
Such cultivation is of considerable interest. With this method, the introduction of seed, germination of mycelium and fruiting are carried out directly on the plot.
Oyster mushrooms on stumps (chocks), storage in cellophane or without it.
It is advisable to use fresh hardwood stumps with a diameter of 25-70cm after recent tree felling. There should be no presence of other mushrooms on the stump. Wood can be infested at any time of the year, but it is better in April-June.
The technology for introducing mycelium is similar to that given above, but there is no need to wrap the stump in burlap. The lower part of the stump is sown close to the ground.
Tall stumps begin to be seeded with mycelium at a distance of 4-6 cm from the top surface. The appearance of oyster mushroom fruiting bodies on stumps and logs located in the garden is facilitated by a decrease in daytime temperature to 12-18°C, and at night - to 4-8°C. This weather is typical for September-October.
Up to 100 primordia of fruiting bodies can appear on one log or stump. Fruiting lasts 30-50 days depending on weather conditions.
In dry weather, the stumps are watered at least 2 times a week. Mushrooms planted on wood grow for 6-8 years and bear fruit until the wood substrate is completely destroyed. Maximum yield is observed in the second year after inoculation. In addition to obtaining excellent mushrooms, you achieve the destruction of stumps on your site without uprooting. Try growing oyster mushrooms in your garden, because mushrooms grown extensively on wood are the most valued mushrooms all over the world for their nutritional and medicinal properties.
Growing mushrooms on straw
Oyster mushrooms are grown not only on wood, but also on bags of straw. The straw is poured with boiling water, cooled to room temperature and placed tightly in a plastic bag, squeezing out excess moisture with your hands. From time to time, sprinkle the straw with fresh mycelium.
For a bucket of straw, 200g of mycelium on wheat or oats is enough. Holes with a diameter of 1-2cm are made in the bag at a distance of 10-15cm.
Oyster mushrooms will germinate through them. Leave the bag in a dark room at a temperature of 22-25°C until the substrate is so overgrown that it takes on the appearance of a compact block overgrown with mycelium. Then it is transferred to a cool place until the primordia of the fruiting bodies appear. Then the bag is taken outside to a shaded place (in summer) or left to bear fruit in the basement or greenhouse (in winter). When the mycelium is sown in April-May, fruiting begins in September-October.
Growing mushrooms in a greenhouse is a very interesting topic, which we have already talked about. But we came up with the idea of growing oyster mushrooms at the dacha. To what extent this is possible and what is necessary for growing oyster mushrooms in the country, we will consider now.
Oyster mushrooms are an excellent and fast-growing type of mushroom, which for many has become not only a product of their own production, but also an industrial crop that has firmly occupied a certain niche in the market. By and large, such mushrooms are inexpensive, and you won’t earn much by growing them in your dacha in small quantities, but you can always organize a small “bed” in a certain room and get fresh mushrooms every day for your own needs. Boiled, fried, stewed, pickled, canned oyster mushrooms, mushrooms in a salad or fried - all this will no longer be a problem if you start growing it in the country. Of course, there is the organization of a place for production and some start-up expenses ahead, but then - no problems, and only fresh and aromatic mushrooms every day.

Growing oyster mushrooms in the country
The technology for growing oyster mushrooms involves a special algorithm that you must follow at first, but in the future do not forget about the main points. In principle, everything ingenious is simple, and in order to grow a decent harvest, you will need to fulfill only the simplest requirements.
Selection and preparation of premises for oyster mushrooms
To grow mushrooms, we need to choose a room in the country that is not currently in use. It is advisable to identify exactly the one that is not planned to be used in the near future. This could be a basement, a cellar, a special hole in an old garage, or a newly equipped room specifically for a small business.
Having chosen a room, it is necessary to prepare it for use and disinfect it. It will be enough to thoroughly treat all surfaces of the room with a 4% lime solution. After treatment, the room should be hermetically sealed for a day or two. Afterwards, ventilate well until the smell goes away completely.

It is worth taking into account the fact that two rooms must be prepared in this way - the germination room and the plant room.
Preparing the substrate for growing oyster mushrooms
Any of the presented materials can act as a substrate. These are sunflower husks, sawdust, corn cobs, and cereal straw.
We recommend using chopped straw or husks, or a mixture of these materials, for mushroom production. Initially, we will need pasteurization of straw, husks or a mixture of them and the preparation itself. You can do it as follows:
- Our mixture or individual material is poured with warm water for 20 minutes, at a temperature of no more than +25°C. All this time the mixture can be stirred, as if rinsing it;
- Afterwards, you need to drain the dirty water from the pasteurization container, squeeze out the mixture and fill it with hot water, at +70+80°C, set pressure on top for 5-7 hours, and then simply drain the water and squeeze out the straw and husks;
- Now, in order to increase the nutritional value of the substrate, and hence the fruit formation in it, we need to add additional components. We choose 0.5% superphosphate, 0.5% urea, 2% gypsum and 2% ground limestone;
- When adding additives, their humidity should be kept at 75% so that the additives are not simply washed out with water. Also, you can pasteurize the additives separately and only then add them to the substrate.

Preparing bags for the production of oyster mushrooms
To grow high-quality mushrooms, we need to plant them not only in a high-quality substrate and maintain agricultural technology, but also prepare the correct container for oyster mushrooms, that is, bags.
There is nothing complicated here, and any plastic bags can be used to grow oyster mushrooms in the country. For example, bags 40x60 cm or bags 50x100 cm. Next, we will need to make holes through which the mycelium will “serve” fruits to us. Holes in the bags for oyster mushrooms are made 15-20 cm apart, in a chaotic manner. We need holes 1.5-2 cm in diameter.

We place the substrate in bags and populate the mycelium
The finished substrate is poured into a bag. The first layer is 15 cm, then a layer of mycelium, the next layer is 15-20 cm, and again a layer of mycelium. This must be done until the bag is 2/3 full. The main thing is to lay the substrate and mycelium evenly, and spend about 5% of the mycelium of the total weight of the bag on each bag. Please also note that the average moisture content of straw with husks should be 75%.
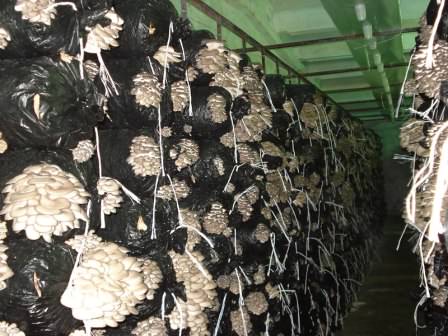
After filling the bags, they are tied and transferred to a prepared room, where they are stacked on top of each other in rows of 2-3 bags, or simply hung.
Growing oyster mushrooms, caring for mushrooms
The temperature of the germination room must be strictly regulated and remain at a level of about +22+24°C, the temperature of the substrate in bags should not exceed +28°C. It is also necessary to monitor the humidity in the room - 90-95%. The interesting thing is that for germination and “complete infection” of the substrate with the fungus, no lighting is required.
After the substrate is overgrown with mycelium, the bags are transferred to the second room - the plant room, where fruiting will occur.
The bags are placed over the area and on top of each other, but not tightly, so that you can walk between them and also have good ventilation. For example, you can install 3-4 bags for each square meter of the room. But there is another way that will save space, or rather, make it more useful. To do this, you will need to install special stakes - bases for bags with substrate, on which you can put several bags at once. Also, the bags can simply be hung from the ceiling.
Fruiting of oyster mushroom
Fruiting of oyster mushrooms occurs only with strict adherence to agricultural technology. It is necessary to maintain the temperature at +12+18°C, humidity at 90-95%. Soon, so-called mushroom plugs should appear in the openings of the bags - oyster mushroom embryos, which will form the fruiting bodies of the mushrooms in the future.
The required humidity must be maintained at all times. This can be done using special installations, or independently, using standard sprayers, or installing several containers filled with water in the room.


If you irrigate indoor air, you must avoid getting water on the bags or forming even small puddles on the floor.
Now we will need lighting, which should work exactly half the day. Don’t worry, there won’t be any significant energy costs, since only 100-180 lux is enough, approximately the same as in cloudy weather. Standard fluorescent lamps can be used to illuminate the growing room.
Don’t forget that oyster mushrooms prefer ventilated rooms with fresh air, which means we need high-quality ventilation. To comply with the requirements, you will have to provide the growing room with special equipment (if the cultivation is large-scale and for business), or with ordinary fans if the room is small. It will be enough to open windows and doors and turn on fans 5-7 times a day.
Remember, the concentration of carbon dioxide in the room should not exceed 1%. In addition, be very careful about your own health, because mushroom spores during fruiting can cause coughing and even a serious allergic reaction. Take care of yourself and use special protection - masks, respirators.
Oyster mushrooms - a simple and profitable business (video)
How is oyster mushroom harvested?
The oyster mushroom stretches closer to the holes that we made, but the mushrooms do not always fall exactly into them. Therefore, it is necessary to help the mushrooms get out - cut holes in the bags, making them a little larger. Once the mushrooms emerge, they take about 6-8 days to grow to the point of cutting.
Mushrooms should be cut carefully, without leaving particles of oyster mushroom fruiting bodies on the bags. You can use mushrooms immediately, but if you need to store them, you will need to use special containers or plastic packaging.
After cutting the mushrooms, the next harvest will appear in two weeks, and the next one in another two. Let's put it simply - there are three waves of harvest, which make up the total harvest in the corresponding percentage - 70%, 20%, 10%.
The value of the substrate in terms of the weight of the finished product is approximately the following - from 10 kg of substrate for the entire rotation you get about 3 kg of oyster mushrooms.

Growing oyster mushrooms in the garden
Growing mushrooms in the basement is always interesting, but today we want to present you with another way so that you can easily grow oyster mushrooms on stumps or logs. What’s good is that when using this method you will not need special equipment to grow oyster mushrooms. Also, it will not be necessary to use the technology for growing oyster mushrooms very strictly, because oyster mushrooms in the country grow very well.

As you can see, this simple method gives us the opportunity to grow oyster mushrooms in the country with our own hands.
Advantages of growing oyster mushrooms in a summer cottage
- It is possible not only to grow them in the warm season, but also to grow oyster mushrooms in winter, in basements, cellars or other specially equipped rooms.
- Low start-up costs, stable yield.
- Always fresh and environmentally friendly product.
- Stable increase in yield at will, and, accordingly, a gradual transfer of hobby into business.

How to grow oyster mushrooms on stumps (video)
Oyster mushrooms, cultivation and care, technologies for forcing and harvesting - now these phrases will not scare you, but will only delight you with the memories that you were able to start such a pleasant event, as well as get an excellent harvest of mushrooms and bring it to a constant level .
Kira Stoletova
Unpretentious oyster mushrooms do not require careful care and do not lead to large financial expenses, so even inexperienced summer residents use the cultivation of oyster mushrooms in the country.

Suitable premises
To grow oyster mushrooms in a summer cottage, you will need a suitable room: growing them in a heated living room or on a country loggia is problematic. The most suitable option is a cellar or basement, where the air temperature is maintained cool.
Before planting mushrooms, the room is disinfected to get rid of mold and pathogenic microorganisms. This is done by staining with lime 1-2 times, followed by spraying with chlorine dissolved in a concentration of 4%.
Growing on substrate
When growing on a substrate, prepare a mixture that consists of:
- cereal straw,
- corn cobs,
- sawdust, excluding softwood sawdust.
All components are crushed so that the particles are no larger than 3-8 cm, then pasteurized by keeping in hot water at a temperature of 70°C-80°C for 5-8 hours or boiled for 1.5-2 hours. Water is drained from the cooled substrate.
Additives added to the substrate can speed up the process of mushroom fruiting. It is given as a percentage of the total mass of soil:
- bran - up to 10%,
- young limestone - up to 2%,
- gypsum - up to 2%,
- urea - up to 0.5%,
- superphosphate - up to 0.5%.
Sowing
Sowing mycelium into the substrate mixture can be done in one of the following ways:
- The substrate is laid out in bags in layers of 10-15 cm, between which the mycelium is laid out. The layers are not compacted, but also do not allow air gaps. The bag is filled to 2/3 of the allowable volume, tied and vertical slits are made on the surface at intervals of 10-15 cm. The mycelium consumption rate is about 3-5% of the total volume of the substrate mixture used.
- The bags are filled with substrate and tied. Vertical slits are made on the surface through which the mycelium is laid. The slits are sealed with tape for 7 days, after which it is removed. The consumption rate of mycelium for each slot is 1 tsp.
Aftercare
The incubation period is 10-15 days. At this time, bags with mycelium are placed in a room with a temperature of 18°C-22°C, no lighting is required. The growing white mycelium appears 3-4 days after sowing.
When the temperature is exceeded by more than 30 points, the mycelium dies.

At the end of the incubation period, bags with sprouted mycelium are transferred to a place where the temperature is maintained at 10°C-15°C. For additional lighting, fluorescent lamps are used, creating an artificial daylight hours lasting at least 8-10 hours. The required humidity level is 90-95%. When optimal care conditions are created, fruiting occurs after 1.5-2 weeks. Mushrooms are collected by twisting them out of the substrate. The number of harvests from 1 bag is up to 4.
Growing on stumps and logs
It is also possible to grow oyster mushrooms in the country on tree stumps and logs. The most suitable tree species for such purposes are deciduous, including apple, maple, alder, acacia, and linden.
When growing oyster mushrooms on stumps, choose healthy wood, free of mold and fungi.
Chocks up to 30-40 cm long and 15 cm thick or more are suitable for planting. They are soaked in clean running water for several days to gain moisture. Freshly cut wood is not soaked.
In the upper horizontal layer of wooden chocks to a depth of 10-15 cm, holes with a diameter of 1.5-2 cm are made with a drill. Additional holes can be made on the sides.
Sowing
More often, to grow oyster mushrooms in the country on stumps, they use independently sprouted grain mycelium, which is placed in each hole, covered with a cotton swab dipped in water or covered with clay on top.
It is recommended to sow mycelium when the air temperature is not lower than 10°C. During the incubation period, wood chocks are placed in a room where the temperature does not fall below 15°C. As a cotton-like white coating appears on them - sprouted mycelium - they are taken out to an open area, choosing the shady side near a building, fence or under the crowns of bushes and trees as the location.
Aftercare
Caring for oyster mushrooms grown on stumps involves regularly moistening the soil on which the chocks stand.
Fruiting on chocks begins with the complete development of the nutritious wood environment by the mycelium, which occurs no earlier than 3-6 months later, however, the mycelium in wood tolerates wintering well and allows mushrooms to be grown for several years to come. They are collected by cutting them to the base with a knife.
Grow oyster mushrooms on tree stumps.
The easiest method for growing oyster mushrooms.
Oyster mushrooms in the country!!!
Conclusion
There are two main ways to grow oyster mushrooms in your summer cottage: on a substrate or on tree stumps. In the first case, the fruiting process begins much faster: after 2 weeks, but ends in 2-3 months. In the second method, mycelium is grown, planted for several years. If wintering is successful, it bears fruit in subsequent years.