Do-it-yourself gas burners for soldering: instructions for making from improvised means. Do-it-yourself flame soldering torch Homemade mini soldering torch
When repairing a car, sometimes you have to resort to soldering various metal parts.
The burner required for this is one of those tools that do not have to be purchased in a store - you can easily make it yourself.
Such skills can be very useful, because it is not always possible to go to a building supermarket, and financial disruptions are quite common.
So, to everyone for whom this issue is relevant, we suggest that you familiarize yourself with this article, the topic of which is do-it-yourself gas burners for soldering.
Soldering allows you to perform an integral hermetic connection of two metal parts by a kind of "gluing" them with some kind of molten material - solder. The latter must show high adhesion with respect to the joined metals, that is, be very “sticky”, and have sufficient strength after solidification.
The melting temperature of the solder must be higher than the operating temperature at which the soldered product is operated; and at the same time lower than the melting point of the base material.
 A gas burner is just what is needed in order to heat the solder and make it viscous enough in this way.
Obviously, for the convenience of work, its torch must maintain a stable shape and temperature.
The advantage of this tool lies in the ability to process areas with a large area - such a task will not be possible for an electric soldering iron.
At the same time, a simple low-power burner can be made with your own hands without much hassle.
With the help of a homemade burner, you can do a lot of useful things. Its capabilities will be quite enough for soldering copper and brass vessels that are part of radiators, intercoolers and heat exchangers, as well as for soldering using hard solders.
In addition, only with the help of this tool it is possible to disassemble the radiator in order to replace its core, as well as replace the honeycombs in it.
Such a burner will also come in handy during body repairs, in which a high temperature is not only not needed, but also highly undesirable, as it can cause warping of this part of the car.
 Perform the restoration of a small damaged area, solder holes with brass, carry out “jewelry” straightening - this tool will be quite suitable for all these works.
A slight heating will also be needed if it is necessary to dismantle a part that has been fitted with an interference fit, that is, a pressed one.
It can be a bearing cage or some kind of bushing.
This method is especially effective if the parts included in the connection are made of materials with different coefficients of thermal expansion.
Propane mini gas burner
A do-it-yourself gas burner on propane is quite simple.
 To make a homemade burner, you will need the following materials:
- brass tubes of various diameters;
- plates made of some heat-resistant material (you can use wooden blocks);
- sealing material - silicone or fluoroplast (FUM-tape).
You will also need some tools:
- vise;
- drill;
- chuck for small diameter drills, for example from Dremel.
To connect the burner to a liquefied gas cylinder, you will need a reducer and a rubber-fabric hose.
Scheme
A homemade soldering torch is extremely simple. Its body is a tube with a nozzle at the end. At the other end, a tap with a pipe for connecting the gas supply hose will be installed.
For the convenience of adjusting the power of the torch, we will equip the nozzle with a divider.

Gas burner diagram
How to make a gas burner with your own hands
Here is the procedure to be followed in the manufacture of the burner:
- From the brass tube, it is necessary to cut off a fragment of a certain length, which will be the burner body. We select the length for reasons of convenience of work and with a small margin for installing the handle.
- The easiest way is to use the handle from an old soldering iron that has served its purpose. In the absence of such, you can cut this element out of a wooden block. A through hole must be drilled along the axis of the wooden handle, into which the burner will be installed. To fix it, you should use epoxy resin.
- To the end of the tube sticking out of the handle, you need to attach a tap, taken, for example, from an old autogen. The junction should be sealed with FUM tape or silicone.

DIY hydrogen burner
Next, you need to plug the tube-body on the other side and make a hole with a diameter of 0.1 mm here - this will be the nozzle. It is not so easy to make such a small hole, let's dwell on this in more detail.
 A mining burner is a necessary device that essentially works on waste. and does not lose its relevance in our time.
You will find instructions for soldering plastic pipes.
Do you know what an electrolyzer is? you will learn everything about this device and how to make it yourself.
Nozzle for gas burner
The craftsmen solve this problem in the following way:
- A hole of as small a diameter as possible is drilled into the body tube. Today, drills with a diameter of 0.2 - 0.3 mm and special cartridges for them are on sale. An example is the Dremel brand.
- Next, the burner is clamped in a vice with soft jaws and gently deformed with a hammer for chasing so that the hole narrows to the required size - 0.1 mm.

Gas Regulator and Nozzle/Jet
It remains to process the nozzle with fine-grained sandpaper, eliminating burrs and irregularities. This must be done in order for the gas flow, and accordingly the torch, to be even.
When starting the burner for the first time, you need to see if this has been achieved, and if not, clean it more thoroughly.
Fabrication and installation of the divider
The divider is made from a piece of brass tube, slightly larger in diameter than the burner. It is attached to the body in parallel. Now, during the operation of the burner, a vacuum is formed in the place where the gas leaves the nozzle, as a result of which air will be sucked in there.
The principle of operation of this device is the same as that of a tourist stove, only it is smaller and runs on a different fuel.
This burner can work both on propane and on a mixture of propane and butane.
Double needle burner
 A very small, one might say, micro-burner, connected to a can for charging lighters, can be made from a very modest set:
- needle for inflating the ball;
- syringe needle;
- two systems for droppers;
- air compressor for aquarium.
In addition, you will need copper wire, a set of tools and materials for soldering, and glue.
Despite its modest size, this burner will turn out to be quite functional: the temperature of its torch reaches 1000C.
Here's what to do:
- Approximately in the middle of the needle for inflating the ball with a needle file, it is necessary to cut off part of the wall so that a small hole is obtained. Its dimensions should be exactly such that the needle from the syringe enters inside.
- With the same needle file, it is necessary to cut off the sharp tip on the needle from the syringe, after which it is obliquely inserted into the hole made in the needle to inflate the ball. “Oblique” is so that the angle between the needles is approximately 15 degrees. At the same time, those parts with which the needles are connected to the pump and syringe should look in the same direction.
- The entry point of a thin needle (from a syringe) into a thick one must be wrapped with copper wire, and then soldered. Thanks to this, the hole will be sealed, and a thin needle will be fixed with a relatively thick one.
- Each of the needles must be tightly attached to the dropper system using glue and a nylon thread winding. The systems have regulators, a kind of valves - they need to be moved to the “closed” position.
- The second end of the system, connected to a thick needle (for inflating the ball), must, again with the help of glue, be tightly attached to the nozzle of the can for charging lighters.
- The other end of the system, connected to the needle from the syringe, must be tightly fixed to the discharge pipe of the aquarium compressor.
Their number and ratio can be changed with the help of regulators on the systems.
In the absence of an aquarium compressor, a compressed air source can be made from a plastic bottle:
- From below, a hole is made in it, into which a spool or nipple is inserted from the inside. Glue is not needed here - this element is securely fixed with the help of the nut on it.
- It is necessary to make a hole in the bottle cap into which the syringe body is inserted (without a piston and needle). Its outlet, on which the needle is usually put on, should look out.
- The place of installation of the syringe in the cap must be properly glued.
- Next, the cap is screwed onto the neck of the bottle and a system connected to a thin needle is tightly connected to the syringe sticking out of it with glue.
It remains to pump air into the bottle through the spool - and the burner can be used.
Related video
A gas burner is a special device that ensures uniform combustion of gas and allows you to regulate the supply of fuel. Often, not every person can afford such a device, however, a do-it-yourself gas burner made from scrap materials will be an economical and practical alternative to factory counterparts.
The main components for the manufacture of powerful gas burners are industrial valves. They may be new, but for a homemade device, it is enough to use used ones in the absence of a gas leak. They are designed to work in tandem with a 50-liter propane gas cylinder with an angle valve and a reducer.
Burner with valve VK-74
The device of this burner is shown in fig. 1. The valve of the oxygen cylinder VK-74 is taken as the basis. A fitting-handle machined on a lathe is installed to the outlet end, to the corrugated part of which a hose from the cylinder is connected. A cap with a prepared threaded hole for the jet is screwed onto the part of the valve with a K3 / 4˝ conical thread, with which it was connected to the gas cylinder. You can use a ready-made version of a blowtorch or gas stove.
The nozzle is made from a piece of steel pipe 1/4˝ 100 mm long and welded to the cap on two pieces of wire ∅5 mm. A distance of 15 mm should be left between the cap and the nozzle for air to enter the combustion zone. By bending the wire holders, the position of the nozzle is adjusted to achieve the center position of the flame.
The sequence of actions for ignition of the burner:
- Open the cylinder valve;
- Bring a lit match to the nozzle and slowly open the burner valve;
- Control gas ignition;
- Regulate the flame with the burner valve
By the way! The highest flame temperature is at the end of the green-blue part of the torch.
A home-made gas burner of this design has one drawback associated with the peculiarity of the location of the valve. The gas flow is directed in the opposite direction to the normal position. Stuffing box seals experience constant gas pressure (including when the valve is closed), so it is necessary to constantly monitor the tightness of the seals.
Attention! The VK-74 valve should only be used when adjusting the flame. Stop gas supply only at the cylinder
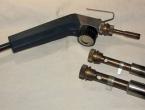
Burner converted from acetylene gas cutter
If you have an acetylene torch with a defective oxygen supply valve, do not rush to throw it away. It will also fit for the manufacture of a burner (Fig. 2.).  Alterations require a mixing chamber, the contents of which must be removed to reduce weight. You will need to remove the oxygen barrel and valve. Solder the resulting hole with hard solder. Connect the hose coming from the gas cylinder reducer to the M16 × 1.5 left-hand threaded fitting.
With a union nut on the mixing chamber, fix a home-made tip bent at 45 ° to make it more convenient to work with the burner. Screw the flange with the nozzle welded to it onto the thread of the tip.
One of the options for the execution of such a burner is the use of a cap with an M22 × 1.5 thread. The design of the nozzle here is similar to the nozzle of the burner described above. Homemade gas burner is ready to go.
Gas mini burner
Mini gas burners are more suitable for working with small parts. The mini burner is based on a ball inflation needle. It is necessary to make a cut in it, a little further than the middle of the needle. Some needles already have a similar hole, which greatly speeds up the work process. Next, you need to take a syringe needle, and bend it about 45 degrees in the middle.

The design of the mini gas burner
The pointed end of the syringe needle is best sharpened so that it is straight. After that, it must be inserted into the ball needle in such a way that one of its ends comes out through the hole, and the other protrudes from the large needle by several mm. The resulting mini design should be fixed with soldering. After that, droppers must be attached to the bases of the two needles. Clamps - Dropper regulators should be moved as close to the needles as possible. In the resulting burner, they will act as regulators for the supply of gas and air. They also need to be fastened together, and this is best done with a thermal gun. It remains only to connect a source of compressed gas to the finished device, the burner is ready for use. Such a homemade gas burner can heat objects up to 1000 degrees. It should be handled with care and safety precautions.
Infrared heater
The use of homemade gas burners may suggest the idea of \u200b\u200bcreating an infrared heater with your own hands. Such heaters are designed to heat houses or garages, in the face of ever-increasing gas prices. The easiest way to keep warm is to use ordinary food foil. It must be mounted on the wall behind the battery. Heat flows will be reflected from the aluminum surface into the room, which will not allow heat to escape through the walls.
In a more complex version, you can use a spiral. To do this, you need to purchase an incandescent spiral and an infrared port in the store. Making such a device is quite simple: the spiral must be laid in a metal block that is connected to the mains. An infrared port is attached to the resulting structure. This device works on the basis of the ability of the port to distribute thermal information received from the hot coil into the room.
For garages or other small non-residential premises, a heater based on a small tin box and graphite sand is best suited. Such a device is quite compact, it does not require much space, while doing an excellent job with the tasks assigned to it. Before starting work, the container must be thoroughly rinsed and dried. It can be of any diameter and size, it is important that it fully fits your ideas about what the future heater should be like. 
Graphite must be mixed with fine sand in a ratio of one to one and half filled in the box. From a sheet of tin, you need to cut a circle with a diameter suitable for an iron container, and attach a lead wire to its edges. This structure must be laid on a mixture of sand and granite, after which it is covered with the remaining mixture. Next, the container must be tightly closed with a lid in order to artificially create pressure inside it. The second wire of the container body is connected to the car battery.
You can regulate the heating temperature of such a device using a cover. With tighter twisting, the temperature of the tin box will be stronger. With less, it will lose heat. It is important not to allow such a heater to overheat. In such cases, the box will begin to glow with a red or orange glow. When overheated, the process of sand sintering occurs, which leads to a loss in the efficiency of the home-made gas burner. To restore it, internally shake the device.
A gas infrared heater is more expensive in terms of materials, as it requires the purchase of a small  infrared ceramic heater. It is best not to buy a large device, since it will “eat” from a small propane tank, 1 liter in volume. In addition, a burner is needed - a nozzle with a special tap. First of all, you need to get rid of all the burner nozzles, leaving only the pipe and tap. A hose is put on the pipe, which should be a little more than half a meter long. A gas cylinder is connected to this device. It is very important that it be in a vertical position, since the movement of gas goes up, and not horizontally. Such a heater works for two hours on a conventional 200-gram cylinder.
Fishermen often use a similar device during winter fishing in a tent. The stock of cylinders with gas allows you to comfortably spend the night on the ice. In addition, this design is safe, there is no open flame in it, which can cause harm. It takes 10 minutes for a ceramic tile to fully warm up, after which it begins to actively radiate heat, heating the air around it.
How to make a gas burner with your own hands? Or a heater? Very simple! The main thing is to know the internal structure of these devices in order to have an idea about its operation. After that, making a homemade design will not be difficult. The main thing is not to forget about safety precautions when working with open fire or its sources.
Today we will tell you how to make a simple, reliable and convenient injection gas burner for forging and casting with your own hands.
Hello readers and subscribers of the site!

Materials required for the manufacture of a homemade injection gas burner:
- * roofing gas burner;
- two pieces of black pipe 40x3mm (length: 40mm, 50mm);
- one piece of black pipe 25x3 (length: 155mm).
*- a lot of people bother and make a burner from a bunch of plumbing fittings and welding tips, faucets. For what? All this is sold in the store in the form of a roofing torch (take an average nozzle size for normal performance). And we just have to redo the nozzle!
By the way, speaking of the snot. If you are now wondering why something needs to be redone when there are ready-made burners. Just the one I'm going to redo. So the answer is simple. And I demonstrated it clearly in the video. With a short nozzle, the burner will not burn in a closed space! The injection process of air leakage will not work and the flame will go out.
The tool required for the manufacture of an injection gas burner:
- welding machine;
- Bulgarian.
I indicated all the dimensions on the drawing and marked them in the video **  **- Also on the picture displayed ANALOGUE! It can be assembled from transitional cast-iron plumbing couplings and pipes. It will also work well. For me, price is key! I bought pieces of pipe at a metal warehouse and they cost me a little more than 50 rubles + welding expenses, etc. The price of the nozzle rose to 50r! couplings are much more expensive (remember, I have a super-budget starter kit!).
Well, I told you about what I used and why I used this and not another. And you will see a visual production in the video!
p.s. The burner flame burns steadily and very efficiently. Combustion occurs in its outer part. The burner is well cooled by the air flow and remains cold for the entire time of operation. Only the tip is heated, which only contributes to the combustion of gas.
Thank you for watching!
In this article, we will look at how a do-it-yourself gas burner for soldering is made. This device is often in demand both in the private sector and for commercial purposes - for individual technical creativity and various construction tasks. In particular, with the help of gas burners soldering, plumbing and blacksmithing, roofing, jewelry work is carried out, and a flame whose temperature exceeds 1500 ° C is also obtained for other purposes.
In plumbing, using a gas burner, you can heat a metal blank so that in the end it turns out to be sufficiently hardened. When carrying out welding work with some metals, the places of future seams must be warmed up.
Parameters for making a soldering torch
First, the device must be made of refractory metals. With a properly adjusted burner, temperatures in excess of 1000°C can be achieved.Secondly, the burner must be equipped with a reliable working valve that, in the event of a dangerous situation, will shut off the gas supply.
Thirdly, you need to use a reliable connection to a tank with a valve or a 5-liter propane tank with a reducer, which will eliminate the risk of accidents.
Below is a typical diagram and principle of operation of an injection gas burner:

Gas is supplied under pressure through the hose (1) - usually propane. When the liquefied gas in the cylinder evaporates, pressure is created - enough to provide a stable directional flame. Here, a reducer is not needed; a working valve (2) is used to adjust the volume of gas.
The jet enters through the supply tube (3) to the nozzle, and to the nipple (6), which sets the direction of the fire, which is located in the insert (5). This liner mixes gas and air. In the nozzle, the screw fixes the liner. The burner is collapsible, so the nipple can be cleaned.
From the liner, the mixture of air and gas is fed into the nozzle of the nozzle (8). There, oxygen further saturates the mixture. With the ventilation holes (7) stable combustion is achieved.

With these dimensions, the burner is designed for cylinders up to 5 liters.
How the liner is arranged - we will consider separately, the dimensions are shown in the drawing:

The inner diameter of the liner tube (1) must be 0.5 mm smaller than the inner diameter of the nozzle. A washer (2) with air holes is welded inside. The sleeve (2) fixes the tube with the nipple.
The design is different in that when the tab is moved in the nozzle, it is possible to adjust the suction of air through the ventilation holes - and as a result, adjust the temperature of the fire in a wide range.
Making a gas burner from scrap materials: step by step
List of materials and tools:drill;
Bulgarian;
hammer;
sandpaper;
blanks made of brass for the nozzle of the divider;
thin brass tube with a diameter of 15 mm;
wooden bars;
vise;
silicone sealant or FUM tape;
hoses for connection;
valve for adjustment.
How to make a nozzle and a handle

First of all, we take a brass tube and attach a handle to it - for example, from an old burner, or from a wooden block, having processed it before that. In the bar, we drill a hole for a brass tube with the appropriate diameter. Putting the tube into the timber, we fix it with silicone or epoxy.
Important! To make it more convenient to work, we bend the brass tube above the handle at an angle of 45˚.

Next, we proceed to a more time-consuming and lengthy stage of work - the manufacture of the nozzle. The hole size should preferably be 0.1 mm.
With a drill, you can make a slightly larger hole, and then adjust the edges to 0.1 mm. The hole must have the correct shape so that the flame is even.
After that, we fix the workpiece in a vise, take a hammer and carefully, in a vertical plane with a “branch” to the middle of the workpiece, strike the future nozzle. We evenly scroll the product to form an ideal hole.
Then we take sandpaper with fine grit and skin the nozzle head. To connect to the tube, a thread is applied to the back of the product, and the elements can also be simply soldered - but in the future the repair of parts will be more difficult.
Now we attach the device to the gas cylinder and set it on fire - the do-it-yourself burner is ready to go. However, here you can see that to adjust the gas flow, you can only open and close the valve of the gas cylinder, and in this way it is very difficult to obtain the desired flame. What we can do?
How to improve flame control

For the normal operation of our home-made unit, we will install a divider and a crane on it. It is better to mount the faucet near the handle, at a distance of about 2–4 cm, but it can also be mounted on the inlet pipe. As an option, take a burner tap from an old autogen or another similar tap that is threaded. To seal the connection, we take the FUM tape.
The divider is installed on a pipe with a nozzle, it is made of brass, diameter 15 mm. The best option is a cylindrical part, where there is a hole for a tube with a nozzle.
If it doesn't exist, do this:
1. We take a brass pipe with a diameter of 35 mm and cut off a piece of 100–150 mm.
2. We take a marker, step back from the end and mark 3-5 points, with an equal distance between them.
3. We drill holes of 8–10 mm in the pipe, take a grinder and make cuts evenly to them.
4. We bend everything to the center and weld it to the burner pipe.

For proper fixation of the divider, we place it in such a way that the nozzle protrudes 2-3 mm from the junction. Due to such a device, the flame will be protected from strong winds, and will also be fed by a flow of oxygen and maintain a stable and strong combustion.
We smooth all welding places with a grinder - so our unit will have a more presentable appearance. Now the burner is ready! We bring gas to it and you can get to work.
Do-it-yourself burner: video
A homemade gas burner is a device that has a number of advantages over its other counterparts that run on gasoline and other fuels. The main advantages of gas burners are as follows: they are easy to use, do not emit harmful and unpleasant odors during use, and do not smoke, like, for example, gasoline burners. In addition, it is very compact, which means that it can be used in almost any industry. What are its features and how to do it yourself?
Gas burner device
The design of this tool assumes the presence of the following main parts:
- Reducer.
- Nozzles.
- Fuel supply regulator (in this case, gas).
- heads.
- Node where it is fixed
What does she work on?
As for fuel, the gas burner often runs on propane (or a propane-butane mixture). They fill a separate container (cylinder), which, as we noted above, is attached to a special assembly.
Is it difficult to do it yourself?
It should be noted that in its design this device does not have any complex elements and details. Therefore, it is done by hand very quickly (as practice shows, it takes no more than 30-40 minutes of time to work), and even a novice master will be able to figure out its design. In the case of gasoline devices, things will not be so positive.

Scope and design elements
It is mainly used for heating and drying materials, for cutting metal products, including pipes, and for firing old paint. The design of the burner includes a metal case (it also includes a special glass that prevents the wind from blowing out the flame), a nozzle (for igniting fuel), a handle that is attached to the body (by the way, its length should be no more than 100 centimeters), a holder ( mounted on the handle and made of wood or heat-resistant plastic), as well as a gas hose. In addition, there is a reducer and a supply pipe with a valve. The latter regulates the level of gas supply and, accordingly, the length of the flame too.
How to make a mini-gas burner with your own hands?
You can start with the simplest - with the handle. It can be made of wood, and it is best to take it ready from any burnt soldering iron. The inlet pipe should be made of steel. Pay special attention to sizes. The optimal diameter of the tube should be approximately 1 centimeter. In this case, the thickness is not more than 2-2.5 millimeters. This tube must be inserted into the handle and fixed. This can be done with ordinary glue.

Frame
We also make it from steel, namely from a brass bar 2 centimeters wide. You can also make a divider from it. Next, you need to make a few holes. This is necessary in order to ensure a normal supply of oxygen. Otherwise, at the slightest draft, the burner flame will go out or the gas from the nozzle simply will not ignite. How many holes do you need to make? There are 4 of them in total, each of which has a diameter of 1 millimeter. These holes must be made in the divider rod. In addition, drill 2 radical holes of 5 millimeters directly into the case. All this will contribute to the normal combustion of fuel in the device, which will positively affect the speed and quality of the work performed.

How is a homemade gas burner made next? Next, you will need to press the divider into the body. In this case, the inner flange should be installed with a small gap (at least 0.6 mm). This slot will serve to slow down the flow of gas supplied to the igniter hole.
How to make a nozzle?
It will be machined from a metal bar. In order to make a hole in the nozzle, you will need to use a 2 mm drill bit and make a blind hole with it. In this case, the distance to the exit should be at least one and a half millimeters. For a jumper, we try on a drill with a diameter of 4 mm. The hole made is tapped with a hammer, then the end of the device is ground with sandpaper. It must be processed until the nozzle can be screwed onto the threaded tip of the tube.
Now a hose is put on the end of the tube (it comes from the cylinder), made of a special rubber-fabric material. It is fixed with a conventional clamp using a Phillips or minus screwdriver. When the working pressure is set, supply gas and bring the nozzle into the flame of the gas burner. This should be done only after the substance has completely expelled the air from the hose. The top part of the part should be polished. It must be processed until the length of the burner torch is about 50 millimeters.
How to bring all these elements together?
The body together with the divider should be screwed onto the external thread of the nozzle. At the same time, a gas burner, made with your own hands, taking into account all the recommendations, must supply an even flame. It is important to ensure that the fuel does not emit soot during combustion.
What to do if the burner smokes and gives an uneven flame? In this case, you need to gradually turn the body on the thread of the nozzle. This must be done until the gas does not give such a characteristic smoke. If it is very loose, seal it. Everything, at this stage, the do-it-yourself gas burner has been successfully constructed. Now you can safely use it on the farm.

A few words about how to work with the tool
In order for a do-it-yourself gas burner to be safe to use, before the first start, be sure to check its parts for leaks, namely solder joints, connectors and sleeves. After that, open the valve half a turn and wait until the device fires. Here, the ignition process occurs automatically, so no further action should be taken. Now adjust the level and length of the supplied flame (this is done using a reducer or the same valve) and get to work.
So, we found out how a gas burner is made with our own hands, learned its design and the rules for using this device.