Do-it-yourself drainage system around the house - device technology. House foundation drainage system: schemes and solutions How to make drainage under the foundation
There are several places in a private house that need to be protected from getting wet from the outside. This is the foundation and recessed buildings. Rainwater, all kinds of runoff and rising groundwater gradually destroy the monolithic foundations and walls of the basements. A properly equipped drainage system around the house can prevent the occurrence of this process. It is able to remove excess moisture from structures. Even a very good blind area cannot be compared in terms of the degree of protection of a house with a laid drainage system. It is highly recommended to equip such a system near each house, regardless of the presence of a basement or basement.
A high-quality drainage system around the house with your own hands can be made in several ways:
Features of different foundation drainage systems
The choice of a particular type of drainage depends on the presence of buried rooms, the depth of groundwater, the composition of the soil on the site and the relief of the site itself. Consider what features the drainage device around the house has.
In total, there are 3 types of drainage, which differ in their location and design:

Important: Please note that reservoir drainage does not replace other types of drainage, but only complements it. Therefore, in addition to it, the main drainage system should be carried out.
Please note that if you decide to do ring drainage around the house with your own hands, the system should be located 0.5 m below the foundation level. Such an arrangement will ensure high-quality removal of groundwater from the building at any time of the year.
And if you are thinking about that, then our separate material on this topic may be useful to you.
Drainage installation
Consider how to make a drainage system around the house in two ways.
Production of wall drainage
Before performing work, it is necessary to prepare the foundation, since the system will directly adjoin it.
For this, the following work is carried out:
- The foundation from the outside is primed with a special bituminous primer.
- Bituminous mastic is applied to the dried surface.
- A reinforcing mesh with 2 x 2 mm cells is glued onto the mastic.
- The next day, after the mastic has hardened, the second layer of mastic is again applied to the mesh.
 In the photo, the drainage system around the house is a trench and manholes along the edges
 - a collector well is mounted, to which drainage pipes will be connected. It is located at the lowest point on the site;
- using a laser or building level, the slope of the trench passing near the foundation is ensured towards the water collector;
- the bottom of the trenches is covered with a layer of sand of at least 5 cm;
- geotextiles are laid on the sand, the sides of which will subsequently be overlapped;
- a gravel backfill is created having a thickness of the order of 10 cm;
- prepared perforated pipes are laid on the gravel layer. They are provided with a slope of 2 degrees;
- pipes are joined by adapters and corner connectors;
- at the corners of the building, all pipelines enter the installed manholes;
- pipes are laid from the manholes, diverting water into a collection well or drain pit. These pipes are also located in trenches and have a slope;
- the pipes are backfilled with gravel (about 10 cm) and the entire contents are wrapped with geotextiles. By means of synthetic ropes, the geotextile is firmly fixed;
- further backfilling of the trenches to the level of the soil is carried out with sand or soddy soil.
We looked at how to make drainage around a wall-type foundation. Next, we will pay attention to the manufacture of trench drainage, which is even more popular.
Production of an annular drainage
For this type of work, you will also need perforated pipes, crushed stone, sand and geotextiles. When an annular drainage system is made around the house, the technology involves digging trenches at a distance of 5-8 m from the foundation of the building in order to exclude the possibility of subsidence of the soil around it. The trenches are located around the building and represent a closed system. The depth of the trenches should be such that the drainage passes below the level of the foundation by 50 cm.
A trench (or several trenches) is immediately carried out towards the main catchment well. The slope of the trenches is provided at least 2-3 cm per linear meter. The slope can be adjusted by adding sand in the right places.

- the bottom of the trenches is lined with a layer of sand, and then with geotextiles, the edges of which are wrapped around their walls;
- crushed stone is poured onto the geotextile with a layer of 10 cm;
- pipes with holes drilled in them are laid out on crushed stone. It is desirable to use a pipe diameter of at least 10 cm. It is advisable to pre-wrap all pipes with a layer of geotextile, which will prevent their clogging;
Tip: Ordinary PVC pipes used for sewerage are quite suitable. In them, you can drill holes of small diameter with a drill, placing them in a certain order.
- the slope of the pipes is checked, which must be at least 2 degrees;
- manholes are mounted at pipe bends, closed with removable covers. The same wells should be installed on long straight sections, with a step of 12 m;
- crushed stone or gravel is poured over the laid pipes with a layer of 20-30 cm;
- the entire “pie” inside the trenches is wrapped with overlapping geotextiles;
- the place remaining in the trenches is covered with river sand and covered with turf.

Features of drainage wells
Any drainage around a site or structure should be constructed using multiple manholes located at pipe bends. It is in these places that clogging of drainage pipes most often occurs. Through the manhole, you can control the cleanliness of the drains and clean them if necessary. Wells can be purchased or made from any material. They should be of such a width that it is convenient to clean them by lowering your hand there.

In addition to several manholes, at the lowest point of the site is located collector well designed to collect all the water flowing through the channels. This is a wider and more voluminous structure, which can be concrete, plastic or metal. Its depth is chosen in such a way that the pipes entering it are at a considerable distance from the bottom. This makes it possible to periodically clean the well from sediments accumulated at its bottom and allows the well to be filled with sewage. From the collector tank, water can be pumped out by a pump or go by gravity to designated places.
By creating a drainage system around the house in accordance with all the rules, you will get rid of the detrimental effect of excessive dampness affecting the foundation and recessed rooms of the house.
Starting work on building a house, you need to have an idea about all the stages of construction, including how to properly drain the foundation. The reliability of the entire structure depends on the quality of the foundation.
The drainage system is used to strengthen the foundation with an unfavorable type of soil, or in conditions of frequent precipitation and is of two types:
Wall drainage system
 House foundation drainage
It is necessary to drain melt, ground and other waters and protect the structure from their harmful effects. With high-quality installation of drainage, the service life of the building is significantly increased, since it prevents the accumulation of moisture, the formation of mold and other adverse factors that lead to the destruction of the house.
Wall drainage is an angled system consisting of closed pipes. The corners of the structure are equipped with manholes. Wells are necessary to eliminate blockages that may occur during operation.
With the help of drainage, the hydrostatic and mechanical pressure of soil water on the foundation is removed.
Ring drainage system
 Ring type drainage
This drainage system is not mounted at the surface of the walls, but at a certain distance from them (about 3m). This drainage is used in the absence of the possibility of using a wall type and an installed blind area.
In the absence of waterproofing of the walls, or the presence of a reinforced concrete base, it is worth making a choice in favor of wall drainage, otherwise you will not get the desired result.
Consequences of lack of drainage

The presence of a drainage system is simply necessary, otherwise the impact of moisture on the base of the house will lead to its destruction. The consequences will manifest themselves gradually in the form of skewed walls, roofs and the entire structure. That is, over time, the probability of falling at home is high.
Pipes for drainage

To create a drainage system, there are many materials that are sold in hardware stores. The most used are corrugated polyethylene pipes, which bend well. The walls of such pipes are equipped with holes (perforations) necessary for the passage of water into them and further into the catchment.
Pipe laying is carried out at a depth of up to 3 meters, and the service life exceeds half a century. They are mounted both before waterproofing and after. The diameter varies from 5 to 20 cm.
If there is a high possibility of penetration of foreign particles into the pipe, and, accordingly, there is a high probability of blockages, an additional winding from the geotextile is required.
Geotextile
 Geotextile Geotextiles have recently been rapidly gaining popularity in the construction industry. It is produced using a woven or non-woven method from polymer fibers. Since the raw materials are environmentally friendly, the final material is also environmentally friendly.
The geotextile has the following advantages:
- chemical resistance;
- no reaction resulting from thermal oxidation;
- not subject to rotting, mold and fungal diseases;
- due to its structure, the geotextile is protected from rodent attacks and plant germination.
This material is used when filtration, separation, drainage and protection of the drainage system is required.
Self-installation of the drainage system
 Materials for work
 ring drainage When thinking about building your own house, it is necessary to provide for a drainage system, otherwise the life of the structure will be minimal.
This task should be approached with maximum responsibility and it is advisable to entrust all work to specialists. However, having acquired the necessary theoretical base, you can cope on your own.
- A sand cushion is made at the bottom of the ditch;
- Installation of pipes is carried out at an angle of 1 cm per meter;
- The pipes are cut with a hacksaw, then the sections are connected using a press fit and the joints are sealed with glue, followed by tape wrapping;
- Having laid and formed the pipeline, the ditch must be covered with a 30 cm layer of fine gravel, then a layer of filtering geotextile spreads;
- A non-perforated collector is installed on top of the entire structure, which is attached to downpipes using fittings;
- The last step is the tamping of the upper soil layer covering the entire structure. If there is a possibility of abundant water flows, it is necessary to provide for a crushed stone embankment of large or medium fractions.
On this, drainage work is considered completed, and in the future you can not worry about the safety of your own home.
How to do foundation drainage
An important functional purpose of foundation drainage is the timely drainage of the foundation of the house, protection from damage caused by excessive dampness, mold, and freezing.

As well as preventing flooding of basements and cellars, the formation of puddles from precipitation, melt and groundwater on the footpaths around the building.
Drainage is able to reliably protect the foundation from flooding with groundwater.
An efficient modern drainage system around the perimeter of the foundation extends the life of residential buildings, commercial buildings and structures of various types.
What is drainage and why is it needed
Drainage is a closed system of drainage pipes located at a certain angle below the level of the base of the foundation. All pipes are interconnected by special wells for drains.
To install the foundation drainage, wear-resistant double-layer corrugated pipes with a diameter of up to 110 mm and external gutters for efficient water drainage are used.
High-quality drainage provides for the quick and safe removal of water from the plot and foundation. It protects the base of the building, basement and technical rooms from flooding caused by ground and melt water, precipitation and runoff.
Drains, properly laid in earthen trenches around the entire perimeter of the building, are able to divert excess water, prevent the appearance of dampness, fungus and the destruction of load-bearing walls.
The complexity of the installation of drainage directly depends on the type of soil and terrain on which the building is located, as well as the depth of groundwater flow.
What types are
According to the installation method, a modern drainage system is divided into two types: closed and open.
Closed drainage is installed in a traditional and combined way, which provides for the additional installation of drainage channels and pipes.
Open drainage is simpler and more affordable in terms of installation and maintenance, it requires the preparation of shallow earthen drainage trenches along the perimeter of the site, interconnected by protective gratings.
According to the method of entry of effluents, drainage can be divided into the following types:
- Perfect. The system provides for lateral and upper entry of wastewater into the drainage. Sprinkling of such drainage is carried out in the direction of groundwater intake;
- Imperfect. This type of system is installed above the water stop. This assumes top, bottom and side penetration of groundwater and runoff into the system, and drainage is sprinkled from all sides.
According to the functionality, foundation drainage can be of several types:

This type of drainage system is also known as a trench. The distance from the foundation to the drainage is 1–3.5 meters.
Suitable for areas located on clay soils and loams, as well as for buildings that do not have basements, basements, garages and other technical premises.
Between the ring (trench) drainage and the base of the house, a clay layer is laid, which prevents the building from flooding.
Distinctive characteristics of the ring drainage system:
- Such a drainage system is presented in the form of a semi-closed ring with a moisture-resistant interior;
- The installation of the system is carried out below the level of the base of the premises for which drainage is provided;
- The distance between the drains and the wall of the building is 3 meters. With highly permeable soils, the pipe laying depth is up to 100 cm, on weak soils - up to 200 cm.
This type of system is designed to protect buildings with basements, basements and technical rooms located on soils with a high content of clay and sand.
Laying a wall drainage system with your own hands is carried out at the stage of foundation construction. For buildings of any type, the foundation drainage is carried out along the perimeter of the base, in the outer corners the pipes are docked with manholes, and at the lowest point - with a well for pumping wastewater.

Additionally, a protective clay lock is installed to effectively remove excess moisture. The distance between it and the outer walls of the building is 100 cm.
Distinctive characteristics of the wall system:
- It is often used for a mixed type of groundwater source;
- Drainage is laid along the perimeter of the building at a distance that does not exceed the width of the foundation;
- The laying of the system is carried out not below the level of the base of the foundation;
Used in combination with ring and wall systems. It is used with a large number of underground sources on any soil, especially on clay and loam.
Formation drainage can be connected to the external drainage system using connecting pipes laid through the foundation of the building. This method of drainage for a pile foundation, which can be done by hand, is especially effective.
Drainage scheme
For all types of foundations, a classic drainage system scheme is used.
It provides for the laying of drainage pipes with a diameter of up to 110 mm along the perimeter of the base of the building. Each drain is mounted at an inclination of up to 8 degrees, and is connected to rotary wells at the outer corners of the perimeter.
At the outlet of the system there is a well equipped with a pump for pumping wastewater. Such a scheme is intended to equip the drainage of a strip foundation, pile, columnar, slab and other types of foundations.
The foundation drainage device consists of such elements as:
- Pipes for drainage with perforation;
- A layer of crushed stone;
- Geotextile;
- Gravel protective layer;
- Drainage wells.

Preparatory work
Before laying the foundation drainage with your own hands, it is necessary to perform a set of preparatory work. They are carried out according to the following algorithm:
- First you need to dig out the base of the building. The outer part of the foundation is cleared of the ground and the old waterproofing layer (if any) is left to dry.
- The outer part of the foundation is treated with a special primer based on bitumen and kerosene.
- After priming, the base is covered with bituminous mastic, resistant to groundwater.
- A special paint mesh with a mesh size of 2.5 × 2.5 mm is installed in the finished layer of mastic.
- A day after the mastic dries, an additional protective layer of coating should be made.
After the work on preparing the foundation is completed, you can start laying the drainage system.
Materials and tools for laying
To properly lay the drainage system with your own hands, you should prepare the main set of materials and tools:
- Perforated drainage pipes made of PVC, HDPE, PP, NDPE. They are produced with the necessary equipment. The degree of rigidity of the pipes is selected taking into account such parameters as the speed and volume of groundwater;
- gravel;
- Sand;
- Wells of rotary type;
- Plastic barrel with perforation for pumping wastewater;
- Pump;
- Pipe clamps;
- Geotextile;
- Shovel and bayonet shovels;
- Pick;
- Electric perforator;
- Trolley for transportation of bulk materials.
Self built
How is the do-it-yourself foundation drainage system laid? The whole process is carried out in several stages:
- Along the perimeter of the building at a distance of 1.5 meters from the foundation, it is necessary to make a trench at an angle of 8 degrees. Earthworks are carried out taking into account the highest point. The width of the trench should be 35 cm more than the width of the pipes. When choosing the depth of the trench, parameters such as the height of the finished foundation, the depth of its laying and the level of groundwater are taken into account.
- At the outer corners of the trench, special extensions are provided for the installation of rotary wells.
- A protective layer of sand up to 25 cm high is poured onto the bottom and is well compacted.
- Geotextile strips are laid out on the sand layer so that the edges of the cuts protrude beyond the trench.
- Next, a layer of coarse gravel is poured to a height of up to 20 cm.
- Drainage pipes can now be installed with a slight slope towards the lowest point of the system. At the turn, special bends are installed for the installation of rotary wells. Pipes are securely fixed with copper clamps.
- In the final part of the system, at a depth of up to 0.6 meters, such an important element as a well for pumping wastewater is installed. The bottom of the pit for the sewer well is lined with geotextiles, then a plastic container with perforated walls is installed and covered with rubble. A drainage pump is mounted in the prepared wastewater tank.
- All connecting pipes of the system are brought to the collection well at an angle.
- The installed drainage pipes are covered with crushed stone, after which the ends of the geotextile are connected and secured with reliable fasteners.
- Branches or small boards are laid out on top of the geotextile to provide additional rigidity. Next, the trench is covered with sand and soil in such a way that a barely noticeable hill is formed.
At this point, the do-it-yourself drainage installation process is considered complete, and the system is completely ready for operation.
Foundation drainage: device, types, do-it-yourself installation
Drainage is a closed system of drainage pipes located at a certain angle below the level of the base of the foundation. All pipes are interconnected by special wells for drains.
Do-it-yourself foundation drainage
Closely located groundwater or a large accumulation of moisture in the soil have a negative impact on any buildings, especially on the foundation. Therefore, to eliminate excessive moisture, it is necessary to carry out measures related to the installation of a drainage system. It is not so difficult to make foundation drainage if you know the features of its installation and the technology of work.

The need for drainage for the foundation and its function

Even the deep occurrence of groundwater in some cases requires the arrangement of drainage, in each case a large number of factors are considered. In some situations, drainage around the foundation is necessary anyway. Here are some of them:
- With a great depth of the basement, when it is below the groundwater level, or less than half a meter from the basement floor to them;
- If the basement is equipped in loamy or clay soil, the level of groundwater passage in this case is not taken into account;
- With a depth of underground premises of more than 1-1.5 meters in conditions of loamy or clayey soil;
- If the place where the building is located is a zone of capillary moisture.

Based on the foregoing, it can be concluded that drainage is necessary when groundwater is located in critical proximity to the building, or passes high enough, giving the impression of a swampy area with no vegetation. There is no need to equip such a system when the soil is dry, and even during the rainy season the groundwater level does not rise to critical levels.

The main functions of the drainage system include:
- Protection against flooding of the building located on the site;

- Ensuring reliable waterproofing of the foundation;
- Prevention of waterlogging of the territory;
- Timely removal of excess water;
- Reducing the degree of heaving of the soil;
- Reducing the pressure of the frozen soil layer on the foundation of the building in winter;
If the right choice of the type of drainage is made, and the design is made in compliance with the project, then the pipes and wells included in the drainage system will significantly reduce the likelihood of cracks and cracks in the foundation, improving its strength characteristics.
Types of drainage
Depending on the installation depth of the drainage system, wall drainage of the foundation is distinguished:
- Deep, mounted strictly below the level of soil freezing, taking into account the depth of the passage of groundwater, or taking into account the degree of drainage of soil layers;

- Surface drainage performs the function of collecting storm and waste water. This type of construction is most often used to protect strip foundations from moisture, and its installation is carried out around the entire perimeter of the blind area. The system of such drainage involves the removal of raindrops that flow down the walls of the building, fall onto the blind area, and from there into the drainage system.

Each of these types of drainage can be both an annular type and a reservoir type.
The ring type scheme is a closed loop encircling the building along the perimeter. With a deep laying system, such a structure can also be laid in a radial way over the entire plane of the structure.

It is most expedient to build reservoir drainage in the case of the Foundation of the building of the "Swedish plate" type. It is laid at a level lower than the plane of the foundation. The peculiarity of the technology of its laying is that drainage pipes are laid on a sand and gravel cushion, on top of which they are covered with a foundation slab.

Necessary tools and materials
To make the drainage of the foundation with your own hands, you will need tools and materials such as:
- Pipes for drainage, usually with a diameter of 100 - 1120 mm, with transverse stiffeners that prevent punching and ensure proper load distribution;
- Wells, which can be either observation wells (most often made of plastic and installed at the corners of the foundation) or receiving wells (of which water gradually goes into the soil, and their location is the territory outside the site);
- Storm drains - designed to drain rainwater from the foundation, and have a semicircular shape;

- Geotextile - its function is to filter the water that enters the drainage system. It is a special canvas, the structure of which is made up of polypropylene threads, unique in their characteristics.
Work technology
Do-it-yourself drainage of the foundation with your own hands is quite simple, for this you need to follow certain rules for its construction, depending on the type of foundation of the building.
slab foundation
The drainage of the slab foundation consists of the following stages:
- A drainage well is installed 20 meters from the building;

- The depth of laying the water intake pipe is estimated and the maximum allowable level of pipe laying is determined;

- Then the pipe is laid, which is gradually filled up, until tightly fixed, after which it is completely covered with backfill;
- The next step is backfilling with sand 10 cm thick, after which it is filled with water and rammed;
- Next, another layer of geotextile is placed to prevent mixing of layers, filtering water and preventing capillary suction of moisture;
- The layer of gravel poured on top is compacted, and on top it is covered with areas of unfilled geotextile;
- Two layers of XPS are laid, 50 mm each;
- Then the formwork structure is installed and covered with a film 6 mm thick;
- Then, to enhance the strength characteristics, reinforcement is installed and the concrete mixture is poured.
Columnar (pile) foundation

The drainage of the pile foundation is done in this way:
- A 20 cm layer of sand, crushed stone is laid in a ditch dug along the perimeter of the building, and a drainage pipe is placed on top;
- A layer of crushed stone of 30 cm is again poured from above, and geotextiles are laid;
- Everything is covered with earth.
Rules for the organization of the drainage system
After completing all the work, it is necessary to make wells into which excess water will flow. There are some rules for installing them:
- They are most often located in the corners of the building;
- For a medium-sized house, 4 viewing and 2 receiving wells are usually enough;

Installation of the drainage system is done at a distance of 1.5 - 3 meters from the foundation. The slope should be towards the main receiving well, its beginning should be from the far corner well.

To make your foundation protected from moisture and precipitation, groundwater, you should use the most suitable drainage system, choosing its type depending on the base and soil characteristics.

High-quality drainage, made according to the rules, can reliably protect the house from flooding, prevent the formation of excess moisture, mold and fungus on the walls of the basement or basement, and also extend the life of the entire house.
foundation drainage
Do-it-yourself foundation drainage Closely located groundwater or a large accumulation of moisture in the soil have a negative impact on any buildings, especially on the foundation. Therefore, for
Do-it-yourself foundation drainage: instructions for slab, strip and column bases

Frost on the walls of the bathhouse, mold and dampness inside are a sure sign that the drainage of the foundation and the drainage of storm water were not done in a timely manner. And this situation is especially dangerous when there is a high level of groundwater on the site - then dampness in the bath and destructive mold on the foundation are provided! Only high-quality drainage around the foundation can save from all this.
What is drainage?
The word "drainage" comes from "drain" - "pipe". In fact, wall drainage of the foundation is a closed system, which is sloping and located below the level of the base of its pouring. The drainage pipes themselves are interconnected at the corners of the bath with special "revision wells". Everything works like this: the excess water that accumulates over time in the soil enters the drainage pipes, and through them - into the collection well, and already from it by pumping out - into the ditch.
As for drainage pipes, it is better not to purchase corrugated flexible pipes for this purpose - they are good in some ways, but it is extremely difficult to maintain the required slope with them. Much better than ordinary orange sewer pipes, in which it is easy to drill as many holes as you like.
And the gutters are used to divert atmospheric water from the foundation - and they are protected with the help of cast-iron gratings.
How to properly design a drainage system?
How effective the foundation drainage device will be depends directly on the accuracy and literacy of its design, as well as on how high-quality materials were used for this. So, for starters, it is important to calculate the loads that the trays and drains will withstand. And for particularly significant loads, it is better not to take plastic pipes.
It is most rational to develop a drainage system even when designing a steam room. And before that, you need to know:
- Ground water level
- foundation level
- Soil composition
The last point is especially important - the correct drainage of the foundation must necessarily take into account the properties of the soil, and materials are selected according to them: sand, geotextiles, a fraction of crushed stone, and the diameter of the holes in the drainage pipe is calculated. The easiest way is to get all this from the company that did the similar drainage in the neighborhood, namely what materials they use to work in this area, how much and why.
There is also no universal depth for the drainage system - it directly depends on the depth of the foundation. But usually the drainage system around the bath is made at a distance of one meter from the walls and at a depth just below the foundation itself.
There is another controversial point: many attendants, during the arrangement of drainage, by trial and error, connected the storm pipe to the drainage pipe - it seems to be more convenient. And how would such systems work normally. But, at the same time, according to building codes, this is not recommended - after all, storm pipes collect surface water, and drainage - only groundwater. Those. their tasks are different, and such experiments are fraught with consequences.
We arrange drainage in the slab foundation
But how to make a foundation-slab drainage? Such a base is often chosen for a bath due to the fact that thanks to it you can make a small technical underground and mount all communications there. The voids between them are filled with sand, insulation is put in and everything is covered with a finishing screed already on the floor. But there is an important point here: water must be diverted from the foundation, especially if the soil itself is saturated with moisture - and it is on this that a monolithic slab is most often built. Yes, and constant dampness in a Russian bath is completely useless ... But there is a way out: this is a good drainage system around the foundation.
Let's break down the whole process step by step:
Step 1. So, first you need to determine exactly where the water will be discharged. Usually this is a drainage well 20 meters from the house. It is necessary to estimate the depth of passage of the water intake pipe in the catchment area, and already on this basis to determine the maximum allowable depth of laying pipes around the bath - namely, the laying depth in the corner of the foundation as the closest to the water discharge point. And the general slope of the entire drainage system will be from about 70 cm to 1 meter.
Step 2. Next, the drainage work itself begins - a foundation pit is dug to a depth of 40 cm. The whole pie will be like this: 10 cm of a sand cushion, 20 cm of gravel and 10 cm of EPPS insulation. The stock should be taken 1-1.5 cm from the edges of the plate.
Step 3. Along the entire perimeter of the bath, it is necessary to dig trenches with a slope - 10 cm deeper than it is supposed to lay the drainage pipe. For the convenience of controlling the position of the pipes, you can pull a rope over the trench itself - with the slope that will be needed.
Step 4. Now the trenches are covered with geotextiles 2 meters wide, and a gravel pillow is poured and rammed on top of them.
Step 5. A pipe is laid in the trench, and gently falls asleep a little. As soon as it is fixed, the final backfill is made.
Step 6. Now the entire pit is filled with a ten-meter layer of sand with watering and tamping.
Step 7. Next, the pit is covered with geotextile - so that the gravel following it is not pressed into the sand, and the layers do not mix. Such a gravel layer will filter water well and lower it into drainage wells, and will also prevent the effect of the so-called capillary suction of moisture.
Step 8. Once the gravel is compacted with a vibrating plate, those parts of the geotextile that protrude at the edges also need to be wrapped again on the gravel. As a result, after tamping, the entire layer will turn out to be even and uniform, the uniformity of the surface will fluctuate + -2 cm.
Step 9. The next step is to lay the XPS - 50 mm each, in two layers. The first layer will extend beyond the borders of the plate by 30 cm, and the second - by a maximum of 5 cm.
Step 10. As soon as the XPS is embedded, the formwork is mounted and the bottom is covered with a film 6 meters wide. Reinforcement is knitted and mortar is poured.
The drainage pipe itself for these purposes can be purchased in geotextile or in coconut winding, which, of course, is more expensive, but more efficient.
How to make drainage of columnar and strip foundations?
Here is how the drainage system is arranged around other types of foundation:
Step 1. The ditch is deepened, and the following is placed on its bottom: sand - 20 cm, crushed stone and a drainage pipe.
The task of the filtration layer is to increase the efficiency of sediment water disposal through drainage. It is made from a filler that would have high water permeability - usually gravel. But it is possible to lay the filtration layer only after waterproofing the foundation walls.
Step 2. Crushed stone is again poured over the pipe, at least 30 cm, and wrapped in geotextiles.
For reference: geotextile is a thin non-woven fabric made of synthetic fibers. It was specially created for laying in the ground - the geotextile passes water well, but it retains small particles of the earth. For the drainage system, this is what you need.
Step 3. All this is covered with earth. By the way, the drainage itself can go into a ditch along the road - if it is well located. And for this, the same water can be pumped out of the wells forcibly - with the help of pumps.
If the drainage system is designed correctly, then the excess moisture that previously impregnated the foundation walls will be removed. And most importantly, the drainage system relieves hydrostatic and mechanical pressure on the foundation itself, and such a bath will last much longer than the one that was built “at random”.
How to make wall drainage around the foundation with your own hands
All about the foundation drainage system: what it is designed for, which pipes are better to take and where to drain water, how to organize drainage from slab and strip foundations.
The stability of the structure and the long service life of any building directly depends on the quality of its foundation. The foundation is the support of the entire building structure and a reliable foundation that evenly transfers the load to the ground. Not surprisingly, the cost of founding houses sometimes reaches 40% of all construction costs.
The construction of the foundation begins after taking into account the type of soil (sandstone, clay soil, gravel, sandy loam, etc.), the freezing point of the soil in winter, the choice of the type of foundation and the accurate calculation of its dimensions.
If the owners did not provide for the drainage system during the construction of the house, they will notice the consequences of their mistake very quickly. In the basement, after a year of operation, dampness will appear and fungus will spread due to seasonal flooding of the building. After another two or three years, the damp foundation will be covered with cracks that will move to the basement and walls.
All of the above signs are a strong argument in favor of the immediate construction of storm sewers and the arrangement of the drainage system of the foundation. Usually these two systems are built simultaneously for a comprehensive solution to problems with excess moisture. Creating a drainage system is as important as water supply in a private house.
Drainage will help drain the foundation, prevent basement flooding in the spring, and avoid problems with building repairs in the near future.
building codes
- Works are carried out only in the warm season. The period from the beginning of June to the end of August is considered optimal, when the air is warm enough, and heavy rains are very rare.
- The arrangement of a drainage system is a rather time-consuming process. For a person working alone, the work will take two to three months. A qualified team will cope on average in three to four weeks. For this reason, the owners hire special construction teams.
- If the work is carried out independently, additional installation around the building of a canopy made of polyethylene and boards is required. This precaution will help protect the already dug trenches and the building itself from moisture entering the basement in the event of heavy rain.
- During the rainy period of summer, the walls of the trenches are reinforced with gratings to prevent soil from crumbling into the structure.
- The yard is equipped with a system of ladders (blind area) made of wood, allowing you to transport soil and building materials without any fear. This measure is especially relevant if there are lawns or a flower bed.
- For the most accurate design of the drainage system, a preliminary digging of the foundation is carried out. At this stage, it is possible to accurately determine the depth of the foundation, its shape and size.
- Along the way, information is collected about the points of maximum accumulation of moisture and the level of groundwater in a particular area.
- At the next stage, the depth of laying pipes and places for placing drainage wells are determined.
- And only after that the list and quantity of building materials becomes obvious.
 The following requirements are put forward for the elements of the drainage system:
- The trench is dug at a distance of one meter from the house and 10-30 centimeters below its base (that is, the laying of pipes is carried out below the foundation). The width of the trench should not exceed 35-40 centimeters.
- A sand cushion must be laid at the bottom of the trench and a slope towards the water collectors is provided (approximately 1 cm per meter).
- Wells (water collectors) are prohibited to be placed at a distance closer than three meters to the house. The best option would be to use a plastic container with a drainage hole at the bottom.
- At the junction of pipes, it is recommended to place manholes. These facilities will assist in flushing the system during operation.
- If high soil moisture is recorded on the site, several water collectors are installed. They are placed side by side and connected to each other by pipes.
Work order
 The device of the drainage system begins with the preparation of the foundation, which includes:
- digging out the entire base of the house (the excavated soil is located on a special construction site, it is used for backfilling);
- digging a trench below the foundation level;
- drying the foundation with a gas burner (but it is better if it dries in the fresh air) and cleaning it from the earth and the remnants of the former waterproofing;
- processing the outer part of the base of the house with a primer (bitumen-kerosene mixture);
- applying bituminous mastic;
- laying reinforced mesh or geotextile fabric on fresh bitumen;
- re-applying the mastic (about a day after the first layer has completely dried).
 Gravel is poured into the excavated trench. This is a rather expensive, but high-quality building material that does not shrink and has excellent filtering properties. Each layer of gravel is compacted with a hand roller.
After the preparatory work and the arrangement of the gravel filter, you can proceed with the installation of the drainage system:
- a moat is dug around the building (the depth is below the level of the foundation, the width is not less than thirty centimeters, the distance from the building is one meter);
- sand is poured to the bottom with a slope towards the water collectors (pillow thickness from 5 to 10 centimeters);
- the bottom and walls are lined with geofabric, the edges of which are temporarily fixed with pins;
a layer of gravel ten centimeters thick is poured on top; - plastic pipes for drainage with perforation are laid (they are produced already wrapped with geofabric);
pipes are covered with a layer of gravel; - above the backfill, the edges of the geotextile are combined and sewn together;
- manholes are located at the corners of the building;
- water intakes are located 3-5 meters from the house below the foundation, but above groundwater (in not too
- wet soil, two water intakes-wells are enough);
- the bottom of all technical pits is lined with geotextiles;
- containers for collecting moisture are sprinkled with gravel, and covered with soil from above (at the bottom of the water collectors
- two or three holes are pre-drilled for water drainage);
- pumps are connected (if it is provided by the project);
- the entire system is backfilled with soil.
Tools and materials
 For construction work you will need:
- bayonet and shovel;
- hammer and other small construction tools;
- drill for working with water collectors;
- perforated plastic pipes (diameter from 7.5 to 10 cm);
- fittings for assembling the pipeline and crosspieces for manholes;
- manholes with plastic hatches;
- plastic tanks for collecting water;
- geotextiles in rolls;
- bituminous mastic for foundation processing;
- gravel and sand.
Important Points
 The device of manholes will help in regular cleaning of the pipeline from dirt accumulated inside. Enough four wells with hatches.
Increased soil moisture requires additional installation of overflow collectors, which serve as reserve tanks and are installed next to the main water collection tanks. The main drains are brought only to the main water collectors.
It is forbidden to sprinkle water collectors with soil. This may cause the container to deform or crack. Backfilling is carried out with fine gravel, which prevents the water collector from heaving.
The angle of inclination of the pipes is selected so that the lower point of the system is 20 cm above the base of the foundation, and the upper one is at the same distance below the floor level in the basement.
What is the greenhouse effect? Read about it in an interesting article.
What to do gently if you broke a mercury thermometer, see http://greenologia.ru/othody/metally/rtut/razbili-gradusnik.html link.
Exploitation
A well-designed drainage system does not require any additional maintenance other than cleaning or flushing the pipes with a water pump. The procedure is performed depending on the degree of clogging of pipes (drains) once a year or less often with the involvement of specialists.
To prevent freezing of drainage water, it is recommended to place pieces of foam plastic with a thickness of at least 2.5 centimeters under the blind area of the building. Styrofoam will act as additional thermal insulation.
It is believed that the gravel itself retains heat well and prevents freezing of the foundation and drainage pipes.
The device of the blind area and drainage of the foundation
 Draining water from the foundation of the house is a very important procedure, because moisture is the main enemy of the foundation. It is able to violate its integrity, contributes to the appearance of dampness, mold and other unpleasant moments.
In order for the building to stand without damage for more than one decade, it is necessary to take care of the waterproofing and drainage system of the foundation.
Preparatory work
Proper drainage of the foundation of the house will help protect the building from dampness. This work can be completed in several stages:
- At the very beginning, the base must be dug in, and the excess earth should be carefully folded nearby for reuse.
- If the house is not new, the soil is scrupulously cleaned from the tiled structures and the old waterproofing is removed.
- The base is thoroughly dried in the open air; during wet weather, gas burners can be used for this purpose.
- Performing foundation waterproofing.
Features of the waterproofing device
Before draining groundwater, it is necessary to waterproof the walls and floor of the basement, the basement and the base of the foundation. Here are some important points to keep in mind:
- the coating used for these purposes must be integral without gaps and cracks;
- on the side that has a greater onslaught of moisture, additional protection is applied with an insulating material;
- it is necessary to have a blind area around the house, the correct choice of its width and degree of inclination. It will allow you to divert water from the building not only by drainage, but also by arranging a storage pit. In the presence of a blind area, puddles do not form. It protects the foundation and soil from water penetration.
The blind area is important in protecting the building from moisture.
Organization of waterproofing for different types of foundation
Arrangement of protection of the constructed building from moisture differs in relation to the types of foundation. The most common are slab bases, pile, columnar, tape and monolithic types.
Plates
 Here the foundation is best wrapped with rolled roofing material. When irregularities are found.
They must be eliminated with a leveling screed.
Then a water-repellent material, a heater are placed on the concrete slabs and the surface is leveled again.
Pile and column types
It is not easy to equip waterproofing on concrete piles and pillars. It is provided by adding water-repellent additives to concrete. Wooden structures are treated with special liquids that prevent rotting and moisture absorption.
Strip and monolithic foundations
To properly arrange waterproofing of these types of bases, the following several methods are used. They are varied and quite effective.
- Treat the foundation with special mastic, only the surface must be dried and even. This method is not entirely reliable, therefore, to strengthen the composition, it is necessary to cover it with a heater or build a brick wall.
- As in the first case, you need to perform all the manipulations using hot bituminous mastic, and stick the roofing material on top in 2 layers with an overlap of about 15 cm.
- Using a special sprayer, a water-repellent composition is applied to a dry foundation. From above it is desirable to apply geotextiles, then the waterproofing will last a long time.
- Another reliable and high-quality method is penetrating waterproofing. It consists of quartz sand, cement and special additives. Such a mass has penetrating properties.
Moisture and precipitation are almost everywhere, so the waterproofing system is important in the process of protecting the building from their penetration.
drainage system
The removal of water from the foundation is implemented by organizing drainage around the house. Before its implementation, you need to know some features of the work:
- installation work is carried out in summer in dry warm weather;
- to build a foundation drainage with your own hands, it will take from 2 to 3 months;
- after preparing the ditches, it is advisable to build a canopy protecting them from rain;
- if the soil is in a loose state, then the walls of the ditch must be properly strengthened;
- in the appropriate authority, you need to obtain information about the state of the soil, as well as conduct a little experiment to determine where moisture is most collected;
- having learned comprehensive information, you can depict the drainage scheme of the building, calculate how much material will be needed and the cost of the structure.
Varieties of drainage
Before choosing a way to drain water from the foundation, you need to know what types of foundation drainage systems are and choose the right one.
In accordance with the design of the building, there are three types:
- wall-mounted - constructed in a building with a basement or basement;
- ring - suitable for buildings without a cellar, basement and basement;
- layered - used under the foundation slab.
wall drainage
Today, this design is widely known and used everywhere. Usually, wall drainage of the foundation is equipped even at the construction stage, before the walls are erected. It is possible after construction, but its cost in this case will increase.
It is necessary when there is a possibility of flooding the basement. Sometimes waterproofing can protect against groundwater, but most often the owners are satisfied with the design of wall drainage. Its specificity – in close proximity to home.
The creation of wall drainage occurs along the perimeter of the base, manholes are installed in the corners. The required number of pipes to be laid, which are located at an angle, is calculated.
 Geotextile
Wall drainage of the foundation has the following features:
- First, the walls of the foundation are protected with a waterproofing material, for example, liquid rubber.
- A profiled membrane is overlapped along the wall from above with a special glue to prevent water seepage.
- The lower edge of the membrane should be laid on the soil and pipes covered with geotextile should be installed.
- The area around the drainage of the building should be covered with sand and gravel.
- Pipes can be taken in different diameters, from 5 to 20 cm, everything is determined by the depth of flood waters. They are laid under a slope of 1-2% to the drainage well.
- To clean the drainage system, vertical pipes with plugs are placed in the corners, as high as a blind area. Cleaning is carried out by launching a stream of tap water into the device. For information on how to mount wall drainage, see this video:
For clay soil, geotextile fabric is essential. If the soil is made of crushed stone or sand, then you can do without such material.
ring drainage
 Find a way out of the situation of how to drain water from the foundation of a house that does not have a basement or basement, you can turn to the foundation ring drainage system .
To do this, a closed set of trenches is built around the building with a depth that exceeds the level of the foundation by half a meter.
When constructing such a structure, it is necessary to pay attention to the following:
- drainage around the foundation should be at least 50 cm below it;
- it also requires a pipe slope of about 1% to the water collection tank. To do this, the distance between the boundaries of the drainage of the building is calculated and the required indicator is determined;
- the gap between the house and the drainage trench should be from 5 to 8 m.
 Ring drainage scheme
The process of constructing an annular drainage
For the convenience of creating drainage for the foundation, you can make markings. For this purpose, various pegs are used, which can be easily removed.
You can equip the ring drainage as follows:
- At a distance of 5 m from the house, you need to dig a deepened ditch greater than the height and width of the foundation of the house in order to fit a pipe with a diameter of 11 cm. There should still be 10 cm indents from the pipe on each side.
- Sand is placed at the bottom under a slope to the water collector with a layer of up to 100 mm. Thus, the water will be able to drain on its own.
- The drainage pipe is placed in a trench, on geotextiles, its ends are fixed on the walls of the ditch. The pipe is laid in a trench, sprinkled with gravel for 50 cm, then wrapped with material twice. The seams of the structure are fastened and covered with sand or gravel.
- The pipes are connected, but not at a right angle, so that silt does not accumulate.
- For the construction of a revision well, a hole is dug and a container with a hole for water to escape is placed. Here you also need to place geotextiles on the bottom so that pebbles do not fall.
- If the soil is heavy and does not pass water well, a solid pipe can be used for drainage.
- With a large accumulation of water in the tank, it can be pumped out and watered garden plants.

Reservoir method of water diversion
Drainage under the foundation slab is necessary to ensure that the properties of the structure remain in contact with water. This means removing water and preventing its effects on the foundation of the house. For more information about drainage work on the site, see this video:
 The drainage device under the foundation slab can be performed in various ways. One of the most popular is the layered view. Its essence is as follows:
- A moat is dug 1 m deeper than the size of the building.
- There is a slight slope from the center to the sides.
- Geotextiles are laid, then a 10 cm layer of sand and a 30 cm layer of gravel alternate to level the bottom of the pit.
Reservoir drainage is used in the presence of various aquifers, pressure groundwater, the location of the basement below the aquifer and the appearance of capillary fluid penetration.
Drainage for strip foundation
Drainage is arranged for this type of foundation due to the high presence of groundwater, highly moistened soil, or the risk of flooding the site. Properly equipped drainage of the strip foundation of the house will help to avoid deformation of the concrete strip during the melting or freezing of the soil. Here it is also necessary not to forget about a properly executed blind area so that moisture cannot easily penetrate to the base.
To choose the right type of drainage, you need to know the characteristics of the soil. Only in this case will it effectively and reliably perform the function of drainage.
Creation of a drainage system
Buying a plot for the construction of a cottage, developers are faced with certain problems. This is the relief of the site, and the characteristic features of the soil, the level of surface and ground waters is also of great importance. Conventional devices that serve as a waterproofing for the foundation of a house sometimes cannot cope with the complete protection of the foundation from moisture. Foundation drainage in these cases will be the only correct solution. Thanks to a special underground sewage system, water will pass around the foundation, which will create a complete protection against moisture.

Foundation drainage scheme.
For the construction of such a canal system, the developer can attract specialists, but this service is not cheap and will cost quite a lot. In companies specializing in this type of service, one linear meter of the drainage system costs from $50 and more. By making a system with your own hands, you can significantly reduce costs. But you should be prepared for difficulties. It is best if the system is carried out during the construction of the foundation, this will greatly save your strength. You can often hear that excellent waterproofing can be achieved with a tire foundation. But this is a frivolous approach, and, using this method, it is better not to remember about drainage.
It is simply necessary to make a drainage system under certain conditions, because sometimes the foundation of a house really requires additional protection from a humid environment.

Reservoir drainage scheme.
The following conditions are typical for the construction of a drainage system:
- the bottom of the foundation is below the groundwater level;
- the distance from the bottom of the foundation to groundwater is less than half a meter. During spring rises in the level of groundwater or surface water, such a distance is considered dangerous, since water fluctuations can lead to very sad consequences: for example, to the destruction of concrete.
- the soil in winter has a large depth of freezing. As a result, the earth will begin to swell, which will lead to a bevel of the foundation, cracks in the walls, etc.
The main types of drainage for foundations
Drainage systems can be divided into vertical, horizontal and combined. Vertical drainage is mainly used in mines or pools. Such a system is equipped with pumps and special drainage wells with pumping water. When the water drops in the basement of the building, meter-long wells are made and pumps with signal floats are installed.
The horizontal drainage system is a horizontal pipe system. It is either open or closed. The system is divided into three parts: collecting, draining and receiving. Often, open horizontal drainage is used to drain a large area, for example, on farms. For private houses and in industry, closed drainage is used. Often you can find a combined type of drainage.
So, drainage for the foundations of a house involves the creation of a special drainage system of channels for underground or surface water. The construction of the drainage system largely depends on the level of groundwater, the topography of the site and the slope of the surface relative to the horizontal plane.
Foundation drainage: basic systems

The scheme of water drainage from the foundation of the house.
Whichever system is chosen, the following tools will be required:
- shovels (bayonet, shovel);
- pick;
- perforator with electric or pneumatic power supply;
- cart or wheelbarrow for the removal of soil and the importation of sand and gravel;
- building level.
In addition to tools, you will need the following materials:
- pipes (according to building codes for the construction of drainage systems, it is allowed to use pipes made of asbestos cement, ceramics or plastic);
- sand;
- rubble.
Wall foundation drainage
If the developer plans to build a house with a basement or a lower floor (ground floor), as a rule, wall drainage of the foundation is used.
Usually it is placed around the base of the house at a distance of no more than a meter. Thanks to this type of drainage, the base of the foundation is reliably protected from the seasonal rise of groundwater, rain and melt water. With the correct construction of the system, the basement will remain dry, without the slightest sign of moisture, salt deposits and mold.

Scheme of waterproofing strip foundation.
The wall type of drainage for foundations is a mounted pipe system lying under a slope and located below the deepest point of the foundation base. Such a system is closed. In order to make it more convenient to clean blockages in the future, manholes are built in each corner of the system. At the lowest point of the system - a collection well - water is collected thanks to the crushed stone located around the drainage pipes, and from it it is already discharged outside the boundaries of the site. To drain the water, you can use various convenient methods of excretion. Thanks to drainage, the influence of groundwater on the foundation is significantly reduced. But in order to completely isolate the foundation from water, it is necessary to make high-quality waterproofing of the base itself, since capillary penetration of moisture will threaten the destruction of the concrete structure.
The main stages of building wall drainage under the foundation.
- For waterproofing the base, a special solution is made (bitumen with kerosene), which primes the basement wall. Then a layer of mastic is applied, into which a reinforcing mesh of nylon threads is embedded. Top with a second layer of mastic and allow to dry.
- A trench is dug at a distance of no more than 1 meter and a depth of no more than 2.5 meters. Drainage pipes must be laid flush with the bottom of the foundation. Sand is poured to the bottom and geotextiles are laid. The width of the web must be sufficient to wrap the pipe without leaving gaps.
- Large crushed stone is added and drainage pipes are laid with a slope of 1 cm for each linear m. This is done so that the water itself flows down and does not stagnate.
- Gravel is added again. The layer height should be approximately 0.5 m.
- The pipe is covered with geotextile. It is advisable to wrap it with an overlap and secure it with a polypropylene rope.
- For additional filtration, river sand or gravel is poured from above. Sand is convenient because it easily passes moisture and does not swell during frost.
- At the end of the work, the backfill should be tamped to avoid subsidence.
Foundation ring drainage

Scheme of wall drainage.
This type of drainage is arranged if the planned house does not have a basement or basement. The soil also plays an important role. On sandy or clay soils, a ring drainage system around the house is welcome. You can make ring drainage around several houses at once if they are on sandy soil. Also, in the presence of a relatively deep basement, when a conventional drainage system cannot cope, ring drainage should be arranged.
The main difference between ring drainage and wall drainage is the location of the drainage system relative to the base of the foundation. The distance around the base will exceed 3 meters. Sometimes developers apply ring drainage after the foundation has already been laid, and it will be expensive to re-dig it out.
Ring drainage will be most reliable if the distance between the base of the house and the ring is 5 m or more. This is necessary so that the foundation does not sit down due to insufficient drainage. For more accurate calculations, you can use geological exploration data.
Basic steps for constructing an annular foundation drainage.
- At a relatively large distance from the base of the foundation and below the level of the sole of the base, trenches are dug.
- If the drainage pipes do not have special filters, then the bottom of the trench is covered with gravel or crushed stone and then covered with geotextile. It is a special material consisting of polypropylene and polyester. It is not susceptible to the harmful effects of fungi and mold. The service life exceeds 20 years.
- After laying the pipes, a layer of sand and gravel is covered. It will protect the drainage pipe from damage and clogging with soil.
- The entire system leads to an inspection well. It serves as a kind of node through which it is possible to carry out preventive maintenance of the drainage system.
Foundation ring drainage is an inexpensive solution for draining ground and surface water. It reliably and effectively protects the foundation of the house from destruction and corrosion, prevents the appearance of dampness and mold in the walls of houses.
Do-it-yourself foundation drainage
Closely located groundwater or a large accumulation of moisture in the soil have a negative impact on any buildings, especially on the foundation. Therefore, to eliminate excessive moisture, it is necessary to carry out measures related to the installation of a drainage system. It is not so difficult to make foundation drainage if you know the features of its installation and the technology of work.

The need for drainage for the foundation and its function

Even the deep occurrence of groundwater in some cases requires the arrangement of drainage, in each case a large number of factors are considered. In some situations, drainage around the foundation is necessary anyway. Here are some of them:
- With a great depth of the basement, when it is below the groundwater level, or less than half a meter from the basement floor to them;
- If the basement is equipped in loamy or clay soil, the level of groundwater passage in this case is not taken into account;
- With a depth of underground premises of more than 1-1.5 meters in conditions of loamy or clayey soil;
- If the place where the building is located is a zone of capillary moisture.

Based on the foregoing, it can be concluded that drainage is necessary when groundwater is located in critical proximity to the building, or passes high enough, giving the impression of a swampy area with no vegetation. There is no need to equip such a system when the soil is dry, and even during the rainy season the groundwater level does not rise to critical levels.

The main functions of the drainage system include:

If the right choice of the type of drainage is made, and the design is made in compliance with the project, then the pipes and wells included in the drainage system will significantly reduce the likelihood of cracks and cracks in the foundation, improving its strength characteristics.
Types of drainage
Depending on the installation depth of the drainage system, wall drainage of the foundation is distinguished:

Each of these types of drainage can be both an annular type and a reservoir type.
The ring type scheme is a closed loop encircling the building along the perimeter. With a deep laying system, such a structure can also be laid in a radial way over the entire plane of the structure.

It is most expedient to build reservoir drainage in the case of the Foundation of the building of the "Swedish plate" type. It is laid at a level lower than the plane of the foundation. The peculiarity of the technology of its laying is that drainage pipes are laid on a sand and gravel cushion, on top of which they are covered with a foundation slab.

Necessary tools and materials
To make the drainage of the foundation with your own hands, you will need tools and materials such as:

To get some valuable tips that will help answer the question of how to make foundation drainage, you can watch the video
Work technology
Do-it-yourself drainage of the foundation with your own hands is quite simple, for this you need to follow certain rules for its construction, depending on the type of foundation of the building.
slab foundation
The drainage of the slab foundation consists of the following stages:

Columnar (pile) foundation

The drainage of the pile foundation is done in this way:
- A 20 cm layer of sand, crushed stone is laid in a ditch dug along the perimeter of the building, and a drainage pipe is placed on top;
- A layer of crushed stone of 30 cm is again poured from above, and geotextiles are laid;
- Everything is covered with earth.
Rules for the organization of the drainage system
After completing all the work, it is necessary to make wells into which excess water will flow. There are some rules for installing them:

Installation of the drainage system is done at a distance of 1.5 - 3 meters from the foundation. The slope should be towards the main receiving well, its beginning should be from the far corner well.

To make your foundation protected from moisture and precipitation, groundwater, you should use the most suitable drainage system, choosing its type depending on the base and soil characteristics.

High-quality drainage, made according to the rules, can reliably protect the house from flooding, prevent the formation of excess moisture, mold and fungus on the walls of the basement or basement, and also extend the life of the entire house.
House foundation drainage
The foundation is the basis for any type of building and ensures its safety and durability. The creation of the base is carried out after assessing the type of soil and choosing a system for removing excess moisture. Drainage of the foundation of a private house will save you from flooding the basements and washing out the soil around the building. A well-designed water drainage system will extend the life of the entire building. The price of drainage depends on a number of factors, including the complexity and duration of the work, the type of materials used. Our company in Moscow offers a drainage system with which you can do the drainage of the foundation of your house with your own hands.
Why install a drainage system around the house?
 Drainage around the foundation is necessary to protect the underlying supporting structure of the building from the damaging effects of groundwater. A properly functioning moisture removal system will protect the basement of the house from flooding and eliminate the possibility of swamping the surrounding area. If the foundation drainage system is neglected, the life of the building will be significantly reduced. The structure will be adversely affected by waterlogged soil and heaving caused by low temperatures. A competent drainage system also provides for drainage throughout the site.
Established norms
Groundwater drainage must be equipped in accordance with the project. The system must comply with established building codes. They include the following conditions:
- carrying out installation work in the warm season: it is best to opt for the summer months from June to August, since heavy rains rarely occur during this period and the air is quite dry;
- when installing with your own hands, you will need to build an additional canopy around the building, made of boards and polyethylene. This measure will protect the house and trenches from sudden precipitation;
- if the installation takes place in conditions of high soil moisture, then the trenches are additionally reinforced with special gratings to prevent shedding of the walls;
- in order to most accurately design the drainage of water from the foundation, it will be necessary to carry out a preliminary excavation of the base. This procedure is necessary to accurately determine the depth, shape and size of the foundation;
- for safe and convenient transportation of building materials and soil, the yard is equipped with a system of ladders - a blind area, which is made of boards;
- it is also necessary to collect information on the places of the greatest accumulation of water and the general level of ground moisture in a particular area.
The elements of the drainage system must be selected based on the following requirements:
- the trench should be at a distance of one meter from the house, 15-30 centimeters deeper than the foundation level. The width of the trench is 30-40 centimeters;
- the lower part of the trench is laid out with a sand cushion with a slope directed towards the water collectors;
- wells should not be located closer than 3 meters from the building. As a water collector, you can use a container made of thick plastic with drainage holes at the bottom;
- manholes are placed at pipe connection sections, since these designs provide simple flushing of the drainage system during operation;
- the higher the level of soil moisture in the territory of a private house, the more wells are installed to collect excess moisture. As a rule, they are located close to each other.

Do-it-yourself foundation drainage device
With due diligence and the presence of certain skills, it is quite possible to perform a foundation drainage device with your own hands. First of all, you need to prepare the foundation of the house:
- excavate the foundation of the entire structure. The soil is removed to the side - it will be needed at the completion of work for the reverse digging of trenches;
- then they dig trenches, which are located below the level of the base of the house;
- the foundation should then be left to dry naturally in the open air. If the ambient humidity is too high, you can achieve results with a gas burner. After that, the foundation is cleaned of the remnants of the old waterproofing;
- foundation drainage device requires treatment of the outer part of the building with a special primer, which consists of a mixture of bitumen and kerosene;
- bituminous mastic is applied, on which geotextiles or reinforced mesh are then installed;
- after 24 hours, re-coat with mastic.
Gravel is poured into the finished trench, each layer of which is leveled with a hand roller. After that, you can pour concrete. After completion of the preparatory stage, it is necessary to proceed with the arrangement of the drainage system. The process includes steps:
- digging a ditch around the building with a depth below the level of the base of the house with a width of at least 35 centimeters, the distance from the building is one meter;
- then sand is poured into it, taking into account the slope towards the wells;
- the ditch is lined with geotextile, fixing the edges of the fabric with pins;
- then a layer of gravel is poured with a height of not more than 10 centimeters;
- perforated plastic pipes wrapped with geofabric are laid in trenches and covered with gravel;
- the edges of the geotextile are combined and fastened to each other;
- manholes are placed at the corners of the building;
- water collectors are located below the base of the building, but at the same time above the level of groundwater;
- technical pits are completely covered with geofabric;
- containers with holes at the bottom, used to collect water, are covered with gravel, and then covered with a layer of soil;
- then, depending on the project, the pump is connected;
- at the final stage, the system is completely covered with the remaining soil.

With a competent approach, drainage under the foundation, installed independently, will not require special care. It is enough to clean the pipes from time to time as they become clogged. This procedure is carried out using a pump to pump out excess water. To protect against freezing under the blind area, foam layers about 3 centimeters thick are placed. A high-quality drainage system will extend the life of the building and protect against a number of unpleasant consequences of flooding a private house or nearby areas.
An excessive amount of water adversely affects the quality and durability of foundation support structures, leads to flooding of basements and creates significant inconvenience in the process of carrying out various landscape activities. In view of this, the construction of a drainage system is an obligatory stage in the arrangement of any site.
The main function of drainage is to ensure the protection of the supporting structure of the building from the harmful effects created by groundwater. The drainage system reduces the likelihood of basement flooding, reduces the risk of swamping and flooding of the territory.
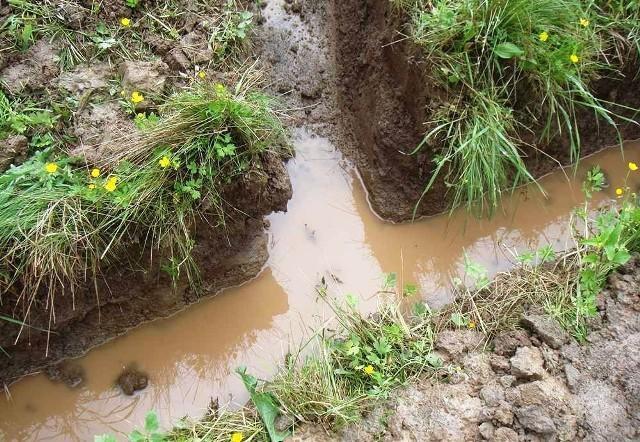

By neglecting the drainage device, the owner runs the risk of significantly increasing the likelihood of reducing the service life of the supporting structure due to waterlogging and exposure to frost heaving forces.

Water in the basement - a consequence of design and construction errors, the lack of a drainage system
Many developers are interested in: is it necessary to equip drainage if the groundwater is low enough, and the soil on the site is not subject to frost heaving to a high degree? The answer is: each case is subject to individual consideration. The unconditional need to create drainage occurs in the following situations:
- if the basements are buried below the groundwater level or if the floor of the basement rises above the groundwater level by less than half a meter;
- if the basement is equipped in clay or loamy soil. The level of passage of groundwater in this case does not matter;
- if the technical undergrounds in the area with clay / loamy soil are buried more than 150 cm in relation to the horizon. Features of the passage of groundwater in this case are not taken into account;
- if the building is located in the zone of capillary moisture.
The conclusion from the above is the following:
- a drainage system is needed if groundwater is critically close to the supporting structure of the building, or if it runs so high that the site area looks swampy and almost nothing grows on it;
- a drainage system is not needed if the site is dry and the groundwater level during the rainy season and the flood period does not rise to a critical level.
Optimal drainage system
There are several types of drainage systems. In combination with the foundation structure, it is advisable to use 2 of them.
First, ring drainage.
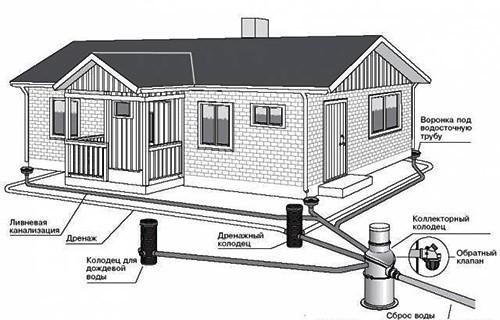

This system is designed to protect basements from flooding with groundwater. At the base are tubular drains laid along the contour of the supporting structure.

The principle of operation of ring drainage is based on a decrease in the level of groundwater in the protected circuit, thereby reducing the risk of flooding of underground structures. The depth of the pipes in relation to groundwater directly depends on how much the level of the latter will decrease. Laying of ring drains is carried out at a certain distance from the building (usually 1.5 - 3 m from the foundation), which makes it possible to arrange drainage after the construction of the building.

Secondly, reservoir drainage. The disadvantage of such a system over the above option is the possibility of arranging it exclusively at the stage of building construction, because. it is equipped under the sole of the foundation at the level of sand backfill. Excess moisture through perforated drains (pipes) enters the receiving well, from there to the place chosen by the developer (sewerage, reservoir, any depression in the relief of the site, or it is pumped out and used for household needs, for example, for watering plantings).

When arranging reservoir drainage, simultaneous protection of the foundation structure from groundwater and capillary moisture is ensured. Reservoir drainage is especially effective in the construction of buildings with basements on poorly permeable soils. Such drainage is also appropriate if the site is located in an area with a powerful aquifer. Reservoir drainage must be equipped if the building is located in the zone of capillary soil moisture and has a basement.

Reservoir drainage - innovations
To make the drainage of your home as efficient as possible, we will tell you about the arrangement of both the ring and reservoir systems. If the building has already been erected, it will remain to be content with ring drainage alone - no one will destroy the building for the sake of stratal drainage.
Prices for drainage pipes
drainage pipes
What is the drainage?

The main elements of the drainage system are pipes, inspection wells and a well for collecting water. The installation of the latter is carried out if the building is located on a flat area in the absence of the possibility of diverting water outside the site.

Pipes for drainage
Previously, for the arrangement of the drainage system, mainly metal, asbestos-cement and ceramic pipes were used.

Such products were used solely because of their wide availability and had a number of disadvantages, including:
- frequent clogging and silting;
- relatively short service life;
- the need for self-preparation of holes for water inflow.
A much more efficient, convenient and modern solution is plastic pipes - we recommend using them when arranging the drainage system.


The drainage system is best assembled from perforated pipes with stiffeners to ensure even distribution of loads on the products.
The advantages of plastic pipes are obvious:
- long service life;
- high strength properties. The presence of stiffeners, as noted, contributes to a uniform distribution of loads, which allows the pipes to effectively withstand the resulting pressure;
- resistance to decay, corrosion and various adverse effects;
- ease of transportation and installation. Plastic pipes for arranging drainage weigh little and bend well, which allows them to be mounted without the use of additional compensating elements;
- the ability to self-cleanse. The inner walls of the pipes under consideration, unlike the outer ones, are smooth, which eliminates the possibility of accumulation of contaminants;
- optimal ratio of cost and quality indicators.

Plastic pipes are the best value for money
Plastic pipes can be laid at a depth of up to 5-6 m, i.e. with their help it will be possible to equip the drainage of any foundation.
Helpful advice! Perforated plastic pipes with pre-installed filters are available for sale. When choosing those, it is necessary, first of all, to focus on the characteristics of the soil on the site. Recommendations are given in the table.
Table. The choice of filters depending on the type of soil
| Soil type | Filtration Recommendations |
|---|---|
| Perforated plastic pipes are suitable for arranging drainage in such soils without the use of additional filters. | |
| In this case, filtration is provided by the forces of geotextiles and crushed stone backfill. | |
| In this case, it is allowed to arrange drainage without using additional filter material, but after laying the pipes, a minimum of 20 cm crushed stone backfill is required. | |
| In order to prevent silting of pipes, filtration from geotextiles is equipped. |
When choosing the diameter of drainage pipes, they are guided, first of all, by the degree of soil moisture. According to the technology, an extensive hydrological calculation must be performed, but in practice, in the conditions of private land, everything is usually limited to standard values, namely:
- for top water - 10-centimeter pipes;
- for ring and reservoir drainage - 16.5 cm pipes.
The depth of laying pipes is determined in accordance with the level of soil freezing - drainage should be below this point.

When arranging the drainage system, 2 types of wells are used.
First, inspection (revision) wells. They are installed to monitor the state of the system and clean it from blockages. When these are formed, the pump is lowered into the well and the pipe is cleaned. Installation of inspection wells is carried out at the intersection of pipes, at every 2nd turn and with a 50-meter step on straight pipelines. The standard diameter of such products is 60 cm. In addition, manholes take on the function of sand traps. To do this, the lower part of the structure is equipped with a special catching grid, and the installation of the product is carried out so that its bottom is 10-30 cm lower than the pipes (the specific value is selected in accordance with the height of the outlet fittings for connecting pipes).

Secondly, a well-collector. It is the final reservoir of the system - it is here that the collected moisture flows. The tight design is completed with a deaf bottom. The collected water can be used for irrigation or diverted to a reservoir, ravine or other suitable place.

If the land plot is located on sandy soil or other soil with good water permeability, instead of a collector well, you can install a so-called. filter well. There is no blind bottom for such a container. Instead, a layer of permeable material, usually gravel, is backfilled. The water that enters the filter well through the pipes of the drainage system is discharged into the ground.

Additionally, the system includes plugs, adapters, fittings and elbows. The connection is made through the sealing gaskets from the kit. The range of available accessories is shown in the photo.

Prices for drainage wells
drainage well
preliminary calculations
When arranging a private drainage system on its own, the calculations come down to determining the depth of pipes and wells, as well as the optimal slopes of pipelines.
The depth of laying the drainage is determined by the depth of the foundation. The principle is simple: drainage is arranged 0.3-0.5 m below the foundation sole.

The slope of the pipelines must be such that the water moving through them can be discharged quickly and efficiently into the receiving tank. Traditionally, a slope of 20 mm per linear meter is maintained.
Pre-find the highest and lowest points of the site. In the first one, you will arrange a place for collecting water (most often this is the highest corner of the house), in the second, you will mount a receiving well. Due to the natural slope, you do not have to buy additional pumping equipment for pumping groundwater.
For a better understanding of the situation, check out the example of calculating the drainage of the foundation.

An example of a specification for a rectangular bath 6x6 m, drainage wells - 3 pcs.
- building dimensions - 9x6 m;
- the distance between the collector well and the building is 10 m;
- the value of the protrusion of the upper edge of the well above the ground is 0.3 m.
To determine the length of each individual section of the trench to the water intake, add the lengths of the sides of the building. In this example, the result will be 15 m. The total distance to the receiving well in this case will be 25 cm. The total slope of the system under consideration is 0.5 m (a couple of centimeters for each of the 25 m obtained).

Important! The distance between the foundation and the elements of the drainage system should be at least 3 m. Sand and gravel are backfilled at a depth below the freezing level of the soil.
Do-it-yourself reservoir drainage
The main function of such a system, as noted, is to protect the foundation from the harmful effects of groundwater and basements from flooding. Reservoir drainage can be used as an independent tool, or as a part of complex drainage. In the second case, pipelines are used to connect reservoir drainage with external drains.
The minimum thickness of the formation drainage layer, equipped under the foundation, taking into account backfilling, is 30 cm. The dimensions are selected so that the perimeter of the drainage system extends 20-30 cm beyond the perimeter of the building.


Important note! In practice, a special need for the use of reservoir drainage arises only during construction on clay soil. In other cases, the ring drainage system, as a rule, is more than enough.
Determine the depth of the pipes so that they are located below the clay ball of the soil.
Important note! Information on preliminary marking, excavation and subsequent arrangement of the foundation after the laying of drainage pipes is not given, because about all this earlier in detail in the corresponding publication of our site.
Work on arrangement of reservoir drainage system is as follows.
- Having prepared the foundation pit for the supporting structure, you further deepen it by at least 20 cm. At this stage, as noted, you need to remove a wider layer of soil compared to the place where the foundation passes.
- Next, the bottom of the resulting pit is covered with a 20-cm layer of gravel. The backfill is carefully compacted and leveled with observance of the slope (in this case, it is advisable to make a 3-centimeter slope for each meter of the site) in the direction of the receiving well.
- Further along the perimeter of the crushed stone base, flexible perforated plastic pipes with stiffeners are laid. The ends of the pipes are diverted to the location of the receiving well.

Further arrangement of the foundation is carried out in the standard manner.
As a result, moisture penetrating under the foundation sole will penetrate through the perforated holes into the pipes and be discharged through them into the receiving well.
As for the receiving well, in the case of reservoir drainage, it is advisable to use its filtration variety. The dimensions of finished round filtration wells are on average 150 cm, rectangular - 280x200 cm. Height - more than 200 cm.

For a well, preferably at a distance of at least 3 m from the future foundation, a hole is dug so deep that the bottom of the receiving tank is located at least 1 m below the entry point of the drainage pipe. This is ideal. In practice, they make sure that at least 1 m of difference remains between the groundwater and the bottom of the well. Compliance with these rules will ensure the most efficient and correct operation of the drainage system.
The length and width of the pit is selected so that after installing the well, at least 200-300 mm of free space remains on each side of it. The well is installed in the pit. The bottom of the tank is covered with a 30-cm layer of gravel, compacted.

The space between the tank and the walls of the pit is also filled with rubble to a minimum height of 1 m. The pipes of the drainage system are introduced into the tank. From above, all this is covered with geotextiles and covered in layers with sand and soil with careful tamping.

Water from the well will be discharged into the deep layers of the soil.
Helpful advice! Do not fill the well completely - leave the possibility of revision work. To do this, having brought the backfill to the upper edge of the well, install the sealant, neck and hatch from the kit.
Important! To install the well, you will have to involve special equipment and / or several assistants - it is unlikely that you will be able to cope with a two-meter volumetric structure on your own.


Do-it-yourself ring drainage
Such a system can be equipped after the completion of the construction of the building. The recommendations for spacing between structures and drainage remain the same.
A couple of additional important remarks should be made first.
Firstly, regarding the depth of the drainage pipes. The dependence is simple: the pipes are laid half a meter below the foundation of the building.

Secondly, regarding the storage well. In the case of a collector system, it is more expedient to use its variety with a blank bottom. The installation procedure differs from the instructions for the filtration well only in the absence of crushed stone bottom backfill.
Revision wells are installed according to the same principle as storage wells. Only the overall characteristics of the products change (selected depending on the conditions of a particular situation) and the place where the drainage pipes enter.


Thirdly, regarding the size of the trench. To determine the optimal indicator, add 200-300 mm to the outer diameter of the pipe. The remaining free space will be filled with gravel. The cross section of the trench can be rectangular and trapezoidal - as you prefer. From the bottom of the pits, stones, bricks and other elements that can violate the integrity of the pipes being laid must be removed.
The order of work is presented in the table.
For your own convenience, you can make a markup first. To do this, step back from the walls of the house 3 m (ideally. In the absence of sufficient space, many developers reduce this figure to 1 m, be guided by the situation), drive a metal or wooden peg into the ground, step back further from it to the width of the trench, drive in the second peg, then set similar landmarks opposite, at the opposite corner of the building. Stretch the rope between the pegs.
Table. Do-it-yourself ring drainage
| Stage of work | Description |
|---|---|
| Dig trenches around the perimeter of the foundation. Do not forget about the slope of the bottom - keep it within 1-3 cm per meter. As a result, the highest point of the drainage system should be located below the lowest point of the supporting structure. |
|
| Fill the bottom of the trench with a 10 cm layer of river sand. Tamp carefully with observance of the given slope. Lay a layer of geotextile on top of the sand (if the soil is clean sandy) of such a width that in the future it will be possible to cover the pipes, taking into account the thickness of the crushed stone backfill. On top of the geotextile, pour a 10-centimeter layer of gravel, not forgetting to withstand the specified slope. Lay pipes on rubble. The image shows ordinary orange sewer pipes - here the developer made the holes himself. It is more convenient to use the initially perforated flexible pipes recommended by us, but if there are none, you can go the way of the developer from the photo. Maintain a 5-6 cm step between the holes. Recommendations for connecting pipes were given earlier. |
|
| Pour a 15-20 cm layer of gravel over the pipe. Overlap the geotextile. As a result, the pipes will be surrounded on all sides by gravel, separated from the soil and sand by geotextiles. |
In conclusion, it remains to install revision and storage wells, connect pipes to them and backfill the soil.

Typical mistakes in foundation drainage
Check out the list of the most popular mistakes made by private developers, avoid them in the process of doing the work, and the drainage of your foundation will last as long as possible without any complaints.
- First, do not pin your hopes on the wall foundation. Its functions are reduced mainly to the removal of precipitation, and not groundwater.
- Secondly, do not use geotextiles as a filter if your site is located on loam or sandy loam - after a few years, the filter will become clogged, which will degrade the efficiency of the drainage system.
- Thirdly, controlling the angle of inclination of trenches for laying pipes, if possible, work with a theodolite and a level instead of a level - it’s more correct.
- Fourth, use drainage wells instead of storm wells. The latter are designed to collect atmospheric precipitation.
- Fifth, do not put all your hopes on the drainage system alone. To ensure the most efficient removal of moisture from the supporting structure and structure, a drainage system must be equipped in the direction of the storm drain.
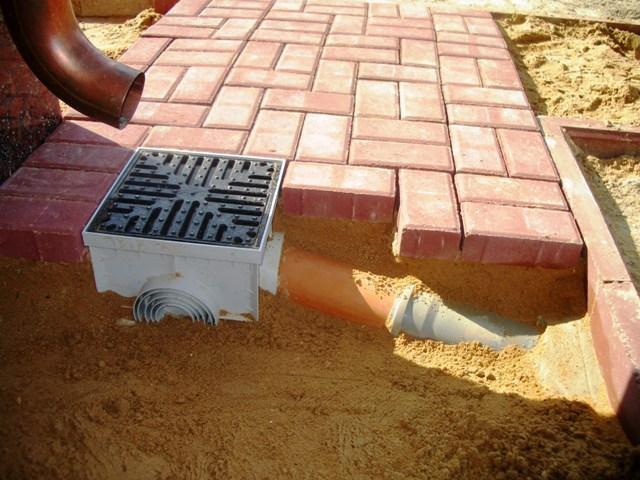

This point deserves separate consideration. First of all, remember: drainage and stormwater must not be connected to the same pipe. In practice, with such a solution, the effect will be the opposite of what is expected - in the rainy period, the drainage will not cope with the removal of moisture. As a result, the soil near the supporting structure will become waterlogged, in winter the excess moisture will freeze, and the soil will swell. This can lead to deformation of the blind area, the occurrence of movements of the supporting structure and its further destruction.

For the manufacture of stormwater, you can use ordinary orange sewer pipes. The system includes water intake trays. Water is drained into a storage well. Detailed instructions for arranging a storm drain are not given, because. this is a topic for a separate voluminous publication not related to the drainage system.
Rainwater prices
storm drain
Video - Do-it-yourself foundation drainage
The foundation is the basis for any type of building and ensures its safety and durability. The creation of the base is carried out after assessing the type of soil and choosing a system for removing excess moisture. Drainage of the foundation of a private house will save you from flooding the basements and washing out the soil around the building. A well-designed water drainage system will extend the life of the entire building. The price of such a drainage system depends on a number of factors, including the complexity and duration of the work, the type of materials used.
Our company offers drainage pipes LightDrein without the use of crushed stone. With their help, foundation drainage is easy to do with your own hands. See the addresses of our stores in Moscow.
Why install a drainage system
Drainage around the foundation of the house is necessary to protect the underlying support structures from the damaging effects of groundwater. A properly functioning moisture removal system will protect the basement of the house from flooding and eliminate the possibility of swamping the surrounding area. If the drainage system is neglected, the life of the foundation will be significantly reduced. The structure will be adversely affected by waterlogged soil and heaving caused by low temperatures. A competent system provides for drainage not only from the house, but also from the entire site.
Established norms
Groundwater drainage must be equipped in accordance with the project. The system must comply with established building codes. They include the following conditions:
- carrying out installation work in the warm season: it is best to opt for the summer months from June to August, since heavy rains rarely occur during this period and the air is quite dry;
- when installing with your own hands, you will need to build an additional canopy around the building, made of boards and polyethylene. This measure will protect the house and trenches from sudden precipitation;
- if the installation takes place in conditions of high soil moisture, then the trenches are additionally reinforced with special gratings to prevent shedding of the walls;
- in order to most accurately design the drainage, it will be necessary to carry out a preliminary excavation of the base. This procedure is necessary to accurately determine the depth, shape and size of the foundation;
- for safe and convenient transportation of building materials and soil, the yard is equipped with a system of ladders - a blind area, which is made of boards;
- it is also necessary to collect information on the places of the greatest accumulation of water and the general level of ground moisture in a particular area.
The elements of the drainage system must be selected based on the following requirements:
- the trench should be at a distance of one meter from the house, 15-30 centimeters deeper than the foundation level. The width of the trench is 30-40 centimeters;
- the lower part of the trench is laid out with a sand cushion with a slope directed towards the water collectors;
- wells should not be located closer than 3 meters from the building. As a water collector, you can use a container made of thick plastic with drainage holes at the bottom;
- manholes are placed at pipe connection sections, since these designs provide simple flushing of the drainage system during operation;
- the higher the level of soil moisture in the territory of a private house, the more wells are installed to collect excess moisture. As a rule, they are located close to each other.

Do-it-yourself drainage device around the foundation
If you have certain skills, you can do the foundation drainage device yourself. First of all, it is necessary to carry out the following work:
- excavate the foundation of the entire structure. The soil is removed to the side - it will be needed at the completion of work for the reverse digging of trenches;
- then they dig trenches, which are located below the level of the base of the house;
- the foundation should then be left to dry naturally in the open air. If the ambient humidity is too high, you can achieve results with a gas burner. After that, they are cleaned of the remnants of the old waterproofing;
- the drainage device requires processing the outer part of the foundation of the building with a special primer, which consists of a mixture of bitumen and kerosene;
- bituminous mastic is applied, on which geotextiles or reinforced mesh are then installed;
- after 24 hours, re-coat with mastic.
Gravel is poured into the finished trench, each layer of which is leveled with a hand roller. After that, you can pour concrete. After completion of the preparatory stage, it is necessary to proceed with the arrangement of the drainage system. The process includes steps:
- digging a ditch around the building with a depth below the level of the base of the house with a width of at least 35 centimeters, the distance from the building is one meter;
- then sand is poured into it, taking into account the slope towards the wells;
- the ditch is lined with geotextile, fixing the edges of the fabric with pins;
- then a layer of gravel is poured with a height of not more than 10 centimeters;
- perforated plastic pipes wrapped with geofabric are laid in trenches and covered with gravel;
- the edges of the geotextile are combined and fastened to each other;
- manholes are placed at the corners of the building;
- water collectors are located below the base of the building, but at the same time above the level of groundwater;
- technical pits are completely covered with geofabric;
- containers with holes at the bottom, used to collect water, are covered with gravel, and then covered with a layer of soil;
- then, depending on the project, the pump is connected;
- at the final stage, the system is completely covered with the remaining soil.

With proper installation, drainage under the foundation will not require special care. It is enough to clean the pipes from time to time as they become clogged. This procedure is carried out using a pump to pump out excess water. To protect against freezing under the blind area, foam layers about 3 centimeters thick are placed. A high-quality drainage system will extend the life of the building and protect against a number of unpleasant consequences of flooding a private house or nearby areas.
Cost of work
|
Name of works |
price, rub. |
||
|
Foundation Ring Drainage Cost |
|||
|
Depth up to 1 m. |
|||
|
Depth up to 2 m. |
|||
|
Depth up to 3 m. |
|||
|
The cost of wall drainage of the foundation |
|||
|
Depth up to 1 m. |
|||
|
Depth up to 2 m. |
|||
|
Depth up to 3 m. |
|||
|
Collector well device |
|||
* The prices indicated on the website are not a public offer (Article 435 of the Civil Code of the Russian Federation) and are for informational purposes
Pricing also depends on the volume, remoteness of the object and other factors.