We make a greenhouse under the film with our own hands: agrofibre and a frame for the greenhouse. Guide: how to build a greenhouse with your own hands from a film Light greenhouses under a film with a lifting wall
As soon as the snow melted, and the ground in the garden dried up a little, he took up a new facility for growing tomatoes.
There were doubts: to buy a factory greenhouse made of polycarbonate or to make a proven design based on experience. Chose the second option. In our area, polycarbonate, even with regular ventilation, creates too high a temperature in the heat: the tomatoes are baked.
The simplest requirements for a greenhouse
I have been doing gardening for a quarter of a century. All this time, I had to conduct all kinds of experiments on growing vegetables, creating various shelters for them.

The main requirements for the protective structures of plants in the country:
- cheap design, which vandals are not particularly covetous;
- optimal conditions for growing vegetables;
- ease of manufacture;
- available materials for construction;
- not complicated greenhouse care;
- convenient work with plants.
The question of the durability of the structure is also important, but my structures have not yet served for more than six years. I make them from the most accessible materials: wood and film, and there are many features here.
I collected the first greenhouses from poles, bringing them from the forest. They were delivered almost free of charge, but harvesting and transportation take time.
Then he began to use a simpler method: to assemble a wooden structure from lumber waste.

There is a sawmill in the village, the owner of which gets rid of substandard scraps, selling them to the population for firewood. These are ordinary slab boards and incomplete profile bars, which are great for building a wooden frame.
Of these, on a home-made circular, good slats for a greenhouse and film fastening are obtained.
At the same sawmill I ordered 4 six-meter bars 5x5 cm and 8 three-meter ones. They were sold cheaply. They brought it for free.
I debunk 4 myths about a film greenhouse
The widely established production of factory models of various designs and polyethylene films is associated with their need, although it needs a mass advertising campaign.
In order to increase sales, myths are created and real facts about various materials and technologies are given. Our task, as a consumer, is to reliably understand this information.
Myth number 1: the film lasts one or two seasons
This opinion is real, but it is built on two principles:
- Polyethylene is indeed destroyed by sunlight and wind loads: its service life is limited.
- The method of fastening the film affects its life.
What kind of film should I buy
Sale offers a wide range of polyethylene films for greenhouses. Among them, you can really meet those that will last one season, or even less.
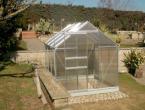
This is what the greenhouse of my western neighbor looks like in the spring after two seasons of operation.

A wide range of polyethylene or polyvinyl chloride films is commercially available. They can be:
- simple composition;
- reinforced;
- with light stabilizing, antistatic, heat stabilizing additives and other improving additives;
- different thickness.
I buy plastic wrap, but I pay attention to the thickness. It should be 200 microns. Producer - Polymir plant.
Its color depends on the added dyes. In cold climates, orange shades are recommended. They contribute to the heating of the greenhouse from the sun's rays, but their service life is shorter. My choice is ordinary transparent varieties without dyes.
During the second season of operation of the old greenhouse, a large hail passed. He pierced not only the film on the greenhouses, but also the roofing material of a neighbor on the roof of the barn.

I didn't plug these holes. They remained, do not expand over time, although they turned black in 4 years, everything continues to work normally.
How to fix the film
The main mechanical load is created by the wind. The sailing of the building is huge. If you make the crate of the sides of large sizes, then the air pressure will be high, and the tensile strength will increase.
Due to this, the film will be constantly subjected to significant tensile loads during a gust of wind, as in a greenhouse of an unsuccessful design.

In the next photo I show the greenhouse of my northern neighbor. Its length is 6.4 meters, width - 2.5. But the height is too small for me - 1.7 m in the center. As soon as I got inside, I immediately had to bend.

On this design, the length of the crate is about 50 cm. The greenhouse has been standing for the fourth season.
Myth #2: Wood rots quickly in a greenhouse.
On the one hand, this is correct. Humid environment, elevated temperature and soil do their job.

This is what the wooden posts look like in my old greenhouse, which were buried in the ground for several seasons. I did not pay attention to this when caring for vegetables and in winter, considering that they stand on bricks. Found in the spring, when the structure was a little lopsided.
You can extend the life of wood by protecting it. It is enough to treat it with antiseptics or soak it with mineral oil, for example, by working out any internal combustion engine.
A layer of waterproofing from the ground is important, for which plates can be cut from ordinary PET bottles.
However, the rest of the wood on the structure remains healthy, whole even under the film.
Myth #3: A building needs a foundation
Of course he won't interfere. But a properly created foundation should be located below the freezing depth of the soil in winter. Only in this case, the greenhouse will not move from frost and will remain stable when the soil melts.
Such foundations are needed for stationary glass structures with increased weight. Glass is quite fragile, it cannot withstand the load of bending or distortions, it requires reliable fixation.
It does not make much sense to install lightweight structures made of wooden slats and film. The winter movement of the soil does not harm them, and a slightly moved greenhouse is not difficult to correct in the spring.

I use ordinary silicate bricks for installation, like my northern neighbor in the country. This is what his greenhouse looks like from the inside in the spring.
Bricks under the posts replace the foundation.
Myth number 4: the greenhouse must be installed strictly in the plane of the horizon
This is ideal, but we live in the real world. My entire property is on a slope. Moreover, the slope goes from north to south.
I don’t see the point in wasting energy on even under a greenhouse. It stands well and has been tilted for six seasons. It will also serve this summer, even taking into account the fact that, due to my oversight, the wood in some places came into contact with the ground: it rotted, warped.

How to choose the optimal and simplest design
Structure height
It should be selected taking into account the growth of the gardener. Working in a bent position is difficult, and in old age it is also dangerous.
With my height of 180 cm, a height of 2 meters is provided at the passage.
Width
Here you need to think carefully about the location of the beds for growing vegetables, as well as the size of the passages between them. My old design was made 2.1 m wide, which is not very convenient for work.

This is especially true from the middle of the season, when the tomatoes grow: you have to cut them too much, tie them up. All this briefly eliminates the need to maneuver between them, moving with extreme caution.
In the new greenhouse, taking into account the mistakes made earlier, the width is 2.4 meters. The location of the beds and the passage is left the same.
Building length
Here, each owner can choose his own size, based on the needs of growing vegetables and rational planning of film consumption.
My size is 5.2 m.
How to plan a wooden structure for film consumption
I assume that the film is sold with a 1.5 meter rolled sleeve, which needs to be cut lengthwise. The width of the canvas is 3m.
I’ll make a reservation right away that the sale also offers sleeves that are six meters wide. People use them, but I'm considering the usual option. It can be placed in two ways:
- along the axis of the entire structure;
- or across.
Scheme of the northern neighbor
His greenhouse has the maximum length that can be created from a solid 5x5 cm timber sold at a sawmill. He places the film along the axis of the structure directly on the roof. Taking into account the slope of the slopes and the total width of 2.5 m, a three-meter film is placed without excess.
He uses the second part of the film on the sides. Cuts it additionally by 1.5 m and nails it to the walls. It is spent on:
- sidewall height 1.2 meters;
- top mounting allowance;
- reserve for digging the lower part into the ground.
The end sides of the structure for the door and the window are closed in separate pieces.
The scheme of the transverse arrangement of the film
This is my choice. Taking into account the chosen height of the sides of 1.5 m and the location of the ridge beam at a distance of 2 m from the ground with a greenhouse width of 2.4, a little less than 6 meters goes to the transverse strip
I stop at this size, I fix the film transversely with two stripes. But I don't attach them to anything. Although I met people who sew them with thread on a typewriter or solder them in various ways. I consider such connections unreliable.
I just put one strip on top of another on the roof, creating a total area of about 20 cm. I use the small remaining margin to close the joints from the ends.
I close the walls with the door and the window separately.
Since each greenhouse is created for specific conditions for growing vegetables, then stage of the project, its design should be carefully thought out and calculated. Only in this case it will be built quickly and economically.
Do-it-yourself greenhouse made of wood under the film: my construction technology
Required Tools
You will need the simplest carpentry kit:
- wood saw;
- an ax, preferably a regular and small one;
- hammer and chisel or chisel;
- nails;
- square;

I also prepared a drill and long self-tapping screws for fastening thick timber. However, this tool let me down because of the mild steel bits bought in China. They wore out very quickly from the applied loads: I had to use nails.
Sequence of work:
- I make the sides strictly according to the intended dimensions.
- I expose them at a distance from the width under the bricks, temporarily fixing them with additional rails.
- I knock down the lower rectangle of the frame with the fastening of its corners with slopes.
- I mount the door frame, the window and the pillars of the middle supports.
- Installing a ridge bar.
- I knock down the roof sheathing.
- I am correcting the general geometry of the greenhouse and ennobling the places where the film fits.
- I cover and fasten the film.
Sidewall installation
Three columns of equal height of 1.5 m were used on one side, as well as two beams with a section of 5x5 cm and a length of 5.2 m. The crossbars of the crate were made of scraps of materials. They provide a film fixing distance of 50 cm.

Moreover, my lower beam is spliced with a tie-in on the middle column of two parts. It is everywhere raised above ground level: this is protection from its decay.

By maintaining the same dimensions for all posts and beams, a base of ideal geometry is created for the construction of the greenhouse.
Field installation
On the planned site, he laid out bricks under the posts and drove stakes into the ground to lean the sidewalls against them. Then I temporarily fastened all the posts with additional crossbars of exactly the same size - 2.4 m (the future width of the greenhouse).

I fixed the structure with side slopes to the ground.

Thanks to the same dimensions of the parts that form the rectangles of all sides, the basis for creating a clear geometry is laid. But it has not yet been sustained: there are many distortions.
Height adjustment for each post
To do this, it is necessary to set all the bricks in the same plane, digging or pouring earth under them. Remember the rammer.
When the site is located horizontally, then this is a little easier. After each adjustment of the brick, I had to move a short distance and evaluate the result of the work by eye.
Ensuring right angles of the structure
Temporarily installed cross bars keep the size. Together with them I embed and fasten those that will work stationary. After checking the geometry of the structure, I remove the temporary hut.
The task of turning a movable parallelogram into a rectangle is solved by inserting bevels that form a rigid fixation of 90-degree angles. I just nail the rails in each quadrangle horizontally and vertically, evaluating the position of the structure being created.

Mounting the middle part
On the prepared rectangular box, I assemble the middle part that secures the door, the window at the ends and the roof. I use six posts of the same height.
This time, the work was simplified thanks to the installation of a ready-made doorway, which I used the frame of an old sofa. I just put it vertically on a flat slate, fastened it with bars with a mounted box.
Then I installed the pillars of the rear end and the middle ones. I fixed the crossbars on them and put two longitudinal beams on top.

The fastening of the ridge beam was carried out on an additional lining.

On it, supported by an intermediate beam, nailed the slats of the roof sheathing.

Along the entire perimeter between the laths of the crate at the same height, he nailed the strips with nails, made a chamfer with a planer, processed the edges of the joints. This provides a better fit for the film to preserve it.

Film work
Taking into account the created design, I placed the film strips across the axis of the greenhouse and secured them with nails through the rails. Additional pieces went to the ends of the structure.

He made a door in the form of a frame from boards, covered it with foil, and hung it on curtains.

The bottom edge of the film was covered with earth.

The window was installed so that it opened inside the structure and did not interfere with caring for vegetables.

In a few days of work, I had a greenhouse that is completely ready for growing tomatoes. If this work is done with an assistant, then you can easily meet the weekend. The season starts in just a week.


I advise you to watch the video of the owner Green Planet "How to make a greenhouse for less than 20 dollars." In it you will find additional ideas that you can also implement in your home garden.
I am waiting for your comments on the topic of how you can build a greenhouse with your own hands from wood under the film.
Hi all!
There is very little time left when the full gardening season begins. Seedlings have already been planted, the first shoots are appearing. And soon it will have to be planted on its site. Something is planted in open ground, and something in greenhouses.
But, before you plant your seedlings in a greenhouse, you must have it)). You can, of course, buy a greenhouse in the store, but if you are ready to make it yourself, then in this article we will consider the most common options for its manufacture.
Select the greenhouse or project you are interested in:

Before building a greenhouse, you need to determine for yourself some points. First, and this is the most important thing, what will grow in the greenhouse. This depends on the size of your building. You can put a large greenhouse, or you can make greenhouses. Next, choose the place where the greenhouse will be located. And, lastly, the material from which we will make it. The most common material is wood. However, with the advent of various types of building materials, a greenhouse can also be made from plastic pipes, polycarbonate, etc.
According to the shape of the roof, greenhouses are arched, single-pitched and gable. The most common in garden plots are gable greenhouses. This shape of the roof gives good illumination.
Consider the option of a greenhouse, which is made of wood. Wood is the best, most profitable and affordable material. Of course, it is also best influenced by the environment. Therefore, when building a greenhouse, it is necessary to take this factor into account and choose the material for your construction, preferably from hardwood, as well as process all the elements and parts of the greenhouse with various preservatives.
On a note:

Which tree species are considered hard and which are soft? The hardwoods are most of the deciduous trees, and of the conifers, larch and swamp cypress. Soft breeds are pine, spruce, alder, linden, aspen.
If you have a temporary greenhouse, then you can use inexpensive soft breeds and practically do not spend money on processing them.
If you put the greenhouse for a long time, then, in addition to suitable wood, you will need to prepare the foundation. Foundations for greenhouses are different. You can choose the most suitable one for you, depending on the design of your greenhouse.
The foundation is made of timber or railway sleepers.We are preparing a trench in which we lay a bar or sleeper on the roofing. Everything is connected with metal brackets. After that, the frame is already installed.
If strong winds prevail in your area, then a columnar foundation will suit you. The concrete base is laid deep enough to help keep the greenhouse in place even if a hurricane hits.To build such a foundation, pipes with a diameter of 20 cm or more will be needed, which must be installed in the ground below the freezing line (from 90 cm to 1.2 m.). If your greenhouse has dimensions of 3x6 m (usually this is the standard), then you will need to put 6 poles. Bars are placed on them and connected to each other and to the frame in the same way as in the previous method.
Block foundation. A trench is dug around the perimeter of your greenhouse, in which concrete blocks are laid on a gravel and sand cushion. To fix them, cement mortar is used. And already on top of these blocks a frame of large cross-section bars is attached
The strip foundation is placed for large greenhouses, as it can withstand heavy loads. Such a foundation is a concrete pad with a thickness of 30 to 50 cm, poured into a shallow trench. The service life of such a foundation is quite large, so greenhouses can be changed on it if necessary.

After the foundation is ready, we proceed to the assembly of the greenhouse frame. There are enough options. As mentioned earlier, there are arched, and one, and gable greenhouses. It is important to choose one that will meet your requirements and the requirements of the area where you will put it. First of all, it all depends on what you are going to grow in the greenhouse, how long it will serve you.
The most optimal (however, standard, found in most gardeners) rectangular greenhouse measuring 3x6 m., With a gable roof. Such a greenhouse is most often covered with plastic wrap. Many, however, use polycarbonate. But it depends on the possibilities. Polyethylene, of course, will cost less. However, it will have to be changed every season.

It is best to start assembling the frame of the future greenhouse from the assembly of individual sections located parallel to the front and rear walls of the greenhouse. The number of such sections depends on the length of the structure, as well as on the required reliability (the more sections, the less sagging and more stability).
If you use polycarbonate to cover the greenhouse, then the number of sections will depend on the width of this cover (210 cm). Sections in this case, for example, can be located at a distance of 0.5-1 m from each other. The dimensions of the sections themselves will be as follows: 1.5-1.6 m for the side walls, 3-meter bars for connecting the upper part and 1.75 m bars for the roof slopes. However, you can choose the size yourself.
Below are several schemes from which you can choose the most suitable for yourself. For example, it was these schemes that interested me (why I took them). But I want to make one for myself on the basis of all these schemes, according to which I will build my greenhouse.


The figure above shows not only the scheme of the greenhouse, but also the list of materials needed for its construction, as well as their size and consumption. This list is intended for standard sizes of 6x2.8 m, however, based on these data, you can calculate the amount of material needed for your size.
Stages of greenhouse construction

As you can see, this is a standard trapezoidal greenhouse in the form of a house (with a gable roof). From one of the ends there will be a door (the back of the picture).
We start with the installation of the carrier beam. As a rule, it is taken for this purpose somewhat wider than the one from which the frame is made. We treat with an antiseptic. This beam is attached to the foundation with the help of metal, anchor bolts, reinforcement.
The main thing to remember is that the basis of the greenhouse should be exactly a solid beam, and not fastened segments. The stability of the greenhouse depends on this.
So, we attached the base to the foundation, go to the frame itself, and start making it from the walls.
The figure below shows a diagram of a finished wall measuring 5.4 x 1.5 m. There are two such walls, and two end ones. In this diagram, the beam is fastened with grooves. To fasten other elements of the frame, you will need self-tapping screws, a metal profile, a corner, and clamps.

Next, we move on to installing the rafters. There can be any number of them, but the more, the better the strength and reliability of the roof, as well as. It is easier to attach the cover material. We also make grooves in the rafters (see picture).
There is such a thing as a rafter leg. The size of this leg depends on the height of the person. If your height is average, then the length of the rafter leg is 1.27 m, and if you are tall, then 1.35 cm.
In general, the length of the rafter leg is directly related to the width of the covering material: the width of the sleeve of the polyethylene film is 3 m, and when unfolded it is 6 m. Based on this, the sum of the lengths of two rafter legs and two racks should be about 5.8 m. As a result By using 6m x 6m plastic wrap, you will avoid extra pieces that go to waste.

The number of rafters usually corresponds to the number of racks.
After the rafters are attached to the racks of the side walls, we proceed to install the roof ridge (attached to the upper groove of the rafters) and wind boards (attached to the side grooves of the rafters). On the general scheme of the greenhouse (first picture), these boards are highlighted in dark color. These three elements of the greenhouse should be made only from solid material.
And, finally, when everything is ready, we install a door from the end, and here, or in the opposite end, a window.
That, perhaps, is all about installing a greenhouse. Now it can be covered with covering material. Previously, polyethylene, sometimes glass, served as a covering material. Now they use polycarbonate.
Greenhouse made of polycarbonate and plastic pipes. We do it ourselves
With the development of technology, new materials for construction have appeared. Plastic pipes are now quite actively used in the construction of greenhouses. It should be noted that I make small greenhouses in my garden only from such pipes. Pipes are of the following types: PVC, polypropylene and metal-plastic.
PVC pipes are the cheapest, but they are all fairly easy to install. Therefore, the choice of pipes is up to you. The only thing I want to note is that metal-plastic is somewhat more reliable.

In addition, using plastic pipes, you can already give any shape to your greenhouse (which is difficult to do in a wooden one).

Before you start building a greenhouse, you, as in the case of a wooden one, choose what you will plant in it, the place where it will stand. Based on this, you prepare a drawing of the greenhouse in order to purchase the required amount of material from it.
Below is an approximate drawing of a diagram of such a greenhouse with mounting options.

Based on this, we select the right amount of material. For the above scheme, the material consumption will be as follows (prices may vary):

After that, you decide whether your greenhouse will be permanent, or temporary (portable). If you put it for a long time, then it is best to make a strip or column foundation under it. If you put it without a foundation, then you need to dig in metal pins. They should protrude 30 centimeters above the ground. They will need to be put on the frame of the greenhouse. To do this, we put pipes on these pins. If the height of the greenhouse is 4 meters, then the length of the dressed pipe will be 6 meters. We bend the pipe, forming an arc and put it on the pins of the opposite side.
To fix the installed arcs among themselves, we take a pipe of the length that the greenhouse is planned to be. If there is no pipe of this length, then we connect two pipes to each other. After that, we place it in the center of the arcs and fix it with clamps.

The frame is assembled. Now we collect the coating for which we use polycarbonate. We select sheets with a thickness of at least 4 mm. Their size will be 2.1x6 m.
We fasten these sheets with an overlap. Joints can be sealed with special tape. We connect the sheets with thermal washers or self-tapping screws with wide caps.
Now it remains for us to attach polycarbonate sheets to the greenhouse.
Polycarbonate is a fairly flexible material. This allows you to cut and install it without any effort. In addition, polycarbonate attracts with its durability and resistance to atmospheric adversity.
Standard sheets for greenhouses are 6 and 8 mm, for greenhouses - 4 mm, and for a winter greenhouse - 10 mm.

To attach polycarbonate to the frame, you can use the so-called plastic earrings or aluminum brackets. The figure below shows a diagram of such an attachment.

Another option for mounting polycarbonate is the use of profiles. Before attaching the screws to the metal frame, we pre-drill holes, after which we attach the polycarbonate to the screws. Self-tapping screws with thermal washers are best, as they have a wide area of \u200b\u200bsupport, and, in addition, this will make it possible to keep the carbonate intact and prevent condensation from appearing.

The figure below shows self-tapping screws for fixing polycarbonate.

A simple greenhouse made of window frames. How to build with your own hands?
Another version of the greenhouse, which can often be seen in garden plots, is a greenhouse made of window frames. It is also a simple and inexpensive project. However, it is good if you have enough of these same frames. If you have frames with glass, then you install a glass greenhouse. If your frames are empty, then you, after installing it, cover the frames with plastic wrap.

So, before we install the greenhouse, we prepare the foundation for it. On it we install a wooden frame made of timber or boards. It is best to use a beam 50X50 mm, and a board 40 mm thick.
The frame consists of racks, upper and lower trim. The lower and upper trims are made from the same boards. Racks are installed from each other at a distance so that a window frame enters between them.
The roof frame must be strong enough. It is better to make a gable roof, with additional supports under the ridge, so that it does not collapse under the weight of snow in winter. It is best to use timber for the roof.

Installation of frames is carried out with nails and screws. Each frame must be fixed both outside and inside, on four sides. If there are gaps between the frames, then they are sealed with mounting foam.
The roof is best made of polycarbonate, or pull a film over it. Thus, your roof will be completely transparent and there will be enough light. But if you are still making it from frames, then it is better to start installing the frames from the roof, and not from the side walls. Otherwise, an accidentally dropped tool or some other material may break the glass.
At the end of the greenhouse we make a door, which is also a frame. So we set up a greenhouse. Now you can use it for its intended purpose.
Do-it-yourself greenhouse from a profile
Another of the modern materials that has become actively used by craftsmen-builders is a profile. The advantage of a profile greenhouse is that both the dimensions and the shape of the greenhouse can be made to your liking.

The figure below shows a diagram of a standard greenhouse from a profile.

To build such a greenhouse, you will need the following tools: metal shears, tape measure, building level and plumb line, screwdriver.
Having drawn up a diagram of the greenhouse, you can begin to assemble it. As described in previous projects, we start with the foundation.

You select the size of the greenhouse based on the size of the polycarbonate that will serve as its cover. You also choose the roof at your discretion: arched, or pitched. It is better to make a pitched house in the form of a house (gable). Then there will be much more lighting.
According to the scheme, you cut the profile into the required size elements. Connect these elements together with metal screws.
Start installing the frame with the guides. We fasten them to the foundation with self-tapping screws. The frame itself consists of sections that are interconnected by a common upper beam. The spacing between the sections must be such as to ensure sufficient rigidity of the structure. Basically, it is equal to the width of the polycarbonate sheet divided by 3 or 4.
The assembly of the front and rear walls is similar to the sections. However, they are reinforced by vertical struts. We make an entrance in the front wall. We fasten the door hinges to one of the racks, and from the profile we assemble the door frame, which we also cover with polycarbonate.
When the sections and walls (front and back) are ready, we fasten them to the guides.
We fix polycarbonate in the same way as in the previous version (greenhouse made of pipes and polycarbonate).
That's probably all that concerns the manufacture and installation of greenhouses from the most common and popular materials. I want to wish you good luck in manufacturing, so that there are no unnecessary difficulties, and a good harvest. You can, of course, buy a ready-made greenhouse, but, you see, growing a good crop in a greenhouse assembled with your own hands is much more pleasant.
Foreword
A do-it-yourself greenhouse built from frames is the pride of every owner of a summer cottage.
Necessary tools and materials
Bituminous masticBulgarian barNailsNail pullerplaned boardDrillPenciljigsawShovelMaster OKHammerknifePerforatorSandPolyethylene filmRuberoidRouletteself-tapping screwsLaddersquareExtensionLevelCementscrewdriverelectric planer
Content
A do-it-yourself greenhouse built from frames is the pride of every owner of a summer cottage. There are several nuances in the work that you will learn from this material. We suggest you read how to build a greenhouse from frames in such a way that it will serve you for at least 10 seasons without major repairs and periodic replacement of the film.
Do-it-yourself frame greenhouse
Frame greenhouses can have a glass or polyethylene coating. The choice of a particular material affects the further construction of the structure. So, a do-it-yourself frame greenhouse under a glass coating is made on a powerful and rigid frame based on metal corners or edged boards, and under a plastic film - from pipes or strong wooden bars. Polyethylene-coated greenhouses are not recommended for installation in those climatic latitudes where the summer months are too hot, heavy snowfalls and powerful gusts of wind.


A frame greenhouse from a metal corner is constructed as follows. At the corners and perimeter of the future building, at a distance of no more than 1.5 m, holes are dug with a size of 20 × 20 cm and a depth of about 50 cm. sides 50 and 2700 mm (the given dimensions are minimal, it is not recommended to reduce them). Then the recesses are concreted so that the upper ends of the corners are at the same level, the lower ones are strictly along the outer perimeter of the greenhouse, and the concrete columns are 15-20 cm above ground level. The inner side of the corners should look outward, as if forming a niche-stretcher, where subsequently, a wooden frame for the glasses will be inserted. The same principle must be observed when installing the remaining parts of the metal frame.


Further, the upper and lower ends of the racks are connected with a strapping and gable frames are installed at the place of the racks, on top of which subframes are welded from the corners. When the frame is ready, holes with a diameter of 10-12 mm are drilled around the perimeter in each stretcher at a distance of 50 cm for attaching the frames.
At the next stage, proceed to the manufacture of frames for glass. To do this, take the exact dimensions of each subframe designed for walls, roof, front and rear sides. For example, greenhouse segments have the following dimensions: front and back sides - 2.15 × 1.15 m, side segments - 2.15 × 1.2 m, roof segments - 1.8 x1.2 m and triangles (four pieces) - 0.6 × 1.70 x1.8 m. For a niche in the central part of the front wall, a frame with a built-in door is assembled, and in places where ventilation is arranged - with vents. The outer sides of the frame are made of a 50-70 mm thick bar, and the inner crossbars are made of a 50 × 50 mm lath, cutting grooves for double glazing along the edges. The frame itself can be divided into two, four, six or nine cells - the smaller the size of the glasses, the more convenient they are to use, durable and less prone to cracking.


At the end of the work, the frames are glazed, inserted into metal stretchers and the gaps between them are sealed, rigidly reinforced with coupling bolts of the appropriate diameter. Glazing and installation of frames is preferably carried out using a rubber seal. The gaps between the frames are sealed with any available heat-insulating material: tow, moss, glass wool, etc. It is tightly packed and covered with a wooden plank on top.
Depending on the method of supplying water to the greenhouse, heating and ventilation, technological openings are provided. To do this, a piece of plywood or tin is installed in one of the cells of the frame through which the pipe passes and a hole of the desired diameter is drilled. For pipes with cold water, plywood is usually used, for pipes with hot - tin.
The lower part of the greenhouse between the posts can be filled with bricks, concrete mortar, clay mixed with stones or soil backfill.
Along the perimeter of the walls, it is desirable to lay a cement-sand screed or lay pieces of slate. Do the same with other types of greenhouses.
The uniqueness of the considered design lies in the fact that when using a polyethylene film, the segments of the greenhouse are pulled from both sides with small pieces of material. In this regard, if the coating is damaged, it is possible to replace only individual places, and not to overtighten the frame as a whole, as is the case when a large piece of film is used.
How to make a wooden greenhouse with your own hands: video and job description


A frame greenhouse made of wood for glazing is constructed from high quality coniferous wood, otherwise the deformation of the supporting structures (after natural shrinkage) will cause the glass to crack.


The following do-it-yourself wooden greenhouse design with improved technical and operational characteristics is possible, close to the previous version. For racks, rafters, beams and strappings, a beam of 50 × 150 or 100 × 150 mm or more is used.


In the first case, to form subframes in the wall and roof segments, a 35 × 100 mm bar is additionally stuffed, and in the second case, grooves 50 mm deep and 35 mm wide are cut in the places where niches are formed.


All types of connections are used to fasten structural elements to each other, including metal brackets, mounting angles and overhead mating plates. Ukosina (oblique supports) and dressings in greenhouses are used only for temporary strengthening of racks and harnesses.


The manufacture of frames for glazing, the glazing itself and insulation are carried out in the same way as in the previous version.
The wooden greenhouse shown in the video is assembled according to the technology described above:
Do-it-yourself greenhouse under the film
A do-it-yourself frame greenhouse under a film is distinguished by its relatively low cost and ease of installation. At the same time, it has quite good performance characteristics. From time to time, such a greenhouse can be dismantled in order to import soil, plant plants in the open air, or carry out other earthworks. The most successful option is a frame made of bent pipes with a wall thickness of 2.5 mm and a diameter of 50 mm or more.
At the preparatory stage, arched ribs are bent along the estimated width of the greenhouse. For a do-it-yourself film greenhouse, both solid pipes and trimmings that can be used as segments are suitable. From two finished arches, front and rear ceilings are made by welding additional racks, veins and a box for a wooden door frame. On all arched ribs from the inside, through holes with a diameter of 10-12 mm are drilled in increments of 50 cm. Next, the attachment points for the legs of the arch are concreted in increments that are a multiple of half or a third of the width of the purchased film: 55, 65 or 75 cm. The attachment points are made from scraps pipes of the same diameter 35-50 cm long, one end of which is prepared for a detachable connection, or pieces of pipes one standard size larger or smaller. Then the ends of the arches are threaded into the racks and securely fastened to the bolted joints - the frame is ready.
How to fix the film on the greenhouse
The next step is to stretch the plastic film. Before fixing the film on the greenhouse, work begins from the front side of the front and back parts, the edges of the film are tucked onto the elements of the arches around the perimeter. Where the doorway is located, to fix the film on the box, a bar is stuffed, excess material is cut off with a knife. The door itself is covered in a similar way.
Fixing the film on the greenhouse
In order to fasten the film on the greenhouse, the rest of the frame is wrapped inside and out. To do this, a ditch is first dug at one of the sides of the greenhouse, then one end of the film is pressed down with a stone, brick or other material, the film is turned to the opposite side and its second end is pressed down with a stone. With the help of bolts through the holes made, the canvas is attached to the ribs, laying some strong and flexible strips from above and below. As such a strip, you can use a PVC pipe cut lengthwise into four parts with a diameter of 35-70 mm.
Video: how to cover a greenhouse with a film
At the final stage, the inner sides of the front and rear arches are covered: the film is cut out along the contour and glued around the perimeter or melted with an iron at a temperature of about + 100 ° C. Along the entire perimeter of the greenhouse, earth is poured, a cement screed is made on top or slate is laid and grooves are dug to drain water.
The video shows how to cover the greenhouse with foil yourself without possible flaws:
Greenhouse from a wooden beam
A frame greenhouse made of wooden beams under plastic wrap is a cheap and affordable building. Its main drawback is some weakness of the design. For the construction of such a greenhouse, bars with a section of 40 × 50, 35 × 60, 50 × 50 mm and more are used. Below is a convenient and practical option with collapsible elements.
The uniqueness of the presented design lies in the fact that it consists of the same parts. This allows for quick installation and dismantling of the structure, as well as, if necessary, storing it in disassembled form. In addition, by adding or subtracting the required number of parts, you can change the area of \u200b\u200bthe greenhouse.
First, assemble the frames for the walls. The dimensions of the frames must be the same and a multiple of the width of the standard polyethylene film. For example, for a film 1.15 m wide, a frame with sides of 1.05 × 1.85 m can be made. In this case, when stretching the film along the roll, 5 cm will remain on the bend on each side. details.
The frame is assembled from bars, a cross-spacer is installed inside, which is strengthened with screws screwed into the end. On the sidewalls on opposite sides, two holes are drilled at the same distance. Finished frames are pulled with a film. In this case, one frame is used to make a door frame and another one to make a door. Next, eight roof trusses are made with a base of 3 m, a height of 0.7 m and a slope length of 1.75 m. Two trusses, front and back, are covered with a film on one side, the second side is pulled after connecting to the slope. In all farms, two holes are drilled per slope at the same points. Next, eight frames with sides of 1.05 × 1.75 m are assembled, holes are drilled at the same points and pulled from both sides with plastic wrap. At the same stage, a ridge and visors are prepared from tin or galvanized metal sheet. For the same purposes, you can use a polyethylene pipe with a diameter of at least 160 mm, cutting it in half lengthwise.
It remains to prepare fasteners from a 35x100x18.5 mm board: four pieces for connecting frames into a corner, six pieces from single boards for connecting wall frames along a line, and six more for roof frames 1.75 m long. Holes are drilled in each element corresponding to the holes in the frames. To improve waterproofing and thermal insulation along the perimeter of the planks, it is advisable to stick rubber seals, which are used when assembling plastic windows.
The installation of walls occurs in the following sequence. First, the corners are assembled at their location, and the void between the panels and the mounting corner is filled with tow, moss, glass wool and other heat-insulating material using a rail or pin. Then the wall panels are mounted using fasteners. Moreover, the connecting strips can be fastened both from the outside and from the inside of the greenhouse, or from both sides, by making an additional number of fasteners to increase strength.
After completing the assembly of the walls, proceed to fix the base of the structure. On uneven areas, the surface is pre-leveled. Then, to a depth of at least 50 cm at a distance of 15-20 cm from the corners with a further step of no more than 2 m, stakes made of boards with a section of 35 × 100 mm and a length of 60-70 cm are hammered in. To prevent the stakes from splitting during driving, into place strike enclose a piece of board or slats. The driven stakes are connected to the base of the greenhouse with nails or screws of the appropriate length. Then backfilling is carried out to a height of 5-10 cm from the bottom of the base, and on the outside, roofing material, concrete slabs or slate about 40 cm wide are laid on top. ) precipitation, it is necessary to provide a columnar or strip foundation.
Next, proceed to the assembly of the roof elements. First, trusses are installed on the sides of the wall panels, fixing them at the junction points to the corners. Skates are laid on top of the trusses, installing fasteners in parallel and fastening them with bolts along previously drilled holes. Then, at the joints along the front, back and sides, as well as in the corners between the slopes, soft thermal insulation such as tow, glass wool, etc. is laid. A ridge and a visor are mounted on top, fixing them on nails or self-tapping screws 3-4 cm long, and tighten all the bolts on roof elements.
In this article, we will talk about how to make a film greenhouse during the weekend. Buildings for growing early vegetables or seedlings are in growing demand everywhere. And this is not surprising, since the price of a kilogram of strawberries in the market in May makes you seriously think about building your own small greenhouse.
Choosing the best option
Actually, before starting construction work, we will decide which film greenhouses are suitable for assembly at their summer cottage. For a long time of operation of quick-assembly structures intended for early growing of plants, many different modifications have been developed.
The following varieties are most widespread among domestic summer residents.
- Arched frame structure assumes the presence of a roof made in the form of an arc.

This design has a number of advantages, including:
- Easy to assemble with your own hands;
- Relatively low cost of construction;
- Versatility in terms of the use of covering material (with the same success, polyethylene film or sheet polycarbonate can be used);
- Frame strength and resistance to mechanical stress;
- Optimum degree of illumination due to the uniform distribution of sunlight over the entire area of \u200b\u200bthe structure.
By the way, the arc-shaped structure does not accumulate snow in the upper part, and therefore the greenhouse can be operated without disassembling it for the winter.
- Single slope design does not imply a separate location, but an adjunction to the wall of a building. For best results, summer residents attach these greenhouses to the south wall. This solution allows not only to ensure optimal heating of the internal space, but also to save space.

The only tangible drawback of this arrangement is that the snow itself does not slide off the roof and has to be removed as it accumulates.
- gable structure provides a better degree of snow sliding off the roof, which is an obvious advantage in regions with high rainfall.

Important: The disadvantage of this type of structure is the relatively low durability, since the usual plastic film lasts no longer than two to three seasons, after which it needs to be completely replaced.
Nevertheless, this type of greenhouse is the easiest to manufacture, and therefore, we will consider the technology of its construction.
- Winter greenhouses made of reinforced film are heated, and therefore technically complex structures, in which everything must be thought out, from an efficient heating system to fire safety measures.

In such structures, increased requirements are imposed on the strength of the frame, since the structure must withstand significant loads of accumulated snow.
- is a structure buried in the ground. The construction is technically complex, as it is buried in the ground by 1-2 meters.

The construction of even a small greenhouse using this technology implies the need to dig a pit, insulate the walls with thermal blocks, equip a heating system, etc. As a result, the construction of such greenhouses is rarely resorted to due to the originality of the design and the complexity of implementation.
Technology for the construction of a summer greenhouse in a summer cottage
It doesn't matter what you decide to build - a reinforced film greenhouse or a greenhouse covered with single-layer polyethylene, the project implementation technology is largely similar.
To begin with, we select a place. It is desirable that it be a flat, well-lit area with the same type of soil composition and with a relatively low degree of humidity.
- Boards and timber pre-impregnated with an antiseptic. For the greatest durability, the wooden elements in the construction of the greenhouse can be covered with several layers of drying oil, burned with a blowtorch or impregnated with hot resin.
- PVC pipes.
- Reinforced polyethylene film.
- Metal reinforcing bars 1m long.
- Screws and nails.
- Door and window hinges at the rate of 2 hinges per vent and 3 per door.
- Metal loops for fixing PVC pipes
Let's start building:
- We prepare a flat area, tamping the soil around the perimeter, where the walls of the structure will be located.
- Along the perimeter of the site, we assemble a box from pre-prepared boards, which will give the frame the required strength.

Important: treat the boards with an antiseptic compound (sold in most hardware stores). If this is not done, the box will collapse within a few years and the entire structure will lose its durability.
- At the corners of the assembled box, metal bars of reinforcement are driven into the ground, which ensure the stability of the structure.

- We drive reinforcing bars into the ground along the long sides of the plank box, which will serve as the basis for the arcs on which the film will be attached. The rods are hammered at a distance of 50-60 cm from each other. Each rod must be buried in the ground by at least 50 cm and the same amount must remain above the ground.
- We put pre-prepared plastic pipes on parallel fittings located on both sides of the duct so that an arc is formed.

- By means of mounting loops, the pipes are fixed in one place. Mounting loops are attached to the screws with a screwdriver.

- At the corners of the frame, we make diagonal supports from a bar with a section of at least 50 x 50 mm.

- We strengthen the ends of the structure with supports from a bar.
- We fasten a longitudinal plastic pipe along the top of the arcs, which will ensure the required stability of the frame.

- We cover the frame with plastic wrap or other greenhouse covering material. The film is attached using special brackets and wide adhesive tape.
- From one end of the beam we build a door frame.

- We knock down the door in the form of a box, cover it with a film and hang it on the hinges.
- In the same way as the doors were made, we make ventilation vents. The vents should be located on both ends, the closer to the top, the better.
Internal arrangement of the greenhouse
Structures covered with polyethylene film are the best choice for growing early vegetable crops or seedlings. Such greenhouses do not imply the need for a heating system.
An important condition for the full operation of any greenhouse, regardless of size, is the rational use of internal space. Therefore, if you decide to make an ordinary small-sized greenhouse, we limit ourselves to backfilling fertile soil on top of the soil. If the built structure is of sufficient size, we equip the racks inside, into which the soil is poured.
Conclusion
A properly built greenhouse or greenhouse is a unique opportunity to grow early vegetables and thus save a considerable amount of money on trips to the vegetable store.

The greenhouse assembly instructions given in the article are the simplest project that anyone can implement. You can build such a structure from pre-prepared materials in one weekend.
Another advantage of such a greenhouse is the complete absence of expensive aluminum profiles, which are used in factory buildings. As a result, a greenhouse can be built without fear of being carried away in your absence, as is the case with factory-made quick-assembly greenhouses.
Have intractable questions or want more useful information on this topic? Watch the video in this article.