Winter house made of twigs. Do-it-yourself houses made of wooden sticks. Hut in the meadow
Parents of kids attending a preschool are aware that every holiday is necessarily accompanied by children's crafts for the kindergarten. Some may find this task to be a waste of time. But for the majority, this is still an entertaining and creative process, as well as an opportunity to spend time with a child with interest.
It is important to keep natural materials in stock in accordance with the season, and then any task for the manufacture of works will not be taken by surprise.

Reserves of natural material
When traveling to the sea, you can pick up small stones and shells. In walks in nature, stock up on beautiful leaves, cones and twigs. At the summer cottage, you can plant decorative pumpkins - this is a good raw material for products that is subject to long-term storage.

Leaves can be stored in a book. It is better to hold the cones in the oven and pour boiling water over them, destroying all the bugs. It’s also best not to throw away toilet paper or paper towel cartons, and save plastic bottles with caps. Designate a place for these items by placing everything neatly in the box.
Crafts for kindergarten - this is what the child must cook with his own hands. The degree of difficulty is determined based on the age category.

With skillful direction, the child will be able to create an application, drawing, and mold a plasticine product on his own. Taking into work natural materials in the form of leaves and cones.

DIY craft ideas for kindergarten below will tell you how best to use non-standard tools, such as pasta or plastic dishes.

Plastic bottles can already be classified as standard materials, the possibilities for working with them are endless. Use matches, napkins, and sushi sticks, they are all great tools.

Products in the autumn version can be performed as compositions or as independent works. Perky hedgehogs, old foresters or alien creatures in a flying saucer - all this can really be done by children's hands using raw materials given by nature.
Winter style products
In winter, we have associations for New Year's holidays, and we also do not forget about the day of the defenders of the fatherland.

On February 23, military items will be relevant. You can make greeting cards. Excellent products are made from fabric, but parents should take part in the creation, since it is necessary to cut.

The body is created from fabric, while the corners at the bottom should be stitched, this is necessary for stability. Next, fill the bag with padding polyester and tighten the thread.

It remains to create a face. The nose can be made from a beige bead. Eyes can be used ready-made or create an application. Embroider eyelashes, and build antennae from threads tied into a bundle. Give a tone with blush or lipstick.

Hands are made of fleece or cloth and glued. Alternatively, attach one handle to the cap. Ideas are endless, you can supplement the work with shoulder straps.

Works in the style of autumn
Products in the autumn style are distinguished by the fact that materials given by nature are used for manufacturing. Leaves, cones and acorns of this raw material are in abundance in autumn, which is perfect for crafts on a site in a kindergarten.
As a rule, competitions of works are arranged in the autumn period. The kid is able to create an application on his own with a little help from his parents.

For products from vegetables and fruits, a knife is used, so the work must be carried out strictly under supervision. Paints are often used in gardens. But you can also replace them with material, for example, autumn leaves will serve as stamps for creating a forest.
Note!


You can tell the kids how the birds need their help and make a feeder together.

This contributes not only to the development in creativity, but also brings up a sense of caring for animals.

In winter, the death of birds is very high, because because of the frost it is difficult for them to survive, so care will be taken when creating a feeder.

For the feeder you need: a tree, a box and plastic bottles. Wooden feeders are known for their durability. But not everyone can handle this material. Cardboard is easy to use, but it will not stand up in wet weather.

In this case, the cardboard feeder can be updated periodically, and the baby will like its decoration. Plastic is the most unpretentious material. Easy to work with and will hold up after rain. The work uses a mock knife, so the process is carried out under the guidance of adults.
Note!


Street layouts
You can build situations that convey the meaning of reality, such a game will help you learn the movement on the road, study the signs. Street markings can be drawn with paints on cardboard, houses can be built from boxes. Decorate the urban landscape with greenery and, most importantly, make road signs and traffic lights.
Road signs can be printed from the Internet. A sign stand can be made from a plastic bottle cap and a sushi stick, and fastened with plasticine.

It is easy to create houses from cardboard boxes or glue them from cardboard and paint the facade. Trees are created from cardboard or natural materials.

If you finely chop the green threads and sprinkle them on cardboard, pre-lubricated with glue, you get grass. The soil is easy to create with grits glued to the surface.


Note!

One side has a background color and the other side has three traffic light colors. Glue a thread between the halves and the circle is easily glued so that you can turn it to the hole of one side or another.

bottle craft
Wall panels, plot compositions and toys can be performed in various techniques. It is very easy to make crafts from plastic bottles for kindergarten.
You can make a penguin. This will require two plastic bottles, with the bottom cut to the required size. And the part is placed one inside the other. For convenience, several cuts can be made in the inside.

Using acrylic paints, paint the toy. We make a pom-pom from threads - to decorate the hat.

The scarf is made of braid or fleece, it will successfully hide the junction of the bottles. For the stability of the scarf, you can put it on glue or double-sided tape. Colored paper is used for wings and paws.

Photo crafts in kindergarten


Julia Pogodaeva
Autumn is not only harvest time, but also harvest time. natural material. From cones, dry twigs, green moss, autumn dry leaves and other material are wonderful and original crafts.


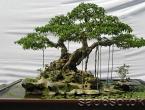
Twigs and twigs - the most affordable craft material. It was the twigs that served as the basis for our crafts, performed by a subgroup of children of the preparatory group under my leadership. We made a hut from twigs Lesovichka.

From the husks of cedar cones, we designed tiles for the roof of the hut. Soft moss served as a carpet, as a piece of the forest edge appeared on a small plank, which served as the basis of our crafts.

The spruce cone appeared in the image of the most mysterious fairy tale character, an inhabitant of the forest, an old man Lesovichka. The eyes and nose of the hero are colored half-beads. Beady eyes looked at us in surprise - what are you guys doing at the edge of the forest near my hut? The beard, hat and forest bast shoes are crocheted by me from acrylic yarn. The beard is tousled, green as moss underfoot. The hat is red, like the hat of a bright fly agaric mushroom. Yes, green shoes, to make it more fun to jump from bump to bump.

At the final stage, the guys decorated under the tree wooden ladybugs. We think it turned out very nice!
Related publications:
Winter is in full swing and the guys and I continue to make crafts, the themes of which are inspired by Beauty Winter. This time we made Snowman - an athlete.
Purpose and tasks: 1. Develop fine motor skills, coordinate the work of both hands. 2. Promote the development of attention, perseverance, design.
Educational field: "Artistic and aesthetic development" Purpose of work: Learn to sculpt a character after reading a book - Cheburashka.
Teacher Sukhonogova Oksana Valentinovna Surgut KhMAO MBDOU No. 48 "Rostok" Master class "House in the village" Spring has come! The spring will come.
Master Class. Ice cream stick house. Appointment: a house for a kitchen garden on a window. To make a house with our own hands, we need:
Hello, dear colleagues. I invite you to my master class on making crafts from natural material for group decoration.
I bring to your attention a step-by-step production of crafts from natural material. We will need: green woolen threads, thin.
Good afternoon. Today I can finally sum up a large collection of ideas for crafts made from natural materials. We already have a wide-form article with autumn leaf crafts for children and adults. There is a detailed article in the autumn theme. In this article I will publish the most interesting and non-standard tricks and techniques. I decided to do wide overview page, which will prove and show that natural material for creativity is not only acorns and chestnuts. You will see with your own eyes and fall in love with all your heart in new fresh ideas of working with natural material. Crafts made with your own hands, from branches, from leaves, from dried flowers, from everything under your feet. Nature is rich in material, and man is rich in beautiful ideas. So, let's see what crafts can be made from natural material this season.
Idea Pack #1
SCALES from cones.
The cones are made up of scales. If you collect open pine cones, then it is convenient to pull out of them with pincers, pliers, or bite SCALES with wire cutters. And then use this bumpy natural material as a mosaic coating on a variety of autumn crafts.
Note. In order for the cones to open well, spread out with scales, they can be warmed up in the oven.
Here we see mushrooms. Their legs are carved from a thick wooden chock. The hats are molded of plasticine and the top of the hats is covered with scales. It turns out cute mushrooms-crafts with their own hands. Suitable job for school.

But the spruce cones have scales flatter and smoother. They look like the smoothed feathers of birds. Therefore, the idea of \u200b\u200bcrafts comes to mind on a bird theme. We sculpt the bird's body from plasticine, we coat with PVA glue, put a layer of torn paper napkins on the glue, again with glue, again with napkins - it turns out papier mache shell. We dry this shell until it is completely lignified. And on this hard dry surface with hot glue (layer by layer, row by row) we lay the spruce “tile” of feather-scales.

And also the scales of a spruce cone are similar to the scaly armor of ancient lizards. So here's another idea for you. After all, this is a great challenge to your artistic potential. It's not just a bird here - there's a whole beast that looks like it's alive. Great crafts for boys made of natural material.
Here we act exactly the same as with the bird- we sculpt the base from plasticine, pack it in several layers of papier mache (alternating pva glue and paper napkins). And then, after this mass has dried into a hard crust, you can glue the dinosaur figure with spruce scales.


After plucking the cone, a cone BOTTOM remains. It looks like a flower with petals. From such cone flowers, you can make a new autumn craft with your own hands - for example, a WREATH. Glue the base for the foam wreath with a chopped cone - just with hot glue from a gun.

You can cover such cones-flowers with bright gouache. In order for the gouache color to become juicier and shine, it is necessary to sprinkle this product on top after drying with gouache, I recommend spraying it with simple hairspray. The color will stick and won't stain your hands.

You can make beautiful flowers yourself, choosing the most accurate and even scales of different sizes, and laying them radially from the center. The middle of the flower can be decorated with beads or rhinestones. From such natural material, you can even make brooches in the autumn style with your own hands - and wear them with a coat, or pin them to a shawl.

Flowers from cones can not only be collected into wreath crafts, but simply laid out on a panel. Put on glue on a piece of plywood. You will get an excellent craft made from natural material for a competition in a school or kindergarten.

From whole buds You can also make great crafts. We add not only natural material to the cones, but also other materials (colored felt, cardboard, ropes, plastic, etc.).


Idea Pack #2
Crafts from natural material
WALNUTS.
From nutshells, we all made boats in childhood, or hats on plasticine mushrooms. But you can go further in your creativity from walnuts. Children will be happy to create mice or birds, and adult skillful hands and a warm spiritual heart can create a whole world out of a nutshell ... Now you will see it.


In this article I want to introduce you to a very good person. Her name is Marina. Master with an attentive soul.
This is how the account page of this master on the Fair of Masters website looks like.

I really like the work of master Marina from the site Fair of Masters. With her own hands she created amazing, in its sincerity and warmth, the world of good old women. The walnuts in the place where the wings are connected are surprisingly similar to a wrinkled smiling old woman. It remains to add eyes, a nose-bone and mentally wrap everything with a cotton handkerchief. And now the cunning old woman looks at you cheerfully.

We make a body from a bump, weave hands from rough paper packaging twine. From felt we dump warm felt boots. Each old woman can be made with her own character. Cheered up with a big smile. Or silent thoughtful, on my mind.

Old women can be both summer and winter.

You can create whole worlds from natural material in which kind old women live and work. They themselves will keep their world clean.

And after work, they will gather for a cup of herbal tea to tell stories, make fun of each other and sing songs of their youth.

Master Marina sells her crafts. You can order her work on the master's personal page - https://www.livemaster.ru/woods. Marina can make you a custom-made craft for your family and friends.
After all, how nice it is to receive as a gift the World of good old women, which will always smell like a village CHILDHOOD for you - grandmother's pancakes, a pile of firewood by the barn, chickens running around the yard, a heated tree of an old bench near the fence.
Master Marina, I want to give an idea. In one I talked about another Czech Master who created the world of ACORN PEOPLE - Dubanchikov and wrote a book with stories about them, which he illustrated with emotional scenes made from natural material. The book is published in the Czech Republic, and only in Czech. I think that many children will like our Russian book with kind stories about Russian village grandmothers, illustrated by Marina's works.
After all, this is a real miracle, to make a new world out of natural material with your own hands - kind, fabulous, REAL. More and more new houses, cozy benches, swings, carts, wagons will appear in it.


Idea Pack #3
Crafts from natural material
FAIRY HOUSES.
If you like fairy tales with fairies and magicians, then you will like the world of fairies made of natural material. You can create cozy houses for fairies with your own hands, set up entire housing complexes for them, with ponds, parks, gardens, swings.

You can bring a man-made miracle to the school competition of crafts made from natural materials. The house where the gnome lives. Parts can be attached to plasticine, staples (from a stapler), to glue from a hot gun.


Pieces of moss, acorn caps, scales torn from a cone with pliers, lichens and dry hard hanging mushrooms taken from trees in the forest. And even pieces of plants torn from indoor flower pots - any natural material will be used to build such a complex but interesting craft. The house will grow and be ennobled by natural design before your eyes.


You can base thick wooden stick found in the forest. Saw off a comfortable piece from it. Buy at a hardware store tinted stain for wood- and cover the tree in a noble dark color. Cut out of thick cardboard windows, cover them with the same stain. From ice cream sticks put together a real door, arrange a porch. Sculpt a conical roof from plasticine. Break a large pine cone with tongs or pliers on scales and lay out tiles from them on the roof of a natural house.
Some elements can be molded salt dough(a glass of fine salt, a glass of flour + water (add water a spoon at a time, and grind with salted flour with your hands until a single lump is formed, similar to plasticine). Roll out the dough - cut into bricks with a knife. Dry - and get a lot of building material for the porch , paths, fences, etc. The dough can also be painted with gouache or stain.


But the house is VERY SIMPLE. Now I’ll tell you how to make it with your own hands from the things that surround us.
- Take strong cardboard package from milk or juice. Cut windows in it - this will be the future facade of the house.
- Buy a small bag of gypsum plaster (or putty) diluted with water and coat the facade of the house with this mixture.
- Dry and cover with whitewash or white gouache (toothpaste on the edge).
Make a roof out of cardboard, also apply glue to it and lay tiles from pieces of bark or cones. or chips.

Idea Pack #4
Applications
And of course, the most common crafts made from natural material are applications using dry herbarium - herbs, leaves, flowers. We made everything from leaves of chicks or fish in an aquarium. In a special article, I give many options.
And in this article I want to show a beautiful mosaic technique of laying out dry natural material in the form of a SILHOUETTE PICTURE.

You can find a lot of ready-made silhouette templates on the Internet. If in the search bar you type the phrase "silhouette of a hare picture" or another animal.

The most important thing in such a craft is to achieve recognition - the clarity of the silhouette. Therefore, you need to choose a silhouette without small details - protrusions. And if you chose with detailed protrusions, try to make the small relief detail be made with ONE SOLID petal (like the ears of a bunny or its protrusions of the paws in the photo above).
If, when laying out the mosaic, the edge of the plant protrudes beyond the border of the silhouette, it must be carefully cut with scissors (as is done in the photo above with a cat - it has triangles of ears cut out).
Nature Idea Pack #5
Crafts from branches.
From branches of different shapes and bends, you can lay out beautiful crafts with your own hands. Branches can just decompose on a white paper background, repeating the outlines of a bird or animal. It is possible in advance on paper draw a silhouette of a bird weak pencil lines. And then pick up branches that would lie on this drawn silhouette of a bird, repeating the curves of the picture.
Crafts from natural material can be fix with glue with a hot glue gun. Or make a photo-craft. That is, lay out the branches and take a picture of the craft, thereby perpetuating your product from natural material in the form of a photograph.

You can fix the craft at the key nodes of the plexus of branches and then in these knots attach it to the base (vertical wall or horizontal shelf-stand), as is done in the photo below.

In addition to branches, you can use wood chips, pieces of bark, chips and saw cuts from logs, chocks, thick branches in your crafts. This is how crafts-owls from the photo below are implemented. Simply and interestingly made with your own hands - you can safely take it to the exhibition of autumn crafts to school or kindergarten.

One and the same idea can be embodied in different angles and different materials. Here, for example, in the photo of horse crafts made from natural material, both branches and bark, and snags are used.

You can lay out entire mosaics completely filling the silhouette image with natural material. The direction of the branches should repeat the direction of the pattern details. Spread the branches in the same directions as the fur pile of the animal, or repeat the muscular relief of the animal with branches.

Perhaps this type of crafts made from natural material will captivate you so much that turn into a solid hobby with the prospects of monetization in a profitable business. Why not make beautiful wooden sculptures for a summer residence or estate for sale.

And if you want to use branches to create crafts from natural material in class at school, then here are simple ideas for you on how this can be implemented in the lessons of labor for boys. Everyone is taught cut with jigsaws plywood figurines. In addition to animal figurines, you can put together frames from slats and make beautiful landscape paintings of an autumn forest with mossy branches overgrown with lichen.

Similar ideas can be implemented at labor lessons for girls - without plywood and a jigsaw - by making a frame from cardboard twisted into a square tube (fold 4 pieces into a frame-frame, insert branches into holes), and cut animal silhouettes from dense packaging corrugated cardboard from old boxes and paint in gouache, if desired.

Package of nature crafts No. 6
Maple and ash seeds.
Dry lobed tree seeds can be very interesting to beat in a variety of do-it-yourself crafts.
You can make a mosaic craft out of this natural material in the form of a bird (because maple seeds look like feathers). You can lay out a pattern in the form of a butterfly on the glass, and thanks to the transparency of the background, it will seem that it is hovering in the air, as is done in the photo below. Maple seeds paint well with watercolor, so your butterfly craft can be in all colors of the rainbow.

At school or kindergarten, from the same natural material, you can make very simple children's crafts with a base on thick cardboard. Maple seeds can be a hairstyle on a painted human head, they can become a fluffy squirrel tail, feathers on the wings of an owl, or needles on a cardboard hedgehog (as in the photo below).

And maple seeds look like dragonfly wings. Therefore, you can make simple children's crafts in the form of beetles. For example, string beads on a wire (this will be the body) and glue seeds to the body on glue or plasticine. Wings can be painted with nail polish and sprinkled with glitter glitter. The bulging eyes of a dragonfly can be cast from frozen drops of the same nail polish. You will get a beautiful quick and simple craft made from natural material for children.

And the same maple natural material can become the basis for fun GRAPHIC CRAFTS-DRAWING with an ordinary black marker. We paint on the missing details for the snub noses and turn the seeds laid out on a sheet of paper into interesting graphics. These are already crafts for training your imagination - a great idea for a circle on the topic "Learning to think creatively."

I told more about this GRAPHIC method of using natural material in the article.
Idea Pack #7
Crafts from natural material
STONES.
A simple rubble stone left over from summer cottage construction, or smooth river, sea stones can become the material for your natural DIY crafts. The stone itself can tell by its shape who it looks like. And you just have to take felt-tip pens or gouache to bring this image to life.
If you feel like an artist in yourself - you can make complex multi-line drawings - as is the case with the stone owl craft. Or smooth thick pebbles can look like clumsy chubby panda bears - and such crafts made from natural material will be feasible for children. First, we cover all the stones with white, dry them, and then with a black marker we draw on it the black details of the teddy bear.


Ordinary felt-tip pens draw very well on stones. After completing the general painting work, the details of the picture need to give contours(clear boundaries) black marker.

You can draw the silhouette of a snail or a sheep on the stone yourself. And to give the children the task to simply color the finished silhouettes, supplement them with a pattern of stripes and dots or curls.

From dry grass and wire or other natural material, you can make a nest. And in this craft, put the chicks made of stones with your own hands. Older children can decorate a complex picture with a chick and an open beak. For younger children, the task is easier in the form of chickens in shells.

On a piece of plywood or a round saw cut from a log, you can lay out a whole picture of stones and other natural materials decorated with paints. This craft is suitable for work on the autumn competition in school or kindergarten.

Older girls will like exquisite pictures from the life of a fashionable girl - a felt-tip pen, paints, stones and rhinestones.

You can use the mosaic technique to lay out a variety of characters from stones. Attach the stones to the glue with a hot glue gun. The stones in the mosaic can be painted with gouache, or have their own natural color.

These can be landscape paintings made of natural material (sea pebbles, glass turned by water, shells, etc.).

Idea Pack #8
Crafts from natural material
PORTRAITS.
A very interesting topic for crafts made from natural material these are portraits. The face in the picture always attracts the eye. You want to look at such a craft for a long time, it has a soul, human eyes, into which you want to look, read their thoughts. A portrait is a craft that looks at you.

You can plant all the details of a portrait from natural material on glue. Or just fold the portrait like a mosaic on a sheet of cardboard, take a picture and brush off all the details of the masterpiece with your hand from the table. And on the wall in your room there will be a photograph of a disappeared, but ever-living portrait.
As an ornamental natural material, you can use stones, dry leaves, cones, seeds, bark. For drawing thin lines, branches of different trees, straws, blades of grass.


If you are working with children, then you can give them an easier task. Print the finished face on the printer. And from natural material in this craft make additions
Good luck with your work.
Olga Klishevskaya, specially for the site
The bizarre outlines of the branches involuntarily attract attention, and I want to capture this sophisticated beauty not only in memory or in a photograph, but also in real life. If desired, you can add an unusual decorative touch to the interior, making interesting compositions or creative products with utilitarian features. Crafts from tree branches is a great hobby that allows you to create beautiful decorative elements with your own hands without investing any financial costs. The interior of the house, decorated with this natural material, acquires a special sophistication, where everything is aimed at emphasizing its individuality. Before starting work, the blank for future crafts should be carefully prepared, taking into account the individual characteristics of the wood.
Crafts from branches - procurement of material
For creative activities to decorate the selected room (this may be, as well as and even), well-dried branches will be required. They are easy to pick up during forest walks, as well as pick up in a square or park. You can independently dry the branches that remain after sanitary pruning.
Before work, dry the material thoroughly for further use:
Inspected for cracks;
Cleaned from dust and dirt;
Exfoliating places on the bark are polished.
To exclude the appearance of unwanted larvae in the house, it is necessary to carry out disinfection using a weak concentration of potassium permanganate solution known to many. Depending on the idea, the branches can be painted in the desired tone, covered with stain or varnish.


Decoration of various items
Having brought home a bouquet, you can quickly make a creative vase using branches. For this, any suitable jar is taken - tin, glass, and pieces of branches are cut into pieces with a length slightly exceeding the height of the container.
They are placed close to each other in a vertical direction on the outer surface of the jar and secured by tying it with a beautiful braid or ribbon. You can plant branches with glue. Flower pots are decorated in the same way.


To make this wonderful vase, in addition to the glass base, you will need: a glue gun, dry willow or birch sticks, wire cutters.
- Harvested branches must be cleaned of bark. It is better to do this when the wood has not yet dried up, so it will be much easier to remove the bark;
- Next, using wire cutters, cut the bare branches into small pieces. Their size should be calculated based on the height of your workpiece;
- After the material dries, we glue each stick to the base in such a way that a kind of crate is obtained;
- It remains to give time for the glue to dry for 10-15 minutes. Congratulations, the branch vase is ready!
Crafts from branches will always find their worthy application in interior design of a house or apartment. Their shape and size can be completely different, because different materials can be used for their manufacture. Products made from bark, chips, snags, cut logs or large branches, etc. will look good. It all depends on your imagination and personal preferences.

The branches installed inside the glass jar in a continuous layer along the entire side plane will look no less original. So that they do not crumble in an impromptu vase, the bouquet should be quite voluminous.
For the products described above, you will need fairly even trimmings from the lower ends of the branches. The upper thin stems will help create a delightful evening with flickering candles. To do this, they are simply placed in a glass container so that they rise above it, pour no more than half the volume of water and lower the floating candles.


Charming compositions from branches
Trunks crowned with a web of thin twigs, placed at the head of the bed in a niche cut through one side of the coffee table top, will help to bring an unusual accent to a room, for example, a bedroom. In the dining area or study, a high floor vase will look elegant, in which, along with the branches, there will be dried cereals.
Bizarrely curved branched thin tree trunks are placed in a vase and decorated with decorative elements matching the color of the interior. It can be sparkling stars or snowflakes on the eve of the New Year, bright valentines on the eve of the corresponding holiday of lovers, or just butterflies with fancy ornaments on the wings, birds, flowers, fruits, leaves from any material at hand.


Having strengthened graceful branches on a velvet fabric, in color harmonizing with the general situation, and placing, after pasting on cardboard, the resulting composition in a wooden frame, you can get an elegant decoration of the interior.
A beautiful branch can be supplemented with golden bows, Christmas balls or forest cones. Such decoration will contribute to a good mood and cause only positive emotions. In addition, New Year's decorations will create a festive atmosphere on the eve of the main winter celebration.


Branches in the interior: a step-by-step master class
Tall shrub trunks (willow is most often taken) will allow in an unusual way. For example, to separate the sofa corner from the rest of the space in the living room. Such a partition is made very simply:
- To do this, a wooden beam of the desired length is taken as a stand. You can use absolutely any type of wood.
- In the beam, two rows of non-through holes are drilled in a checkerboard pattern, in which prepared branches are fixed vertically to the glue. In length, they should be about a meter less than the height of the room. The step depends on how openwork the resulting screen should be.
- To make the product look stylish, it is varnished.


The current bedroom design ideas are endless - birch trunks in the interior are proof of this.

Trimmings of trunks with a diameter of 8-10 cm with strong branches extending upwards from the side at an acute angle easily turn into hangers dear to the heart. They can be mounted on the wall in the hallway, creating a natural corner with a specific purpose. Among the designer finds, you can find birch trunks that play the role of cornices and even racks near the bed for attaching a canopy.
The picture will be complemented by a coffee table, the base of which is a bundle of branches fastened vertically into a stable cylinder, and the tabletop is durable glass of round or oval shape.
You can make an option that is unexpected in effect by fastening the branches in the shape of a cube and laying it on the floor on the side face. A plastic or glass square tabletop is placed on top.


Wall mirrors are often decorated with branches. They can be glued around the entire perimeter perpendicular to the frame or along it. There may be many options. Craftsmen easily make frames for photographs, children's drawings, reproductions of their favorite paintings from scraps of thin trunks.
A gracefully curved thick branch can become the basis of a table lamp. A branch with many branches, mounted on the wall near the mirror on the dressing table, will allow you to easily place all the jewelry.


Such work requires delicate female hands and special attention.

Creative inspiration is the main stimulus for a person who wants to create beautiful crafts from branches with your own hands.
In spacious hallways, one wall can be turned into a fairytale forest by installing trunks reaching the ceiling behind a high plinth with LED lighting installed near the floor. This is one of the best ways to give your interior a scenic look. Both thin and thick branches of trees can be used as material.
Small products made from dried snags will look original. For a change, you can use tree bark and wood chips, combining everything later into a single composition.
We make decor from branches with our own hands
Crafts from branches are always distinguished by their originality and unique design. With the help of these uncomplicated sticks and twigs, you can create a beautiful author's decor on absolutely any subject. , paintings, wreaths, flower pots, bizarre animal figurines - this is just a small part of what can be created from this wonderful natural material.
- Making a wreath from branches is probably one of the easiest tasks that even a child can handle. Take thin willow rods and twist them together into a tight ring, then carefully tie them with copper wire. As an additional decoration for a wreath, you can use tree leaves, flowers, forest cones.
- You can revive an inconspicuous tree branch using ordinary snowflakes. Cut them out of paper, foil, or colored felt and hang them on each branch. Such compositions will look great in the house against the backdrop of a wall with beautiful wallpaper.
- If you still have broken light bulbs, they can also be used as decoration. From a soft wire, make a special mount with which you can hang them on a branch so that the light bulb base is at the top. Further, through a hole specially made in the base, the light bulb is half filled with water. It remains only to give our miniature an elegant look. To do this, the branch can be decorated with decorative braid, ribbons and bows.
Despite the fact that the process of creating some crafts is quite long and laborious, the result of the work done will be amazing.


Even the most ordinary painted twigs can be a great material for making fun crafts. For example, in interior design, unique products made of branches in the shape of a star will look very beautiful and fun. You can make them with your own hands on a regular table.
- Material preparation. For each craft, we need 5 sticks. It can be branches of any tree, as long as they are even and have the same length. The material should be dried and varnished in advance, so your products will last longer. We also need a thread, rope or thin ribbon. With their help, we will tie the ends of our sticks.
- Making a star Lay the sticks on the table so that they form a closed figure of a pentagonal star. Tie each formed corner with a thread or rope and decorate with satin ribbons. The resulting star can be hung on a Christmas tree or given to friends.

To create something unique for your interior, do not copy someone else's ideas, but try to do everything yourself. Feel the mood of your home, think about what exactly it lacks, what things and objects could highlight its own style. Write down everything that comes to your mind in a notebook - when creating an interior design, these thoughts may come in handy for you.
Pay attention to the little things. It is they who, in a creative union with non-standard design solutions, create an unsurpassed atmosphere and focus on a specific element of the interior.


The original floor lamp is a creative interior decoration


Crafts from branches are not only beautiful, but also profitable. The main advantage is that no funds are required for their manufacture, because the material itself is literally lying around under our feet. Moreover, all compositions can be created with your own hands, involving your children in this entertaining process.
Crafts from branches can be easily and quickly sold, because this is a unique decor, which is always in high demand. You can also earn extra money by teaching paid workshops on creating designer jewelry for beginners.


We really hope that this article was useful to you. Create, create, experiment and perhaps this interesting hobby will grow into your professional field of activity.
We are learning how to make a toy fairy-tale house with our children with our own hands from natural materials on the street or from waste materials indoors. A master class and 69 photos will help this.
Delight your children by creating a fabulous home with them. You can make it in the apartment or on a walk from natural materials.
Fairy-tale house from a self-hardening mass with your own hands

Make your own main material. To make a self-hardening mass, take:
- napkins or toilet paper - 20 g;
- flour - 50 g;
- PVA glue - 75 g;
- starch - 50 g;
- olive, baby oil or Fairy - 20 g;
- dry gypsum putty - 125 g.

To make this glue, take tissue paper or paper and tear it up by placing it in a tray. Then pour hot water. All this will soften, then wring out the paper to remove excess water. Now you need to pour glue here, stir it with your hands to get a homogeneous mass.

Now you need to measure out 125 g of dry putty and pour it into adhesive paper.
Since the cast dries out your hands, wear gloves when you make the fairy house this way.
Now add flour to the mixture and mix again. The next is baby or olive oil. The last component is starch, add it.
Put this mass in a bag and store it in it. You can also place it in a container with a lid.

Here's how to prepare a self-hardening mass. And now see what you need to make a fabulous house:
- glass jar with screw cap;
- foil;
- self-hardening mass;
- hot glue gun;
- wire;
- watercolor paints;
- white acrylic paint;
- brushes;
- modeling tools;
- spray varnish.

Unwinding pieces of the desired size from the foil, roll them up, make several flagella and several blanks that look like cakes.

Glue thicker flagella to the bottom of the jar, make the outlines of a window and a door out of thin ones. And two blanks in the form of cakes will turn into two steps to the house. Glue the foil to the lid in the form of a triangular piece.
See where the pipe will be. Attach a slightly twisted wire here, wrap it with foil.

Now you can add foil volume to some places of the house, if necessary.

It's time to get the self-hardening mass and wear it on the foil. Use this spatula for this.

Wet your fingers with water and smooth the surface of the self-hardening mass. While it has not yet hardened, use the modeling tools to give the workpiece a texture. Then the walls will look like stone.

To make the surface even more embossed, go over it with a toothbrush. Her bristles will add graininess.
To make the bottom of the house have a grassy mound, add pieces of clay here and make the texture with a metal tool.

In order to make a fabulous house further, it is necessary to glue the foil around the window with this mass. Now you need to leave the workpiece to dry overnight, and in the morning you can continue to create. Dip the brush into the water, moisten the window, apply the mass here. Using a metal tool, make dotted lines to cut out the window.

And with a silicone stack you will make stripes on it. Then apply thinner lines to make this part of the house look like a wooden one.

Make a stump out of a piece of foil, coat it with mass and also apply patterns on it with a metal spatula so that it is clear what it is.

Add strokes to the window by cutting out the excess. Make a wooden window sill by drawing lines on it with a metal spatula.

Now let the house dry out, at this time you can decorate the roof. To do this, stick clay around the lid on the sides and make stripes with a clerical knife or a thick needle.

Now stick this roof in place and add a little self-hardening mass here, smoothing it out with wet hands. Apply some clay to the pipe as well. Make a semblance of masonry with a metal tool.

At this stage, you can fashion a few bricks, attach them to the door and walls. If you want, cut out a few circles, to do this, lean the back tip of the brush against the selected side and twist it.
Attach a clay fungus here.
You can rest until the house is completely dry. Then mix purple and blue paint with a little black. Paint over the masonry with these tones.

Paint the mound with green paint. For the door, use brown with a bit of green. Blur these tones with a wet brush so that there are smooth color transitions.

And to cover the walls, use pink, yellow, beige, orange tone.

Color the fly agaric hat red.

Let the paint dry. After that, you need to take white acrylic, slightly moisten the tip of the brush with it and go through the protruding parts. It remains to apply white spots on the fly agaric hats and window sills.

Here is such a wonderful fairy-tale house. You can do not one, but two or even more. Then the child will be even more interesting to play.

Another interesting structure can be made from waste materials. But some others will have to be purchased, however, you will not spend more than 3 dollars for this.
How to make a toy house "Forest Fairy Tale"?

You will be surprised that such a magical structure can be made using such simple materials as:
- pizza box;
- two plastic bottles;
- old newspapers or magazines;
- self-hardening mass;
- cardboard box.
Such “good” is usually thrown away, so you won’t spend a dime on acquiring it. And you will need to buy this: PVA glue, acrylic paints, and usually all needlewomen have a hot silicone gun.
Take the first large plastic bottle, tear off the label and cut off the bottom. Now take a rectangular sheet from a disassembled cardboard box or pizza and cut a hole in it equal in diameter to the bottle. Put this sheet on it as shown in the photo.

Now you need to crumple up old newspapers or sheets of magazines and stick them on the bottom of the house. Now take the self-hardening mass and start gluing on top of the newspapers.

Cut out blanks for the roof from cardboard and start gluing them.

Measure the details of the roof to make it the right size. Cut the main elements horizontally. Glue them together with a hot gun. Coat a horizontal sheet with a self-hardening mass, use a knife to make strips on it that will imitate the texture of a tree.

Now you need to add green paint to the self-hardening mass and begin to coat the roofs of houses. On some sections of the roof, make attic windows.

In the balcony area, cut out a horizontal piece of cardboard to make it semicircular. Glue small cardboard rectangles here to create a railing.

You start to get a fabulous house. As you can see, there should be several windows on the walls of the house. They are semi-circular above and straight below. You will make frames for them from cardboard rectangles, glue them crosswise. Now you can use brown, gray, green paint to color your creation.
Be sure to make stairs. To do this, you need to cut out two vertical parts rounded at the top. Connect them with three horizontal steps.

Cut out rectangles from cardboard, start gluing them to the roof elements from the bottom, moving up.

Walk with white acrylic paint on the walls of the house, along the pipe and the lower protruding parts.

To make it a magical house, you can install an LED lamp inside the bottle and turn it on. The light will be visible through a transparent window.

And if you want to get acquainted with another option, then the following master class and step-by-step photos for it will help. For such a structure, not a lot of materials will also be needed, but the result will be excellent.
How to make a toy fairy-tale house from salt dough?

To make such a house, take:
- tea tin;
- PVA glue;
- salty dough;
- stationery knife;
- knitting wire or tape;
- cardboard sleeve from foil;
- plaster cast;
- bamboo skewers;
- sickle mesh;
- paint;
- brush;
- paper;
- pencil.
First, draw the details of the future house on paper.

Cut them out and attach them to a tin can. Circle with a felt-tip pen, then cut out with a clerical knife.

According to the markings provided, cut out the pieces from the rolled out dough. Dry these parts near the battery, and then grease them with PVA glue and attach them to a tin can.

Add water to dry gypsum, fill the distance between the dough and the floor of the house with this mass.
To make a roof, stick sausages on the upper parts of the walls. Then lay wooden skewers horizontally on them, pressing them into the dough. Attach a sickle mesh on top.

Roll out the dough and place it on top of this crate.

Roll out the dough strips and cut each fringe.

Attach these headers to the roof, starting from the bottom. The pipe must be glued with dough, make a kind of stump.

Then stick the rolled strips of dough onto the pipe and go over them with a knife to indicate the structure of the tree.

Roll out the dough, lay it on the grid and cut it to make a square. Give it a free shape and attach to the house.

Now let the house dry completely, then cover it with acrylic paints.

A small garden made of branches with your own hands

The main object of such a landscape will also be a fabulous house, to make it, take:
- a cardboard bag from a dairy product;
- glue;
- ice cream sticks;
- felt-tip pen;
- secateurs;
- hot glue gun.
Draw on the milk bag on the outside where the windows will be located. They will need to be cut. Measure the height of the future walls on the bag with a ruler, and you will need sticks of this length. Trim off the excess with secateurs.
Now, using hot silicone from a glue gun, glue the walls with sticks. In this case, leave the windows free. Lift the top of the bag up to form a triangular roof. Fix in this position using tape.

Measure each window. According to these dimensions, you will need to make frames from ice cream sticks. The same material will help create a beautiful door.
A fabulous house will look great against the backdrop of green moss. Put it in a box. And to make furniture for this garden, also take twigs from twigs, cut them in such a way that you get chairs and stools. Glue these elements with a hot gun.

You can make toy furniture not only with wood, but also with wire. Twist it while helping yourself with pliers to make a round tabletop or seat.

Start twisting the wire from the middle, gradually moving towards the edges. You can put blue glass pebbles to form a river. Also make a bridge through it from wooden sticks. Put a fairy figurine here so that the child can play in this fabulous place. Select a small bed for him, pour light earth here and plant a few strawberry bushes.

Also, an interesting structure can be placed in ordinary baskets. Together with your child, you will show your imagination and, along with a magical house, make a cozy courtyard. Make a bridge, a canopy and a swing from branches, connecting them, tying them with twine. Place fake moss to create green grass. You can also plant some succulents here.

Use a garden wheelbarrow for this. First you need to pour small stones on its bottom, which will become drainage. Now soil is poured on top, a path is laid and a house is installed. Make various decorative items such as a corral for livestock. Place chickens nearby, pour small gravel. Plant small plants in the soil that will not be tall. Here is such a fabulous house with a magical garden turned out.

For such purposes, you can use not only a basket and a wheelbarrow, but also an unnecessary trough. If the baby has grown up, such a container will help to make a miniature garden, in the center of the composition of which there will be a blue house.

And if you have a wooden barrel as unnecessary, then you can also attach it to the case. Put up a miracle house, whichever you want. You can make it in the form of a fly agaric, as in the previous master class, make it from tree branches or from stones.
And if you have a flat slate stone and a hot gun, then you can make the next magical building.

Placing the stones one above the other, secure them. Use a hot gun to glue the stones together. Make a roof out of tree bark. Cut them into strips and attach to make such curls.
Beautiful houses and courtyards for them are obtained from small round light stones.

You will make a pipe to it from a plastic pipe, pasting it with pebbles on the outside. Flip the large shell over to create a pond next to the house. The coastal area is also overlaid with stones, but take slightly larger ones.
So that the child is not bored on a walk or on the beach, show him how to make a house from improvised materials.
DIY toy house made of natural materials

If you are relaxing with a child on the banks of a river or on the sea, to entertain him, show how to make such a structure. Many materials can be found within walking distance.
Take:
- semicircular shells;
- dry algae;
- wooden boards;
- rope;
- seaweed.
Dry algae can usually be found right on the shore. If you do not have these, then you can use grass or handkerchiefs you brought with you as curtains for such a structure.
Put planks or sticks next to each other, tie them with a rope to make a floor. Now you need to glue the shells together. To do this, you need to use superglue. And if you brought natural materials home, then take a hot glue gun. Also at home, you can put together boards with nails, and if you are crafting in nature, then tie them with a rope.
You will need to take it with you. You will also need this material to tie algae or handkerchiefs, which will turn into curtains if desired, but first you need to decorate the roof with green algae and attach it to vertical branches. They will play the role of columns.
With the help of shells, you can create many houses, glue the base with this natural material.

You can make a simpler fairy house on the beach. This is for me, those found are burning, herbs can be created together with a child, such a creation.

If you go for a walk with your child to the forest edge, you can find a stump here and make a house out of it. Kara will become a roof, and cones - an ornament for her. From the sticks you lay out the entrance to the house.

Place three sticks vertically so that they form a triangle. Tie them up. And at the bottom you can stick it into the ground for greater strength. Tie the found feathers with ropes to these sticks to decorate such a wigwam.

Tree bark is easy to find in the forest and can be placed to create a shed or another fairytale home. And the path from it is lined with cones and stones. You can decorate such a structure with forest flowers.

It is also easy to find sticks in the forest and on the edge. Stick four into the ground to form the base of the walls. You will make them from the bark, like the roof of the house.

Chaga or mushroom found in the forest will turn into a roof element. You can cover it with moss or grass. The sticks will become walls that let in light.

If you have enough time, make a two-story house with your child, attach boards horizontally here so that they become shelves. Children will be happy to mold kitchen utensils from clay and plasticine and put them on these shelves. They will develop their imagination to make other household items for this building. Make a ladder with the children from sticks and twigs.

Some houses can be made on the banks of a stream, near which you walk with your children. To do this, you only need moss and sticks. After a while, it will be interesting to come here to see if the house is in place. You can tell the child that the forest fairies will settle here to play with him in this way. If the children are already old enough and do not believe in such magic, then say that such buildings will be useful to small rodents.

These fabulous houses are fun to make for adults with their children. If you want to see what other buildings can be, check out the plots. In the first one, a photo selection of papier-mâché houses awaits you.
And the second will teach you how to make such a structure from cardboard and improvised materials.
![]()