Patterns and ornaments for wood carving. Carved window frames - stencils and patterns for carving with a jigsaw. Wood carving: sketches and master classes
Ornament (lat. ornamentum - decoration) is a pattern based on the repetition and alternation of its constituent elements; intended for decorating various objects. They arose from the need of people to decorate objects. Using a knife, chisel and other objects, you can cut out a beautiful ornament that will please the eye and even protect from evil forces. This was believed in ancient Rus', so each house was decorated with a certain pattern, for which the wood was carefully selected. Nowadays, carved objects are a kind of rarity, which you most often find in antique stores. In this article we will learn how to select the most suitable ornaments for wood carving.
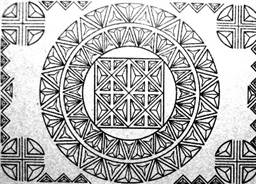
There are thousands or millions of ornamental patterns, but you can also see the same elements that will symbolize different entities, such as “sacred” animals, such as a horse, a deer, a bird, which are depicted on the top of the product. The most common is a wavy pattern of ornaments or a pattern of “towns”, which from a distance are perceived as waves. Circles, drops of dew or rain are also depicted.
Various patterns are found in books or on the Internet. You can find a pattern to suit your taste and find out its symbol.

Variety of options
As they say, the facade is the face of the house, and the windows are its eyes. Therefore, now during house carving, great attention is paid to sketches of various ornaments. They must have the same length or thickness - a fairly important rule for beginners.
To perform these works you will need tools such as knives, chisels and other tools, and the best types of trees are pear, linden, cedar, alder, maple.
To carve a design, you need to draw it on the wood. There are a very large number of ways to transfer a picture to wood (carbon paper, tracing paper, double-sided tape) that will help a beginner draw a sketch clearly and evenly.
There are different sketches: those that are dedicated to animals and people, plants, or those that will be intertwined or, conversely, will be geometric. Geometric carving makes ordinary things extraordinary. As an example, we recommend looking at amazing works decorated with geometric carvings; they are also desirable for beginners. This ornament is used in contour carving; it consists of simple details, which are subsequently combined into a complex, voluminous (or not, as in contour carving) composition. The main element of geometric carving is a trihedron with straight, concave or convex sides, the edges of which form a pyramid. They also often depict lines, curved lines, dots, and spirals.


Well, another great way is stencils, which are good because these templates will be long-lasting if they are made of thick material (plastic, PVC sheets), which in the future should be covered with olive. A stencil is a device that is used to apply a large number of identical symbols or patterns to a specific surface. It especially helps beginners or craftsmen who are trying to complete very complex jobs.
There are several types of stencils: tape, ornamental for boards, towels, and also specialized for a specific tool.
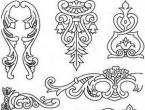
The photo shows one example of a tape stencil:

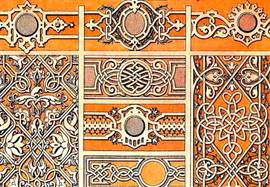
There are a variety of ornament designs. They can be obtained from thematic magazines, newspapers and also video lessons. For example, artists from the Tatyanka center draw various ornaments quite accurately:


Very often you can find floral patterns in products.

It is made in stripes that are repeated one after another, but in general the appearance will be of a whole picture, with images of trees, flowers, and the addition of geometric carvings. This type of ornament is very popular and is found everywhere, in almost every product, except those that are only geometric.

You can find certain types of ornaments that are often used by craftsmen. Among them are varieties of oak, grapes, hops, ivy, which in ancient times carried meaning.
Ornament is the greatest value for the Russian people, because they believed that it contains a secret message to their followers. Russian ornament also has its own rules: the overall composition should look like sketches that go one after another. It is quite important to know the symbols, which elements scared away evil spirits, and which, on the contrary, drove the spirits towards themselves, what color symbolizes what, because very often you could find out the character of an unfamiliar girl just by looking at the ribbons on her wreath.
The Slavs believed that the ornament could protect and fulfill their desires. A picture that will show simple sketches of Russian ornaments:

They most often depicted infinity symbols, curly lines or simple geometric signs, symbols of the gods, various flowers, and droplets.


Interested in wood carving for beginners, as a rule, people who do not have an artistic education. For them this art is a hobby. Due to the fact that the knowledge of most of these carvers is scattered, we will try to organize it. There is nothing complicated about wood carving itself. In Russia, this type of creativity has always been the main one. Even in stone processing, at first they used techniques that they had long been accustomed to.
Applying a pattern to a wooden piece
Today this type of art is of genuine interest, despite the fact that many skills are already being lost.
Generally speaking, wood carving can be classified as a plastic art. Traditionally, a distinction is made between relief and. A novice carver should first master the techniques of creating relief.
This technique has several thread options:

The list doesn't end there. There is still a lot left outside the scope. From the names you can understand how this or that performance technique differs. Classification is often complicated by the fact that our country is large. In different regions, the names of the same equipment may differ. However, the essence does not change, so we will outline the general working methods.
All beginning carvers are introduced to geometric carving. She is simple but beautiful. This type of carving is divided into three types:
- contour;
- triangular-notched;
- nail or staple.
For execution you will need:
- linden board;
- blunt knife;
- Ruler and pencil.
Drawings in the form of a geometric pattern are applied to the board. The carver can come up with his own or copy the one he likes. You don’t need to immediately take on complex elements if you don’t have the skills and your hand isn’t strong enough.
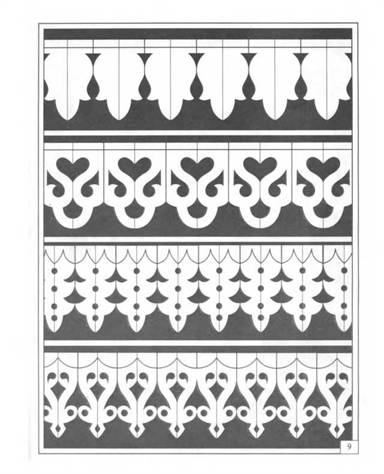
 Several ornaments for wood carving
 The board should be smooth. This surface is achieved through planing. Under no circumstances should you sand the surface with sandpaper. If abrasive particles remain in the fibers, they will prevent the threads from becoming clean and neat. In addition, the cutting edge of the knife will become dull faster.
Beginner carvers are recommended to choose hardwood to make geometric patterns.
They allow you to draw straight lines with a knife. Creating straight lines on softwood boards is much more difficult. So, the tip of the knife cuts vertically into the surface. Depth - 1.5-2 mm. Then the entire line is cut, pull the knife towards you. In this case, the blade tilts at an angle of 40°. Movements should be smooth. Note that you need to start and finish carving the line with the tip of the knife. 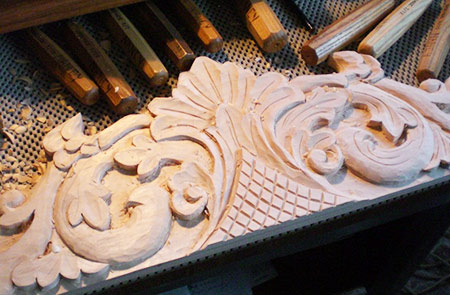
Having made one line or cut, we make the next one. Only now the blade should be tilted in the opposite direction. The chips will separate, and a geometrically shaped depression will appear on the board. If the edges are clear and the surface is shiny, then everything was done correctly. Gradually we cut out the entire element, and then the entire ornament.
Read also
Hand carved wood furniture
It must be remembered that the knife goes easier along the fibers. When cutting through cross fibers, you have to apply more effort. Your hand may slip, and here you need to know the rules:
- work safety;
- organization of work space;
- tool preparation.
Carver's workplace
Work with sharp tools should be carried out at a workbench that meets all the requirements for stability and strength. If it is not possible to make such a workbench, you can limit yourself to a tabletop. It can be of any size, but the height should not be higher than the level of the carver’s belt.
The countertop should always be smooth and clean. Often, while working, the knife slips and hits the table. Jagged edges form and need to be removed. Professionals always monitor the condition of the workbench surface. They do not recommend hammering nails, chopping with an ax, or throwing a sharp tool onto a workbench, as all this can damage the countertop. The board on which the ornament is cut is carefully secured with clamps. Working on your knees or on an unstable table or stool should be avoided.
 An example of a carver's workplace
 The workbench for wood carving should be well lit. You can install it near a window. However, there is little daylight.
If there is only one light source, dull dark shadows appear, which interfere with making the carving clean. Therefore, 2-3 more lamps are installed above the table.
They should illuminate the work from different sides, especially if it is dark outside the window. The lamps must be installed above the carver's eyes. While working, your eyes feel strained. Even experienced craftsmen notice this. A novice carver gets tired faster, and high-quality lighting makes the working conditions comfortable and safe.
Tool requirements
Modern ones open up wide opportunities for artists. They are used successfully in wood processing. But we will consider a tool for manual work.
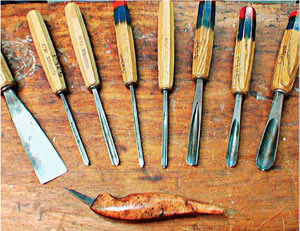 A selection of chisels for wood carving
 After all, gaining the skill to work with such a tool is more important and more difficult.
The master always has in his arsenal:
- saw;
- hand drill or brace;
- plane;
- semicircular and flat chisels;
- knives of different sizes;
- small axe.
Many manufacturers have already taken care of cutters and are creating a variety of sets. It is impossible to unequivocally assess their quality and benefits. There is some debate about this. Let us only note that not a single professional master has such a set. All tools are purchased separately and finished by hand.
Wood carving for beginners is an interesting and exciting activity that is not particularly difficult. It is not necessary to have artistic skills to create ornaments and patterns. Now ready-made sketches and video tutorials come to the aid of a beginner.


Most even accomplished masters are inspired by the work of other people, so be sure to carefully look at the stencils, diagrams and drawings of other amateurs.
Types of techniques
Sculptural carving is the most complex, requiring certain skills. There are many books on this technique.

The incised carving features a fully processed background and beautiful ornamentation. It is performed with a jigsaw, knife, and finishing can be done with a chainsaw.
Geometric carving will help you learn the technique.
In order to perform artistic carving, it is easier to copy a ready-made sketch than to create your own.
But most ready-made patterns are distinguished by a certain intricacy, so a novice master can try his hand at creating his own simple sketch.
Creating a Sketch
When designing a sketch you need to perform the following sequence of steps:
- The workpiece for work is selected;
- The sketch indicates the main elements and places where the thread will be applied;

- Using drawing supplies, the picture is redrawn onto graph paper or tracing paper with scale markings;
- If any elements are repeated, then creating a single stencil is enough.
If you have the skills to work in the simplest graphic editors (for example, Paint), you can create a sketch there, and then simply print it on paper to the required scale.
Stencils are usually used repeatedly, so it is advisable to make them from a relatively dense material (cardboard, plywood).
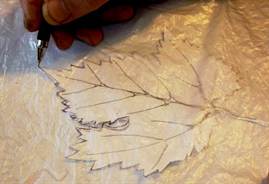
Here are some details of transferring the design from the template to the tree:
- The sample is fixed directly to the base with a milling cutter, cutting is carried out directly along its contour;
- The contours of the stencils are transferred to the wood with a simple pencil;
- You can transfer a sketch from paper to a board by placing tracing paper underneath it. After drawing the outline of the sketch, a trace from the carbon paper will remain on the wood;

- The simplest patterns can be transferred using pricking (with a needle, knife or awl).

Stages of work
When the sketch is transferred to the base, the most interesting process begins - the actual processing of the wood.
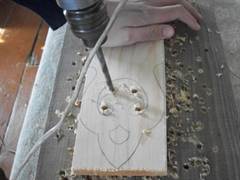
If you are working using the through-thread technique, the first step is to make starting holes in each element. This is usually done using an electric drill. A saw is then inserted into the holes and part of the wood is sawed out. Next, the edges are aligned and the decoration begins.
Flat-relief and volumetric carvings are performed a little differently.

First, the contours of future patterns are made with a knife. Next, the cutter cuts through the deepest central part. All other recesses are formed from it.
Small details are made using a chisel.
Sometimes additional tools may be required (such as a mallet for harder woods).

Deep relief is made with a chisel with a curved blade. Upon completion of the work, all edges are processed to eliminate roughness and chips.


You can make so many decorative items and useful little things from carved wood and plywood that it is stupid to limit the scope of the work. In fact, it can be absolutely anything that your imagination can handle: boxes, covers for decorative and collectible books, lampshades, panels, shutters, furniture elements, trim, cornices... But the most attractive thing about creating exclusive works is that anyone can do them willing, if he puts in a certain amount of effort.
Wood carving: photographs, drawings and sketches
The main key to success in creating interesting things with slotted carvings is the choice of pattern. It is he who conveys the overall concept and sets the aesthetic tone for the entire product.
The easiest way for beginners is to make geometric patterns, as in the photo.


Carved designs of floral and animal themes are classic ornaments for any field of application.


Inscriptions are a modern version of the use of wood and plywood carvings. At the same time, you are unlikely to be able to find drawings and sketches on the Internet - they will have to be compiled purely individually according to personal requirements for sizes, fonts, and words.

Stencils for slotted threads
However, unlike cut-out inscriptions on plywood, drawings with plant, animal and fantasy themes can be found on the Internet. So feel free to choose the stencils you like for your album, and you’ll have plenty of ideas for creativity for a long time!
The simplest sketches are suitable both for training at the very beginning of product manufacturing, and can become individual elements of a complex design. For example, this is how carved houses are decorated.


More complex templates will require some skill and patience, but the results are worth it. Such pictures can serve as an independent product, even as a gift.


Entire compositions with an idea and meaning usually serve either as a separate work or form the basis of a work.


Tools for slotted carving: jigsaw or router
However, choosing a design is only a third of the success. Another important aspect that must be considered before starting the work itself. Namely, the choice of tool that will be used to carve wood or plywood.
Depends on the equipment:
- how thin the thread will be;
- complexity of pictures;
- cutting speed;
- accuracy of work.
Therefore, it is important to evaluate all the pros, cons, capabilities and limitations of each of the traditional sawing tools:
A jigsaw is a device for shaped cutting of parts. Working with a hand tool is quite labor-intensive, but it allows you to cut very accurately according to the drawing. Power tools allow you to quickly produce shaped plywood products, but require caution.

A milling cutter is a tool thanks to which flat-relief slotted threads acquire a thinner and more complete appearance. It is with its help that you can round edges, remove chips, make valances, and carry out the most complex cutting.

Theoretically, a milling cutter can do the same work as a jigsaw, and even more, but in fact, such handling of the tool is fraught with its rapid failure and frequent replacement of the frieze.
Materials for slotting threads
In most cases, plywood is chosen for this type of work - it is uniformly thin, has a pleasant color and structure, and does not suffer from further use or storage, unlike solid wood. It is the choice of material that becomes the third pillar of successful work.
The modern market is replete with different types of materials, so it’s easy to get confused. For this work you should choose:
- FC plywood - harmless to humans and the environment, durable, easy to cut, practical;
- FB plywood is also safe for humans, but resistant to aggressive environments, since it undergoes special processing and receives a protective coating, which is why it can cost an order of magnitude more.
Note! Under no circumstances choose FSF class plywood for interior work - it is treated with carcinogenic preservatives and is only suitable for use outdoors - they are excellent for lining a bathhouse or a house outside.
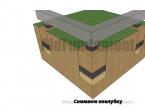
Photos of carved wooden houses
For Russia, slotted carving is of particular importance as a decoration for building facades. Since ancient times, ornaments carved on birch bark and other similar materials have been decorating huts, bathhouses, and churches, as photographs colorfully demonstrate.


Video of wood milling with a hand router
If you have just decided to try your hand at curly slotted carving, it would be a good idea to watch a video with a master class. It will help you better understand how drawings are created and how such home beauty appears.
A router, or manual milling machine, is a universal tool suitable for various types of wood processing. It can be used to drill holes, cut grooves, grooves and chamfers, and process the edges and edges of a wooden product. It is very convenient for installing locks on doors, assembling floors and furniture, and other work with this material. Carving on pre-prepared wood using a router can be mastered quickly with your own hands if you immediately choose the type of manual machine for yourself.
There are several types depending on the work performed. So, they distinguish:
- A vertical milling cutter is used both for making through holes and for cutting blind grooves in the rock
- Edging is useful for processing the edges of wood. Has low power, the big advantage is low weight
- The combined one serves both of the above purposes and has two bases for them.
Let's look at wood carving techniques using a router with our own hands
The now popular art of wood carving can also be done using this tool. There are many cutters, that is, working heads, for various purposes. Advanced craftsmen even make cutters or parts themselves. The main task when working with a hand router is to learn how to use it correctly. Once you master this tool, you can perform any type of artistic carving.

In order to learn how to carve pre-prepared wood using a router with your own hands, you can enroll in thematic courses. However, not everyone has the time or desire to visit them. For such people, there are many video lessons, which, when viewed, will give you an idea of this skill.
Even before watching the video, it is important for beginners to carefully read the instructions for using their electric assistant. There you can find a lot of practical advice on how to assemble the tool, adjust the depth of the cut, what each cutter is needed for, read about the complete set of your router model, and also find out what additional attachments you can buy to achieve exactly your goals. Don't forget to look at the safety precautions and technical specifications section of the device.
After this, you can begin the first small steps in developing the skill of carving with a wood cutter. These training activities are described below.

To have a general idea of the learning process, suffice it to say that most craftsmen start by cutting out simple patterns using a template. To do this, you need to take a piece of wood and draw a sketch on it. There is a large selection on the Internet and in art books; in addition, looking at photos of finished works with abstract ornaments, it is easy to copy these drawings in pencil.

After the sketch is applied to the log, you should adjust the router so that it makes through cuts. Start working with the outer parts, and when the form is ready, you need to cut holes and give the pattern an openwork pattern. If you are cutting out platbands or other elements of the facade of a house, then you need to take a blade made of hard wood. Conifers and oak are good choices. For smaller interior products, it is better to take softer linden or birch.

After mastering the technique of through threading, you can proceed to more complex elements. For example, after adjusting the depth of the cutout, add a pattern to the finished trim using V-shaped or other cutters. Not just flat figures look beautiful, but those complemented by notched carvings or made using other techniques. Chamfers on flat or rounded surfaces of large diameters will look very useful.
Various types of chamfers.

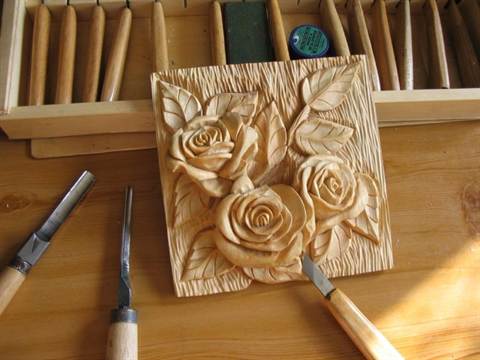
After training in these techniques, you can take on more complex ones. With the help of a customized router, it will not be difficult to make your first product using the flat-relief technique. Such drawings look amazingly beautiful on wall panels, boxes, and in addition, photographs of furniture with carved elements make you look closely and examine the entire pattern.
We hone our skills in using a router and wood carving
To achieve mastery in absolutely any task, constant practice is important. Even if the products turn out a little clumsy the first time or nothing comes out at all, you shouldn’t give up. After all, each time the cut will be smoother, the finish will be thinner, and the products will be more beautiful.
Wood carving with a router – photo for inspiration.

Video lessons and videos on the topic of the article