Build an indoor pool with your own hands. What is the best way to build a swimming pool at your dacha? Pouring the walls of the pool bowl with concrete
To date, several types of swimming pools have been developed, most of which can be installed on your own. The best option is a full-fledged monolithic concrete pool. This design is characterized by the highest reliability and durability.
Read the instructions provided and get started.

Set for work
- Level.
- Roulette.
- Stones.
- Rope.
- Steel knitting wire.
- Reinforcing mesh.
- Small pegs.
- Fittings.
- Shut-off valve.
- Wooden boards or shields.
- Anti-corrosion agent for metal processing.
- Self-tapping screws.
- Cement.
- Sifted sand.
- Material for waterproofing.
- A block for compacting backfill layers.
- Shovels.
Preparatory activities

Decide on the desired shape and required dimensions of the artificial reservoir to be equipped.
When determining the optimal size of the pool, consider how many people will swim in the pond. For a large family, it is better to immediately equip a spacious container.
In accordance with practical experience, the optimal depth of the reservoir is 1.5-1.8 m; in width and length, 4 m is most often sufficient.
For the rest, be guided by your needs and requirements. For example, if you plan to use the pool for full-fledged training, consider this point when determining the required length and width of the reservoir.


Choose a convenient location to build a swimming pool.
The main thing is that the space is not covered by trees. Because of the trees, the water in the pool will not be able to warm up properly and, in addition to this, will be constantly polluted by fallen leaves.
Also, low-lying areas are not suitable for arranging swimming pools, because... with such an arrangement, the water will be constantly polluted by rain flows.
Marking and digging a pit

Armed with a tape measure, stakes and cord, start marking the construction site.
The dimensions of the construction site should be 0.5 m larger than the dimensions of the future pool on each side. To mark boundaries, drive pegs into the ground and stretch a cord between them.

Completely remove the top fertile ball of soil.
Dig a pit of the required dimensions, and the bottom of the hole should be approximately 25-30 cm below the desired depth of the pool.
Carefully level the walls of the pit. The bottom of the pit must be given a slight slope.
Construction of a monolithic pool
Proceed directly to the construction of a monolithic pool.
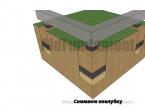
Place a 20-30 cm layer of sand on the bottom of the pit. Carefully compact the laid material and cover it with waterproofing.
The modern market offers a fairly large range of effective ones. To ensure high-quality moisture protection, roofing material is well suited. This is a practical, reliable and inexpensive material.
Lay roofing felt. You can use molten bitumen to attach the material.
Lay the waterproofed surface with stones. Lay a ready-made reinforcing mesh on top of the layer of stones, or make it yourself from metal rods.
Create a drainage hole. Its depth should be slightly greater than the depth of the main reservoir. Install a pipe into the hole to drain water. The end of this pipe must be inserted into the reservoir. Equip the pipe with a shut-off valve to drain the water.
Fill the drainage hole with a fairly thick layer of gravel. Install an overflow and skimmer system to purify the pool water.
Place reinforcing bars around the perimeter of the pit in 30 cm increments. Maintain a 50 mm gap between the reinforcement and the edges of the reservoir. Fasten the reinforcement bars with wire.

Fold from boards. Maintain a 15-centimeter gap between the formwork and the walls of the pit.

At the same stage, consider installing pipes and equipment for pumping and supplying water. Or you can use external systems of pumps and hoses - whichever is more convenient for you.
Start concreting the pool. You can order or make it yourself.
Pour the concrete gradually and slowly, in a horizontal layer.


Also fill the voids between the formwork panels and the pit walls. Give the mixture a month to gain strength and begin arranging the pool.
Do the interior design at your own discretion. You can tile the bowl. Or you can line the bottom with a 10-centimeter layer of clean sand, and then the pool will look like a body of natural origin.

Other private pool options
Frame systems
Such structures are constructed from wood with finishing cladding of tin or aluminum. Aluminum sheets have an attractive appearance and are superior to tin in terms of reliability and service life.
The frame straps are made from pine timber. Intermediate parts can be made from any thick, high-quality boards. To provide additional rigidity to the structure, braces made of strong boards are used.

Among the main advantages of frame pools, it should be noted that there is no need to carry out large volumes of excavation work and the possibility of dismantling the structure during the cold season.
Changing the water in such a pool is carried out using a flexible garden hose, which can be conveniently fixed at the bottom of the tank. Waste water from the pool can be used to water the garden.
All joints of the frame structure are subject to mandatory sealing. To give the structure the required tightness, even ordinary polyethylene film is well suited.
Wooden elements must be treated with an antiseptic.
The installation of frame pools usually costs less money compared to the cost of erecting a monolithic structure, while such reservoirs have a fairly solid appearance and fit well into the design of the site.
Find out how to build with step-by-step instructions in our new article.

To arrange a pool, if desired, you can even use ordinary polyvinyl chloride film. This material has a rather attractive appearance and acceptable performance characteristics.
The film tolerates contact with water normally, ensures proper tightness of the structure and allows you to save on waterproofing the reservoir.
Even if cracks appear in the container, a properly installed polyvinyl chloride film will retain water.
PVC film can be used both when arranging a new reservoir and when repairing an old pool. Moreover, to build such a structure, there is no need to carry out extensive excavation work: the film elements are simply fastened together using the temperature welding method, resulting in a very durable bowl.
The pool is installed on a pre-prepared base and fixed with a frame made of boards.

Today, swimming pools with a base made of fiberglass are very popular. This durable material can withstand even the most severe mechanical loads and does not require any additional coating.
Among the disadvantages of the design under consideration, one can only highlight the need for mandatory connection of all communications.
The bowl is installed on a solid concrete base.
Thus, there are many pool options available for the owner to choose from. Having studied the features of each type of artificial reservoir considered, you can come to the optimal solution and build the pool of your dreams without outside help.

Good luck!
Prices for prefabricated and inflatable pools from the manufacturer Azuro
Prefabricated and inflatable pools Azuro
Video - How to build a swimming pool with your own hands
For many summer residents, a swimming pool is a dream. But, as practice shows, it is quite possible to do it on your own and with small funds. Sometimes very small. But the pool at the dacha is useful for both children and adults: the water perfectly relieves fatigue and nervous tension.
Swimming pool for a summer residence: types and features
All pool designs can be divided into two large groups: stationary and temporary. Stationary structures include all structures partially or completely dug into the ground, which cannot be moved without destruction. The bowls of such pools are made of monolithic concrete, brick, and sometimes concrete blocks are used in construction. They can use a polymer liner (plastic bowl) or provide waterproofing using film or coating waterproofing materials.
Temporary pools are mainly inflatable and frame. They differ in that they are installed in the spring, and in the fall they are rolled up and hidden.
Which swimming pool is better for a summer residence? If you are not yet sure whether you need such an “attraction” on your site or not, buy the cheapest and fastest to install: inflatable. It holds water due to the inflated ring. The disadvantage of such a pool is that it is not very deep: 1.2 meters including the sides is its limit.
But, if you want it for children, then you can’t think of anything better, and adults can “hang” on the wall and relax after “relaxing” at the dacha. Depending on the quality and intensity of use, it can last from a couple of years to four to five.

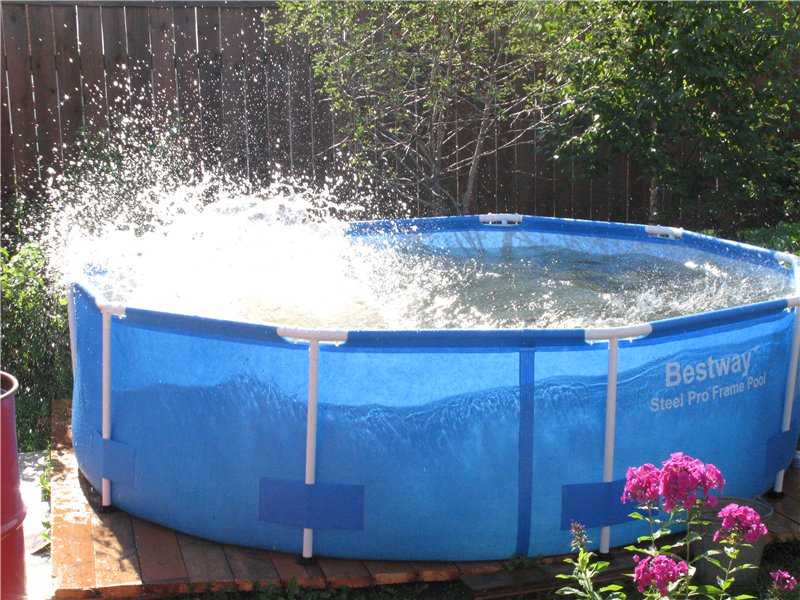
A frame pool is a little more expensive and a little more difficult to install. It already has a frame in the form of pipes, on which a special film in the form of a bowl is hung. The depth of such a pool is up to 1.8 m.
Stationary swimming pools are for those who have decided that they simply need a swimming pool at their dacha. Construction and maintenance are not cheap. First, a pit is dug, then a monolithic slab is poured, and in the second stage, the walls are erected. It is necessary to take measures to waterproof the walls outside - so that underground and melt water do not penetrate into the bowl. Next comes insulation of the walls. If this is not done, heating the water will be problematic. After this, a set of measures begins to waterproof the walls inside the bowl, and then finishing work begins.

But the finished bowl is not the entire permanent pool. It is necessary to clean the water: leaves, dust and debris fall into it, bacteria and algae multiply. To bring the water into order, you need a pump, a filter system, chemical reagents, and also means for “scooping out” leaves and sediment from the bottom. Some equipment is also needed to maintain a temporary pool, but since the volumes are smaller, you can often get by with manual cleaning or water replacement, or you can use improvised means. And if there is at least 5-6 tons of water in a stationary pool (this is a small 2*3 bowl with a depth of 1.4 meters), then even such a volume is problematic to manually clean.
Installation of a frame pool at the dacha
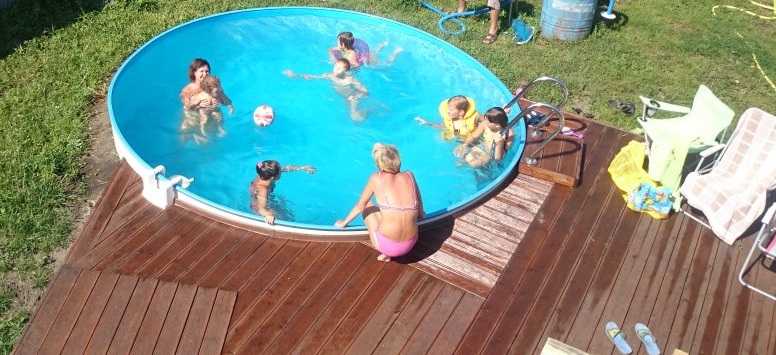
Regardless of whether you are going to install an inflatable or frame pool, you need to prepare a site for it. These pools can be buried a little in the ground, or they can be placed on a prepared site. It doesn't matter. It is important that the surface is level and a lawn is not the best option, even if it is level. The grass under the bottom begins to decompose, and the appearance of the area after the pool is removed is very pathetic.
At the dacha they installed an Esprit Big swimming pool with a diameter of 450 cm and a wall height of 130 cm. It was decided to bury it almost halfway. So what did they do? We started by preparing the pit:

A frame or inflatable pool can be placed on such a base. This pool design has a metal frame wall and support posts that are attached from the outside. It is advisable to insulate the part of the walls buried in the ground. You also need insulation on the bottom: so that the water heats up faster and does not cool down.
First, we lay out a U-shaped profile at the bottom into a ring. Then we take out the metal side, lower it into the pit (one person can’t handle it - it’s hard), unwind it, put the bottom edge into the unfolded profile, and connect it. The operation is simple, everything is clear: in the right place the sheet is connected into a ring.

Next, we take the EPS and lay it out on the bottom of the pool, cutting off the edges, trying to keep the gaps minimal. After laying out the polystyrene, the joints and edges were sprinkled with sand (according to the instructions). Why was polystyrene foam chosen rather than the much cheaper foam? The foam will be flattened under the weight of water, and the effect of such insulation will be zero. EPS can withstand heavy loads, although it is expensive.

Next, we bring the film liner inside, more or less straighten it, and temporarily attach it to the sides with tape. Next, we start swimming))) Pour a little water to the bottom - 10-15 centimeters, straighten the folds on the bottom, trying to keep everything even. Then gradually adding water. We level the film on the walls.

Note - it is better to carry out the work on a sunny, warm day, and not only because the “swimmer” is cold. In the sun, the film softens, making it easier to straighten. We worked without the sun - wrinkles remained, although this did not affect the pleasure of swimming.
After the water procedures, stiffening ribs were installed on the outside, installing fixing strips along the upper edge of the pool. Next we started insulating the walls. In the photo above, laying of one layer began, but in general they laid two - 3 cm each. Thicker slabs are difficult to bend, but thin slabs are easy to bend. Therefore, the installation of polystyrene did not take much time.
Having installed the insulation, they began to fill the pit. Since ours is clay, we used native soil to prevent water from leaking under the walls. They poured a small layer, tamped it down, and so on until the top. One point: the bowl must be filled with water.

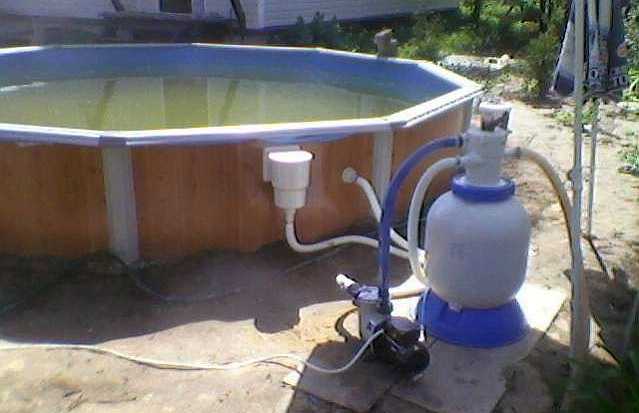
The instructions include a recommendation to make external supporting walls. In this case they were not made. The staircase was half buried, as it was designed to reach its full height, but here 65 cm was buried. They buried it to this depth from the outside. All that remains is the installation of equipment.
As recommended, the included filter and pump were installed. After connecting, it turned out that there was a small leak at the connection point. After partially draining the water and drying, the area is coated with sealant (neutral silicone moisture-resistant). The problem has disappeared.

Where was it dripping...
That's it. The swimming pool at the dacha is ready for use.
The model was chosen to be frost-resistant, so as not to put everything away for the winter. The bowl is covered with wooden shields.
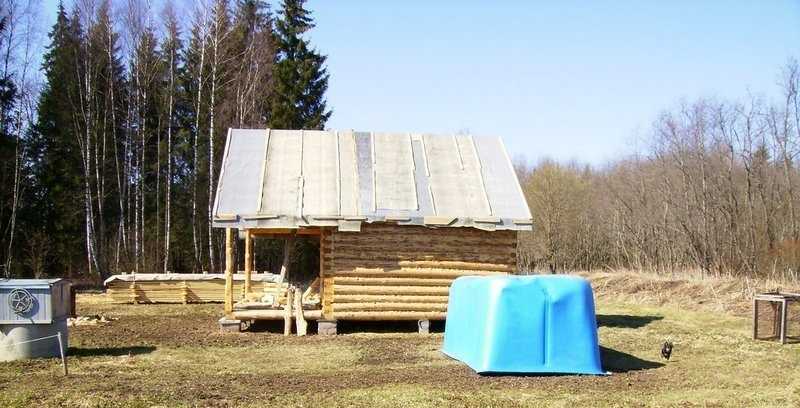
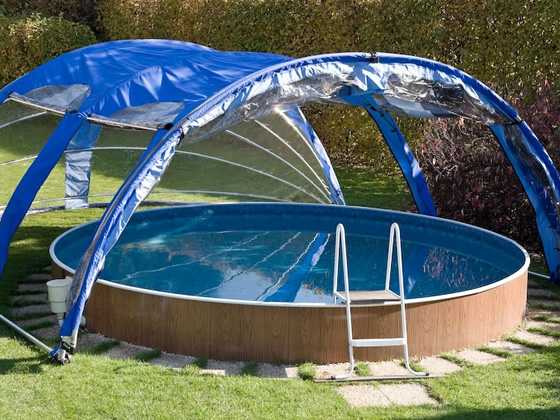
If leaving something on the site is dangerous, you can buy another design. It's just a system of stands and a film liner hung on it. A pool looks like the one in the photo below; it is never buried, but installed on top.
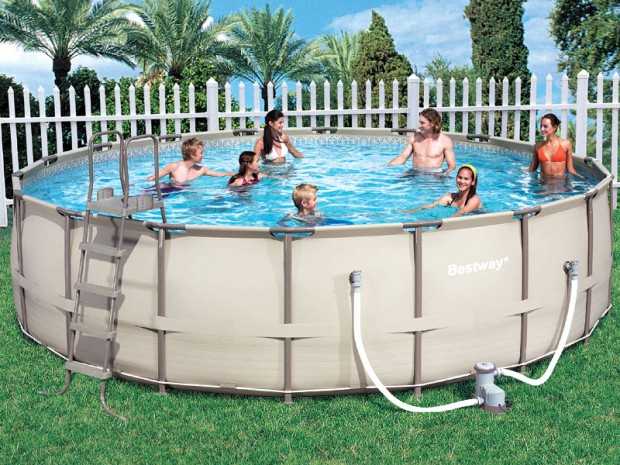
Although in the photo he is simply standing on the lawn, this “feat” is not worth repeating. In addition to turning the lawn into a dirty mess, the soil sucks out all the heat. The swimming season with this setup is extremely short. Moreover, even in the heat in the morning the water is cold; children can swim only from lunch. In general, it is better to make an insulated deck under the pool. Its installation does not take much time and money, but using the pool is much more convenient.
The beginning is the same as described: a pit is being dug. Its depth is about 20-25 cm. First, pour crushed stone into the pit in a layer of 10 cm, compact it well. Lay out geotestile. It will prevent sand and gravel from mixing. On top of it is sand, which is also compacted. You can already install a pool on sand, but this is also not the best option. sand drags around the whole dacha, and cats also love to walk in it. Therefore, it is better to lay at least homemade concrete slabs, paving slabs on top, and sprinkle with pebbles, as in the photo.

You can also knock down a shield from wooden boards, but the boards must be sanded and treated with antibacterial impregnation. You can use WPC - wood-polymer composite. They definitely do not rot and are not afraid of water or frost. A swimming pool can be placed on such a base. But even in this case (except for a wooden platform), it will be difficult to warm up the water.
Insulation required. This is at least 10 cm of EPS, laid under the bottom and covered with geotextile - as a temporary option. For a permanent insulated platform, a deeper pit is required: increase the depth by 15 cm. The sequence of layers is as follows: crushed stone, geotextiles, sand - 10 cm, EPS - 10 cm, geotextiles, sand - 5 cm, paving slabs or slabs.
Inflatable pool at the dacha
Inflatable pools are placed on the same base. Only they are installed quite simply: take the pump and start pumping up the ring. When it is filled with air, water begins to be poured inside. The ring gradually floats up, raising the edges of the pool. When the entire wall is level, the pool can be considered installed.
Plastic pool: DIY installation
The easiest way to make a stationary outdoor pool at your dacha is from a plastic or composite (fiberglass) liner: a ready-made cast bowl. This is one of the easiest ways to make a stationary pool in your country house or near your house. A pit is dug under it, into which it is installed. One of the installation options is in the photo report.
The size of the selected plastic bowl is 183*415*140 cm. The simplest shape was chosen for easier installation. It all started with marking out the area for the foundation pit. The bowl was turned upside down, the contours were outlined, and 5 cm was added to the boards (the plan was to install it in a wooden frame). So they nailed down the pegs, pulled the twine, and started digging.

It was decided to leave part of the side outside, so the depth of the pit is 1 meter. A layer of sand about 15 cm is poured onto the bottom, everything is filled with water to compact the substrate.

While the water is draining, the sand dries up, and boards 2.5 cm thick are assembled to fit the dimensions of the pit. A 50*50 mm beam was used as a frame, and it was also placed on top of the boards. The upper edge of the plastic bowl was attached to this beam.

All boards are treated with an antiseptic for direct contact with the ground. The manufacturer promises 10 years without rot...

When all the walls were assembled and secured, the bowl was inserted inside. The bottom lay tightly, the height was calculated correctly.

There should be a reinforced concrete edge around the perimeter of the pool. To tie the bowl more tightly to the concrete, corners are installed around the perimeter. They are attached to the beam and the edge of the bowl through and through, with stainless bolts and nuts.

To prevent the plastic from “walking” during operation, we grab the edges with a clamp.

The fittings are attached to the installed corners. We used 15 mm, placed 4 rods: two on top and two on bottom. Knitted with special wire.

Formwork is installed around the perimeter. First, sand was poured under the reinforcement, so external shields were installed. The inside of the boards is covered with a thick film to make it easier to remove the formwork. Mortgages were also installed: overflow pipes. They will be placed outside the pool and will protect the bowl from overflowing.

Before pouring the concrete, they began to fill the bowl with water. This is necessary so that the concrete does not crush it. At the same time, the gaps remaining between the walls of the bowl and the plank frame were filled with sand. This means that the bowl is fixed in a better position. When it was almost filled, concrete was poured into the formwork and treated with a vibrator to increase strength and uniformity.

Four days later the formwork was removed. The side turned out to be 40 cm wide and the same height. Next, we begin to prepare the foundation for finishing the adjacent area.

Since the site is slightly sloping, soil had to be removed from one side. Sand is poured and compacted around the perimeter. Roofing material is rolled out over the leveled surface.

Another layer of sand was poured onto it, into which the paving slabs were laid. The cracks between the tiles are also filled with sand.


To prevent leaves from falling into the pool, debris and other contaminants from getting into the pool, a polycarbonate greenhouse was purchased, assembled and installed as a cover for the pool. It turned out that it was very convenient: warm and light.

You just need to fasten it firmly; a strong wind moved it from its place. I had to make adjustments. The pool at the dacha is also used in winter, but only after the bath - the ice hole is cut down)). For winter, empty bottles with screwed caps are thrown into the water. When water freezes, they serve as a damper, taking most of the load from the ice onto themselves.

And until late autumn we swim just like that, we just installed a water heating system to make it more or less comfortable.
Economy option: swimming pool from a banner
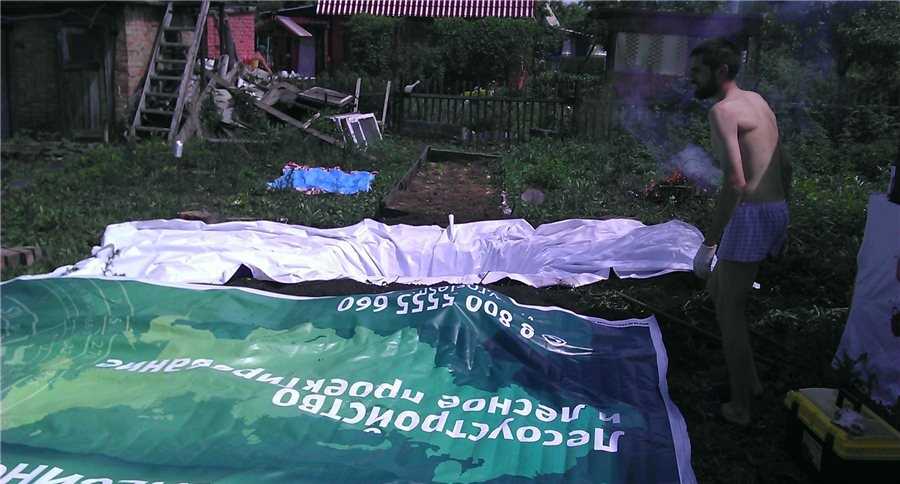
If you need an express option for a pool at minimal cost, you can get by with a thick film. For example, an old banner. The fabric used for them is thick, and you can buy an old one at an agency for mere pennies. If you need a pool in your garden, this is exactly the material: the costs are minimal.
So, armed with a banner, we dig a pit, which is significantly smaller in size than the canvas.
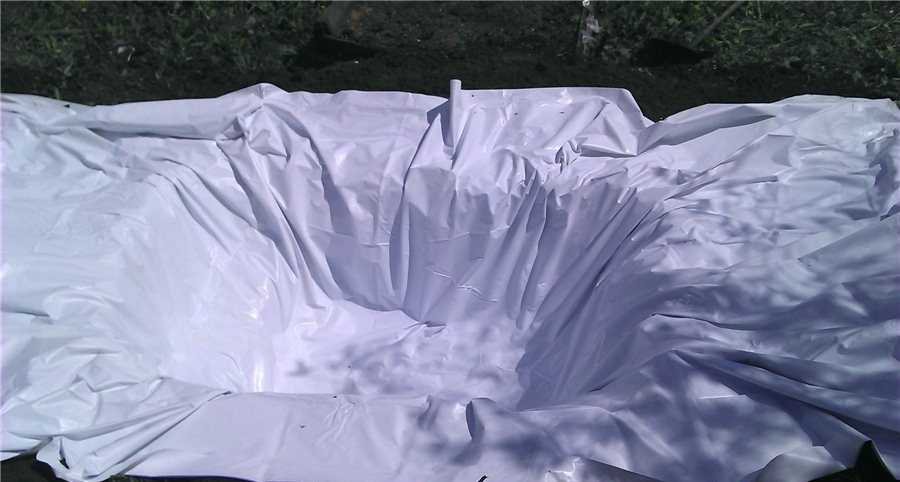
We lay the film in the dug pit and straighten it. For testing, a small pit was dug in case it wasn’t to his liking. Since the banners were old, after all, they laid two. They also tried to straighten the second one.
To prevent the edges of the film from being blown away by the wind, they were pressed down with bricks and a hose was thrown in to collect water.

While the water was being collected, a little earth was poured around the “bowl” under the film, forming sides. They were lined with bricks.
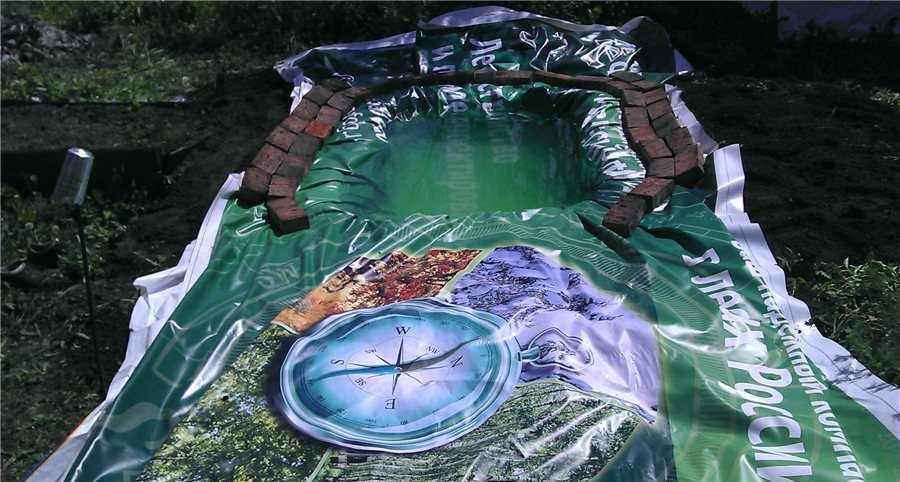
We left the “pool” to bask in the sun. Three hours later the tests were carried out. I liked the result. It was decided to expand the “swimming” part.
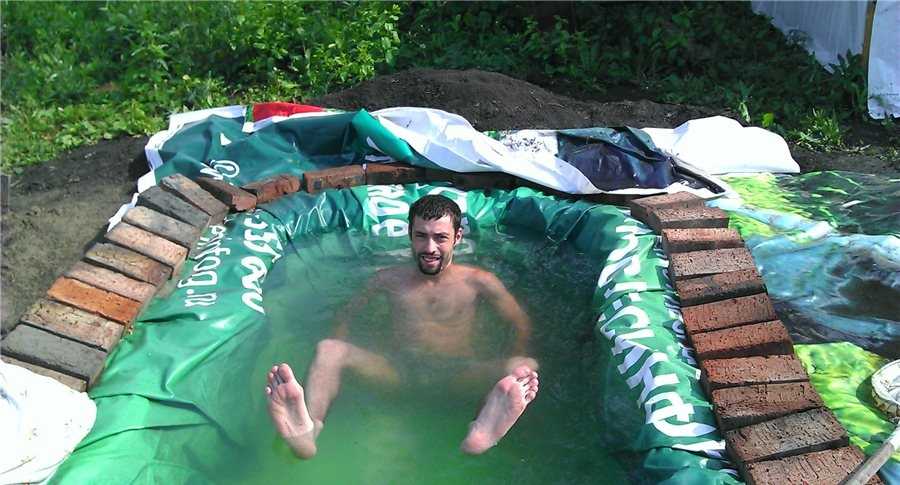
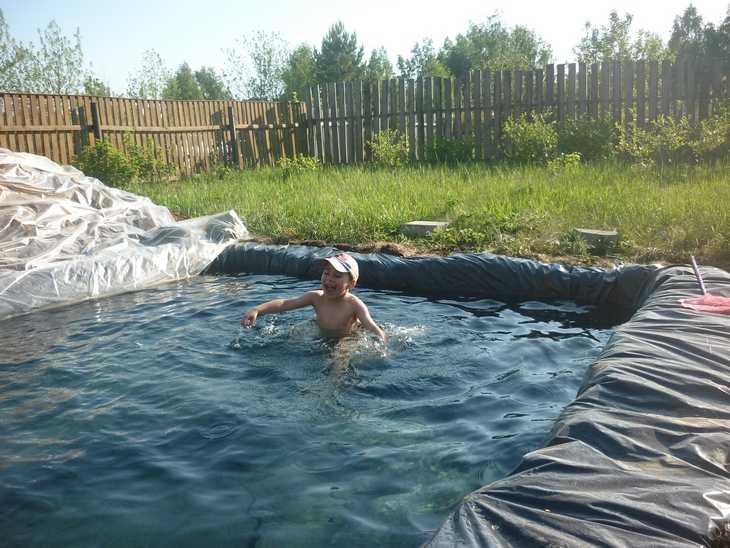
This, of course, is not a great option, but you can freshen up. It took 2 hours for “construction”. The main thing is to dig a pit. And what happens next is a matter of several tens of minutes. The photo below shows the same idea implemented on a larger scale. We bought the film for swimming pools and soldered two pieces together to create a more voluminous “sea”.
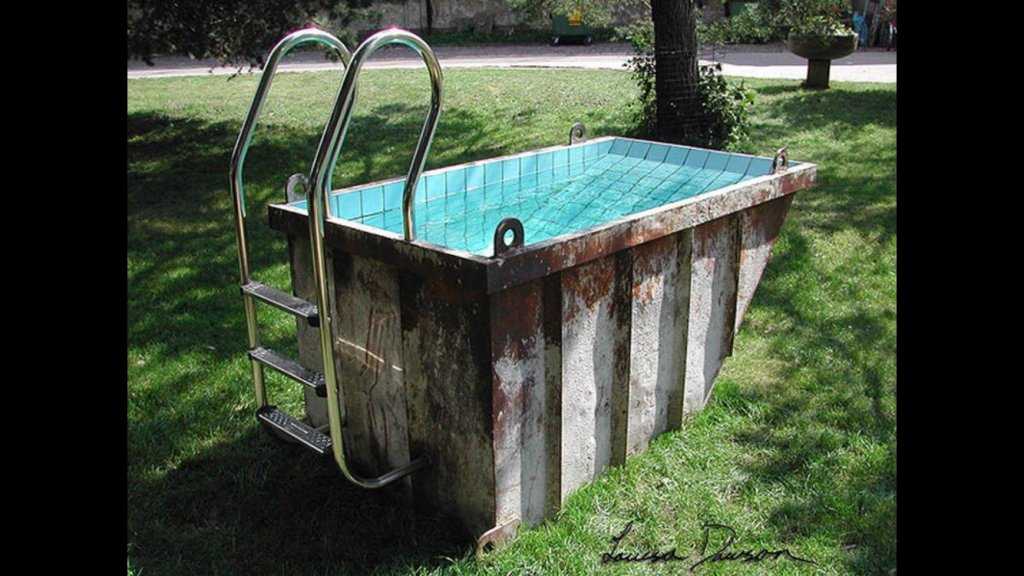
Here, by the way, are several country pools made from scrap materials: an excavator bucket and a huge tire.
A long-lasting pool at the dacha is easy))

Photos of country pools


An inflatable pool is a great option for children

Another option for a polycarbonate pool cover. Built using the same method as


It's summer, which means it's time to swim. And it’s very disappointing when it’s not very close to the reservoir. Therefore, it is not surprising that many owners of country houses have the idea of building a swimming pool in the garden with their own hands.
Don't think this is an impossible task. If you have a great desire, some experience in construction and the necessary tools, then it is not so difficult. Well, to make your work easier, we have prepared recommendations on how to make a pool with your own hands at the dacha.
Choosing a location for a pool and its size
To make it easier for you to decide on a place for a swimming pool, we offer a list of factors that must be taken into account:
- Water supply and drainage. By installing a pool near the house, for example, at the back, you will achieve several goals: simplify the water supply process, speed up maintenance and care of the pool. It will also be convenient if the recreation area is in one place.
- The soil. If possible, choose clay soil for construction. This way, you will avoid additional problems with waterproofing, because clay does not allow water to pass through. Well, how much easier is it to dig a pit for a country pool in clay soil than in rocky soil, for example.
- Wind. If you do not have the financial and technical ability to build a canopy over the pool, then you will need to take into account the direction of the wind. The wind will bring garbage into the pool in any case, so it needs to be easier to catch. Determine such a place and install a pipe there to drain the water. Then the excess debris will go away along with the water.
- Groundwater. Experts' recommendations are to build a pool in a place where groundwater does not approach the ground closer than half a meter.
- Vegetation. The wind will already bring you a lot of trouble, so don’t add it to yourself with additional leaves from nearby bushes and trees. Also, additional difficulties will be caused by the roots of large trees, which can damage the integrity of the building.
Of course, in your yard you are the owner. But in such a labor-intensive task as building a swimming pool, it is better to follow the recommendations of specialists.
But as for length and width, there are no requirements. Only your desire and capabilities. But the depth should be considered very carefully: if you have children, then do not make the pool deeper than 1-2 meters; if you plan to jump from a tower, for example from a three-meter tower, then the depth should not be less than three meters.
Decorative pool - varieties of shapes and materials for construction
Swimming pools with unusual shapes look quite unusual. Of course, they require additional care, and they are more difficult to design, but how much more interesting they look than the usual rectangles, squares, ovals and circles.
 When designing the shape of the pool, show your imagination! Move away from the generally accepted forms!
 Those who love something special will be interested in how to make a mini pool in the country with their own hands. Let's discuss what scrap materials you can use to build something like a swimming pool in your yard:
- Tire mini-pool. First, we look for a tire of the size we need. Tires from a combine or tractor have a suitable diameter. Trim one side panel to the treads, leaving the sides. The place for such a font should be level, clean, and not much larger than a tire. Fill the sand cushion and pour concrete to 15 cm. Install the tire. You can decorate it with brick or stone. Use after complete hardening.
- Mini-pool from the bathtub. A cast iron bathtub that has served you for many years can be turned into a mini pool for your dacha. If you choose a place in the shade, the bath and the water in it will not heat up so much. Although, considering the size, only children can splash in it, it is better if the water is always warm. You need to dig a pit under the bathtub and fill it with sand. Place the bathtub into the bowl and pour sand into the gaps, compacting it thoroughly.
- Gabion mesh products. Although gabions are used as fortifications to protect banks from erosion, resourceful owners also use these structures to build swimming pools. First you need, as in the previous options, to prepare the area for the pool. We lay gabion mesh and film on the concrete base to protect it from moisture.
- Containers. Not the most aesthetic option, but still interesting. A garbage, construction or shipping container can be turned into a hot tub simply by treating it with an anti-corrosion compound. Also check the container for integrity. Bury it to the required depth, and refine the sides.
Of course, you can simplify your task and buy a ready-made container for the pool. The frame metal structure is sold with a ladder, pump and cleaning system. Collect it, fill it with water and use it during the warm season. A plastic pool can also be ordered ready-made. It is not correct to say that this is a completely simple option - after all, a polypropylene pool also requires concrete pouring, but the polymer guarantees the highest quality waterproofing. You can also use a polymer bowl only during the season.
Stationary pool - stages of work
As for permanent pools, the rest of the article will be devoted to this. These are the kind of pools that can be considered real.
 Stationary pool
 There are several stages in the construction of a stationary concrete pool. Let's start, of course, with the preparatory work. Moreover, they will be needed much more than for the construction of the fonts described above.
Preparatory work
It is necessary to mark the territory of the summer cottage. Mark the required dimensions of the pool on the ground using pegs and rope or draw. Most likely, many will call digging a foundation pit the most labor-intensive process in construction. Ground work for the construction of a very large swimming pool will not be possible without special equipment. Add 50 cm on each side of the future pool when you dig. This is additional space for a sand bed and concrete.
Dig the walls and bottom with a slight slope. This way the structure will be more reliable, and the drainage system will work without problems.
Now we are preparing everything for concrete pouring
Compact the bottom and walls of the pit, add 30 cm of sand and lay waterproofing. The most inexpensive water insulators can be considered roofing felt and bitumen mass. Moreover, these materials have earned good reviews. Lay the roofing material in a layer over the entire bowl and three or four layers of bitumen on top.
Time to install the drain
Install the formwork and begin concrete work. Use high grade cement for work. Remove the formwork after the concrete has hardened. Apply the solution in a thick layer and be sure to reinforce it with mesh so that the pressure does not deform the walls. Reinforce the joints with wire. Now rub the entire surface with a solution of cement and water to prevent the appearance of microcracks. Before you start finishing the pool, apply waterproofing using PVC film, roofing felt or a special impregnating compound. By the way, a stationary pool that has lost its seal due to a crack can only be saved.
Now let's start finishing the pool
For this you can use:
- Ceramic tile. It does not deteriorate from being in water for a long time and is easy to wash. When laying, take into account the water pressure under which the coating will constantly be located. If you forget to leave a small gap between the tiles, the pressure will cause the tiles to crack over time. The grout should be elastic.
- PVC material. It is available in a wide range of colors, and thanks to its strength, a film pool becomes the most used and reliable. The airliner will last about seven years. The film is easy to clean and does not react with pool care chemicals.
- Marble. It is rarely used due to its high cost, but it certainly looks very rich.
- Glass mosaic. With its help you can create all kinds of patterns and ornaments. You can cover any corner with such fine material.
Laying mosaics (video)
Pool equipment
Install ladders, nozzles, flashlights, heater. An important additional equipment is a water purification filter. The filtration system prevents the appearance of unpleasant odors and the slippery deposits typical of swimming pools. A pump with a filter is installed next to the pool, and water is supplied by two pipes - for collecting and draining water. The water in the pool will be in constant circulation.
 Pool equipment system
 An additional cleaner, but not the main one, is chlorine, bromine, and perhydrol. Although for the health and long service life of the structure, professionals recommend using a chemical, mechanical and electrophysical method of water purification in combination. You can, of course, periodically pump out all the water and replace it with new one, but how long will it take to heat up?
And speaking of heating, a comfortable temperature can be maintained even in not very favorable weather. The following will help with this: heat exchanger - hot water runs through pipes laid along the walls; solar installation – water heaters based on solar energy; special coating - a polymer material that allows the sun to pass through but does not release heat; boilers - you can heat water in them and pour it into the pool, or you can arrange a direct-flow system.
Consider the arrangement of the area around the pool. Use floor ceramics with an anti-slip effect.
Step-by-step instructions for building a pool (video)
What other materials can you use to build your own swimming pool?
No less common is a pool made of concrete blocks. This is a convenient and reliable way of construction. The blocks can withstand severe pressure and reduce construction time. Although the construction of such a pool also begins with a foundation pit and ends with finishing, time and money are significantly saved on the use of formwork and expensive technologies.
Today you can also often find home ponds built from polystyrene foam blocks. For a large pool, choose large blocks. First, the foundation is poured. Blocks are installed on the dried concrete, interconnected by grooves. The solution is poured into the finished walls, leaving space for all additional elements of the system. Choose a cladding method.
 Expanded polystyrene blocks in pool construction
 The fastest and cheapest way to build a pool is an in-ground pool. Remove roots and stones from the pit, compact it, and fill it with sand. Use mineral wool or roofing felt as insulation. Lay out the geosubstrate and film. Simply dig the edges of the film into the ground and secure it with a stone edging.
 Pool using film
 As you can see, it is not so difficult to build a pool yourself. Moreover, the time and effort spent are worth it - this will be the most popular place in your yard.
When summer comes and it gets hot, everyone wants to take a dip in cool water. It is not always possible to get to a body of water, and dreams of resorts with clear water remain only dreams for the time being, so it is better to have your own place for swimming near your home.
Having your own pool in the country, even after working in the garden, adds a zest to your ordinary holiday and takes it to a new level. In addition, regular swimming is a great contribution to health. This article will tell you how to make a swimming pool with your own hands in the courtyard of a private house.
After taking the time to obtain the necessary information, you can safely get down to business. A quality holiday with water treatments will appeal to all family members, without exception.
Types and types of pools
When choosing which pool to make, you need to think about how much space is available for this structure and in what season it will perform its functions. Frame pools are installed on the ground, not inside it. They are made mainly from PVC. Externally, the structure can be made of durable plastic or metal. These pools are round in shape; square or rectangular options are less common.

It is impossible to make plastic pools yourself; they are bought ready-made. Made from polypropylene or fiberglass. A permanent pool in a country house with your own hands implies permanent installation without the possibility of moving it to another place. It can be framed or built into the soil. For its normal functioning, auxiliary systems will be required: water supply, its purification and subsequent drainage. This is done using special equipment.
Choosing a location for installation
The first and very important decision on which the success of the entire project depends is the correct choice of location for the future pool. There must be a water source nearby to fill the pool. This could be a well, borehole or water supply. Placing a pool under trees is not the best solution; the water will not warm up well and debris will appear on its surface. It is desirable to have a power source nearby and a place where water will periodically drain, for example, a vegetable garden or a ravine. But the best options would be a drainage system and sewerage.

When installing a swimming pool in a private house, you need to take into account some space around it so that you can walk freely. The area on which it will be located must be flat or with a slight slope. Clay and sandy soil is considered the best for installation. Its advantages:
- Clay is a plus for waterproofing.
- Such soil is stable, and it is unlikely that the bottom of the reservoir will crack.
- Protects against ground moisture. Without contact with underground water, the pool lasts much longer.
There are also some minor parameters for choosing the installation location, which it is also advisable to take into account: You should choose the sunny side so that the water warms up without human intervention. But this issue can be resolved if artificial heating is provided in the pool model. It is better to place a pool in the garden in places protected from the wind. A sunny area near a fence is suitable.

A pond that is deep enough and where small children can access it is better to fence it with a small fence for their safety.
Pit preparation
Digging a pit manually is not an easy task; it requires a lot of time and effort, but it allows you to do excavation work cheaper than using an automated method. A pit is made in the ground according to the dimensions of the project, but 20 cm must be added to each value. The depth is calculated depending on the purpose. If you plan to jump into the water from the side, it should be 2.5 meters, and if you go down the stairs - from one and a half to two meters. The walls of the pit are given a slope so that they do not crumble. The bottom should also have a slight slope towards the water drainage.

A drainage system is required to drain groundwater after snow or rain. It is a pit (you can make two) with a discharge pipe. It is covered with sand, crushed stone and compacted. You can make concrete yourself by calculating the number of components of the mixture. In this case, it is desirable to automate the process using a concrete mixer, which facilitates and speeds up mixing. There is also the option of purchasing ready-made concrete, especially if there is nothing obstructing large equipment on the way to the construction site.
To concrete the bottom, experienced builders advise first laying the reinforcement on a sand bed, using supports. After this, concrete is poured, which should cover all the reinforcement.
Instructions for making swimming pools
Made from polypropylene and fiberglass
Polypropylene is a material for building a swimming pool; it is a white solid substance, which became known thanks to the achievements of chemists in the mid-20th century. Being environmentally friendly, it does not interact with substances when in contact with water and is absolutely not dangerous to humans. It is impossible to slip on it, such is the structure of the surface of this material. Installing a pool with it is cheaper than with other materials. During construction, sheets of greater thickness are taken for the walls, and thinner ones for the bottom, but it is preferable that they are no thinner than 8 mm, so that the polypropylene does not change shape when welded.

To weld the material you need a heat gun. The polypropylene is heated with hot air at a given temperature and a soft rod is placed in the seam, it melts and connects the sheets. Internal joints are cooked this way, and for external joints, nozzles are used. After this, vertical stiffeners are made, with a distance of 50–70 cm. They are also made of polypropylene and welded using a rod.
Now you need to fill the space between the welded pool bowl and the soil with a concrete mixture. To prevent deformation, half a meter of water is poured into the pool. The same environmentally friendly and non-hazardous material is fiberglass, consisting of polyester resin and reinforcing materials. The pool is not assembled or welded from it, but is bought ready-made in the store. It does not deform and withstands the influence of the external environment well. Usually made in blue or blue colors. It is important that this version of the pool is mobile and allows for transfer to another location.

First you need to choose the type of pool on the site, its size and depth. Next, you need to make a good drainage system for the outflow of snow and rainwater. A hole up to 2 meters deep is dug in the center of the pit, which is filled with crushed stone. Sand is poured on top. After this, the most important stage of work begins, namely the installation of the pool tank using lifting devices. The space between the bowl and the pit is filled with soil.
When purchasing a tank, it is important to look at its characteristics, namely at what temperatures it can be used.
For example, when the ground freezes, if the bowl is not designed for this, it can be pushed out of the pit.
Made from monolithic concrete
Concrete pools are famous for their long service life, which is 3 times longer than the two previous representatives. Heavy concrete is used for production. In this case, a drainage system is also needed. Before digging a pool pit, markings are applied to the ground, 60–80 cm larger than the planned dimensions. When the pit is ready, pipes are laid under the drain, if such a water intake is chosen.
You need to lay roofing material on the bottom in 2 layers for waterproofing. Then there is a sand cushion, followed by gravel. According to the manufacturing technology, this time you will need formwork along the height of the walls and reinforcement; the rods can be welded or connected with knitting wire at each intersection.

To build walls, you need moisture-resistant plywood or boards, but plywood will be more convenient. Reinforcement is installed in the formwork, which is fastened to a horizontal reinforcing layer. The reinforcement frame is placed from two rows of rods along the walls and the lower ends of these rods are connected to the mesh at the bottom.
Reinforcement is needed for rigidity and resistance to the mass of water. You can make walls from foam blocks, but it is somewhat more expensive. When the concrete is completely dry, you can begin waterproofing. For this purpose, sheets of roofing felt are used. Bitumen and liquid rubber are also suitable.
To improve the quality of waterproofing, first level the walls manually or using a sander.
For internal waterproofing, the bowl is first checked for cracks. The surface is plastered using special waterproof compounds for swimming pools. Next you need to choose the type of waterproofing. When gluing walls, bitumen-based materials are used (glass insulation, Rubitex). Mastics are used for coating.
The process of building a stationary pool made of monolithic concrete ends with finishing work. You can also make your own pool from blocks. The bottom is concreted as in the previous case, and the walls are erected from blocks in one row.
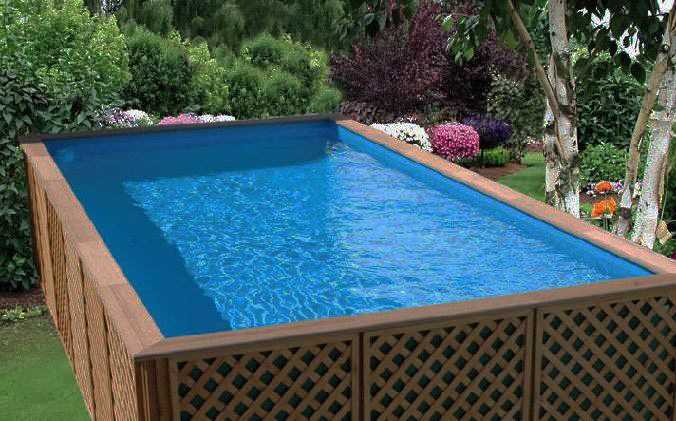
Made of wood with PVC film
You can make a country pool made of wood with your own hands quickly and inexpensively. A frame is made from ordinary 100 by 50 timber. It is better if the design is rectangular in shape, it is more convenient. The racks are placed in the corners in the drilled holes, the empty spaces are covered with crushed stone. After installing the vertical posts, horizontal boards are nailed. If they are unedged, then they should be cleared of bark and treated against insects. A PVC film bag is inserted inside.
We improve the area around the pool
An artificial pond always attracts attention. To make a small pool seem deeper, the inner surface is painted a light color, and the area nearby is made darker. To create decor, garden figurines and flower pots are placed nearby. We must not forget about the recreation area. Here you can place a children's playground, sun loungers, garden furniture, and a gazebo.
Water filtration and purification
Previously, the problem of cleaning an outdoor pool from microorganisms and debris was solved by changing the water. Nowadays, it has become expensive to change water, and purification using filters is used. They differ in filter material and can be chemical, mechanical, electrophysical, or combined.

The larger the pool, the more expensive it will be in price and maintenance. If the pool is small, you can purchase a filter pump, a filter station with quartz sand, or use homemade water purification devices.
Building a pool with your own hands is a painstaking task, but not too difficult; just study the step-by-step instructions. A summer resident can do this, even if he has no experience in building a swimming pool. The courtyard of a private house will look respectable, and relaxation will become more comfortable.
Rest and recreation are now only a dream for many people, because not everyone can afford a train to the sea. The reason for this is simple - there is little money. This is not happy, but the situation can be corrected if you are the happy owner of a house. If the sea is unattainable, then you can make an indoor pool at your dacha, which will also please you and your family.
You just need to make a little effort, and your summer cottage will become a wonderful home resort. Just a few years ago it was almost impossible to create an artificial pond on the site.
Today, everyone can afford this luxury item. Yes, yes, and all because swimming bowls in their variety of types and prices have expanded so much that choosing a pool that suits your means will not be difficult.
 Building a pool on your property is a great way to relax in the summer heat. If it is of decent size, then you can not only splash, but do swims in the mornings and evenings. And how much joy the children will get! Excellent well-being is guaranteed to you.
And the dachas of the 21st century are no longer so similar to those they used to be. Now I’m going out of town not to starve myself of planting cucumbers and tomatoes, as well as many other household chores. works. Exhausted by the pace of city life, residents of large cities turn their plots of land into recreational areas designed “to suit themselves,” and in this case a swimming pool will be an excellent addition.
Artificial pond in the country- this is not only a new comfort zone, but also a place for a special microclimate and even a reservoir of water for emergencies when there is nothing to water the flower beds with. In general, the benefits of a pool are obvious if you install the container correctly and operate it strictly according to the instructions.
Which pool should you choose?
On the modern market you will find three popular categories of pools:
- Collapsible.
- Stationary.
- Inflatable.
They all differ in shape, design and size. These are the main parameters that will influence your choice. You will choose what to choose based on the size of the plot, conditions and preferences. But it should be said that each of the options is good in its own way.
Stationary
The name speaks for itself. Such containers are installed turnkey. Such pools are either medium or large. According to the type of installation they are divided into:
- Frameless
Frameless structures built into the ground
To operate such a model, it will have to be equipped with some systems, at a minimum, this is a water supply, drainage and cleaning system. If you don’t take care of this in advance, within a couple of weeks you will be swimming not in clean water, but in dirty slurry. You can refuse the purification system, but think for yourself - where will you drain 14 tons of water, and how much will it cost you to fill the pool every 2 weeks with clean water? These costs will be more expensive than it would cost you to purchase and install the purifier once.
It looks great, and if you are mentally prepared to endure all the difficulties with installation and arrangement, then you should not refuse this option. If not, give preference to a frame container, since installation problems (and costs) will be much less.
But many summer residents are seriously concerned that they will have to spend a lot of time on cleaning, so they decided to make an indoor pool in their country house with their own hands. This is the right decision, since the pool will only need to be cleaned once every six months.
When choosing the type of container for your dacha, do not forget about the climatic features of the region. Most containers, even without water, simply will not withstand local frosts, so you will have to invest in frost-resistant models.
Collapsible
 Such pools are classified as small and medium in size. The thing is that it is almost impossible to assemble it yourself, and the procedure is quite expensive. But the advantage of the model is that it is ideal for unguarded areas. It can be assembled, filled with water upon arrival, and dismantled in the fall and sent to the barn.
This type of pool also needs filtration, but there is no need to install complex systems. For small volumes, you can limit yourself to disinfection with reagents that are harmless and of high quality.
Inflatable
Naturally, such pools cannot be large, which is great. Due to its size, the pool is suitable for those owners whose plots are not so large, and the advantage is that storing such models is not problematic - you can even fold them into a sofa. You can also take the pool with you on a picnic. For large models, a metal frame is provided - it is assembled from hollow tubes (made of aluminum).
What are indoor pools for cottages made of?
When choosing a pool, you should remember that they can be made of any materials. This is especially true for stationary models. Manufacturers have fallen in love with materials such as plastic and other composite materials.
Products made from polypropylene have good characteristics and can withstand temperature changes well. They can be used all year round.
Plastic containers are more fragile and may burst when the temperature drops. It is not used to create large tanks, but is not uncommon for medium-sized tanks. It is also used for folding structures and decorative colored pools.
More practical models are made from composite. The material can transform, but the body does not break through. The walls cannot be scratched or broken. Such a pool will be durable, which is why it is used to create an indoor pool.
But all types have one drawback– they have a standard appearance, so if you want a unique pool, you will need to build it yourself. Yes, it’s expensive, but it’s the way your heart desires.
Separation by filling type
According to the filling methods, pools can be:
- Overflow.
- Skimmer.
In the first models, a grate is made in the tank, through which overflowing water enters the storage tank. This system visually increases the size of the container and allows you to always maintain a certain water level.
In skimmer models everything is somewhat different. They cannot be filled to the brim of at least 15 cm, since there are no storage tanks. The water that enters the tank is purified through a skimmer. This is an inexpensive option, which is why it is very popular in the private sector.
Finishing materials
An indoor swimming pool at your dacha can be decorated with the following materials:
- Polypropylene.
- Mosaic.
- Tile.
- PVC film.
The film is sold in rolls and can be of any color. The most popular are blue, white, light blue shades. The role of such finishing has a dual meaning: waterproofing and aesthetics.
Polypropylene is a polymer that has high strength, is easy to weld and is resistant to aggressive climate conditions. Usually they buy blue polypropylene.
But mosaics and tiles are chosen with a low level of water absorption. Ceramics are used to decorate a public pool, and mosaics will fit perfectly into a summer cottage. A pool with this finish will appear visually deeper.
Location
It’s not enough to choose a pool, you need to think about how you will care for it, so we suggest planning everything in advance.
Important: If you have clay soil on your site, then this is an ideal option for installation.
When planning container placement, consider the following points:
- If your soil is clay, you don’t even have to choose a location for installation. If the waterproofing fails, it will stop water leakage.
- The area where you plan to place the pool should have a natural slope. In this case, it will be easier for you to dig a pit and choose a place to install the drainage system.
- You should not place an indoor pool in your dacha where there is shade from tall trees. Plants sense moisture and can easily damage the waterproofing. The most aggressive trees are willow, chestnut and poplar.
- If the pool is located near a water supply, this will make it easier to fill the container with water.
Dimensions
The ratio of length and width is correlated with the general purpose. If you want to do swims, give preference to a rectangular shape. For a simple “splash”, it is better to make a round shape. Depth will also be important. If you are a fan of jumping from the side, then the bottom should be at least 1.5 m deep. To place a tower or springboard, you will need a greater depth - at least 2.5 m. But you can make the bowl deeper in the place for jumping, and then bring it to standard depth.
The biggest difficulty in creating an indoor pool with your own hands will be the combined type, which is suitable for both children and parents. The zones will have to be separated by partitions that will go from the very bottom. This way, children will be protected from falling into deep water.
Attention! In this type of pool, you should make a flat bottom that will smoothly descend. Sharp jumps are unacceptable for safety reasons, because walking along the bottom you can inadvertently miss the line and choke. Don't ignore this advice.
Design of an indoor pool at the dacha
 When you come to decorating, do not forget that you have a pool, not a pond, and you should decorate it accordingly. This is done using paving slabs or wood decking. The pool bowl can be hidden behind a stepped deck. If you are planning a large stationary pool, entrust this matter to professionals.
A distinctive feature of a pond will be the presence of a cleaning system, drainage, for example, heating/counterflow. To do this, you will need a utility room, which can be made in the form of a beautiful house. The design of the pool room or roof does not require any frills.
Plants as decoration
If the indoor pool at your dacha will be located outside, decide what you want to see around it. When drawing up a plan and choosing an idea for plants, do not break the main rule:
“There is no need to plant plants near the pool or on its shore. The water with the chlorine it contains will kill them, and you can forget about comfortable swimming among beautiful plants.”
To do everything at its best, the plants will need to be planted in tubs or containers. In this case, there will be no interaction with the treated water. Regarding the plants themselves, choose those that can withstand all weather conditions. These include juniper, Chinese rose, oleander, agapanthus, yucca gloriousa, and southern cordyline.
Add-ons
Making an indoor pool at your dacha with your own hands is not that difficult, but decorating it and making it a full-fledged recreation area is not easy. Pool lighting will help you with this. This way, you can enjoy swimming in the evenings. A fireplace or fire pit will also look impressive. Such elements will relax and add coziness.