DIY shed made from scrap materials. What can you use to build a shed at your dacha cheaply and quickly? Selection of materials and calculations
When settling in a summer cottage, the first thing they do is build a utility block from various materials and different sizes. In many cases, this is just a change house or temporary shelter until a permanent structure is built, but some people strive to create amenities almost like in an apartment.
Options for utility room - choose for your needs
Building a utility block with your own hands after purchasing a plot is the next task for its owner. Why do it on your own, because you can buy a change house or order construction? There are several reasons why many people prefer to build themselves. Firstly, the financial issue: after purchasing a plot, not everyone will have the money to purchase a utility unit or pay for construction by contractors.
Secondly, many cabins available for sale often cause dissatisfaction with those who bought them because their service life is too short. And thirdly, if you have construction experience and leftover material, you can build a utility block yourself, not of a standard type, but based on your needs. It will last a long time economically, and the experience gained during its construction will be useful in the future.
Having bought several acres, summer residents strive to immediately build a reliable utility unit for various purposes:
- as housing until the house is built, in order to later remodel it for other needs;
- outbuilding for equipment and other property;
- as a dressing room, pantry, bathroom, summer kitchen;
- as sheds for rabbits, poultry, and livestock.
The utility block is a universal room; everyone can adapt it to their needs. If the owners spend a lot of time working on the land at their summer cottage, then they will think about a rest room, about a bed in it to spend the night. A small compact structure can look like a simple barn or a house from a fairy tale. It all depends on the needs, capabilities, and priorities of the owner.
Materials and projects - what and what to build from
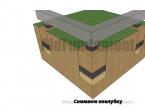
Construction begins with the foundation and ends with the roof. There is no particular choice in materials here. The foundation is made strip or columnar. For tape you need sand, cement, crushed stone or concrete blocks. Columnar is made of brick or stone. Recently, asbestos-cement pipes have been used, which are filled with concrete. The utility block is usually covered with inexpensive material: slate or corrugated sheeting.
The construction of walls often confronts a summer resident with the problem of choosing a material. One should proceed from several factors: cost, labor intensity, thermal protection, if they are going to live in the utility block in the winter. Cheap material will save money, and lightweight material (panels, aerated concrete) will allow you to build a cheaper foundation. Large blocks, panels, sip panels, boards, and corrugated wall sheeting will significantly speed up construction.
To build a utility block, one of the simplest schemes is increasingly used - frame.
Having sorted out the material, we decide on the purpose and, accordingly, the dimensions, and make drawings. The smallest storage shed, which can also serve as a temporary shelter, has dimensions of 3.5 x 2.5 m. If we expect to have a warehouse, a room separated by a partition, or a corner for cooking in the utility unit, we will need dimensions of 4.5 x 3.0 m. In both cases, it is impossible to find a place for a bathroom; you will have to install a toilet and shower in the yard. A 6×3 utility block will allow you to place everything you need for living with minimal amenities.

Frame project 6×3 – how much material is needed
Let's look at how to build a 6x3 m utility block, how much and what material will be needed. We focus on one option, because it is impossible to consider all the diversity. If the dimensions of your frame structure differ, it is easy to calculate the amount of material by increasing or decreasing it.
When starting construction, we make sure to draw a drawing as best we can, and based on it, we draw up a list of materials. You shouldn’t rush into this; it’s better to think it through carefully until you find the ideal option.
You will need bars 100×100 mm:
- for lower and upper frames 6 m long - 6 pieces, three-meter ones - 8;
- for vertical supports – 2.4 m – 11 pieces;
- 2 pieces of 6.6 m each for rafters;
- plus horizontal bars on doors and windows.

Boards needed:
- 20 pieces 25×150 mm for the floor, the same number for the ceiling or replace with another material (plywood, fiberboard, etc.);
- for the sheathing – 7 pcs. 25×100 6 m long;
- for windshields the same 2 pieces, but 3.6 m long;
- for fastening rafters – 50×100×3600 – 6 pieces.
If we are making a metal frame for a building, we focus on the length of the lumber. We calculate the amount of material for the foundation and covering based on the size of the building. If the foundation is strip, you will need quite a lot of sand, cement, and crushed stone. The columnar one will cost much less; for a frame utility block it is a good option.
We begin construction - foundation and lower trim
We make a columnar foundation from asbestos-cement pipes with a diameter of 150 mm. First, we mark the place for the foundation: remove the turf and a layer of earth to the depth of a spade bayonet. Fill it with 10 cm of sand and tamp it down well. At the place where the pipes are installed, we dig holes 1.2 m deep, fill the bottom with sand, and tamp them. We place pipes of the required length into the holes.
Using a building level, we check the verticality, horizontality and correct location around the perimeter of the building. We fix the position by filling the space between the poles and the ground with sand. We fill the pipes inside with concrete or cement-sand mortar. First, fill it to a third of the length, lift it slightly so that the solution goes into the hole and forms a solid base at the bottom. We fill the pipes to the top, compacting the concrete so that cavities do not form. In the center of each pipe we place an anchor to secure the frame frame.
While the foundation takes several weeks to gain strength, we prepare the frame. We make a rectangle from 10x10 cm beams, fastening the corners into half a tree, fixing it with nails and self-tapping screws. To strengthen the frame, we install logs across it inside. We treat the wood for the frame, as well as for the entire structure, with antiseptics or twice hot drying oil. At the top of each column we lay roofing material for waterproofing. Place the frame on the anchors and tap lightly to mark the locations for the holes. We drill holes, install the lower trim on the foundation, securing it with nuts on the anchors.
Continuation of work - erecting a frame, assembling rafters and roofing
We begin assembling the frame from the ends, fastening the building materials to the lower frame using metal corners. To strengthen the fixation, you can install diagonal struts from beams or temporarily fasten them with a board using self-tapping screws. We assemble the front part of the frame, installing the vertical posts, then the rear. The distance between the posts is 1.8 m. We strengthen the frame with diagonal struts made of beams.

Don’t forget about windows and doors, creating openings in the places where they are installed. The size of the doorway is 2x0.85 m. We install crossbars for the windows: the lower horizontal at a height of 80 cm from the frame, the upper - 1 m from the bottom. If we plan to arrange several sections inside, we install partitions. We finally fasten the frame racks at the top with beams.
We make the roof depending on the method of assembling the frame. If the building has front and back sides of different heights, we install rafters on the longitudinal beams of the walls and attach the sheathing to them. If the walls are the same height, we assemble the rafters on the ground, and then install the finished ones on top. We create the necessary slope by raising the front part by 50 cm. But you should keep in mind that one person will not be able to lift them, so if there is no assistant, we assemble them at the top.
We cover the roof, lay the floor, sheathe the walls
Immediately after assembling the frame, we cover the roof. The list of available roofing materials is large, so we make the sheathing for large sheets sparse, and for rolled material - continuous. Before laying the floor, it is advisable to insulate the subfloor: fill the openings between the pillars with any material, fasten them with cement mortar, and fill the inside with expanded clay. We lay the floor from the boards along the joists.
We cover the walls, starting from the front wall, going from bottom to top. The material can be different: boards, lining, siding, corrugated sheets, etc. We insulate with glass wool; it is not advisable to use polystyrene foam - mice adore it. from the inside, we make partitions, install windows, hang doors - the utility block is ready and, undoubtedly, will become a decoration of the land plot.
At first glance, it seems that building a shed is simple. Choose a picture you like on the Internet or drawings of a utility unit you like - and build it for your health. Moreover, you can make a barn from timber, using frame technology, or even a stone one - from brick or aerated concrete. But behind the apparent ease lies the main pitfall. The barn in the picture is not yours, but “that guy’s.” Will it be right for you, will it be convenient to use this outbuilding, will everything that is planned fit into it? You will learn the answers to these questions, and more, from our article. Namely:
- What is a shed for?
- How to determine the optimal size of an outbuilding.
- How to turn a barn into a multi-functional building.
- What are utility blocks built from and on what foundation?
Where does the construction of a barn begin?
Often, a barn is the first building that is erected on a site, at the start of building a house or even before that. To hide tools, building materials, to take shelter from bad weather or to spend the night - in everything, the “shed” becomes an indispensable and universal assistant.
After the site has been inhabited, the tools and equipment necessary for caring for the garden and vegetable garden are stored in the outbuilding.

They drag in snow removal equipment, lawn mowers, and building materials that were left after the construction of the cottage. And often - everything that is a pity to throw away or is planned to be left “for later”, because a zealous owner makes everything work.

It is not surprising that over time the barn turns into a “junk pile”, filled with a mass of necessary and unnecessary things. If it is easier for the owner to go to the market and buy the wrench or hardware needed on the farm than to find them in the utility room, then something needs to be done about it. And you need to start in advance, even before the construction of the shed begins, by properly designing it and calculating the optimal dimensions.
MAX001 FORUMHOUSE Member
I have a brick house of 200 square meters. m and an ordinary change house measuring 6x3 meters. One day I realized that the change house, which had been in use for 3 years, had outlived its usefulness. I sold it and wondered what to do with the tool and other things pulled out of it. I decided to build a barn. At this stage, I made a fatal mistake - I consulted with my wife about the dimensions of the outbuilding. As a result of lengthy negotiations, during which my wife did not see the point in building something big, we came to a common denominator - a small utility block, approximately 2.5x3 meters + high ceilings.
We will immediately show what happened to the user.

The problem is that all the beautiful “pictures” of the correct placement of things in the shed were shattered by the reefs of harsh reality a year later. The racks and shelves were filled with various “junk”, and there was practically no free space left.

When asked what to do about it, the user found the only correct answer - to attach another one to the barn... a barn. According to MAX001, headaches can be avoided if you immediately erect an outbuilding of normal size. And so I had to buy another iron door, build walls, and so on down the list.

But now everything fits in the barn.

Although there is an opinion that the larger the shed, the more clutter it can become, there are minimum dimensions below which you should not build. Otherwise, you’ll have to throw everything up to the ceiling, filling the shed like a shopping bag. There will never be order in the utility room. The starting point for calculating the dimensions of the utility unit is the physical dimensions of the things that you are going to store there.

Ironka Member of FORUMHOUSE
My mother built a shed at the dacha measuring only 9 square meters. m. As a result: now you can only stand in the middle. Moreover, nothing large, in the form of any special equipment, is stored there. Just a bicycle, greenhouse films, hoes, axes, saws, nails and various small things. I think that building a shed less than 15-18 square meters. m not worth it. This way there will still be room left in reserve.
MAX001
My shed is about 12 square meters. m. is saved by the fact that the ceilings are high, you can put up shelving. I even use the space between the rafters - I filled the bars and store folding country furniture there, and in the summer - skis.
In addition, the user increased the functionality of the shed by mounting a shed for the firewood on the outside wall (stone), where it is now possible to store about 2 cubes of logs.


Cosolapyj FORUMHOUSE Member
I decided to build a barnhouse style because... the number of tools and various equipment exceeded all reasonable limits. It is not possible to store everything compactly, so the shed will have the appropriate dimensions - 8x18 meters, at USHP.

When constructing outbuildings, the user recommends adhering to the principle “do a little more at once than you can afford, and you won’t have to redo it for longer.”

Let's add that in the barn Cosolapyj plans to equip a workshop, make a water supply for car washing, and also (eventually) install an ATV and a garden grader.

We'll also show you the barn plans.

From left to right: a storage room and a place for a grader, in the middle is a workshop, on the left is a shed.
How to calculate the optimal dimensions of a shed and turn it into a universal utility unit
As can be seen from what is written above, by the word “shed” each developer means his own building. In one case, you need a small outbuilding for storing garden tools and various small items, and in another, the barn grows to the size of a house. But there is one nuance that unites them. This is ease of use.

The shed must be practical, which means it must be made for specific needs.
Therefore, instead of taking the dimensions of the shed from the Internet or from a neighbor, it is better to decide for yourself what you need the shed for and what you plan to store in it.

There can be many options for such planning. For example, at the initial stage of construction in the barn it is necessary to place tools, some building materials, and equip sleeping places.

In the future, the barn can be transformed from just a “storage room” on the site - into a workshop, as well as a place for storing firewood or pellets.

Or it can turn into a “garage” for storing various equipment - a motor cultivator, lawn mower, vibratory rammer, snow blower, etc.

Any summer resident has a basic set of tools and agricultural equipment, which he cannot do without on his plot. It is from this list that you need to start when calculating the minimum dimensions of the shed.
For example, to store a simple set of garden tools - shovels, rakes, axes, hoes, small spades, saws, brooms - you can allocate 2 square meters. m.

If you plan to actively garden and store fertilizers and greenhouse materials in the shed, increase the area to 3-4 square meters. m.

If you have electric tools: a gas trimmer, a high-pressure washer, garden pumps, hoses, sets of ordinary tools, you need even more space - 5 or more square meters.

Practice shows that the averaged and The optimal size for an outbuilding can be taken as dimensions of 3x6 meters with a height of 2.5 m.

In this case, it will be possible to place long building materials in the shed - boards and fittings. Set up a small workspace for a home handyman, install racks for storing hardware and various household items.

When building a barn, do not forget about arranging a small terrace with a canopy, where you can work outside in bad weather or just relax while sitting at your desk in the evening.

An important stage is zoning the barn. To do this, we divide the building into a number of rooms - blocks, each of which stores its own. For example, “dirty” things - a garden wheelbarrow, shovels, rakes, spades, watering hoses, etc. It is better not to drag what is needed for working with the soil into the outbuilding, but to place it on the side in a small compartment with separate doors.

This way, these tools will always be at hand and you won’t have to sweep/wipe the floor in the barn every time, cleaning out sand, black soil, fertilizers or clay.
We allocate space for a work table, shelves with carpentry and plumbing tools and places to store bolts, nuts, nails, screws, etc.

Rule: we place what is required first and most often closer to the entrance. Anything that is rarely used or used seasonally can be placed in the back of the shed against the far wall.

If you plan to store long materials in the barn, then, for ease of pulling them in, you should make the door not in the middle of the building, but on the side - on the right or left, or at the end. If you are not “greedy” at the height of the barn, then the attic can also become the optimal place to store leftover fittings, boards, plywood, and pipes.

Those. everything that is not needed often, but can be easily obtained if necessary. In addition, even before construction we think about whether the barn will be insulated. In our climatic conditions, this will allow working in outbuildings in late autumn and winter.
Household block: design options and construction features
Experienced developers know well that it is better to learn from the mistakes of others, so as not to make mistakes in their construction. To do this, it is best to study the experience of portal users who have already built sheds and cabins. Therefore, in this part of the article we have collected illustrative examples of practical utility units.
What materials can you build a shed from? The experience of our users shows: from any. It all depends on the budget and the intended design. Everything is used, they build from wooden budget outbuildings standing on, to permanent buildings made of brick or aerated concrete. In any case, you should start by developing a plan, and ideally a project. An illustrative example is a portal participant with the nickname AlexanderFJTI.

AlexanderFJTI User FORUMHOUSE
It all started when I conceived the idea of building a utility complex - combining a barn, a terrace and a bathhouse under one roof. Construction began with a model. I bought slats at the store and, together with my son, built a model of a multi-shed in the winter.


Note that the barn was built using one of the most common technologies used for the construction of such objects - frame. Screw piles were used as the foundation.


AlexanderFJTI
A team of three people screwed 21 piles by hand. They worked very quickly. The piles were cut to the water level, the shaft was filled with cement-sand mortar, and the cap was welded on top and everything was painted. Next I started building the frame. And this is what happened in the end.


To save on the services of a construction team, it is better to build the barn yourself and use the experience gained when building a house.
A different approach was taken Goshapiter.

Goshapiter FORUMHOUSE Member
There was a barn on my property that my grandfather built back in 2001. The building served faithfully all these years, but it became “cramped” for all the equipment stored there. In addition, it was worn out, so I decided to build a new one from permanent polystyrene foam formwork. Dimensions from the inside - 4800x3600 mm. The roof is flexible tiles.
As a foundation, the user erected a “ribbon”, within the perimeter of which, from the inside, a slab was poured.

In this option, the slab is also the finished subfloor of the barn. In addition, the problem of possible rotting of the wooden floor disappears. You can also, without fear of a “trampoline,” place heavy shelving, a table with tools, machines and vices in the barn.

The inside of the utility block was finished with OSB boards, which were secured on guides from the drywall fastening. Siding was used on the outside.


Goshapiter
Everything fit in the barn - bicycles, gardening equipment, tiles left over from the construction of the house. Construction took 1.5 months. It would have turned out faster if not for “wet” concrete work.
Another example of an unusual barn - a utility block Dmitr173, made from homemade tongue-and-groove boards.


Dmitr173 FORUMHOUSE Member
I, like any owner of a country plot, thought about building a barn. It should accommodate: a small workshop; my wife needs a corner for storing gardening supplies. Besides this, I would like to build something original - for the soul.
Having drawn up the technical specifications and gone through several options, the user decided to build a shed from tongue-and-groove boards. The foundation is a proven and relatively inexpensive MZLF (shallow strip foundation).

To maximize the use of natural light, the roof of the barn has a transparent polycarbonate insert.
No matter how much space there is in a country house, a personal plot cannot do without such a necessary outbuilding as a barn.
If you don’t yet have experience in self-building, but the owner knows how to use tools, he can easily build a shed at his dacha with his own hands, following the instructions.

If the barn will be located next to the house, and it is important that it looks aesthetically pleasing, it is better to use the same materials from which the house is built. To reduce the cost of construction, you can decorate the barn with siding - it can be different, and imitates any materials - wood, brick, stone of different textures.
How to make a shed quickly and inexpensively
Following step-by-step instructions on how to make a shed yourself, you can build it in the shortest possible time, while spending very little money.

One of the simplest, fastest and cheapest options is a frame shed. The frame itself can be made of wood or metal, the outside is sheathed with suitable material, a roof is installed - and the comfortable outbuilding is ready for use.

If the barn is made of wood, then the frame can be made of timber. But it is more convenient, reliable and durable to make a frame from profiled pipes with a rectangular or square cross-section - a profile with a round cross-section is more difficult to join and weld.

There are also ready-made metal frames on sale, which are assembled using self-tapping screws, and at the factory you can order a structure according to your own drawing.

As practice shows, assembly of both metal and wooden sheds usually takes only a few days. The photo shows sheds on frames - what they are like, and how beautifully they can be finished.
What should the foundation be like?
Sheds on frames are lightweight buildings, so the foundation for them is made lightweight. Most often, several posts, screw piles or a concrete block are enough - one or several, depending on the area of the barn.

If the soil on the land plot is complex, the foundation can be a shallow strip foundation made of special monolithic blocks.

A reinforced strip foundation will withstand even bricks and building blocks as walls - the building will be reliable and will not crack on soil that is prone to swelling, since the movement of the structure will occur along with the foundation.

The choice of foundation type depends on the soil on the site, the area of the barn, the material from which it is built, as well as the financial capabilities of the owners of the site. But it’s easier, faster and cheaper to build a shed on a frame without a foundation.
Frame lean-to shed without foundation
Frame sheds can be built without a foundation at all. There are two options. In one case, the racks treated against rotting are buried 60-80 cm, concreted, and then the lower frame is attached to them, on which the floor is laid on the joists. It is worth noting that this method is only suitable for building a small area.

On soils that absorb and drain water well, you can also build a shed without a foundation this way: the area for construction is marked out in such a way that the area on which the shed will stand is 0.5 m wider on each side than the area of the building itself .

The turf is removed from the soil and a sand and gravel backfill is made, which must be thoroughly compacted. A strapping beam is laid on the prepared site, and floor joists treated with an antiseptic are attached to it - the joists will be in direct contact with the ground, so treatment with an antiseptic is required.

As soon as the logs for the future floor are laid on the site, the floor itself is made. It can be made of planks, from sheets of moisture-resistant plywood or from oriented strand board (OSB). In this case, the recommended thickness of materials:

- for boards – 20 mm;
- for plywood and OSB – 13-15 mm.
When the site for the building is ready, you can begin building the shed.
Note!


When building a frame barn with a pitched roof, the roof should be installed correctly - its angle should be such that snow easily rolls off it.

Practice shows that the optimal angle of inclination is achieved when the height of one wall is 3 m, and the opposite one is 2.4 m. It is a good idea to cover the roof with ondulin - this roofing material is also called Euro slate.

Ondulin is much more attractive in appearance than slate, it has a wave-like shape, and its color can be different, this allows you to make the roof of the barn beautiful, cheerful, truly country-like.

Having started assembling the frame, first the racks of each wall are mounted into the floor one by one. If not boards are chosen for cladding, but ready-made slabs - made of wood, metal or other material, the cladding can be installed on the frame of each wall in advance, on the ground, and the wall can be fixed to the floor in finished form. As an option, the walls can be sheathed with OSB 9.5 mm thick.

There is an alternative technology - Balloon. With this method, installation is carried out gradually - corner frame racks are immediately attached to the frame or the blocks themselves as the racks are installed in height. A rope is stretched between them at each new height level, along which the next racks are then placed.
Note!


When constructing window and door openings, it should be taken into account that the load on the frame is greater here, so it is necessary to strengthen the frame in those places where the window and door sashes will be attached. For this purpose, the openings are equipped not only with corner posts, but also with reinforced posts.
Erection of the roof
Since the roof of the barn will be single-pitched, the rafter system is simple: rafter boards, the length of which to provide an overhang (as a rule, it is made 30-50 cm) must be greater than the length of the side of the area intended for the roof, are laid on the edge. For example, if the planned area of the shed is 3 m by 3 m, then the length of the rafter board should be 3.840 m.

The boards are nailed diagonally - two nails on both sides, so that the roof can more reliably withstand loads under snow pressure and strong winds; it can be reinforced with metal corners.

It is necessary to install a sheathing on the roof (100*25 mm is suitable). If the roof is planned to be covered with ondulin, then the optimal lathing pitch recommended by the manufacturer of this roofing material should be 40 cm.

The final step is to cover the roof with the selected material - ondulin, slate or others.

Note!

Completing the construction of the shed
After the walls and roof are erected, windows and doors are installed in the prepared openings.

You can make a small porch at the door or just one or several small steps - depending on the height of the threshold of the barn.

The lining of the shed can be painted to match the roof, or, if it is wooden, leave it a natural color, which will look organic in the dacha by oiling it.

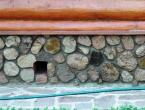
And to make the building look aesthetically pleasing and neat, the foundation should be covered with an asbestos sheet.

Such a barn, if the site on which it is being built has already been prepared, can be erected in just a couple of days. Built with your own hands and taking into account individual needs, it will turn out to be very comfortable and beautiful.

Photo of a do-it-yourself shed


A do-it-yourself garden shed is the easiest way to get the minimum required level of comfort in the shortest possible time. When the first joy of acquiring a plot has passed and the question of real development of the plot becomes a question, the utility block is the first necessary building. While the residential building is just being built, it will serve as a place to store all the necessary equipment. And after construction is completed, the barn can retain its original functions, fulfilling the role pantry, and become a place for storing firewood or, for example, chicken coop.
How to choose a barn for a summer residence: considering options
Often, the construction of a barn begins the development of a site, so by this time it is necessary to already have a detailed plan diagram, which will indicate the location of all planned buildings: a residential building, a bathhouse, a gazebo, garage, barn, etc.
Advice! Since a summer cottage usually does not have a large area, it is better to combine all outbuildings to save space - build a shed that will combine the functions of a storage room, toilet and shower. This decision is especially justified at the initial stage of construction.
There are several approaches to choosing a place to build a shed, for example, near the border of the site, behind the house, in order to hide the utility block from prying eyes. In addition to the house, additional camouflage for the barn can be provided with the help of a plot. Another option is to place the shed near the house so that you don’t have to run across the entire site for every little thing. Very often, a place is allocated for a shed, which for various reasons (shade, north side, poor soil) is the worst suited for planting trees or growing garden crops.
Let's look at some of the most popular options for garden sheds.
Ready-made container utility unit
The fastest and least labor-intensive option is to purchase a ready-made shed (house) in the form of a ready-made prefabricated/dismountable utility unit. This is a monoblock structure (usually a container type), which is based on a rigid metal frame, which is sheathed on the sides with metal, and insulation is laid in the walls, and electrical wiring is already installed in it. There are many options - it can be just a small storage shed, or a multifunctional utility unit, including a toilet, shower and even a place to relax, and some models provide a removable canopy, which makes it possible to make a small veranda.
To install such a container utility unit, pouring a foundation is not required; a columnar foundation or simple concrete blocks will be quite sufficient. In a ready-made form (although it may require minimal assembly of internal communications, for example, connecting hoses to water collectors, which can be done independently), it is delivered to the site; installation will require a truck crane. Outwardly, such a barn does not look very attractive, but thanks to its reliability, durability and mobility, such a utility unit can be sold after the construction of a residential building is completed.
A barn is one of the most important and useful outbuildings. In this building you can store various kinds of garden supplies, barbecue, garden and home care products, and tools. If you really want to, you can even install a toilet and a summer shower in the barn.
With proper preparation, building a shed will not take much time or money. There are several types of such outbuildings. Beginners are recommended to give preference to frame structures - they are the easiest to construct.
Instructions for arranging a frame shed will be given below. Read the instructions and get started.

Choosing a location for a shed
When choosing a location for your shed, use personal preference. Some owners prefer it when the barn is located in some nook of the site. For others, it is more convenient when the barn is located next to the house.
It is most rational to build a shed on an area that is least suitable for growing garden and various types of agricultural crops. You can find a similar place in almost any area.
At the stage of choosing a place for arranging a shed, take into account the location of other zones of the land plot, take into account the dimensions of the building being erected and its external data. Try to ensure that the shed fits well into its surroundings and blends harmoniously with nearby buildings.

Set for work
- Wood processing machine. You can do without a machine, but with it the work will be faster and easier.
- Electric jigsaw.
- Hand-held circular saw.
- Electric planer.
- Screwdriver.
- Electric drill.
- Chain Saw.
- Boards.
- Logs.
- Ruberoid.
- Fastening elements.
- Switches.
- PVA glue.
- Sockets.
- Oilcloth.
Prices for various types of construction boards
Construction boards
Foundation
Any building structure needs a reliable and durable foundation that can support its weight.
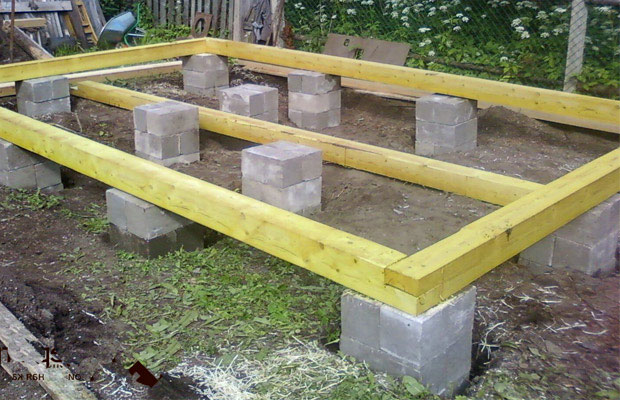
Columnar, monolithic, strip and pile-screw type bases are suitable for arranging a shed. A columnar foundation is suitable in most cases, so experts recommend giving preference to this particular design.

Mark the area for the foundation. Any suitable pegs, cord and tape measure will help you with this.
Using a tape measure, measure the sides of the figure and its diagonals. The length of the elements must be the same.
Dig holes 500-700 mm deep around the perimeter of the marked area, in the corners, as well as at the intersection points of the internal partitions (sometimes deeper, depending on the level of soil freezing) for installation. The optimal spacing of the pillars is 1.2-1.5 m.

Build supports from asbestos pipes filled with reinforcement and concrete, or brick pillars - choose at your discretion.
Make sure that the pillars are installed evenly using a building level, fill the space around the pillars in the pits with a sand-gravel mixture to approximately 150 mm of the height of the recess, and fill the remaining space.


Leave the foundation to gain strength for several days.
Before backfilling and concreting, you can treat the support columns with a special mastic. It will help improve the waterproofing of the base and extend its service life.
Start assembling the frame of the future shed. Pre-soak all wooden elements with an antiseptic. The best option is impregnation with color. This product is simply more convenient to use - untreated areas will be clearly visible.
Place a timber support on the dry base. Select the dimensions of the timber in accordance with the dimensions of the shed being built.
 Base - foundation and perimeter made of timber
Lay the timber on support posts, previously covered with waterproofing material (roofing felt). Fasten the columns in any suitable way at your discretion.

Lay wooden boards 3-4 cm thick on the frame. At this stage of work, the main thing is to cut out parts of the boards near the vertical posts as carefully as possible.
Attach the boards to the floorboards “in secret”.
When determining the required number of support posts, take into account the presence of openings for installing double-glazed windows and doors, as well as the number of corners of the structure.

Place the beams strictly according to the building level. For leveling, use slope sticks. They will allow you to provide temporary fixation of the bars in the required position. Use nails to temporarily fasten elements together. Hammer them in approximately half the length so that in the future there will be no difficulties in dismantling the temporary supports.

Attach vertical support posts to the bottom frame frame. Fixation is carried out using corners, self-tapping screws, and pins extending from the base.
The frame can also be built on brick supports. In this case, first, several rows of brickwork are built around the perimeter of the foundation, and then wooden vertical posts are installed on them.

Use an electric planer to plan the three inner sides of the vertical beam. Bevel the sides facing the interior of the shed. Leave untreated only the sides that will later be sheathed with external boards.
Roofing and wall cladding

Attach the top portion of the shed frame to the exposed vertical support posts. Pre-prepare cuts in the timber according to the size of the posts. Fix the connections with corners and self-tapping screws.
Traditionally, barns are equipped with roofing structures. In this case, the length of the wooden posts on one side should exceed the length of the opposite supports.

This placement will further contribute to the effective removal of sedimentary moisture from the roof surface.
Build a roofing structure from boards 4-5 cm thick. The length of the rafters should be approximately 50 cm longer than the length of the frame.
In the places where the rafters meet the beams, make cuts first. Lay the rafters on the frame and secure with self-tapping screws. The installation pitch of the rafters is 40-50 cm.
Treat the frame with an antiseptic. Attach batten boards to the frame. Boards measuring 2.5x15 cm are optimal.

A roof made of boards requires a mandatory layer arrangement. Traditionally, roofing felt is used for moisture insulation. If you plan to install a more beautiful finishing coating, use polyethylene film for waterproofing.
Choose the finishing coating at your discretion. You can lay corrugated sheets, euro slate, etc.

Lining is suitable for covering the walls of a building; chipboard, boards and other similar materials can also be fixed. First, sheathe the front side of the shed, and then line the side and rear walls. Attach the boards without gaps.

If necessary, sand the outside of the boards with an electric planer. Typically, such treatment is only needed when covering walls with boards. Thanks to this, the material will become more attractive in appearance, and rain will linger much less on a smooth surface.
If you wish, you can paint the walls of the shed. Oil and water-based compositions are best suited for painting such buildings.

Carry out the interior arrangement of the finished shed at your own discretion. If the building is intended to store various kinds of tools and accessories, install convenient racks and shelves around the perimeter. Shelving allows you to make the most of the available space and easily access the things you need.
You can buy racks and shelves ready-made or make them yourself, for example, from boards, fiberboard, leftover furniture, etc.
At this point the barn is ready. All you have to do is bring it to it, if necessary, and install the required devices.

Good luck!
Prices for popular types of corrugated sheets
Corrugated sheet
Video - How to build a barn with your own hands