A rubble stone foundation is inexpensive and truly reliable! The strength of a rubble stone foundation and its construction Do-it-yourself stone foundation step-by-step instructions
Any home craftsman can lay a rubble foundation with his own hands. And he will not need any special equipment or any specific knowledge. It is enough to understand the simple technology of constructing rubble stone foundations.
Experts say that rubble foundations for various buildings have been erected for more than 4 thousand years. In the Middle Ages, durable and aesthetically attractive rubble was used to make reliable strip foundations not only for houses, but also for powerful fortresses and defensive structures. Structures made from this stone last 150–500 years, demonstrating unique performance properties.
Rubble foundations for houses are absolutely environmentally friendly. They perfectly resist the effects of soil water and do not lose their characteristics when frozen.
Reliable foundation made of rubble
A rubble base is understood as a strip structure built from natural large-sized stones, which are filled with cement-based mortar.
This natural material is not divided into separate categories based on its size. For this reason, it may contain fractions with different geometric parameters - from 15 to 50 cm.
To build a foundation for a house, it is recommended to use stones with relatively wide and even upper and lower edges. Such material is usually called bedded. But it is also possible to use stones that are less correct in terms of geometry. Their shape does not affect the strength of the constructed foundation in any way.
Nowadays, rubble is most often used to build foundations for 1–2-story houses, as well as for various commercial buildings. The technology for constructing standard five-story residential buildings from rubble stone has existed for more than 60 years. A minimum of financial resources are spent on the construction of such buildings, due to the low cost of natural materials.
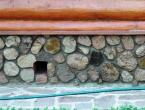
It is impossible not to separately note the natural beauty of natural stones. You can use them both to build a solid foundation for your house and to furnish the basement of your home. In the latter case, you will not have to spend money on finishing measures. The rubble base does not need to be plastered or tiled. It will look truly luxurious anyway.
On clay soils, high-density loams and sandy soils, rubble foundations last up to 150 years without any repairs. If such a foundation is being built on heaving ground that is prone to subsidence, the structure should be strengthened with reinforcing elements. And it will serve you for the same 150–200 years.
The quality of rubble for laying foundations for residential buildings is determined very simply. You just need to hit the stone well with a regular hammer. If the bottle does not break from a strong blow and at the same time produces a clear and ringing sound, it means that you have excellent material in front of you.
Stones are also checked for quality by splitting them. If you break the rubble, and it does not generate dust and does not break into small fractions, feel free to use it to build a foundation. Believe me, a foundation made of such stone will last for many decades.

Rubble house foundation
The rubble must be washed before laying. This procedure, let’s say right away, is labor-intensive. Please be patient and have some free time. You have to thoroughly wash every stone. If this is not done, the concrete mixture will not bond with the stones at the proper level, which will significantly worsen the strength of the foundation.
Large pieces of rubble for laying the foundation of a house require additional preparation - breaking them into smaller stones weighing no more than 30 kg. This procedure is called plinting. It is done with your own hands using the following technology:
- Using a soft pencil, draw a line on the stone along which you plan to break the rubble.
- Stretch the nylon rope and forcefully press it into a piece of pre-prepared chalk.
- Pull the cord marked with chalk over the line marked on the stone and suddenly release the rope. As a result, you will get a clearly visible chalk mark on the rubble. This is where the material needs to be split.
- Use a hammer to drive a steel chisel into the cut line on the rubble. You are splitting a stone. The hammer blow should be performed quite strongly. Do not be afraid. A high-quality stone, as we said, will not crumble, but will clearly separate into separate fractions along the split line.
Now that the material has been prepared, you can proceed directly to laying the foundation for the house.
The laying of the structure we require is carried out in several stages:
- Clearing the land.
- Dig a trench of the required size. The ditch must be made with a small margin. Maintain a distance between the boundary of the future foundation and the edges of the walls (load-bearing) of the house being built at a level of 15–20 cm. The depth of the trench is below the freezing mark of the ground in your area.
- You do. It will protect the ditch from soil falling into it. The formwork structure is dismantled immediately after pouring and setting of the concrete mixture.
- Place a 30-centimeter sand cushion at the bottom of the pit. Sand must be poured into separate layers, tamping each of them.
- Lay sheets of roofing felt over the made pie. They will be an excellent waterproofing material for the foundation.

Creating a rubble stone foundation
After this, start laying the rubble. It must be moistened with water before starting work. Then the stones will adhere well to the cement mixture. Note! Stones cannot be placed back to back in the trench. Leave a small gap between individual pieces of rubble.
The masonry technology itself is simple. You need to remember that the short side of rubble stones is called a poke, and the long side is called a spoon. In one row of spoons should alternate when laying with a poke. The total thickness of the masonry is usually taken at 0.6–0.7 m. For a residential building, this is quite enough. Installation of stones is carried out using a small sledgehammer or a massive hammer.
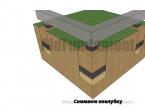
The construction of a rubble foundation is carried out according to three different schemes. The operation can be performed “under the bay”, “under the scapula” and “under the bracket”. If you plan to make formwork, it is recommended to implement the “flooded” scheme. It is given below:
- Place the butt row in the prepared ditch (on a sand bed). Pour fine gravel or crushed stone into the gaps. Compact the layer.
- Fill the stones with liquid concrete (3 parts sand plus 1 cement).
- Lay the spoon row. Repeat all the described procedures.
The topmost row is filled with thicker concrete (add less water to the mixture). The layer of mortar should have a thickness of about 0.5–0.6 m. Then, using a vibrator, compact the concrete until the mixture no longer penetrates into the gaps between the rubble stones.

Creating a foundation from rubble
Important point. If the foundation is developed according to the “bay” scheme, only light buildings (for example, a small or outbuilding) are allowed to be erected on it. Structures with a large mass are not installed on such a foundation.
For loaded houses, the foundations are usually built according to the “shovel” and “bracket” schemes. In the first case, you are allowed not to choose a bottle by size. But the “under the bracket” option involves careful selection of stones in height (it should be the same for all pieces used).
Laying according to these two options is done as follows:
- Place the bonded row dry on a bed of compacted sand.
- Compact the stones, pour small stones into the gaps between them.
- Pour liquid concrete.
- You install a row of spoons, tamp it, pour the concrete mixture.
- Next, lay the bond row again, then the spoon row, and so on.
Note! It is imperative to tie the seams between all mounted rows with reinforcing bars and steel wire. You need to ensure that the rubble in the masonry does not wobble, but stands really firmly.
And one last point. When installing rubble in rows, you must constantly monitor the horizontal and vertical positions of the corners of the masonry and the surfaces of the stones themselves. Then you will have an impeccably reliable foundation.
The foundation made of rubble is reliable and aesthetic, its service life is at least 150 years, and the upper limit is not limited. After all, buildings made using the same technology several centuries ago have survived to this day. When building with your own hands, the most important thing is to choose quality stones, sort them correctly and follow the instructions.
Rubble - stones with uneven edges of different sizes and shapes, obtained by natural destruction of rocks (sandstone, dolomite, shell rock) or blasting. The average size of the fragments is 30-50 cm in diameter, weight – from 25 to 45 kg.
Types by shape:
- torn - all edges of the fragment are uneven and sharp;
- bedded - one of the sides of the cobblestone is smoother and more even;
- flagstone - flat, arbitrarily shaped with even opposite sides.
This classification is conditional, since the stone is simply sorted based on the shape created by nature or rough mechanical action; no special processing is performed. Especially large cobblestones are sometimes split into pieces.
These stones are used to make foundations for any buildings, strengthening the almost chaotic masonry with cement mortar. In such a structure there is about 90% rubble. Cobblestones are placed in rows in a trench and secured with concrete. It is more convenient to use bedded and flagstone types. The high base is reinforced with a reinforcing belt. The rubble concrete foundation is suitable for any buildings several floors high, the construction of a basement, outbuildings, baths. It can be used to make a strip and column structure.
One of the most important criteria for choosing this material is availability. In regions with mountainous terrain, it is easiest to buy stone, but delivery to remote locations can be very expensive. It is also necessary to select a cobblestone with a high level of strength - when hit with a hammer, it should not crumble, but only make a ringing sound. Cracking and delamination are unacceptable.

Pros and cons of buta
Not a single column or strip foundation will be reliable and of high quality if, when laying it, the advantages and disadvantages of the materials used are not taken into account.
- Aesthetic appearance. The part that rises above the ground looks like stonework, giving the building a presentable appearance. Does not require additional finishing.
- Environmental Safety.
- Withstands temperature changes and exposure to moisture.
- If the technology is followed, seasonal soil movements are not dangerous.
- Durability amounts to hundreds of years.
- The large load-bearing capacity allows the construction of large structures in area and number of floors from heavy products.
- Not susceptible to fungus, mold and insect damage.

The construction of a rubble concrete foundation is far from a simple process, requiring time and physical effort. This is due to the characteristics of the material and technology:
- The stones have different shapes and sizes; to place them as densely as possible, sorting and careful selection of elements will be required.
- The rubble base must be buried 20 cm below the soil freezing level, so you need to dig a deep trench and gradually lay rows of cobblestones.
- Construction in regions remote from the location of the stone is much more expensive due to the delivery of material.
- All work has to be done with your own hands, since it is impossible to use special equipment.
- Concreting is carried out in stages, so several portions of the cement mixture have to be mixed.
If it is not possible to carry out the work on your own, you will have to hire a team of installers. Masonry by professionals is much more expensive than the construction of other types of foundations.

Step-by-step instructions for laying a rubble foundation
You should make a plan for the location of the tape or pillars, sort the stones by fraction and shape. The smoothest and largest ones should be left at the corners. Study the structure and type of soil, establish the location of groundwater passage and the level of freezing - this is necessary to determine the optimal depth. Most often, 1.5-1.8 m is enough; in areas with a harsh climate and moving soil, they are buried 2 m. It is not recommended to use trench walls as formwork, as they will crumble, deform and take a lot of moisture from the raw concrete. Therefore, the width of the ditch with a tape thickness of 0.5-0.6 m should be at least 2.5 m. This is enough to install formwork on both sides.
The technology provides two methods:
- Rubble. Laying stone in rows on mortar is similar to brick. With this method, most of the volume is bottled. To implement it, you need to select the most even flat fragments of different sizes and try to place them at the same level.
- Rubble concrete foundation. Concreting with rubble, it occupies less volume and serves as reinforcement, and is located less orderly. Cobblestones are selected in the middle fraction up to 30 cm.

A solution should be prepared from a grade of cement not lower than M400. To improve plasticity, it is recommended to add liquid soap or dish detergent. The ratio of the main components is classic - 1 part cement to 3 parts sand. When constructing a rubble concrete foundation, fine crushed stone can be introduced. The consistency should be such that the mixture penetrates well into all voids, but does not spread much.
You will need a set of tools: a sledgehammer, a hammer, a building level, a shovel, twine, a trowel. To fill the voids, it is advisable to prepare small crushed stone or pebbles.
Preparatory work
Preparing the site for a strip foundation or rubble pillars involves clearing the site of debris, uprooting stumps, bushes and trees. If the relief is uneven, it is corrected by removing the top layer or raising the masonry to different heights above ground level.
Next, lines are marked and the depth of the trench is determined. For large volumes of excavation work, it is better to carry out using an excavator. Sand is poured into a 15 cm layer at the bottom of the ditch and compacted - it will serve as a pillow. The specifics of further stages depend on the type of base.
Installation of formwork
The formwork is made from removable and non-removable bars and boards or panels. Since wood absorbs moisture, waterproofing from a thick film or roofing material will be required - it is attached to the walls of the frame and placed on the bottom.
Install gradually for ease of use. After installing one layer, some of the boards are moved higher. For a concrete base, the frame is installed at once to its full height and is not removed upon completion of work.

Method 1: laying rubble.
Careful sorting by thickness will be required. The general principles are to do the dressing as in the case of bricks, to place the largest and most even pieces in the corners, it is allowed to use large cobblestones in some places that will block two rows at once. Layers of stone are placed alternately with the short and long sides.
Instructions for strip foundation:
- Pour concrete 3-5 cm thick into the bottom of the formwork.
- Place large cobblestones in two corners of the trench and install a beacon made of twine - this will serve as a level for the first row.
- Lay the flattest elements in two layers, fill the resulting voids with fine gravel.
- Pour in the next portion.
- Each subsequent row of rubble-tape base is laid before the cement sets; the position of the stones can be adjusted during the process.
When the work is completed and the foundation has dried, the formwork is removed, the ditch is filled with sand or soil, the upper part is waterproofed, and a blind area is made.
Method 2: concreting with rubble.
The solution takes up more space, and the stones are sorted only by size. It should be poured one at a time to avoid delamination.
Instructions:
- At the bottom of the trench, make a cushion of sand and crushed stone and compact it.
- Pour 20-30 cm of mixture.
- Lay the first layer of rubble and drown it ⅔ into the DSP. The stones should not touch the walls of the formwork so that they are completely immersed in the solution.
- Remove air cavities and bubbles using vibration equipment or a rod.
- The layer rising above the ground, or the last 50 cm, is made using reinforcement and without cobblestones.
The formwork is not removed to ground level; the panels are dismantled only above it. The upper part is laid with waterproofing and a blind area is equipped.
| Articles |
A rubble foundation is a budget-friendly and aesthetic solution for a residential or country house, garage and bathhouse. It is strong, durable and environmentally friendly, because the structure is assembled from natural stones. Rubble foundations are not as common as reinforced concrete ones for various reasons, one of which is the lack of awareness among developers. Let's compensate for the lack of information and consider this type of construction from all sides.
general description
The rubble foundation is predominantly a strip structure, sometimes a columnar system. The main volume is made up of rubble stones - up to 90%, the rest is cement mortar of a grade not lower than M100, optimally M200-M300, depending on the mass of the future structure.
Large and durable stones are used for masonry. Preference is given to relatively regular-shaped cobblestones with parallel edges weighing up to 50 kg. Actually, the larger and stronger the fragments, the faster the installation is carried out and the stronger the foundation.
Unlike other types of structures, rubble foundations are not reinforced for several reasons:
- Bandaging the stones during laying creates sufficient strength for the tape/pillars, similar to a brick wall;
- Laying straight reinforcement in stones with non-ideal shapes is not an easy task.
However, reinforcement at the plinth level will help avoid the formation of cracks during wall shrinkage and compensate for the unevenness of incoming loads, because the foundation itself does not have elasticity and impeccable rigidity (not to be confused with strength).
Most historical buildings of European architecture stand on rubble foundations, and, it should be noted, they have been preserved almost in their original form for more than 200 years. A striking example is historical St. Petersburg, where the bulk of the foundations are piled wooden foundations, the rest are rubble.
Advantages of a rubble foundation
A foundation made of rubble, in comparison with structures made of other materials, has a number of advantages:
- Cheapness– the first and most powerful argument in favor of buta. Any stones suitable for strength and size are suitable for it. You can extract them yourself from a block or purchase ready-made ones, but even in this case, rubble will cost less than reinforced concrete (about 600-900 rubles per ton versus 2000-2500 rubles).
- Strength The compression ratio is higher, the larger the stones used. As already mentioned, the design does not include reinforcement, because natural rocks cope with the function of distributing the load.
- Durability demonstrated by ancient buildings of St. Petersburg and Paris (a striking and famous example is Notre Dame Cathedral).
- Aesthetics – the base, made of rubble, does not require finishing and looks natural and complete.
- Relatively easy installation: you can handle the design yourself; there is no need to knit complex frames. But by simplicity we mean installation, not speed.
Flaws
What you need to keep in mind when choosing a rubble foundation:
- Setting up the tape is labor-intensive: the structure is laid below the freezing level of the soil in a compacted base, the height of the wall is considerable.
- Long construction times for self-installation. In addition, some knowledge of stone placement will be required to ensure a good dressing. It will take more time to make stones if you decide to bomb the block yourself.
Preparation of material
The durability of the building and its safety depend on the correct choice of stones.
Rubble is fragments of rocks of different origins: limestone (shell rock), dolomite, granite, marble, etc. Rubble stones are obtained by explosion in quarries for mining or through the natural destruction of rocky blocks.
How to choose a high-quality rubble that can provide strength for the foundation? To do this, you don’t need to push a mountain into the laboratory; use a few life hacks:
- Inspection is the first step. The rock should not crumble; the bulk of the batch should contain only large stones of uniform color without obvious signs of destruction and colonization of microflora.
- Hit the stone with a hammer as hard as you can. A “good” copy will not crumble or crack, and will make an audible ringing sound. It is especially important to check limestone and shell rock in this way, which are not always distinguished by excellent strength.
- Determine the number of voids and total porosity visually - rock that absorbs water is not suitable for construction.
The shape is also important when choosing. For laying, the most convenient stones are flat ones with relatively parallel spoons and pokes. Their installation requires less labor, including adjustment. It is also possible to work with free-form stones, but it is more difficult to arrange and create a dressing with them.

Important! Before work, the stones are thoroughly cleaned of dust to increase adhesion to the cement solution, and also thoroughly moistened.
Masonry mortar
The minimum grade of mortar for masonry is M100, this can be used when constructing a light structure, for example, a garage or utility shed. For a house, of course, you need stronger material - M250-M300 and higher, in proportion to the massiveness of the house.
The standard proportions for preparing masonry mortar when constructing a wooden or concrete-block cellular two-story house are 1:3 (M400 cement and medium river sand). The consistency of the mass should be standing - a lump of mortar should stand on the trowel and not spread. Together with mixing water, it is recommended to use plasticizers that increase plasticity without loss of cement strength. If the sand contains clay admixtures (about 15-20%), this will also help make the solution more plastic.
Important Rules
- The stones in the masonry must be laid in such a way that the vertical seams of each subsequent row overlap;
- The distance between the stones should be minimal, and voids should be excluded;
- Large stones at the bottom, small ones at the top;
- The stones must be laid taking into account the rigidity of the overall structure, so that individual elements do not tend to fall out of the system when exposed to load.
Basic calculation
Due to the lack of reinforcement in the rubble foundation, to ensure the rigidity of the structure, it must be laid below the level of soil freezing in the region, 20-30 cm lower. The masonry is carried out on a compensation cushion of sand and crushed stone with a total thickness of about 20 cm, carefully compacted. The height of the embankment can be taken into account towards the total height of the foundation. The presence of groundwater is also taken into account; if it is abundant, drainage arrangements are required, but it is prohibited to reduce the height of the foundation above the freezing level.
The width of the wall is determined as usual - wider than the house walls by 10 centimeters or more or according to more accurate calculations.
Basics of laying a rubble stone foundation
The structure is laid using fresh mortar and general masonry principles.
When the pit is ready, the soil must be thoroughly compacted with vibrating plates. This is necessary to create the most stable and rigid foundation. The bulk sand and gravel cushion is also compacted by vibrocompression. It is recommended to fill it with a layer of concrete preparation 5-10 cm thick with M100 solution.
The first row is laid out from the largest stones. They are placed as close to each other as possible. It is necessary to achieve “solidity” of the stone structure - masonry mortar is needed only to connect the fragments to each other.

The next row is laid in such a way that the vertical seams overlap with stone. In installation, such a quality as intuition is very important - it is difficult to make ideal masonry from irregularly shaped stones, so selection is carried out by eye, taking into account the size of the seams, cobblestones and their shape. “Bricks” of irregular shape must be laid taking into account their rigidity so that they do not tend to fall out of the structure. The result should be a system that supports itself.
Before laying each subsequent row, first of all, stones of an optimal height of up to 30 cm are selected, which will be oriented towards during the entire process and laid out in the corners. These are "beacons".
Throughout the entire process, the verticality and horizon of the structure are monitored.
The voids of the laid row are filled with mortar, the stones are first adjusted to dry, then driven into the structure with a hammer, this is especially important when working with irregularly shaped cobblestones. But caution is important in everything.
The top row must be made as even as possible with careful selection of stones. When the process is completed, a reinforcing belt is made - approximately 5 cm thick, into which steel reinforcement with a diameter of 10-12 mm is laid in increments of 15-20 cm. That is, for a wall 30 cm wide, it is optimal to lay 2 rods at a distance of 20 cm from each other. To ensure reliability, they are tied with transverse reinforcement with a diameter of 6 mm (knitting wire). You can make the frame yourself or order a ready-made welded or knitted one.
When working with a columnar foundation, masonry is carried out in the same way; reinforcement occurs along the floor beams.
Waterproofing is laid over the reinforcing belt and subsequent construction occurs.
WITH structures made of “wild” stone or rubble, one of the most economical structures in terms of materials costs. Moreover, the same DIY rubble stone foundation It’s much easier to do than, for example, . Equipment may only be needed for excavation work.
Rubble stone is the oldest building material and is actively used in construction to this day. Rubble is used to construct artificial foundations in road construction, and you can read how to make a rubble concrete foundation in any construction reference book.
Content.
1.
2.
3.
3.1
3.2
4.
What is rubble stone
Bute, “savage”, “wild stone”, “rock” - no matter how it is called at a construction site, in most cases it is mined by quarrying, blasting or otherwise crushing rocks.
Rubble stone is rarely transported over long distances; it is mainly used near the mining site. In the estimated standards, it falls under the “local building materials” section and is cheaper than the same crushed stone.
The choice of rocks for rubble stone depends on the mining region. Both metamorphic or igneous and sedimentary rocks are used, from granites and basalts to marble or chalk.

The dimensions of the stones do not exceed 500 mm, weight 45-50 kg. The shape of the stones depends on the rock of their component, and partly the method of extraction. Lamellar stones are obtained from layered sedimentary rocks, rocks that do not have a pronounced structure also produce stones of arbitrary shape, and smooth rounded stones are mined from river beds.
Whether this type of stone is suitable as a material from which a rubble foundation can be made depends on its properties, which are studied in a construction laboratory.
Rubble foundation structures
Structurally, rubble foundations are not much different from their monolithic concrete counterparts. The foundation is made of rubble concrete, the foundation made of rubble can be either, have the same width over the entire height or be stepped. However, unlike foundations made of reinforced concrete, the structures of which can be subject to bending, rubble and rubble concrete foundations perceive exclusively compressive loads.
The problem of how to make a rubble foundation so that it is not destroyed by bending forces is solved by supplementing the rubble masonry with a reinforced concrete component.

For example, a reinforced concrete belt is placed on top of the rubble masonry. Or they make a reinforced monolithic support pad, on which they then build a rubble foundation with their own hands.
Rubble stone foundations today are a fairly rare type of foundation. Its distinctive feature, as the name suggests, is the use of bituminous stone as a filler for concrete mortar. Moreover, for a rubble stone foundation, both natural and artificial rubble can be used. A professionally made rubble foundation consists of 90% stone, which significantly affects the cost of the foundation, and therefore the cost of the entire construction.
Advantages and disadvantages of a rubble stone foundation
The advantages of rubble stone include the following factors:
- With a high base, such a foundation will have an excellent appearance, which will avoid cladding.
- Compared to strip foundations, rubble foundations are significantly less hydroscopic: natural stone practically does not absorb moisture, and, therefore, can last for many decades.
- The high compressive strength of rubble stone allows the foundation to be strong even when using not very strong grades of concrete.
- Rubble stone foundations are not attractive to moss, fungi, mold, insects or animals.
- If there is a stone quarry nearby, a rubble foundation can be very attractive from an economic point of view.
- A rubble stone foundation can easily withstand sudden temperature fluctuations, and can also withstand more severe vertical and horizontal loads than a simple strip foundation.

The disadvantages of constructing a foundation made of rubble stone include the following factors:
- The cost of natural stone is quite high, and in some cases the final cost of the foundation (including labor, concrete and reinforcement) becomes too high.
- Few specialists are engaged in creating a foundation from rubble stone, so finding workers will be very problematic.
- A foundation made of rubble stone cannot simply be “poured” from a concrete mixer, as when creating a strip foundation. The time costs will be very noticeable, and this cannot but affect the cost of constructing such a foundation.
- When creating a rubble stone foundation yourself, difficulties arise when adjusting the stones. Rubble stone does not always have a convenient shape, so it becomes necessary to select the stone or additionally process it before laying.

Tools for laying rubble stone foundations
- First of all, this is a trowel. Since laying a rubble stone foundation is more reminiscent of laying walls than pouring a foundation, a trowel (or trowel) will be almost indispensable in this matter. A trowel will help level the mortar and the internal and external walls of the foundation.
- A hammer will allow you to remove sharp corners from the rubble stone, as well as compact the masonry itself. It is necessary to hit the rubble stone with a hammer during its laying in order to ensure the tightest fit of the stone.
- A sledgehammer is also necessary; it allows you to work, trim and lay stones weighing more than 20 kilograms, when working with which a hammer would simply be ineffective.
- A shovel for mixing the solution, preferably several pieces. Since it is impossible to use ready-made concrete when creating a rubble stone foundation, the concrete solution will need to be made on site. In the absence of a concrete mixer, a shovel is the only way to get a high-quality solution.
- The construction level will allow you to check how smooth or, alas, crooked the resulting foundation is, and, accordingly, will allow you to see unevenness and flaws in time.
- A plumb line, string and tape measure will be needed when marking.

Features and nuances of a rubble foundation
The first stage of creating a rubble stone foundation is not much different from the technology for creating a conventional strip foundation. First of all, it is necessary to dig a trench with a depth no less than the depth of soil freezing. The thickness of the foundation should be 12.5-25 centimeters greater than the thickness of the planned walls - this will allow the house to be clad in the future without any problems, if necessary.
After digging the trench, the formwork is created. OSB sheets or simple plywood may be suitable for this. In some cases, a convenient solution is to use an inch board 100 or 150 millimeters wide. The correct installation should be checked with a level or construction twine.
After laying the formwork inside, it is necessary to fill the sand cushion. It is best to take sand of large fractions: it is quite cheap, and the voids between individual grains of sand will be filled in the future with “concrete milk”, which will reliably connect the bulk of the foundation with the sand cushion. Some experts, on the contrary, waterproof the sand cushion, however, the vast majority of experts come to the conclusion that this is a waste of roofing material that will still be useful.

The next stage of creating a rubble stone foundation is fundamentally different from creating a strip structure.
The largest and, preferably, flat stones are taken and placed on a sand bed. If possible, it is advisable to orient them along the foundation. The joints between individual rubble stones should be minimal, but visually distinguishable. It is necessary to achieve such an arrangement of stones in which a thick solution can flow between the individual ones, and in which the distance is minimal.
After laying the first layer, it is necessary to compact the layer as tightly as possible. It is worth pouring large or medium crushed stone into individual large cracks. Only after the surface has been thoroughly compacted is the first layer of cement-sand mortar poured.
After pouring and leveling the first layer of cement-sand mortar, it is necessary to lay the second layer of rubble stone. At the same time, it is necessary to remember that you need to try to make sure that the foundation contains as much stone as possible. At the same time, you should try to seal the outer walls of the foundation with stone as tightly as possible: the natural inability of stone to absorb moisture will allow the foundation to last long enough.

When laying, we must not forget about the need for holes for supplying communications. Diamond horizontal drilling of the foundation will be extremely labor-intensive and very expensive in the case of a rubble foundation.
In the process of laying a rubble stone foundation, it is very useful to use a concrete vibrator, which will allow you to get rid of all the voids that appear during the pouring process.
Is it necessary to reinforce a rubble stone foundation?
If the foundation is high enough, then reinforcement is simply necessary. Reinforcement with a cross section of 8-12 millimeters is suitable for this. The number of reinforcement bars that will be used to reinforce a rubble foundation directly depends on the thickness of the foundation itself. As a rule, 1 rod per 10-12 centimeters of foundation width is enough. If you have a foundation of “one and a half bricks,” that is, about 380-400 centimeters thick, then 3 bars of 10 reinforcement is enough. Individual parts of the reinforcement must be overlap welded; the thickness of the overlap must be at least 10 diameters of the reinforcement (that is, 10mm reinforcement is welded with an overlap of 10 centimeters).

Cladding of rubble foundation
The issue of lining a rubble foundation arises quite rarely. As a rule, cladding is done using artificial stone or brick. Often, the cladding of rubble stone foundations occurs indoors, and not outside, when creating residential basements, for example.
If brick cladding occurs, then for laying facing bricks you need to make your own small foundation. In this case, the masonry is carried out in half a brick, and every 3-5 next are connected to a rubble foundation. The tie can be carried out using small anchors at a distance of 1-1.5 meters every 3 rows. In this case, it is necessary to ensure that the anchors are not visible from the side from which they will be looking.
Lining a rubble foundation with artificial stone is an absurd phenomenon, but it does occur sometimes (after all, the lining looks like the foundation itself). This design is used to insulate the foundation with bitumen, but at the same time maintain its appearance. In this case, a simple cement-sand mortar is used, and installation is carried out in the same way as on any other surface.

Tricks and secrets of laying a rubble stone foundation
- Despite the fact that rubble stone practically does not absorb moisture, it is still recommended to wet it before laying it on cement mortar. This allows you to increase the adhesion of concrete to stone, and, consequently, increase the strength of the entire finished structure.
- When laying a rubble stone foundation, you must try to “bandage” the stones, so to speak. Bandaging long stones of irregular shape will increase the strength of the foundation, allowing it to adequately respond to both vertical and horizontal loads.
- When laying rubble stone on a mortar, it is necessary to press the stone into the mortar; in this case, you can use rubber mortars (“mallets”), as well as simple trowels. Craftsmen recommend embedding stones in the solution at least 50-60% of the height of the stone.
- Simple stamping is also suitable for reinforcing a rubble stone foundation. Despite the fact that such reinforcement will be more expensive and simpler, such reinforcement cannot be called sufficiently strong, therefore, if possible, it is better to carry out reinforcement with reinforcement.
- As when creating a strip foundation, when laying a rubble foundation, you must try to protect it from direct sunlight and from excessively rapid drying. Otherwise, there is a high risk that the foundation will begin to crack. Cracks will lead to depressurization of the room and the possibility of moisture and mold appearing inside the room.