Drying for vegetables with their own hands. How to make a dryer for vegetables and fruits with your own hands. Does the dryer need tiers
Drying is the oldest way to preserve fruits and vegetables. Initially, it was produced only with the help of sunlight, but now special devices are used for this purpose - solar or infrared dryers. They can be purchased at the store, or you can make your own. How to do this, we will consider further.
What is this device?
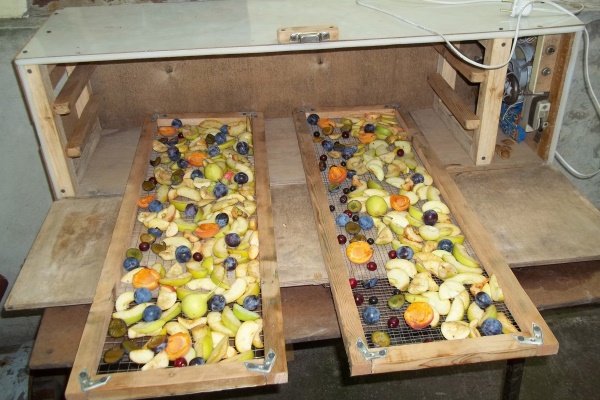
Modern dryers are presented in a wide variety, but basically they consist of several tiers of mesh boxes located one above the other. The device is closed with a lid, in the middle of which there is a hole for the exit of moist air. The pallet is equipped with the simplest electric motor. It heats the incoming air masses, which are then redirected to the working chamber and act on the ingredients.
In the blanks, metabolic processes are activated, which accelerate the process of their drying. In the process of heating, the moisture from the fruits evaporates, and their final moisture index is on average 5-8%. To prevent a sharp effect of open air flow on the fruits, it is first recommended to cut them and arrange them on trays, and after 3-4 days simply keep them in the dryer.
In general, two conditions are required for drying products:
- create a warm temperature regime at which the processes of evaporation of moisture from fruits and vegetables begin (about 40 degrees);
- create ventilation, through which moisture will be removed from the container in time.
To assemble a dryer of any type with your own hands, you must proceed from these criteria. Beginner craftsmen can start with solar appliances, while more experienced crafters can also handle the assembly of infrared dryers.
Solar beam dryer
It is the most economical option, since the design works due to the heat of sunlight and does not require any additional energy sources. You can assemble such a dryer from a wooden cabinet, which will have sectional trays for fruits and vegetables. What you need to do for this, read on.
Assembly
To assemble the solar structure, you will need wooden bars measuring 50x50 mm, but their width and length can be changed based on your own needs. It should be taken into account that the number of trays located inside will depend on the height of the structure.
You can make a wooden dryer according to the following instructions:
- Knock down the bars between themselves to get the outline of the future dryer. In general, three such circuits will be required, and one of them will be used as a door.
- Determine the angle of future shelves. Trays must be placed at an appropriate angle so that the rays warm up the workpieces well when the cabinet is located at right angles to the sun. You can determine the angle empirically, since it depends on the time of year and the territory of residence. To do this, set the frame in the sun and follow its shadow. When tilting it, it is important to determine the moment when the shadows of the two contours converge. At this time, attach the level to the side wall and mark the location of future shelves with a pencil.
- Sew up the side and back walls with plywood or lining. In addition, a thin metal sheet should be attached to the back wall, which will increase the heating of the dryer.
- Build ventilation blocks. In the upper and lower parts of the structure, from the front and back, nail plywood, in which to make round holes of 8 pieces on each side to ensure the release of wet fumes. Close the openings with a mosquito net to prevent the entry of insects.
- Paint the inside of the structure black to create a greenhouse effect in the dryer, which will speed up the drying of fruits and vegetables.
- Install shelves. For free air circulation in the structure, it is required to use mesh materials. For these purposes, it is best to use a mosquito net, which is fixed on the frame.
- Put the cabinet on long legs, which are fixed with transverse wooden beams.
- Cover the front of the frame with a transparent material through which the sun's rays can pass and affect the fruit. For these purposes, you can use transparent slate, cellular polycarbonate or glass. For even more heating, you can first place cans of drinks on the bottom of the cabinet.
- From above, close the cabinet with a roof made of plywood or metal sheets, and then make a door to tightly close the structure. So, by simple manipulations, you can assemble a solar dryer.
For better exposure to sunlight on fruits and vegetables during drying, the structure should be leaned against some surface. If there is none, you can use pipes by attaching them to the sides of the dryer.
Operating principle
The assembled dryer operates as follows:
- The rays of the sun penetrate the structure through the transparent coating and heat the rear metal sheet.
- The temperature in the container rises and exceeds 40 degrees, and therefore the fruits gradually begin to dry out.
- The moisture that comes from fruits and vegetables is vented outside through the ventilation windows, so that the food does not get moldy. So, ventilation needs to be given special attention so that cold air enters through the lower hole, heats up and exits through the upper hole, also removing moisture to the outside.
Thus, natural air circulation is carried out, and the heating and ventilating effect is simultaneous. This dryer model allows you to provide all the necessary conditions for drying fruits and vegetables.
The drying process cannot be accelerated by increasing the temperature to 50 degrees and above, since this will lead to the destruction of a large amount of vitamins and pectins in the preparations, which will ultimately reduce their nutritional value.
In the following video, the home master clearly shows how you can assemble a simple but productive dryer from wooden beams:
Infrared dryer with heating elements
This type of dryer emits infrared radiation of a certain wavelength, which is actively absorbed by the water contained in the products, but is not absorbed by the fabric of the dried blanks. So, when moisture is removed at low temperatures (40-60 degrees), vitamins and biologically active substances are preserved in fruits and vegetables. In addition, they retain their natural color and aroma even after drying.
The device using infrared heating elements has the following characteristics:
- the level of preservation of useful substances: 80-90%;
- vitamin loss rate: 5-15%;
- reduction of blanks in volume: up to 3-4 times;
- weight reduction of blanks: 4-8 times;
- storage of products after drying: up to 2 years in sealed containers.
Heating element selection
To make such a dryer, you will need an infrared heating element in the form of a flexible lavsan film. It can be purchased at the radio market. The optimal characteristics of this element are as follows:
- power consumption: 30 W;
- supply voltage: 12 V;
- infrared surface temperature: up to 65 degrees;
- operating temperature range: from -40 to 50 degrees;
- dimensions: 28x20 cm;
- weight: up to 15 g;
- warranty period: 2 years from the date of purchase;
- service life: 50 years.
Such a heating element will become the heart of an infrared dryer, which you can assemble with your own hands in several stages.
Assembly
Two lattice plastic boxes are used as the basis for the design. Their optimal length is 48 cm, and the width is 29 cm. They have a convenient initial shape and fit the dimensions of the heating elements. In addition, the boxes are made of plastic, so it is convenient to work with them.
Having prepared the heating element and two boxes, you can start assembling the dryer:
- Cut off part of the wall of one drawer, as this will keep the optimal distance from the surface of the heating element to the products inside the drawer. This distance can be from 7 to 10 cm. So, if the standard height of the sides was 11.5 cm, then after trimming it should be 7-10 cm. Also cut the corner supports of the box. The optimal length is 13.5 cm. The finished box will later be the main (lower).
- Take a second box with a side height of 18 cm. Cut off part of the wall, but do not touch the supporting corners. Install on the main drawer for a compact and lightweight structure.
- Prepare a holder for infrared heating elements. For this, you can use double-folded cardboard with a thickness of 6 mm, since it will provide greater rigidity. So, you need to cut out three cardboard partitions along the contour of the box - the top, middle and bottom.
- Take ordinary food foil and glue the partitions as follows: the lower and upper ones on one side, and the middle one on both. You can use double sided tape to attach the foil. The foil is used as a reflector as it helps direct the infrared rays generated by the heating elements onto the food.
- Attach the heating elements to the foil partitions using double-sided tape. Do it as follows: attach 2 elements to the upper and lower partitions (4 in total), and 2 elements to each side (4 in total) to the middle one. In this case, it is necessary to make all the conclusions of the heating elements in one direction, so that it is easier to connect. At this stage, the assembly of the dryer is completed, so it remains to connect.
It should be noted that there may be free areas on the partitions that could not be covered with heating elements. You should not worry about this, since there is a small spread of infrared rays, so they will heat the entire area of \u200b\u200bthe trays, that is, all workpieces will dry under such influence.
Connection
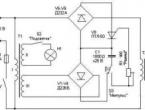
When assembling the dryer, only 8 heating elements were used. Each of them consumes 30 watts, so the total power of the device is 240 watts. In addition, it must be borne in mind that drying will require a voltage of 12 V. To ensure it, it is advisable to use a 220/12 V step-down transformer with a power of 250 W. Here are its characteristics:
- manufacturer: Feron;
- input voltage: 230 V;
- output voltage: 12V;
- power: 250 W;
- dimensions: 84x29x42 mm.
The connection stage must be given special attention, because in case of incorrect or unreliable connection, the device simply will not work, and the failure of the heating elements can lead to damage to the step-down transformer.
In order to properly perform all the work, you first need to understand the connection diagram of the heating elements. Since they must work in parallel, the two elements can be connected as follows:

In the case of a dryer, 8 heating elements will need to be connected, with each polarity connected to a transformer. Therefore, the exact circuit of a 240 W dryer will look like this:

Having dealt with the circuit, you can proceed directly to the connection of the wires to each other. In this case, it is worth using flat female-male connectors, since with their help you can make a high-quality connection without the ability to solder, only using pliers and electrical tape. In addition, with such a connection, one of the heating partitions can later be turned off so that only one drawer works. This is convenient if you want to dry a few products.
Connection work is carried out in the following order:
- Connect the ends of the wires to each other, using the above diagram, and secure with a male connector on the heating elements.
- Additionally secure with electrical tape of different colors to prevent confusion when connecting the female-male connector to the transformer. In general, duct tape will help keep moisture out of the joints.
- Make the connection on the transformer with 4 connectors for each polarity. To do this, you need to use 4 wires of different colors, which will facilitate the connection process. Care must be taken when connecting the transformer connection to the cable that will be connected to the 220 V network.
- The design is ready, so it remains only to assemble the entire system. To do this, you need to insert partitions into the frame: the top one - on the top box with the heating element down, the middle one - between the boxes, the bottom one - under the second box with the heating element up.
- Plug in the transformer.
Examination
To test a homemade dryer, you can use a thermal imager, as it will allow you to clearly see how the device works in the infrared spectrum. If the connection is made correctly, on the right you can see the operation of the 12 V heating elements. In this case, the photographs will show that they create infrared radiation over the entire surface of the dryer, which is required for drying fruits and vegetables.
With the help of a thermal imager, it will also be possible to determine how much the entire structure heats up. Normally, the cardboard reflector will heat up to 34 degrees. This will mean that the bulk of the infrared rays are directed in the right direction, that is, on the products. In the very center, the structure can heat up to 45 degrees. If you bring your hands to a running dryer, you can feel a pleasant warmth. There should not be any unpleasant odors.
In order to increase the efficiency of the design, it is possible to install a layer of foam plastic 2-3 cm thick on top and bottom of the dryer in order to direct infrared rays by more than 80-90% towards the workpieces.
Homemade dryers from improvised items
You can assemble an electric dryer from old household appliances. We will consider various options below.
air grill
It is required to perform a series of simple manipulations to turn an air grill of any modification into a dryer. The instruction looks like this:
- Remove a baking sheet from the stove, on which to spread vegetables, fruits, berries or mushrooms.
- Remove the cover with the lamp and fan from the air fryer.
- Take the high grid from the kit for the baking sheet and place it exactly in the middle of the baking sheet, while it must rest firmly on the steel, and not swing.
- Place the grill cover on the grid and connect to the outlet.
- Open the handle to block the inclusion.
- Place the baking sheet with the airfryer lid on the floor, stool or table. At the same time, it is important to monitor safety in order to prevent fire. It is worth keeping away curtains, pets and children.
- Start the convection oven according to the instructions at a low temperature, while caution is required, since the heat will be quite strong.
- Set the makeshift dryer timer to 60 minutes. At the signal, mix the workpiece, and after 20 minutes turn it on again. Continue until the product is completely dry.
Fridge
If you have an old refrigerator and don’t know where to put it, then it can be easily turned into a dryer using the following instructions:
- Remove the freezer and compressor from the refrigerator. In such devices, as a rule, a double-glazed window is used as a heater. When removing it, you must act carefully, after putting on tight clothing and rubber gloves.
- In the lower and upper parts of the refrigerator, make windows through which air flows will enter the structure, and then exit.
- Fix the door using a regular hook. If it is slightly bent and a notch is made on it, when closed, the door will fit as tightly as possible to the refrigerator, ensuring a hermetic closure of the case.
- As a bottom, install a fine-mesh metal mesh.
Grill grates
A primitive appliance can be assembled using a grill grate. Proceed in this order:
- Remove the wire handles from the grill.
- On the grid, fix the fan, which is equipped with a motor. You can get a similar element from old technology or make it yourself. If there is no fan, two 150 W incandescent lamps can be used as a replacement. It is worth considering that in the case of using lamps, drying will take a little longer.
- Install trays at the top of the box, which will be affected by the air flow from the fan.
Heating film
It is used for the installation of underfloor heating. Based on it, you can make a simple and economical dryer.
You will need the following materials:
- heating film 50x100 cm in size and 110 W;
- electrical wire with plug and switch;
- insulation kit.
Experienced craftsmen recommend using bituminous insulation, which is used for installing infrared floors. On top of this material, it is worth laying PVC insulation, which can be purchased at the points of sale of the heating film. In general, the assembly of the dryer is as follows:
- Connect the wire to the heating tape using 2 clamps, an eyelet and a terminal - rings.
- Connect the wires with a soldering iron. During the soldering process, it is worth placing a metal bar under the film to prevent it from overheating.
After connecting the wires, you can get a dryer, the temperature of which can reach 58 degrees, which is quite enough for drying products. Such a device is rolled up, so it is easy to store or transport. In cold seasons, it can also be used as a heater.
The following video offers step-by-step instructions for assembling an electric dryer from improvised means:
Each home craftsman can assemble a productive dryer for vegetables and fruits with his own hands, and for this you can use the most affordable materials and tools. There are many ways to assemble such a device, so everyone can choose the option that suits them.
In contact with
The gifts of gardens and fields are a storehouse of vitamins and microelements necessary for health. But you use fresh fruits and vegetables only in summer and autumn. For use for a long time, it is necessary to process the products so that they do not lose their useful qualities and can be stored for quite a long time. With good harvests, it becomes necessary to preserve these fruits. To do this, housewives are engaged in canning, freezing and drying. During these manipulations, many useful substances are lost. Conventional drying is a lengthy process and not always effective. Therefore, the farm also needs fruit. With your own hands, you can make this simple device, and with minimal and for a short time.
How to dry fruit
Most often, various products "weather" in the sun. The beneficial substances are preserved, but this is fraught with difficulties, since the smell attracts flies and other insects that can spoil the products. Gauze wraps, drying in a closed space without oxygen do not help to get high-quality dried fruits. Processing with chemicals can spoil the product and even make it unsafe for ingestion.
What do housewives use?
Drying cabinets, which are sold in stores, are electric and infrared. A homemade dryer for vegetables and fruits can be made by a home craftsman. With your own hands, using skill and ingenuity, it is quite possible to create the device necessary for the household.

The cost of devices in stores is quite high. But you don’t always want to spend about 6,000 rubles to buy the right product, so a home-made dryer for vegetables and fruits will come to your aid. With your own hands, in a few hours you can make a device that is no worse than a store-bought one, and the quality of the resulting dried fruits will be even better. And at a cost of this unit will be much cheaper. For manufacturing, you will need various improvised materials, tools and old appliances that gather dust in the pantry.
How does it work
An electric or infrared drying cabinet operates on the principle of removing moisture from products using a stream of warm air or special rays that penetrate 10 mm deep into the fruit. At the same time, the products change their appearance, almost without losing their qualitative composition. Some of the vitamins disappear, especially during processing, but in general, such dried fruits can be stored for a long time and consumed. Convection currents prevent the development of mold.
The action of a homemade device
Blowing food with warm air - this is how a dryer for vegetables and fruits works. You can put together a box with your own hands, place nets with laid out fruits there and direct the fan. A simple and necessary device can help in the processing of a large number of fruits, as well as meat and fish products.
The simplest design
Extraction of moisture from fruits is possible in the oven or in the Russian oven. This is the simplest dryer for vegetables and fruits. With your own hands (photo in the article), you can upgrade it and use it for drying fish and meat. The chamber is constructed without a bottom and a lid and can be of various sizes - as far as your imagination and the amount of the crop is enough. The optimal design is 60 x 80 x 40 cm.

On the inside, pallet sliders are stuffed or wires are pulled in case of hanging meat or fish. The side faces are fitted with a mosquito net. After removing flies and other insects, after closing the top panel, turn on the fan, which you have previously placed inside the frame. In such a dryer, you can quickly dry a large number of vegetables, fruits, as well as meat and fish. This camera is good because it is easily transported and can be installed in the country house, on the veranda and even on the balcony. Internal grids or grids can be rearranged closer to the fan and the drying time can be adjusted.
How to make an infrared dryer
Infra-red and fruits dry them well and quickly and in some cases can warm the room. Having bought a special thermal film, which is used for the manufacture of underfloor heating, with dimensions of 50x100 cm, an electric wire with a plug, connecting terminals and bituminous insulation, you can easily create a dryer. A big plus is that it is easy to carry and does not take up much space in the car. Vegetables and fruits with the help of such a device quickly turn into products suitable for storage.
Drying under the sun

For summer cottages, the simplest dryer for vegetables and fruits is being built. With your own hands, without electricity, with the help of a saw, hammer, scissors and a stapler, you can quickly assemble this design. Such a homemade camera is widely used by summer residents.
You build a box with dimensions in accordance with the volume of processed fruits. Make shelves from any material that should be well ventilated, and mount them at an angle after first determining the maximum amount of sunlight. Cover the side and rear walls with clapboard or plywood. The rear panel must be sheathed with a metal sheet for greater air heating. To create a greenhouse effect, paint the surface with black paint. Seal the holes for air circulation with gauze to protect against insects. Make the top panel of transparent plastic or glass.
More than 10 kg of fruits at a time can accommodate such a dryer for vegetables and fruits. With your own hands for a summer residence, you can make it from improvised materials. It works quite simply: under the influence of sunlight, the metal sheet and black surfaces are heated up to 40-50 ° C. In this mode, vitamins and minerals are subject to the least destruction. Moisture evaporates due to the presence of ventilation holes, and therefore the products do not become moldy.
An old refrigerator will help you
An old non-working refrigerator takes up a lot of space in the house, collects dust and makes household members nervous. Often it is used to store trash or unnecessary things. But he can do a good job. It makes an excellent dryer for vegetables and fruits. With your own hands, from a refrigerator that is a pity to throw away, you can build a camera that will surpass even store appliances.

There are already grooves in the refrigerator compartment, and you can fit home-made shelves under them, which can be used as grill grates (after biting off handles with pliers), office supplies for storing stationery, or home-made pallets (as far as your imagination is enough) made of wire, mesh and wooden blocks. it is better to attach to the rails with self-tapping screws, not nails, after bending it in order to prevent delamination and breakthrough.
It takes several hours to create this design. It is necessary to carefully remove the freezer, compressor and cut holes on top for forced air ventilation.
Purchase a Chinese-made electric fan heater and connect it in such a way that it can be led outside the drying chamber. Use the hole left after removing the compressor to connect the camera. At the same time, it is necessary to ensure good blowing of sheets with products. This is achieved by an appropriate distance between the walls, trays and fan - at least 20 mm.
Many users leave positive feedback about such a dryer, about the quality of dried fruits, and craftsmen are constantly improving a home-made chamber to increase its efficiency.
A do-it-yourself dryer for vegetables and fruits from standard purchased parts will be no worse than an industrial one.
Homemade drying chamber
Before you start making a dryer for vegetables and fruits, read the main requirements for drying. You can dry any fruits, vegetables and fruits that contain moisture:
- berries;
- mushrooms;
- apples;
- fish.
The principle of drying is simple and has long been known. Under the action of temperature, moisture is removed from apples, vegetables, berries and fruits. Therefore, a constant temperature of 50 to 60°C must be maintained in the dryer body while removing moisture. For juicy fruits, a one-hour drying mode at a temperature of 60 ° C and subsequent hours from 50 to 55 ° C is provided. How to make an electric dryer will consider in this article.
What are the designs of dryers
There can be many reasons for making do-it-yourself dryers of different volumes and capacities for vegetables and fruits: they are not satisfied with the performance, high price, high energy intensity, and others.
There are three options for making do-it-yourself dryers for vegetables, fish or fruits:
- electric;
- on wood;
- solar.
Other options for the execution of homemade products, such as sublimation, UHF, infrared, using vacuum, will not be considered due to the complexity of manufacturing.

Of the three options presented above, only electric can work in automatic mode.
On wood and solar require the presence of a person and adjustment can only be carried out by sliding gate valves to regulate the inflow and removal of air.
Let's consider the manufacture of a dryer with a capacity of 50 to 100 kg of wet weight of the product at home, based on the fact that the home craftsman plans to sell some of the dried products.
Energy intensity
A factory dryer with automatic processing of dried apricots consumes about 1.6 kWh of electricity per 5 kg of raw product and dries for 36 hours.
Based on the average data, the jack of all trades should take into account that a home-made dryer for processing 50 kilograms of a raw apricot type product will consume 16 kW of electricity, and 32 kW for 100 kg. By simple mathematical operations, you can find out the future costs of cooking 1 kilogram of fruit.
For domestic consumers, the maximum power consumption of 3 kW / h is provided. Accordingly, 16 kW can be taken from the line in 3 hours, and 32 kW in 6 hours of continuous operation. But for 3 or 6 hours to dry products with a high water content will not work.
Conclusions: in domestic conditions, it is not problematic to build a dryer with a capacity of more than 50 kg of dry product if there is no limitation in electricity consumption. Accordingly, if someone decides to build a dryer for 100 kg, then he will have to increase the drying time by 1.5 times. And then 100 kilograms of raw product will have to be dried for 3-4 days with an increase in electricity consumption up to 32 kW.
Do-it-yourself electric dryer for fruits and vegetables
To do this, you need to make an electric dryer case, buy a fan, a heating element, a temperature sensor (thermostat), a time relay, two chimney draft regulators.
Tips: Before you start building a dryer with a power input greater than 3 kW, ask your local power company about the maximum power they can provide you.
Fan
For our purposes, household smoke exhausters for boilers are best suited.

Smoke exhausters for domestic boilers
Their distinguishing feature is that they can pass air with temperatures up to 150 ° C through themselves without damage to the electric motor. An ordinary axial fan is not suitable for these purposes. It is not able to work at 50°C for a long time. The diameter of smoke exhausters starts from 150 mm. It is necessary to place an electric heating element with an open spiral in the pipe coming from the smoke exhauster.
Tips: you can buy a fan for snail-type boilers with a capacity of at least 50 times the volume of the drying chamber.
Electric heater for dryer
For maximum heat removal, the heating element must be with an open spiral. The power is calculated based on the allowable rated power for the house and is equal to 3 kW minus the power of the fan of the smoke exhauster and household appliances. If this rate is exceeded, then the automation will work and turn off the light in the house.

Open coil electric heater
When choosing an electric heater, consider its dimensions. It must fit in a pipe that is connected to a smoke exhauster or a fan that supplies air to the drying chamber.
Smooth thermostat
Thermoregulators with smooth temperature control from 0 to 300°C are a standard part of all household electric furnaces. It must be connected in series in an electrical circuit with heating elements and a fan. When the required temperature is reached, it will automatically turn off the heating and the fan.

Household thermostat
You can use a thermocouple from ovens.
Where to buy a thermostat? There are several purchase options:
- online store;
- the nearest workshop for the repair of household appliances.
It is quite possible to purchase a thermostat at a flea market.
Time relay
In order to fully automate a home-made dryer, you need to buy an electronic two-channel time relay with programming for a week.
There are many options for execution and programming of the time relay and everyone can choose the right one for themselves.
By connecting a fan and a heating element to the time relay, you can set up its operation empirically. To do this, you need to set the time for turning on the heating element and the fan.
Chimney draft regulator
Draft regulators are installed in stainless steel chimneys. This automatic device is a precisely fitted valve on an axle. In order for it to be always closed or open, a small load is installed on one of the sides.
Install these two valves in the inlet and outlet ports of the dryer. When the fan is off, they will close the inlet and outlet of warm air under the weight of the load.

draft regulator
The use of these valves will automate the intake and supply of air without the use of actuators and expensive controllers.
For especially advanced jacks of all trades, we recommend buying a programmable controller. This equipment is more complicated, but it allows you to automate all drying processes, connecting humidity, temperature sensors, motors, slide gates and other actuators. They are widely used for lumber drying kilns.
When building a drying compartment, use the following materials for the frame:
- wooden slats;
- chipboard;
- wood fiber boards;
- oriented strand boards;
To insulate the drying chamber, use:
- polystyrene boards;
- mineral wool;
Please note that the insulation is installed from the outside, not from the inside!

Homemade drying chamber
To fix the insulation, use:
- glue Titanium, mounting foam for polystyrene foam boards:
- plastic fungi for mineral wool.
Close the insulation with a fiberboard board or seal it with self-adhesive aluminum foil. In extreme cases, it can be plastered with plaster on a synthetic mesh. It is sold in hardware stores for insulating houses.
If there is no necessary woodworking equipment to stiffen the frame, use metal corners for window frames.

metal corners
It is better to connect a wooden frame with screws than with nails.
Please note: to calculate the cross-section of wires, there is such a rule: for 1 kW you need 0.7 mm 2 of the cross-sectional area of \u200b\u200bthe wire. Thus, for a drying chamber with a rated power of 3 kW, the cross section of the wires must be at least 2.5 mm 2.

Dried fruits
For safe operation, the metal parts of the dryer must be grounded.
When calculating the volume of the dryer, design a load per pallet of no more than 5 kg of wet product. If pallets are placed at intervals of 10 cm, then the height of the chamber for 20 pallets will be 2 meters. In this case, there may be a problem with loading at high altitude.
To combat mold and other diseases that occur in a humid and warm atmosphere, use a UV lamp.
Today, any technique can be found in the store. This also applies to the dryer for vegetables and fruits. With your own hands, however, you can also do it. At the same time, the equipment will cost much cheaper than the factory counterpart, because you will use improvised materials in your work.
In general, such a unit consists of tiers, which are mesh boxes located on top of each other. There is a cover on top, in the central part of which there are holes for the exit of moist air. The electric motor blows air, which enters the working chamber through a hole in the floor. Having studied the features of the device of the dryer for vegetables and fruits, you can make it with your own hands.
Does the dryer need tiers
There are not always so many fruits and vegetables that a lot of space is required to accommodate them. In this case, the dryer is replaced by an air grill of any modification. It is necessary to borrow a baking sheet from the stove, on which everything that needs to be dried is laid out. It can be fruits and vegetables, berries and mushrooms.
From the air grill, remove the cover with the fan and lamp. You will also need the mesh that comes with the kit. It should be installed in the central part of the baking sheet so that the element rests on the steel and does not wobble. On the grid, install the cover of the air grill and connect to the network. In this case, the handle must remain open to block the inclusion.
It is important to make sure that the dryer is located in a place where ignition cannot occur. Keep it away from children, pets and curtains. On a table, stool or floor, you can place a baking sheet with a convection oven lid. It is launched at a low temperature, while the heat will be strong enough.
The impromptu dryer timer must be set to 1 hour. On a signal, the products are mixed, and after a quarter of an hour everything should be repeated. It is necessary to act according to this scheme until everything is dry. The advantage in this case is that you don’t have to do anything with your own hands, and you don’t need to allocate extra space in the room. If you don't have an air fryer, you can get a cheap model to try out, and soon you won't be able to refuse spiced chicken breasts fried without oil.
An alternative dryer

If you need a dryer for vegetables and fruits, you can easily make it with your own hands. To do this, you can use an alternative method. You can replace the air grill with a hairdryer or a kitchen hood motor.
To begin with, the technique is set to the minimum mode. It is not recommended to use the grate as described above, since the outlet of the hair dryer is rather narrow, so the spout can be melted. The device is suspended on a rope, while it should be directed to the right place. The downside here is that such equipment does not have a timer, so the device may not withstand long work.
If there is a thermostat based on a bimetallic plate inside, then you can prevent overheating of the equipment. The plate can be borrowed from an oil heater, an iron or an electric kettle. Online stores offer thermostats for adjusting the temperature of the heating system. In the case described, this is fine. Otherwise, a do-it-yourself dryer for vegetables and fruits will fail rather quickly. After all, a fuse can blow if the motor windings overheat. Therefore, a hair dryer is not so preferred, but an acceptable solution.
Using improvised tools to make a dryer

The problem in the manufacture of the dryer rests on the fact that it is quite difficult to select the power of the spiral. Most models of dryers (their body and grids) are made of plastic. This suggests that the temperature does not rise too high. Therefore, it is necessary to first study the characteristics of the purchased model.
The average power can be 600 W, there is no timer in the unit, as well as automation. The capacity of each of the 5 tiers is 1 kg. The temperature does not rise above 70 °C. Before you make a dryer for vegetables and fruits, you must prepare the following materials:
- motor;
- nichrome spiral;
- heat resistant plates;
- steel;
- a jar of olives or tomato paste.
As for the engine, you can take the cooler by removing it from the system unit. It is recommended to take a more powerful motor. The nichrome spiral should have a resistance of 90 ohms. As for the heat-resistant plates, they must be made in the likeness of those installed in the hair dryer. To do this, some masters use a halogen lamp.
The body is recommended to be made of steel. The grid under tiers is made of food steel. No need to use a mosquito net, which was previously made of metal. Welded electronic products should not be used for racks. Copper wire with lacquer insulation will not work either. You should stock up exclusively on edible salt or edible aluminum.
When drawing a dryer for vegetables and fruits, you must indicate its dimensions. Perhaps they will be determined by the parameters of a tin of olives, pasta or other canned products. As an alternative solution, a sheet of steel can be rolled up to obtain the dryer body of the required dimensions.
You should not use soldering to connect the edges, but you can rivet. It is important to remember safety when assembling the described equipment. To do this, a temperature control mechanism is installed. A bimetallic plate from an oil heater is suitable for this. However, if you are looking for a thermostat with a handle, then this solution will be the best.
Work methodology

Performing useful homemade products in the form of a vegetable dryer, the reflector will need to be installed above the outlet in the bottom. In terms of area, the part must be larger than the channel, this ensures that the fruit does not fall on the spiral, otherwise you may encounter a fire hazard. The sidewalls should also be protected with a mesh. A bimetallic plate must be installed on the reflector. The power supply of the spiral must be carried out through an impromptu relay. The problem can only be inertia.
If the reflector is made of tin, then the bimetallic plate will constantly click. Inertia can be achieved by using 6mm steel or something similar. Between the grids for the dryer, the distance must be expressed, which is determined by the needs. Five centimeters for vegetables will be enough.
What else to consider

The CPU cooler is powered by direct current. You can use a mobile charger. In this case, the voltage will be slightly less than 12 V, which will cause a decrease in speed. The fan for the dryer is installed under the spiral. If there is no desire to communicate with direct current, then an asynchronous motor should be found, since there may be some problems with collector motors, expressed in the fact that they are very noisy.
Low noise motors are installed in refrigerators, fans and some range hoods. When choosing this site, you need to focus on hearing.
Security measures

When performing a dryer, you must also take care of safety. For this, the metal case is grounded. In addition, moisture can get inside, while the plugs will simply knock out.
Making a dryer from window frames

Another technology for making a dryer is the use of window frames. As a base, you can use cellular pallets, which are made of a metal mesh. The cell size can be 8x8 mm. Such a miracle of technology may involve the presence of 6 pallets that are mounted on rails. They can be attached to the side frames.
Using three strips of thin steel, gables should be made. On the bottom of each strip, it is necessary to make longitudinal bends that will not allow rain to penetrate inside. Such useful homemade products necessarily provide for the presence of a roof, which is made of two sheets of polycarbonate. The principle of operation of the device is to ventilate, for this you need to install a box. Through the mesh pan, air will penetrate inside, removing moisture. Through the roof, where there are gable and side slots, excess moisture will evaporate. To increase the intensity of traction, the back wall should be pasted over with a black film.
Conclusion
A mesh dryer can be a universal solution for harvesting vegetables and fruits, as well as mushrooms and berries, which can be prepared for long-term storage. You can use steel as the basis for the box, as in the first of the described options, or a window frame. The latter can still be found in some sheds. The use of improvised materials can reduce the cost of the dryer to almost zero.
If you are a supporter of a healthy diet, and even more so if you grow healthy food yourself, a vegetable and fruit dryer will be your indispensable ally. I want to offer you a variant of a home-made electric cabinet for drying fruits, vegetables, herbs, berries and mushrooms from Ilya Tretnikov.
Materials and tools:
- plywood sheets for the body
- wooden slats
- self-tapping screws
- mosquito net
- drill
- furniture stapler
- heater
- foil
- power cord with plug
- electrical tape
Preparing the main elements
1.
Wooden case for dryer
It can be an old bedside table or a wooden case knocked together on your own.

Be sure to drill a lot of holes in the "roof" or wall opposite the fan for the free exit of moisture from the products.

To avoid harmful emissions from the walls of the case when heated, it is recommended to sheathe it from the inside with foil without lamination. In addition, it is an element of additional thermal insulation.

2. Net trays
With their own hands, they are made of a wooden frame and a mosquito net. It is better to connect the frame rails with self-tapping screws, and fasten the mesh with a furniture stapler. So that the grid does not get out of alignment, its edges are wrapped several times. Stretching the mesh on a wooden frame is first in width, and then in length.

3. Rails for placing trays in the dryer
They can be from the same wooden slats 5 * 8 mm in size in profile. Their fastening to the wooden case is carried out using self-tapping screws.

Let's get down to calculations and installation
Step 1. Go without nails
For this device, nails are completely unreliable. In this case, the author of the master class is recommended to use self-tapping screws. So that the self-tapping screw does not damage the integrity of the structure, drill a hole with a smaller diameter from the diameter of the screw leg and only then screw it in.

Step 2. Decide on the design of the future dryer
Ilya Tretnikov suggests considering two types of dryer designs for vegetables and fruits. The first type - up to 13 kg when loading products, square. The second type - the design is complicated and the loading volumes of fresh products are possible up to 40 kg. This option is complemented by a pyramidal installation for fans that provide uniform air circulation. Thanks to the pyramidal shape, the air flow receives a specific direction of movement and reaches the farthest corners.
Step 3. We select fans
According to the recommendations of the author of the master class in the dryer, up to 57 cm deep, the inner working surface up to 39.5 cm high, and 41 cm wide, only one fan is enough to get high-quality products at the exit. Accordingly, a tree with a thickness of 1.7 * 1.7 cm is used, and we get the deco size - 41 * 45 cm.
Basic calculations:
Dryer total depth (57 cm) - pan length (45 cm) = space for air dispersal (12 cm). If you make a dryer for fruits and vegetables with a load of up to 13 kg, this is enough.
When building a dryer for fruits and vegetables, along with a pyramidal structure and dimensions: the width of the inner working surface is 61 cm, the height of the inner working surface is 83 cm, the depth is 42 cm, 2 fans are installed. A baking sheet measuring 41.5 * 60.5 cm.
Basic calculations:
Total dryer height (83 cm) - pan length (60.5 cm) = room to disperse air from the main body to the wall of the attachment (22.5 cm).
Step 4. Thermostat and electricity
In order not to delve deeply into physics, Ilya Tretnikov recommends simply buying a “dutik” heater, as it is popularly called, and immediately getting a set of all the necessary parts.

The main thing is the thermostat built into the fan, which is placed in the middle of the heater body. Its author is a master class and places it inside the working chamber of the future dryer. Using a conventional thermometer, Ilya manually adjusts the thermostat. To do this, it is necessary to rearrange the contacts so that the effect of the thermostat extends only to the heating element. This means that when the maximum temperature is reached, only the coil will automatically turn off, and the fan will continue to operate. When the coil cools, the thermostat will start it again. At this point, you should pay special attention, since the factory assembly of the heater involves turning off the thermostat of both the heating element and the fan. The method created by Ilya is much more economical in terms of electricity consumption.
Step 5 Installing the Coil
Step 6 Install the dryer switch
It is better to distribute the functions of the switch in this way: fan on / heating coil on and fan / off.

Step 7 Dryer Operation Indicators
Ilya uses 2 light bulbs:
- the first is an indicator of the overall operation of the device, that is, it lights up when the “on” position, does not light up when the “off” position
- the second - the indicator of positions "on" / "off" for the heating element.
Step 8 Installing Two Fans in a Pyramid Design
When creating a dryer with a pyramidal design, Tretnikov uses 2 fans, each with one heating coil. But the adjustment of the operation of both heating elements will be performed by only one thermostat. That is, it is very important to obtain as a result the simultaneous opening of the heating elements, since otherwise the drying process will become uneven. To make sure that the temperatures are uniform, it is enough to place several thermometers on different planes throughout the entire cavity of the dryer.

Step 9 Installing the Dryer
Particular attention is focused on the fact that the dryer must be raised above the surface of the support, that is, it is important not to forget to attach the legs in order to avoid overheating and, again, even distribution of heat inside.