Repair of a kitchen faucet with two handles. The tap is leaking, how to fix the faucet in the kitchen with your own hands? Video - How to install a rubber gasket
The situation when a faucet leaks in the kitchen occurs quite often in everyday life, and it is not always convenient or profitable to call a repairman. Almost all faults in plumbing can be fixed by yourself if you correctly determine the reason why the faucet is dripping, leaking or is generally faulty. And to solve this issue, let’s figure out how to fix it with your own hands.
Often malfunctions occur in the place where the water supply is regulated, sometimes the siphon under the sink leaks at the places where it is attached to the sink and where its parts are connected, and less often the pipes of the water supply system leak.
Before you begin repairing a mixer, it is useful to study the design features of their various types and restoration methods.
Modern high-tech touch faucets
The main reasons why the kitchen faucet leaks and drips
Any repair of a kitchen faucet begins with troubleshooting and the causes of their occurrence, and the following cases most often arise:
- A low-quality device is purchased. Such situations occur quite often when there is a large quantity of cheap Chinese goods on the market, and it is not guaranteed that the product from a well-known brand is not a fake. When purchasing, you should choose a product in the middle price range and pay attention to the material it is made of.
- If a kitchen faucet is dripping, the cause of the malfunction may be poor-quality installation of the device by an unqualified specialist; most often, the mixing parts are poorly connected or the gaskets are incorrectly selected and installed.
- The faucet also leaks if it was not used correctly - the handle was turned at the wrong angle or excessive force was applied when moving it.
- The main cause of leaks in the kitchen sink is wear and tear of the main parts of the mixer - gaskets, locking mechanisms (faucets) and other moving elements.
- Sometimes a situation occurs in which water from the taps flows in a thin stream or drips when you turn the handle - the reason may be that the aerator filter is clogged with sand or dirt at the spout outlet.

Single lever kitchen mixer taps
How to determine the cause of leaks?
To find out what kind of problem has already arisen and why the faucet is dripping, consider the sources of leakage in the following places:
- A leak appeared in the lower part of the faucet body attached to the sink, or valve.
- Water begins to drip or flows in a thin stream from the gander when the valve is closed.
- Moisture seeps in at the junction of the body and spout.
- Water does not flow or has low pressure when the valve handles are open.
- A leaking kitchen sink faucet has visible damage through which liquid is leaking.
- The leak is located at the bottom at the connection point with the supply hoses or pipes.
To fix problems with a leaking or dripping faucet, it is not necessary to change it; most problems can be fixed with your own hands.

Standard kitchen two-handle faucets
If the water flow becomes too weak
The main reasons for low flow when the mixer is working properly are clogging of the filter aerator, breakdown of the cartridge or shut-off valve, and abrasion of the gaskets. In the first case, unscrew the aerator filter from the spout, clean it with a brush and rinse it; to eliminate other faults, replacement of parts is necessary.
Leaking under the sink
If a kitchen faucet is leaking under the sink, the supply water hose has probably leaked due to damage or the gasket at the point where it connects to the body has worn out.
In this case, you can run to the store for a new hose or seals. The repair consists of replacing the entire hose or the rubber sealing rings on its outlet pipe at the connection point.
Leakage at spout connection point
When a kitchen faucet leaks at the junction of the spout and the body, the gaskets at the leaking base have become damaged or are severely worn out. To eliminate the problem, you should purchase new rubber gaskets and replace old worn rubber rings with a new seal.
The gander is flowing
The faucet spout may leak if its body is damaged; the main reason for such a defect is a clogged filter at its outlet, as a result of which the water pressure leads to cracks in the metal tube. If a malfunction is detected in single-lever models with a non-separable drain built into the body, you will have to completely replace the mixer with the exception of the cartridge. In a two-valve design, the gooseneck can be easily removed and replaced with a new one.
Other causes of water leaks
Sometimes the faucet starts to work poorly after some time for no particular reason, and it is not immediately clear what to do if the faucet drips. The main reason for this malfunction is the formation of limescale deposits on plumbing parts.
In this case, you need to disassemble and clean the tap, using special household chemicals to clean sanitary equipment from limescale.
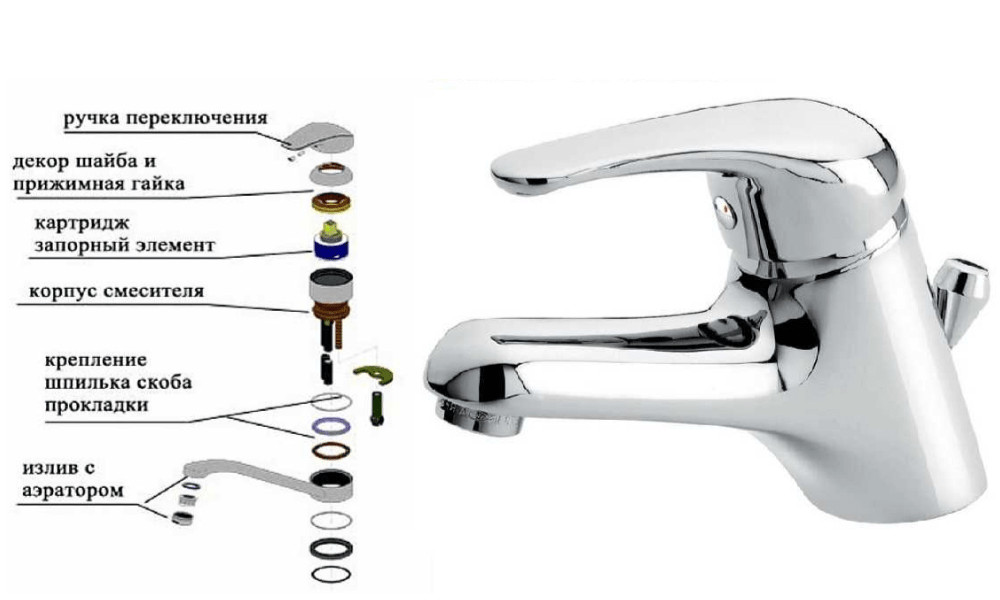
Components of a single lever tap
The design of kitchen faucets and their types
Although there is a large selection of kitchen faucets on the market, they can all be divided into three groups depending on their design features: double-valve, single-lever and touch.
The latter type is a product of modern innovative technologies; it supplies water without direct contact when hands and any objects come into the range of an infrared or ultrasonic sensor. Typically, sensor types are adjusted to a specific temperature and flow, so they are inconvenient for use in the kitchen, where constant changes in the parameters of the water stream are required.
Single lever
The operating principle of a ball-type mixer allows you to regulate the temperature and flow of water using one lever. The main elements that control the water supply are internal cartridges in the shape of a hollow ball with guide holes or cylindrical cartridges with built-in ceramic plates.
The single-lever type is designed in such a way that replacing the cartridge that most often fails does not present any particular difficulties for any owner; the disadvantages of ceramic cartridges include high sensitivity to water contaminants.
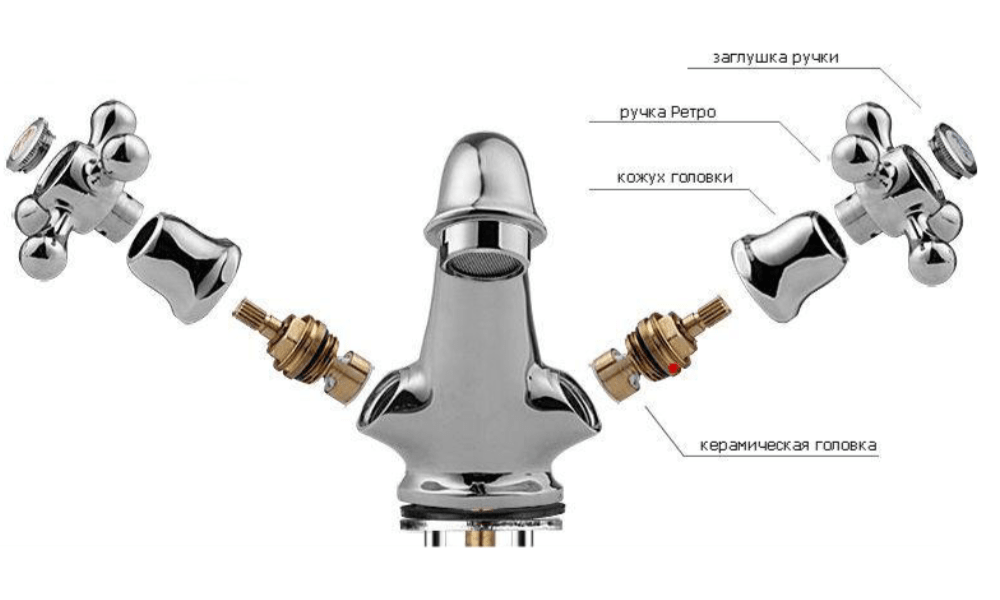
Double-valve tap - structural device
Two-valve
Valve mixers are a classic version of devices for regulating water supply; temperature settings are adjusted by turning separately located hot and cold water valves. The valve mechanism circuit may include two types of locking devices: worm-type with a rubber shut-off valve and ceramic with a ceramic sealing cylinder.
The design of a ceramic kitchen faucet differs from the worm type in that to lock and open it is enough to make a half or quarter turn.
The disadvantage of the rubber gasket is its short service life and poor performance at very high temperatures; ceramics are more wear-resistant and resistant to temperatures, but can be damaged if solid sand particles enter the water supply.

Appearance of plumbing valves and cartridges
Do-it-yourself kitchen sink faucet repair
Repairing kitchen faucets yourself is a fairly simple task if you have the right tools and minimal knowledge of plumbing equipment. The task is greatly simplified when single-lever devices break down - to restore functionality, you simply need to replace the damaged cartridge.
Required Tools
To disassemble a faucet with two handles or change the cartridge in a single-lever model, you need the following tools:
- Adjustable plumbing wrench. With its help, you can dismantle a two-valve type mixer by unscrewing the decorative trim and the nut that secures the cartridge; the wrench is the main tool of any plumber.
- Hex wrench or screwdriver. The tool is necessary when disassembling the valve to remove the handles and heads of the mixers, which can be screwed to the locking axle boxes with hex or Phillips screws.
- Sharp knife. May be needed for work on removing plugs, adjusting rubber seals, cutting flax tow or synthetic sealing tape.

Plumbing repair tools and components
Before you repair a kitchen faucet, you need to purchase the necessary parts (cartridge, rubber seal) and auxiliary sealing materials in the form of silicone grease and linen rags. It is useful to have modern, highly effective household chemicals on hand to combat limescale, which makes dismantling plumbing parts difficult.
Preparatory work
When solving the problem of how to fix a leaking faucet in the kitchen yourself, you should make the necessary preparations before performing the work. When complex repairs are coming up or you doubt your ability to cope with the task, you can make a small supply of water.
Faucet repair involves shutting off the common water supply in the apartment, so before carrying out work you should make sure that closing the common water supply valves completely eliminates leaks.
Replacing the rubber gasket
Replacing gaskets in a two-valve model is the most common DIY kitchen faucet repair. In this case, the sealing rings can be changed at the place where the spout is fixed to the body or on the locking box.
Most often, the seal wears out or is missing on the locking axle box; the main tool and components for performing the work are a wrench and a set of gaskets.
Replacing seals in a two-valve locking box
Before changing the gasket in the tap, perform the following operations:
- Remove the plastic plug and use a Phillips screwdriver to unscrew the screw securing the rotary flywheel.
- After removing the flywheel, use an adjustable wrench to unscrew the locking axle box from the mixer body; in some models, remove the decorative nut before doing this.
- Replace the worn seal on the body and axlebox shut-off valve, having first coated it with silicone grease.
Before replacing the gasket in the outflow, it is necessary to isolate the metal adjustable wrench from direct contact with the locking head to avoid damage to it. To do this, put insulating material (insulating tape, paper) under the key, and after removing the ebb, replace the old O-rings with new ones.
When changing the gasket in a mixer with a ceramic axle box, you usually purchase all rubber and ceramic seals in a standard replacement kit. The device is disassembled in the same way as the example above; replacing the gasket in the tap occurs without any particular difficulties.
The wear of the sealing rubber located between the plates of the cartridge-type housing in most cases cannot be repaired, since it is made in a non-separable design.

Do-it-yourself kitchen plumbing repair - cartridge replacement
Gander repair and replacement
Replacing the gander in a two-valve faucet occurs in the standard way; the old element is unscrewed and the new element is installed. In the single-lever version, the gander is installed in the housing, so it is impossible to remove it - you need to completely replace the mixer or repair the current drain.
Cold welding, epoxy resin and other building materials are used to seal cracks and cracks in the body of a damaged ebb.
Since the ebbs are made of metal (copper alloys, brass) that can be easily soldered, the most high-quality and effective way to restore them is soldering. Before carrying out work, remove the top layer of chrome plating with sandpaper and seal the cracks in the gander tube using a high-power soldering iron.
Replacement and repair of axlebox
Before replacing the faucet, you should purchase a similar product from a retail chain. In most cases, the body of the old part does not change; the design of the axlebox valve makes it easy to disassemble it and replace worn gaskets and ceramic parts.

Since kitchen taps are used much more often than bathroom faucets, there are more problems with them - failures, leaks and other breakdowns. In some cases, it is necessary to completely change the device. If the faucet in the kitchen sink is leaking, repairs can be carried out with the help of a mechanic or independently. Do-it-yourself repairs will require a little experience, tools and knowledge of the design.
Signs for repairs
Kitchen faucet repair is required under the following circumstances:
- there is a leak from under the nut at the spout, as well as from under the handle, valve, during switching on;
- malfunctions in the movements of the lever, for example, the inability to fix it or there is scrolling;
- weak stream with high pressure in the water supply;
- water dripping with the tap closed.
If any of the described symptoms appear, repairs must be carried out immediately in order to increase the service life of the device and prevent flooding.
Features of different types of mixers
In kitchens, it is more common and more practical to use traditional taps, with one or two levers. Common parts include the body, spout, aerator and sealing gaskets. The remaining parts are significantly different.
Double valves
This technique is classic and made very simply. Under the flywheel, which rotates when the water is turned on, there is a valve axle that performs a shut-off function. In devices where flywheels must be turned to stop and supply water, worm-type axle boxes are installed. They are based on rotating movements; the more you unscrew the valve, the more water will come out through the spout.

There are axle boxes with ceramic panels, with which you only need to make half a turn in the tap to supply water. When opened, the holes align and water flows through the spout. The cost of the axle box is low, you can always find it in a plumbing store and make a replacement.
Single lever types
A single-lever kitchen faucet is considered more fashionable and modern. With its help, pressure and temperature are regulated with only one lever. Water is mixed using a hollow ball or cartridge.

When using ball cutters, please note that they will have 3 holes. 2 inputs, where hot and cold water flows, 1 output - needed for draining into the sink. The mechanism itself rests on 2 rubber “saddles”, and by moving the lever you can set the desired water pressure and temperature. Fixation is carried out with a sealing collar and a nut for the stopper.
The main problem with seal failures is small specks and debris that are in the water pipes. To fix the problem, you need to disassemble the faucet and remove dirt.
Cartridge devices work in a similar way, but there is no ball mechanism inside. The internal design is significantly different. There are 3 holes, as in the first case, but inside the cartridge there are small ceramic disks, with the help of which the water supply can be adjusted. If such a device leaks, then the repair is almost no different from the ball type.
Causes of faucet leaks
Kitchen faucet leaks can have different types and causes. Among the main types are the following:
- the appearance of water from under the gander. A common problem if there is a two-valve faucet. The reason is the wear of the gaskets, which fail when the water is turned on frequently. To replace it, just unscrew the nut, remove the gooseneck and install a new gasket or cut it out of rubber. When reassembling, do not tighten the nut tightly so as not to damage the base, especially if it is made of silumin;

- valve leaking or inability to completely turn off the water. To solve the problem, the axle box assembly is changed;

- leak under the sink. Often the problem is hidden in the hoses that supply water to the tap or wear of the gasket at the connection points. Repair consists of the usual replacement of a hose or seal;
- poor quality faucet. The problem appears very often, especially if a Chinese faucet is purchased. The service life is only a couple of years, after which it begins to leak;
- incorrect installation or poor quality of work performed. The leakage problem is caused by improper selection of gaskets or poor connection of parts;
- incorrect use of the mixer. Problems begin when turning the handles at a different angle or increasing the force on the levers.
If the mixer does not work well after a certain period of operation, and there are no obvious reasons, then the problem is hidden in limescale deposits on the parts. To solve the problem, you need to disassemble the device and completely clean it of salts using household chemicals.

The problem of leakage often appears when installing a new faucet, although this should not happen. In this case, there is room for defects and the product must be replaced under warranty. It is strictly forbidden to repair the device, as this will not allow for a replacement.
Do-it-yourself faucet repair
Before removing the faucet and repairing it, you need to prepare the tool. To do this you will need:
- adjustable wrench or set of wrenches;
- screwdriver;
- parts for replacement, depending on the type of failure;
- lubricant in the form of WD-40 to make it easier to unscrew parts;
- pliers.
Regardless of the type of mixer, before starting work, you must turn off the water supply and drain the remaining residue from the system. After this, repairs can be carried out based on the design features of the mixer.
Single lever taps
The main principle of work is step-by-step execution of actions and accuracy. The execution steps are as follows:
- Using a small screwdriver or a knife, remove the plug on the mixer body.
- A screw will be visible in the hole that connects the lever and the adjustment rod. It is unscrewed using a hexagon.
- The lever is removed from the body, the protective casing is unscrewed, under which there is a clamping nut. It must be carefully removed with an adjustable wrench.
- For a ball device, there will be a sealing collar under the nut at the bottom; the ball is pulled out and inspected for cleanliness and deformations.
- The cartridge is removed from the cartridge tap and inspected for damage.
- The parts are replaced and everything is assembled in the reverse order.

There is no need to tighten the nuts very tightly so as not to cause deformation of the rubber bands for sealing and malfunction of the tap. For smooth running and longer service life, you can use silicone lubricant. For clarity of repairs, it is recommended to watch the video:
Double valves
The procedure for repairing faucets with 2 valves is almost the same, and how to disassemble it correctly is presented in the step-by-step guide:
- Pry off the plugs on the valve flywheel and remove them.
- Using a screwdriver, unscrew the fixing screw.
- Remove the flywheel to get to the axle box, unscrew the part counterclockwise and conduct a detailed inspection.
- The gasket of the worm gear is often damaged, so it must be replaced separately. The axle box with ceramics is replaced as an assembly.
- After completing the work, you need to reassemble the mixer in the reverse order.

In addition to a leaking faucet, there are other possible problems. For example, the degree of contamination of parts, namely the aerator, depends on the quality of tap water. Solid debris accumulates inside it, and when there is a lot of it, the pressure weakens significantly. To do this, you need to replace the part or simply remove it for cleaning.
If there is a crack in the product, then the mixer must be replaced completely. To temporarily solve the problem, you can seal the hole with sealant.
Complete replacement of the mixer
If it is impossible to repair the faucet and eliminate the leak, then you need to buy a new plumbing fixture and replace it. For this you need screwdrivers, keys and a container for water. Regardless of the faucet model, the replacement procedure is no different and looks like this:
- The first step is to remove the old faucet. To begin with, the water supply from the central system is closed, the valves on the tap are opened to completely relieve pressure and remove residues in the system.
- Open the flexible hoses from the supply pipes and drain the water in them into a bucket or basin.
- Disconnect the siphon from the sewer and, if desired, remove the sink; this will greatly simplify further work.
- Unscrew the faucet fasteners from the bottom of the sink, remove the product with hoses through the hole in the sink.
- To install new equipment, you should buy hoses and screw them to the mixer. It is important to ensure the presence of gaskets and their correct location.
- A sealing ring is placed in the faucet body to prevent water from getting under the cabinet.
- The hoses are inserted into the hole in the sink, and the mixer is fixed using a special plate. It is clamped with one bolt.
- If the sink has been removed, you need to fix it back and seal the joints with sealant.
- Connect the hoses to the pipeline, install a siphon and turn on the water supply valve.


After the work is completed, check the functionality and presence of leaks at all connections. More often it appears at the junction of the hose with the mixer or pipeline.
Prevention
Repairing a mixer may not always give good results; in some cases, a complete replacement of the device is required. Experts advise adhering to a few simple rules, with which the equipment will serve for a long time:
- If possible, install filters for rough water purification to prevent the entry of debris and other dirt from the water supply;
- if you install a filter to remove salts, the parts will be protected from lime, so you can forget about leaks and repairs for a long time;
- The highest quality and most durable faucets are considered to be brass, while low-quality faucets are made of silumin. Often, cheap faucets are produced by Chinese and Turkish manufacturers;

- single-lever designs are more modern and convenient, they are easier to repair.
- To clean the body and other parts, it is better to use cream-like substances or gels that are suitable for the metal of the mixer. Do not use brushes or alkaline cleaning products;
- to preserve chromium, all traces of detergents must be removed immediately with plain water;
- Gaskets and other parts need to be changed once every 2-3 years, possibly more often. This preventive measure is much cheaper than replacing the entire faucet;
- The valves must be opened and closed completely, but without effort.
Knowing what to do when a kitchen faucet leaks, you can replace parts or the entire faucet yourself. Often the described schemes are suitable for all appliances, including those in the bathroom. Before performing work, it is important to determine the cause of the leak, and when choosing new faucets, you should buy only high-quality products and not give preference to cheap products.
The kitchen faucet is one of the most frequently used plumbing fixtures in an apartment or house, so it is not surprising that it often fails.
In this case, a one-handed rotary faucet requires preventive repairs with replacement of components; sometimes the malfunction cannot be eliminated and the plumbing fixture has to be replaced completely.
Almost every homeowner can carry out this work at home without calling a paid plumbing specialist. To do this, you need to know how to disassemble a kitchen faucet with one handle and have a simple construction tool available.
Single lever kitchen faucet
Design of single-lever mixers
In modern kitchens, the main type of taps are one-handle types, which have practically replaced the inconvenient two-valve designs and are more practical than touch-sensitive devices.
The design of a single-lever kitchen faucet is not complicated; the main components are the body (has a drip line, seats for installation in the sink and water supply) and a built-in adjustment unit.
If a single-lever mixer fails, repair in most situations consists of simply replacing the unified switching unit or its parts.
Types of control units
The manufacturer supplies the market with single-lever models for mixing liquid with only two types of control units: ball and plate ceramic cartridges.
It can be noted that ceramic cartridges, due to their high technical characteristics and performance qualities, have practically forced ball models out of the market.
A high-quality ceramic block can regulate water supply for up to 10 years without loss of performance properties; budget Chinese crafts can fail the next day and need to be replaced much more often.

Appearance of structural elements of ceramic cartridges
Ceramic cartridges
The ceramic cartridge is a prefabricated assembly of parts installed in a plastic cylindrical body, at the top of which there is a lever on which a rotary handle is attached. There are three holes in its lower part: water flows into two of them, and from the third the mixed liquid is directed into the low tide and flows out.
The main components of the cartridge are two ceramic plates with slots that fit tightly to each other. When one of them rotates around its axis, the inlet holes through which cold and hot water enters overlap to varying degrees - thus, the temperature regime is adjusted.
If the movable plate moves along its axis, both inlet openings are simultaneously blocked - this is how the pressure is regulated.
The main advantage of equipping a kitchen faucet with a cartridge is its ease of replacement and high maintainability - its cylindrical body can be easily disassembled.

Working principle of ceramic block
Ball
Ball control units consist of one main part - a metal ball with three holes for water and a rod for installing a rotary handle. During operation, the ball rotates in a spherical housing seat that has three holes: two for water inlet and the third for the outflow of mixed liquid.
Adjusting the temperature and pressure occurs in the same way as moving the handle in ceramic models; to seal, spring-loaded rubber rings are inserted into the area of the inlet holes.
The advantage of one-arm ball valves is their simplicity of design, long service life and excellent maintainability - the metal ball itself theoretically cannot fail, so repairing a mixing device consists only of installing new gaskets.

Features of the design of ball joints
Risks during purchase and operation
To avoid risks when purchasing and operating, it is better to purchase sanitary equipment from well-established manufacturers on the market - this guarantees that it will last a long time without breakdowns or malfunctions.
Usually, upon purchase, the control unit is already installed in the plumbing fixture, and given that all of their models are unified, the right decision would be to purchase exactly such a fixture right away. This will allow you to immediately replace the old unit with a new one if the old unit breaks down, and if the situation repeats, you can assemble two faulty devices into one that works and then use the repaired one.
When operating a kitchen faucet, in most cases the water supply is made using flexible reinforced hoses, which are not always of high quality. Flooding of premises in the event of damage to water hoses can be avoided by installing an Aquastop valve at the outlet of the pipes.
It should be borne in mind that the principle of operation of the valve is to shut off the water flow at high pressure, that is, it is effective if the water hose falls off the mixing body or pipe. In other situations, if there is a leak, the apartment can be successfully flooded with Aquastop protection.
What is needed for repair
To carry out repair work, you will have to disassemble the faucet without removing it from the sink; sometimes you may need to repair the kitchen spout, which in one-handed models can be carried out without disassembly operations.
When dismantling the faucet, you have to remove the handle, unscrew the fixing nuts and hoses - this requires suitable tools, consumables and components.

Tools and supplies for plumbing repair work
Tools
To carry out repair work you will need the following tool:
- An adjustable wrench for unscrewing the nut from the mixing device body and dismantling flexible hoses.
- A socket or flat wrench for tightening and removing bolts on mounting studs.
- A Phillips screwdriver or hex wrench for removing the faucet handle.
Necessary materials
When removing the mixing body from the kitchen sink or removing underwater hoses, you often encounter difficulties associated with contamination of the dismantled parts with limescale or corrosion. Before carrying out work, it is better to treat their surface with household chemicals to remove rust and limescale - this will simplify the dismantling and further installation of the equipment.
The presence of gaskets in the underwater hoses and the mixing body eliminates the use of various types of additional seals in the form of synthetic and linen tape, rubber rings.
During repair work, it is often necessary to replace underwater hoses that have become unusable; for replacement, it is better to purchase types with stainless braiding and a union nut with fittings made of non-ferrous metals (copper, brass).

Internal structure of a single lever cartridge faucet
Cartridge faucet repair
Repairing a faucet with a built-in cartridge, depending on its malfunction, requires a different approach. If the water in the tap does not shut off well or constantly flows, in most cases the cartridge needs to be replaced. When the casing shell or ebb is damaged, you will have to remove the mixing device and purchase a new faucet with subsequent installation.
What may require repair
The main components that most often fail during operation are the adjustment unit and the spout. The control unit can be damaged as a result of long-term use with poor quality or from contaminated water with sand entering the water supply system. The main reason for its malfunction is the breakdown of the built-in plastic parts and the rod on which the handle is attached.
The ebb tide most often fails as a result of clogging of the filter nozzles at its outlet - in this case, the water pressure ruptures its thin-walled tube and a leak forms.

Spout filter repair
How to disassemble
When carrying out repair work, it is often necessary to disassemble a single-lever mixer; the process consists of the following steps:
- Using a knife or flat-head screwdriver, remove the plastic plug on the side of the handle; the fixing screw may have a head for a Phillips screwdriver or a hex key. Unscrew the mounting screw with a suitable tool; before carrying out work, it may be necessary to pre-treat it with household chemicals against limescale and rust.
- After removing the handle, unscrew the decorative nozzle. It is designed for manual removal, but during long work, water gets into the threads and the coating prevents unscrewing. To make removal easier, you can use an adjustable wrench, after placing a soft cloth under its jaws to prevent scratches on the chrome surface. When dismantling the cap, excessive force should be avoided - this can lead to deformation of the thin-walled lining.
- Under the cap there is a clamping nut with a hexagonal ring at the top - it is simply unscrewed counterclockwise with an adjustable wrench. It is easy to remove the cartridge - it is pulled out of the mounting socket using the lever using your fingers.

Disassembling a faucet with a ceramic cartridge
How to replace a cartridge
Before changing the cartridge in the mixer, the internal parts of the mixer body are cleaned of plaque and dirt using a rag and household chemicals. Replacing a cartridge with a new one is quite simple - when installing, align the body protrusions with the recesses in the installation socket.
Mistakes you can make
It often happens that after seemingly correct assembly, the cartridge does not work correctly. This happens due to the fact that the protruding rubber gasket at the bottom during installation prevents the two locking protrusions on its body from accurately falling into the mounting sockets. The faucet will have to be completely dismantled again, the block must be installed in the correct position and pressed harder by hand when tightening the clamping nut.
During installation, it is important not to overtighten the clamping nut - this can lead to a stiff movement of the joystick and compression of the housing shell, causing rapid wear of the internal parts and, in extreme cases, their cracking - if the joystick moves tightly, you should immediately loosen the clamp.

How to disassemble a ball-type kitchen faucet
Ball mixer repair
The main do-it-yourself repair of a ball mixer in the kitchen is replacing the gaskets; if there is significant damage to the drain or casing, leading to leaks, the plumbing will have to be replaced.
Before repairing a ball valve, prepare the usual tools and consumables in the form of rubber cylindrical gaskets and a dome washer. Household chemicals may be needed for the preliminary treatment of parts coated with plaque and corrosion.
Possible faults
The main malfunctions of ball types include:
- wear of the upper dome gasket;
- defects in a hollow metal ball;
- abrasion of saddle valves;
- weakening of springs.
If we repair a faucet with our own hands, then, unlike cartridge types, to accurately determine the faulty part, it requires preliminary disassembly.
Disassembling the mixer
When disassembling a single-lever ball-type mixer, perform the following operations:
- Remove the decorative trim on the handle, completely unscrew the fixing screw and remove the handle.
- Unscrew the top cap with an adjustable wrench, installing it in the outer slots.
- Remove the plastic washer with a domed rubber ring and the ball from the body, and use a screwdriver to remove the seat gaskets with springs.

How to disassemble a ball mixer - replacing seals
How to repair
Instructions for connecting the faucet can help you with self-repair; after studying it, it will be much easier to repair it.
But even in its absence, repair is not particularly difficult; the following operations are mainly performed:
- The valve seats are most often replaced. To do this, they are inserted into the housing recesses along with the springs.
- If the ball is damaged, any ball repair is ineffective - it is replaced with a new one.
- Wear of the upper dome washer occurs very rarely; if it wears out, it needs to be replaced.
To speed up the repair time without conducting a preliminary inspection of the ball valve and disassembling it, it is better to purchase a standard repair kit from a retail chain in advance.
Most owners are accustomed to solving the nuances of household repairs with their own hands, without resorting to the help of various “masters for an hour.” And it’s not just about saving money; fixing minor problems with modern plumbing is an interesting task and quite feasible even for a beginner.
But to achieve success, you need to know the principle of operation of the device and its weak points. Let's try to analyze in detail one of the problems - how to repair a ball mixer in the bathroom or kitchen.
The faucet with ball mixer has a laconic and modern look, which allows it to organically complement any kitchen or bathroom interior.
But its main advantage is comfortable use. Indeed, unlike the valve design, in order to adjust the pressure and temperature of the water flow, you do not need to turn the knobs in search of the “golden mean”, but simply set the switch in the optimal position and put it into operation with one movement of the hand.
The ball mixer is very easy to use: the water temperature is regulated by moving the lever to the right/left, and the pressure is adjusted down/up
The design of a typical ball valve consists of the following required elements:
- Control lever– a rotary handle that sets the flow force and water temperature. It is attached to the body with a screw, closed with a decorative plug, on which the designations of cold and hot water are indicated in color or letters.
- Metal cap, fixing the valve mechanism to the body.
- "Cam"– a plastic part with a shaped washer, which ensures the movement of the “ball” in a certain range. The washer itself is dome-shaped and equipped with rubber seals.
- Mixing chamber– a steel hollow “ball” fixed using a system of seat valves and springs. It has several holes: two for the entry of hot and cold water and one for the outlet of the mixed flow through the tap spout. In some designs, the “ball” is enclosed in a special protective capsule - a cartridge.
- Metal body with spout.
- Circle nut, fixing the body on the sink.
The system is activated by a lever. When it is lifted, the “ball” inside the faucet begins to rotate, and when the holes align with similar recesses in the seats, water is supplied to the spout. Depending on how complete this coincidence was, the pressure and temperature of the flow are adjusted.

The ball mixer is easy to repair - all consumables can be found on sale, but in order not to make a mistake with the size, do not throw away the failed spare part, but take it with you to the store.
Learn more about the troubles that happen with plumbing fixtures and how to eliminate them.
Problems with ball mixer
Although ball valves are considered one of the simplest and most reliable designs, from time to time they also fail due to natural wear and tear of parts or under the influence of external factors. Let's look at the most common breakdowns that can occur when using such a mixer.
It is impossible to adjust the jet temperature
If the mixing of hot and cold flow occurs chaotically, the problem lies in the failure of the ball cartridge or rubber “seats”. The cause of failure is most often a blockage in the space between the “seats” and the holes of the “ball”.
The faucet will have to be disassembled to inspect the parts for damage. If such are found, the gaskets or the entire “ball” will have to be replaced - no amount of sealant or other tricks will give a long-term effect.
Such breakdowns most often occur due to poor quality of water purification in the home water supply system. And we are talking not only about mechanical inclusions - particles of rust and other small debris. The problem may also be due to increased water hardness.
If your region is supplied with water with an excess of mineral impurities, before purchasing it would be a good idea to study the mixer's datasheet - many manufacturers specifically indicate the acceptable hardness for the smooth operation of their products.
If you do not want to regularly repair and replace plumbing, install a filtration system that will purify the water. Mechanical filters will extend the life of plumbing throughout the house
For a bathroom where water is used primarily for technical purposes, the simplest mechanical filter is quite sufficient, which will simply protect the plumbing from foreign impurities.
But for the kitchen, you can install a system that improves not only the quality, but also the composition of water, enriching it with scarce microelements. There are many options here - from simple cartridge filters to systems.
Weak water pressure at maximum opening
The reason may lie not in the mixer itself, but also in low pressure in the water supply system of the house or apartment. Therefore, before disassembling the structure, make sure that water flows from other taps with good pressure. If it is still confirmed that only one mixer is at fault, check to see if the aerator on the spout is clogged.
The water sometimes contains sand, rust particles from worn pipes or limescale, which accumulates on the mesh and interferes with the free flow. To make sure that this is the reason, remove it and turn on the water again.
To check the condition of the aerator, just unscrew the spout tip by hand or using a plumber's wrench pre-wrapped with electrical tape.
If the flow has increased to the required value, you just need to thoroughly rinse the mesh and install it in its original place. Of course, if a part breaks or rusts, it is better to replace it with a new one.
Image gallery

When replacing a spring, the diameter of the new part should be slightly smaller than the previous one - this will ensure a tighter fit to the rod
Conclusions and useful video on the topic
The process of disassembling and repairing the device can be studied more clearly in the video:
And the last piece of advice: do not save when buying a faucet, since its service life is affected not only by the quality of water and other external factors, but also by the materials from which the faucet structure itself is made.
If you choose a cheap model, most likely it will be made of silumin (an inexpensive alloy of aluminum and silicon). Although such taps look very attractive both in price and appearance, they quickly lose their original luster and fail. Therefore, for long service without accidents and regular repairs, it is worth taking a closer look at time-tested brass.
Please leave comments and ask questions in the block below. Perhaps you have already had to deal with the repair of a ball mixer and managed to successfully cope with the breakdown. Share with our readers how you managed to fix your plumbing.
How to repair a faucet in the kitchen yourself
When you buy a new faucet for your kitchen, you use it for a certain period of time without any problems. However, one day you discovered that it began to leak water, and at night water began to drip even with the tap tightly closed. Naturally, a broken faucet in the kitchen needs repair.
You can invite a plumber who will promptly repair the faucet in the kitchen, but his work will cost you approximately the cost of a new unit. Or you can do the repairs yourself by studying the proposed material and watching video tutorials on this topic on the Internet.
How to understand that a faucet needs repair
As a rule, each of us opens and closes the water in the kitchen several dozen times during the day, but almost no one counts these times. Such movements place a very heavy load on the mixer, which on average is designed for a million such movements, but with frequent opening and closing it is also prone to breakage.
The need to repair the mixer appears when the following signals occur:
- water drips from under the handle of the structure;
- water drips from the spout, even the valves or lever are closed;
- when the tap was operating, a humming sound began to appear in the pipes;
- the stream of water became thinner;
- With a single-lever mixer, the handle began to move jerkily;
- the lever is extremely difficult to fix in a certain position;
- water begins to flow even from under the spout union nut;
- if the mixer is valve type, water flows from under the flywheel.
When you detect at least one such “symptom”, you need to urgently take action so as not to provoke more serious problems with the mixer. You will learn below how to repair a faucet with your own hands in the kitchen in as much detail as possible.
Preparatory work
If you are determined to take on the task of repairing the faucet yourself, you need to first prepare for it. Preparatory activities will be as follows:

The following set of tools will be required:
When everything is ready, you can start repairing. Repair work will vary depending on the type of fault and type of faucet.
Reasons for failure of single-lever faucets

The most common type of kitchen faucet is the single lever faucet. Before you begin repairs, take a close look at it to find out why the leak occurred. Typically, the reasons may be as follows:
- damage to the body;
- worn inner gasket.
If the housing is damaged, the resulting crack can be repaired with a compound such as cold welding, but this measure will only be temporary. If the leak occurs again, the mixer will need to be replaced. And if you do not find any cracks during inspection, then you need to change the gasket.
To change it yourself, you need to remove the tap itself. Take a screwdriver and use it to lift and remove the decorative casing of the structure, if there was one on it. If it is made of fragile material, you need to be extremely careful. Next, unscrew the nuts on the body and remove the mixer. We remove the old gasket and put on a new one, then screw the fasteners and put the faucet back.
This repair is suitable for wall-mounted faucets that are connected directly to the pipes, but if they are built into the sink, then there will be much more work.
For models that are built into the sink, the ceramic or metal cartridge very often wears out. When it wears out, water constantly drips, and if measures are not taken in time, the intensity of its flow will only increase. To make repairs yourself in this case, you need to follow these steps:
- pry the cover on the lever and lift it to gain access to the fastening screw;
- unscrew the screw and remove the lever, then unscrew the fasteners on the cartridge;
- unscrew the cartridge from the thread, but do not damage it;
- change it to a new one;
- Reassemble the structure following the reverse procedure.
The old cartridge can no longer be repaired; it can only be replaced, especially since the price of the new product is not too high.
Repair of a mixer with two valves

If the faucet in the kitchen leaks too intensely, then you need to repair it yourself only after turning off the water. However, this does not happen too often, so we will consider in detail other situations, for example, how to replace the rubber gasket in a two-valve faucet in the kitchen with your own hands.
Rubber gaskets for kitchen faucets with two valves are a key consumable. They wear out and become deformed due to the following reasons and factors:
- temperature effect;
- small particles in water getting on the gasket.
To repair and replace, you will need a new gasket, as well as a screwdriver and an adjustable wrench.
The repair progress is as follows:
- turn off the water. Make sure that it is closed by opening both valves, and at the same time drain the remaining water from the pipes;
- leave the valves open to reduce the load on the internal parts of the valves;
- disassemble the valves - pry off the decorative red and blue caps on their flywheels, then use a screwdriver to unscrew the screw inside the flywheel;
- unscrew the fastening nut with an adjustable wrench;
- Unscrew the valve axle and remove the gasket. If it is fixed with special nuts, then first remove them, and after replacing, put them back;
- rinse all parts of the valves in a bucket of water to clean them from dirt and rust;
- install a new gasket and assemble the structure.
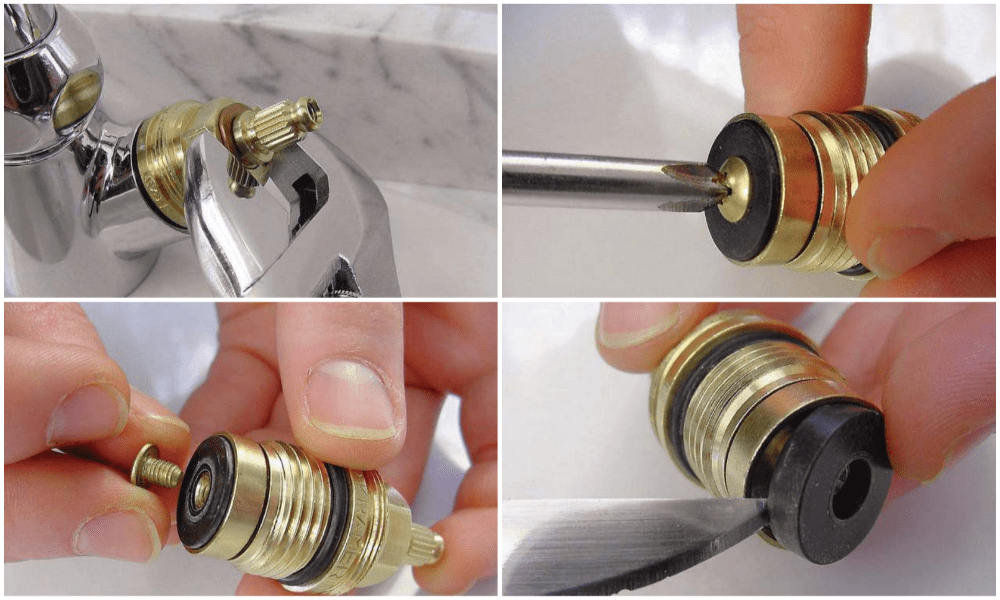
How to seal an oil seal with your own hands
Very often, a valve mixer in the kitchen becomes unusable due to a leakage of the seal, when the seal ring on the body of the faucet axle wears out. To check this and understand what type of repair is suitable, disassemble the valve as indicated above, remove the valve axle and examine the seal. If there are even minor abrasions or burrs on it, then the stuffing box ring needs to be replaced. It is sold in any hardware store or market. To purchase the desired model, take with you a crane axle box and an old oil seal. Very often, one or another model is suitable exclusively for a specific mixer.
When installing the ring into the groove, make sure it is seated correctly. Tighten the faucet and flywheel, and then turn the water supply valve and open it. See if the water is flowing now. If there are no leaks, then the repair was done correctly.
How to repair a ball mixer in the kitchen
The ball-type design is the most advanced in terms of operation and internal structure. You can adjust the temperature and water pressure with just the movement of one lever. This design includes a hollow stainless steel ball with three holes:
- one hole for cold water;
- the second is for hot;
- the third is for the release of mixed water into the spout.
The ball glides using fluorinated rubber seats. All structural elements are contained in a cartridge sleeve, which is located in the mixer.
Such a faucet may need repair due to the usual speck or rust particles that get into the hole between the seats and the ball. In such cases, it needs to be urgently repaired. To save yourself from repairs, it is better to install special cleaning filters on pipes with hot and cold water.
Also, a ball mixer in the kitchen can break due to wear of the gaskets and seats.
What you need for DIY repairs
Repair of a ball unit includes the use of the following working tools, some of which are included with the product:

Now you need to properly disassemble the tap itself:
- unscrew the special screw in the lever using a hexagon and remove the handle;
- using pipe pliers, unscrew the cap, then remove first it, then the cam, then its washer and the ball itself;
- take a flathead screwdriver and pull the seats out of the holes along with the springs;
- To remove the spout, turn it up so that you can remove the seals and lubricate them or replace them.
- Of course, before starting repairs, turn off the water in the riser so as not to have unnecessary problems and not flood the kitchen with water.
Useful tips for repairing kitchen faucets
Every time you undertake one or another plumbing repair with your own hands, you are exposed to unpleasant consequences that may arise due to ignorance of certain nuances of the work. Experienced specialists share with you the following useful tips that will save you from consequences and save time:
- buy all components for repairs in advance;
- Carry out repair work only during the day when stores are open. This way you can always run out and buy the necessary parts or tools;
- if you unscrew nickel-plated or chrome-plated elements, wrap the tools to prevent the surface from being scratched;
- When removing the cap on the ball mixer, be careful as it may be pressed tightly against the body due to salt deposits. Make sure that the flexible leads at the bottom of the structure do not come off.
So, we have introduced you to the types of malfunctions of certain mixers, which you can get rid of through DIY repairs. In addition, you received basic knowledge of how to replace damaged parts of a structure with new ones and what tools to use for this.
If you do everything correctly, your kitchen taps will not leak, and everything will work like clockwork.
Donskikh Vladimir Alexandrovich
How to repair a single lever kitchen faucet with your own hands
One of the main and frequently used devices will, of course, be a kitchen faucet. And due to its need, it also becomes unusable. And today I will tell you how to repair a faucet in the kitchen with your own hands. There are a lot of videos on similar topics on the Internet, but in this article everything will be described in more detail. Recently, housewives are increasingly choosing a lever mechanism rather than a conventional one. Such faucets are usually durable, due to the absence of rubbing parts, and their stylish appearance, smooth lines and a variety of colors do not make things worse.
Single lever mixers come in 2 types:
The operating principle and design of a single-lever mixer with ceramic cartridges is shown in the photo. 
The central part, which is located between the lever and the tube, is called the mixer body; the most important part is hidden in it - the cartridge, which is responsible for mixing water and is often the main source of problems. The mixer handle is installed on the body. At the faucet mounting point there is a swivel spout; its water resistance and mobility are ensured by a variety of rings. There is an aerator at the end of the faucet, but we'll get to that later.
There are also ball mixers. Their device looks something like this: 
They also have a “body”, but inside they have a ball, which is actually responsible for regulating the water. Under the handle, which is secured with a screw, there is a metal cap that holds the entire valve mechanism inside. There is also a shaped washer inside, which serves as a regulator of the angle of rotation of the lever, and it fits tightly to the ball itself. The bottom is not much different from the previous faucet.
Types of fastening:


Many craftsmen advise removing the entire sink, which will make working with the faucet easier, and at the same time it will be possible to update the sealant. If you are still planning a major overhaul of the mixer, then you should purchase a set of flexible metal braided hoses, just be sure to check the length. You can also try rigid liner made from metal-plastic pipes. On the one hand, you will need to buy special adapters 
. but on the other hand, this method of eyeliner will last a very, very long time.
Before starting any work, do not forget to turn off the cold and hot water, and open the tap to reduce the pressure, and of course, drain all liquids. If you disconnect the pipes, use a bucket to drain the remaining water. Repairing a single lever faucet is a very neat job.
What symptoms will tell you that the problem is in the mixer:

You screw the adapter to the pipe, and only then put the hose on the adapter itself. As an option, remove the sealing gasket between the faucet and the sink.

If the lever is functioning normally, but there is water near the faucet, then try looking for cracks. If you do notice something, change the mixer immediately; there is no way to help it.
Step-by-step instructions for repair:


If you have the same problem, but in a ball mixer, then you need to do this:
As a result, repairing a kitchen faucet with your own hands is not such a difficult task. In principle, it will take you one day to go through the entire sink. But there's no need to rush. Everything needs to be done as carefully and carefully as possible. But the easy and understandable design of this mixer corresponds to the ease of its repair.
How to fix a faucet in the kitchen: we fix leaks and other faucet malfunctions with our own hands
In the kitchen, the faucet is used much more actively than in the bathroom, so it breaks down much more often. In rare cases, the only solution to the problem that has arisen is to buy a new device and invite a plumber; in other cases, you can handle it yourself. By deciding to repair a kitchen faucet yourself, you will save on the services of a specialist and gain important experience. You just need to arm yourself with theory and tools.
Your kitchen faucet needs repair if you experience the following “symptoms”:
- Leakage from under the nut at the water outlet, from under the handle (lever) or mixer valves in working condition.
- The correct movement of the lever or valves is disrupted (they stick, turn, do not lock in the desired position, etc.).
- At normal water pressure in the system, the jet is not powerful enough.
- Water drips from a closed tap.
Please note: the detected problem must be resolved as quickly as possible! This will extend the service life of the mixer and protect yourself and your neighbors from flooding, saving money, time and nerves.

The problem that raises the most questions is a leaking faucet. And here you need to know the “enemy” not only by sight, but also from the inside. We are talking about the design of mixers.
Such delights as thermostatic and touchless faucets are good for bathrooms. In the kitchen, more practical models - traditional two-valve and single-lever - are fighting for a place in the sun. The common elements for them are: body, spout (spout), aerator, sealing gaskets. Otherwise they differ significantly.
Faucets with two valves that are familiar to the eye are designed quite simply. Under the flywheel, which you turn when operating the structure, there is a crane-axlebox - its locking element. Below is the design of such a kitchen faucet in pictures.

Axleboxes in a two-valve mixer (sectional view)
In products where several revolutions of the flywheel are required to supply or shut off water, worm axle boxes are installed. Their work is based on rotational-translational movements. The more you unscrew the valve, the further the axle box gasket will move away from the so-called “saddle”. The consequence of this is the flow of water into the internal cavity of the mixer, and then into its spout (spout).

Worm worm valve axle box for mixer
In models where it is enough to make only half a revolution to supply water, axle boxes with ceramic plates are installed. When you open the tap, the holes in them coincide and water flows into the spout.

Crane axle boxes with ceramic plates
The cost of faucet axle boxes is low, they are always available in plumbing stores, and their replacement is extremely simple.
More modern and practical are models of faucets with one handle (lever) that regulates pressure and temperature. Mixing water in them is carried out in a hollow ball with three holes or in a special cartridge.
The mixing element in ball models has three openings, two of which are inlets - designed to supply hot and cold water to this miniature container, and one outlet - for supplying water at a given temperature to the sink.

Ball mixer device
The ball itself is located on two rubber “saddles”. Its displacement relative to them, carried out when the lever moves, allows you to regulate the pressure and temperature of the water being poured out. The ball is secured at the top with a sealing collar and a lock nut.

Schematic structure of a ball model of a kitchen faucet
The operating principle of a mixer with a cartridge that replaces a ball is similar. At the same time, their internal structure is fundamentally different. There are still the same three functional holes, but inside the cartridge there is not a cavity, but special metal-ceramic disks. Due to their displacement relative to each other and the degree of overlap of the supply holes, when turning the lever, the water supply is adjusted.

Replaceable ceramic cartridges
To repair a kitchen faucet you will need:
- knife with a sharp end;
- hex and adjustable wrench;
- screwdrivers;
- a new cartridge, valve axle, rubber gasket, etc. - depends on which part you will change;
- WD40 is a technical aerosol that is useful if parts are “stuck” to each other. However, you can get by with the traditional tapping of a hammer on a screwdriver, but there is a high risk of damaging the mixer.
Regardless of which faucet you have installed, before starting repairs, you must turn off the water supply to the system and drain its remaining water into a sink or a separate container. To do this, just open the tap. Then you can begin to repair it, taking into account the design features.

To repair a single-lever faucet, you will need a hex wrench.
The main principles of repair are sequence of actions and accuracy.

Removing the decorative casing
It is important! Do not tighten the nuts too tightly, as this may lead to deformation of the rubber seals and disruption of the normal operation of the mixer.

Installing a new cartridge
To extend the service life of the product and ensure smooth running of its rubbing parts, you can use a special silicone lubricant.

Removing the mixer handwheel
What to do if your two-valve faucet is dripping in your kitchen? Almost everything is the same.
- On the valve flywheel, pry up and remove the decorative plug.
- Using a screwdriver, unscrew the screw that secures the flywheel.
- Remove the flywheel. There will be a crane box in front of you.
- Unscrew it counterclockwise and inspect it.

- If it is a worm-type axlebox and its gasket is damaged, replace it separately - buy it in a store (costs pennies) or cut it yourself from rubber of a suitable thickness. The axle box with ceramic discs is replaced entirely.
- Reassemble the faucet in reverse order.

General scheme of mixer repair work
Everything is as simple as possible and slightly reminiscent of a construction set. But a leaking faucet is not the only problem you may encounter while using it in the kitchen.
The quality of water in many cities leaves much to be desired, so over time the aerator in the tap can become dirty. On the inside, hard deposits “grow” on it. When there are too many of them, the pressure and quality of the water deteriorate significantly. The solution to the problem is to replace the aerator. Ideally, it can be easily unscrewed with an adjustable wrench, but for stuck parts you will need WD40 or tapping with a hammer.
It is important! Carry out all work carefully, otherwise the mixer will have to be replaced completely.
The faucet is leaking, and during the inspection you found a crack in it? Then it's time to go for a new product. For a short time, silicone sealant can be an assistant.
You can extend the life of the faucet if you install a water filter and use the device carefully, without tightening the valves too tightly or moving the lever suddenly and all the way.
Now you know what to do if your kitchen faucet is dripping. In most cases, the repair schemes discussed are also suitable for eliminating breakdowns of faucets in bathrooms. This is a good saving for the family budget. But if you are not confident in your abilities or you simply don’t have time, a competent plumber will complete all the work in a matter of minutes.