Sizes of arbors: we choose the optimal building for a different number of people. DIY wooden gazebo dimensions Do-it-yourself summer gazebos made of wood drawings
Good day to all!
Today we will talk about how to build a gazebo at your dacha yourself. On the garden plot, it is one of the important elements of a comfortable stay, at least for most gardeners. Agree, because you not only come to your site to work properly, but also to relax. And what rest can be compared with outdoor recreation in a beautifully arranged gazebo.
If we compare the designs of gazebos in general terms, they can be divided into categories such as open (structure without walls, only a roof, used in the warm season), closed (can be compared with a small house) and portable (these gazebos can be assembled, disassembled and put it anywhere).
As for the materials and dimensions of the structure, this largely depends on your capabilities, tastes and preferences. The easiest. Below is a diagram of a simple gazebo that you can easily build yourself.

The choice of the type of gazebo, closed or open depends on how you plan to use it. If you need a year-round gazebo, then undoubtedly only a closed one will do. And if you are in the country only during the planting and assembly seasons. That open gazebo is enough for you. It will take much less materials, and there will also be little cost in terms of money and time.
As for the roofing material, here, no matter what kind of gazebo you have. Slate, corrugated board, flexible tiles, cellular or monolithic polycarbonate are best suited.
At the beginning, we will see how to make a simple open gazebo from different types of materials.
The first step is to draw up a sketch and drawings of your gazebo, given the size of the site. Then, according to the drawings, the required amount of the desired material is acquired. By the way, you make a drawing for the material from which you will build.

You also add to the sketch whether you will have a brazier with a barbecue or an oven.

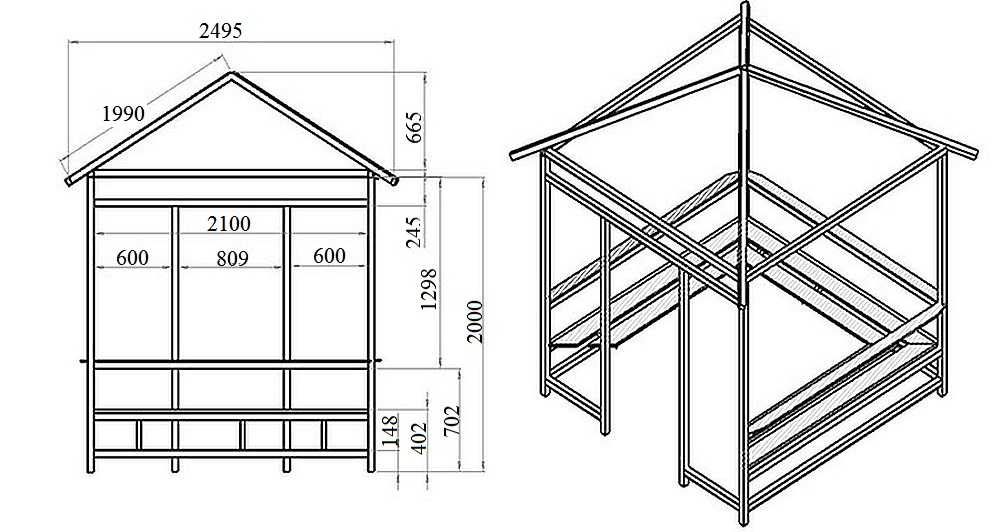
If you don’t care about some particularly “cool” design, then it’s best to make the gazebo rectangular. It will be much easier to build it than a polygonal one, and you will have to do much less markup. A drawing of the foundation is made separately. Where you specify the dimensions of the posts, their height and the depth to which they will dig.
In the drawing of the roof, it will be necessary to indicate the rafter system, the fastening of the upper trim, the lower support for the rafters and the step between the rafters.

For the convenience of work, attach to your project a detailed installation diagram of technical units, indicating the options for their fastening to each other..
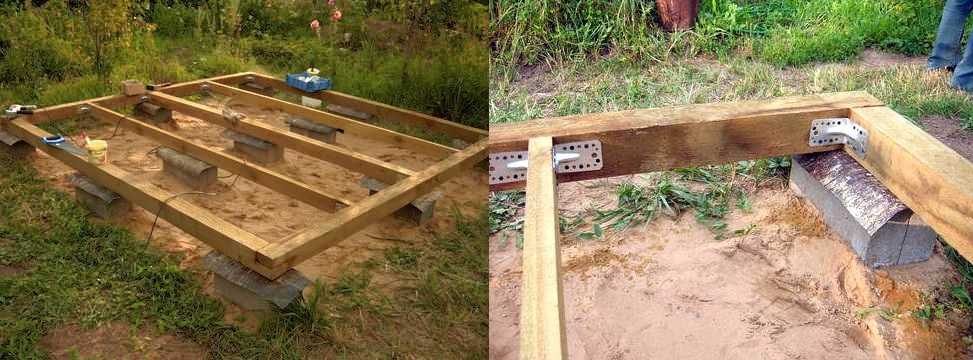
Work begins with the installation of the foundation. For a gazebo, a hole up to 80 cm deep is enough.
We spread a layer of sand on the bottom, after which the supports are set and concreted. At the same time, one must not forget to check the level of their evenness, their distance from each other and the level in height.

After that, the lower harness is made and the floor from the log is equipped. For this, wooden bars are used. After the floor frame is made, you can lay out the flooring from the boards. Next, the upper trim is made and the roof frame is assembled. Then it is sheathed with a board and covered with roofing material.

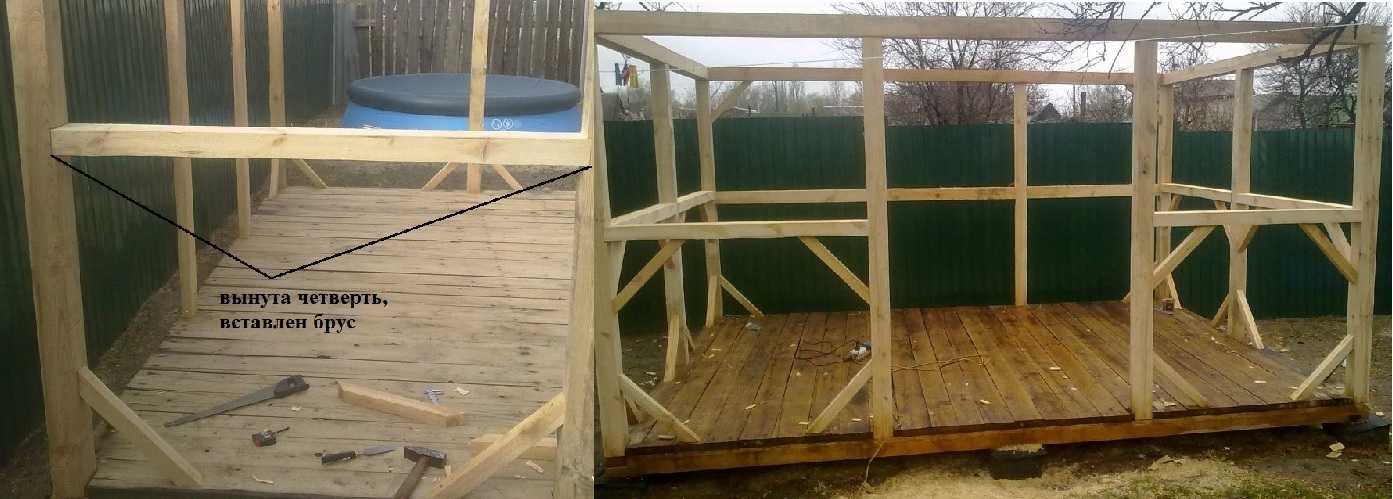
The design is ready and you can proceed to its fence. First, we put horizontal bars, which will play the role of a railing. Then we put vertical racks. If you decide to make a fence in the form of a wooden lattice, then first you make a frame from a bar, and then you stuff the lattice itself inside it.
 Below is a diagram of the assembly of a gable gazebo.

And here is a diagram of the foundation:
 This diagram shows how to equip the roof:
 Can make a simple gazebo not only from wood but also from metal. For this purpose, you can use both aluminum and simple iron. All connections are made by welding.


If you decide to make an open gazebo with a barbecue, then you also make a sketch where you need to indicate where you will put it on your site. This is necessary in order to subsequently correctly bring water to the gazebo, and if there is gas, then it.

Such gazebos usually replace summer kitchens, so its construction must be approached with more care.
When making a drawing of a gazebo, it is necessary to reflect not only the dimensions of the future summer cottage building, but also the location of a fireplace or barbecue in it. Additionally, a diagram of the foundation and chimney is drawn. In addition, the project includes the brazier itself, the shape of the brazier, the number of firing points and laying the stone in rows.

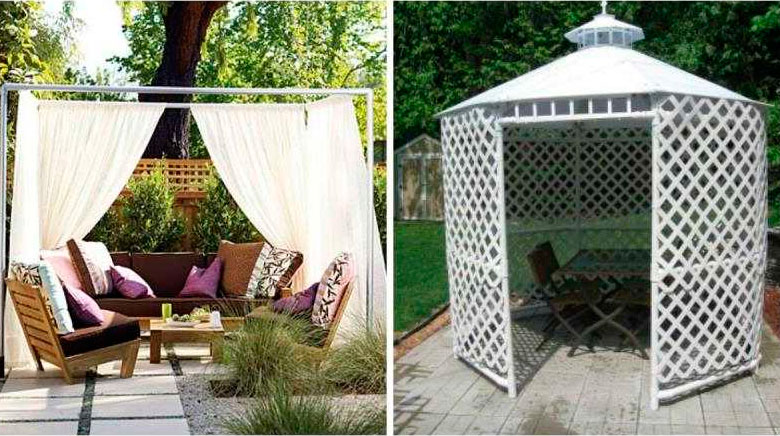
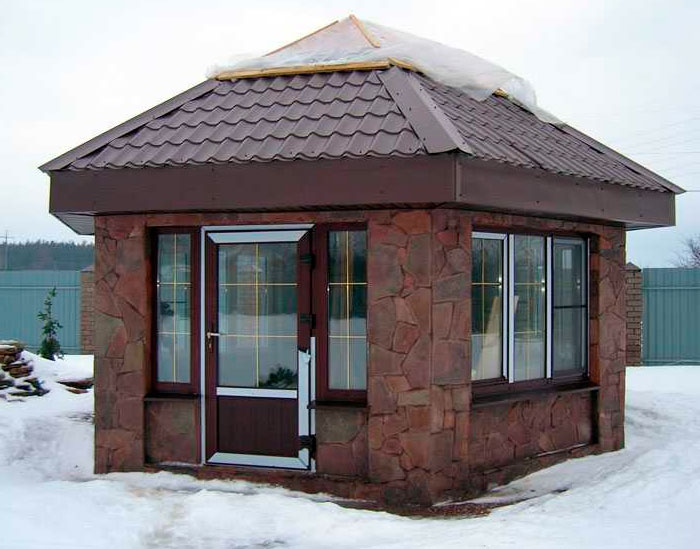
Pergolas glazed (closed) for summer cottages and houses with barbecue inside
Most often, gazebos with barbecue facilities are closed. It will already be a full-fledged not only summer, but also winter kitchen. Structures are of different types: with windows, and fully glazed to the floor.


The material for the construction of arbors is both wood and brick. But the main element is glass. At the same time, there are three types of glazing: cold, warm and triplex. Cold glazing is the simplest way, when the glass is only inserted and no insulation is made. At the same time, the temperature inside will be ten degrees higher than outside. With warm glazing, good thermal insulation is made. And walls made of timber or brick will protect well from the cold. The method of frameless structural glazing is called triplex.

As for the glass itself, for glazing, you can use both plain glass and double-glazed windows or stained glass windows made of tempered glass.

In order to better navigate the choice of glazing, the table below shows the characteristics of several types of glazing.

As mentioned earlier, before you start building a gazebo, you need to choose the right place for it.

You can install it wherever you like. However, it is better to adhere to the rule that it is better not to put it next to a bathhouse, a compost pit, a toilet, a pond, a well, and of course, at the neighbors' fence.

In shape, in addition to standard rectangular arbors, you can build it in a round or oval shape:

In order to glaze the structure, several steps are required.

The first step is to apply a layer of sealant. When the sealant dries, it will be possible to insert either finished frames or glass into the appropriate grooves. After that, all joints are processed and re-coated with sealant.
A closed gazebo for a summer residence with a barbecue and a turnkey barbecue - do-it-yourself (project and drawing)
Closed gazebos with barbecue and barbecue look much more profitable and cozy than open ones. In addition, you can comfortably stay in it if it suddenly gets colder.
There are a lot of different options for creating such structures. It can be made of brick or timber and glazed, or you can make the part where the barbecue is located from stone, and the living room from wood.


When compiling a project, it is necessary to take into account all the nuances. In order not to be mistaken with the quantity and size of the required material, all this must be indicated in the project. In addition, do not forget to draw up a separate project for the barbecue and barbecue, as it will have to be built more carefully.

It is also necessary to take into account the fact how the smoke will come out. Since harmful gases are released during combustion, good and reliable ventilation will be needed.
In addition to stand-alone structures, of interest are gazebos attached to the house. What they are good for is saving space and creating additional house territory. You can get into such a gazebo immediately from the house, and not go to it through the entire site.


Such an extension is being built to almost any wall of the house, the main thing is that this wall is in good condition, without chips and cracks. A good option is if there is a window on this wall through which you can serve the necessary things.
Gazebo with summer kitchen
This type of gazebo is most often combined and consists of two zones. The first zone is the kitchen, where the barbecue grill is located. Since cooking here is associated with fire, it is best to make this area out of bricks. The second area is the living room. Here you relax, communicate, etc. This zone is best made of wood.


As you can see, there are a lot of options. As they say, how many people, so many views. Therefore, the choice is always yours.
And at the end, watch a short video on how to make a wooden garden gazebo.
Good luck with your building!
Arbor drawings, as well as its sketches and 3D models, must be included in the project without fail. When developing these schemes, plans and drawings, it is necessary to observe the proportions of structural elements, as well as indicate their exact dimensions. In this case, during the construction of the building, there will be no problems that could lead to additional time and financial costs.
What are the rules for drawing up drawings and sketches of arbors, and how should they be drawn? This is our article.
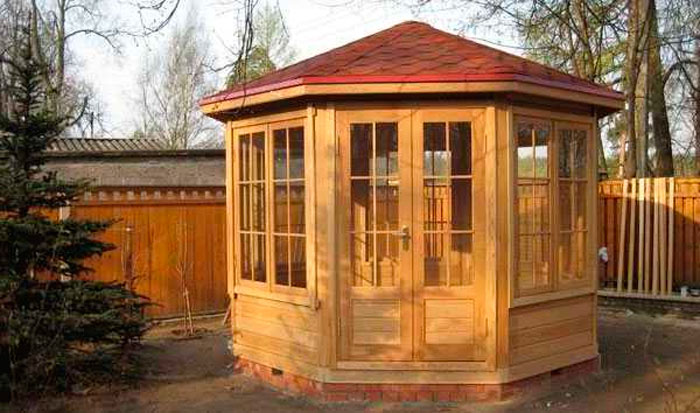
Pergolas with 8 sides


General drawing rules
Drawing up drawings of a gazebo for a summer residence will allow you to accurately plan the location of various kinds of important structural elements - lamps, doors, windows, possibly or. In addition, accurate diagrams and sketches will help determine the amount of building materials needed.

How do-it-yourself gazebos are made (drawing, photo)
There are rules for drawing up drawings with your own hands, which should be followed:
- First of all, you need to measure the place on the site allotted for. The dimensions of the structure in the drawing should not exceed its area.
- Next, a sketch is drawn.

A sketch of a wooden building or its 3D model clearly shows how it will look in the end
- Then they draw the frontal and profile projections of the building with the indication of the dimensions. For complex structures with barbecues or massive furniture, a plan (projection from above) will also need to be attached to the set of drawings.
- Next, a foundation diagram is drawn separately, which can be.

Scheme of a columnar foundation
- After that, walls and large elements are drawn (brazier, table, etc.). At the same stage, the locations of windows and doors should be noted.
- Then, on the finished drawing, the dimensions of all elements of the frame and skin are noted.

Drawing of the frame of the summer building with the indicated dimensions
- At the next stage, a roof diagram is drawn up with dimensions and angles applied.
- The locations of the fixtures and the wiring diagram are marked.
- If necessary, a brazier with a foundation and a chimney (oven, barbecue) is drawn.
- Next, you will need to “arrange” the furniture on the plan.

The plan should include, among other things, furniture
Important: In the event that it is planned to build a closed structure, it is imperative to indicate the location of all ventilation openings.Examples of drawings with explanations
Wooden structure for recreation
Structures on a cobbled frame are currently the most popular. It is not at all difficult to draw up a drawing of such a structure as a rectangular one.

A small garden gazebo on a frame made of timber, designed for family holidays
First, we draw a drawing of the structure in two projections, indicating the dimensions.

Do-it-yourself simple rectangular summerhouses. Frontal and profile drawings
Important: The project must also include small detailed diagrams indicating the methods of fastening and the dimensions of the elements in the joints.
Scheme of connection nodes of various structural elements
Next - according to the rules - we draw the foundation. Of course, you first need to decide what it will be. On weak or unstable soils, it is better to build a pile grillage, on soils with good bearing capacity - tape.

Detailed drawing of the columnar foundation of the gazebo

Do-it-yourself drawings of a garden gazebo. Frame railing diagram
At the next stage, we draw a diagram of the truss system. You should start with the development of a drawing of the upper harness and Mauerlat.

Layout of the elements of the upper trim and Mauerlats of the building

Drawing of the truss system of a gable roof, indicating the width of the step between the rafters and their length
The drawings must also be accompanied by a table of the specification of elements indicating the types of building materials required for the construction of one or another part of the gazebo, their size and quantity.

Table listing design details
After all the drawings are ready, you can go to the building materials store and buy everything you need.
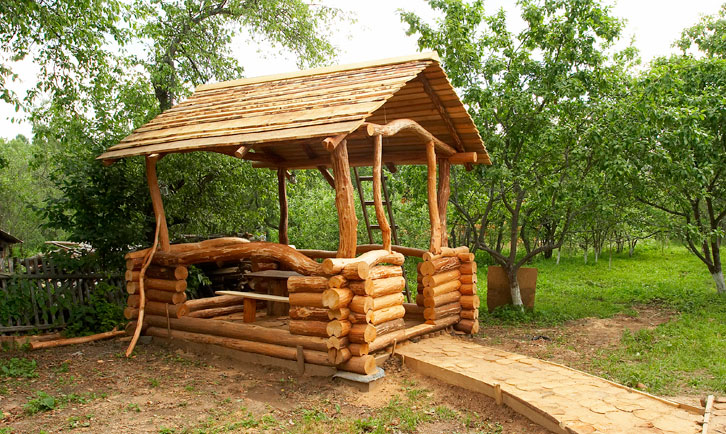
Advice: Buy materials with at least a small margin. Some elements may be damaged during the construction process. And from the purchase of defective goods in our country, no one is insured.Barbecue log structure
In the yards of large residential buildings, chopped ones are often erected. At the same time, or are usually installed inside them. Below we present to your attention the project of such a convenient and solid building.

Drawing of a wooden gazebo equipped with a barbecue
For such a rather complex design, it is better to additionally draw up a plan.

Scheme of the first crown of the building with a barbecue and its general view
Drawings of gazebos with barbecue
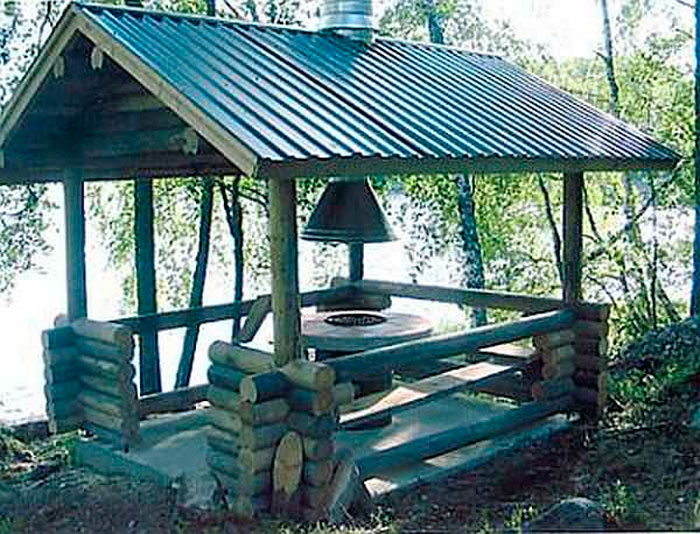
A more complex building is. Such options for courtyard structures are also quite popular. On the grill, very tasty kebabs are obtained, since its solid brick walls are able to retain heat for a long time. The plan of the gazebo for giving with barbecue:

Plan of a gazebo with barbecue
Important: In the set of drawings of a gazebo with a barbecue, it is imperative to include a diagram of the foundation of this design, as well as a chimney.
Scheme of the foundation of the gazebo with barbecue
In some cases, it can be installed in the middle of the structure. same - the design is heavy, massive and overall. Therefore, they always put it against a wall or in a corner. Another original design of a gazebo with a barbecue:

Sketch of the construction of the original performance with barbecue
And diagrams for it:

Arbor schemes with barbecue
The set of drawings of a structure with a brazier must necessarily include a drawing of the brazier itself.

Drawing of a brazier for a gazebo with an indication of the dimensions of all elements
In addition, the project must be attached and order. The same goes for fireplaces.

Arrangement of the brazier of the gazebo
Gazebo kitchen
Designs that combine a gazebo and a kitchen are considered very convenient. In such a building, you can not only have a good time, enjoying the closeness to nature, but also arrange lunches and dinners.

Plan of a gazebo for a summer residence, equipped with a sink, barbecue, dostarkhan, stove, table and benches
In the video below you can see the original design of the gazebo complex - a summer kitchen made of brick and wood.
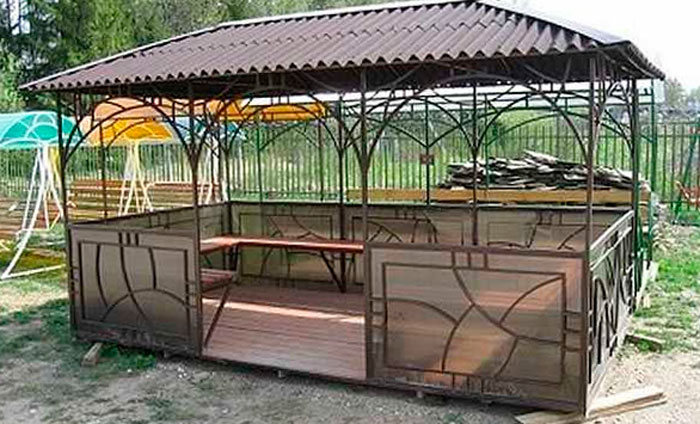
Metal constructions
Of course, not only wooden gazebos (the drawings of which are presented above) are being erected in summer cottages, but also structures made of other materials. A very popular option are, for example,. Of course, it is also necessary to draw drawings before their construction. It is as easy to make diagrams of a gazebo from a profile pipe as it is a wooden one. Structurally, they are usually even simpler and it is not necessary to draw complex drawings for them.

What can be a drawing of a gazebo made of metal. Photo of the simplest design 3x4m with diagrams showing the main dimensions
Very often, multifaceted gazebos made of metal are installed in summer cottages. The design of 6 coal buildings is a little more complicated than that of a simple rectangular one. But such structures are also being built quite quickly and simply.

How do-it-yourself hexagonal gazebos are built. The drawings of these structures are drawn quite simply.
Quite simple to assemble is such a design as an octagonal gazebo made of metal, wood or polycarbonate.

Drawing of an arbor 8-faced, indicating the dimensions of the frame and roof
Sketches of a large brick garden gazebo
Pavilions with cathedral stove structures
In closed gazebos, prefabricated structures, including a barbecue, stove and other similar equipment, can be installed.

Sketch of a complex for a gazebo, consisting of a Russian stove, barbecue, smokehouse and hob
Advice: In the event that a brazier, barbecue or oven is installed in the building, the woodcutter should be arranged directly under them. This will make the use of structures more convenient and save space.As you can see, projects of such structures as gazebos are drawn up with their own hands with drawings quite simply. If you do not want to spend time on this procedure, you can order a finished drawing from an organization involved in the design of small architectural forms. However, of course, this will incur additional costs.
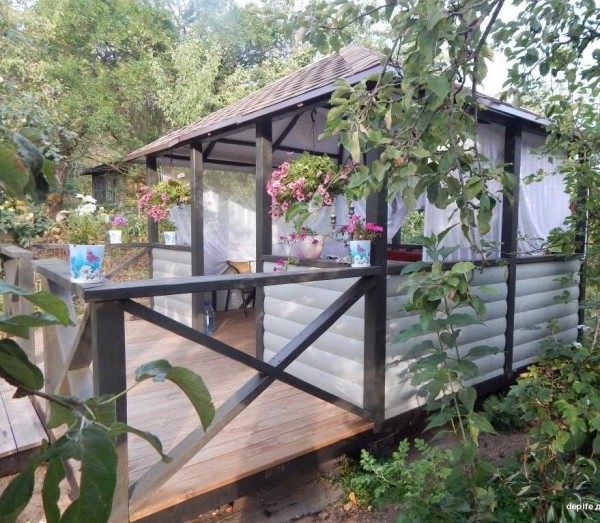
Almost all owners of cottages or private houses equip a wooden gazebo in the yard, where you can sit and relax in the summer. If you make a capital gazebo of medium size, then inside it is really possible to install a barbecue. Then here you can not only relax, but organize any celebration with your family or friends. If it is also closed from all sides, then you can spend time here in winter, especially since the brazier will serve as an additional source of heat.
The decision on which gazebo is better to build is made by the owner of a summer house or a private house based on his financial capabilities. In this regard, most often you can see fairly simple do-it-yourself designs.
The article is aimed at helping the owners of cottages and private households to build some kind of gazebo, depending on the available opportunities.

There are summer arbors, open-type and closed-type arbors, all-weather. In addition, there are combined options when the gazebo opens for the summer, and with the advent of cold weather it is insulated. But these are intermediate options that deserve attention. As a rule, such options are somewhat cheaper than completely closed ones, but they take away some of the precious time for manipulation.
Gazebos with and without floors
There are pavilions with a floor, as well as pavilions mounted on an open area or a platform where a concrete screed is made or paving slabs are laid. If you build a gazebo just on the ground, especially a wooden one, then you need to take measures to protect wooden structures, especially in places that are in contact with the ground. If the gazebo is made of metal, then you will have to protect it from rust.
 Wooden gazebo without a floor, built of wood. She has one feature: the roof is quadrangular, and the gazebo itself has beveled corners.
 The construction of a gazebo with a floor involves the installation of a foundation. Basically, they are limited to a columnar foundation, which is made of brick or rubble, poured with concrete, or mounted on foundation blocks. Alternatively, you can use large stones (boulders) and support the entire building on them, if any are available. Such a foundation is suitable for light, frame buildings made of wood or metal. If the building is capital, made of brick, then it is unlikely that it will be possible to confine itself to a columnar foundation: you will have to pour a concrete strip foundation, albeit in a simplified version. It is enough to deepen the foundation by 20-30 cm.
 Arbor made of wood, but with a wooden floor, mounted on supports.
 To lay the tiles in the gazebo, you will have to fill the floor with concrete, but after insulating the floor with foam, for example, and also laying a layer of waterproofing. After that, you can lay the tiles, and the floor is frost-resistant. At the same time, it should be done so that the floor extends 50 centimeters beyond the gazebo, and these 50 cm should be laid out at a slope so that moisture is not retained on the tile. If the gazebo is not closed, then the entire tile should have a slope. If moisture does not linger on the tile, then the tile will stand for a long time.
Materials used
For frame buildings of this type, the following materials are suitable:
- Wooden beam or round timber of small diameter.
- Steel profile pipes.
- PVC pipes.
Of these three materials, only the last does not require additional protection. Polymeric materials do not rot and are not afraid of both high and low temperatures. Therefore, such structures endure winter quite easily. The only thing that is accompanied by a certain complexity is the selection of PVC pipes for the manufacture of the frame, since they do not have such high strength as wooden beams or metal pipes. In this case, you will have to decide on the design of the gazebo so that the installed furniture does not load the PVC structure, and the barbecue will have to be installed away from the PVC pipes.
 PVC pipes can serve not only as a frame, but also act as a decorative finish.
 In order for a wooden gazebo to please others with its appearance for a long time, you will have to treat the tree with a protective compound and more than once.
Alternatively, you can use impregnations such as "SENEZH" or "ESTATE". Reviews about these protective compounds are not bad. In addition, this manufacturer also supplies tinting compositions to the market.
In the case of making the frame of the gazebo from metal, it should also be protected from atmospheric influences. To begin with, the pipes are primed, and then treated with a primer at the welding site. Although this option is not optimal: it is not at all difficult to coat an already welded structure with a primer. If rust is found on metal elements, then it is better to clean it off with sandpaper. This approach will allow you to maintain an acceptable appearance of the gazebo frame for a long time, which means that it will last a long time.
 Arbor made of plastic. Nothing to do with the environment, but no additional treatment is needed from fungi or rust.
 You can sheathe a gazebo with any material, but wood is considered the most popular: after all, a natural material. As a material for sheathing, a processed board, blockhouse, lining (wooden), thin round timber, as well as pallets that are disassembled, the board is processed (grinded) and the lower part of the gazebo is sewn up. Enough time, but very economical. In addition, such wood is quite dry and, after additional protection, can last a long time.
Arbors of any design, it is possible to sheathe such materials:
- Polycarbonate, but it will be quite expensive.
- Profiled, somewhat cheaper, but not very comfortable.
- Tempered glass is, well, very expensive.
- Ordinary fabric, which is very economical, but not very modern.
- Transparent PVC film.
- Bamboo, expensive, but stylish.
 Arbor made of metal combined with sheathing from translucent polycarbonate.
Frameless gazebo options
Frameless gazebos are capital buildings on a strip foundation, lined with brick or foam block, lined with decorative tiles or artificial stone on the outside. Moreover, building options can have both all walls up to the ceiling, and several main walls (for example, two), and the rest of the gap (s) remains open. Such structures are characterized by large capital investments. To build them, it is better to hire craftsmen or seek help from a construction company. If you do it yourself, then the construction of the gazebo can be delayed indefinitely.
 Capital gazebo, trimmed with wild stone, in combination with glazing. Both brick and other modern materials can be used as the main building material.
 If you plan to build a gazebo made of bricks, then it is better to hire good masons to lay out the frame of the gazebo with high quality. Then, you may not have to spend extra money on finishing the building from the outside. The construction of a gazebo from a foam block will require external decoration. Lots of finishing options. In this case, you will first have to level the walls and only then proceed with the decoration. Since capital buildings are intended for operation in the winter, they must be warm. Alternatively, you can build a wooden frame outside, insulate with ursa and sheathe it with siding.
Roof structure
The design of the roof depends entirely on how complex the shape of the gazebo is. If the gazebo is rectangular, then the roof structure will turn out to be quite simple: single-sided, double-sided or four-sided. Such forms of gazebos are also considered one of the simplest, requiring a minimum of time and money. The construction process of a single-pitched, double-pitched or four-pitched roof is almost the same, technically.
 Rectangular gazebo made of round wood, equipped with a gable roof.
 With more complex forms of arbors, the process of building a roof becomes more complicated. If the gazebo is pentagonal, hexagonal or octagonal, then the most suitable roof option is a hipped roof. In technical terms, these are the most complex structures, since you have to think about how to connect all the rafters at one, central point.
 A roof in the form of a dome is technically difficult to implement. In the absence of experience with wood, it is better to refuse this option.
 The presence of modern building materials, including roofing, allows you to make the roof generally round, without the presence of edges. In this case, you need to be able to work with metal pipes and welding. The pipes are bent according to a certain pattern and a crate is attached to them. It is desirable that the crate be continuous. A flexible roofing material is mounted on top of the crate.
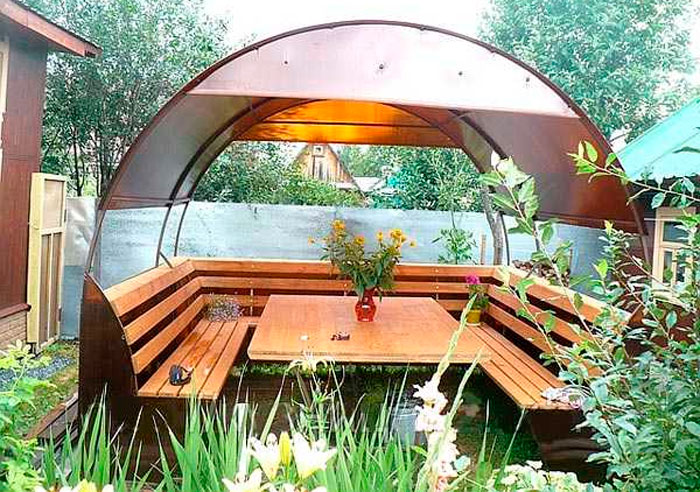 The simplest version of a garden gazebo: two curved pipes to which polycarbonate is attached.
 Simple designs of gazebos, especially in recent times, are very popular. Some summer residents equip gazebos under the same roof as the house. They are called verandas. In fact, it is just as simple and affordable option, with a minimum of costs.
There are a lot of designs of arbors, so it’s simply unrealistic to tell about all of them. Moreover, each of them is the result of hard work and wide imagination.
How to make a gazebo with your own hands
It just so happened that most often they build gazebos with their own hands from wood. This is due to the fact that working with wood does not require special tools. The second place is occupied by gazebos made of metal, but their construction requires skills in working with metal. Arbors from other materials are rarely seen mono. This is due to some difficulties, as well as increased costs, which the family budget cannot withstand.
In the case of building a gazebo made of wood, first of all it will have to be treated with preparations that protect the wood from bacteria and fire. Work can begin after the impregnation is completely dry. Firstly, it is necessary for quality, and secondly, it is problematic (inconvenient) to work with wood that has not yet dried.
Availability of a drawing
The presence of a drawing with dimensions greatly simplifies the process of building any structure and a garden gazebo is no exception, despite its small size. Without a drawing, it is very easy to get confused in the manufactured parts, although there are not many of them at all.
The figure below shows two options for gazebos: one with a gable roof, and the other with a 4-pitched roof, although both gazebos are 4-coal.
Step by step instructions with the presented photo
All work begins with the preparation of the site for the gazebo. As a rule, a certain ball of soil is removed along with the fertile layer. This is necessary so that in the future this organic matter does not rot under the floor of the gazebo. If the soil is sandy or sandy, then construction waste, crushed stone, broken bricks, etc. are poured into the dug pit, after which everything is carefully rammed. After that, a layer of sand is poured on top. If the soil is clayey and there are problems with water drainage, then it is better to fill the pit with a layer of clay and compact it. If you fill the hole with something else, then moisture will accumulate in it. Under the influence of heat, the water will begin to emit an unpleasant odor, which is not necessary at all.
Arrangement of the foundation and lower trim
The easiest way is to install concrete blocks on the prepared pillow so as not to delay the construction of the gazebo. If you lay out brick columns, then it will take a lot of time (not only work is taken into account here, but also the time to strengthen them). The distance between the blocks is selected from 1.5 to 2 meters. If the gazebo is built from a wooden beam 100x100 mm, then the distance is chosen at 1.5 meters, and if from a profile pipe 60x60 mm, then 2 meters are enough.
Supports must be set in the same plane. To control this, you will have to use a level and a long straight rail. After that, waterproofing is laid on top of the posts (2 layers of roofing material or bituminous mastic). And only after that the bars of the lower trim are mounted. The bars are interconnected with nails, 150 mm long. To strengthen the frame, each connection is duplicated with powerful metal corners. Despite the fact that this is a summer gazebo, extra strength will never hurt, as the structure will quickly loosen under the influence of the wind.
 Lower harness assembled.
 Mounting racks
The next step is to mount the racks. Racks are provided at the corners of the gazebo, in the center, on both sides of the entrance, and also where the supports (foundation) are installed. Racks on top have the same strapping as on the bottom.
Installation of racks is carried out strictly vertically, with the control of this process by the building level. Many argue that building levels have a large error. Maybe this is so, but for the construction of a garden gazebo, the error does not play much importance. In addition, when buying a level, it is advisable to check it. Alternatively, you can use the usual plumb line, but it is very difficult to use it alone. One person should use the plumb bob and the other person should fix the posts. Using the building level, you can do without outside help.
Fix the position of the racks with jibs. In the future, having fixed and secured everything thoroughly, the jibs can be removed if they interfere. If the lower part of the gazebo is not transparent, then the jibs can be left. They can simply be finally and securely fixed with the help of metal corners. At the same time, each time it is desirable to check the racks for verticality.
 Two options for mounting racks with slopes. On the left are temporary braces that are planned to be removed, and on the right are capital ones that will be used in the future.
 Installation of the top trim and floor boards
After the final fixing of the racks, they are also fixed from above, mounting the upper trim. Technically, it looks the same as when installing the lower harness. For reliability, metal corners should be used. This is especially important if there are no permanent jibs in the design.
After the frame is almost assembled, proceed to laying the floor boards. They, like all wooden structures, are treated with antibacterial impregnation. For such purposes, impregnation "Senezh" or "Senezh-Ultra" is suitable. They differ from each other in that "Ultra" does not stain the wood, but gives it a greenish tint. If the entire structure is covered with a dark stain, then the greenish tint will disappear and remain invisible.
 Means for impregnating wood that may come into contact with the ground.
 After the boards are fixed with nails, it is better to paint the wooden floor, otherwise the wood will get dirty before the construction is completed. It is better to paint a tree on the street with varnish or oil-based tinting paints. Moreover, these are not classic oil paints, but special compositions for protecting wood from atmospheric precipitation. The basis of these compositions is oil, to which protective elements and color pigments are added. As a result, the wood acquires a completely different shade, while maintaining the texture.
Structural binding in the middle of the frame
The middle strapping of the frame, in most cases, is simply necessary, since the frame is divided into an upper and lower part, which is always (almost always) sewn up. It is better to fix the bars to be installed using metal corners or make recesses for them in the racks, up to 25 mm in size, if the thickness of the bar is 100x100 mm.
 Option for fastening the middle strapping.
 After that, you can proceed to the final coloring of the frame of the garden gazebo.
Roof arrangement
The next step is to assemble the rafter system, as shown in the photo below. Rafters are similar in appearance to triangles.
 Rafters (triangles) for arranging the roof.
 These elements are attached to the frame of the gazebo. Since there is no overhang of the roof, they are attached directly to the beam of the upper trim. Triangles are installed vertically and fastened with nails. To fix them in this position, you can use the slopes.
If an overhang is provided in the design of the gazebo, then it is necessary to cut out the seats in the rafter beam. The attachment points are in the form of triangles.
 Options for the correct fastening of rafters.
 Of these two options, the first is more suitable, since the roof is not large. In order not to customize each leg of the rafter individually, it is better to use a template. To do this, you need to take a piece of an ordinary board and cut an opening of the required size. This will not only simplify the task, but also provide the necessary accuracy. So that the work is not a burden, you can use a power tool, for example, a jigsaw.
Before the final fastening of the rafters, it is imperative to check the correctness of their installation, both vertically and horizontally.
After the final and reliable fastening of the triangles, the crate is stuffed. The nature of the crate depends on the nature of the roofing material. Soft types of roofing materials require a continuous crate. If it is slate or corrugated board, then the usual crate will go.
decorative trim
After arranging the roof, when the whole structure is closed from rain, they begin to finish the lower part.
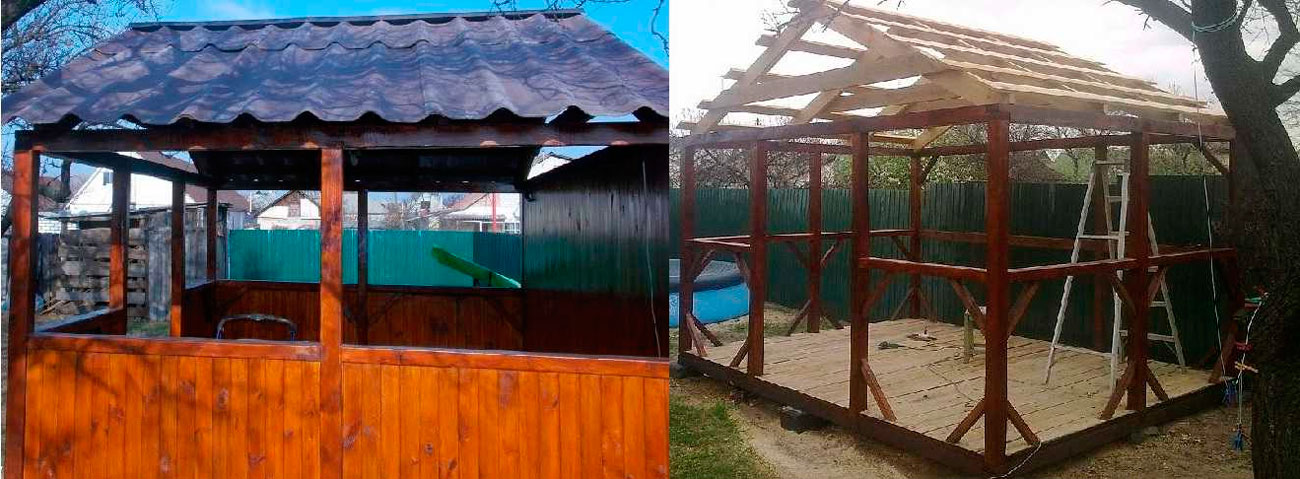 The do-it-yourself gazebo is ready.
 This design belongs to the category "simple, fast and cheap." Taking her as an example, you can experiment by doing something with your own trim elements. In the following example, you can see how the gazebo, made according to the same project, has changed: the lower part is sheathed with a blockhouse painted in a light tone. And the rest of the frame has a dark tone.
 This is a different version of the same project.
 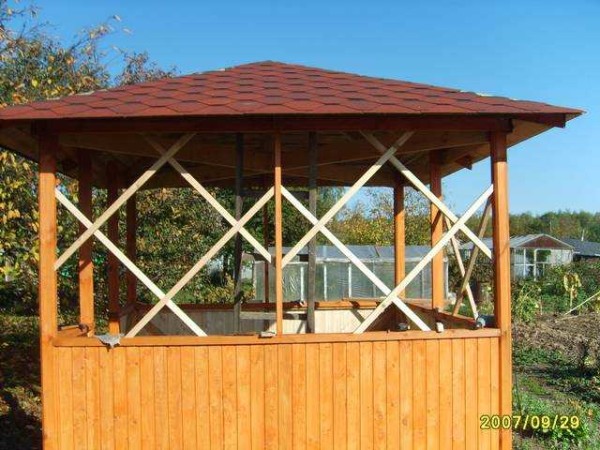 In the next photo, another option. Based on this project, you can get many options.
 Below in the article are drawings with all sizes. Below are interesting photos, but without drawings. There is hope that someone will use them.
Sketches of gazebos with drawings and dimensions
All dimensions indicated on the drawings can be increased or decreased in order to obtain a design of the required dimensions. With a significant increase in size, the dimensions of the wooden elements (section) should also be increased for the required strength. If everything is done correctly and in the right sequence, then you can count on a positive result.
Classic wooden gazebo
The project is almost the same, but some dimensions have been changed: the top point of the roof has been raised, which makes it seem lighter. Arbor quadrangular with hipped roof.
 An ordinary square gazebo for a garden or a summer house made of wood.
 Mounting the roof has problematic attachment points, indicated in the figure by circles. The figure below shows how to do it correctly.
 Options for fixing problem nodes in the arrangement of a hipped roof.
  Variant of distribution of space in height and option of fastening the crate on the roof.
 Chinese style gazebo
The drawing shows all dimensions, and the project includes marking for the foundation, installation of the truss system, etc. The project is arranged in the form of a photo gallery.
Any construction work should begin with planning, and the construction of a garden gazebo or gazebo is by no means an exception. Of course, the easiest way is to order a project of a rectangular gazebo to professional engineers, but if you have certain skills in construction work, you can cope with the task on your own. Moreover, there is nothing particularly complicated in the design, which means that we only have to accurately maintain the dimensions.
General design scheme
Arbor design
Sizing
Before we start building a drawing of a rectangular gazebo, we need to determine its dimensions:
- Firstly, the building should fit on our site, and at the same time not interfere with the movement. Ideally, the gazebo should be located at a distance from residential and outbuildings - this approach will provide optimal conditions for a comfortable stay.

Standard size option
- Secondly, inside should be spacious enough. If we are talking about rectangular models, then they are initially planned as canopies for a fairly large number of people. At a minimum, your entire family should be accommodated comfortably there.
- Ideally, the width of such a structure should be from 2.5 to 3.5 m, and the length - from 4.5 to 6 m. If we make it smaller, it will be cramped, and a structure with large dimensions will look cumbersome.
Note! If you plan to install a hearth or a barbecue, then in this case it is necessary to lay a platform of approximately 2x3 m in one of the ends. This reserve is necessary so that the smoke and heat from the coals do not interfere with rest.
The selected dimensions can be adjusted in the process of building a detailed plan. Naturally, this must be done in such a way that the overall dimensions do not “crawl out” beyond the area allotted for the construction on the site.

Pagoda gazebo project
When you have decided on the dimensions, you can take on a ruler or a special computer program. In any case, the principles by which we will build, remain unchanged.
Related articles:
- Gazebo projects
- Drawings of gazebos for giving with dimensions
- Projects of gazebos for summer cottages
Building a base drawing
You need to start designing by building a foundation diagram.
As an example, we will take a columnar foundation made of concrete blocks 250x250 mm:

Foundation plan
- On a sheet of paper (it is advisable to use graph paper - it will be much easier for a beginner to avoid mistakes) we draw the outline of the structure in accordance with the selected dimensions.
- On the drawing we impose axial lines passing through the middle of the long and short sides.
- Focusing on the position of the center lines, we mark the places where the installation of the foundation elements will be carried out

The device and appearance of the base
- Supports must be evenly spaced. For example, for an option with a width of 3.4 and a length of 5 m, the optimal step between concrete columns will be 1.4 m, as shown in the diagram.
Note! Based on the fact that we will mount supports 250x250 mm, the step between the centers of their sockets during installation will need to be 1500-1550 mm.
- Next, we need to draw the strapping. Using the previous scheme, and better - making a copy of it, we put on paper the image of the bars. As a strapping, it is best to use a wooden beam with a section of 150x150 mm or a board of 50x150 mm, which should be reflected in the drawing.
- It is also necessary to schematically depict the design of the junction of the racks to the base, including fasteners and a waterproofing layer of roofing material or a waterproof membrane.

Rack mount
- In conclusion, we separately draw the floor device. As a rule, in arbors of this type, one layer of massive floorboards laid on logs is sufficient.
Separately, you should consider the situation with the installation of a stationary stove or barbecue. If the mass of these devices is large, then the floor made using conventional technology may not withstand. That is why it is worth pouring a separate foundation under the furnace, marking it on the drawing.
Related articles:
- Barbecue gazebo project: dimensional drawings
- Arbor 3x3 do-it-yourself: drawings and dimensions
- Arbor projects: drawings and photos
Development of frame details
When the base scheme is ready, you can proceed to the construction of the frame. In most cases, drawings of a rectangular arbor are built in several projections (long view and short side view), which allows you to get an idea of the general view of the finished structure.
To begin with, as in the case of the base, we draw the general contours of the structure. Here you need to choose the right height.
The optimal settings are:
- From ground zero to the ridge -4 - 4.5 m.
- From ground level to ceiling - 2.8 - 3m.
- From floor to ceiling -2.3-2.5m.
- Plinth - up to 0.5 m.

Lateral projection with elevation mark
Having marked these heights on the diagram, we proceed to the image of individual elements:
- First of all, we make a drawing of the racks, making sure that their placement coincides with the placement of the foundation supports.
- Then we connect the racks with the upper strapping, if necessary, depicting the ceiling deck.
- Between the racks we apply schematic images of fences. The fences themselves should be built on a separate sheet on a larger scale.

Rafter attachment scheme
- At the top of the diagram, we draw rafters connected to a ridge beam. To facilitate the design, you can also make a drawing showing the top projection of the placement of the rafters - so it will be easier for us to navigate during installation.
Advice! As in the case of the junction with the foundation, we draw the place of attachment of the rafters to the upper harness separately.
- At the final stage of work, we apply finishing elements to the scheme: handles, stairs, decorative details, etc. They must be placed in such a way that they do not reduce the performance of the structure itself.
As we noted above, this instruction can also be implemented through computer programs. Naturally, their use requires practice, but in the end, in addition to the drawing, we can get a three-dimensional model of the future gazebo, and imagine what your site will look like with this new building.
Materials and technologies
What are we made of
When building drawings with your own hands, you need to constantly keep in mind what materials we have available for work. And it is precisely on this basis that specific dimensions should be applied to the diagram.
For example, to build the gazebo described in the example, we will need:
- Concrete supports 250x250 mm, about 1 m high.
- Racks made of timber 150x150 mm, about 2.5 m high.
- Boards or bars for strapping (50x150 mm, length from 3.5 to 6 m).
- Ceiling beams (50x150 mm, length - 3.5 - 5.5 m).
- Rafters (40x120 mm).
- Ridge timber (50x150 mm, 2000 mm long).
- Boards for flooring (40x100 mm).

The range of used lumber is very extensive.
We will also need:
- Fencing elements (polycarbonate sheets on a frame, wooden lattice panels, etc.).
- Boards for lathing and sheathing.
- Casing boxes for window structures (if any are provided for by the project).
- Fasteners.
- Roofing material.
The decisive factors in choosing these parts are your preferences, as well as the availability and price of certain materials in your area.
A gazebo is an indispensable attribute of a personal plot. The Internet is replete with offers to buy ready-made drawings of gazebos for, or entrust the construction of a small architectural form to professionals. But often, for some reason, existing proposals do not meet the needs of land owners, either the size does not fit, or it does not suit, or it is simply expensive. And in itself - the process is not complicated and quite feasible with your own hands.
This article is devoted to how to draw up a plan, drawing and diagrams of gazebo nodes, depending on the purpose of the building, how to do it right, a place to relax, a kitchen, etc. And of course, we have selected for you ready-made schemes and drawings of gazebos.
In the photo, the layout of the space with a barbecue, corner structures save space
Layout
The first thing to decide is where the building will stand. To do this, you will need a site plan on a scale convenient for you, which indicates: the main building (house), outbuildings (bathhouse, sheds), garden paths, trees.
Advice: It is better not to cut down perennials, they will still serve for shade and landscape design.
Drawings of a do-it-yourself garden gazebo, in the diagram there is a rectangular building made of timber

Do-it-yourself gazebos with drawings, a photo of a canopy made of logs of a non-standard simple shape with a corner barbecue
Carefully study the plan of the infield, taking into account the totality of circumstances, and mark on the diagram where, in your opinion, the gazebo will be most appropriate. It is better to place it in the depths of the garden, at the end of the path, between the trees. The distance from the main house is 3-5 m. If, then it is desirable to move it away from the main residential building by more than 8 m.

Gazebo plan for a summer residence, an independent drawing with dimensions
When drawing up a drawing, do not forget about. For optimally arranging a columnar base. The distance between the posts is 1500-2000 mm, for each vertical support. Post section 300*300, 400*400 mm. When marking the foundation scheme on the ground, add 100 mm on each side so that the base is larger than the dimensions of the building.

Approximate layout of furniture in an 8-corner building
Functionality and dimensions - what you need to know
For comfortable outdoor recreation, which means that they should be comfortable, durable, reliable, everything should be at hand, nothing should interfere, annoy. And for this you should know some rules of ergonomics.

Typical drawing of a rectangular structure

As a rule, rectangular buildings have a two- (as in the diagram above) or a hipped roof.

Wooden gazebos, drawings of a square building with a hipped roof
Standard table width 600-800 mm, length 800 mm - for 4 people, 1200 mm - for 6 people. The convenient size of the seat of a chair or bench is 400-450 mm. Thus, the minimum width of the gazebo is 1500 (600+450+450) mm, length 1500-2000 mm.

Do-it-yourself country gazebos, drawings of a mini log construction
Note: If necessary, it can be reduced, in which case it is better to opt for a small, frame canopy building, see an example in the diagram below.
Arbor scheme for a small area

The product is on a metal frame, the dimensions are schematic, the length and width of the gazebo can be changed to suit your needs
For comfortable accommodation of one person, a floor area is required - 2 m 2, therefore, the optimal size of the gazebo for a company of 4-8 people is 3 * 4 m, 4 * 4 m (12-16 m 2).

Do-it-yourself hexagonal gazebos, drawings of a standard wooden structure
If not only a place for gatherings is planned, but also a recreation area, with, then the area of \u200b\u200bthe gazebo is calculated at the rate of 4 m 2 per 1 person.
To correctly make a drawing or a fireplace, when calculating the area. The optimal depth of a brick barbecue is 750-1000 mm (3-4 brick lengths), width - 1200 mm (10 brick widths).

Drawing of a standard brazier
In addition to the barbecue or, on the side of it, for convenience, a desktop with a width of 600-800 mm should be provided, to it, preferably, a sink - a width of 600-800 mm, and on the other side a place to store firewood, for symmetry the same distance. Based on this, the minimum length of the kitchen, including the oven, is 2400-3400 mm.

Scheme of a brazier with a working area
In front of the barbecue, it is necessary to provide a free space of 1000-1200 mm in order to move freely during cooking, and the heat does not interfere with those sitting at the table. Thus, when drawing up a drawing of a gazebo, in addition to a place for gatherings of 8-12 m 2, an additional area should be allocated for the barbecue: at least - 2400 * 1750 mm, with comfort - 3400 * 2200 mm.

Gazebo with barbecue, drawing of furniture placement

Scheme of construction with a barbecue, wooden structures should be treated with a fire-resistant compound
To save space, or make a separate canopy on the site near the building.

Drawings of gazebos with barbecue, this form of construction contributes to convenient zoning of the kitchen and dining area
Shape and design features
In addition to being and, they also differ in shape: rectangular, polyhedral, round, combined, etc.

Assembly diagram of a closed square garden summer house under a hipped roof

Scheme of a large gazebo made of wood under a hip roof, on a foundation 4 * 6 m
The easiest way is to make a drawing of a rectangular gazebo, but pitfalls lie in wait here: when transferring the scheme to the site, make sure that the angles are strictly 90 o, the diagonals are the same, or use the rule of the Egyptian triangle.

Marking the area for the gazebo
Measure 3.0 m on one side, 4.0 m on the other, connect the points in a straight line, check the geometry, if the connecting line is 5.0 m, then the angle is 90 °
Simple rules for building circuits
Drawings of multi-organ structures cause some difficulties. But let us remind you of just a few rules from the school course. So, for example, a hexagon with equal sides always consists of 6 equilateral (all sides are equal, and angles = 60 o) triangles. Or from two equal trapezoids.

A diagram of how to simply draw the base of a hexagonal gazebo
If you want to change the shape of the gazebo, for example, to enlarge some sides, then first a rectangle is drawn (in the diagram below with a green line), then its diagonals are drawn, the middle is found. From the point of intersection of the diagonals, perpendicular to the long sides of the rectangle, I set aside the same segments (yellow line in the diagram), then the points are connected. Or you can still draw 2 equal trapezoids with a common base, the height of the trapezoid should be equal to half the side of the gazebo.

Do-it-yourself hexagonal gazebo drawings, if you want to change the length of the sides
To draw an octagonal gazebo, its base must also be decomposed into simple shapes, as shown in the diagram below.

2 perpendicular intersecting lines are drawn, equal to the length and width of the structure, a rectangle is built, one side of which is equal to the side of the building, the other is the width


The drawing of the gazebo is 8-sided, in the diagram it is marked in yellow how to connect the sides of the polygon

To increase the number of sides in a polygon, just draw another rectangle and connect the vertices along the path, as shown in the diagram.
Projects of gazebos - we build with our own hands

Drawing of a gazebo made of wood, 6-sided design

Scheme of the base and roof of 6 coal buildings

Drawings 8 coal elongated structure
In the form of a polygon, it is a little more difficult to build relatively simple rectangular buildings, but they look more original and spectacular. To make the gazebo not only functional, but also become, decorate it or choose a lighting scenario.

The scheme of how to build a gazebo in the Japanese style

Scheme of assembling a wooden house grill

Arbor do-it-yourself drawings, photo metal constructions

Arbor metal from a profile pipe, decorated with decorative forging elements, frame scheme

Drawing how to make a gazebo in the country with your own hands
Please note that in many drawings and diagrams there is no floor in its usual form; instead, a flat area of paving slabs is laid out or a monolithic concrete slab is poured.

Drawing of a gazebo made of metal, photo of a simple design with forging elements
Try to adjust the size of the gazebo to a standard sheet of 2100 * 6000 mm.

Hexagonal metal structure
In order to accommodate more people, they are installed around the perimeter, it is advisable to provide a round table in such a building.

Drawing of a welded portable structure with a polycarbonate roof

Large square canopy made of rolled metal and polycarbonate, frame diagram with dimensions
Even large buildings and polycarbonate look light and airy. For protection from side rain and wind with transparent monolithic polycarbonate, screens made of special durable polyethylene or waterproof fabric.

Drawing of a wooden gazebo, cross section of an octagonal structure

Summer construction made of polycarbonate, a diagram of how to weld a metal frame

Drawing of a wooden building made of timber, decorated with a wooden lattice

Closed Structure with Lattice, Hexagon Building Project

Scheme of a log building in the Russian style
We have brought to your attention the most popular ones. If you have not found a suitable option, then use our tips on how to complete the drawing of the building yourself.

Drawing of a shed building from a bar

Drawing of a combined summer building with a barbecue, placement of the main zones
If you do not have professional builder skills, try to choose simple designs, without complex lines and architectural frills.

Summer room for a large company with a barbecue and a bathroom, space zoning drawing