Flat-relief woodcarving. Practical wood carving tips for beginners. About woodcarving for beginners
relief carving
Flat-relief carving is widespread in house carving and in the manufacture of various souvenirs. It is characterized by the selection or deepening of the background around the ornament to a depth of 5-7 mm.
In flat-relief carving, the image takes on three-dimensional forms, maintaining the same height of most of the protruding planes with the same background depth.
Flat-relief carving enables the carver to perform various compositions with floral ornaments, images of animals, birds and humans.
The planes of the ornament can be (Fig. 1):
1-concave;
2-straight;
3-convex
Rice. 1. Ornament planes in flat-relief carving
The background in flat-relief carving is (Fig. 2):
- overwhelmed(A). Carving with an oval outline or background is the simplest type of flat-relief carving. Reminiscent of contour carving, since the contour of the pattern consists of dihedral notches, slightly oval.
- cushion(b). Pillow-backed carving differs from previous types in that the background never remains flat. The drawing is steeply ovalized from the side of the contour and more sloping from the side of the background, which resembles pads in shape.
- Selected(V). A carving with a selected background is performed in the same way as a carving with an oval outline, but the background is selected to a certain depth. The background can be made even, minted or filled with profile slots.
- handpicked(G). They are performed similarly to carving with an oval background, but the background around the ornament is chosen at a certain angle of inclination to the plane.
- Undercut(e). A carving with an undercut background, similar to a carving with a selected background, with the only difference that the background goes under the ornament.

Rice. 2. Types of background in flat-relief carving
It is possible to distinguish varieties of flat-relief carving such as:
Openwork (slotted) carving. The background of the pattern is selected completely through sawing or drilling (Fig. 3). In the technique of openwork carving, platbands, cornices, shutters, berths, anemones, fenders in Russian and Belarusian huts are made.

Applied thread. This is an openwork carving attached to a wooden plane.
Carving technique
Performing a flat-relief carving with an oval contour.
The carving begins with an incision with a knife-jamb along the contour of the drawing (Fig. 4), then trimming follows from the side of the background.

Rice. 4. Making a thread with an oval contour
(arrows show the direction of movement of the tool):
a - incision; b - pruning; c - folded contour.
After trimming, they begin to roll the edge from the side of the ornament element in such a way that the edge is rounded more steeply than the trim on the border with the background. The result is a relief image with smooth soft oval lines without harsh shadows.
IN Perform flat-relief carving with a selected background.
An incision is made along the contour of the drawing with a slight slope from the line of the drawing towards the background (Fig. 5).

Rice. 5. Carving with the selected background
Such a slope makes it possible to protect the edge of the ornament from accidental cuts when choosing a background. At the end of the work, you need to cut it vertically, exactly along the line of the drawing, and then process the edge of the ornament contour. After an incision along the contour, a trim is made. Trimming is performed to a predetermined depth, the same over the entire plane of the ornament. After trimming, they begin to select the background with straight, semicircular, sloping chisels.
When stripping the background, it is important to take into account the direction of the layers of wood so that there are no scratches. Hardwood carving is done with a mallet.
The main tool for performing flat-relief carving: a joint knife, semicircular chisels of various widths.
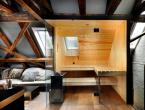
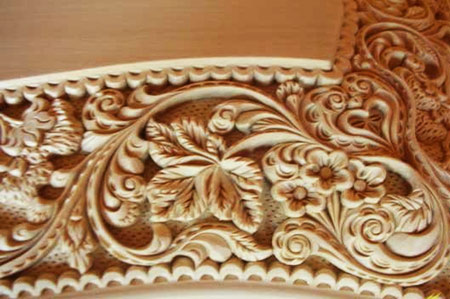
Flat-relief carving was widely used and is used to decorate furniture, various souvenirs, in house and interior carving.
Products and panels made using flat-relief carving are shown in the photographs:

Cabinet with elements of flat-relief and openwork carving

Panel with a plot composition

decorative panel
Literature:
1. Burikov V.G., Vlasov V.N. House carving-M.: Niva Rossi together with the Eurasian Region Company, 1993-352 p.
2. Logacheva L.A. Fundamentals of wood carving. - M.: Publishing house "People's creativity", 2002. - 136 p.: ill.
Relief woodcarving can be more than just a hobby. Having mastered the skills of owning tools and getting acquainted with the technology, the master will be able to get a good and stable source of additional income. Wooden decorations are in demand both in apartments and in country houses.
An example of a painting made in relief carving
Wood carving is a traditional craft of many nations. This type of applied art has a long history. And during this time, the masters have created several types of technologies, such as:
In addition, as a separate variety, experts distinguish wood processing in the Kudrin style (Kudrinsko-Abramtsevo). The style owes its name to the place of its birth - the village of Kudrino in the Moscow region. It is distinguished by abundant floral ornaments, garlands of flowers, in which peculiar animals and birds are placed.
The type of wood processing got its name from the word "relief", which in our case is understood as areas raised above the common surface. Flat-relief carving, in turn, is divided according to the methods of execution into:
- bas-relief;
- high relief.
The first type has a high relief, the second - a lower one. A sign of a deaf variety of wood processing is a solid carved background surface without even surfaces.
 Step-by-step execution of flat-relief carving
 The background is located below the level of the drawing, and it is chosen with a chisel of one type or another. One of the varieties of artistic woodworking is. It differs from relief in that a pattern is applied to the surface of the material, the contours of which are selected with a special tool.
The protruding part remains flat, and only the contours emphasize the image, while the relief carving has a figured surface of the pattern.
Note that slotted processing implies a complete selection of the background, that is, the picture seems to be hanging in the air.
What can be obtained by carving wood
The main pattern that is performed in the technique of flat-relief carving or its other variety is. It can be a simple geometric pattern or vegetation, stylization.
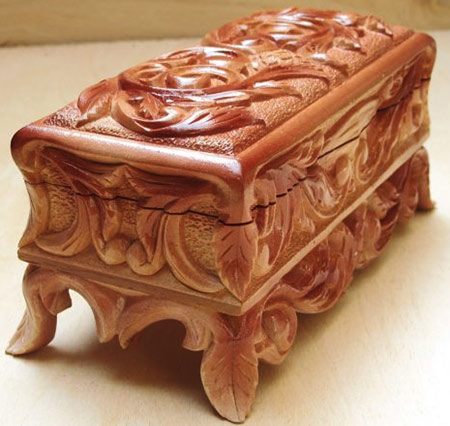 An example of a casket made with embossed carvings
 More experienced craftsmen include images of animals, birds, people in their works. There are both traditional folk stories and compositions on contemporary themes. Everything depends on the skill of the author and his ability to transfer the image to the board.
Read also
Hand carved wood furniture
Since the source material for this type of work is a wooden board, then it is made from it:

The range of products is very large. You can emboss the surface of the cutting board and the window sill, in general, any thing in the house that has a flat surface. The most popular are souvenirs made in the style of relief or contour carving.
A hand-made thing in the traditional folk spirit will be a wonderful gift for relatives and friends. And yet, having mastered the work, the master will be able to sell souvenirs via the Internet. Such products are in great demand, especially abroad.
How to choose and prepare wood for carving
You can start training to make carved embossed surfaces on ready-made boards. Shelves from old racks will do, parts that can be bought for next to nothing in any carpentry shop or at a sawmill. Linden wood is considered the most suitable for carving. Of the advantages of this breed, craftsmen note a uniform density, slight shrinkage during drying and quick drying, in addition, the ability to cut in relief both along the fibers and across them.
Before work, the material must be dried. The tree is harvested from November to February, when there is little juice in it. If the master buys a ready-made workpiece, then you need to clarify whether it has been dried. If he does it himself, then the process is as follows. First, the trunk is cleared of branches and bark, then cut into pieces. 
Then the wood for carving is boiled in a container with the addition of salt for 4 hours. This will remove juices and speed up the drying process. Then the blanks are lowered into the basement, where they are placed upright on a concrete floor. This will draw out excess moisture, after which the wood is laid in a ventilated room under a canopy for drying. Moisture content in the range of 12-10% is considered normal. Without special devices, the content can be found like this. A piece 3 cm long and 15 cm wide is cut off from the end (excess is removed).
The fragment is weighed, and then dried for 5 hours at a temperature of +100°C in the oven. Then weigh again and make calculations. To do this, the resulting difference is divided by 150 and multiplied by 100. The result will show the available humidity.
relief carving
Of the presented varieties, relief carving is the most expressive, therefore, in former times, wall panels, furniture, doors and ceilings were covered with it. It is still relevant when decorating the interior. There are 2 types of relief carving - bas-relief and high relief. The first is a type of relief sculpture, which is characterized by such a feature: the convex part of the image rises above the plane by no more than half of its volume, in contrast to the high relief, in which the image rises above the plane by more than half of its volume. These types are also different in scope: if the high relief is used mainly in architecture, then the bas-relief finds a wider application: it can be found not only in architecture, but also as a decor for monuments, on coins, medals, gems, etc.
Secrets between the lines
How to find the golden mean between large form and details?
It is important for the carver not to overload the products with excessive detailing, but it is also impossible not to pay due attention to them. Owning this side of the carving shows how skilled the craftsman is. This helps photography, painting and graphics. The carver must collect material in order to look at analogues if necessary, which is especially important if some details, such as the position of dynamic folds on clothes, cannot be checked on the model. The execution of folds requires great experience and skill, since it is necessary to depict them in such a way that a figure is felt under them. Then it will be convincing.
Since the main advantage of relief carving is the play of chiaroscuro, all lines and intersections are performed as clearly and accurately as possible. Relief carving refers to labor-intensive types of carving, as it requires the carver to have experience, the ability to work with both hands and the possession of a variety of carving tools. The sequence of embossed carving is as follows: drawing a picture, cutting and trimming the contour of a picture or ornament, rough selection of the background, identifying the relief forms of the ornament, finishing the background, making a small relief of the ornament, chasing the background. Since we have already talked about drawing a picture, it makes no sense to dwell on this again. As for the threading itself, this is clearly shown in Fig. 89.
Rice. 89. The sequence of the relief carving: A- notching along the contour; b- cutting to the base of the incision; V– draft background selection; G- curling up the ornament and finishing the background; d– development of relief
For incising, the tool (to make a straight line, use a jamb knife, for a curved line, a chisel of the required profile) is held vertically along the contour of the pattern, tilting slightly towards it (this will help to avoid “undercutting” the ornament in high relief).
Secrets between the lines
When can I start cutting parts?
Beginning carvers, having outlined the general contours of the head, proceed to the detailing of the face. This should not be allowed under any circumstances. Specific details can be dealt with only when the form is revealed, the silhouette is processed, and the details themselves are thought out to the smallest detail. Out-of-sequence threading leads to serious and often uncorrectable errors.
Cutting is carried out with sloping, medium and steep chisels, as well as a poke (the tool is held at an angle of approximately 45 ° to the plane of the workpiece and the end of the handle is pressed with the palm of your hand). The cutting depth is maintained at the same level.
In complex ornaments, elements can overlap each other. Then cutting and cutting start from the top lines and make them less deep, cutting and cutting elements in the background - deeper.
On solid wood, incisions are not always obtained at once, so their repetition is allowed. At the same time, at the first cut, the tool is pressed quite lightly, since the main thing here is that the cut falls exactly on the line of the drawing and turns out to be clean and smooth. The cut is deepened during cutting.
The background begins to be drafted first of all from large areas, using wide chisels that are moved in different directions. This is determined both by the area of the background and by the direction of the wood layers. The chisel is held with both hands at a slight angle to the background plane. The result of the work should be the same depth background.
The shape of the relief is revealed by ovalization (in this case, it is important to ensure that the convex element does not have sharp outlines, but at the same time it does not give the impression of being flat) or rounding the convex elements (after the incision and trimming are completed, the main chamfer is removed from them at an angle 45 °, then alternately upper and lower, in conclusion they are cleaned with a sloping chisel).
Secrets between the lines
In what sequence are the head and face of the wooden sculpture carved?
Having specified the tilt or turn of the head, setting the direction of gaze, you can proceed to the details of the face. The work goes from the general to the particular: the oval of the face, the hair, the profile line. Then outline the lines of the eyes, ears, mouth. If the proportions are not violated, the details are clarified, and the eyes and ears are performed at the final stage.
The fine cleaning of the background begins with the processing of large areas, using a straight wide chisel, which is held almost horizontally. In corners and narrow places, you need to work especially carefully so as not to damage the ornament, so narrow chisels or cranberries are used, cleaning the background in the direction from the edge to the center.
Often the background is covered with chasing, which is carried out with the help of chasings (punches), on which short blows are applied with a hammer. But it should be noted that in relief carving this technique is rarely resorted to.
This text is an introductory piece. From the book Stylish DIY Jewelry. Beads, bracelets, earrings, belts, headbands and hairpins author Khvorostukhina Svetlana AlexandrovnaCarving Carving is one of the most difficult types of decoration, because it requires a certain amount of experience and precise hand movements. For this work you will need very sharp knives with thin blades. Carving is best done on thick leather, then carved patterns can
From the book Secrets of Wood Carving author Serikova Galina AlekseevnaFlat thread As follows from the name of the thread, its background is a flat surface (both the workpiece and the object being decorated), and the pattern consists of recesses (recesses) of various shapes. Flat serrated threads are subdivided into contour and
From the book Wood burning [Techniques, techniques, products] author Podolsky Yuriy FedorovichFlat-relief carving When performing flat-relief carving, the image is located in one plane, while the relief, which is diverse in pattern and composition, is revealed in a peculiar way. To do this, the background surrounding the element or ornament is selected or deepened. IN
From the book Wood carving [Techniques, techniques, products] author Podolsky Yuriy FedorovichRelief carving Of the presented varieties, relief carving is the most expressive, therefore, in former times, wall panels, furniture, doors and ceilings were covered with it. It is still relevant when decorating the interior. There are 2 types of relief carving -
From the author's bookSlotted carving The name of this type of carving means that with this method of processing wood, the background is removed. Therefore, such a thread is otherwise called sawn or through.
From the author's bookSculptural carving Sculptural carving is the most ancient and dates back to the time when people carved figures of pagan gods from wood, whom they worshiped and from whom they sought help and protection.
From the author's bookHouse carving The name of this type of carving speaks for itself: house carving is intended for external decoration of a dwelling and its interior decoration. By the nature and technique of execution, house carving is heterogeneous and can be relief, slotted and
From the author's book From the author's bookFlat serrated thread Flat serrated thread is characterized by the fact that its background is the flat surface of the decorated product or workpiece, and the pattern is formed by recesses of various shapes - recesses. The lowest points of the relief are located below the level of the decorated
From the author's bookRelief carving The essence of relief carving is that a pattern (drawing) is formed by sampling the background around it. Such a sample can be uniform in depth. In this case, the formed pattern (drawing) will have the same height (usually 5–7 mm) throughout
From the author's bookSlotted carving Slotted carving can be made both in the technique of flat-relief (with a flat ornament) and embossed carving. The background in the slotted thread is removed with a chisel or saw. In the latter case, the thread is called sawn. The slotted thread has received a wide
From the author's bookSculptural carving Sculptural or three-dimensional carving is characterized by the fact that in it the relief image is partially or completely separated from the background, turning into a sculpture. Unlike a one-sided image of an object in other types of threads, volumetric threads can be
From the author's bookHouse carving House carving is characterized by the fact that it is large-scale, performed mainly on coniferous wood with an ax, saw, chisel and is used to decorate wooden buildings. Although house carving was already popular in the 16th century, before us
From the author's bookContour carving According to the execution technique, contour carving as a variety of geometric is the simplest. Images made in this way resemble a clear graphic drawing. Applying various types of cuts and combinations of straight lines, curves,
From the author's bookGeometric thread All elements of geometric thread are the simplest geometric shapes formed by straight and curved lines or a combination of tetrahedral or semicircular grooves. The main elements of geometric carving are dihedral,
From the author's bookStaple, or nail-like, thread Staple carving is performed with semicircular chisels, using a joint knife as an auxiliary tool. As a result of the use of a semicircular chisel, a trace remains on the surface of the wood, similar to a bracket or a mark from a nail, hence
Depending on which master, what technique he has, what plan, the carving can be performed in different forms. It can be both simple and complex. There are various types of woodcarving: relief carving, flat-relief, three-dimensional, as well as flat-cut and slotted carving. Now we will characterize these types of threads separately.
flat washing divided into two types, the first type - geometric ornament, second view - planimetric contour, which is sometimes also called a floral ornament. By the name of this type, you can guess in what technique the work will be performed. This carving will consist of notches, which together will make up the contour lines, cut to a certain depth.
geometric carving or geometric ornament, it is so called because it is made of circles, triangles, almond-shaped recesses, rosettes, stars, the so-called geometric elements. Depending on how many excavation elements you take, this will be the ornament.
There is another ornament - contour. I also call it in our literature as vegetable. But, in my opinion, we need to delve into this concept, since contour drawing is often performed in the technique with contour carving. This carving technique is a bit similar to metal engraving, the difference is that the grooves made, which make up the contour lines on the wood, have a greater width and depth, and the tools have a different sharpening. The contour carving in execution is very simple. This carving can be done on any wood and on plywood with a semicircular chisel or an ordinary joint knife.
relief carving
One of the most distinguishing features of this type is that we select the background around the ornament to the same depth. The edges of this ornament can be rolled up. There is also another type in which the ornament can be deepened into the wood, and the background on the surface will remain intact. It is not difficult to perform this type of carving, but you are tormented by cleaning and choosing a plane or background of an in-depth ornament on your own. This process can be facilitated with a manual milling machine. The background of your ornament can be minted. With the help of embossing, you can smooth out the bumps that form during manual processing, and improve the visual effect of your creation. You can also apply various deepenings to the background: cells, grooves, grooves, using small incisors.
slotted thread
This wood carving has no background. If we remove the background in a flat-relief ornament, then we get a slotted carving. In products like a box, for expressiveness and delicacy, colored paper or fabric is placed underneath.
relief carving
The main purpose of our tutorial is to share experience with craftsmen and help beginner carvers to master this carving. Without taking into account other types of thread, we will dwell on relief carving, as it is complicated in execution and development. If we make ornamental products using the technique of relief carving, then they will be very decorative and expressive.
Relief wood carving has long been used by the Russian people in Orthodox churches. And in our time, some monuments of Russian architecture and art have been preserved, for example: the Kiev-Pechersk Lavra. relief carving with painting and gilding is unusually and solemnly beautiful.
Now let's decipher the relief. Relief is a bulge or convex ornament on a plane, or a combination of various irregularities on the surface of our earth's crust.
bas-relief(low relief) - a sculptural ornament or image, convex above a flat surface of wood less than one second of its thickness.
High relief this is a sculptural ornament or image that can protrude above some plane by at least half the thickness of the entire sculpture. These definitions clearly show that relief carving is divided into two types: 1) high relief - with high relief, 2) bas-relief - with low relief.
Volumetric thread, it is also called sculptural. Unlike the previous types, voluminous objects are trimmed with this carving from several sides or even from all. In architecture, these are columns of balconies, wooden columns, carved balusters, etc. Furniture legs are often trimmed with volumetric carvings. These details may well be considered sculptural images.
Having barely learned to hold objects in his hands, the little man shows a craving for creativity. Over time, he will have the opportunity to try himself in various types of skills: needlework, modeling, origami, woodcarving, drawing. Of course, certain skills that the child received in early childhood will be useful for this. Sometimes a simple hobby gradually turns into a hobby, and then becomes a matter of life. So many centuries ago in Rus', one of the main types of creativity was woodcarving. And in the 21st century, it still arouses genuine interest among people.
Popular types of intricate art
 For a long time, people have decorated their homes with wooden carvings. All sorts of paintings, kitchen utensils, religious objects, children's toys were considered valuable things for any family. Perhaps that is why various types of woodcarving appeared. The most popular options are:
- geometric;
- flat notched;
- slotted;
- sculptural;
- embossed;
- openwork;
- invoice.
Fortunately, the list does not end there, because this type of creativity is widespread throughout our vast country. Let's consider just a few of them.
 Geometric wood carving involves the use of various figures in the work. These are triangles, circles, squares and polyhedra. It is used for the manufacture of furniture elements, household utensils, as well as wall crafts. The oldest type of such a carving is a trihedral-notched carving. This is one of the simplest methods, since it is performed with only one tool - a joint knife. For such woodcarving, you will need a simple set of items:
- lime board;
- special knife-jamb;
- ruler;
- pencil.
First, sketches of geometric shapes or a finished ornament are applied to the board. It is better for novice amateurs not to use complex drawings so that the work turns out to be flawless. For the first work, material from deciduous trees is suitable, since it is more convenient to draw straight lines on it with a sharp knife.
The wooden surface should be as smooth as possible. This is achieved by planing the board. However, it does not need to be sanded with sandpaper. Otherwise, the thread will not turn out clear and accurate, and the tool will quickly become dull.
The flat-pitted method is used to cut out recesses of various sizes and shapes on a plane. It can be oval contours and all kinds of bulges.
 The slotted type of thread is also considered quite simple. It is done with a jigsaw. A sketch of any figure applied to a wooden plane is cut out along the contour. As a result, cute crafts come out. A slotted carving is used for the manufacture of background objects through which other planes are visible. It is often called openwork carving, and it is used to decorate furniture in the Baroque style. It can also be elements of cupboards, window casings, doors, and sometimes decorative screens. If crafts are attached to a special base, then this type of thread is considered to be overhead.
The process of working with a slotted method begins with a sketch, which is applied to a pre-polished workpiece. It is transferred to the surface using a special template or transparent white paper. Then holes are made on the contours and cut out on the desktop using a thin jigsaw file.
 Relief carving includes two main methods: flat and deaf. In addition, the deaf option implies a low or convex relief. The bottom line is that the pattern is formed due to the main background of the surface.
 The flat-relief method is performed in such a way that the pattern and the background surrounding it are made at the same depth over the entire area of the base. Blind carving is characterized by a convex pattern that does not have a flat outline. Such products are valued for their high decorativeness and richness of composition. After all, a kind of miniature landscape is created on the plane with hills, depressions and depressions. To create such masterpieces, masters use elements of almost all types of woodcarving. Therefore, beginners should master each method separately in order to apply skills with more.
First steps on the road to mastery
 History shows that wood was traditionally used to decorate a living space. Nowadays, various photographs, drawings and sketches of woodcarving are exhibited in local history museums or printed publications. This suggests that smart people who are willing to learn are able to master this art form. Wood is a wonderful natural material from which you can create decorative compositions, paintings, furniture elements and kitchen utensils. Having mastered the basics of ancient art, some have become true masters of woodcarving, devoting their whole lives to this.
Folk wisdom says: "Dashing trouble - the beginning." This is how it is if you do nothing. Practical wood carving tips for beginners open the door for brave people to the world of magnificent DIY crafts. First you need to prepare the tools and understand the basic nuances of the craft.
It is advisable for beginners to choose high-quality and durable equipment for work in order to acquire valuable craftsmanship skills.
 For wood carving, you need to prepare the following tools:
- sharp knife;
- chisel;
- jigsaw;
- bit;
- drill;
- needle files;
- spoon cutter;
- bars;
- milling machine.
Of course, for beginners, it will be enough to purchase a special set of tools for woodcarving, which includes a knife, a jigsaw and an awl. With their help, it is very convenient to master the skills of ancient craftsmanship.
The next step is the choice of raw materials. This is what the quality of the product depends on. In nature, there are two types of wood: hard and soft. The first group includes mahogany, oak and beech. To the second -, aspen, pine, spruce, birch. Of course, soft wood is easier to work with, but with one wrong move, it quickly deteriorates. Despite this, it is considered the most suitable raw material for beginners.
Hardwoods are used by professionals because they are very expensive.
In addition to the strength of the material, the color of the wood also plays a key role. A suitable raw material to learn the craft is birch. It lends itself wonderfully to cutting and drilling in any direction. When choosing drawings for woodcarving, it should be borne in mind that birch wood darkens over time. Despite this, she is very easy to work with. 
When the pattern is selected, it must be transferred to a wooden blank. In the age of technology, you can use ready-made photographs or drawings provided by specialists. The theme of the images is very different, but each has its own unique beauty. When everything is ready, you can start creating your own masterpieces. An invaluable help for beginners are thematic woodcarving lessons.
Master class simple crafts
 When you look at the finished crafts, it seems that making them is not at all difficult. Therefore, many lovers of folk crafts took up the instrument and got down to business. To cut an ordinary flower, you need to prepare the following set of items:
- wood blank;
- double soft pencil;
- tracing paper;
- chisels.
It must be borne in mind that only special chisels for woodcarving are suitable. They should be v-shaped, narrow and semicircular. The next step is drawing. It can be taken from the Internet. To do this, a sheet of paper is applied to the screen, the diagram is redrawn, and then applied to a wooden plane. 
Start work from the central part of the sketch, carefully cutting out a circle. Then, using a v-shaped chisel, the petals are cut along the contour. Waste wood between them is removed in the course of work. If there is no such chisel, professional wood carving knives are suitable, which are no worse to wield in this craft. 
The outer part of the petal is cut out with a semicircular chisel. It becomes similar to the outline of a heart, but it's not scary. Then cuts are made in the inner part of the petal, connecting it to the center of the flower. It remains only to round it and the flower is ready. Now you can admire the first creation of your own hands. An invaluable help for beginners is a thematic wood carving video that encourages you to immediately get to work.
Modern technology for experienced craftsmen
In the modern world, many works have long been performed mechanically. Applied craft does not lag behind in this. The use of technology enables craftsmen to save their strength and precious time. Wood carving machines make it possible to quickly and efficiently prepare the source material for work. The only drawback of such devices is their high cost, but people for whom carving is not just a hobby are ready to purchase them.
Pantograph
 The device is designed to work with any wooden surfaces. It performs operations of various kinds, both volumetric and on the plane. The pantograph is used to process arcuate, bent or rotating parts. So with the help of a machine cut out various elements of furniture, statues or panels.
Drill
 Excellent device for working with hard wood. It is important to take into account the properties and location of the fibers of natural material. With the help of a drill, craftsmen sharpen tools, grind wood, and, if necessary, polish it.
Wood species with dense wood that do not tend to chip are suitable for working with a drill.
CNC milling machine
 This technique is mainly used for the production of wooden furniture with carved decoration. The machine is designed to work with plywood of any kind and wood. It is characterized by high functionality and technical capabilities. When working on such equipment, it is important to use special protective equipment - goggles and gloves. Also follow the instructions for use of the device.
 As practice shows, such machines simplify the process of wood carving. They make it possible to create a huge number of products in a short time. Devices are used not only in industry, but also for a personal workshop.
In any case, handmade products bring real satisfaction to a person. They create a pleasant atmosphere in the house, help to express the feelings of the master to his loved ones, and serve for the benefit of the household for a long time. Wooden crafts retain their natural beauty for a long time and never go out of style. Woodcarving is an art that has been passed down from generation to generation. It is available to anyone who wishes to master this craft. The main thing is not to be afraid of failures, but to be willing to learn, pick up tools and create masterpieces.
Wood carving video tutorial for beginners