How to use a soldering iron with rosin: learning to solder. How to solder with a soldering iron with rosin How to solder with rosin
It would seem that the very question of how to properly solder with a soldering iron is very simple. I dipped the tip in rosin, put some solder on the tip, and touched the contacts of the part to be soldered.
In fact, to do this job you need certain skills that come with experience. Otherwise, how to explain the difference in the quality of soldering made by different craftsmen?
How to quickly learn to solder
In order to master the basics of soldering, you need to choose the right tool. Let's start with the main thing, with the choice of a soldering iron.
Choosing the right soldering iron
In most cases, a soldering iron with a 40-60 W copper tip, a stand, flux (rosin is best) and solder will do.
You should not chase expensive ceramic devices and soldering stations. For training, the basic set is quite suitable. And don't forget the tweezers.
IMPORTANT! After you master the basics of soldering, it will become clear that the training kit is suitable for 90% of homework with a soldering iron.
Many advanced radio amateurs have been using Soviet soldering irons without regulators for decades.

And the quality of soldering can be envied by the owner of a soldering station equipped with the latest technology.
It takes practice to solder properly.
If the tool is new, it is necessary to prepare a sting, sharpen and tin. This method is only suitable for copper tips.

How to tin a sting, step by step instructions
If you have already used the tool, then this video will help you properly prepare the sting for work.
Next, cut a few pieces of wire of different sizes, and find any broken electrical device (transistor receiver or cassette recorder). From this set you can make a great training ground.
How to properly tin a sting if the solder does not stick - video
Solder and put back the radio components on the diagram, connect the wires with and without twisting. The best teaching aid is self-practice on components that you don’t mind ruining.
Sequencing
Do not rush to immediately connect the two parts with solder. First, learn how to strip the wire and pad on the circuit board. Then practice tinning the stripped wire.
Try to solder two, and then a three-pin radio component (for example, a transistor) from the board. And only after that try to solder cleanly. Remember the main rule - first warm up the place of soldering, then add solder to it.
There are several ways to add solder.
- Bring the molten composition to the tip of the sting
- Bring the wire of solder to the junction and press everything with a sting until the composition begins to melt.
The art of soldering must be learned gradually. Starting from soldering wires and moving on to printed circuit boards - each of the methods has its own subtleties both in the selection of consumables for soldering and in technology. Today we will share with readers the basics of soldering and basic work skills.
What is the essence of soldering
In soldering, the ability of some metals in the molten state to effectively spread over the surface of others under the influence of gravity and moderate surface tension is used. The solder connection is one-piece: the two parts to be joined are, as it were, enveloped in a layer of solder and remain motionless after it solidifies.
Since we will consider soldering in the context of soldering metals, the most important parameters will be the strength of the mechanical and the conductivity of the electrical connection. In most cases, these are directly proportional values, and if the two parts are tightly grasped, then the conductivity between them will also be high. However, the solder has a higher resistivity than even aluminum, so its layer should be as thin as possible, and hiding power should be as high as possible.

In order for soldering to be possible in principle, there are two conditions. The first and most important thing is the cleanliness of the parts at the soldering point. Solder attaches to the metal surface at the atomic level and the presence of even the slightest oxide film or contamination will make reliable adhesion impossible.
The second condition is that the melting temperature of the solder must be significantly lower than the temperature of the parts to be soldered. It seems obvious, but there are solders with a melting point higher than aluminum, for example. In addition, if the actual difference in melting temperatures is not high enough, when the solder solidifies, the temperature shrinkage of the parts may interfere with the normal formation of the solder crystal lattice.
Fluxes and solders - how to choose the right one
For the reasons described above, the correct choice of flux and solder is almost half the success in soldering. Fortunately, there are quite universal grades suitable for most tasks. The industry of application of almost all fluxes and solders is quite intelligibly indicated on the labels, but some aspects of their application still need to be known.
Let's start with fluxes. They are used for etching parts, removing and dissolving the oxide film with further protection of the metal from corrosion. As long as the surface is covered with flux, you can be sure that it is clean, as well as that the molten tin will wet it well and spread.
Fluxes are distinguished by the type of metals and alloys of the parts to be joined. Basically, these are mixtures of metal salts, acids and alkalis that actively react when heated with a soldering iron. Well, since there are quite a lot of oxide forms and contaminants, the cocktail should be specially selected for a specific type of metals and alloys.

Conventionally, fluxes for soldering are divided into two types. Active fluxes are created on the basis of inorganic acids, mainly perchloric and hydrochloric. Their disadvantage is that they must be washed off immediately after soldering is completed, otherwise the acid residues cause rather strong corrosion of the joint and in themselves have a sufficiently high conductivity that can cause a short circuit. But active fluxes can solder almost anything.
The second type of flux is created mainly on the basis of rosin, which can also be used in its pure form. Liquid flux is much more convenient to apply, it also contains alcohol and / or glycerin, which completely evaporate when heated. Rosin fluxes are the least effective when soldering steel, however, for non-ferrous metals and alloys, they or other compounds of organic chemistry are mainly used. Rosin also needs to be rinsed out as it tends to corrode in the long run and can become conductive by picking up moisture from the air.
 Liquid and solid rosin
With solders, everything is somewhat easier. Basically, lead-tin solders of the POS brand are used for soldering. The number after the marking means the content of tin in the solder. The more it is, the higher the mechanical strength and electrical conductivity of the joint and the lower the melting point of the solder. Lead is used to normalize the solidification process; without it, tin can crack or become covered with needles.

There are special types of solders, primarily lead-free (BP) and other non-toxic ones, in which lead is replaced by indium or zinc. The melting temperature of BP is higher than that of conventional ones, but the connection is stronger and more resistant to corrosion. There are also low-melting solders that spread already at 90-110 ºС. These include Wood's and Rose's alloys, used for soldering components that are sensitive to overheating. Special solders are mainly used in the soldering of radio equipment.

Power and types of soldering irons
The main difference between a soldering tool is the type of its power source. For ordinary people, network soldering irons powered by 220 V are most familiar. They are used mainly for soldering wires and more massive parts, because it is almost impossible to overheat a copper wire, except, perhaps, for melting the insulation.

Plus network soldering irons in their high power. Due to it, high-quality and deep heating of the part is ensured, plus a bulky power supply is not required for operation. Among the shortcomings, one can single out the low convenience of work: the soldering iron is quite heavy, the tip is located far from the handle and such a tool is not suitable for fine work.

Soldering stations use thermal control to maintain a stable temperature level. Such soldering irons do not have significant power, usually 40 W is already the ceiling. However, for heat-sensitive electronics and soldering small parts, this tool is best suited.
Sting selection and care
Tips for soldering irons are distinguished by shape and material. With the form, everything is simple: the most primitive and at the same time universal is the styloid sting. Variations are possible in the form of a spatula, a cone with a blunt end, with a bevel and others. The main task when choosing a form is to achieve the maximum area of contact with a specific type of parts to be soldered, so that the heating is powerful and at the same time short.

According to the material, almost all the stings are copper, but they come with and without coating. Cover copper tips with chromium and nickel to increase heat resistance and eliminate oxidation of the copper surface. Coated tips are very durable, but they are somewhat worse wetted by solder and require careful handling. To clean them, use brass shavings and viscose sponges.

Uncoated stings can rightly be attributed to consumables for soldering. Such a sting during operation is periodically covered with a layer of oxides and the solder ceases to stick to it. The working edge needs to be cleaned and tinned again, so with intensive use, the sting wears off quickly enough. To slow down the burning of the sting, it is recommended to pre-forge it, and then grind it to give the desired shape.

Soldering wires
Soldering wires is the easiest. We dip the ends of the veins into the flux solution and draw a soldering iron over them, the tip of which is abundantly moistened in the flux. In the process of tinning, it is advisable to shake off excess molten solder. After applying the half-wires, they form a twist from the wires, and then carefully warm it up with a small amount of solder, filling the free space between the cores.

Another way is also possible, when, before twisting, the wires are simply thoroughly moistened with flux and soldered without prior tinning. This method is especially popular when soldering stranded wires and wires of small diameter. If the flux is of high quality, and the soldering iron provides a sufficiently strong heating, even a twist of 3-4 “fluffy” cores of 1.5 mm 2 will be well saturated with tin and will be reliably soldered.

Please note that in electrical installation, that is, inside junction boxes, it is not customary to solder the wiring. First of all, due to the non-detachable connection, plus everything, the spike has a significant transition resistance and there is always a high risk of its corrosion. Wires are soldered exclusively for connections inside electrical appliances or for tinning the ends of stranded wires before tightening them with screw terminals.
Working with electronic components
Soldering electronics is the most extensive and complex topic, requiring experience, skills and special equipment. However, an amateur can also replace a faulty element on a printed circuit board, even with only one network soldering iron.
Output elements (which are with legs) are the easiest to solder. They are preliminarily fixed (plasticine, wax) with pins in the holes of the board. Then, from the reverse side, the soldering iron is pressed tightly against the tail to warm it up, after which a wire of solder containing flux is introduced into the place of soldering. Too much tin is not needed, it is enough for it to flow into the hole from all sides and form a kind of elongated cap.

If the output element dangles and needs to be held by hand, then the place of soldering is first wetted with flux. It needs a very small amount, here it is optimal to use bottles of nail polish, pre-washed with acetone. With this soldering technique, tin is collected on a soldering iron in a small amount and a drop of it is carefully brought to the output of the element 1-2 mm from the board surface. The solder flows down the leg, evenly filling the hole, after which the soldering iron can be removed.

It is very important that the parts to be joined remain motionless until the solder has completely cooled. Even the slightest violation of the shape of tin during crystallization leads to the so-called cold soldering - crushing the entire mass of solder into many small crystals. A characteristic sign of this phenomenon is a sharp clouding of the solder. It needs to be reheated and wait for uniform cooling in complete immobility.
 Poor quality, cold soldering
To keep the tin in a liquid state, it is enough that the soldering iron is in contact with the tinned surface of the tip with any point of the wetted area. If the soldering iron literally sticks to the soldered parts, this indicates a lack of power for heating. For soldering heat-sensitive semiconductor elements and microcircuits, ordinary solder can be mixed with low-melting solder.
Soldering massive parts
Finally, let's talk briefly about the soldering of parts with high heat capacity, such as cable glands, tanks or dishes. The requirement for the immobility of the connection is most important here, large parts are preliminarily connected with clamps, small parts with lumps of plasticine, before soldering the connection, it is pinpointed in several places and the braces are removed.
Massive parts are soldered as usual - first at the junction, then filling the seam with liquid solder. However, solder for this purpose is used in a special, usually refractory and capable of maintaining high tightness, as well as good resistance to partial heating.

With this kind of soldering, it is extremely important to keep the parts well warmed up. For these purposes, the soldering seam is heated directly in front of the place of soldering with a gas burner, and instead of a conventional electric soldering iron, a massive copper hatchet is used. It is also constantly heated in the flame of a burner, moistened with solder along the way, and then the joint is filled, partially melting the previous seam by several millimeters.
A similar heated soldering technique can also be used when working with a conventional soldering iron, for example, when soldering thick cable strands. The sting in this case acts only as an operational tool for careful distribution of tin, and the gas burner serves as the main source of heating.
The soldering process itself is not complicated - we prepare the parts, process with flux, heat up, add solder in the soldering area. But, as in any business, there are some nuances that you need to know in order to get a quality result.
What is the soldering process
Soldering is performed when two parts need to be joined.

Before the process, it is necessary to prepare the components: clean them of dirt and remove the oxide film at the place of soldering, since the presence of even slight contamination or oxidation will prevent reliable joining of materials.

When choosing a solder, you need to be guided by the rule - the melting temperature of the solder should be lower than the melting temperature of the elements that are planned to be connected.

Procedure in soldering technology:
The surfaces of the parts must be cleaned from dirt, rust, oxide film, etc., so that the base metal shines. To remove oxidation and prevent it in the future, it is necessary to cover the parts at the junction with flux. You can apply it with a brush in a thin layer.


An alternative to the second step can be a treatment option called tinning. Mainly used for wire processing. The stripped wire is placed on the rosin, heated with a soldering iron, the wire must be turned so that it is all in the molten rosin, then a thin layer of molten solder is applied, which is chemically connected to the base metal (you can take a drop of solder directly with a soldering iron and apply it to the part).

The parts are connected mechanically: for example, when working with wires, you need to twist; the output elements on the board are fixed with plasticine, wax or hot melt adhesive, other parts can be clamped with pliers or a vice.

An additional flux is applied to avoid oxidation when heated. Solder is applied with a heated soldering iron.

For ease of understanding, we attach a photo instruction on how to solder correctly.

Types of soldering irons
In everyday life, network soldering irons operating on a voltage of 220 V are common.

Professionals prefer soldering stations. Their main plus is the presence of a thermostat, thanks to which the set temperature is consistently provided.

In the case of network soldering irons, the temperature is determined by rosin or flux, when the soldering iron is ready to work, they begin to boil well, but you should not bring it to burning.

For home use, you can purchase two soldering irons with low (40-60 W) and medium power (100 W). A low-power soldering iron is designed for soldering parts in electronics.


Consumables
Flux
This is a mixture to remove oxidation from metal parts before the soldering process. Flux treatment allows the solder to spread better at the joint and protect it from corrosion when heated. Flux can be found in liquid, paste and powder form. It is, of course, more convenient to apply liquid flux.

Fluxes can be rosin, ammonia, boric and orthophosphoric acids, ordinary aspirin tablets.

It is easy to find a flux for any kind of work on sale, and as a rule, the label already indicates how and for what materials to use it. This allows you not to engage in amateur activities, but to use an already prepared mixture, which will avoid surprises in the form of soot.


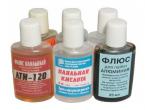
Rosin is a popular flux, has a pleasant smell when heated, and is non-toxic. How to solder with a soldering iron with rosin: you can immediately take the liquid version of rosin, it is more convenient. If we are dealing with solid rosin, then first you need to melt it with a soldering iron and apply it with a sting to the place of soldering.

Rosin is suitable for soldering copper conductors, radio and electrical elements, behaves well with gold and silver. The remains of rosin after soldering must be removed to prevent corrosion of the metal.

Alcohol-rosin flux (abbreviated as GFR) is rosin with alcohol in proportions of one to three. It is used in the same cases as ordinary rosin. It is more convenient to use due to the liquid state.


Solder
The solder has a lower melting point than the material of the elements to be joined, therefore, when hot, it envelops the joint, and after cooling, the two parts become one. At what temperature to solder depends on the chemical composition of the parts and the selected solder.

Alloys used as solders:
- tin + lead
- cadmium
- nickel
- silver, etc.


POS lead-tin solders are the most commonly found on the market. The POS abbreviation is followed by a numerical value that indicates the amount of tin. The higher it is, the more tin, which has a positive effect on the strength and electrical conductivity of the future connection.

This tip will allow you to figure out how to properly solder with tin, rosin is usually chosen as a flux (the most convenient option is tin wire inside which rosin is already present).

Lead is used as a regulator of the solidification process, since tin without this auxiliary element will crack and become covered with needles. Lead can be replaced by indium or zinc (lead-free solders).

For aluminum, you will need to choose specialized flux (F-61A, F-34A) and solder (there are different options).

soldering iron tip
Almost all stings are made of copper, they are coated and uncoated. Chrome-plated and nickel-plated tips are more heat-resistant, durable and do not oxidize.


Uncoated stings require constant stripping, as when oxidized they cease to work efficiently (the solder does not stick). And during cleaning, the sting wears off quite quickly.

The choice of the shape of the sting depends on the task, but they are considered universal in the form of an awl and a spatula.


Shutdown
After the work with the soldering iron is completed, it is necessary to clean the solder tip, and you can already turn off the soldering iron. The hot sting must be inserted into the solid rosin and wait for it to cool, remove the sting, the excess rosin will drain and the already completely cooled soldering iron can be put back in place.

Armed with good theoretical knowledge of how to properly solder with a soldering iron, in practice you can achieve success in this matter.


Every novice radio amateur sooner or later has to acquire a minimum set of tools and learn the basics of soldering with a soldering iron. To do the job quickly and with the highest quality, you need to master the soldering with rosin.
How to solder with a soldering iron with rosin
In order to get started, you need to purchase the minimum devices:
- electric soldering iron;
- tin or solder;
- rosin.
Regarding the power of the soldering iron, a regular 40 W (voltage 220V) is suitable. For home use, such a soldering iron is quite enough. Now solder - you will need it in order to connect the nodes and parts. Solder can be different: rosin, tin-lead alloy. It is sold in the form of tubes (with flux inside) or in the form of wire. The last option is better.
As for the choice of solder, a flux marked POS (tin-lead solder) is suitable for hardness and melting point, 60 is the percentage of tin, and 40 (this figure is not indicated, we calculate it ourselves) - so much lead in this solder. It is good if you can find solder with a high lead content (it is different in color, it will be darker). The melting temperature of such solder is an order of magnitude higher, which means increased solder strength.
And finally, about fluxes - this substance is designed to remove oxides from soldered parts. This cannot be avoided, because the tip of the soldering iron is copper and will oxidize when heated, so you will have to periodically remove carbon deposits. If this is not done, then the solder will not attach to the parts, but will simply spread. Soldering with such a contaminated sting will not work.
The simplest and most reliable flux is rosin. The material is natural, because rosin is made from pine resin. It is an amber-colored liquid, has a pleasant coniferous aroma. It is sold in pieces in its pure form, in the form of a viscous or liquid flux. For beginners, both pure rosin and alcohol-rosin flux are suitable, this is a universal material consisting of a solution of rosin and ethyl alcohol in its pure form.
How to solder rosin
Everything you need is purchased, prepared, you need to clean the soldering iron tip (and if it is not flattened, do it yourself). The thinner the tip, the finer the soldering work can be done. The angle at the sting should be dihedral 30-45 degrees.
How to solder rosin:
- Open a window and work in a well ventilated area.
- Turn on the soldering iron, wait until the unpleasant smell and characteristic smoke go away - the tip is calcined and ready for use.
- You can turn off the soldering iron for now to clean the tip.
- Turn on the appliance again, wait until the sting glows.
- You can lightly tin the parts retainers (touch the rosin several times with a hot tip so that the tip is covered with solder) in order to perform high-quality adhesion of the parts to be soldered.
- Take the rosin, touch the tip of the sting to the rosin to pick up a little solder. Wait for it to warm up. It will take just a few minutes.
- Place the stinger on the pine board for a few seconds, then repeat your steps again.
- After a few repetitions, you will succeed.
- When mastering the basics of soldering, it is more convenient for a beginner to work so that the tip is bare, this is the most basic mistake when working. Due to the large exposure of the sting, the circuit often ignites.
- When working with a copper wire, one tinning is enough, that is, you need to warm up the tip, touch the rosin, attach the tip to the work surface, lift the wire, lower it into the rosin, attach the red-hot tip to the surface and lift the wire.
- As a result of the actions taken, the rosin will begin to smoke, the wire will flow around the rosin mass. After that, you will need to cover the soldering with tin, transfer to the wire.
- If, as a result of the actions taken, the wire changed color from yellow to silver, then this means that everything was done correctly. To solder 2 wires, you need to tin both.

Every radio amateur or master doing repairs on his own, sooner or later will be forced to pick up a soldering iron and try. The quality of the work performed and even the performance of the product will directly depend on many factors that you need to know about before starting work.
Proper use of a soldering iron
Despite the apparent simplicity of working with a soldering iron, it is very desirable to have the initial skills of high-quality work and be able to properly use solder with rosin.
Soldering is done using a variety of solders. The so-called solder in the rosin spool is perhaps the most popular. When performing work related to soldering, solder is used. The amount of tin and lead contained in it is 60 and 40%, respectively. This alloy melts at 180 deg.
What you need to work with a soldering iron:
- the soldering iron itself;
- solder;
- rosin.
The heated solder creates a sufficient internal bond with metals such as copper, brass, silver, etc., if the following conditions are met:
- The surfaces of parts must be cleaned from oxides.
- The part at the place of soldering is heated stronger than the melting temperature of the solder itself.
- During operation, the soldering site must be protected from oxygen exposure; various fluxes are used for this. They create a protective film directly over the soldering point.

Tricks and secrets of working with a soldering iron
After the solder has begun to melt, it can already be soldered. To do this, cover the soldering iron tip with a thin layer of solder, and then wipe it well on a damp sponge. So the solder with rosin remaining from work is removed. It will not be superfluous to make it a habit to wipe the sting on a wet sponge every time after soldering.
Before you start soldering the radio component, you need to prepare it. Its conclusions should be bent so that the part freely enters the holes intended for it.

Beginners without experience often touch the soldering point with the tip of a soldering iron tip. And you need to hold the soldering iron so that between it and the place of soldering the contact area is as large as possible, otherwise the place where you need to solder does not heat up enough to fasten the parts.
How to clean a soldering iron tip
When soldering, soot often appears on the soldering iron. It can be removed with plain water. If you run the soldering iron over a damp cloth, the scale will remain on it, and the tip will become clean again. Periodically, you need to do this while working with a soldering iron. If the cloth does not help, you can use a hard sponge.
Soldering Tip Classes
- Nickel-plated removable tips.
- Sorry copper.
First class soldering tips are usually used in complex soldering irons that have the ability to control the temperature.
The sting of the second is the most common.
nickel-plated tips
- Needle-shaped sting - they are soldered to very small radio components, such as SMD. When repairing phones, such a sting is indispensable. It is used on boards with a high density of mounted parts.
- Spatula sting - used for soldering and in cases of mounting large radio components. They work with multi-output microcircuits.
- A tip in the form of a drop - it is convenient for them to transfer solder with rosin to the place of soldering, which leads to an increase in the quality of work.
- A sting with a curved shape - most often they are soldered to radio components that are in a copper sheath so that excess solder does not remain on the board. It can also be used for conventional soldering. The soldering iron is heated to a temperature of 290-300 C.
When working with a soldering iron, you must always keep it in perfect cleanliness. New soldering tips are usually worked with a hammer so that small notches form on its surface. Subsequently, they are carefully trimmed with a file to give the sting the most correct shape.

Then the sting should be tinned using solder with rosin. That is, cover with a thin layer of solder, dipping it in rosin.
How to cool the soldering point
The metal tweezers that hold the radio component also work as a heat sink during the soldering process. You can also use a special crocodile clip for this purpose.
Secrets of soldering with a soldering iron
To obtain a good result when soldering, it is necessary to correctly apply solder with rosin and flux. This is a low-melting alloy of a special metal, which is used to solder the leads of parts and wires.
- The best solder is pure tin. But such a metal is too expensive to be used for soldering. Therefore, when working with radio components, so-called lead-tin solders are used.
- Lead with tin. In terms of solder strength, these solders are no worse than pure tin. They melt at a temperature of 170-190 degrees. It is customary to designate such solders with the abbreviation "POS" - tin-lead solder. The figure standing after these letters in the designation means the share of tin, expressed as a percentage. It is better to use solder "POS-6O".

- Fluxes are substances that have antioxidant properties. They are used to prevent oxidation of the soldering site. If you do not use flux, then the solder simply will not stick to the metal surface.
Types of fluxes
When working with radio components, fluxes are used that do not contain acid. For example, rosin. Bow rosin for lubricating musical instruments is also sold in stores. It can also be used for soldering. But metal utensils are soldered using solder without rosin. To repair it, you need zinc dissolved in hydrochloric acid. It is also impossible to solder radio components with such solder, because over time it will destroy the soldering.
If you need to solder in hard-to-reach places, then you need to have a liquid flux. You can make it yourself. Rosin is ground into powder, poured into acetone or ethyl alcohol. After mixing the solution, you need to add more rosin until a thick mushy mass is obtained. Such liquid rosin should be applied to soldering points with a brush or stick. At the same time, there is a nuance - for working with printed circuit boards, the flux must be more liquid. For hard-to-reach places, you can also use solder wire with rosin, which is much more convenient.

When working with various fluxes, it must be borne in mind that those that have acetone in their composition are very toxic. Therefore, when working with them, it is necessary to avoid getting vapors into the respiratory tract. It is better to solder near the window if it is summer, and in winter it is more often to ventilate the room in which the work is carried out. At the end of work, be sure to wash your hands with soap and warm water.
solder with rosin
An important condition for successful soldering is the cleanliness of the surfaces to be soldered. Be sure to clean the soldering points to a shine. Then the parts must be put on a piece of rosin and warmed up. The molten rosin will help the solder spread evenly over the conductor or part to be soldered. You can gently rotate the part, while driving along it with a soldering iron tip, so that the solder spreads evenly over the surface.
If you need to tin a conductor that is soldered into the board, then after cleaning the place of soldering with sanding paper or a knife, you need to bring a piece of rosin, and then smoothly distribute the solder as evenly as possible, using a soldering iron.
The quality of soldering is also affected by how correctly the wires or contacts of the parts are connected when soldering. They should be pressed tightly together and then bring the soldering iron to the prepared conductors, touching it. After the heated solder spreads over the surface, filling even small gaps between them, the soldering iron should be removed.
The continuous soldering time should be no more than five seconds. After this period of time, the solder will harden and the parts will be firmly bonded. However, so that the soldering does not collapse, the parts must not be moved for 10-15 seconds after soldering is completed. Otherwise, the connection will be unstable.
If work is done with transistors, then their conclusions must be protected so as not to overheat. It is better to hold them either with pliers or tweezers, thereby dissipating heat.

When soldering radio components, in no case should you twist the ends of the parts. If you need to re-solder parts or replace conductors, then you need to think about it in advance, before starting installation. It is best to solder the ends of the parts at a small distance from each other, and not in one place.