How to unscrew the valve from the mixer. Effective tips on how to unscrew a stuck faucet. Causes of failure of a ceramic crane axle box
Is the mixer running? This can be fixed! The water supply communications of many apartments, to put it mildly, leave much to be desired, and this is also compounded by periodic water shutdowns and testing of pipes, as a result of which dirt gets into our mixers and taps. It is this, or rather the sand, that ultimately becomes the root cause of breakdowns. Unfortunately, these are the realities of our lives.
And, as practice shows, neither the quality of the product nor the installation of filters can save you from this, but only slightly delay their failure. What should you do if your faucet suddenly starts to leak or even run? We will repair it.
Now let’s look at just such a case: the kitchen faucet began to leak hot water. It was produced by the famous Bulgarian company Vidima, and it fell victim to sand that got inside.
Most often, it is the grains of quartz that get into the faucet that grind down its ceramic surface, thereby allowing water to pass through!
We have several ways to solve the problem.
Very simple repair
Let's start with the first one, I would call it “Great luck”, and all because you have to do indecently few actions. You just need to turn the valve head from the dripping side to the unscrewing side, i.e. counterclock-wise.If it is not tightened tightly, this entire assembly will unscrew. In this case, further disassembly and replacement of the damaged part will take very little time. Here's what it looks like using cold water as an example (it's on the left).

Easy replacement
In the next case, the situation will be like this: the valve head with the valve and the faucet box does not unscrew. In this case, unscrew the top plug (it is threaded), and use a screwdriver to unscrew the screw.
Next, we try to remove the valve from the slots, if necessary, gently tapping it from below, of course, using a non-metallic object for this.

If everything worked out, great! All that remains is to unscrew the decorative cap and unscrew the valve axle for its further replacement.
Please note that the type and size of the crane axlebox varies from manufacturer to manufacturer, so do not rush to get rid of it: it will be useful for selecting a new one!
Complete disassembly
Yes, this is exactly what you will have to face in most cases. Here, too, things didn’t turn out the way we would like: after six years of faithful service where the hot water runs (that’s what drips), everything became completely stuck. There is only one option left: you need to remove and disassemble in more convenient conditions.Let's start by unscrewing the liner from the pipes. Don't forget to turn off the water before doing this!
To do this we need an adjustable wrench KR-20 or KR-30. It won’t work with a regular wrench, because the nut is 25 mm (although, in principle, such open-end and combination wrenches are found).

After this, we remove the faucet from the sink, here we use a tubular (socket) wrench, in this case 12 mm. After unscrewing the nut from the stud, remove the faucet by threading the hoses through the hole in the sink.

The next step is to unscrew the liner from the faucet. We do this with a 10 mm wrench.

Now that's it, you can start the main work. We remove the plug, unscrew the screw and, tapping lightly (now this is much more convenient to do), remove the valve.

If he doesn’t want to get off, you can wet the area with WD-40, but don’t get carried away: it destroys the gaskets.

Having removed it, we unscrew the cap and gain access to the crane box itself. Most likely, it is seriously stuck, so you will have to try to unscrew it.
We work again with an adjustable wrench; if necessary, you can carefully clamp the mixer, prudently protecting its chrome surface from damage.
After two attempts we succeeded.

Now all that’s left to do is find and buy (it’s better, of course, to do this in advance if the exact model and brand of the device is known) a new crane axle box and put it in place. And then everything is in reverse order.

Yes, I’ll take this opportunity to say: don’t be lazy to clean and wipe the product with some cleaning agent to remove lime deposits in hard-to-reach places.

That's all: the faucet is fixed, you can use it again.
Today the children and I decided to take a walk along the Voronezh Reservoir on a river bus and almost became participants in a disaster.…
 The photo that outraged me
I was once an atheist. Despite the fact that I did not believe in God, I had some deep understanding of what not to do. Not because…
I very rarely write negative reviews, but today is THE day. Online store ELITE TEXTILES: DON’T THINK OF ORDERING, they are scammers.…
 My wild imagination
Yesterday I was looking for a film about a father and son who were traveling by train under the dome, escaping from a worldwide cataclysm - eternal winter. And I remember it very well - here...
That is, all the time I was on the verge of the possible and the impossible))) I will write on a sober head when I rest, because I will do this...
I load the news - Ksyusha and elections are everywhere. Damn, I didn’t even take this seriously, what’s there to discuss, what’s all the hype? Comedy and nothing more...
 You really don’t know what might come into children’s minds...
Yasha had just returned from school and was telling him that a student from the lower grades had heard something strange, that an ambulance was coming. Jumpers, almost everyone has them...
Money doesn't smell like conscience
It happens that you start looking for one thing, but end up sitting and reading something else for three hours. That’s what I have, I was looking at repairs and saw an article about...
If, during the repair of a mixer, it is necessary to unscrew a faucet that has become stuck, it is unlikely that it will be possible to do this in the usual way. Plaque and rust accumulated on the threads will seriously hinder dismantling. There are 4 methods to correct the situation. Let's look at how to unscrew the valve axlebox if it is stuck, using each of them.
 WD-40
WD-40 All-purpose lubricant WD-40, vinegar, or Cilit Bang plumbing product will work. Any of them needs to thoroughly lubricate the connection and leave it like that until the morning. The thread will loosen and it will become much easier to remove the valve axle. After using chemicals, the mixer must be thoroughly rinsed.
It is used if the axle box valve does not unscrew after applying the previous method. As a rule, the faucet box and the adjacent part of the mixer body are made of different metals, which means they have different degrees of expansion when heated. This can help loosen the threads.
 Construction hair dryer
 A hair dryer is suitable for the job. It needs to be adjusted to the lowest temperature, and then warmed up at the joint at some distance from the thread. In this way, you can ensure that the part can be unscrewed by hand. Using an open fire will speed up the process significantly, but there is a risk of melting the plastic elements.
Another way to unscrew a stuck axle box– fill a small saucepan with water, add a couple of tablespoons of soda and boil the product in it for 20 minutes. Then wipe the threaded area dry and unscrew the required part.
 Kiyanka
 It will help if the crane axlebox is made of light alloy. You will need a mallet or hammer. The connection is tapped on each side about 20 times. It is necessary to monitor the force of blows so as not to damage the product. With the help of these actions, rust and limescale will come off, due to which the connection will be weakened, and the part can be removed.
If, after trying all of the above methods, the axle box valve still does not unscrew, you will need to complete dismantling with hole drilling. For this:

Now you can install the new part. If an axle box valve with a worm-type gasket is used, the rod must be tightened as much as possible before installation. The ceramic axle box has fragile parts, so it must be tightened carefully. Simply place the product in the appropriate cavity and then tighten it with a wrench.
After finishing work you can put all the parts back: plastic rings first, then handles and plugs.
The information presented in the article will help you understand how to unscrew a stuck faucet axlebox from the mixer. Basic methods include the use of chemicals, heating and tapping the joints. In rare cases, you will have to drill out the part using a drill or cutter.
A ceramic axle-box faucet is more convenient to use than a worm-type faucet. It lasts much longer, but also costs more. A simple locking mechanism allows you to repair a ceramic faucet axlebox with your own hands and extend the service life of the unit for several more months.
Purpose and design of ceramic crane axlebox

Construction of axle-box crane
The axle box valve is a locking mechanism located inside the valve body. When closed, it blocks the passage of water. It is enough to unscrew the valve; the ceramic rings with slots move relative to each other. The holes on them are opposite, and water flows freely into the spout of the tap.
In classic worm axle boxes, the water is shut off by pressing the rubber seal against the hole. As a result, the gasket ring quickly wears out and fails. The price of the locking unit is less, but you have to change it or the gasket more often.
The strength of ceramics is much higher. High precision and cleanliness of processing of metal-ceramic parts allows them to grind closely and connect at the molecular level. As a result, without any gaskets, ceramics reliably block the path of water and last a long time.
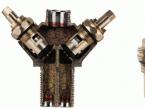
The axle box in a single-valve faucet consists of brass and ceramic parts:
- frame;
- rotary rod;
- fixing washer;
- sealing ring;
- spring washer;
- ceramic rings.
On the outside of the body there is a thread for screwing the shut-off unit into the tap. An O-ring protrudes above it to prevent water from leaking between the axle box and the valve body. The rod ends at the top with a square or toothed shank. This is the seat for the valve wing. When replacing axleboxes, you should pay attention to the shape of the shank, the mounting thread, and the size of the body itself.
Advantages of ceramic axlebox:
- works completely silently;
- To fully supply water, it is enough to turn the flywheel a quarter turn;
- service life is several times longer.
Disadvantages include:
- clogs quickly if the water contains a lot of impurities;
- high price.
The cost of a ceramic axlebox during operation justifies itself. It does not have quickly wearing parts in its mechanism, which cause faucet leaks and require frequent repairs or replacement of the entire assembly.
You need to buy ceramic axle boxes in specialized stores. They cost a little more, but the quality is much higher.
Do-it-yourself replacement of the structure in the mixer

Mixer design
When the faucet starts to drip, the bathtub becomes damp and covered in streaks. It is necessary to repair the mixer in a timely manner. To replace the axle box, you will need the following tools:
- flat screwdriver;
- pliers;
- adjustable wrench;
- Phillips screwdriver.
The new design must correspond to the basic parameters of the old one. If the exact dimensions are unknown, you need to unscrew the axle box and take it with you to the store, select a new unit in exact accordance with the old one. This applies to the external thread on the body, the shape of the stem shank and the length of the product itself.
Procedure for repairing a mixer.
- Shut off hot and cold water in the apartment.
- Remove the colored cover from the center of the flywheel. It indicates what kind of water a given tap opens.
- Unscrew the screw securing the flywheel to the rod.
- Remove the flywheel.
- If you can’t immediately remove the axle box from its place, clean the connection from salts and limescale deposits.
- Pull out the locking unit.
- Clean the seat and threads inside the faucet from debris, deposits and scale.
- Screw in the new axle box and put the flywheel in place.
Now you need to open the water. To avoid dynamic shock, first unscrew the valve being repaired, then the valve. The air accumulated during the repair will be released freely, and the mixer will work without sudden pressure changes in the pipes.
If unscrewing does not work the first time due to a large accumulation of scale, you should lubricate it with a solution of citric acid or vinegar. The carbonate salts will react and become friable.
Causes of breakdowns
The kitchen faucet is often misused. In a hurry, the flywheel spins sharply, with great force. This leads to the pressing of the rubber gasket, which rests on the seat of the valve body and with the other side fixes the position of the lower ceramic ring.
Sand and other hard particles in the water settle around the stem, making it difficult to rotate. The abrasive can also destroy the smooth surface of the face of the ceramic ring. In this case, it is difficult to repair the axle box.
Single lever faucets and kitchen faucets are the most likely to fail. Out of habit, they put a lot of pressure on them, trying to turn it further. As a result, a dynamic load occurs and one side of the brass axlebox is crushed.
Careful handling and installation of water purification filters will extend the life of the faucet.
Self-repair of crane axleboxes

Crane axle box repair
In most cases, you can repair a ceramic faucet axle yourself and do not have to buy a new one. First you need to disassemble the mixer and remove the axle box from it. After this, deal directly with the locking mechanism. The repair kit is simple - just a flat screwdriver, a napkin and a cotton swab.
- Pull out the rubber ring at the bottom of the housing.
- Remove the spring retaining clip where the rod exits. To do this, just pry it off with the corner of a screwdriver.
- Using light pressure on the stem, gently push out the ceramic rings. Between them and the rod there is a shaped plate that connects them together and transmits torque.
- Remove the stem.
The case usually remains unassembled. You don’t need to remove anything else from it, just clean the inside of any debris. A cotton swab is suitable for this. It should be unscrewed only when the seal, which is located above the external thread, is worn out or destroyed. In this case, water will seep between the axlebox and valve bodies. You will need a wrench and an adjustable wrench:
- Using an adjustable wrench, clamp the smooth, lower part of the body below the threads.
- Carefully unscrew the housing and change the ring, installing a new one.
- Reassemble the parts in reverse order.
If there are defects on the surface of the brass body in the form of cracks or dents, it should be replaced with another one. Such seemingly minor damage cannot be repaired. Do the same if there is a defect in the external thread.
A lot of dirt and sand from the water pours onto the rod. It should be wiped and lubricated. Now the flywheel will rotate easily, without effort.
The plate may stick to the ceramic ring and stem. Then it will be more difficult to disassemble them; you will have to clean the surfaces of salts and apply force.
When inspecting ceramic rings, you should pay attention to the smoothness and integrity of the edges. Hard material is difficult to break. But a large amount of salts and prolonged exposure to abrasives can leave scratches and disrupt molecular bonds. The edge may be erased on one side. As a result, the rings will not fit tightly and allow water to pass through.
It is impossible to cut at home. To do this, you need to have bulky and expensive industrial equipment. You should try changing disks. Please note that they come in different designs.
A common cause of breakdowns is a rubber conical gasket with a side, which presses the lower ring against the upper ring with its end. Under strong pressure it sags a little. As a result, the ceramic elements of the locking assembly do not fit tightly to the plate, and a gap is formed into which water leaks.
Repairing a bad fit is easy. You just need to do everything carefully. On the upper ceramic ring there is a platform for gripping it with a plate. You should cut out 2 pieces of insulation and stick it on top exactly on the platform. As a result, the upper ceramic ring will move lower and will again fit snugly against the lower one.
Now you need to carefully put everything back together:
- The rod is connected to the plate and inserted into place in the body. Fixed with a spring washer.
- Ceramic rings are inserted into the body. On the bottom there are 2 small protrusions that should be inserted into the grooves.
- To fix the protrusion of the upper ceramic ring in the plate, the rod is rotated in both directions, the rings are slightly pressed. When the top one sits in place, it will begin to rotate along with the rod.
- The last thing to put in place is the rubber seal.
The ceramic axle box has been repaired and will again be able to work for a long time. It must be installed in place, in the mixer.
How to extend product life
The main enemy of all parts in the tap is hard and contaminated water. To extend the service life of the axle box and all kitchen equipment that has heating elements, you need to install a filter. Even rough cleaning will get rid of mechanical and metal impurities and significantly purify the water. The stem will remain clean and the tap will be easy to unscrew.
Careful handling of taps, regular cleaning and lubrication of components and locking mechanisms will significantly extend the service life of mixers with ceramic axle boxes.
How to repair a crane axle box
What to do if the faucet is leaking? There is only one way out: to repair the crane axle box yourself. It’s not worth calling a plumber from the housing department because of such nonsense.
In this article we will tell you how to replace the valve axle (or the rubber gasket on it, if we are talking about an old-style product).
Let's say right away: repairing a ceramic crane axle box is impossible. But the procedure for replacing the faucet axlebox in a new type of mixer is quite identical to the preparatory stage of repairing an old faucet axlebox with a rubber gasket.
 Unscrewing the valve axle with a sliding wrench
 - Shut off the water
- Remove the decorative plug covering the screw that secures the valve to the valve axle rod
- Remove the screw securing the valve to the valve stem.
- Remove valve
- Remove the decorative cap covering the valve axle, if any. Use an adjustable wrench
- Unscrew the valve axle. Use an adjustable wrench. Old Soviet crane axle boxes with a square seat for the valve can be unscrewed with a “seven” wrench, engaging the edges of this “square” with it.
 Unscrewing an old valve box with a square “head” for the valve
 If we are talking about replacing a crane axle box with ceramic liners, then this, in fact, is where the process ends. All that remains is to screw in the new crane axle box and perform the assembly operations in the reverse order.
 An article on our website “Crane axle box for a mixer - what is it?” will help our readers understand both the structure of crane axle boxes and the features of their operation
Where to buy a crane axle box? Find the answer to this question at http://remontspravka.com/kran-buks-shopping/
Crane axle boxes are usually equipped with two-valve mixers. Read more about them in the review on our website.
When screwing in a ceramic faucet, do not tighten it too tightly: you may crush the ceramic inserts!
 Replacing the gasket in a worm-mounted valve axle
 If you are repairing a worm-type axle box, then you need to find a rubber gasket at the end of the rod and remove the screw that secures it. Gaskets for the faucet axle box are sold at any plumbing store, but it is easy to cut them yourself from a piece of rubber of suitable thickness - following the example of an old gasket.
Malfunctions in the operation of air conditioners - how to identify, how to eliminate
Having fixed the gasket on the valve stem, assemble the device in the reverse order described above. In general, that’s the whole story about how to change the crane axle box.
How to remove the crane axle box if it is “stuck”? And you can’t turn it away?
You can follow the path “where a wrench fails, a big wrench will do.” But this is not our method. Even if you unscrew the axle box “swinging” - pressing the key in one direction or the other.
This way you can unscrew the entire mixer. Or simply rip off the thread of the seat of the crane axle box.
How will you install a new one then?
 Removing a stuck crane axle box
 If Sillit or WD-40 did not help immediately, then build a bath (say, from plasticine) around the threaded joint, pour one or another of these liquids into it and leave it overnight. It will work by morning!
How to unscrew a stuck faucet if Sillit and WD-40 did not help?
 “Which faucet and mixer is better” - a review of the types of plumbing gadgets will allow the reader to understand the design and operating specifics of various devices for regulating the flow of water
How to fix a faucet if it is leaking. See the procedure here: http://remontspravka.com/faucet-leak-remont/
Instructions for replacing the faucet are available on our website. Please use it!
2. 3.
How to change a faucet gasket
 This cutter will help remove the crane axle box
 How to change the axle box valve - watch the video here:
Problems with plumbing have always frightened its owners. Not every man knows how to change a gasket or install a siphon. The situation becomes especially aggravated if a leak occurs or if any components of the faucet or mixer have to be replaced. Of course, you can call a plumber and hope that he will be conscientious, or you can learn to do it yourself.
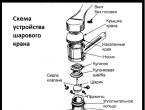
Water tap diagram.
Replacing a broken tap
Sometimes a difficult situation arises when, when trying to change a faucet, a piece with part of the thread falls off and it seems that nothing further can be done. In fact, you can unscrew the remains of the tap using the tricks of folk craftsmen.
Crane design diagram.
There are several options for solving this problem yourself.
So, having experience in using a hacksaw for metal, you can cut the canvas on both sides and remove the remains of the faucet in the bathroom.
If you are unsure about using a hacksaw, you can place an oblong object, for example, a file or drill with suitable parameters, into the hole formed.
If the faucet is old and the plumbing has not been dismantled for a long time, everything in the pipe may become firmly attached to each other. In this case, you need to hammer a piece of wood into the hole and use it to unscrew the remains.
Another proven method is to tap a section of pipe with thread fragments from different sides using two hammers.
If the faucet is rusty, it must be handled with care. In order to unscrew a rusty faucet in the bathroom, you should lightly tap it on all sides. Movements must be careful, since after exposure to corrosion the metal becomes very brittle. If there is no liquid key or it is not possible to use it (the plumbing is very rusty), you can heat the problem area with a gas torch or blowtorch.
Removing and installing a bathroom faucet
Over time, even the most reliable faucets begin to leak and rust. It is advisable to change old plumbing fixtures in a timely manner, without waiting for a critical moment. It is quite possible to change the faucet in the bathroom with your own hands. Many modern faucet models are designed in such a way that unscrewing them is not difficult.
Structure of a single-lever mixer with an aerator and built-in filter: a – disassembled mixer: 1 – fixing element, 2 – rotary handle (joystick), 3 – housing cover, 4 – circular nut, 5 – replaceable mechanical cleaning cartridge, 6 – gasket, 7 – housing, b – disassembled ball cartridge, c – disassembled ceramic cartridge.
Before dismantling the mixer, it is necessary to turn off the water supply to the riser. It is advisable to line the bottom of the bathroom with old newspapers and rags in order to soften the blow from a possible fall of the faucet elements. So, if any of the tools or parts fall on the surface of the bathroom, deep scratches will be inevitable.
A mandatory measure is to block the drain hole. It’s a shame, but this is where important small parts and fasteners very often end up. It is possible that some of the parts from the old faucet will be useful in the future.
In general, the faucet should be removed entirely, without preliminary disassembly. In order to unscrew the tap, you need to use only one key (adjustable or locksmith). The dismantling process involves unscrewing the nuts that secure the faucet to the cold and hot water pipes. If you have to replace plastic pipes, you should carry out the work as carefully as possible and do not pull the wrench too hard, otherwise you may damage the pipes. You should also hold the pipes with your hands while working.
The nuts that are used to secure the faucet with pipes are always included with the mixer, so you should consider whether they can still function or whether they need to be replaced with new ones. In order to unscrew rusted, damaged nuts, you should use a special tool - a liquid wrench (WD-40). Its action is aimed at corroding the resulting layer of rust, salt deposits and roughened paint. The product acts quite quickly, in a few minutes it will be possible to remove even the most ancient nut.
Mixer repair stages.
Before installing a new faucet, the pipe threads should be sealed using plumbing insulating tape. Before you wrap the tape around the threads of your bathroom faucet, you should put a shiny washer on it. It is designed to mask areas that serve as junction points.
When using insulating tape, there are some nuances: it should be wound strictly in the direction in which the nut will be tightened in the future. If you do everything correctly, the nut will tighten smoothly, easily, without the use of additional tools. If you suspect that the nut is not seated correctly and is not tightened according to the thread, you should start all over again rather than try to forcefully tighten the nut.
Once the old faucet has been removed, you can begin installing the new one. Plumbing fixtures are supplied as standard, and all necessary parts must be included in the kit.
The main element of the mixer is the eccentric. Thanks to it, a transition is made from the liner to the nut of different diameters, and they also allow installation in case of a mismatch in the center-to-center distance. Eccentrics are mainly produced from brass. They must be installed between the mixer and the pipe coupling or water-dispensing outlet.
It is easy to attach various kinds of decorative caps to the wide side of the eccentric thread, which serve as a mask from flaws when installing a water-dispensing outlet in the bathroom.
Subtleties of installing a faucet
DIY faucet repair.
In order to avoid damaging the decorative nut when working with the key, you can use thin cardboard or a soft cloth.
Depending on the country of origin, the direction in which the tap opens may differ. So, if inconveniences arise and it is difficult to get used to the new faucet, the direction of opening the faucet can be changed in the faucet box.
To dismantle the crane, the following tools and parts should be used:
- adjustable wrench;
- liquid key for rusty areas;
- newspapers and rags;
- insulating tape (FUM tape) of a certain width.
The situation is more serious if it is necessary to unscrew the faucet, and not the entire faucet in the bathroom. In addition to the key, in this case you will also need a screwdriver. Under the decorative valve plug there is a screw that should be found and unscrewed. After dismantling the screw, you can unscrew the crane axle itself. Perhaps replacing the gasket will save the situation and there will be no need to change the plumbing.
How to replace the crane axle box?
The need to replace the faucet is clearly indicated by the water mixer, which begins to leak in the closed position. Even a small stream of water, thinner than a match head, which will flow from a faucet in the bathroom, can significantly increase money expenses; in addition, the irrational use of water has an extremely negative impact on the ecology of our planet.
It is necessary to replace the part in the mixer with an identical one.
To replace, in addition to screwdrivers and keys, you need to arm yourself with pliers - a multifunctional tool that can act as wire cutters, pliers and pliers.
- Turn off the tap using the valve. Pipeline fittings related to shut-off and control products are located in front of the mixer.
- Look for a small shut-off valve if there is no valve on the supply pipe. This is a large diameter ball valve in the form of a metal ball with a hole in the top.
- If such an element is missing, turn off the water in the riser.
- Remove the decorative caps. Use the screwdriver.
- Unscrew and remove the screw. It is easy to “calculate”. The part secures the flywheel.
- Remove the bushings. They are located at the top of the crane box.
- Unscrew the axle box. Apply the key.
Nuances of work
When unscrewing an old faucet axle box, you may encounter some problems. If it is thoroughly stuck to the body and it is not possible to remove it with handy tools, you must apply the following:
- Place a pipe wrench around the edges of the bolt. Try to rip it off by moving it from side to side, as if swinging it. Here it is important not to overdo it, namely not to damage the threads and not ultimately break the mixer.
- Use chemical-containing products. They will help loosen the threaded connection. Take some vinegar, Cillit-type detergent, or other acid-containing compounds. If they don't help, then try making a small plasticine container around the bolt. After this, pour in the liquid again.
- Move the threads using the thermal method. Use a heat gun to warm up the threaded part. It is necessary to achieve complete weakening of the bolt.
If the tried methods do not help, you should remove the valve axle by drilling. To do this, cut off the protruding part of the bolt and drill out the remaining elements. The drill can be replaced with a milling cutter.
Installing a new
Installing a newly purchased or repaired part does not require anything complicated. Perform the same steps as when unscrewing, only in reverse order:
- Check if the water is turned off.
- Screw in the faucet axle box by hand and only then use a wrench or pliers to be extra sure that it fits snugly to the rest of the structure. You should not put too much pressure on the product, as the gasket may become deformed. Violation of the integrity of the element leads to blocking of the water supply channel.
- Be careful not to damage the sealing gasket on the valve seat with the tool.
- Tighten the locknut and secure the entire body of the part from turning.
- Open the water. The absence of smudges indicates that everything was done correctly.
Varieties
Deformations of the crane axle box occur for many reasons. This part of the mixer is used every day, so it is often subject to breakdowns. The design is based on a metal rod and sealed gaskets. The latter are available in rubber or with movable ceramic plates. Based on this, a distinction is made between a ceramic faucet and a model with rubber inserts.
Ceramic options are reliable. Allows you to open the water in half a revolution of the mixer handwheel. Options with rubber inserts (also called worm inserts) wear out quickly. To supply water, you need to make several turns of the valve.
Crane axle box with rubber inserts
- Wear of ceramic plates. Occurs rarely and requires replacement of elements. The work is labor-intensive, so it’s easier to purchase a new part.
- Foreign objects between the plates. In the future, to prevent such defects from appearing, it is advisable to install a device for purifying water from impurities.
- The appearance of a thread between the rod and the valve body. In this case, it is necessary to change the entire part.
Before repairs of any complexity, it is necessary to turn off the water and prepare the tools for work. The minimum set should include a flathead and Phillips screwdriver, pliers, a gas wrench and a spanner.
You can select a team of builders on the website www.stroitel.od.ua
In order to correctly perform operations to restore the functionality of the mixer, everything must be done in stages. The repair plan is as follows:
- Remove the flywheel from the crane axle box. To do this, remove the colored decorative plug from the valve. Next, pull the flywheel up. There should be a bolt underneath. Unscrew it and remove the valve.
- Clean the threads and flywheel. Run the parts under water a couple of times, use cotton swabs or other similar objects.
- Unscrew the decorative insert of the faucet. At this stage, use a socket wrench with a 17mm head.
How and what to use to unscrew the faucet axle from the mixer? Counterclockwise with an adjustable wrench. The main thing is to hold the mixer. Then clean the threads with a brush.
Gasket repair
Operating procedure:
- unscrew the valve axle;
- apply a little silicone to the gasket;
- install the part back.
Grains of sand contribute to the leakage of the axlebox and its failure. Foreign objects cause leakage. The order of work in this case is as follows:
- unscrew the valve axle and disassemble it;
- clean the plates, treat them with waterproof lubricant;
- return the part to its place.
Important! The plates must not be turned over.

The best way is to replace the plates.